FRÄNKISCHE SediPoint Manual

Installation and maintenance manual
SediPoint®– sedimentation shaft
DRAINAGE SYSTEMS
ELECTRICAL SYSTEMS
BUILDING TECHNOLOGY
INDUSTRIAL PRODUCTS
Last modified: January 2020

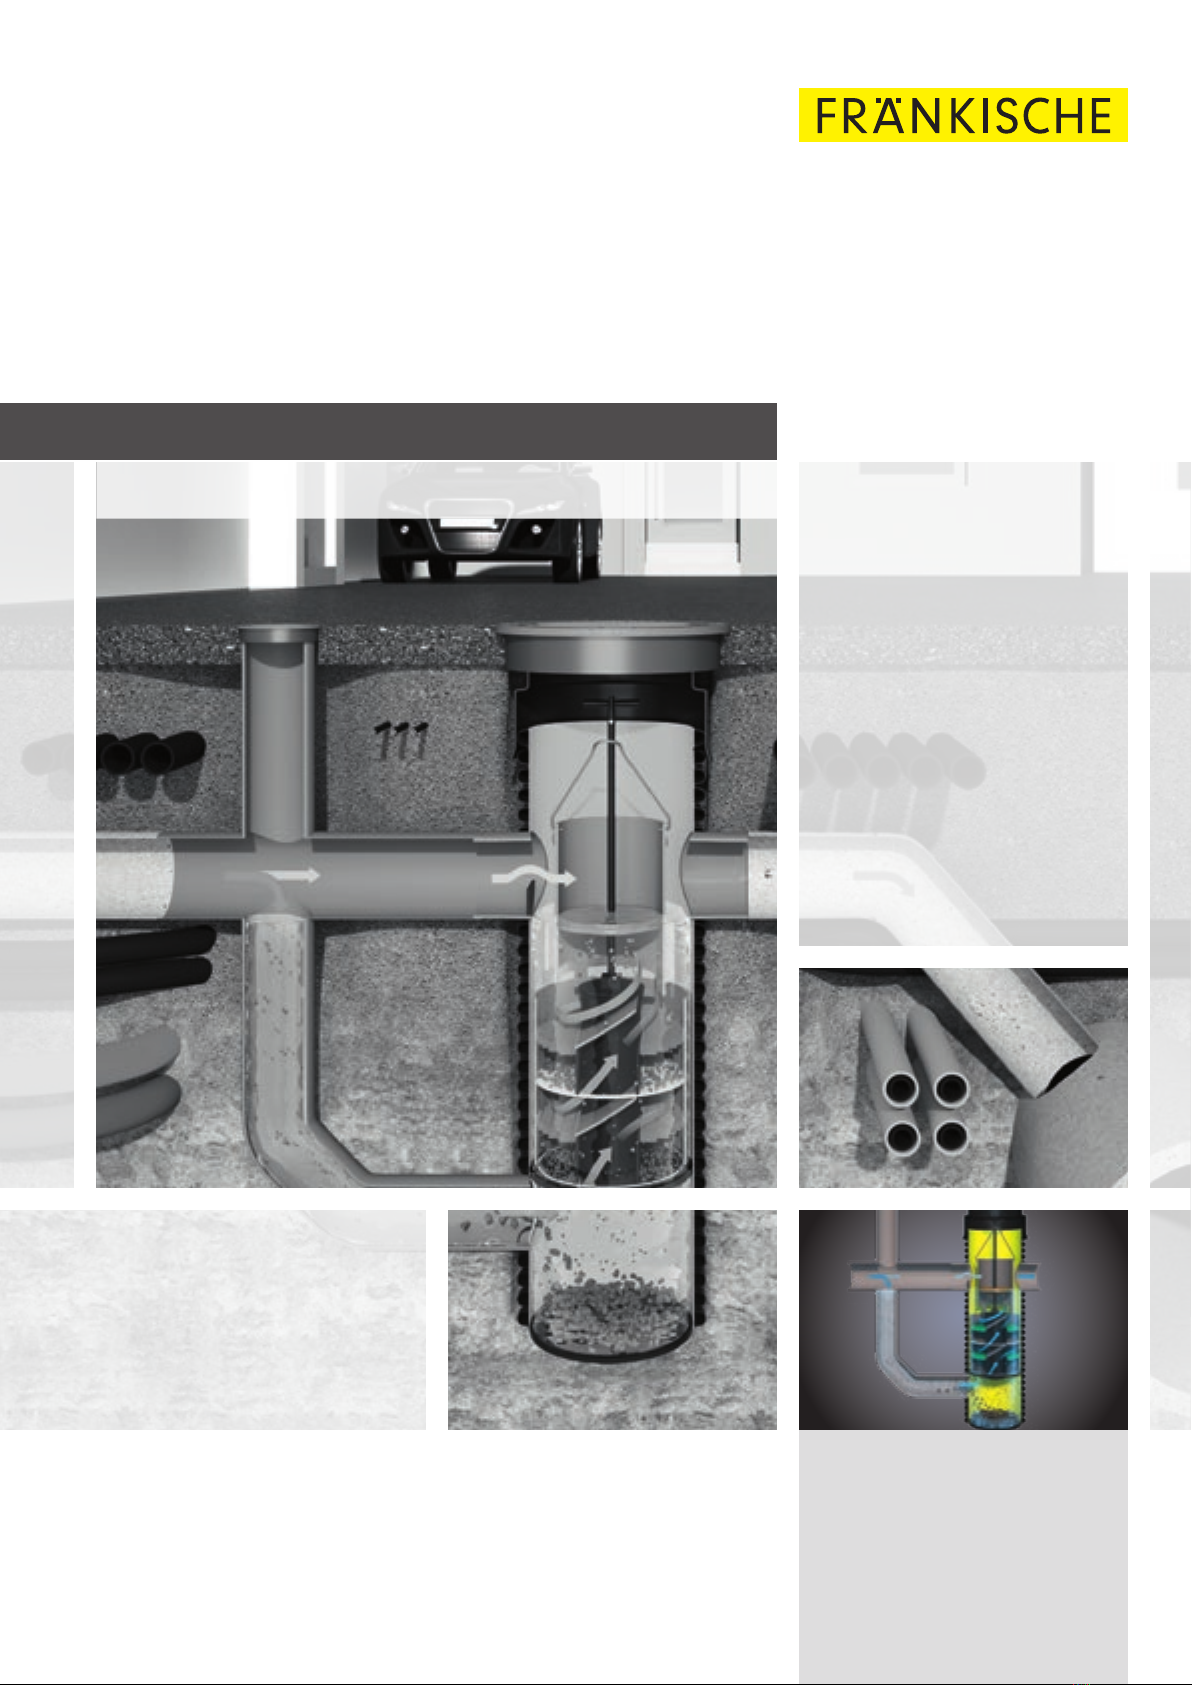
FRÄNKISCHE | IM MM SediPoint2
1. Safety instructions
Staff responsible for installation, assembly,
operation, maintenance and repair must
have appropriate qualifications required
for this kind of work. The operator is respon-
sible for organising in detail authority,
responsibility and supervision of staff.
The operational safety of the system com-
ponents supplied is only guaranteed in
case of proper installation and correct use.
Technical threshold values must not be
exceeded.
Observe the accident prevention
regulations and relevant standards
and directives for installation, fitting,
operation, maintenance and repair!
This includes (in extracts):
nAccident prevention regulations
- Construction work BGV C22
(Bauarbeiten BGV C22)
- Technical wastewater systems GUV-V
C5 (Abwassertechnische
Anlagen GUV-V C5)
nSafety regulations for working in
enclosed spaces of technical
wastewater systems GUV-R 126
(Sicherheitsregeln für Arbeiten in
umschlossenen Räumen von
abwassertechnischen Anlagen GUV-R
126)
nHandling biological working materials
in technical wastewater systems
GUV-R 145 (Umgang mit biologischen
Arbeitsstoffen in abwassertechnischen
Anlagen GUV-R 145)
nDirectives for working in tanks and nar-
row spaces BGR 117
(Richtlinien für Arbeiten in Behältern
und engen Räumen BGR 117)
nStandards
- Excavations and trenches – slopes,
planking and strutting, breadths of
working spaces DIN 4124 (Baugruben
und Gräben - Böschungen, Verbau,
Arbeitsraumbreiten DIN 4124)
- Construction and testing of drains and
sewers DIN EN 1610 (Einbau und Prü-
fung von Abwasserleitungen und
-kanälen DIN EN 1610)
nTool for safety and health protection in
technical wastewater systems
ATTENTION
Non-compliance with the operating
manual may result in considerable
property damage, injury or death.
The system is part of an entire network.
During installation, maintenance, service
and repair work on one component,
always consider the entire system.
Avoid work during rain.
Changes or modifications to the system
may only be carried out with the agree-
ment of the manufacturer. For safety
reasons, use original spare parts and
accessories approved by the manufacturer.
The use of other parts may void the
liability for any consequences arising
therefrom.
nHazards from gases and vapours
such as risk of suffocation, risk of
poisoning and risk of explosion
nRisk of falling
nRisk of drowning
nGerm pollution and wastewater with
sewage
nHigh physical and psychic strain
during work in deep, narrow and
dark spaces
nAnd others
WARNING
DANGER
CAUTION

3FRÄNKISCHE | IM MM SediPoint
Table of contents
1. Safety instructions 2
2. SediPoint®at a glance 4
3. System description 5 - 6
3.1 Application 5
3.2 System description 5
3.3 Function description 6
3.4 Treatment stages 6
3.5 Collecting volumes 6
4. Installation 7 - 15
4.1 Transport and construction site storage 7
4.2 Excavating pit and creating bearing 8
4.3 Pre-assembling the base shaft 8
4.4 Installing the base shaft 8
4.5 Embedding the pipe 12
4.6 Optional: connection set 12
4.7 Tests before backfilling and impermeability test 13
4.8 Backfilling excavation pit 13
4.9 Installing the shaft cover 13
4.10 Filling the system 14
5. Cleaning 15 – 17
5.1 General cleaning information 15
5.2 Cleaning 15
5.3 Special case – removing the sediment collector 17
5.4 Optional connection set 17
5.5 Special case – light liquid spills 17
6. Contact 19

2. SediPoint at a glance
FRÄNKISCHE | IM MM SediPoint4
SediPoint with optional connection set
1SediPoint
2a Sediment collector with
flow separator
2b Immersion pipe
3Integrated bypass
incl. backwater threshold
4Inlet
5Outlet
6Mud chamber
7Operating pipe with telescopic rod
1
2a
2b
3
4
5
6
7
Optional: connection set

3. System description
5FRÄNKISCHE | IM MM SediPoint
3.1 Application
3.2 System description
SediPoint is a shaft system for the treat-
ment of polluted stormwater runoff
from built-up areas to protect the
Lightweight and durable PP shaft DN
600, black outside, yellow inside, for
optimum inspectability. Designed for
standard shaft covers CW 610 to be
supplied on site.
Inlet diameter DN 200 KG spigot, outlet
diameter DN 315 KG spigot, as reducer
on site as required. Integrated bypass
DN 315 KG spigot.
Optional accessories:
nSediPoint connection set as a
drop structure to create the entire
SediPoint inlet situation including
inspection and cleaning access to
the outside drop structure
n Extension pipe for inlet depths
greater than 1.57m to 2.50m
n BARD ring class D concrete
support ring
environment and downstream
stormwater management structures.
2.00
Inlet
DN/OD
315
Inlet
DN/OD
200
1.02 ... 1.57
1.49
2.51 ... 3.06
0.34
0.30
Shaft cover 1)
CW 610, with ventilation openings
and dirt trap acc. to DIN 1221
(to be supplied on site)
Class D
shaft cover CW 300
1.16 1.02 ... 1.57
SediPoint
connection
set
(optional)
Outlet
DN/OD
315
0.10
0.102)
0.17
2.00
Inlet
DN/OD
315
Inlet
DN/OD
200
1.57 ... 2.50
1.49
3.06 ... 3.99
0.34
0.30
1.16 1.57 ... 2.50
SediPoint
connection
set
(optional)
Outlet
DN/OD
315
0.10
0.102)
0.17
SediPoint®without extension pipe
1) Class D shaft cover, incl. 1cm mortar joint
2) BARD ring
SediPoint®with extension pipe
Inlet soil depth 1.02 to 1.57m Inlet soil depth 1.57 to 2.50m
Class D
shaft cover CW 300
1.22 1.22
Shaft cover 1)
CW 610, with ventilation openings
and dirt trap acc. to DIN 1221
(to be supplied on site)
0.10
0.10
0.10
0.10
Extension pipe
DN 250
Extension pipe
DN 250

FRÄNKISCHE | IM MM SediPoint6
3. System description
3.3 Function description
3.4 Treatment stages
3.5 Collecting volumes
Sedimentation separates coarse and
fine particles and collects them in the
sediment. The immersion wall retains,
e.g., oil in case of spills with light liquids.
* In case of spills in dry weather
Floatables and
light liquids
Coarse particles Fine particles
Coarse particles sediment in
the mud chamber
Fine particles sediment thanks to
the highly efficient flow separator
technology
Floatables and light liquids are
retained in case of spills*
1 2 3
System
Light liquid *
collecting volume
[litres]
Mud chamber
collecting volume
[m3]
Permanent water
level volume
[m3]
SediPoint 60 0.15 0.45

7FRÄNKISCHE | IM MM SediPoint
4. Installation
4.1 Transport and construction site storage
Please note
Check all components for completeness
and intactness upon delivery.
Damaged parts must NOT be installed.
Do NOT throw components,
they include breakable parts!
The shaft components are delivered
packaged. Unload using appropriate lift-
ing equipment (e.g., excavator, wheel
loader). Use wide hoisting slings.
Protect the material and packaging from
humidity and direct sunlight during stor-
age. Store the components such that
they are not damaged and that they are
protected from getting dirty. The impact
strength of the material decreases in
sub-zero temperatures.
The relevant safety provisions of the
building industry apply.
Delivery includes
SediPoint standard design
Cone with sealing ring
Optional accessories
SediPoint standard design
Base shaft, sediment collector,
operating pipe
Optional accessories
Extension pipe incl. coupling
and 2 sealing rings
SediPoint connection set
(optional)
Connection set,
consisting of crosspiece,
coupling KG 315,
bend segment,
coupling KG 200,
extension pipe DN 250
and class D shaft cover
CW 300
Shaft cover
BARD ring
Profile sealing ring
Coupling
SediPoint
extension pipe
SediPoint
connection set
SediPoint

FRÄNKISCHE | IM MM SediPoint8
4. Installation
4.2 Excavating pit and creating bearing
4.3 Pre-assembling the base shaft
Create the excavation pit according
to the planning specifications. The
respective country-specific provisions,
e.g., DIN 18300 "Earthworks" (Erdarbeiten)
and DIN 4124 "Excavations and trenches"
(Baugruben und Gräben), apply. When
installing the shaft, comply with, e.g.,
DIN EN 1610 "Construction and testing of
drains and sewers" (Einbau und Prüfung
von Abwasserleitungen und -kanälen).
Create and compact the shaft bearing
with 10cm to 15cm of stoneless,
compactable material.
The base shaft is delivered as individual
shaft body. Sealing ring, operating pipe,
sediment collector and cone form a
packaging unit and are separated at first.
Sealing ring
Operating pipe Cone
Sediment collector
Packaging unit Components included

9FRÄNKISCHE | IM MM SediPoint
4. Installation
Snap the bail of the sediment collector
in the shaft wall to avoid uplift.
Insert the sediment collector in the base
shaft.
Inserted sediment collector
Insert the operating pipe in the base
shaft with bayonet nut connector.
For better accessibility, position the
handle directly under the mud bucket.
Adjust the telescopic rod of the operating
pipe, if required, with extension for large
shaft depths.
Please note
The shaft bottom's lock pins must snap
into the recesses in the collector bottom.
1
2
5
3 4
Please note
The bayonet nut connector is closed
if the handles point towards inlet and
outlet. Close by turning clockwise.

FRÄNKISCHE | IM MM SediPoint10
4. Installation
SediPoint can be adjusted to shallow
connecting sewers by cutting the cone
to length and to deep connecting
sewers by using equalisation rings.
Extension pipes are additionally used
for connecting sewers with larger depths.
nShaft design depending on the inlet pipe invert depth
Place the shaft at the appropriate height
on the prepared planum and secure it to
prevent shifting. Ensure upright
alignment.
Mount cone with sealing ring on base shaft into the
second corrugation trough, use lubricant.
Mount cone with sealing ring on base shaft into the
second corrugation trough, use lubricant.
SediPoint with class D cover
min. inlet depth of pipe invert of 1.02m below ground level
max. inlet depth of pipe invert of 1.57m below ground level
SediPoint with extension pipe and class D cover
min. inlet depth of pipe invert of 1.57m below ground level
max. inlet depth of pipe invert of 2.50m below ground level
A
B
4.4 Installing the base shaft

11FRÄNKISCHE | IM MM SediPoint
4. Installation
nCutting the extension pipe
nCone information
Cut the pipes to length in the middle of
the corrugation trough and align upright
to the pipe axis using a fine-toothed
saw or other appropriate tools. Remove
edges and irregularities on the cutting
surfaces with a grater, file or another
suitable tool.
Caption
1) Class D shaft cover, incl. 1cm mortar joint
2) BARD ring
3) Spacing between the top edge of the
extension pipe and the bottom edge
of the BARD ring = 0.10m
nThe BARD ring (class D concrete
support ring) can be used as an alter-
native to on-site concrete support.
Generally, both must be positioned
10cm over the edge of the shaft or
extension pipe! Ensure load separation
to the shaft or cone when using on-site
concrete support. No loads must be
transferred from the cover to the shaft.
nThe cone neck can be cut to length
and must remain as long as possible.
nThe support rings protect the cone
neck against earth pressure. The soil
must not touch the cone.
Min. soil depth: SediPoint 1.02m
Max. soil depth: SediPoint with extension pipe 2.50m
Min. outlet height 1.02 m Max. outlet height 2.50 m
Cone - 27 cm shortened Cone unshortened
* ... 1x support ring h = 8 cm,
2x support ring h = 10 cm,
incl. 1 cm mortar joint each

FRÄNKISCHE | IM MM SediPoint12
4. Installation
4.5 Embedding the pipe
4.6 Optional: connection set
Country-specific regulations must be
observed. DIN EN 1610 forms the basis
for the entire installation.
Create embedding and side filling
with stoneless, compactable material.
Compact material layer by layer.
For structured-wall pipe connections,
mount the sealing rings into the second
corrugation trough. Use lubricant. The
extension pipe DN 250 can be cut to
length, if required (see Section 4.4).
Example SediPoint outlet height 1.02 – 1.57
Cl. D shaft cover
Inlet
Inlet
SediPoint connection set
Cl. D shaft cover
CW 300
CW 610, with ventilation
openings and dirt trap acc. to
DIN 1221 (to be supplied on site)

13FRÄNKISCHE | IM MM SediPoint
4. Installation
4.8 Backfilling excavation pit
4.9 Installing the shaft cover
4.7 Tests before backfilling and impermeability test
Shaft covers and concrete support rings
are not included in the scope of delivery
of FRÄNKISCHE Rohrwerke and must
be supplied on site.
Cover and cone are generally load sepa-
rated, i.e., cone and extension pipe are
not subject to vertical forces from the free
cover bearing. The free bearing transfers
loads from the surface to the cover directly
to the load-bearing underground.
Install shaft covers according to DIN EN
124, CW 610, with ventilation openings,
installation according to design specifi-
cations. You may put support rings
according to DIN 4034 on a respective
bearing under the shaft cover. We
recommend using the BARD ring from
FRÄNKISCHE's range of accessories as
bearing.
The shaft cover can be placed on a
10-mm-thick mortar joint to avoid sta-
tionary loads between equalisation ring
and shaft cover. Create the bearing from
compacted bearing layer material (EV2
module ≥ 100MN/m²) or in-situ concrete
of at least C 16/20. Avoid connections of
the bearing with the cone of the exten-
sion pipe by any means (use casing
aid!). Vertical loads may only be trans-
ferred to the load-bearing underground.
The cone can be cut to length as
specified in Section 4.4.
Before backfilling the excavation pit,
check the system for proper installation
and leak-tightness.
The following tests must be performed
in particular:
Backfill the excavation pit according to
design specifications. Compact material
layer by layer. Comply with DIN EN 1610
and/or country-specific regulations.
Make sure to compact the area around
the extension pipe evenly and do not
shift the pipe while doing so.
Height of the shaft according
to design specifications
Exact adjustment
of the shaft
Check for damage,
foreign objects or
coarse contamination
Impermeability test
1 3
4
2
Attention!
We recommend having the system
approved by the site management
before backfilling.
4.9.1 SediPoint

FRÄNKISCHE | IM MM SediPoint14
4. Installation
4.9.2 Optional: connection set
Use appropriate and approved lifting
equipment, operating wrenches and
means of transport for transporting
and opening / closing the cover only.
Observe the maximum load of the shaft
cover also during the construction period.
Cover and extension pipe are generally
load separated, i.e., the extension pipe
is not subject to vertical forces from the
free cover bearing. The free bearing
transfers loads from the surface to the
cover directly to the load-bearing under-
ground.
The cast iron cover can be integrated in
the road surface without any problems.
As soon as the road superstructure is
being prepared, the bearing for the shaft
covers must be created.
Prepare a lean concrete bearing of min.
10cm for a safe and free load transfer
from the cover to the building ground.
Include an expansion joint between the
bearing and extension pipe.
The bearing surface for the frame must
be even. The frame of the shaft cover
must rest on the bearing with its entire
contact area.
If the cover is outside the road, the
bearing for the cover must be prepared
separately at least from non-cohesive,
compactable material. The professional
compaction with appropriate equipment
is essential (compaction 98% DPR
according to ZTV StB). If required, a
bearing made of lean concrete makes
sense in this case, too.
Using plate compactors or vibrating rollers
on the shaft covers is not permitted.
Clean the covers, in particular the contact
surfaces, after the work has been com-
pleted and/or after every opening.
Use common hexagonal wrenches M10
to screw connect the cover with the frame.
The optional connection set includes a class D shaft cover.
4.10 Filling the system
After the work has been completed, the
system must be refilled with water up to
the outlet. This is required to ensure the
retention of floatables and light liquids
through the immersion wall.
Cl. D shaft cover
CW 300

15FRÄNKISCHE | IM MM SediPoint
5. Cleaning
In order to ensure long-term smooth
operation of the system, it is necessary to
carry out cleaning at reasonable intervals.
The recommended cleaning interval is
2 years.
The cleaning intervals are generally
determined depending on local condi-
tions and/or the degree of pollution.
The cleaning interval mentioned applies
to average to increased degrees of
pollution of the areas. 500kg/(ha x a)
of dry matter have been considered.
In the case of a new system, we recom-
mend checking the degree of pollution
and, if necessary, cleaning the system
on a monthly basis. A suitable cleaning
interval can be deduced from these
experiences, if applicable. To ensure
reliable operation, cleaning activities
should be carried out at least every two
years, preferably in autumn after the
leaves fall.
All cleaning activities can be carried
out by a sewer cleaning specialist.
Alternatively, cleaning can be performed
using a high-pressure cleaner and a
wastewater pump. The maximum out-
side diameter of the pump must not
exceed 170mm. For disposal of
a) Remove the shaft cover and the dirt
trap. Empty the dirt trap. Observe the
relevant accident prevention regulations,
in particular those with regard to securing
the working area for the entire traffic.
The shafts are not accessible.
b) Remove the operating pipe.
To do so, open the bayonet nut connector
by turning it counter-clockwise.
Leave the sediment collector in the
shaft. Snap the tip of the bail of the
sediment collector in the shaft wall to
avoid uplift of the collector in the shaft.
sediment and/or flushing water,
relevant legal provisions must be
observed, if applicable.
Irrespective of the cleaning interval,
we recommend inspecting the system
visually through the open cover at least
every 3 months.
5.1 General cleaning information
5.2 Cleaning
View of the shaft with operating pipe
After removing the operating pipe
Removing the operating pipe
1
Removing
the operating
pipe
Removing
the cover

FRÄNKISCHE | IM MM SediPoint16
5. Cleaning
Empty the cleaning shaft by removing
water and sediment.
To do so, direct the wastewater pump or
suction hose through the maintenance
channel of the sediment collector all the
way down to the bottom of the mud
chamber below the sediment collector.
See page 15 Flush the sediment collector using a
high-pressure cleaner and at the same
time drain the flushing water.
To do so, clean the depots and flow
separators through the cleaning shaft
of the sediment collector.
1Insert the operating pipe.
2Close the bayonet nut connector by turning it clockwise.
The bayonet nut connector is closed if the handles point
towards inlet and outlet.
3Refill the shaft.
4Insert the dirt trap.
5Close the cover.
nCompleting cleaning work
Vacuuming with a
pump or a cleaning
/vacuum truck
High-pressure
cleaning
and vacuuming
2 3
Removing the
operating pipe
1
Removing
the operating
pipe
Removing
the cover

17FRÄNKISCHE | IM MM SediPoint
5. Cleaning
Please note
When re-inserting the sediment collector,
the lock pins of the shaft bottom must snap
into the recesses of the collector base.
5.3 Special case – removing the sediment collector
5.4 Optional connection set
5.5 Special case – light liquid spills
It is normally not necessary to remove
the sediment collector when cleaning
SediPoint. If, in exceptional cases, above
ground inspection or cleaning is
required, the sediment collector can be
removed using a winch or tripod.
When using the optional connection set,
you can determine the degree of pollution
of the inlet through the open cover. The
drop structure empties when the flushing
water is drained from the shaft, which
allows for pollution to be removed by
high-pressure cleaning and simultaneous
removal.
After light liquid spills, have the system
and, if required, the connection set
emptied and cleaned by a professional
provider. Washed matter must be
disposed of appropriately.
Make sure that the bail snaps into the
shaft wall before the system is re-filled
to avoid uplift.

FRÄNKISCHE | IM MM SediPoint18
Notes
Important note:
General information on using our products and systems:
Information about or assessments of the use and installation of our products and systems is exclusively provided on the basis of the
information submitted. We do not assume any liability for damage caused by incomplete information. If the actual situation deviates
from the planned situation or if a new situation occurs or if different or new installation techniques are applied, these must be agreed
upon with FRÄNKISCHE, since these situations or techniques may lead to different conclusions.
Notwithstanding the above, the customer is solely responsible for verifying the suitability of our products and systems for the intended purpose.
In addition, we do not assume any liability or responsibility for system characteristics and functionalities when third-party products or
accessories are used in combination with FRÄNKISCHE systems. We only assume liability if original FRÄNKISCHE products are used.
For use in other countries than Germany, country-specific standards and regulations must also be observed.

19FRÄNKISCHE | IM MM SediPoint
6. Technical advice – local technical consultants
International Sales Director
European Sales Director
Professional advice by FRÄNKISCHE
Horst Dörr
+49 9525 88-2490
Klaus Lichtscheidel
+49 9525 88-8066
klaus.lichtscheidel@fraenkische.de
International Sales
European Sales
Technology
Dinah Nigrowics
+49 9525 88-8155
dinah.nigrowics@fraenkische.de
Stefan Weiß
+49 9525 88-8824
stefan.weiss@fraenkische.de
Jennifer Gernert
+49 9525 88-2569
jennifer.gernert@fraenkische.de
Julia Möller
+49 9525 88-2394
julia.moeller@fraenkische.de
Fax +49 9525 88-2522
Carolin Rausch
+49 9525 88-2229
carolin.rausch@fraenkische.de
Viktoria Majewski
+49 9525 88-2103
viktoria.majewski@fraenkische.de

EN.1347/3.01.20 | Subject to change without notice | Cat. no: 59999671
FRÄNKISCHE ROHRWERKE Gebr. Kirchner GmbH & Co. KG | 97486 Königsberg/Germany
Phone +49 9525 88-2200 | Fax +49 9525 88-92200 | marketing@fraenkische.de | www.fraenkische.com
©www.bildnachweis.de
Rooted in Königsberg –
Our facilities in North America and Mexico:
Anderson, USA
Rochester Hills, USA
Guanajuato, Mexico
Our facilities in Africa:
Ben Arous, Tunisia
Casablanca, Morocco
Our facilities in Asia:
Anting/Shanghai, China
Hangzhou, China
Changshu, China
Pune, India
FRÄNKISCHE is an innovative, growth-
oriented, medium-sized family-owned
enterprise and industry leader in the
design, manufacturing and marketing
of technically superior corrugated pipe
systems for drainage, electrical, building
technology and industrial applications.
We currently employ about 4,200 people
worldwide. Both our many years of
experience and expertise in plastics pro-
cessing, our consulting services and the
large array of products are highly valued
by our customers.
FRÄNKISCHE is a third generation family
owned business that was established in
1906 and is now run by Otto Kirchner.
Today, we are globally represented with
production facilities and sales offices.
The proximity to our customers enables
us to develop products and solutions
that are perfectly tailored to our cus-
tomers’ needs. Our action and business
philosophy focus on our customers and
their needs and requirements for our
products.
FRÄNKISCHE – Your partner for sophis-
ticated and technologically advanced
solutions.
globally successful!
Our facilities in Europe:
Königsberg, Germany (headquarters)
Bückeburg, Germany
Schwarzheide, Germany
Okříšky, Czech Republic
St.-Leonards-on-Sea, Great Britain
Moscow, Russia
Yele s / Tole do, S pain
Torcy-le-Grand, France
Mönchaltorf, Switzerland
Milan, Italy
Istanbul, Turkey
Cluj, Romania
Wels, Austria
Table of contents