HERKULES G550 User manual

Part# 1003108-12
9/14/2020
Made in USA
This manual contains important information concerning the
installation and operation of the gun washers listed above.
Read manual thoroughly and keep for future reference
OWNERS MANUAL INSTRUCTIONS
Toll Free: 800-444-4351
Phone: 248-960-7100
Fax: 248 960-7109
Website: www.herkules.us
E-mail: info@herkules.us Herkules Equipment Corporation
2760 Ridgeway Court
Walled Lake, MI 48390-1662 USA
Page 1 of 16

Warranty ……………………………………………………………………………………………………………….................... 3
Model Information ……………………………………………………………………………………………………………. 4
Warnings ……………………………………………………………………………………………………………………… 5-6
Installation ………………………………………………………………………………………………………………….. 7
Operation ……………………………………………………………………………………………………………………. 7 - 9
Preventive Maintenance ………………………………………………………………………………………………………. 10
Troubleshooting ……………………………………………………………………………………………………………… 10
Drawings with Part Lists …………………………………………………………………………………………………… 11 - 15
G550 Schematic ………………………………………………………………………………………………………................... 16
Herkules Equipment Corporation
A U.S.-based manufacturer, Herkules Equipment Corporation offers a diverse line of products that support multiple
industries by improving efficiency, productivity, ergonomics, comfort, and safety in the work environment. The
company consists of the three product lines: Herkules, Enkon and BossLifts.
Since 1985, Herkules has designed, engineered and manufactured quality products at our Walled Lake,
Michigan facility. Our company supports our products after delivery, with U.S. based customer service, and
replacement parts, enabling our customers to proceed with confidence.
To learn more about Herkules, visit http://herkules.us. Contact us at info@herkules.us with any
questions or concerns.
Thank you for purchasing a Herkules product!
Table of Contents
Page 2 of 16

Warranty
At Herkules we take great pride in the construction of our American-made products, and we stand behind their reliability.
Our limited liability warranty coverage for Paint Gun Washers warranties the unit for a period of 12 months. Washer pumps
have a separate warranty; the Herkules 338 pump is protected for a period of 2 years from the date of purchase. All other
pumps, including rinse pumps, are warrantied for 12 months.
This warranty does not apply to equipment damaged from accident, abuse, overload, misuse, negligence, improper
installation, abrasive or corrosive materials, or shipping damage.
In the event of product failure, the defective item must be returned, freight prepaid, to the Herkules manufacturing plant for
repair or replacement. If repairs are required, Herkules will not be liable for these repairs to take place in the field regardless
of the application. Proof of purchase and date of purchase must be confirmed. An RGA* (Returned Goods Authorization) and
written approval from Herkules must be obtained before any goods can be shipped to Herkules. We reserve the right to
Determine whether failure is due to defective material, normal wear, and / or other causes.
There are no warranties which extend beyond the description on the face hereof. Herkules
disclaims any warranty of merchantability or fitness for a particular purpose in connection with
the Buyer's purchase of any Product under this agreement. Damages are limited to the sales
price of the Herkules system. The terms and conditions herein represent the entire agreement
between Herkules and the Buyer. Any prior / future representations do not apply.
*To obtain a RGA, contact Herkules at 1-800-444-4351 and have the item model, serial numbers, and invoice number if applicable.
Upon receipt of your equipment, please write your purchase information below. Please retain this manual for your records.
Serial Number Model Number
Purchase Date Distributor (if applicable)
IMPORTANT NOTICE: if you have a problem with your Herkules product,
DO NOT RETURN TO PLACE OF PURCHASE
Contact Herkules: by phone 1-800-444-4351; by email, info@herkules.us; or on the web at herkules.us/contact-us.
Page 3 of 16
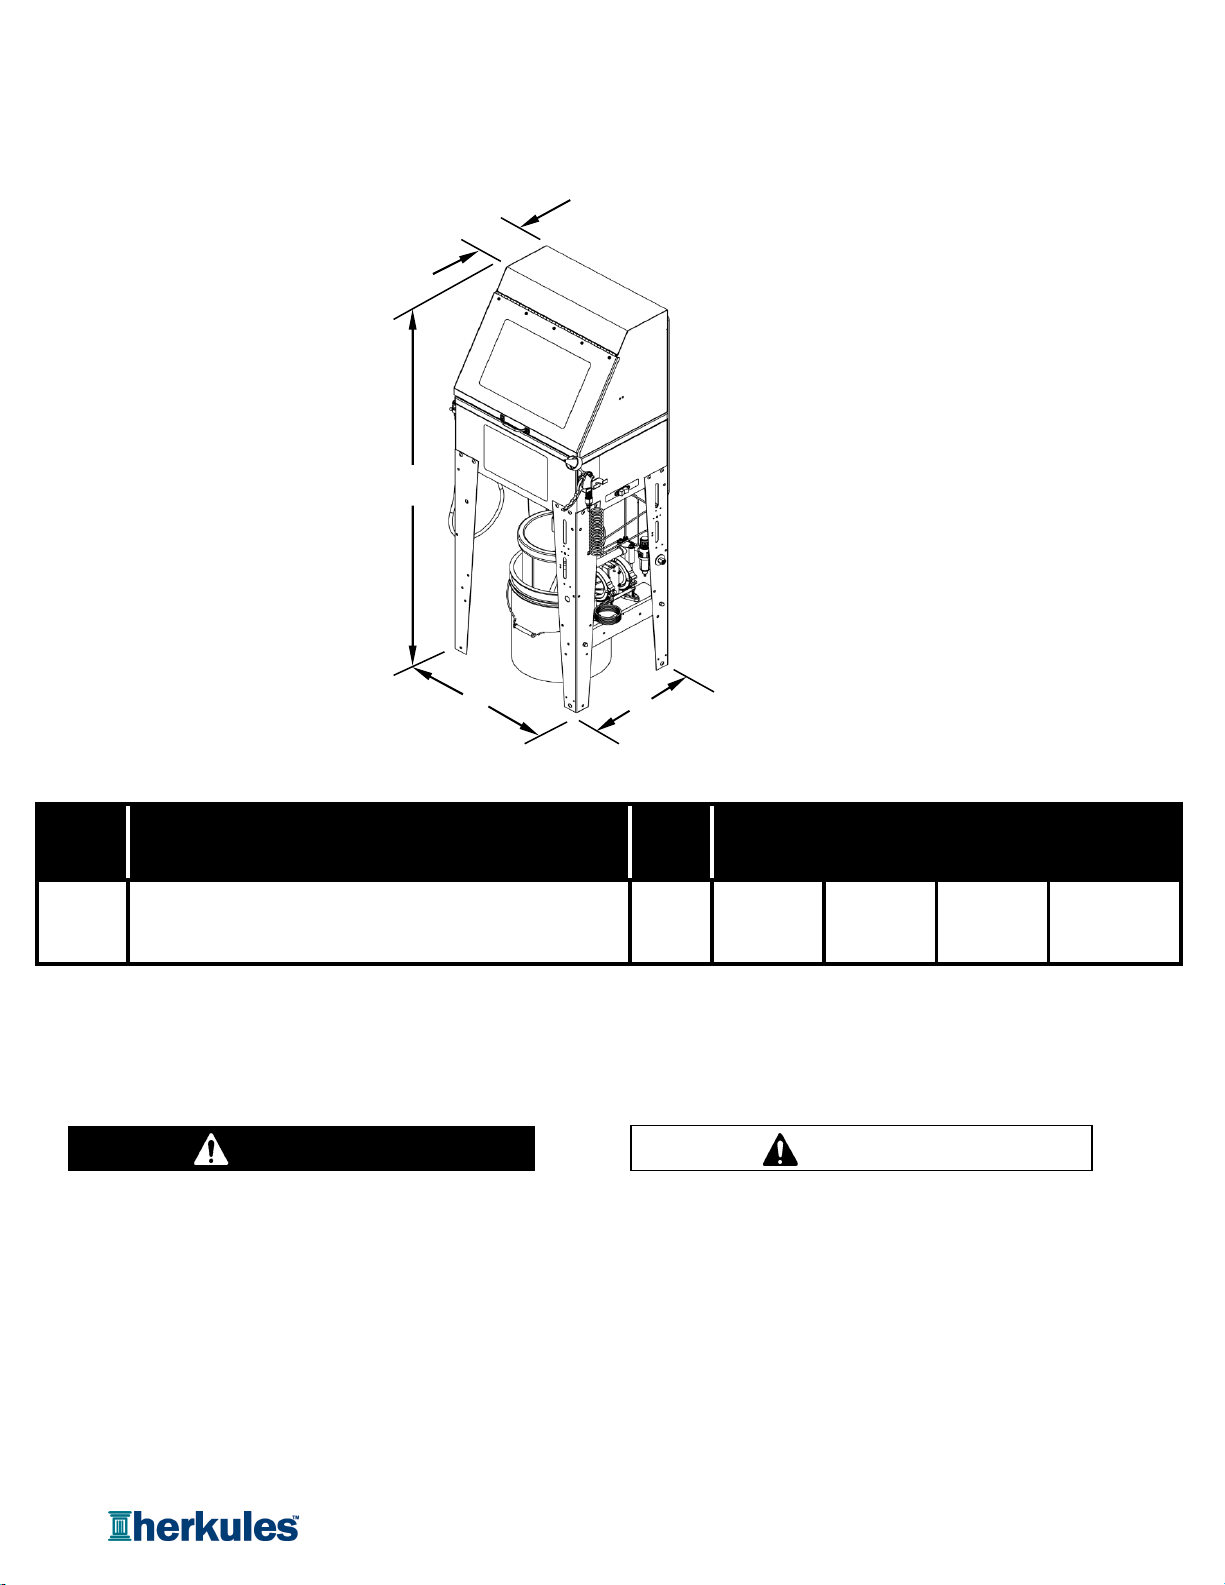
Model Information
`
Dimensions in./(mm)
A
B
C
D
Manual cleaning waterborne Gun Washer includes 56 15.5 6.5 20.38
pressure cleaning nozzle, clean rinse nozzle, flow thru (1422) (394) (165) (518)
brush and agitator / accelerator.
NOTE: Dimensions listed are overall measurements.
Model Description Weight
lbs/(kg)
69
G550 (31.3)
Warning Symbol Caution Symbol
A
B
C
D
CAUTION
WARNING
This symbol alerts you to the possibility of serious
injury or death if you do not follow the instructions. This symbol alerts you to the possibility of damage to
or destruction of equipment if you do not follow the
instructions.
Page 4 of 16

EQUIPMENT MISUSE HAZARD
Equipment misuse can cause the equipment to rupture, malfunction, or start unexpectedly
and result in serious injury.
•
This equipment is for professional use only.
•
Read all instruction manuals, tags, and labels before operating the equipment.
•
Use the equipment only for its intended use.
•
Do not alter or modify this equipment.
•
Do not exceed the maximum working pressure of the lowest rated system component.
•
Do not operate the gun washer at a pressure above the maximum working pressure rating of the
gun(s) being cleaned.
•
Route the hoses away from traffic areas, sharp edges, moving parts, and hot surfaces.
•
Do not use the hoses to pull the equipment.
•
Do not move pressurized equipment.
•
Comply with all applicable local, state and national fire, electrical and other safety regulations.
PRESSURIZED EQUIPMENT HAZARD
Spray from hose leaks, ruptured components, or from operating the gun washer with an open lid
can splash fluid in the eyes or on the skin and cause serious injury.
•
Do not stop or deflect fluid leaks with your hand, body, glove, or rag.
•
Tighten all fluid connections before operating the equipment.
•
Replace worn, damaged, or loose parts immediately.
WARNING
Page 5 of 16
Other manuals for G550
1
Table of contents
Other HERKULES Cleaning Equipment manuals


Popular Cleaning Equipment manuals by other brands


Suevia
Suevia 130.5011 EASYCLEANER Mounting instructions

i-MO
i-MO Öko 2000 user guide

unGer
unGer Hydro Power Ultra UNP01 operating instructions

Black & Decker
Black & Decker BHPC130 Original instructions

Uni-ram
Uni-ram UG5000E operating manual

Axi
Axi MTC HC-300 Installation, operating and maintenance manual