Franke 7612982239441 User manual

ZMI_001_2030036654-ACEX9005_#SEN_#AQU_V1.fm / 02/03/2018
Installation and operating instructions
Reader
EA-Nr.: 7612982239441
FAR-Best.-Nr.: 2030036654
ACEX9005
DE
EN
FR
ES
IT
NL
PL
SV
CS
FI
RU

ZMI_001_2030036654-ACEX9005_#SEN_#AQU_V1.fm
- 2 -
Table of contents
1. Abbreviations and units . . . . . . . . . . . . . . . . . . . . . . . . . . . . . . . . 4
2. Key . . . . . . . . . . . . . . . . . . . . . . . . . . . . . . . . . . . . . . . . . . . . . . . . 4
3. Warranty. . . . . . . . . . . . . . . . . . . . . . . . . . . . . . . . . . . . . . . . . . . . 4
4. Important notes. . . . . . . . . . . . . . . . . . . . . . . . . . . . . . . . . . . . . . . 4
Description of product
5. Scope of delivery . . . . . . . . . . . . . . . . . . . . . . . . . . . . . . . . . . . . . 5
6. Dimensions. . . . . . . . . . . . . . . . . . . . . . . . . . . . . . . . . . . . . . . . . . 5
7. Construction . . . . . . . . . . . . . . . . . . . . . . . . . . . . . . . . . . . . . . . . . 6
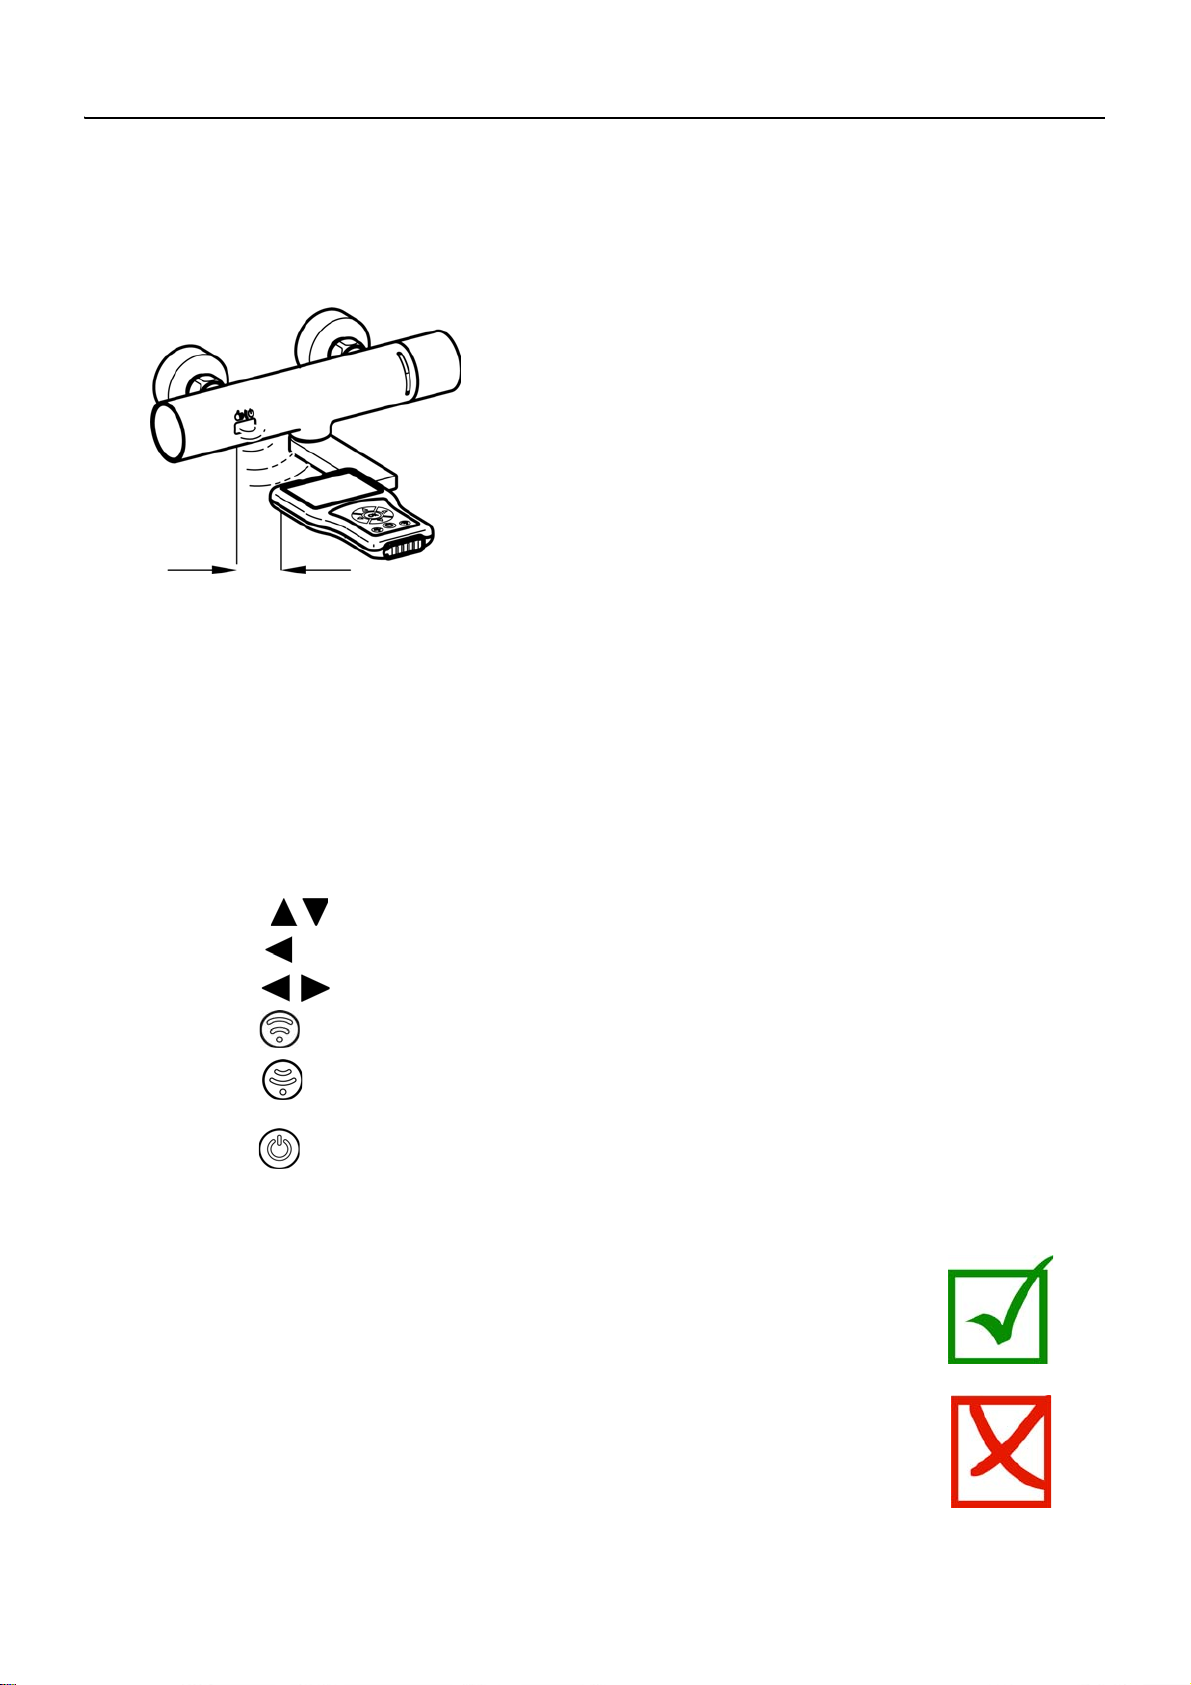
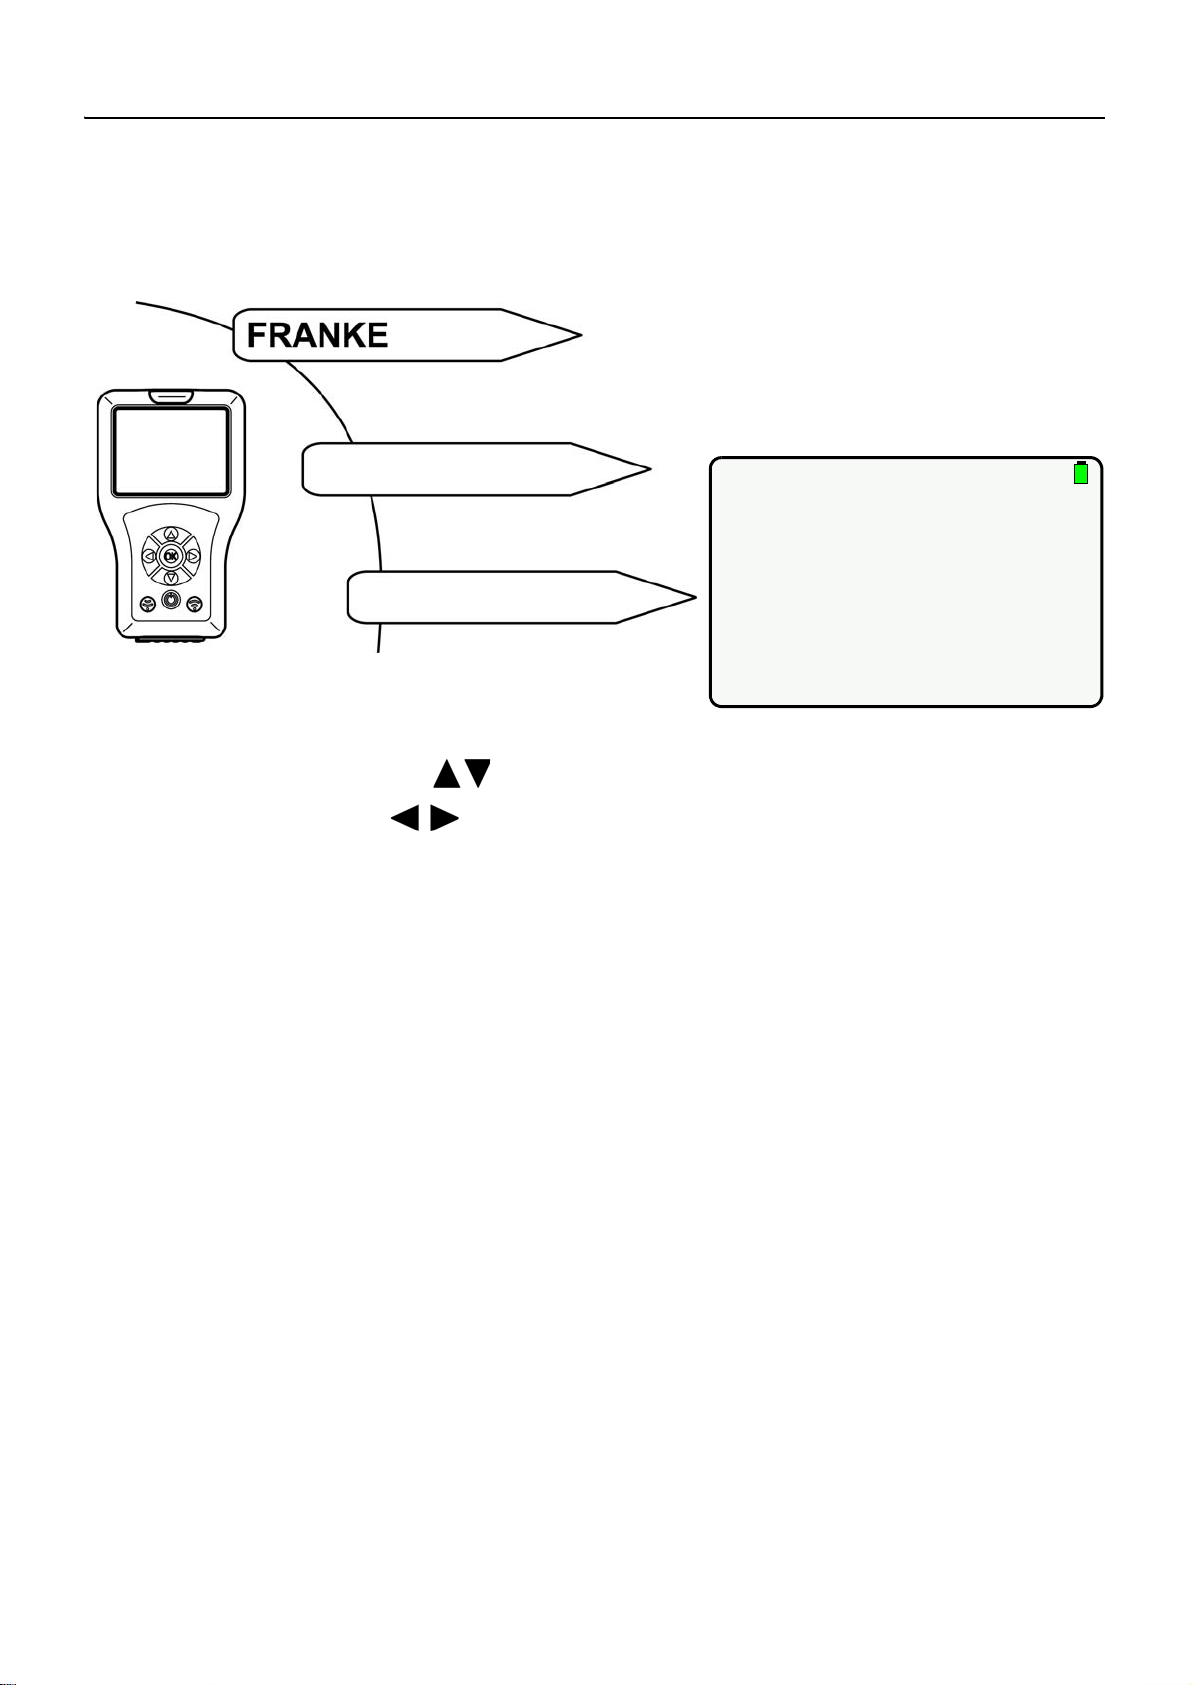
8. Operation . . . . . . . . . . . . . . . . . . . . . . . . . . . . . . . . . . . . . . . . . . . 7
9. Menu Structure. . . . . . . . . . . . . . . . . . . . . . . . . . . . . . . . . . . . . . . 8
System settings
10. Charging the Reader . . . . . . . . . . . . . . . . . . . . . . . . . . . . . . . . . . 9
11. Date/Time. . . . . . . . . . . . . . . . . . . . . . . . . . . . . . . . . . . . . . . . . . . 10
12. System Setting . . . . . . . . . . . . . . . . . . . . . . . . . . . . . . . . . . . . . . . 11
13. USB Mass Storage Mode. . . . . . . . . . . . . . . . . . . . . . . . . . . . . . . 12
14. FirmwareUpdate. . . . . . . . . . . . . . . . . . . . . . . . . . . . . . . . . . . . . . 13
15. Settings Readout . . . . . . . . . . . . . . . . . . . . . . . . . . . . . . . . . . . . . 14
16. Settings Memory. . . . . . . . . . . . . . . . . . . . . . . . . . . . . . . . . . . . . . 15
17. Displaying Stored Settings . . . . . . . . . . . . . . . . . . . . . . . . . . . . . . 15
18. Sending Settings . . . . . . . . . . . . . . . . . . . . . . . . . . . . . . . . . . . . . 16
19. Deleting Stored Settings. . . . . . . . . . . . . . . . . . . . . . . . . . . . . . . . 17
Basic settings
20. Setting Flow Time. . . . . . . . . . . . . . . . . . . . . . . . . . . . . . . . . . . . . 18
21. Setting Run On Time . . . . . . . . . . . . . . . . . . . . . . . . . . . . . . . . . . 19
22. Setting Range. . . . . . . . . . . . . . . . . . . . . . . . . . . . . . . . . . . . . . . . 20
23. Setting Mode of Operation . . . . . . . . . . . . . . . . . . . . . . . . . . . . . . 21
24. Activating Power Function . . . . . . . . . . . . . . . . . . . . . . . . . . . . . . 22
25. Activating Power On Rinse. . . . . . . . . . . . . . . . . . . . . . . . . . . . . . 23
26. Activating TouchCODE. . . . . . . . . . . . . . . . . . . . . . . . . . . . . . . . . 24
27. Setting Cleaning Time . . . . . . . . . . . . . . . . . . . . . . . . . . . . . . . . . 25
28. Switching on Cleaning Time. . . . . . . . . . . . . . . . . . . . . . . . . . . . . 26
29. Setting Safety Shutdown . . . . . . . . . . . . . . . . . . . . . . . . . . . . . . . 27
30. Switching off the tap . . . . . . . . . . . . . . . . . . . . . . . . . . . . . . . . . . . 27
Continuous operation
31. Switching on the Basin Filling function. . . . . . . . . . . . . . . . . . . . . 28
32. Setting Basin Filling/Continuous Operation . . . . . . . . . . . . . . . . . 29
33. Starting Basin Filling/Continuous Operation. . . . . . . . . . . . . . . . . 30

- 3 -
ZMI_001_2030036654-ACEX9005_#SEN_#AQU_V1.fm
Body Approach
34. Switching on DetectionFeedback . . . . . . . . . . . . . . . . . . . . . . . . . 31
35. Switching on Body Approach . . . . . . . . . . . . . . . . . . . . . . . . . . . . 32
Hygiene Purge
36. Switching Hygiene Purge on/off . . . . . . . . . . . . . . . . . . . . . . . . . . 33
37. Setting Hygiene Interval . . . . . . . . . . . . . . . . . . . . . . . . . . . . . . . . 34
38. Setting Hygiene Flow Time. . . . . . . . . . . . . . . . . . . . . . . . . . . . . . 35
39. Starting Hygiene Purge. . . . . . . . . . . . . . . . . . . . . . . . . . . . . . . . . 36
Thermal Disinfection
40. Requests for thermal disinfection. . . . . . . . . . . . . . . . . . . . . . . . . 37
41. Setting TD Delay Time . . . . . . . . . . . . . . . . . . . . . . . . . . . . . . . . . 38
42. Setting TD Impact Time . . . . . . . . . . . . . . . . . . . . . . . . . . . . . . . . 39
43. Setting TD Cooling Time. . . . . . . . . . . . . . . . . . . . . . . . . . . . . . . . 40
44. Setting TD Safety Period . . . . . . . . . . . . . . . . . . . . . . . . . . . . . . . 41
45. Setting TD Water Saving Function . . . . . . . . . . . . . . . . . . . . . . . . 42
46. Start Thermal Disinfection . . . . . . . . . . . . . . . . . . . . . . . . . . . . . . 43
Statistics
47. Activating Statistics. . . . . . . . . . . . . . . . . . . . . . . . . . . . . . . . . . . . 45
48. Statistics Readout and Display. . . . . . . . . . . . . . . . . . . . . . . . . . . 46
49. Display statistics. . . . . . . . . . . . . . . . . . . . . . . . . . . . . . . . . . . . . . 47
50. Storing Statistics. . . . . . . . . . . . . . . . . . . . . . . . . . . . . . . . . . . . . . 48

ZMI_001_2030036654-ACEX9005_#SEN_#AQU_V1.fm
- 4 -
1. Abbreviations and units
2. Key
Warning!
Failure to observe can result in bodily injury or even death.
Caution!
Failure to observe can result in material damage.
☞Important!
Failure to observe can cause the product to malfunction.
☞Useful information for optimum handling of the product.
3. Warranty
Liability is accepted in accordance with the General Terms and Conditions of
Business and Supply.
Caution!
The statistical data is provided to show trends in user behaviour and frequency
of use.
The hygiene purge data is provided to assist the user in complying with the
incumbent operator obligations. However, it cannot replace them. We strongly
recommend that the operator checks the hygiene purge function at regular intervals.
4. Important notes
Warning!
Infrared radiation
Do not look directly into the sensor window.
STB Standby
PC Personal Computer
Bist Bistable
Mono Monostable
m Minute
hHour
s Second

- 5 -
ZMI_001_2030036654-ACEX9005_#SEN_#AQU_V1.fm
5. Scope of delivery
6. Dimensions

- 7 -
ZMI_001_2030036654-ACEX9005_#SEN_#AQU_V1.fm
8. Operation
The sensor functions differ depending on their application cases. There are different
executable sensor functions for each tap. The Reader automatically identifies the
right tap family. Operation is described on the basis of a Standard Tap in these
instructions for ease of understanding. The menu navigation is identical for each
type of Franke tap. Only the scope of the lowest menu levels differs.
The Reader sends signals via the opto-electronic
interface. The sensor of the tap and the opto-
electronic interface of the Reader require visual
contact with a minimum distance of at least 50 mm
and a maximum distance of 250 mm to make settings.
☞Important!
The sensor must be activated before using the Reader (move your hand towards the
sensor).
The Reader is controlled via the following buttons:
– The “OK” button opens a menu item and confirms changes, whereby the menu
item is exited at the same time.
– The “ ” buttons are used to navigate through the menu items.
– The “ ” button is used to navigate to the previous menu level.
– The “ ” buttons are used for navigation or setting parameters.
– The “ ” button is used to send settings/parameters to the tap.
– The “ ” button is used to receive pre-set parameters/statistical data from
the tap.
– The “ ” button switches the Reader to Standby Mode or from Standby Mode.
☞A selected line or field is highlighted in yellow.
If an action has been successfully sent to the tap,
it is displayed with the following icon:
If an action has not been successfully sent,
it is displayed with the following icon:
> 50 mm
< 250 mm

ZMI_001_2030036654-ACEX9005_#SEN_#AQU_V1.fm
- 8 -
9. Menu Structure
Sensor Settings Settings readout
Stored Settings
0X Tap Menu
1X Shower Menu
Sensor functions
01-Standard Washbasin
02-Washbasin Timer
03-Washbasin Timer & Body
11-Shower body
12-Shower Timer
13-Shower Timer & body
0X Tap Functions
1X Shower Functions
Menu with START/STOP function
Sensor statistics Readout statistics
Display statistics List of stored statistics
Reader Settings Date/Time
System Setting
USB Mass Storage Mode
FirmwareUpdate
Date/Time Settings
Language Setting,
Standby mode, ...
Display of USB connection for
storing settings
Display for FirmwareUpdate
List of stored
settings

- 9 -
ZMI_001_2030036654-ACEX9005_#SEN_#AQU_V1.fm
10. Charging the Reader
Caution!
Charge the Reader with a max. 0.5 A (5 V DC).
Charging with the Reader switched on:
10.1
Connect the Reader to a PC.
• The following icon appears in the top right-hand corner of the Reader display:
Charging with the Reader switched off:
10.2
Connect the Reader to a PC.
• The following display appears on the Reader:
Charging Battery
Voltage: 5.4V

ZMI_001_2030036654-ACEX9005_#SEN_#AQU_V1.fm
- 10 -
11. Date/Time
The date and time are shown in the top left-hand corner of the display in all menu
levels.
Select the following menu items to go to the destination display:
11.1
Select parameters with “ ” buttons.
11.2
Set parameters with “ ” buttons.
11.3
Confirm with “OK” button.
• The settings are stored.
Reader Settings
Date/Time
14-Jan-2018 16:03
Day
Year
Hour
Minute
Seconds
14
2018
16
03
15
Month Jan

- 11 -
ZMI_001_2030036654-ACEX9005_#SEN_#AQU_V1.fm
12. System Setting
The following parameters are set in System Setting:
– Language
Language of the display.
– Standby Mode
The display switches off after the pre-set time when the Standby Mode is
activated. The Reader goes into Standby Mode.
Press the “ ” button to exit the Standby Mode.
– Standby Time
Time after which the display switches off.
– Key Beep
Each keypress generates a noise when Key Beep is activated.
The other parameters cannot be changed.
Select the following menu items to go to the destination display:
12.1
Select parameters with “ ” buttons.
12.2
Set parameters with “ ” buttons.
12.3
Confirm with “OK” button.
• The settings are stored.
☞Important!
Energy is saved when the Standby Mode is activated.
Reader Settings
System Setting
14-Jan-2018 16:03
Language:
Standby Time:
Key Beep:
Voltage:
Firmware Ver:
German
0.5m
Yes
3.6V
01.00.07
Standby Mode: Yes
Build Date: Aug 8 2017
Build Time: 16:39:56

ZMI_001_2030036654-ACEX9005_#SEN_#AQU_V1.fm
- 12 -
13. USB Mass Storage Mode
The USB Mass Storage Mode connects the Reader to a PC via a USB cable.
Data can be
• stored in the Reader (e.g. new firmware)
or
• loaded from the Reader (e.g. statistical data).
☞Important!
The Reader must be set to the Mass Storage Mode before it is recognised by the PC
as an external drive.
Select the following menu items to go to the destination display:
13.1
Insert USB cable in Reader and PC.
13.2
The following display appears:
• The Reader is shown as a mass-storage device on the PC.
14-Jan-2018 16:03
Reader Settings
USB Mass Storage Mode Connect PC to USB Port
Press LEFT to Exit
14-Jan-2018 16:03
USB Connected

- 13 -
ZMI_001_2030036654-ACEX9005_#SEN_#AQU_V1.fm
14. FirmwareUpdate
A new firmware version is selected in the "FirmwareUpdate" menu on the Reader
and installed (see Chapter 12).
14.1
Connect the Reader to a PC (see Chapter 13.).
14.2
Drop the new firmware file in the main folder of the mass-storage device.
14.3
Select the following menu items to go to the destination display:
14.4
Select the new FirmwareUpdate with the “ ” buttons.
14.5
Confirm with “OK” button.
14.6
Follow the instructions on the display.
14-Jan-2018 16:03
Reader Settings
FirmwareUpdate
SELECT FIRMWARE FILE
tapreader-0.0.22.bin
BU000020.BIN

ZMI_001_2030036654-ACEX9005_#SEN_#AQU_V1.fm
- 14 -
15. Settings Readout
The current settings of the tap are read out and imported to the Reader and
displayed.
Select the following menu items to go to the destination display:
15.1
Press the button.
• Parameters are read out.
If a connection could not be made, the following display appears:
15.2
Confirm with “Yes”.
• Settings are read out.
Sensor Settings
Settings readout
Settings Readout
Press the Receive Button!
14-Jan-2018 16:03
Error Reading Para
Try Again?
Yes No

- 15 -
ZMI_001_2030036654-ACEX9005_#SEN_#AQU_V1.fm
16. Settings Memory
The altered settings of the tap can be stored in the Reader.
Select the following menu items to go to the destination display:
16.1
Navigate to “Save Settings” with the “ ” buttons.
16.2
Confirm with “OK” button.
• Settings are stored.
17. Displaying Stored Settings
Select the following menu items to go to the destination display:
17.1
Select the respective setting with the “ ” buttons.
17.2
Confirm with “OK” button.
• Settings are imported to the Reader and displayed.
Sensor Settings
0X Tap Menu
0×-Washbasin ×××
14-Jan-2018 16:03
01-Tap ×××
Power On Rinse
DetectionFeedback OFF
OFF
Actuator Type Bist
TouchCODE OFF
Hygiene rinse OFF
Usage statistics OFF
Save Settings
Send Settings
14-Jan-2018 16:03
Sensor Settings
Stored Settings
Settings Memory
01_65000_030422.SET
02_65000_141117.SET
01_65001_141117.SET
01_65002_151117.SET
01_65003_151117.SET
02_65001_160118.SET

ZMI_001_2030036654-ACEX9005_#SEN_#AQU_V1.fm
- 16 -
18. Sending Settings
The current settings of the Reader can be sent to the tap individually or completely.
Sending an individual setting
18.1
Change the parameter setting (see e.g. Chapter 20 to Chapter 23.)
18.2
Press the button.
Sending the complete settings
18.3
Select the following menu items to go to the destination display:
18.4
Navigate to “Send Settings” with the “ ” buttons.
18.5
Confirm with “OK” button.
• All settings are sent to the tap.
14-Jan-2018 16:03
01-Tap ×××
Power On Rinse
DetectionFeedback OFF
OFF
Actuator Type Bist
TouchCODE OFF
Hygiene rinse OFF
Usage statistics OFF
Save Settings
Send Settings
Sensor Settings
0X Tap Menu
0×-Tap ×××

- 17 -
ZMI_001_2030036654-ACEX9005_#SEN_#AQU_V1.fm
19. Deleting Stored Settings
The respective files can be deleted if memory space is required or the settings are
no longer required.
Deleting settings via display
19.1
Select the following menu items to go to the destination display:
19.2
Select the setting you wish to delete with the “ ” buttons.
19.3
Press and hold down the “OK” button until the following display appears:
19.4
Confirm with “Yes”.
• The setting is deleted.
Deleting settings via the USB Mass Storage Mode
19.5
Connect the Reader to a PC (see Chapter 13.).
19.6
Delete the desired file in the “FR_SETTINGS” folder.
14-Jan-2018 16:03
Settings Memory
01_65000_030422.SET
02_65000_141117.SET
01_65001_141117.SET
01_65002_151117.SET
01_65003_151117.SET
02_65001_160118.SET
Sensor settings
Stored Settings
14-Jan-2018 16:03
Delete File:
01_65001_141117.SET
No
Yes

ZMI_001_2030036654-ACEX9005_#SEN_#AQU_V1.fm
- 18 -
20. Setting Flow Time
☞Important!
Flow Time is only active during sensor operation.
Flow Time is the time during which the water flows after the tap has been triggered.
Select the following menu items to go to the destination display:
20.1
Select “Flow Time” with “ ” buttons.
20.2
Press the “OK” button.
20.3
Select “Flow Time” with “ ” buttons (1-255s).
20.4
Confirm with “OK” button.
20.5
Press the button.
• The parameter change is sent to the tap
Sensor Settings
0X Tap Menu
0×-Tap ×××
14-Jan-2018 16:03
0×-Tap ×××
Flow Time
Range
Safety Shutdow
Cleaning Time
Body Approach
Hygiene Interval
1s
27%
255s
1min
ON
24h
Hygiene Flow Time 30s
Run On Time 1s

- 19 -
ZMI_001_2030036654-ACEX9005_#SEN_#AQU_V1.fm
21. Setting Run On Time
☞Important!
Run On Time is only active during sensor operation.
Run On Time is the time during which the water flows after the detection area has
been left.
Select the following menu items to go to the destination display:
21.1
Select “Run On Time” with “ ” buttons.
21.2
Press the “OK” button.
21.3
Select “Run On Time” with “ ” buttons (1-255s).
21.4
Confirm with “OK” button.
21.5
Press the button.
• The parameter change is sent to the tap
Sensor Settings
0X Tap Menu
0×-Tap ×××
14-Jan-2018 16:03
0×-Tap ×××
Flow Time
Range
Safety Shutdow
Cleaning Time
Body Approach
Hygiene Interval
1s
27%
255s
1min
ON
24h
Hygiene Flow Time 30s
Run On Time 1s

ZMI_001_2030036654-ACEX9005_#SEN_#AQU_V1.fm
- 20 -
22. Setting Range
Range is the distance within which the body can be detected by the sensor. Range
can be set from 0-100%.
• Approx. 300 mm is equivalent to 100% in the F3 tap series.
• Approx. 700 mm is equivalent to 100% in the F5 tap series.
Select the following menu items to go to the destination display:
22.1
Select “Range” with “ ” buttons.
22.2
Press the “OK” button.
22.3
Select “Range” with “ ” buttons (0-100%).
22.4
Confirm with “OK” button.
22.5
Press the button.
• The parameter change is sent to the tap.
Sensor Settings
0X Tap Menu
0×-Tap ×××
14-Jan-2018 16:03
0×-Tap ×××
Flow Time
Range
Safety Shutdow
Cleaning Time
Body Approach
Hygiene Interval
1s
27%
255s
1min
ON
24h
Hygiene Flow Time 30s
Run On Time 1s
This manual suits for next models
2
Table of contents