Franke FDW 614 D6P DOS E User manual

FDW 614 D6P DOS E
EN User manual
FR Manuel d‘utilisation
IT Istruzioni per l‘uso
TR Kullanım kılavuzu
Dishwasher
Lave-vaisselle
Lavastoviglie
Bulaşık makinesi
ϡΩΧΗγϻϝϳϟΩ AR ϕΎΑρΔϟΎγϏ

2
LANGUAGES
EN USER MANUAL ..........................................................................................................................................................................3
FR MANUEL D‘UTILISATION..................................................................................................................................................... 14
IT ISTRUZIONI PER L‘USO......................................................................................................................................................... 25
TR KULLANIM KILAVUZU.......................................................................................................................................................... 36
47............................................................................................................................................................................................ ϡΩΧΗγϻϝϳϟΩ AR

3
EN
TABLE OF CONTENTS
OVERVIEW................................................................................................................................................................................................4
FIRST TIME USE.......................................................................................................................................................................................5
PROGRAMS TABLE.................................................................................................................................................................................6
OPTIONS AND FUNCTIONS................................................................................................................................................................7
LOADING THE RACKS ...........................................................................................................................................................................8
DAILY USE.................................................................................................................................................................................................9
ADVICE AND TIPS...................................................................................................................................................................................9
CARE AND MAINTENANCE.............................................................................................................................................................. 10
INSTALLATION...................................................................................................................................................................................... 11
TROUBLESHOOTING.......................................................................................................................................................................... 12
SUPPORT................................................................................................................................................................................................ 13

4
Before using the appliance carefully read Safety Instructions guide.
USER GUIDE
CONTROL PANEL
12345678910
11
1. ON-OFF/Reset button with indicator light
2. Program selection button
3. Salt rell indicator light
4. Rinse Aid rell indicator light
5. Program number and delay time indicator
6. Tablet indicator light
7. Display
8. Half Load indicator lights
9. Half Load button
10. Delay button
11. START/Pause button with indicator light / Tab
OVERVIEW
1. Upper rack
2. Foldable aps
3. Upper rack height adjuster
4. Upper spray arm
5. Lower rack
6. Cutlery basket
7. Lower spray arm
8. Filter Assembly
9. Salt reservoir
10. Detergent and Rinse Aid dispensers
11. Rating plate
12. Control panel
0000 000 00000
Service:
1
2
3
4
5
6
10
12
7
11
9
8

5
EN
The use of salt prevents the formation of LIMESCALE on the dishes
and on the machine’s functional components.
• It is mandatory that THE SALT RESERVOIR NEVER BE EMPTY.
• It is important to set the water hardness.
The salt reservoir is located in the lower part of the dishwasher
(see PRODUCT DESCRIPTION) and must be lled when the SALT REFILL
indicator light in the control panel is lit.
1. Remove the lower rack and unscrew the
reservoir cap (anticlockwise).
2. Only the rst time you do this: ll the salt
reservoir with water.
3. Position the funnel (see gure) and ll the salt
reservoir right up to its edge (approximately
1 kg); it is not unusual for a little water to leak
out.
4. Remove the funnel and wipe any salt
residue away from the opening.
Make sure the cap is screwed on tightly, so that no detergent can
get into the container during the wash program (this could damage
the water softener beyond repair).
Whenever you need to add salt, it is mandatory to complete
the
procedure before the beginning of the washing cycle to avoid
corrosion.
.........................................................................
SETTING THE WATER HARDNESS
To allow the water softener to work in a perfect way, it is essential
that the water hardness setting is based on the actual water hardness
in your house. This information can be obtained from your local water
supplier.
FIRST TIME USE SALT, RINSE AID AND DETERGENT
FILLING THE SALT RESERVOIR
Rinse aid makes dish DRYING easier. The rinse aid dispenser Ashould
be lled when the RINSE AID REFILL indicator light in the control
panel is lit.
1. Open the dispenser Bby pressing and pulling up the tab on the lid.
2. Pour in the rinse aid (max.110 ml), making sure it does not overow
from the dispenser. If this happens, clean the spill immediately with
a dry cloth.
3. Press the lid down until you hear a click to close it.
NEVER pour the rinse aid directly into the appliance tub.
The factory sets the default value for the water hardness
• Switch on the appliance by pressing the ON/OFF button.
• Switch o the appliance by pressing the ON/OFF button.
• Hold down button P for 5 seconds, until you hear a beep.
• Switch on the appliance by pressing the ON/OFF button.
• The current selection level number and the salt indicator light both ash
.
• Press button P to select the desired hardness level (see WATER
HARDNESS TABLE).
Water Hardness Table
Level °dH
German degrees
°fH
French degrees
°Clark
English degrees
1 Soft 0 - 6 0 - 10 0 - 7
2 Medium 7 - 11 11 - 20 8 - 14
3 Average 12 - 16 21 - 29 15 - 20
4 Hard 17 - 34 30 - 60 21 - 42
5 Very hard 35 - 50 61 - 90 43 - 62
• Switch o the appliance by pressing the ON/OFF button.
Setting is complete!
As soon as this procedure is complete, run a program without loading.
Only use salt that has been specically designed for dishwashers.
After the salt has been poured into the machine, the SALT REFILL
indicator light switches o.
If the salt container is not lled, the water softener and the heating
element may be damaged as a result of limescale accumulation.
Using of Salt is recommended with any type of dishwasher detergent.
FILLING THE RINSE AID DISPENSER
A
B
Usage of detergent not designed for dishwashers may cause
malfunction or damage to the appliance.
To open the detergent dispenser
use the opening device C.
Introduce the detergent into
the dry dispenser D only. Place
the amount of detergent for pre-
washing directly inside the tub.
ADJUSTING THE DOSAGE OF RINSE AID
I
f you are not completely satised with the drying results, you can adjus
t
the quantity of rinse aid used.
• Switch the dishwasher on using the ON/OFF button.
• Switch it o using the ON/OFF button.
• Press button P three times - a beep will be heard.
• Switch it on using the ON/OFF button.
• The current selection level number and rinse aid indicator light ash.
• Press button P to select the level of rinse aid quantity to be supplied.
• Switch it o using the ON/OFF button
Setting is complete!
If the rinse aid level is set to ZERO (ECO), no rinse aid will be supplied.
The LOW RINSE AID indicator light will not be lit if you run out of rinse aid.
A maximum of 5 levels can be set according to the dishwasher model.
The factory setting is specic to the model, please follow instruction
above to check this for your machine.
• If you see bluish streaks on the dishes, set a low number (1-2).
• If there are drops of water or limescale marks on the dishes, set a mid-
range number (3-4).
FILLING THE DETERGENT DISPENSER
C
D
1. When measuring out the detergent refer to the mentioned earlier
information to add the proper quantity. Inside the dispenser Dthere are
indications to help the detergent dosing.
2. Remove detergent residues from the edges of the dispenser
and close the cover until it clicks.
3. Close the lid of the detergent dispenser by pulling it up until
the closing device is secured in place.
The detergent dispenser automatically opens up at the right time
according to the program.
If all-in-one detergents are used, we recommend using the TABLET
button, because it adjusts the program so that the best washing
and drying results are always achieved.
After installation, remove the stoppers from the racks and the retaining elastic elements from the upper rack.

6
ECO program data is measured under laboratory conditions according to European Standard EN 60436:2020.
Pre-treatment of the dishes is not needed before any of the programs.
*) Not all options can be used simultaneously.
**) Values given for programs other than the program Eco are indicative only. The actual time may vary depending on many factors such
as temperature and pressure of the incoming water, room temperature, amount of detergent, quantity and type of load, load balancing, additional
selected options and sensor calibration. The sensor calibration can increase program duration up to 20 min.
PROGRAMS TABLE
PROGRAMS DESCRIPTION
Program
Drying
phase
CoolDry
Available
options *)
Duration of wash
program
INJO
Water
consumption
(MJUSFTDZDMF
Energy
consumption
L8IDZDMF
1. Eco 50° 2:45 12.0 0.95
2. Intensive 65° 2:30 15.0 1.50
3. Mixed 55° 2:00 15.0 1.35
4. Rapid 30’ 50° -- 0:30 9.0 0.50
5. Sanitizing 65° -1:40 11.5 1.30
6. Prewash --
- 0:10 4.5 0.01
1 ECO
Eco programme is suitable to clean normally soiled tableware, that
for this use, it is the most ecient programme in terms of its combined
energy and water consumption, and that it is used to assess compliance
with the EU Ecodesign legislation.
2 INTENSIVE
Program recommended for heavily soiled crockery, especially suitable
for pans and saucepans (not to be used for delicate items).
3 MIXED
Mixed soil. For normally soiled dishes with dried food residues.
4 RAPID 30’
Program to be used for half load of lightly-soiled dishes with no dried
food residues. Does not include drying phase.
5 SANITIZING
Normally or heavily soiled crockery, with additional antibacterial wash.
Can be used to perform maintenance of the dishwasher.
6 PREWASH
Use to refresh crockery planned to be washed later. No detergent
to be used with this program.
Notes:
Please note that cycle Rapid 30’ is dedicated for lightly soiled dishes.
Instructions on wash cycle selection.

7
EN
OPTIONS AND FUNCTIONS
OPTIONS can be selected directly by pressing the corresponding button (see CONTROL PANEL). If an option is not compatible with the selected
program see PROGRAMS TABLE, the corresponding LED ashes rapidly 3 times and beeps will sound. The option will not be enabled.
HALF LOAD
If there are not many dishes to be washed, a half load cycle
may be used in order to save water, electricity and detergent. Select
the program and press the HALF LOAD button: the indicator light will
light up.
Press the HALF LOAD button to deselect this option
Remember to halve the amount of detergent.
.........................................................................
DELAY
The start time of the program may be delayed for a period
of time between 1and 12 hours.
1. Press the DELAY button: the corresponding «h» symbol appears
on the display; each time you press the button, the time (1h, 2h, etc. up
to max. 12h) from the start of the selected wash cycle will be increased.
2. Select the wash program, press the START/PAUSE button and within
4 seconds close the door: the timer will begin counting down.
3. Once this time has elapsed, the indicator light «h» switches o
and the wash cycle begins.
To adjust the delay time and select a shorter period of time, press
the DELAY button. To cancel it, press the button repeatedly until
the selected delayed start indicator light «h» switches o.
The DELAY function cannot be set once a wash cycle has been
started.
TABLET (Tab)
This setting allows you to optimize the performance
of the program according to the type of detergent used.
Press the START/PAUSE button for 3 seconds (the corresponding symbol
will light up) if you use combined detergents in tablet form (rinse aid,
salt and detergent in 1 dose).
If you use powder or liquid detergent, this option should be o.
.........................................................................
CoolDry
CoolDry is a convection drying system which automatically opens
the door during/after drying phase to ensure exceptional drying
performance every day. Door opens at the temperature that is safe
to your kitchen furniture.
As additional steam protection, special designed protection foil is added
together with the dishwasher. To see how to mount protection foil
please refer to (INSTALLATION GUIDE).
CoolDry functionality could be disabled by the user as follows:
1. Go to the Dishwasher software menu pressing and holding P
button (6 sec).
2. You switched to CoolDry Control Menu, you could change status
of CoolDry functionality by pressing Pbutton:
E– enabled d– disabled
To conrm the change and exit from the Control Menu please press
and hold Pbutton (3 sec).

8
LOADING THE RACKS
For pots, lids, plates, salad
bowls, cutlery etc... Large plates
and lids should ideally be placed
at the sides to avoid interferences
with the spray arm.
(loading example for the lower rack)
Load delicate and light dishes:
glasses, cups, saucers, low salad
bowls.
(loading example for the upper rack)
..................................................................
ADJUSTING THE HEIGHT OF THE UPPER RACK
The height of the upper basket can be adjusted: high position to place
bulky crockery in the lower basket and low position to make the most
of the tip-up compartments by creating more space upwards.
The upper rack is equipped with a Upper Rack
height adjuster (see gure), without pressing
the levers, lift it up by simply holding the rack
sides, as soon as the rack is stable in its upper
position. To restore to the lower position, press
the levers (A) at the sides of the rack and move
the basket downwards.
We strongly recommend that you do not
adjust the height of the rack when it is
loaded.
NEVER raise or lower the basket on one side only.
FOLDABLE FLAPS WITH ADJUSTABLE POSITION
The side foldable aps can be fold or unfold to optimize
the arrangement of crockery inside the rack.
Wine glasses can be placed safely
in the foldable aps by inserting
the stem of each glass into
the corresponding slots.
Depending on the model:
– to unfold the aps there is
needed to slide it up and rotate
or release it from the snaps
and pull it down.
– to fold the aps there is needed
to rotate it and slide aps down
or pull it up and attach aps
to the snaps.
LOWER RACK
CUTLERY BASKET
The basket is equipped with top grilles
for improved cutlery arrangement.
The cutlery basket should
be positioned only at the front
of the lower rack.
Knives and other utensils with
sharp edges must be placed
in the cutlery basket with the points
facing downwards or they must
be positioned horizontally
in the tip-up compartments
on the upper rack.
UPPER RACK

9
EN
DAILY USE
1. CHECK WATER CONNECTION
Check that the dishwasher is connected to the water supply
and that the tap is open.
2. SWITCH ON THE DISHWASHER
Open the door and press the ON/OFF button.
3. LOAD THE RACKS (see LOADING THE RACKS)
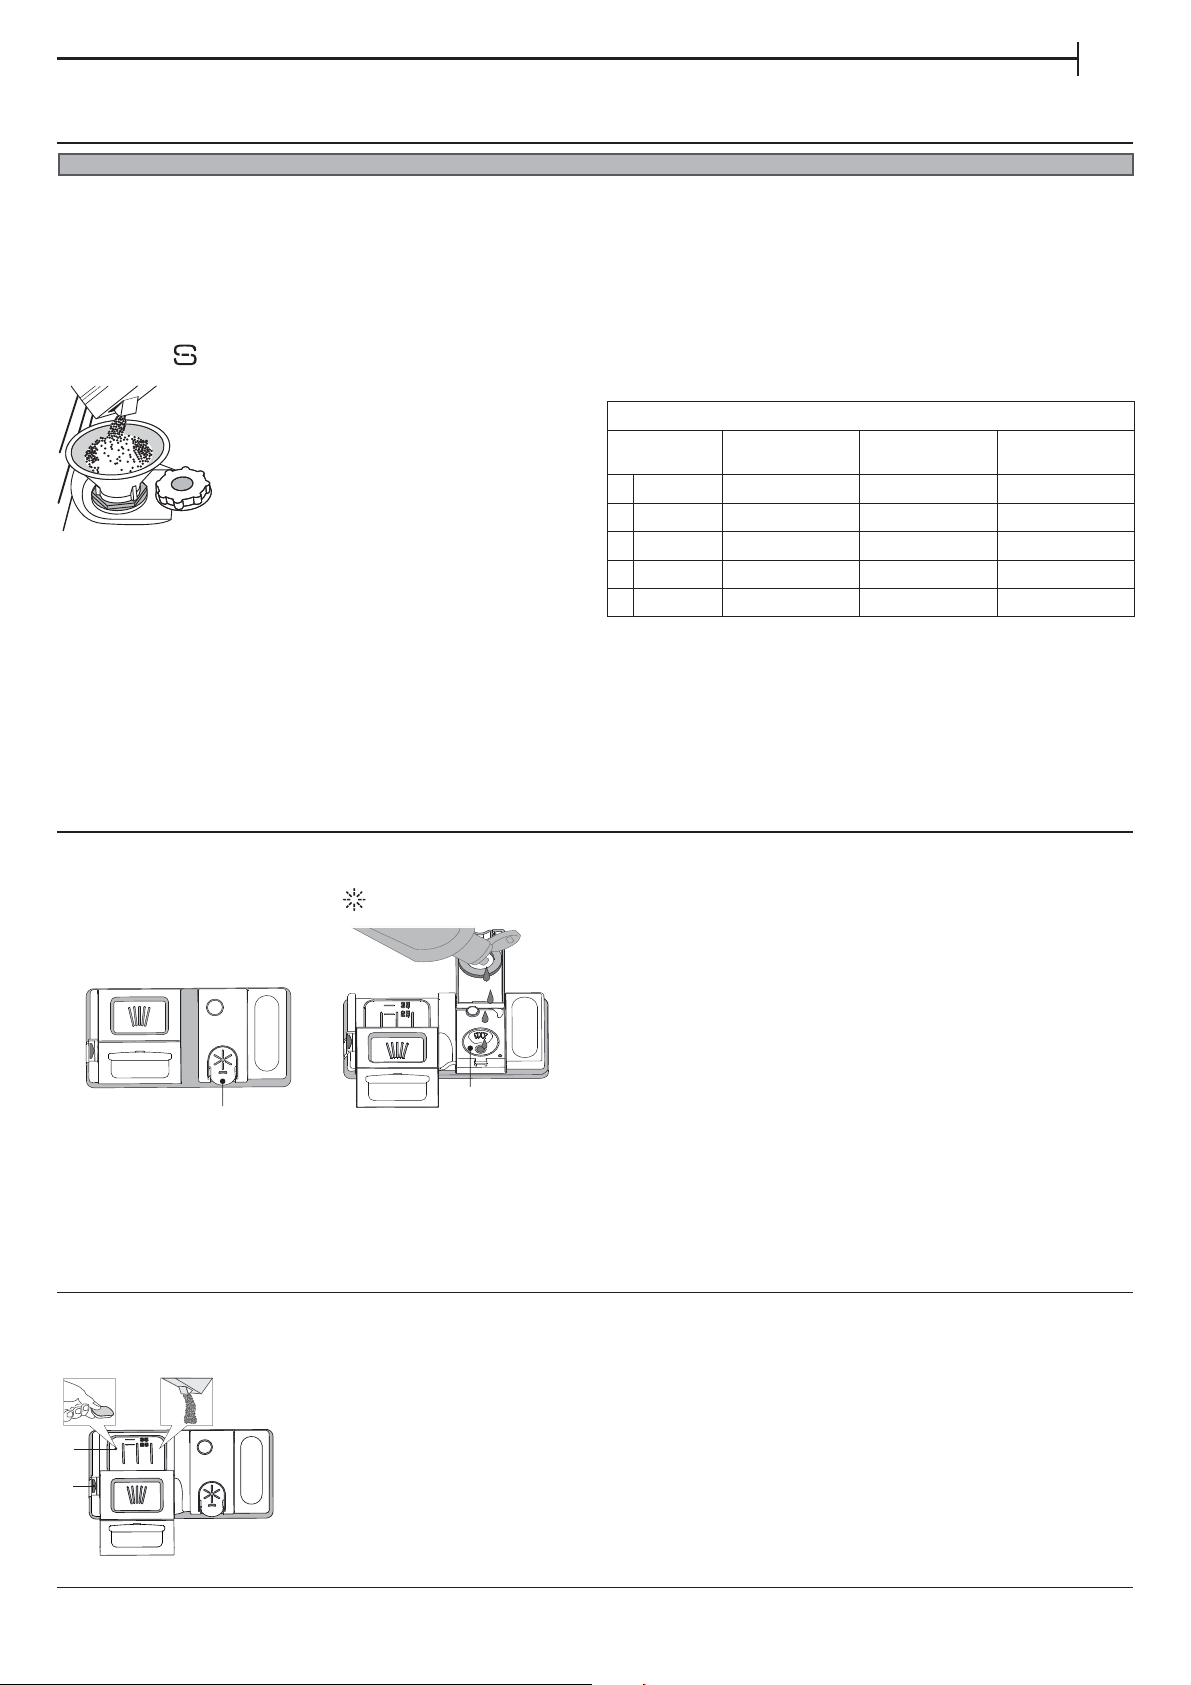
4. FILLING THE DETERGENT DISPENSER
5. CHOOSE THE PROGRAM AND CUSTOMISE THE CYCLE
Select the most appropriate program in accordance with the type
of crockery and its soiling level (see PROGRAMS DESCRIPTION)
by pressing the P button.
Select the desired options (see OPTIONS AND FUNCTIONS).
6. START
Start the wash cycle by pressing START/Pause button (led is lit)
and closing the door within 4 sec. When the program starts
you hear a single beep. If the door was not closed within 4sec.,
the alarm sound will be played. In this case, open the door, press
START/Pause button and close the door again within 4 sec.
7. END OF WASH CYCLE
The end of the wash cycle is indicated by beeps and by the ashing
of the wash cycle number on the display.
.
Open the door
and switch o the appliance by pressing the ON/OFF button.
Wait for a few minutes before removing the crockery - to avoid
burns. Unload the racks, beginning with the lower one.
The machine will switch o automatically during certain extended
periods of inactivity, in order to minimise electricity consumption.
If the crockery is only lightly soiled or if it has been rinsed with
water before being placed in the dishwasher, reduce the amount
of detergent used accordingly.
.........................................................................
MODIFYING A RUNNING PROGRAM
If a wrong program was selected, it is possible to change it, provided
that it has only just begun: open the door, press and hold the ON/OFF
button, the machine will switch o.
Switch the machine back on using the ON/OFF button and select
the new wash cycle and any desired options; Start the wash cycle
by pressing START/Pause button and closing the door within 4 sec.
.........................................................................
ADDING EXTRA CROCKERY
Without switching o the machine, open the door (START/Pause
led starts blinking) (be ware of HOT steam!) and place the crock-
ery inside the dishwasher. Press the START/Pause button and close
the door within
4 sec., the cycle will resume from the point at which
it was interrupted.
..........................................................................
ACCIDENTAL INTERRUPTIONS
If the door is opened during the wash cycle, or if there is a power cut,
the cycle stops. Press the START/Pause button and close the door
within
4 sec., the cycle will resume from the point at which it was
interrupted.
ADVICE AND TIPS
TIPS
Before loading the baskets, remove all food residues from the crockery
and empty the glasses. You do not need to rinse beforehand under
running water.
Arrange the crockery so that it is held in place rmly and does not tip
over; and arrange the containers with the openings facing downwards
and the concave/convex parts placed obliquely, thus allowing the water
to reach every surface and ow freely.
Warning: lids, handles, trays and frying pans do not prevent the sprayer
arms from rotating.
Place any small items in the cutlery basket.
Very soiled dishes and pans should be placed in the lower basket
because in this sector the water sprays are stronger and allow a higher
washing performance.
After loading the appliance, make sure that the sprayer arms can rotate freely.
.........................................................................
TIPS ON ENERGY SAVING
• When the household dishwasher is used according
to the manufacturer’s instructions, washing tableware
in a dishwasher usually consumes less energy and water than
hand dishwashing.
• In order to maximize dishwasher eciency it is recommended
to initiate the wash cycle once dishwasher is fully loaded.
Loading the household dishwasher up to the capacity indicated
by the manufacturer will contribute to energy and water savings.
Information on correct loading of tableware can be found in Loading
chapter.
In case of partial loading it is recommended to use dedicated wash
options if available (Half load/ Zone Wash, Multizone), illing up only
selected racks. Incorrect loading or overloading the dishwasher may
increase resources usage (such as water, energy and time, as well
as increase noise level), reducing cleaning and drying performance.
• Manual pre-rinsing of tableware items leads to increased water
and energy consumption and is not recommended.
HYGIENE
To avoid odour and sediment which can be accumulated
in the dishwasher please run a high temperature program at least
one a month. Use a tea spoon of detergent and run it without
the loading to clean your appliance.
.........................................................................
UNSUITABLE CROCKERY
Items which are not dishwasher-safe:
• Wooden dishes, pots or pans: these may be damaged by the high
washing temperatures.
• Handcrafted items: these are rarely suitable for washing
in a dishwasher. The relatively high water temperatures
and the detergents used may damage them.
• Plastic dishes: these are not heat resistant and may lose their shape.
Heat resistant plastic dishes must be washed in the upper basket.
• Dishes and objects in copper, tin, zinc or brass: these tend to stain.
• Aluminium dishes: items made from anodised aluminium may lose
their colour.
• Silverware: silver items may stain.
• Glass and crystal: in general, glass and crystal objects can be washed
in the dishwasher. However, certain types of glass and crystal may become
dull and lose their clearness after many washings. Therefore, for these
items we recommend using the least aggressive program available.
• Decorated items: the decorated objects available on the market are
generally able to withstand washing in the dishwasher, although
the colours may fade after a great many washes. If in doubt
as to the fastness of the colours, it is advisable to wash just a few
items at a time for approximately one month.
.........................................................................
DAMAGE TO GLASS AND CROCKERY
• Only use glasses and porcelain guaranteed by the manufacturer
as dishwasher safe.
• Use a delicate detergent suitable for crockery
• Collect glasses and cutlery from the dishwasher as soon as the wash
cycle is over.

10
CLEANING AND MAINTENANCE
Always unplug the appliance when cleaning it and when performing maintenance work. Do not use ammable liquids to clean the machine.
CLEANING THE DISHWASHER
Any marks on the inside of the appliance may be removed
using a cloth dampened with water and a little vinegar.
The external surfaces of the machine and the control
panel can be cleaned using a non-abrasive cloth which
has been dampened with water. Do not use solvents
or abrasive products.
.........................................................................
PREVENTING UNPLEASANT ODOURS
Always keep the door of the appliance ajar in order to avoid moisture
from forming and being trapped inside the machine.
Clean the seals around the door and detergent dispensers regularly
using a damp sponge. This will avoid food becoming trapped in the seals,
which is the main cause behind the formation of unpleasant odours.
.........................................................................
CLEANING THE WATER INLET HOSE
If the water hoses are new or have not been used for an extended
period of time, let the water run to make sure it is clear and free
of impurities before performing the necessary connections. If this
precaution is not taken, the water inlet could become blocked
and damage the dishwasher.
CHEKING THE WATER SUPPLY HOSE
Check the inlet hose regularly for brittleness and cracks. If damaged,
replace it by a new hose available through our After-Sales Service
or your specialist dealer. Depending on the hose type:
If the inlet hose has a transparent coating, periodically check
if the colour intensies locally. If yes, the hose may have a leak
and should be replaced.
For water stop hoses: check the small safety valve inspection
window (see arrow). If it is red, the water stop function was triggered,
and the hose must be replaced by a new one.
For unscrewing this hose, press the release button while unscrewing
the hose.
After cleaning the lters, replace the lter assembly and x it in position
correctly; this is essential for maintaining the ecient operation
of the dishwasher.
Regularly clean the lter assembly so that the lters do not clog
and that the waste water ows away correctly.
Using dishwasher with clogged lters or foreign objects inside ltration
system or sprayarms may cause unit malfunction resulting in lose
of performance, noisy work or higher resources usage.
The lter assembly consists of three lters which remove food residues
from the washing water and then recirculate the water.
The dishwasher must not be used without lters or if the lter is
loose.
At least once per month or after each 30 cycles, check the lter
assembly and if necessary clean it thoroughly under running water,
using a non-metallic brush and following the instructions below:
1. Turn the cylindrical lter Ain an anti-clockwise direction and pull
it out (Fig 1).
2. Remove the cup lter Bby exerting a slight pressure on the side
aps (Fig 2).
3. Slide out the stainless-steel plate lter C (Fig 3).
4. In case you nd foreign objects (such as broken glass, porcelain,
bones, fruit seeds etc.) please remove them carefully.
5. Inspect the trap and remove any food residues. NEVER REMOVE
the wash-cycle pump protection (black detail) (Fig 4).
On occasions, food residue may
become encrusted onto the spray
arms and block the holes used
to spray the water. It is therefore
recommended that you check
the arms from time to time and clean
them with a small non-metallic brush.
To remove the upper spray arm, turn
the plastic locking ring in an anti-
clockwise direction. The upper spray arm should be replaced so that
the side with the greater number of holes is facing upwards.
21
43
A
C
A
B
CLEANING THE SPRAY ARMS
The lower spray arm may be removed
by pulling it upwards.
CLEANING THE FILTER ASSEMBLY

11
EN
CONNECTING THE WATER SUPPLY
Adaptation of the water supply for installation should only be perfor-
med by a qualied technician.
The water inlet and outlet hoses may be positioned towards the right
or the left in order to achieve the best possible installation.
Make sure the dishwasher does not bend or squash the hoses.
.........................................................................
CONNECTING THE WATER INLET HOSE
• Run the water until it is perfectly clear.
• Screw the inlet hose tightly into position and turn on the tap.
If the inlet hose is not long enough, contact a specialist store or an
authorised technician.
The water pressure must be within the values indicated in the Techni-
cal Data table - otherwise the dishwasher may be function properly.
Make sure the hose is not bent or compressed.
SPECIFICATIONS FOR THE CONNECTION OF THE WATER SUPPLY HOSE:
WATER SUPPLY cold or hot (max. 60°C)
WATER INTAKE 3/4”
POWER OF WATER PRESSURE 0,05 ÷ 1 MPa (0.5 ÷ 10 bar)
7,25 – 145 psi
.........................................................................
CONNECTING THE WATER OUTLET HOSE
Connect the outlet hose to a drain duct with a minimum diameter of 2 cm A.
The outlet hose connection must be at a height ranging from 40 to 80 cm
from the oor or surface where the dishwasher rests.
Before connecting the water outlet hose to the sink drain, remove
the plastic plug B.
.........................................................................
ANTI-FLOODING PROTECTION
Anti-ooding protection. To ensure oods do not occur, the dishwasher:
- is provided with a special system which blocks the water supply
in the event of anomalies or leaks from inside the appliance.
Some models are also equipped with the supplementary safety device
New Aqua Stop, which guarantees anti-ooding protection even
in the event of a supply hose rupture.
Under no circumstances should the water inlet hose be cut as it conta-
ins live electrical parts.
ELECTRICAL CONNECTION
WARNING: Under no circumstances should the water inlet hose
be cut as it contains live electrical parts.
Before inserting the plug into the electrical socket, make sure that:
• The socket is earth and complies with current regulations;
• The socket can withstand the maximum load of the appliance
as shown on the data plate located on the inside of the door (see
PRODUCT DESCRIPTION).
• The power supply voltage falls within the values indicated
on the data plate on the inside of the door.
• The socket is compatible with the plug of the appliance.
If this is not the case, ask an authorised technician to replace the plug
(see AFTER-SALES SERVICE). Do not use extension cables or multiple
sockets. Once the appliance has been installed, the power supply cable
and the electrical socket should be easily accessible.
The cable should not be bent or compressed.
If the power supply cable is damaged, have it replaced by the manufac-
turer or its authorised Technical Assistance Service in order to prevent all
potential hazards.
The Company shall not be held responsible for any incidents, if these
regulations are not observed.
.........................................................................
POSITIONING AND LEVELLING
1. Position the dishwasher on a level sturdy oor. If the oor is uneven,
the front feet of the appliance may be adjusted until it reaches
a horizontal position. If the appliance is levelled correctly, it will
be more stable and much less likely to move or cause vibrations
and noise while it is operating.
2. Before recessing the dishwasher, stick the adhesive transparent strip
under the wooden shelf in order to protect it from any condensation
which may form.
3. Place the dishwasher so that its sides or back panel are in contact
with the adjacent cabinets or the wall. This appliance can also be re-
cessed under a single worktop.
4. To adjust the height of the rear foot, turn the red hexagonal bushing
on the lower central part at the front of the dishwasher using a he-
xagonal spanner with an opening of 8 mm. Turn the spanner in
a clockwise direction to increase the height and in an anticlockwise
direction to decrease it.
.........................................................................
DIMENSIONS AND CAPACITY:
WIDTH 598 mm
HEIGHT 820 mm
DEPTH 555 mm
CAPACITY 14 standard place-settings
MIN 40 cm
MAX 80 cm
If the appliance must be moved at any time, keep it in an upright position; if absolutely necessary, it may be tilted onto its back.
Water softener automatically reduces water hardness, consequently
preventing scale buildup on heater, contributing also to better cleaning
eciency.
This system regenerates itself with salt, therefore it is required
to rell salt container when empty.
Frequency of regeneration depends on water hardness level setting
- regeneration takes place once per 5Eco cycles with water hardness
level set to 3.
WATER SOFTENING SYSTEM
Regeneration process starts in nal rinse and nishes in drying phase,
before cycle ends.
• Single regeneration consumes: ~3.5L of water;
• Takes up to 5 additional minutes for the cycle;
• Consumes below 0.005kWh of energy.
INSTALLATION

12
In case your dishwasher doesn’t work properly, check if the problem can be solved by going through the following list.
For other errors or issues please contact authorized After-sales Service which contact details can be found in the warranty booklet.
The manufacturer ensures the availability of spare parts for at least 10 years after production date of this appliance.
TROUBLESHOOTING
PROBLEMS POSSIBLE CAUSES SOLUTIONS
Salt
indicator is lit
Salt reservoir is empty. (After rell the salt
indicator may remain lit for several wash
cycles).
Rell reservoir with salt (for more information - see page 5).
Adjust water hardness - see table, page 5.
Rinse aid
indicator is lit
Rinse aid dispenser is empty. (After rell
the rinse aid indicator may remain lit for seve-
ral wash cycles).
Rell dispenser with rinse aid (for more information - see page 5).
The dishwa-
sher won’t start
or does not
respond to com-
mands.
The appliance has not been plugged
in properly. Insert the plug into the socket.
Power outage.
For safety reasons, dishwasher will not re-start automatically when power
returns. Open dishwasher door, press START/Pause button and close the door
within 4 seconds.
The dishwasher door is not closed.
CoolDry pin is not pulled in. Vigorously push the door until you hear the “click”.
Cycle is interupted by door opening
for more than 4 seconds. Press START/Pause and close the door within 4 seconds.
It does not respond to commands.
Display shows: 9or 12 and On/O LED is
blinking rapidly
Switch o the appliance by pressing the ON/OFF button, switch it back on after
approximately one minute and restart the program. If problem persists, unplug
the appliance for 1 minute, then plug it back in.
The dishwasher
won’t drain.
Display shows:
3and On/O LED
is blinking rapidly
The wash cycle has not nished yet. Wait until the wash cycle nishes.
The drain hose is bent. Check that the drain hose is not bent (see INSTALATION INSTRUCTION).
The sink drain pipe is blocked. Clean the sink drain pipe.
The lter is clogged up with food residues. Clean the lter (see CLEANING THE FILTER ASSEMBLY).
The dishwasher
makes excessive
noise.
The dishes are rattling against each Position the crockery correctly (see LOADING THE RACKS).
An excessive amount of foam has been
produced.
The detergent has not been measured out correctly or it is not suitable
for use in dishwashers (see FILLING THE DETERGENT DISPENSER). Restart the cu-
rrent cycle by switching OFF the dishwasher, then switch it on again, select
a new program, press START/Pause and close the door within 4 seconds.
Please do not add any detergent.
The dishes are
not clean.
The crockery has not been arranged
properly. Arrange the crockery correctly (see LOADING THE RACKS).
The spray arms cannot rotate freely, being
hindered by the dishes. Arrange the crockery correctly (see LOADING THE RACKS).
The wash cycle is too gentle. Select an appropriate wash cycle (see PROGRAMS TABLE).
An excessive amount of foam has been
produced.
The detergent has not been measured out correctly or it is not suitable for use
in dishwashers (see FILLING THE DETERGENT DISPENSER).
The cap on the rinse aid compartment has
not been shut correctly. Make sure the cap of the rinse aid dispenser is closed.
The lter is soiled or clogged. Clean the lter assembly (see CARE AND MAINTENANCE).
There is no salt. Fill the salt reservoir (see FILLING THE SALT RESERVOIR).
The dishwasher
does not ll
the water.
Display shows: H,
6 and On/O LED
is blinking rapidly
No water in the water supply or the tap is
closed. Make sure there is water in the water supply or the tap running.
The inlet hose is bent. Make sure the inlet hose is not bent (see INSTALLATION) reprogram
the dishwasher and reboot.
The sieve in the water inlet hose is clogged;
it is necessary to clean it
After having carried out the verication and cleaning, turn o and turn
on the dishwasher and restart a new program.
Dishwasher
nishes the cycle
prematurely.
Display shows: 15
and On/O LED is
blinking
rapidly
Drain hose positioned too low or siphoning
into home sewage system.
Check if end of drain hose is placed at correct height (see INSTALLATION).
Check for siphoning into home sewage system, install air admittance valve
if necessary.
Air in water supply. Check water supply for leaks or other issues letting air inside.

13
EN
SUPPORT
In the event of any operation problems, contact a Franke Technical Service Centre.
Never use the services of unauthorized technicians.
Specify:
– the type of fault
– the appliance model (art./Code)
– the serial number (S.N.) on the rating plate.
When you contact the After-Sales Service, you must provide the codes shown on the rating plate attached
to the left or right side inside the door of the dishwasher.
FDW XXX XXX XXX
XXXXXXXXXXXX
Built-in dishwasher /
XXXXXXXXXXXX
S/N
xxxxxxxxxxxx
FXXXXXX RMMDDXXXX
FDWXXX XXX XXX
XXXXXXXXXXXX
XXX.XXXX.XXX
TYPE: DWX-DEAXXX-X
Ma x.XXXX W XXXX W
XXX-XXX V ~XXHz X,XX
÷
X MPa
XX A
I.C.
xxxxxxxxxxxx
[BAR-CODE AREA]
[CERTIFICATIONAREA]
Made in Poland /
Energy efficiency class for RF A
Safety class I
The model information can be retrieved using the QR-Code reported in the energy label.
The label also includes the model identier that can be used to consult the portal of the registry at https://eprel.ec.europa.eu (available only
on certain models).
001

14
SOMMAIRE
APERÇU.................................................................................................................................................................................................. 15
PREMIÈRE UTILISATION .................................................................................................................................................................... 16
TABLEAU DES PROGRAMMES......................................................................................................................................................... 17
OPTIONS ET FONCTIONS................................................................................................................................................................. 18
CHARGEMENT DES PANIERS........................................................................................................................................................... 19
UTILISATION QUOTIDIENNE........................................................................................................................................................... 20
AVIS ET CONSEILS............................................................................................................................................................................... 20
NETTOYAGE ET MAINTENANCE..................................................................................................................................................... 21
INSTALLATION...................................................................................................................................................................................... 22
DÉPANNAGE......................................................................................................................................................................................... 23
ASSISTANCE.......................................................................................................................................................................................... 24

15
FR
Avant d’utiliser l’appareil, lisez attentivement les Consignes de sécurité.
APERÇU
PANNEAU DE COMMANDE
MODE D’EMPLOI
1. Panier supérieur
2. Volets pliables
3. Bouton de réglage de la hauteur
du panier supérieur
4. Bras d’aspersion supérieur
5. Panier inférieur
6. Panier à couvert
7. Bras d’aspersion inférieur
8. Ensemble ltre
9. Réservoir à sel
10. Distributeurs de détergent et liquide
de rinçage
11. Plaque signalétique
12. Panneau de commande
1. Touche Marche-Arrêt/Réinitialisation avec le voyant
2. Sélecteur de programme
3. Voyant de niveau de sel
4. Voyant de niveau de liquide de rinçage
5. Numéro de programme et indicateur de temps
de retard
6. Voyant Pastille
7. Achage
8. Voyant Demi-charge
9. Touche Demi-charge
10. Touche Diéré
11. Touche Départ/Pause avec le voyant/ Pastille
0000 000 00000
Service:
1
2
3
4
5
6
10
12
7
11
9
8
12345678910
11

16
L’utilisation de sel empêche la formation de CALCAIRE sur la vaisselle
et sur les composantes fonctionnelles de l’appareil.
•LeRÉSERVOIR DE SEL NE DOIT JAMAIS ÊTRE VIDE.
• Il est important de régler la dureté de l’eau.
Le réservoir de sel est situé dans la partie inférieure du lave-vaisselle (voir
VUE D’ENSEMBLE) et il doit être rempli quand le voyant REMPLISSAGE
DE SEL sur le panneau de commande est allumé.
1. Enlevez le panier inférieur et dévissez
le bouchon du réservoir (sens antihoraire).
2. La première fois uniquement, vous devez
eectuer l’opération suivante : Remplissez
d’eau le réservoir à sel.
3. Placez l’entonnoir (voir gure) et remplissez
le réservoir de sel jusqu’au bord (environ 1 kg);
il est normal qu’un peu d’eau déborde.
4. Enlevez l’entonnoir et essuyez les résidus
de sel autour de l’ouverture.
Assurez-vousquelebouchonest bien serrépouréviterquedudétergent
pénètre dans le réservoir durant le cycle de lavage (le réservoir pourrait
s’endommager au point de ne plus être réparable).
Après chaque ajout de sel dans le réservoir, il est obligatoire de lancer
immédiatement un cycle de lavage an d’éviter toute corrosion de la cuve.
.........................................................................
RÉGLER LA DURETÉ DE L’EAU
Pour que l’adoucisseur d’eau fonctionne à la perfection, il est important
de régler la dureté de l’eau aux conditions existantes dans votre
résidence. Cette information peut être obtenue de votre fournisseur
d’eau local.
REMPLIR LE RÉSERVOIR DE SEL
Le liquide de rinçage permet à la vaisselle de SÉCHER plus facilement.
Le distributeur de liquide de rinçage Adevrait être rempli lorsque
le voyant de NIVEAU DE LIQUIDE DE RINÇAGE est allumé à l’écran.
1. Ouvrez le distributeur Ben appuyant et en tirant sur l’onglet sur
le couvercle.
2. Versez doucement du liquide de rinçage jusqu’à la marque
de référence (110 ml) du réservoir de remplissage - évitez les débor-
dements. Si cela se produit, nettoyez les dégâts immédiatement
avec un linge sec.
3. Appuyez sur le bouchon pour le fermer; un clic se fait entendre.
Ne JAMAIS verser le liquide de rinçage directement dans la cuve.
L’usine règle la valeur par défaut de la dureté de l’eau.
• Allumer l’appareil en appuyant sur la touche MARCHE/ARRÊT.
• Éteindre l’appareil en appuyant sur la touche MARCHE/ARRÊT.
• Appuyer sur la touche P pendant 5 secondes ; un bip se fait entendre.
• Allumer l’appareil en appuyant sur la touche MARCHE/ARRÊT.
• Le numéro de la sélection actuelle et le voyant de niveau de sel clignotent.
• Appuyer sur la touche P pour sélectionner le niveau de dureté désiré
(voir TABLEAU DE DURETÉ DE L’EAU).
Tableau de dureté de l’eau
Level °dH
Degrés allemand °fH
Degrés français °Clark
Degrés anglais
1 Très douce 0 - 6 0 - 10 0 - 7
2 Moyenne 7 - 11 11 - 20 8 - 14
3 Douce 12 - 16 21 - 29 15 - 20
4 Dure 17 - 34 30 - 60 21 - 42
5 Très dure 35 - 50 61 - 90 43 - 62
• Éteindre l’appareil en appuyant sur la touche MARCHE/ARRÊT.
Le réglage est terminé !
Une fois cette opération complétée, lancez un programme sans charger
le lave-vaisselle.
Utilisez seulement le sel spécialement conçu pour les lavevaisselles.
Lorsque le sel est versé dans l’appareil, le voyant AJOUTER DU SEL s’éteint.
Si le contenant de sel n’est pas rempli, l’adoucisseur et l’élément
chauant peuvent être endommagés à cause de l’accumulation
de calcaire.
L’utilisation de sel est recommandée avec n’importe quel
type de lessive pour lave-vaisselle.
REMPLIR LE DISTRIBUTEUR DE LIQUIDE DE RINÇAGE
A
B
L’utilisation d’un détergent non-conçu pour les lave-vaisselles peut
provoquer un dysfonctionnement ou des dommages à l’appareil.
Pour ouvrir le distributeur
de détergent, utilisez le dispositif
d’ouverture C. Insérez le détergent
dans le distributeur sec D
seulement. Placez la quantité
de détergent pour le prélavage
directement dans la cuve.
AJUSTER LE DOSAGE DU LIQUIDE DE RINÇAGE
Si vous n’êtes pas complètement satisfait avec le séchage, vous pouvez
ajuster la quantité de liquide de rinçage utilisée.
• Allumez le lave-vaisselle en utilisant la touche MARCHE/ARRÊT.
• Éteignez-le en utilisant la touche MARCHE/ARRÊT.
• Appuyez sur la touche P à trois reprises - vous entendrez un bip.
• Allumez-le en utilisant la touche MARCHE/ARRÊT.
• Le numéro du niveau de sélection actuelle et le voyant du niveau
de liquide de rinçage clignotent.
• Appuyez sur la touche P pour sélectionner la quantité de liquide
de rinçage qui doit être utilisée.
• Éteignez-le en utilisant la touche MARCHE/ARRÊT.
Le réglage est terminé !
Si le niveau de liquide de rinçage est à ZÉRO (ÉCO), il n’y aura pas
de liquide de rinçage distribué. Le voyant LIQUIDE DE RINÇAGE BAS
ne s’allumera pas s’il ne reste plus de liquide de rinçage. Un maximum
de 5 niveaux peuvent être réglés selon le modèle du lavevaisselle. Les
réglages d’usine sont spéciques au modèle, merci de suivre les instruc-
tions ci-dessus pour vérier ceux qui s’appliquent à votre machine.
• Si vous observez des traces bleuâtres sur la vaisselle, placez sur un ni-
veau plus bas (1-2).
• Si vous observez des gouttelettes d’eau ou des traces de calcaire sur
la vaisselle, placez sur un niveau plus haut (3-4).
REMPLIR LE DISTRIBUTEUR DE DÉTERGENT
C
D
1. Lorsque vous mesurez la lessive, consultez les informations mentionnées
précédemment pour ajouter la quantité correcte. À l’intérieur
du distributeur Dse trouvent des indications pour aider au dosage
de la lessive.
2. Enlevez les résidus de détergent sur le bord des récipients avant
de fermer le couvercle; un clic se fait entendre.
3. Fermez le couvercle du distributeur de détergent en le tirant vers
le haut jusqu’à ce que le dispositif soit fermement en place.
Le distributeur de détergent s’ouvre automatiquement, au moment
déterminé par le programme.
Si vous utilisez un détergent « tout-en-un », nous vous conseillons
d’utiliser la touche PASTILLE, elle ajuste le programme de façon
à toujours obtenir les meilleurs résultats de lavage et séchage.
Après l’installation, enlevez les boulons d’arrêt sur les paniers et les éléments élastiques qui retiennent le panier supérieur.
PREMIÈRE UTILISATION
SEL, LIQUIDE DE RINÇAGE, ET DÉTERGENT

17
FR
1 ÉCO
Le programme Éco est adapté pour nettoyer la vaisselle normalement
sale, et pour cette utilisation, c’est le programme le plus ecace
en termes d’énergie combinée et de consommation d’eau, et il est
utilisé pour évaluer la conformité à la législation européenne en matière
d’éco-conception.
2 INTENSIF
Programme conseillé pour une vaisselle très sale, particulièrement
adapté pour les poêles et les casseroles (ne pas utiliser avec la vaisselle
délicate).
3 MIXTE
Saleté mixte. Pour la vaisselle normalement sale avec des résidus
de nourriture secs.
4 RAPIDE 30’
Programme à utiliser pour la demi-charge de vaisselle légèrement sale
sans résidus alimentaires séchés. N’a pas de phase de séchage.
5 ANTIBACTÉRIEN
Vaisselle sale ou très sale, avec lavage antibactérien supplémentaire.
Peut être utilisé pour eectuer l’entretien du lave-vaisselle.
6 PRÉLAVAGE
Utilisez ce programme pour rafraîchir la vaisselle qui sera lavée plus
tard.N’utilisez pas de détergent avec ce programme.
Remarques :
Il convient de noter que le cycle Rapide 30’ est destiné uniquement
à la vaisselle légèrement sale.
DESCRIPTION DES PROGRAMMES
TABLEAU DES PROGRAMMES
Les données du programme Éco sont mesurées sous des conditions en laboratoire conformément à la norme européenne EN 60436:2020.
Aucun prétraitement de la vaisselle n’est nécessaire avant l’un quelconque des programmes.
*) Les options ne peuvent pas toutes être utilisées en même temps.
**) Les valeurs indiquées pour des programmes diérents du programme Éco sont fournis à titre indicatif uniquement. Le temps réel peut varier
selon des facteurs comme la température et la pression de l’eau, la température de la pièce, la quantité de détergent, la quantité et le type de vais-
selle, l’équilibre de la charge, les options supplémentaires sélectionnées, et la calibration du capteur. La calibration du capteur peut augmenter
la durée du programme jusqu’à 20 minutes.
Programme
Séchage
CoolDry
Options disponibles *)
Durée du pro-
gramme de la-
vage
(h:min)**)
Consomma-
tion d’eau
(l/cycle)
Consomma-
tion
d’énergie
(kWh/cycle)
1. Éco 50° 2:45 12,0 0,95
2. Intensif 65° 2:30 15,0 1,50
3. Mixte 55° 2:00 15,0 1,35
4. Rapide 30’ 50° -- 0:30 9,0 0,50
5. Antibactérien 65° -1:40 11,5 1,30
6. Prélavage --
- 0:10 4,5 0,01
Consignes pour la sélection du cycle de lavage.

18
Les OPTIONS peuvent être sélectionnées directement en appuyant sur la touche correspondante (voir PANNEAU DE COMMANDE).
Si une option n’est pas compatible avec le programme sélectionné (voir TABLEAU DES PROGRAMMES), le voyant correspondant clignote 3 fois
et un bip se fait entendre. La fonction n’est pas activée.
OPTIONS ET FONCTIONS
DEMI-CHARGE
S’il n’y a pas beaucoup de vaisselle à laver, la demi-charge peut
être utilisée pour économiser de l’eau, de l’électricité, et du détergent.
Sélectionnez le programme et appuyez sur la touche DEMI-CHARGE :
le voyant s’allume. Appuyez sur la touche DEMI-CHARGE pour annuler
cette option.
N’oubliez pas de réduire la quantité de détergent de moitié.
..........................................................................
DIFFÉRÉ
Le début du programme peut être retardé pour une période
entre 1et 12 heures.
1. Appuyez sur la touche DIFFÉRÉ : le symbole «h» correspondant appa-
raît sur l’écran ; chaque fois que vous appuyez sur la touche, le temps
(1 heure, 2 heures, etc. jusqu’à un max de 12 heures) avant le début
du cycle de lavage augmente.
2. Sélectionnez le programme de lavage, appuyez sur le bouton DÉPART/
Pause et dans les 4 secondes, fermez la porte : la minuterie commencera
le compte à rebours.
3. Une fois le temps écoulé, le voyant «h» s’éteint et le cycle de lavage
démarre.
Pour ajuster le délai et sélectionner une période de temps plus courte,
appuyez sur la touche DIFFÉRÉ. Pour l’annuler, appuyez sur la touche à plu-
sieurs reprises pour éteindre le voyant «h» de départ diéré sélectionné.
La fonction DIFFÉRÉ ne peut pas réglée une fois le
programme en cours.
PASTILLE
Ce réglage vous permet d’optimiser le rendement
du programme
selon le type de détergent utilisé.
Appuyez sur la touche DÉPART/Pause pendant 3 secondes (le symbole
correspondant s’illumine) si vous utilisez un détergent sous la forme
d’une pastille (liquide de rinçage, sel, et détergent en une seule dose).
Si vous utilisez un détergent en poudre ou liquide, cette option
devrait être éteinte.
.........................................................................
CoolDry
CoolDry est un système de séchage à convection qui ouvre
automatiquement la porte pendant/après la phase de séchage pour
assurer une performance de séchage exceptionnelle chaque jour. La
porte s’ouvre à la température qui est sûre pour les meubles de votre
cuisine.
À titre de protection supplémentaire contre la vapeur, une feuille
de protection spéciquement conçue est ajoutée avec le lave-vaisselle.
Pour voir comment monter la feuille de protection, consulter le (GUIDE
D’INSTALLATION).
La fonctionnalité CoolDry pourrait être désactivée par l’utilisateur
comme suit:
1. Allezaumenudelogicieldulave-vaisselleenappuyantetenmaintenant
le bouton P(6 sec).
2. Vous passez au Menu de contrôle CoolDry, vous pouvez changer d’état
de la fonctionnalité CoolDry en appuyant sur le bouton P:
E– activé d– désactivé
Pour conrmer le changement et sortir du Menu de Contrôle, appuyer
sur le bouton Pet le maintenir enfoncé (3 sec).

19
FR
CHARGEMENT DES PANIERS
Pour les poêles, les couvercles, les
plats, les saladiers, les couverts,
etc. Les grands plats et les grands
couvercles devraient être placés
sur le côté pour éviter qu’ils
n’entravent le fonctionnement
des bras d’aspersion.
(exemple de chargement
du panier inférieur)
Chargez la vaisselle délicate
et légère: verres, tasses,
soucoupes, saladiers bas.
(exemple de chargement du panier supérieur)
..................................................................
AJUSTER LA HAUTEUR DU PANIER SUPÉRIEUR
Vous pouvez ajuster la hauteur du panier supérieur : position élevée
pour placer la vaisselle encombrante sur
le panier inférieur, et la position basse pour
proter au maximum des supports rabattables
et créant plus d’espace vers le haut et éviter les
chocs avec les articles sur le panier inférieur.
Le panier supérieur comprend un dispositif
de réglage de la hauteur du panier supérieur
(voir gure), sans appuyer sur les leviers,
simplement soulever en tenant le panier sur
les côtés jusqu’à ce qu’il soit stable en position
élevée. Pour abaisser le panier, appuyez sur les
leviers Asur les côtés du panier et déplacez-le vers le bas.
Nous vous conseillons fortement de ne pas ajuster la hauteur
du panier lorsqu’il est chargé.
Ne JAMAIS soulever ou abaisser un seul côté du panier.
VOLETS PLIABLES AVEC POSITIONS AJUSTABLES
Les volets pliables latéraux peuvent
être pliés ou dépliés an d’optimiser
la disposition de la vaisselle
à l’intérieur du rack.
Les verres de vin peuvent être
placés de façon sécuritaire dans les
volets pliables en insérant le pied
de chaque verre dans la fente
correspondante. Selon le modèle:
– pour déplier les volets, il est
nécessaire de les coulisser vers
le haut et de les tourner ou de les
libérer des gries et de les tirer vers le bas.
– pour replier les volets, il est nécessaire de les tourner et de les faire
coulisser vers le bas ou de les tirer vers le haut et de xer les pattes
aux gries.
PANIER INFÉRIEUR
PANIER À COUVERT
Le panier comprend des grilles
supérieures pour placer les couverts
plus facilement. Le panier à couvert
doit uniquement être placé à l’avant
du panier inférieur.
Les couteaux et autres ustensiles
avec des bords tranchants
doivent être placés dans le panier
à couvert avec la pointe vers le bas,
ou placés à l’horizontale dans
le compartiment rabattable sur
le panier supérieur.
PANIER SUPÉRIEUR

20
CONSEILS
Avant de charger les paniers, enlevez tous les résidus de nourriture sur la va-
isselle et videz les verres. Vous n’avez pas besoin de rincer la vaisselle
avant de la placer dans le lave-vaisselle.
Placez la vaisselle pour qu’elle tienne bien en place et ne risque pas de tom-
ber; et placez les récipients avec les ouvertures vers le bas et les parties con-
caves/convexes de côté pour permettre à l’eau d’atteindre toutes les surfa-
ces et couler librement.
Avertissement : les couvercles, poignées, plaques et poêles à frire n’em-
pêchent pas les bras d’aspersion de tourner. Placez les petits articles dans
le panier à couvert. La vaisselle et les casseroles très sales devraient être
placées sur le panier inférieur car les jets d’eau sont plus forts dans cette
section et permet un meilleur rendement lors du lavage. Après avoir chargé
l’appareil, assurez-vous que les bras d’aspersion peuvent bouger librement.
.........................................................................
ASTUCES SUR L’ÉCONOMIE D’ÉNERGIE
• Lorsque le lave-vaisselle domestique est utilisé conformément
aux instructions du fabricant, le lavage de la vaisselle dans
un lave-vaisselle consomme habituellement MOINS D’ÉNERGIE
et d’eau que le lavage à la main.
• An d’optimiser l’ecacité du lave-vaisselle, il est recommandé de déb-
uter le cycle de lavage une fois que le lave-vaisselle est totalement
chargé. Le chargement du lave-vaisselle domestique jusqu’à la capacité
indiquée par le fabricant contribuera à économiser de l’énergie
et de l’eau. Vous trouverez des informations sur le chargement correct
de la vaisselle dans le chapitre CHARGEMENT DES PANIERS.
En cas de chargement partiel, il est recommandé d’utiliser des op-
tions de lavage spéciques si elles sont disponibles (Multizone),
en remplissant uniquement les paniers sélectionnés. Un charge-
ment incorrect ou une surcharge du lave-vaisselle peut augmenter
l’utilisation des ressources (telles que l’eau, l’énergie et le temps,
et augmenter le niveau de bruit), en réduisant les performances
de nettoyage et de séchage.
• Un prérinçage manuel des éléments de vaisselle provoque une
augmentation de la consommation d’eau et d’énergie et n’est pas
recommandé.
HYGIÈNE
Pour éviter les odeurs et les dépôts qui pourraient s’accumuler dans
le lave-vaisselle, lancer un programme à haute température au mo-
ins une fois par mois. Utilisez une cuillère à café de détergent et lancer
le programme sans vaisselle pour nettoyer l’appareil.
.........................................................................
VAISSELLE QUI NE CONVIENT PAS
Vaisselle ne pouvant être lavée dans un lave-vaisselle :
• Casseroles et vaisselle en bois : elles peuvent s’abîmer à cause
des températures de lavage élevées;
• Objets d’artisanat : ils peuvent rarement être lavés dans un lavevais-
selle. Les températures relativement élevées de l’eau et les déter-
gents utilisés peuvent les endommager;
• Vaisselle en plastique : la vaisselle en plastique résistant à la chaleur
doit être lavée dans le panier supérieur;
• Vaisselle et objets en cuivre, étain, zinc et laiton : elle tend à se tacher;
• Argenterie : la vaisselle en argent peut se tacher;
• Verre et cristal : les objets en verre et en cristal peuvent générale-
ment être lavés dans un lave-vaisselle. Cependant, il existe certains
types de verre et de cristal qui deviennent opaques et qui per-
dent leur transparence après de nombreux lavages ; pour ce type
de matériaux, nous conseillons de toujours utiliser le programme
le moins agressif du tableau des programmes;
• Vaisselle avec des décorations : les objets décorés se trouvant dans
le commerce ont généralement une bonne résistance aux lavages
dans les lave-vaisselle, même s’il peut arriver que leurs couleurs
pâlissent après des lavages fréquents. En cas de doute sur la ré-
sistance des couleurs, il est opportun de laver peu de pièces à la fois
pendant environ un mois.
.........................................................................
VERRES ET VAISSELLE ENDOMMAGÉS
• Seulement utiliser des verres ou de la porcelaine qui sont lavables
au lave-vaisselle conformément aux recommandations du fabricant.
• Utilisez un détergent doux, adéquat pour la vaisselle
• Retirez les verres et les couverts du lave-vaisselle aussitôt que le cy-
cle de lavage est terminé.
L’appareil s’éteint automatiquement durant des périodes
d’inactivité prolongées pour réduire la consommation d’énergie.
Si la vaisselle est légèrement sale ou si elle a été rincée avec à l’eau
avant d’être placée dans le lave-vaisselle, réduisez la quantité
de détergent utilisée en conséquence.
.........................................................................
MODIFICATION D’UN PROGRAMME EN COURS
Si vous avez sélectionné le mauvais programme, vous pouvez
le changer, à condition que ce soit fait au tout début du cycle: ouvrir
la porte, appuyer sur le bouton MARCHE/ARRÊT et le maintenir enfon-
cé, la machine s’éteindra.
Rallumez l’appareil en appuyant sur la touche MARCHE/ARRÊT
et sélectionnez le nouveau cycle de lavage et les options dé-
sirées ; lancer le cycle en appuyant sur le bouton DÉPART/Pause
et en fermant la porte dans les 4 sec.
.........................................................................
AJOUT DE VAISSELLE SUPPLÉMENTAIRE
Sans éteindre la machine, ouvrir la porte (Le voyant DÉPART/Pause
commencera à clignoter) (attention à la vapeur CHAUDE !) et placer
la vaisselle à l’intérieur du lave-vaisselle. Appuyer sur le bouton
DÉPART/Pause et fermer la porte dans les 4 sec, le cycle reprendra
à l’endroit où il a été interrompu.
.........................................................................
INTERRUPTIONS ACCIDENTELLES
Si la porte est ouverte pendant le cycle de lavage, ou s’il y a une cou-
pure de courant, le cycle s’arrête. Pour reprendre le cycle à l’endroit où
il a été interrompu, appuyer sur le bouton DÉPART/Pause et fermer
la porte dans les 4 sec.
AVIS ET CONSEILS
UTILISATION QUOTIDIENNE
1. VÉRIFIER LE BRANCHEMENT DE L’EAU
Assurez-vous que l’appareil est raccordé à un réseau d’alimentation
et que le robinet de l’eau est ouvert.
2. ALLUMER LE LAVE-VAISSELLE
Ouvrez la porte et appuyez sur la touche MARCHE/ARRÊT.
3. CHARGER LES PANIERS (voir CHARGEMENT DES PANIERS)
4. REMPLIR DE DISTRIBUTEUR DE DÉTERGENT
5. CHOISIR LE PROGRAMME ET PERSONNALISER LE CYCLE
Sélectionnez le meilleur programme selon le type de vaisselle
et le niveau de saleté (voir DESCRIPTION DES PROGRAMMES)
en appuyant sur la touche P.
Sélectionnez les options désirées (voir OPTIONS ET FONCTIONS).
6. DÉMARRER
Démarrez le cycle de lavage en appuyant sur le bouton DÉPART/Pause
(le témoin est allumé) et en fermant la porte dans les 4 secondes.
Quand le programme démarre, vous entendez un bip simple.
Si la porte n’a pas été fermée dans les 4 secondes, le signal d’alarme
est activé. Dans ce cas, ouvrez la porte, appuyez sur le bouton
DÉPART/Pause et fermez de nouveau la porte dans les 4 sec.
7. FIN DU CYCLE DE LAVAGE
La n du cycle de lavage est indiquée par des bips et par
le clignotement du nombre de cycles de lavage sur l’écran. Ouvrez
la porte et éteignez l’appareil en appuyant sur la touche MARCHE/
ARRÊT.
Pour éviter de vous brûler, attendez quelques minutes avant
de retirer la vaisselle. Déchargez les paniers en commençant par
le panier inférieur.
Table of contents
Languages:
Other Franke Dishwasher manuals

Franke
Franke FDW 614 D7P A++ Setup guide

Franke
Franke FDW 4510 E8P E User manual

Franke
Franke FDW 614 D7P DOS A++ User manual

Franke
Franke FDW 614 D10P User manual

Franke
Franke FCDW60FS Manual

Franke
Franke FDW 4510 E8P E Firmware update

Franke
Franke FDW 613 E6P A+ Setup guide

Franke
Franke FDWS 614 D8P DOS E User manual

Franke
Franke URBAN FCDW60SI Manual

Franke
Franke 117.0611.673 User manual