manuals.online logo
Brands
  1. Home
  2. •
  3. Brands
  4. •
  5. Franz Mensch
  6. •
  7. Dispenser
  8. •
  9. Franz Mensch HYGOMAT Series User manual

Franz Mensch HYGOMAT Series User manual

v
Automatischer Überschuh-Spender / Automatic Shoe cover dispenser
Verpackungsangabe/Packaging Specification
Geräte-Abmessungen/Machine Measurements: 69,5 x 31,5 x 23 cm
Karton-Abmessungen/Machine Measurements: 76,50 x 39 x 29 cm
Nettogewicht/Carton Net Weight: 9,08 kg
Bruttogewicht/Carton Gross Weight: 9,68 kg
Lieferumfang/Packaging List
Überschuh-Spender/Shoe cover dispenser: 1 piece
Benutzerhandbuch/User Manual: 1 piece
Verpackungsangabe/Packaging Specification
Geräte-Abmessungen/Machine Measurements: 74 x 32 x 90 cm
Karton-Abmessungen/Machine Measurements: 80 x 38 x 80 cm
Nettogewicht/Carton Net Weight 21 kg
Karton Bruttogewicht / Carton Gross Weight: 24 kg
Lieferumfang/Packaging List
Überschuh-Spender/Shoe cover dispenser: 1 piece
Handgriff/Handgrip: 1 piece
Befestigungsschrauben/Mounting screws: 4 pieces
Benutzerhandbuch/User Manual: 1 piece
Verpackungsangabe/Packaging Specification
Geräte-Abmessungen/Machine Measurements: 74 x 32 x 90 cm
Karton-Abmessungen/Machine Measurements: 80 x 38 x 80 cm
Nettogewicht/Carton Net Weight 21 kg
Karton Bruttogewicht/Carton Gross Weight: 24 kg
Lieferumfang/Packaging List
Überschuh-Spender/Shoe cover dispenser: 1 piece
Handgriff/Handgrip: 1 piece
Befestigungsschrauben/Mounting screws: 4 pieces
Benutzerhandbuch/User Manual: 1 piece
Rollen/Rolls: 2 pieces (optional)
Befestigungsschrauben/Mounting screws: 8 pieces (optional)
HYGOMAT CLASSIC
HYGOMAT COMFORT
HYGOMAT CLEANROOM
CLASSIC
COMFORT
CLEANROOM
matic
Shoe cover dispenser
Platz für
Überschuhe
Space for
overshoes
220
Platz für
Überschuhe
Space for
overshoes
220
Geräte-Abmessungen/Machine Measurements: 69,5 x 31,5 x 23 cm
Karton-Abmessungen/Machine Measurements: 76,50 x 39 x 29 cm
Platz für
Überschuhe
Space for
overshoes
110
Shoe cover dispenser
1
G
U
A
R
A
N
T
Y
G
A
R
A
N
T
I
E
G
U
A
R
A
N
T
Y
G
A
R
A
N
T
I
E
*
**
*
JAHR
YEAR
Bedienungsanleitung / Manual
HYGOMAT
®
G
ü
t
e
s
i
e
g
e
l
-
s
e
a
l
o
f
a
p
p
r
o
v
a
l
PREMIUM-
QUALITÄT
premium
quality past
BEDIENUNGSANLEITUNG / MANUAL HYGOMAT
HYGOMAT CLASSIC
I-5 I-6 I-7 I-8
I-5 I-6 I-7 I-8
HYGOMAT CLASSIC
INSTALLATION
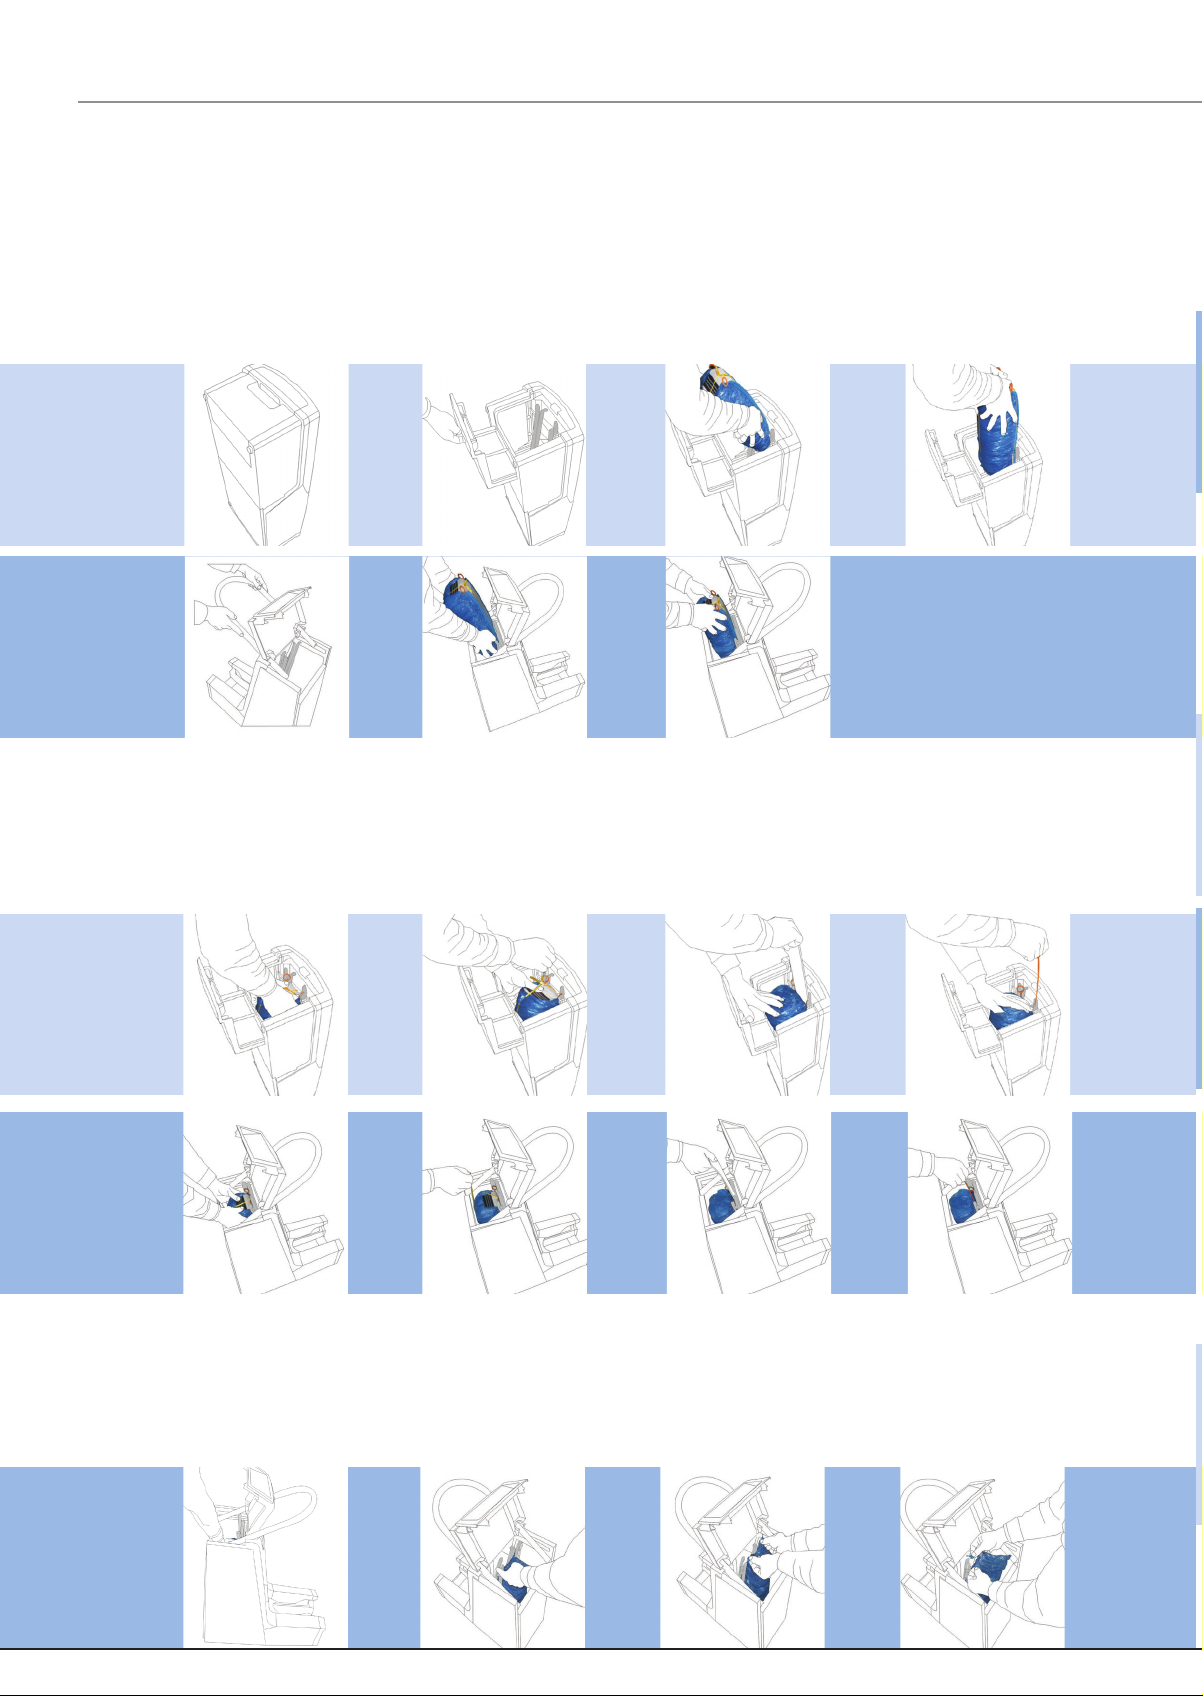
1. Stellen Sie die Maschine auf. Siehe. Öffnen Sie den Deckel. Siehe Abb. I-1.
Bei Comfort/Cleanroom befestigen Sie den Handlauf mit den Schrauben. Siehe Abb. I-2.
2. Nun nehmen Sie ein Bündel Überschuhe mit beiden Händen, und schieben die Plas-
tikhalterungen auf beiden Seiten in die Führungen. Abb. I-3. (Sollte der Abstand nicht
genau passen, so kann dieser mithilfe der linken und rechten Seite der Plastikhalterun-
gen eingestellt werden).
3. Drücken Sie das Bündel mit Überschuhen ein bisschen nach vorne und halten Sie es dann
gerade, um sicherzustellen, dass alle Plastikhalterungen in der Führung liegen.Abb. I-4.
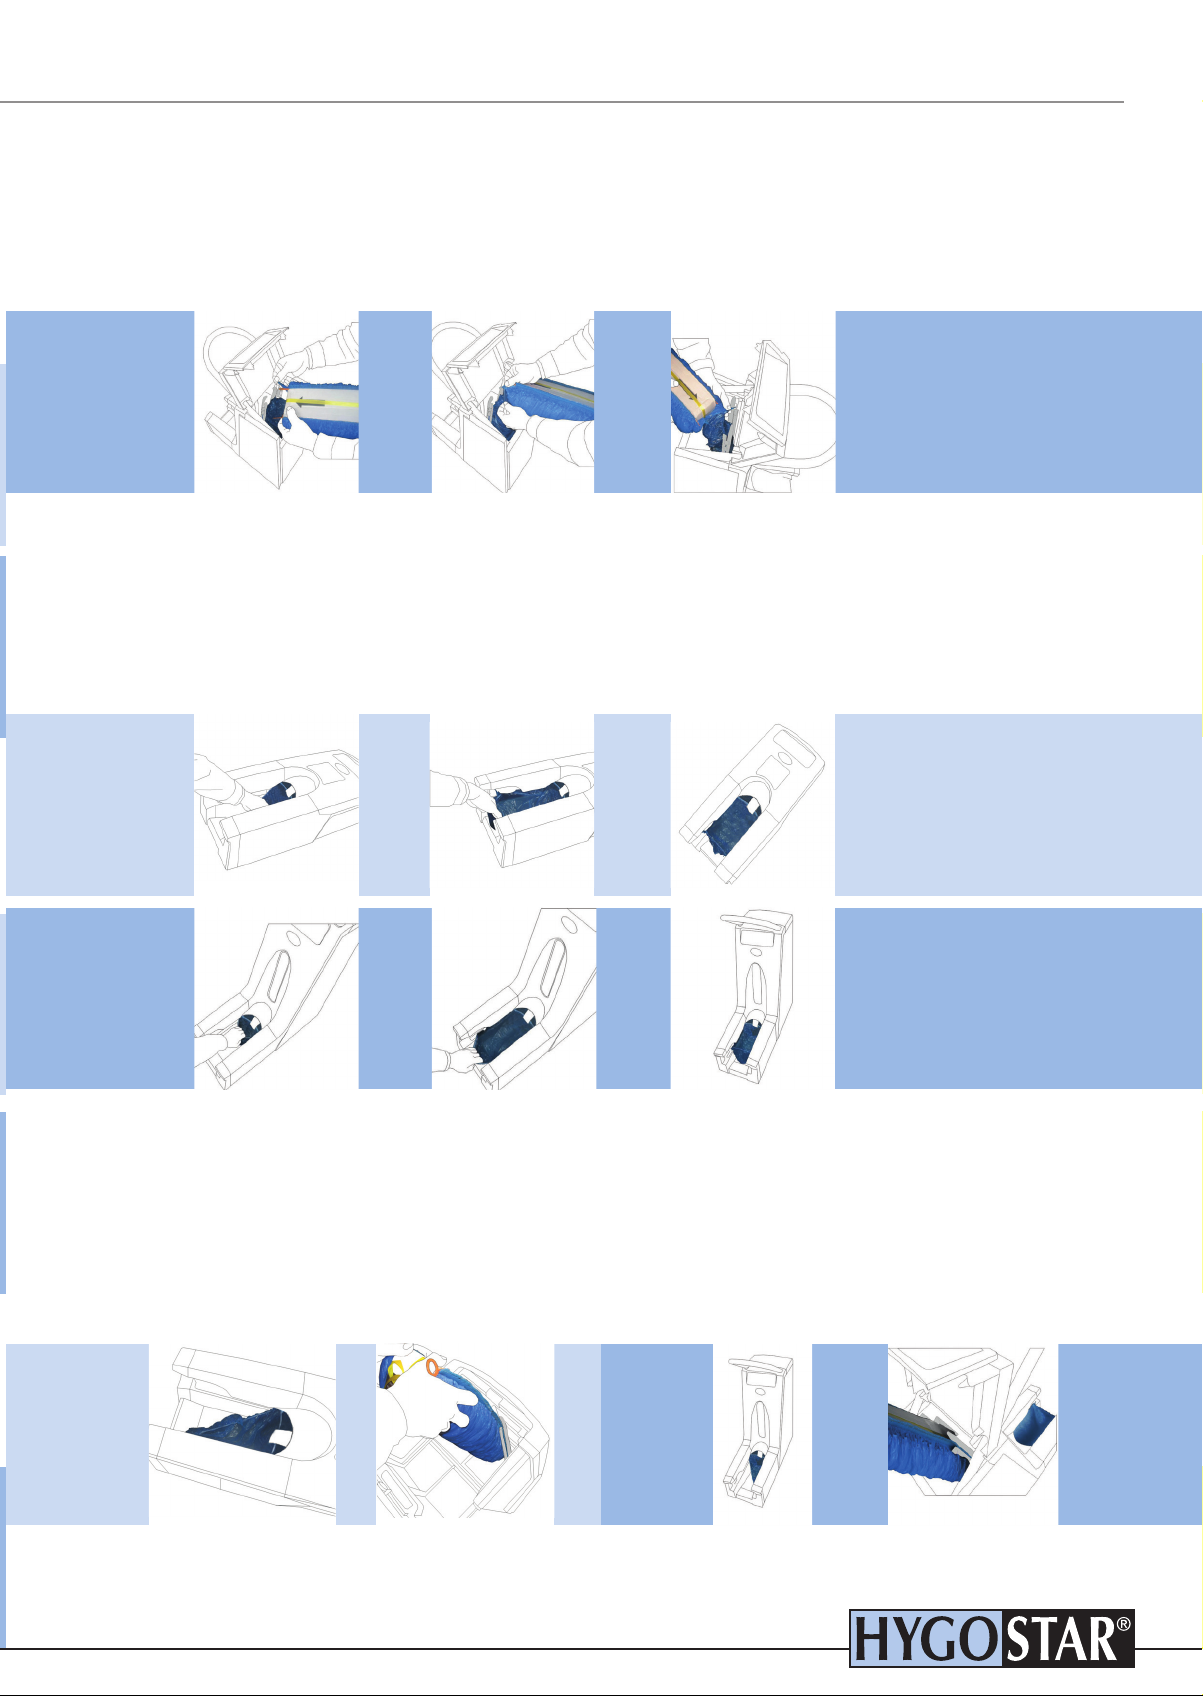
4. Drücken Sie das Bündel an beiden Seiten und mit beiden Händen gleichmäßig in die
Führung bis sich alle komplett unter der Verschlussstelle und in den Führungen befinden.
Abb. I-5.
5. Lösen Sie das Band, welches die Überschuhe zusammenhält und entfernen Sie es wie
in Abb. I-6 dargestellt.
6. Entfernen Sie den Karton. Siehe Abb. I-7.
7. Entfernen Sie den Plastikverschluss-Streifen auf beiden Seiten des Bündels mit einer
Hand, während Sie mit der anderen Hand die Überschuhe festhalten, damit diese
nicht mit herausgezogen werden. Nun greifen Sie den Plastikring und ziehen diesen
vollständig aus der Maschine. Siehe Abb. I-8.
8. Drücken Sie die Überschuhe nun ganz nach unten. Siehe Abb. I-9.
HYGOMAT COMFORT/CLEANROOM – MÖGLICHKEITEN UM FORTZUFAHREN:
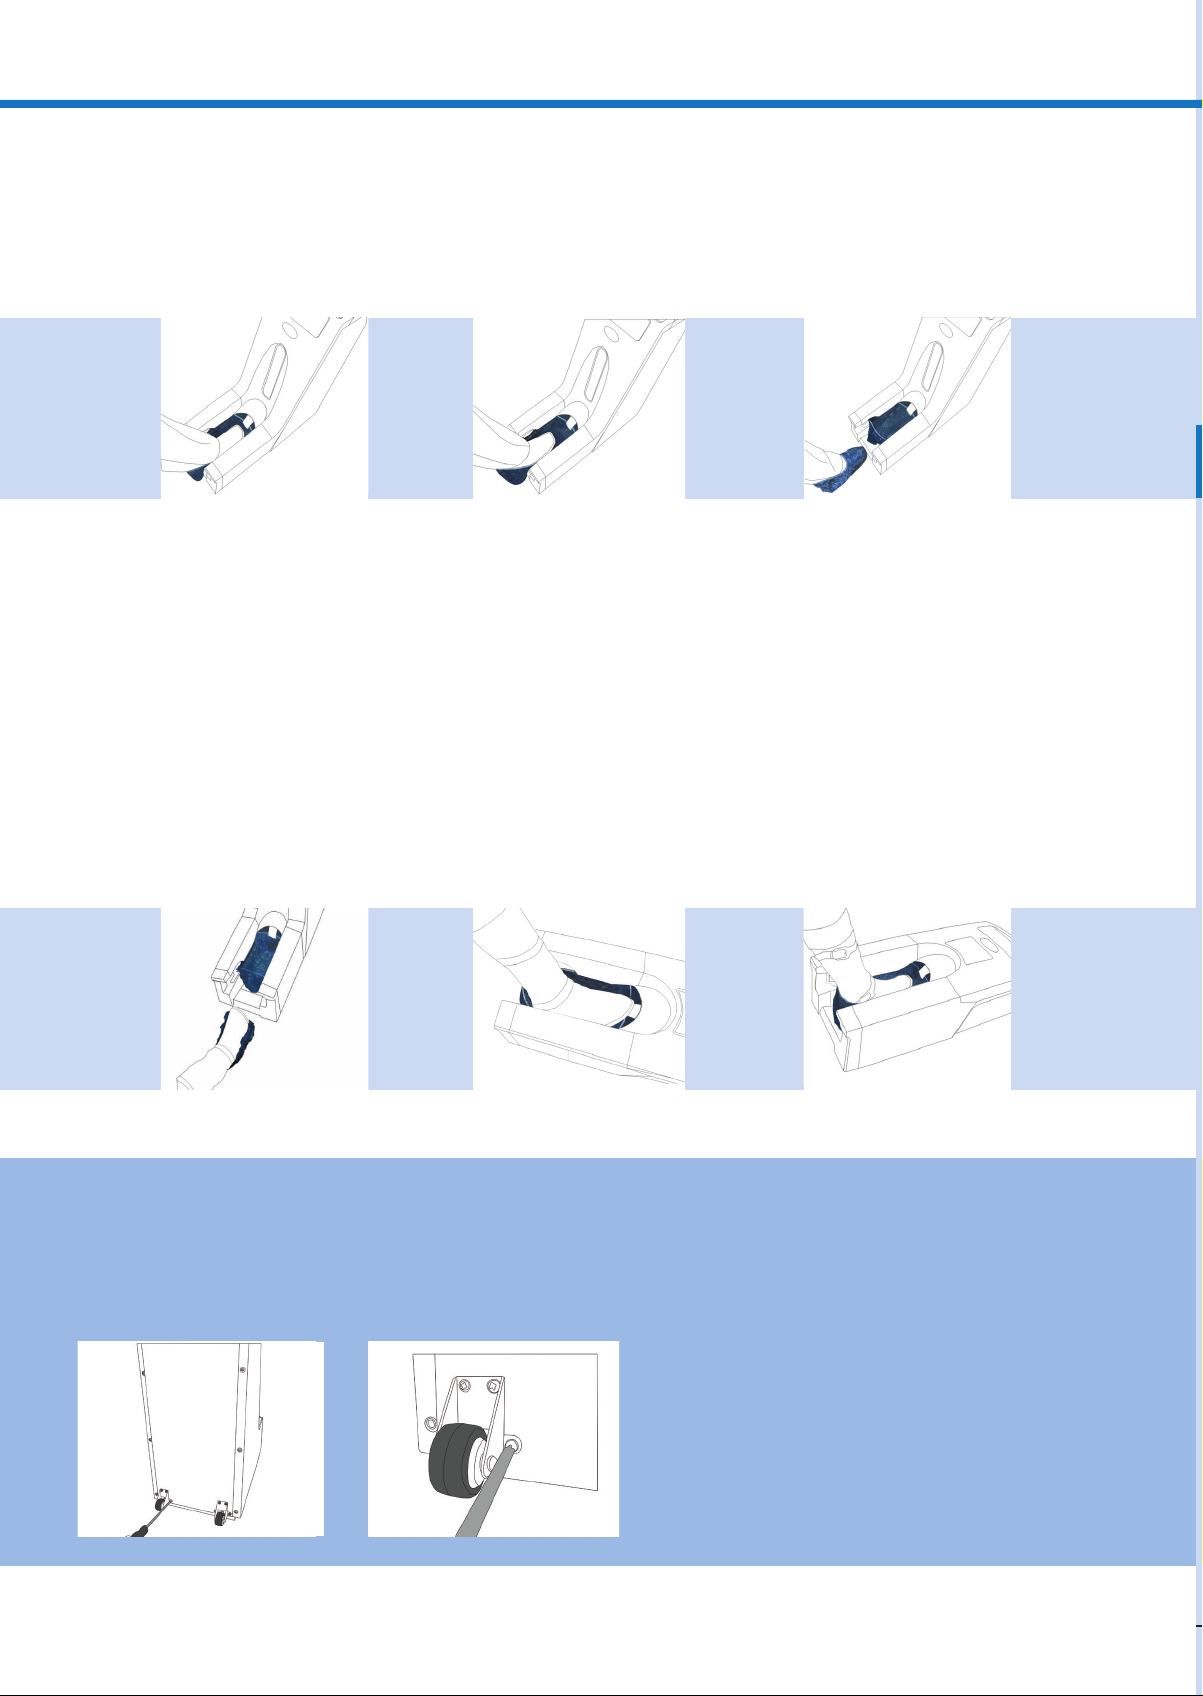
09. Der erste Überschuh des zweiten Bündels wird nun mit dem letzten Überschuh des ersten
Bündels verbunden.
10. Führen Sie den letzten Überschuh am Lauf entlang nach oben. o. Abb.
11. Öffnen Sie die Verschlüsse indem Sie diese nach unten drücken. Siehe Abb. I-10.
12. Nehmen Sie die 2 Plastikhalterungen des letzten Überschuhs des Bündels heraus.
Siehe Abb. I-11.
5.
Untie the ribbon holding the overshoes together and remove it as shown in diagram I-6.
6. Remove the cardboard as shown in diagram I-7.
7. Remove the plastic locking strip on both sides of the overshoes by holding the
overshoes in place with one hand. Use the other hand to grip the plastic ring and pull
it completely out of the machine as shown in diagram I-8.
8. Push both sides of the bundle with both hands and press all the overshoes inside the
tracks until the last piece is completely inserted into the track, over the lock position,
as shown in diagram I-9.
HYGOMAT COMFORT/CLEANROOM – OPTIONS TO PROCEED:
09. The first shoe cover of the second bundle has to be attached to with the last shoe
cover of the first bundle.
10. Please guide the last shoe cover along the guide railas shown in diagramI-9.
11. Open the lockspushing them downwards.
12. Take the two plastic holders outof the last shoe cover of the bundle as shown in
diagramI-11.
INSTALLATION
1. Assemble the machine as shown in image I-1. Open the cover as shown in image I-2.
For Comfort/Cleanroom: attach the hand rail with the screws, shown in image I-1a.
2. Now take one bundle of overshoes with both hands and slide the plastic holdings into the
guidance rail on both sides. Shown in image I-3. (In case the gap is not correct, it can be
adjusted with the left and right sides of the plastic holders.)
3. Press the bundle of overshoes slightly forward and then hold it straightly to make sure that
all plastic holders are located inside of the guidance rail. Shown in image I-4.
4. Steadily press down the bundle on both sides and with both hands into the guidance rail
until all overshoes are arranged under the locking spot and inside of the guidance, as shown
in image I-5.
HYGOMAT COMFORT/
CLEANROOM
I-1/ I-2 I-3 I-4
I-1 I-2 I-3 I-4
HYGOMAT COMFORT/
CLEANROOM
I-9 I-10 I-11 I-12
HYGOMAT COMFORT/
CLEANROOM
BEDIENUNGSANLEITUNG / MANUAL HYGOMAT
13. Entfernen Sie die 2 Plastikhalterungen dieses Überschuhs. Siehe Abb. I-12.
14. Ziehen Sie die Plastikhalterung des zweiten Überschuhbündels vom rechten Plastikver-
schluss-Streifen ab. Siehe Abb. I-13.
15. Bringen Sie die erste Plastikhalterung des zweiten Bündels am letzten Überschuh des
ersten Überschuh-Bündels an. Siehe Abb. I-14.
16. Führen Sie die Plastikhalterung des zweiten Bündels in den Lauf ein und drücken Sie
diesen so weit hinein, dass sich der Verschluss komplett im Lauf befindet. Siehe Abb.
I-15.
13. Remove the 2 plastic holders of this shoe cover as shown in diagramI-12.
14. Remove the plastic holders from the second bundle from the right plastic holder side as
shown in diagramI-13.
15. Attach the first plastic holder of the second bundle to the last shoe cover of the frist
bundle as shown in diagram I-14.
16. Guide the plastic holder of the second bundle along the guide rail and push it enough so
that far as the lock is inthe guide rail as shown in diagram I-15.
I-16 I-17 I-18
HYGOMAT COMFORT/
CLEANROOM
I-16 I-17 I-18
HYGOMAT CLASSIC
I-13 I-14 I-15
HYGOMAT COMFORT/
CLEANROOM
SO FAHREN SIE FORT:
17. Wiederholen Sie die Schritte 16 bis 18 für die linke Seite des Plastikverschluss-
Streifens.
18. Wiederholen Sie die Schritte 2 bis 7 für das zweite Überschuh-Bündel.
19. Schließen Sie die Abdeckung und ziehen Sie den ersten Überschuh aus der Öffnung,
welche sich unterhalb der Metallplatte befindet. Siehe Abb. I-16.
20. Ziehen Sie diesen Überschuh nun solange am Lauf entlang bis er den Einhänger
erreicht. Siehe Abb. I-17.
21. Der Überschuh-Spender ist nun zum Einsatz bereit. Siehe Abb. I-18.
DIE AM HÄUFIGSTEN AUFTRETENDEN PROBLEME:
PROBLEM: Eine oder beide Seiten der Plastikhalterungen befinden sich nicht in der
Führungsschiene. Siehe Abb. I-19.
MÖGLICHER GRUND: Die Plastikhalterungen wurden während der Installation nicht
exakt in den Lauf eingebracht.
LÖSUNG: Vergewissern Sie sich, dass sich sämtliche Plastikhalterungen in der Führungs-
schiene befinden. Siehe Abb. I-20. Ist dies nicht der Fall, drücken Sie die beiden Verschlüs-
se, welche an der Führung befestigt sind, herunter, um diese zu lösen. Entnehmen Sie
nun die Überschuhe deren Plastikhalterungen sich nicht in den Führungen befinden und
befestigen Sie diese erneut.
PRAY CONTINUE:
17. Repeat Step 16 to 18 for the left side of the plastic holder stripe.
18. Repeat step 2 to 7 for the second shoe cover bundle.
19. Close the coverage and pull the first shoe cover out of the opening, which is underneath
the metal plateas shown in diagramI-16.
20. Guide this shoe cover along the guiding rail until it reaches the hangeras shown in
diagramI-17.
21. Now the overshoe-dispenser is ready as shown in diagramI-18.
MOST COMMON ISSUES:
PROBLEM:
One or boths sides of the plastic holders are not in the guiding rail as
shown in diagramI-19.
POSSIBLE REASON:
The plastic holders have not exactlybeen fixed into the guiding.
SOLUTION:
Please make sure that all plastic holders are in the guiding rail as shown in
diagramI - 20. If not, please push down both locks, which are fixed on the guiding rail,
to loose them. Remove the loose overshoes and fix them again put them in again.
I-19 I-19
I-20 I-20
HYGOMAT CLASSIC
HYGOMAT COMFORT/
CLEANROOM
v
Automatischer Überschuh-Spender / Automatic Shoe cover dispenser
BEDIENUNGSANLEITUNG / MANUAL HYGOMAT
Franz Mensch GmbH | Gewerbering 20 – 21 | 86922 Eresing
Telefon: +49(0)8193 – 93 93-0 | Fax: +49(0)8193 – 93 93-26 | E-Mail:
[email protected]
www.franz-mensch.de
HOW TO USE THE AUTO SHOE COVER DISPENSER:
1. Put one foot inside the shoe cover as shown in diagram I-21.
2. Pull the foot backwards catching your heel in the shoe cover as shown in diagram I-22.
3. Continue pulling your foot slowly until the clips are released from the tracks.
WIE SIE DEN AUTOMATISCHEN ÜBERSCHUH-SPENDER VERWENDEN:
1. Stellen Sie einen Fuß in den Überschuh, auf dem Lauf. Siehe Abb. l-21.
2. Achten Sie darauf, dass sich Ihre Ferse im Überschuh befindet. Siehe Abb. l-22.
3. Ziehen Sie Ihren Fuß nun langsam aus dem Lauf, bis sich die Halterungen aus der
Führung lösen. Siehe Abb. I-23.
IMPORTANT NOTICE:
1. During the installation of overshoes, please make sure that the plastic clips are all
inside the tracks.
2. During use, put the foot inside the shoe cover and pull the shoe cover backwards in
horizontal direction. Do not lift the front of the foot too high.
WICHTIGER HINWEIS:
1. Vergewissern Sie sich, dass sich während der Inbetriebnahme alle Plastikhalterungen
in den Führungen befinden.
2. Achten Sie während des Gebrauchs der Maschine darauf, dass Ihr Fuß beim Heraus-
ziehen stets horizontal steht. Heben Sie die Fußspitze nicht so stark an, dass sie über
den Überschuh hinausragt.
ONLY FOR HYGOMAT CLEANROOM:
Hygomat Cleanroom can be cleaned with all common detergents and be desinfected due to
its stainless steel side parts and its stanless steel backside.
ASSEMBLING THE ROLLS:
For assembling the rolls please use all 4 screws.
NUR FÜR HYGOMAT CLEANROOM:
Der HYGOMAT CLEANROOM kann aufgrund seiner Edelstahl-Seitenteile und seiner Edel-
stahlrückwand mit allen gängigen Reinigungsmittel gereinigt und desinfiziert werden.
MONTAGE DER ROLLEN:
Benutzen Sie zur Installation der Rollen jeweils vier Schrauben,
wie auf den Bildern dargestellt.
PROBLEMLÖSUNG
PROBLEM:Ihr Fuß befindet sich nach dem Anziehen nur halb im Überschuh.
Siehe Abb. I-24.
MÖGLICHER GRUND:
Die Fußspitze wurde während des Anziehvorgangs zu weit
angehoben. Siehe Abb. I-25.
LÖSUNG:
Achten Sie während des Gebrauchs der Maschine, darauf, dass Ihr Fuß beim
Herausziehen stets horizontal steht. Heben Sie dabei die Fußspitze nicht zu stark an.
Siehe Abb. I-26.
PROBLEM SOLUTION
PROBLEM:
The shoe is only half inside the shoe cover as shown in diagram I-24.
POSSIBLE REASONS:
When pulling the shoe cover backwards, the user lifted the front
of the foot too high, which is why the foot is not inside the shoe cover, as shown in
diagramm I-25.
SOLUTION:
Put the foot inside the shoe cover and pull the shoe cover backwards in
horizontal direction as shown in diagram I-26.
I-24 I-25 I-26
I-21 I-22 I-23
HYGOMAT CLASSIC/
HYGOMAT COMFORT/
CLEANROOM
HYGOMAT CLASSIC/
HYGOMAT COMFORT/
CLEANROOM

This manual suits for next models

3

Popular Dispenser manuals by other brands

Fast & Fluid Management Harbil HA180 Operating and safety manual

Fast & Fluid Management

Fast & Fluid Management Harbil HA180 Operating and safety manual

Silver King SK2SB Technical manual and replacement parts list

Silver King

Silver King SK2SB Technical manual and replacement parts list

San Jamar VENUE H2003 Series installation instructions

San Jamar

San Jamar VENUE H2003 Series installation instructions

Polar Refrigeration CF760-A user manual

Polar Refrigeration

Polar Refrigeration CF760-A user manual

Hilti HDE 500-A22 Operating	 instruction

Hilti

Hilti HDE 500-A22 Operating instruction

Silver King SK2 Imperial Operation manual

Silver King

Silver King SK2 Imperial Operation manual

U-Line Better Pack 555eS user guide

U-Line

U-Line Better Pack 555eS user guide

AFFINIS GROUP SaniServ AccuFreeze Operation manual

AFFINIS GROUP

AFFINIS GROUP SaniServ AccuFreeze Operation manual

FROST 199-W Installation guidelines

FROST

FROST 199-W Installation guidelines

Franke RODX625 Installation and operating instructions

Franke

Franke RODX625 Installation and operating instructions

SEMAK HCD05 Operation and warranty booklet

SEMAK

SEMAK HCD05 Operation and warranty booklet

Accucold AIWD160 user manual

Accucold

Accucold AIWD160 user manual

Precision 0002 Series owner's guide

Precision

Precision 0002 Series owner's guide

RCBS 98941 Product instructions

RCBS

RCBS 98941 Product instructions

MICRODOS ME1-mA Programming instructions

MICRODOS

MICRODOS ME1-mA Programming instructions

Franke RODX618E Installation and operating instructions

Franke

Franke RODX618E Installation and operating instructions

Franke SD80 Installation and operating instructions

Franke

Franke SD80 Installation and operating instructions

Cornelius Quest Elite 2000 instruction manual

Cornelius

Cornelius Quest Elite 2000 instruction manual

manuals.online logo
manuals.online logoBrands
  • About & Mission
  • Contact us
  • Privacy Policy
  • Terms and Conditions

Copyright 2025 Manuals.Online. All Rights Reserved.