FRANZ VIEGENER E116-P User manual
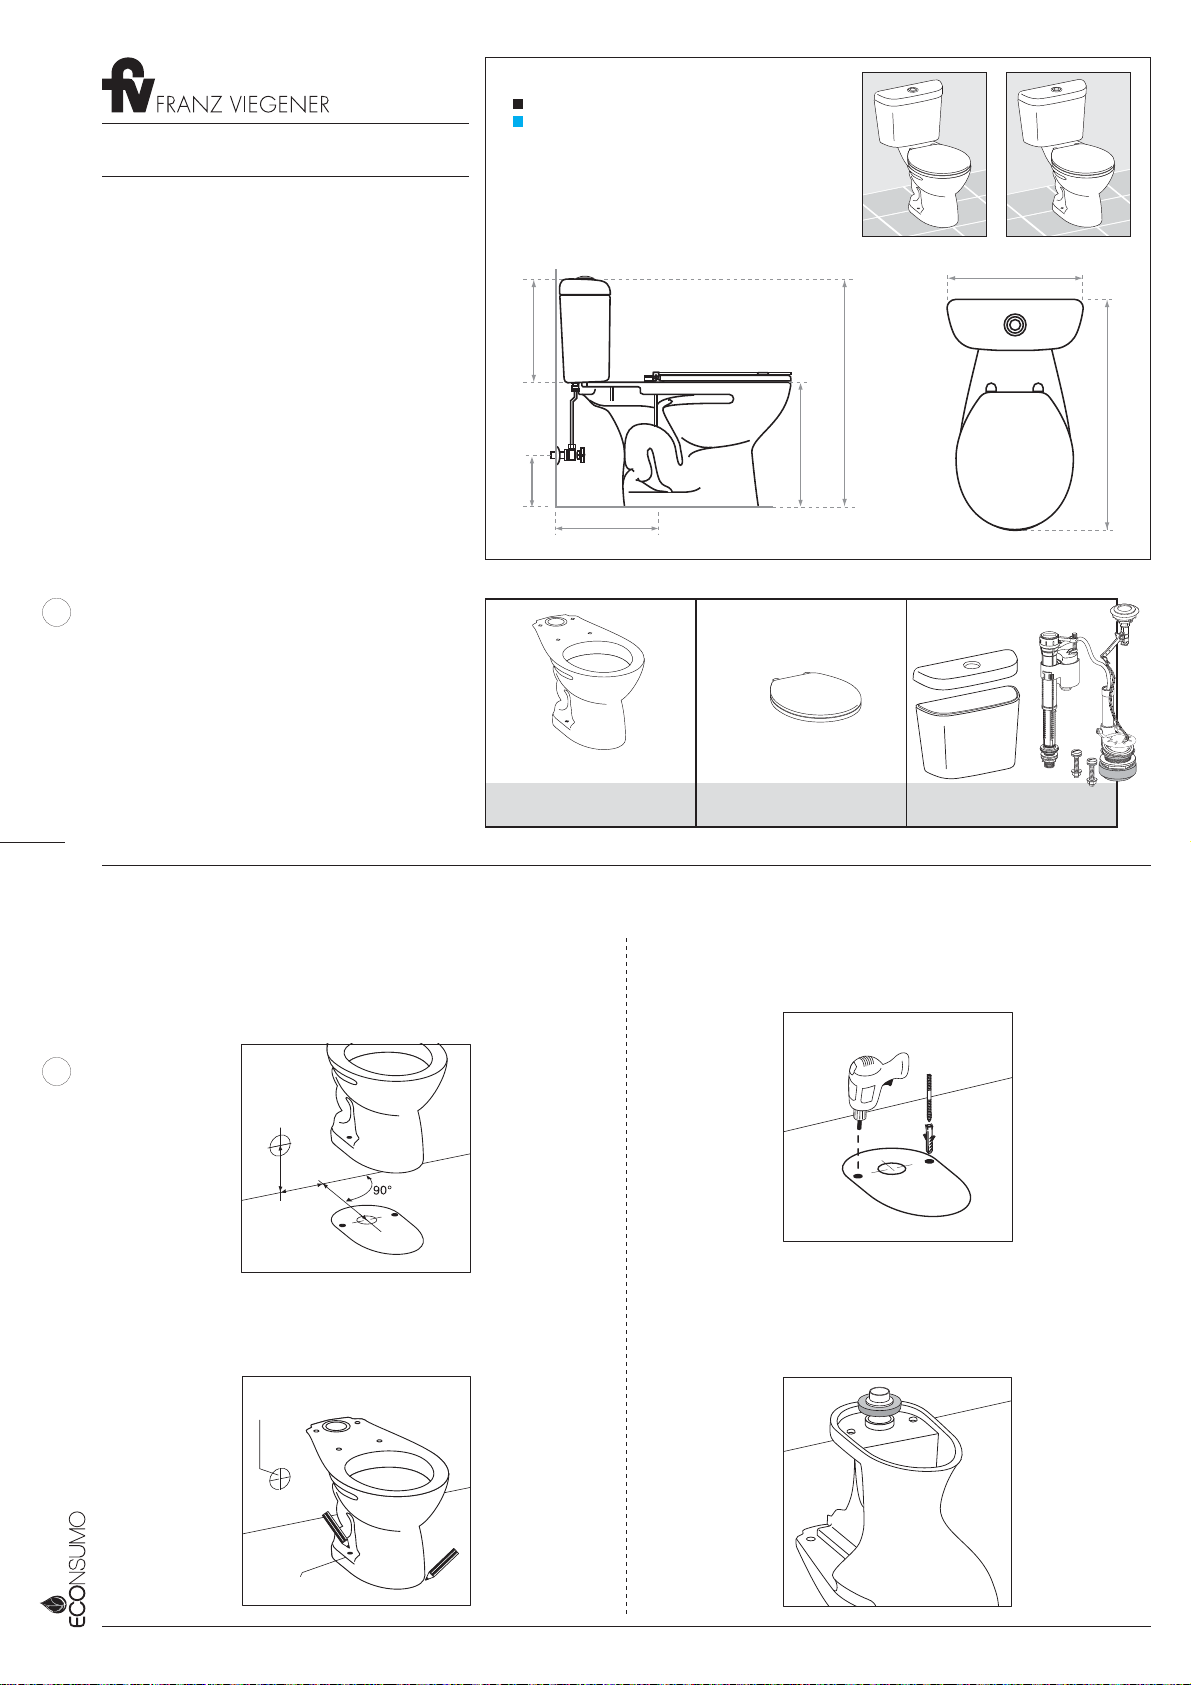
MEDIDAS / MEASURES:
RECOMENDACIONES:
Asegúrese que la persona que vaya a instalar el producto sea
un profesional en la materia, para prevenir errores que afecten
las instalaciones o el correcto funcionamiento del producto.
Realice los ajustes del sanitario UTILIZANDO una herramienta
adecuada para que la superficie y el acabado del producto no
se raye o lastime.
Recuerde que todos los productos tienen un mecanismo de
control que debe ser revisado y cambiado de ser necesario, ya
que este puede deteriorarse debido a la frecuencia de uso.
Recommendation:
The person who goes install the product you be professional in
the stuff, for prevent mistake in the installation or working the
p
roduct.
For fit of sanitary to using the implement appropriate for not
hurt the surface of the product.
Remember who all the products have a mechanism of control
that is review and change of necessary, it can spoil for the use.
30.5 cm
15 cm
15 cm
Llave angular F.V.
F.V. Angle stop set
Agujeros
para fijación
Fixation holes
Inodoro / Toilet
Milan Estandar
680
26” 3/4
400
15” 3/4
305
12”
670
26” 3/8
305
12”
367
14” 13/32
150
5” 7/8
Dimensiones en milímetros
Dimensiones en pulgadas
La grifería FV - Franz Viegener está fabricada pensando en el cuidado del ambiente y en evitar el desperdicio. Nuestras llaves y mezcladoras de lavabo, ducha y cocina incorporan restrictores de caudal que controlan el consumo de agua.
COLORES DISPONIBLES /
COLORS AVAILABLE:
• Arena / Sand : AR
• Azul Cobalto /
Cobalt Blue : AO
• Azul Mediterráneo /
Mediterrane Blue : AM
• Blanco / White : BL
• Bone / Bone : BO
• Caribbean Shell : CS
• Ciprés / Cypress : CI
• Gamuza / Chamois : GA
• Gris /Gray: GR
• Merlot / Merlot : ME
• Mora / Raspberry
puree : MO
• Verde Primavera /
Sea Foam : VP
E110.1-COLOR
E101.01-COLOR
E116.2-color
E116.2.1
E116.2.2
1. Ubicar el inodoro en la posición que irá, verificar la alineación del inodoro respec-
to a la pared y posicionar de acuerdo a las dimensiones (gráfico # 1).
Verify the alignment of toilet regarding the wall and place from agreement to the
dimensions (graphic # 1).
LEA LAS INSTRUCCIONES COMPLETAMENTE ANTES DE INSTALAR / READ ALL INSTRUCTIONS BEFORE INSTALLING
3. Perforar y colocar los tacos de fijación #10 (no incluidos) (gráfico # 3).
Drill and place the fixation bolts #10 (not included) (graphic # 3).
4- Voltear hacia abajo el inodoro y colocar el anillo de cera alrededor del
desagüe
(gráfico # 4).
Turn down the toilet and place the ring of wax around the drainage (graphic # 4).
2. Marcar (gráfico # 2).
Mark (graphic # 2).
INSTRUCCIONES DE INSTALACIÓN / INSTALLATION INSTRUCTIONS:
E102.17
E116-P / E116-S
E116-P E116-S

F.V. - FRANZ VIEGENER se reserva el derecho de modificar, cambiar, mejorar y/o anular materiales, productos y/o diseños sin previo aviso.
It is F.V. - Franz Viegener right to modify, replace, improve and/or cancel materials, products and/or designs without previous notification.
Visítenos en / Visit us at:
www.franzviegener.com
Fecha: 30 - Abril - 2013
Código: HT- 1014F
Ref.: E266.02 DH CR
Nota: No es recomendable usar cemento en la base del inodoro y antes de instalar el tanque verifique que la tubería de alimentación este limpia y libre de impurezas y residuos de construcción.
Note: It is not advisable to use cement in the base of the toilet to fix it. Before installing the tank, verify that the feeding pipe is clean and free of sludge and construction residuals.
5. Fijar el inodoro al piso con pernos (gráfico # 5).
Fix the toilet to the floor (graphic # 5).
7. Colocar el tanque con el herraje armado, retire su tapa inviertalo y coloque el
empaque espumoso, Ubicar el tanque sobre el inodoro alineando las dos piezas
(gráfico # 7).
Remove the cover of the tank cover. Place the tank on the toilet aligning the
holes foreseen to joint both pieces.
(graphic # 7).
6. Nivelar el inodoro y fijar al piso con un cordon de silicona (gráfico # 6).
Even the toilet and fix to the floor with a silicone cord (graphic # 6). 8. Para la conexión a la acometida de agua usted puede usar: llave angular F.V. -
Franz Viegener (gráfico # 8).
To connect the toilet you can use: F.V. - Franz Viener angle stop set (graphic # 8).
CONSEJOS DE MANTENIMIENTO / ADVICES MAINTAINANCE:
Los sanitarios F.V. - Franz Viegener son fabricados con porcelana sanitaria vitrificada, cum-
pliendo normas internacionales, garantizando así su larga vida útil. Por las características
propias de los materiales utilizados y la tecnología empleada en su desarrollo, se limpian
fácilmente evitando el desarrollo de gérmenes y hongos.
Realice la limpieza utilizando productos limpiadores y desinfectantes para baños de marcas
reconocidas. Ayúdese de una esponja o un paño húmedo. En lo posible evite productos de
limpieza fuertemente abrasivos. la porcelana sanitaria vitrificada no permite adherencias y
las grasas se eliminan con facilidad.
La porcelana sanitaria mantiene el brillo propio de su esmalte sin necesidad de pulimentos.
F.V. - Franz Viegener bathroom sets are made of vitrified porcelain according to internatio-
nal regulations, giving to the products a long lifetime warranty. Because fo the characteris-
tics of vitrified porcelain, these products can be cleaned easily, avoiding the growing of
germs and mold.
For cleaning use bathrooms cleaners and desinfectants of well-known trade-marks and
sponge or humid cloth. Avoid, it possible, abrasive clening products. The vitrified porcelaine
does not allow adherences and grease and oil are eliminated easily.
Porcelaine enamel maintains its own brightneed without the need of polishing.
En caso de tener algún problema con el herraje verifique los siguientes puntos:
If you have any problem with the fitting, please verify the following points:
arandela,
contratuerca (a) /
washer, locknut (a)
Nota: En caso que no pase el agua al tanque,
retire el filtro, límpielo y vuelva a colocar en su
sitio /
Note: if water does not go into the tank,
remove the filter, clean it up and put the filter
back.
1- Ajuste las contratuercas inferiores a y b
A
djust the lock nuts a y b
2- Asegure el tanque al inodoro con los pernos de
anclaje /
Fasten the tank to the toilet bowl with the screws.
4- Instale el flapper en la válvula de descarga y
permita el ingreso de agua, confirmando que llegue
al nivel marcado en el tanque, de lo contrario
REGULE EL HERRAJE.
Install the flapper in the outlet valve and let the
water come in. Be sure the water reaches the leve
l
marked in the tank, otherwise CALIBRATE TH
E
HARDWARE.
5- Conecte la cadena al botón superior de
accionamiento. La cadena no debe quedar muy
tensa
/
Connect the chain to the button. The chain mus
t
not be tightened.
3- Ajuste la tuerca manualmente en
sentido horario
/
Manually adjust the plastic nut counter clockwise.
empaque
cónico /
conic
gasket
(a)
(b)
filtro /
lter
Limpie el borde /
Clean the rim
empaque /
gasket
flapper
flapper
flapper
This manual suits for next models
1
Other FRANZ VIEGENER Toilet manuals

Popular Toilet manuals by other brands


Better Bathrooms
Better Bathrooms BUN/BeBa 27555/78725 user manual

American Standard
American Standard CONCEPT Cube TF-2704 installation manual

BIOLAN
BIOLAN ECO Instructions for installation, use and maintenance

Thetford
Thetford C260 Series user manual

KELISS
KELISS T162A Series instruction manual

Kohler
Kohler K-22241K Installation and care guide


