Free The Tone FT-2Y/FLIGHT TIME User manual

FT-2Y/FLIGHT TIME
DIGITAL DELAY
Ver 1.1
OWNERʼS MANUAL

2 3
Thank you for choosing a Free The Tone product.
In order to take full advantage of the features and performance it provides, please read this owner’s
manual thoroughly, and keep it in a safe place for future reference.
Table of Contents
Controls and Indicators ................................................................................ . 4
Front Panel ............................................................................................. 4
Rear Panel ....................... ... ... .. ... ... ..... ... ..... ... ..... ... ... .. ... ... .. ... ... .. ............ 6
Side Panel .............................................................................................. 6
Basic Operations and How to Use Each Function .................................................... 7
Storing Changes in a Preset .......................................................................... 7
Recalling a Preset...................................................................................... 7
Selecting Delay Units ................................................................................. . 8
Adjusting Delay Tempo (1)............................................................................. 8
Adjusting Delay Tempo (2) - Tap Function .......... ................................................. 9
Setting Delay Length as Note Duration (Subdivision)... ............................................ 9
Adjusting Delay Volume.............................................................................. . 9
Adjusting Feedback Amount......................................................................... 10
Adjusting Output Volume............................................................................. 10
Adjusting Delay Timber............................................................................... 10
Hold Function ......................................................................................... 11
Modulation Function.................................................................................. 11
Offset Function........................................................................................ 11
BPM Analyzer Function .............................................................................. 12
Rec & Repeat Function.............................................................................. . 12 Handling Precautions
• Never connect or disconnect plugs to/from the input/output terminals on the FT-2Y when the
external device that drives speakers is powered. Doing so can cause noises and damage the
speakers.
• Avoid applying excessive force to the footswitches, tact switches, and phone jacks on the FT-2Y.
• If the unit malfunctions or behaves erratically, cease operation at once and contact your local
dealer or Free The Tone directly.
Useful Features.......................................................................................... 13
Setting to Retain Delay Sound (Trail Function) .................................................... . 13
Tap-Preferred Mode .................................................................................. 13
Swapping Switch Functions ....................................................................... .. 13
MIDI Setups ............................................................................................. 14
Setting up MIDI Receiving Channel ................................................................ . 14
Transmitting Data to/from an External Device........................................................ 14
Updating Firmware...................................................................................... 14
Initializing ................................................................................................ 14
Factory Presets ......................................................................................... 15
MIDI Specifications and Parameters .................................................................. 16
Product Specifications ................................................................................. 17
Safety Precautions...................................................................................... 18

4 5
Controls and Indicators
Front Panel
DELAY/FEEDBACK/OUT switch & display
PRESET/CHANNEL(hold) switch & display
Pressing this switch repeatedly illuminates the LEDs in
the order of DELAY - FEEDBACK - OUT and the display
content changes accordingly.
Adjusting delay volume p.9
Adjusting feedback amount p.10
Adjusting output volume p.10
By pressing this switch, the PRESET and CHANNEL LEDs
illuminate alternately and the display content changes
accordingly. When the PRESET LED is lit, the display
shows the number for the preset currently recalled. When
the CHANNEL LED is lit, the MIDI channel being edited is
shown. Note that there are two preset regions: User preset
region = nos. 01–90 and factory preset region = nos.
91–99.
Recalling a preset p.7
Setting up MIDI receiving channel p.14
Activate this switch if you wish to remain the delay sound
when switching presets or turning off the delay effect.
When the switch is turned on, the LED next to it illuminates.
This setting can be stored in each preset.
Setting to remain delay sound p.13
TRAIL switch
Press this switch to enable the Rec & Repeat function.
The LED next to the switch illuminates when the function is
enabled.
Rec & Repeat function p.12
REC & REPEAT switch
Press this switch to invert the phase of the delay sound.
When enabled, the LED next to the switch illuminates and
the phase of the delay sound is inverted. This setting can
be stored in each preset.
DELAY PHASE switch Pressed to turn on/off the delay effect. When on,
the LED above the switch illuminates. Press this
switch to stop recording or playback when the
Rec & Repeat function is enabled.
Rec & Repeat function p.12
ON/OFF-STOP switch Pressed to enable the BPM Analyzer function. When
enabled, the LED next to the switch illuminates. The
microphone is used to capture your performance sound
for BPM analysis when the BPM Analyzer function is
enabled.
BPM Analyzer function p.12
BPM ANALYZER switch & microphone Pressed to enter the tempo by tapping.
Adjusting delay tempo (Tap function) p.9
When the Rec & Repeat function is enabled, this
switch is pressed to play the recorded phrase.
Rec & Repeat function p.12
You can recall a preset in many ways.
Recalling a preset p.7
TAP-PLAY/hold (PS SEL > PS1/PS2) switch
Used to increase or decrease a
parameter value in each setting.
INC/+: Increases the parameter value.
DEC/–: Decreases the parameter value.
INC/+ and DEC/– switches
Pressed when storing a setting or
confirming parameters.
SAVE and ENTER switches
By pressing this switch, the BPM
and msec LEDs illuminate alternately
and the display content changes
accordingly.
Selecting delay unit p.8
BPM/msec switch & display
Pressing this switch repeatedly illuminates the LEDs in the
order of LPF - HPF - RATE - DEPTH and the display content
changes accordingly. This switch is used when changing
delay sound timber or activating a modulation effect.
Adjusting delay timber p.10
Modulation function p.11
FILTER/MODULATION switch & display
By pressing this switch, the SUBDIVISION
and OFFSET LEDs illuminate alternately and
the display content changes accordingly.
Setting delay length as note duration p.9
Offset function p.11
SUBDIVISION/OFFSET switch & display

6 7
Rear Panel
Storing Changes in a Preset
Recalling a Preset
Side Panel
Basic Operations and How to Use Each Function
Selects whether to output the
incoming original sound (dry sound)
or not.
ON: The original sound (dry sound)
is muted and only the effect sound
(delay sound) is output.
OFF: Both the original sound (dry
sound) and effect sound (delay
sound) are output.
For connecting the AC adapter for the FT-
2Y.
Be sure to use the dedicated AC adapter
supplied with your FT-2Y.
External terminal for the
Hold and Rec functions
(when REC & REPEAT is
turned ON). Connect an
unlatch (momentary) type
switch.
Hold function p.11
Rec & Repeat function
p.12
KILL DRY switch POWER DC12V IN terminal
HOLD(REC) terminal
INPUT terminal
Used to connect to an amplifier, mixer,
etc.
OUTPUT terminal
Recalling a preset p.7
Sending data to external device p.14
Receiving data from external device p.14
MIDI IN & OUT/THRU terminals
This switch is used to select the FT-2Y’s input level based on the
output level of the device connected to the INPUT terminal.
To connect an instrument level device, set the switch to the rear side
(closer to the I/O terminals).
To connect a line level device, set the switch to the front side.
Use a small flat-blade screwdriver to slide the switch.
INPUT LEVEL select switch
1. Press the SAVE switch.
2. The BPM/msec display flashes [toXX] (XX: preset number indicated).
3. Press the INC/+ or DEC/– switch to change the number shown in the BPM/msec display to the preset number in
which you wish to store the data.
4. Press the ENTER switch to confirm the save operation and store the data in the preset.
NOTE
To cancel the save operation, press the SAVE switch again.
When a preset parameter is being changed, the dot in the last digit of the preset number illuminates. This dot goes out when the data
is stored in the preset.
NOTE
Since preset nos. 91–99 are reserved as the factory preset area, it is impossible to store user presets in this area.
The FT-2Y provides various ways to recall a preset.
Recalling a Preset with INC/+ or DEC/– switch
1. Press the PRESET/CHANNEL(hold) switch to flash the display.
2. Press the INC/+ or DEC/– switch to select the preset number from which you wish to recall the data and press the
ENTER switch.
Recalling a Preset with TAP-PLAY/hold(PS SEL > PS1/PS2) switch
1.
2.
3.
Recalling Preset 1 * Only when the TAP-PLAY/hold(PS SEL > PS1/PS2) switch is used for the Tap function.
1. Press and hold down the
currently displayed.
TAP-PLAY/hold(PS SEL > PS1/PS2)switch for 3.5 seconds to flash the preset number
2. At the moment when the flashing stops, the preset is switched to Preset 1.
Toggling between Presets 1 and 2 * Only when the TAP-PLAY/hold(PS SEL > PS1/PS2) switch is used for the Tap function.
1. Recall Preset 1 or 2.
2. Press and hold down the TAP-PLAY/hold(PS SEL > PS1/PS2)switch for 3.5 seconds to flash the preset number
3. At the moment when the flashing stops, Preset 1 (2) is switched to Preset 2 (1).
For connecting a guitar, another
musical
instrument, or
effects unit. By
implementing
Free The Tone’s
original HTS
(Holistic Tonal
Solution) circuit,
sound texture is
kept the same
whether the
effect is turned
on or off.
Press and hold down the TAP-PLAY/hold(PS SEL > PS1/PS2)switch for two seconds to flash the preset number
display.
Press the TAP-PLAY/hold(PS SEL > PS1/PS2)switch to increment the preset number and press the ON/OFF-
STOP switch to decrement. Select the desired preset number. display.
Press and hold down the TAP-PLAY/hold(PS SEL > PS1/PS2)switch for two seconds to confirm the preset
number.
Used to connect an external MIDI device
to send/receive MIDI signals. The FT-2Y’s
presets can be switched from an external
MIDI controller. This terminal can also be
used to transfer FT-2Y’s preset data
between an external PC or an another
Flight Time.

8 9
Adjusting Delay Tempo (2) - Tap Function
Setting Delay Length as Note Duration (Subdivision)
Adjusting Delay Volume
Swapping Presets 1 and 2 Instantly in Instant Preset mode
1. While holding down the ENTER switch, press the TAP-PLAY/hold(PS SEL>PS1/PS2)switch for two seconds.
2. The BPM/msec display shows [PS1.2.].
3. Release both the switches to complete.
NOTE
To return to the previous operation mode, press the TAP-PLAY/hold(PS SEL > PS1/PS2)switch while holding down the ENTER
switch. Release both the switches when the BPM/msec display shows [TAP].
NOTE
When the Instant Preset Switching function is enabled, the footswitch connected to the HOLD terminal executes the
Tap function. Also note that the Trail and Rec & Repeat functions are disabled.
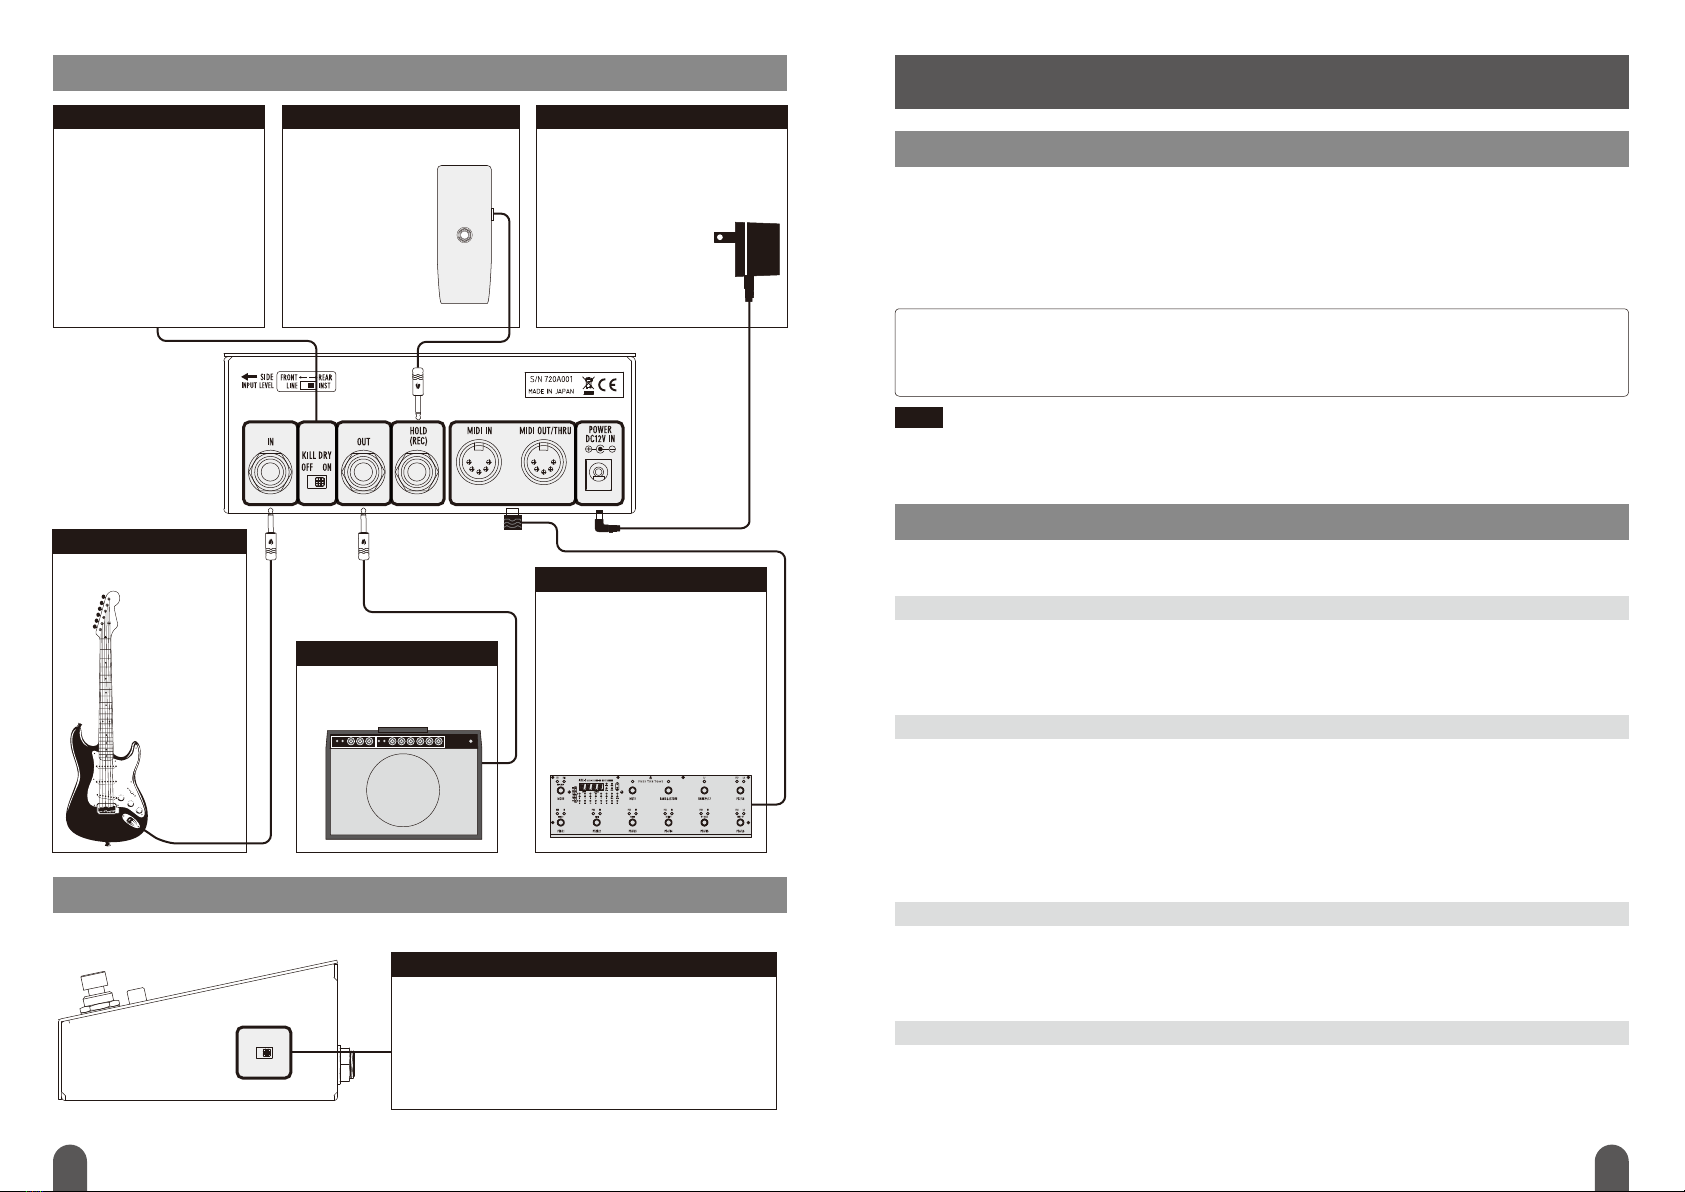
Recalling Preset by MIDI Signal from External Device
When receiving a MIDI signal containing a program change number from an external MIDI device, the FT-2Y switches
its presets. You need to set the FT-2Y’s MIDI channel to the same MIDI channel as the program change number
sending device.
Setting up MIDI receiving channel p.14
Selecting Delay Units
Adjusting Delay Tempo (1)
The FT-2Y can select delay units in BPM or msec.
1. Press the BPM/msec switch to turn on the BPM or msec LED.
2. Press the ENTER switch.
NOTE
BPM: Beat Per Minute. Used to show the tempo of performance indicated by the number of quarter notes (crotchets) counted in one
minute (60 seconds). Since a BMP value can be set down to the tenths place, it is possible to specify tempo accurately.
ex) If = 120, then 1 BPM is 500ms. 60 seconds ÷ 120 (BPM) = 0.5 (s) = 500ms
msec: Short for millisecond. 1 millisecond equals to one thousandth second.
ex) 100 msec equals to 0.1 seconds. Delay time can be set from 1msec to 9999msec (about 10 seconds).
With INC/DEC switches
1. Press the PRESET/CHANNEL(hold) switch to flash the preset number.
2. Press the INC/+ or DEC/– switch to show the preset number in which you wish to store the data and press the
ENTER switch.
3. Press the BPM/msec switch to turn on the BPM or msec LED.
4. Press the INC/+ or DEC/– switch to adjust the parameter and press the ENTER switch.
5. Press the SAVE switch.
6. Press the ENTER switch to confirm the save operation and store the data in the preset.
With TAP-PLAY/hold(PS SEL > PS1/PS2) switch
1. Press the PRESET/CHANNEL(hold) switch to make the preset number flash.
2. Press the INC/+ or DEC/– switch to show the preset number in which you wish to store the data and press the
ENTER switch.
3. Press the TAP-PLAY/hold(PS SEL > PS1/PS2)switch three times to adjust the parameter.
4. Press the SAVE switch.
5. Press the ENTER switch to confirm the save operation and store the data in the preset.
NOTE
When the user presses the TAP-PLAY/hold(PS SEL > PS1/PS2) switch three times, the Tap function calculates the BPM by averaging
time intervals between the 1st and 2nd presses and between the 2nd and 3rd presses.
The tap-entered tempo is recognized as a quarter note and the BPM is calculated from its duration.
We recommend to set as explained in “Adjusting Delay Tempo (1)” if you want to set delay tempo precisely. To set the tempo while
feeling the rhythm of performance, the method explained in “Adjusting Delay Tempo (2)” would be more suitable.
1. Press the PRESET/CHANNEL(hold) switch to make the preset number flash.
2. Press the INC/+ or DEC/– switch to show the preset number in which you wish to store the data and press the
ENTER switch.
3. Press the SUBDIVISION/OFFSET switch to turn on the SUBDIVISION LED.
4. Press the INC/+ or DEC/– switch to adjust the parameter and press the ENTER switch.
5. Press the SAVE switch.
6. Press the ENTER switch to confirm the save operation and store the data in the preset.
NOTE
By handling a quarter note as the reference tempo, delay time can be set by the duration of a note. The default value is quarter
note (crochet). You can select from: Whole note [Semibreve] (1), Half note [Minim] (2), Dotted Quarter note (4.), Triplet in four (43),
Quarter note [Crochet] (4), Dotted Eighth note (8.), Triplet in two (23), Eighth note [Quaver] (8), Triplet in one (13), and Sixteenth note
[Demiquaver] (16). If the Dotted Quarter or Dotted Eighth note is selected, then the dot LED (DOTTED) in the first digit illuminates.
N.B.) When the time display unit is “msec,” the delay time is automatically calculated and displayed accordingly. The display will not
change when the time display unit is “BPM.”
1. Press the PRESET/CHANNEL(hold) switch to make the preset number flash.
2. Press the INC/+ or DEC/– switch to show the preset number in which you wish to store the data and press the
ENTER switch.
3. Press the DELAY/FEEDBACK/OUT switch to turn on the DELAY LED.
4. Press the INC/+ or DEC/– switch to adjust the parameter and press the ENTER switch.
5. Press the SAVE switch.
6. Press the ENTER switch to confirm the save operation and store the data in the preset.
In Instant Preset mode, Presets 1 and 2 are swapped instantly by pressing the TAP-PLAY/hold(PS SEL
> PS1/PS2)switch.
Other manuals for FT-2Y/FLIGHT TIME
1
Table of contents
Other Free The Tone Music Pedal manuals

Free The Tone
Free The Tone MOTION LOOP User manual

Free The Tone
Free The Tone COSMIC WAVE User manual

Free The Tone
Free The Tone TA-1H Use and care manual

Free The Tone
Free The Tone BLACK VEHICLE BV-1V User manual

Free The Tone
Free The Tone FT-2Y/FLIGHT TIME User manual

Free The Tone
Free The Tone TA-1H User manual

Free The Tone
Free The Tone MOTION LOOP User manual

Free The Tone
Free The Tone OVERDRIVELAND User manual

Free The Tone
Free The Tone AS-1R User manual