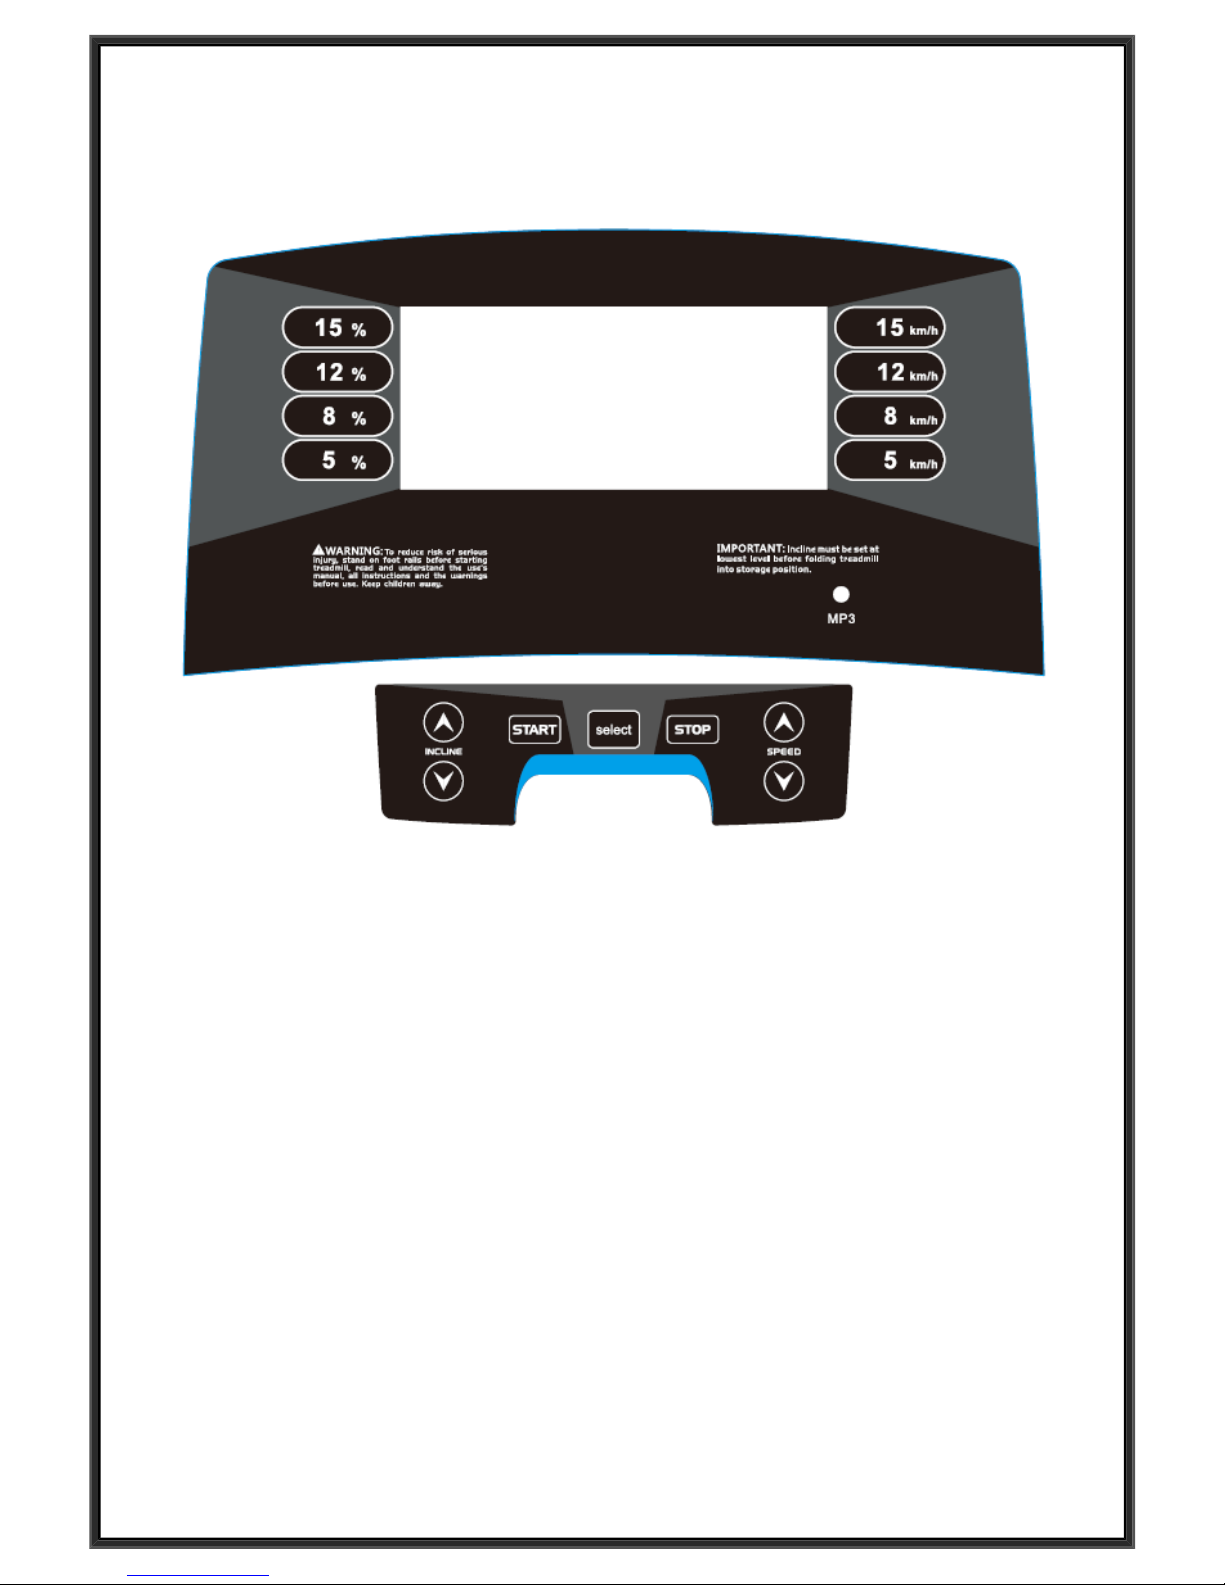
Freeform F40 User manual

F40 Treadmill
Operating Instructions Manual
Special tips:
1. Please read this operation manual carefully before installation and operation.
2. Save this manual for future reference.
3. Product may vary slightly from the item pictured due to model upgrades.
1

IMPORTANT SAFETY INSTRUCTIONS
Danger–To reduce the risk of electric shock disconnect your treadmill from the electrical outlet
prior to cleaning and/or service ork.
DO NOT USE AN EXTENSION CORD: DO NOT ATTEMPT TO DISABLE THE GROUNDED
PLUG BY USING IMPORPER ADAPTERS OR IN ANY WAY MODIFY THE CORD SET.
1) Install the treadmill on a flat level surface ith access to correct voltage and frequency,
grounded outlet.
2) Do not operate treadmill on deeply padded, plush or shag carpet. Damage to both carpet
and treadmill may result.
) Do not block the rear of the treadmill. Provide a minimum of 1 metre clearance bet een the
rear of the treadmill and any fixed object.
4) Place your unit on a solid, level surface hen in use.
5) Never allo children on or near the treadmill.
6) When running, make sure the plastic clip is fastened on your clothing. It is for your safety,
should you fall or move too far back on the treadmill.
7) Keep hands a ay from all moving parts.
8) Never operate the treadmill if it has a damaged cord or plug.
9) Keep the cord a ay from heated surfaces.
10) Do not operate here aerosol spray products are being used or here oxygen is being
administered. Sparks from the motor may ignite a highly flammable environment.
11) Never drop or insert any object into any openings.
12) The treadmill is intended for in-home use only and not suitable for long time running.
1 ) To disconnect, turn all controls to the off position, remove the safety key, and then remove
the plug from the outlet.
14) The pulse sensors are not medical devices. Various factors, including the user’s movement,
may affect the accuracy of heart rate readings. The pulse sensors are intended only as
exercise aids in determining heart rate trends in general.
15) Use handrails provided; they are for your safety.
16) Wear proper shoes. High heels, dress shoes, sandals or bare feet are not suitable for use
on your treadmill. Quality athletic shoes are recommended to avoid leg fatigue.
17) Allo ed temperature: 5 to 40 degrees.
Remove the safety key after use to prevent unauthorized treadmill operation.
WARNING:
Once finding any breakdo n or damage occurred, stop the treadmill and consult ith local agent to find out the
solution. In order to secure the personal safety, don’t make any maintenance ithout a qualified engineer.
WARNING - Read all instructions before using this treadmill. It is important your
treadmill receives regular maintenance to prolong its useful life. Failing to regularly
maintain your treadmill may void your warranty.
2

IMPORTANT ELECTRICAL INFORMATION
WARNING!
1) NEVER use a ground fault circuit interrupt (GFCI) all outlet ith this treadmill. Route the
po er cord a ay from any moving part of the treadmill including the elevation mechanism
and transport heels.
2) NEVER operate treadmill on Generator or UPS po er supply.
) NEVER remove any cover ithout first disconnecting AC po er.
4) NEVER expose this treadmill to rain or moisture. This treadmill is not designed for use
outdoors, near a pool, or in any other high humidity environment.
IMPORTANT OPERATION INSTRUCTIONS
1) Insert the po er plug into the socket directly.
2) The constant running time is less than 2 hours. Be sure to read the entire manual before
operating your machine.
) Understand that changes in speed and incline do not occur immediately. Set your desired
speed on the computer console and release the adjustment key. The computer ill obey
the command gradually.
4) Use caution hile participating in other activities hile alking on your treadmill; such as
atching television, reading, etc. These distractions may cause you to lose balance or stray
from alking in the centre of the belt; hich may result in serious injury.
5) In order to prevent losing balance and suffering unexpected injury, NEVER mount or
dismount the treadmill hile the belt is moving. This unit starts ith a very lo speed.
Simply standing on the belt during slo acceleration is proper after you have learned to
operate this machine.
6) Al ays hold on to handrail hile making control changes.
7) A safety key is provided ith this machine. Remove the safety key ill stop the alking belt
immediately; the treadmill ill shut off automatically. Insert the safety key ill reset the
display.
8) Do not use excessive pressure on console control keys. They are precision set to function
properly ith little finger pressure.
9) This appliance is not intended for use by persons (including children) ith reduced physical,
sensory or mental capabilities, or lack of experience and kno ledge, unless they have been
given supervision or instruction concerning use of the appliance by a person responsible for
their safety, Children should be supervised to ensure that they do not play ith the
appliance.
10) Please consult your doctor at first before running, if you have one of the follo ing diseases:
a. Cardiopathy, hypertension, sugar diabetes, respiratory disease, smoking, and other
chronic diseases, complication disease.
b. If you are over 35 years old and heavier than common eight.
c. Women in pregnant or in breasting period.
11) Please stop exercising immediately and consult your doctor hen you feel giddy, surfeit,
thorax ache or other symptoms.
12) Please drink adequate ater after taking exercises on our treadmill for more than 20
minutes.
3

Warning: No here e suggest that you should consult ith your physician or health professional
before starting your orkout, especially for ages above 35 or people ith existing health problems. We
take no responsible for any accidents or injuries if you don’t follo ing our specification. Treadmill ill be
carefully assembled and covered the motor shield, then connect to the po er.
ASSEMBLY INSTRUCTIONS
When you open the carton, you will find the below spare parts:
Spare parts list:
NO. DES. Specification Nos. NO. DES. Specification Nos.
1 MAIN FRAME 1 65 5#ALLEN WRENCH 5mm 1
95 LOCK WASHER 8 10 86 BOLT M5*12 6
70 BOLT M8*15 10 23 LEFT UPRIGHT TUBE CO ER 1
66 WRENCH W/SCREW
DRIVER
S=13,14,15 1 24 RIGHT UPRIGHT TUBE CO ER 1
FIXING TOOLS:
5#ALLEN WRENCH 5mm 1pcs、
WRENCH W/SCREW DRIVER S=1 、14、15 1pcs
4

Notice: Do not connect power before assembly completion
ASSEMBLY STEP 1:
ASSEMBLY STEP 2:
ASSEMBLY STEP :
Lift up the console (A) and Upright tube
(B) to ards the arro direction.
Notice: When you pull up them, make sure
do not press the ires inside the upright
tube; keep touch the upright and computer
by hand to prevent falling do n.
Use the 5# Allen rench(65) and M8*15
bolt(70) and lock washer (95), lock the
upright tube(B) onto MAIN FRAME .
Open the carton ,take out the above
spare parts and put the MAIN FRAME on
the level ground.
5

ASSEMBLY STEP 4:
ASSEMBLY STEP 5:
Use the 5# Allen rench (65) and M8*15
bolt (70) and lock washer (95), lock the
computer (A) onto the left and right upright
tube (B).
Fix the Left & Right upright tube
covers(23,24) to the base frame (A) by
using rench /scre driver (66) and
M5*12 bolt(86).
ATTENTION:Please make sure the machine is completely assembled before
operation. Before you use the treadmill, please read the instructions carefully.
6

FOLDING INSTRUCTIONS
Pulling up:
Pulling down:
Pulling Down:
Support place A ith hand, then pull up as
the arro direction, till hearing the sound
that the CYLINDER (B) is locked into the
round tube.
Support place A ith hand, press the
frame slightly, then kick the place B , and
the base frame ill fall do n
automatically.
7

GROUNDING METHODS
This product must be grounded. If it should malfunction or breakdo n, grounding provides
a path of least resistance for electric current to reduce the risk of electric shock. This
product is equipped ith a cord having an equipment-grounding conductor and a
grounding plug. The plug must be plugged into an appropriate outlet that is properly
installed and grounded in accordance ith all local codes and ordinances.
DANGER – Improper connection of the equipment-grounding conductor can result in
a risk of electric shock. Check ith a qualified electrician or serviceman if you are in doubt
as to hether the product is properly grounded. Do not modify the plug provided ith the
product – if it ill not fit the outlet, have a proper outlet installed by a qualified electrician.
This product is for use on a nominal voltage circuit and has a grounding plug that
looks like the plug illustrated in sketch A in follo ing figure. Make that the product is
connected to an outlet having the same configuration as the plug. No adapter should be
used ith this product.
8

OPERATION GUIDE
WINDOW DISPLAY:
1、“SPEED” indo : The indo ill display speed under operation mode, sho speed range of : 1.0-
16 KM/H.
2、”DIS./CAL./INCL.” indo : Display the running distance, runner’s calories orked out and incline
every five seconds in turn.
A. Display the running distance positive direction from 0.00-99.9, hen up to 99.9, it ill count again
from 0; When count do n, it ill sho from setting data to 0; When do n to 0, the machine ill stop
smoothly and sho ‘ End ’, enter into the initial situation after 5 seconds.
B. Display runner’s calories orked out. it ill count from 0 to 999, hen up to 999, it ill count again
from 0; hen count do n, it ill count from the setting data to 0, hen do n to 0, the machine ill stop
smoothly and sho ‘ End ’, and enter into the situation aiting for operation after 5 seconds.
C. Display incline range: 0-15 sections.
3、” TIME/PULSE” indo : Display running time and the runner’s heart beat. Display the exercise time
positive direction clock from 0:00-99:59 , hen count to 99:59, the machine ill stop smoothly and
sho ‘ End ‘, then enter into initial situation after 5 seconds; When count do n, it ill sho from the
setting time to 0:00, hen do n to 0:00 , the machine ill stop smoothly and sho ‘ End ’, and ill enter
into the initial situation. When the runner holds handle pulse ith t o hands, the system can calculate
the runner’s heart beat and sho in this indo , the range is 50-200 beats/min ( this data is just for
reference, can not be as the medical data).
9

BUTTON FUNCTION:
1、“SELECT” Button:Press this button to choose modes circularly “0:00” “15:00”、“1.0”、“50” “ P1-
P15…U01-U02-U03 -FAT”(“0:00” is manual model, “15:00” is the time count do n, “1.0” is distance
count do n and “50” calorie count do n); hen you choose each mode, you can press the speed
button and incline button to set value, after that ,press the START button to start this treadmill.
2、“START” button:hen start the po er and attach the magnet end of the safety pulling rope to the
computer, press this button and the machine ill start ork.
3、“STOP” button: Press this button to stop the machine;
4、“SPEED+”、“SPEED-” Button:Press this button to set the value under setting mode. Press this
button to adjust the speed hen the machine is orking.
5、“INCLINE+” , “ INCLINE-” button: Press this button to set the value under setting mode. Press this
button to adjust the incline hen the machine is orking.
6、”INCLINE: 5、8 、12、15” incline shortcut button: set incline quickly
7、“SPEED:5、8 、12、15” speed shortcut button:set speed quickly
START-UP QUICKLY (MANUAL)
1、Open the po er s itch, attach the magnet end of the safety pulling rope to the computer.
2、Press STATR button,the system ill enter into 3 seconds count do n, the buzzer ill make sound
and the speed indo display count do n, the speed ill run ith speed of 1.0km/hour after 3
seconds.
3、After start-up, you can use speed up or do n to adjust the speed up or do n, and use incline up or
do n to adjust the incline up or do n.
THE OPERATION OF EXERCISE PROCESS:
1. Press speed-do n ill reduce the running speed.
2. Press speed-up ill increase the running speed.
3. Press incline do n ill reduce the incline section.
4. Press incline up ill increase the incline section.
5. Press the speed shortcut button ill adjust the running speed.
6. Press incline shortcut button ill adjust the incline section.
7. Press the stop button ill stop the machine.
8. Holding the handle pulse ith t o hands about 5 seconds ill sho the pulse data.
MANUAL MODE:
1.Under standby mode, press START button directly, the treadmill ill ork from the speed 1.0km/h,
incline 0. The other indo s ill start to count from positive direction from indo s default, press
“SPEED+”, “SPEED-” change the speed, press “INCLINE+”、“INCLINE -”to change the incline;
2. Under standby mode, press “SELECT” button to enter time count do n, the TIME indo ill
display“15:00” and glittering. Press “SPEED+”, “SPEED-” , “INCLINE+” 、 “INCLINE –“ to set up the
time hat you need. The setting range is 5:00-99:00.
3.In Time setting model, press “SELECT“ button to enter into distance count do n, the DISTANCE
indo ill display “1.0” and glittering. Press “SPEED+”, “SPEED-”, “INCLINE+”、
“INCLINE –“ to set up
the distance hat you need. The setting range is 0.5—99.9.
4. To set up the Distance, press “SELECT” button to enter into calories count do n, the CAL indo
ill display “50’ and glittering. Press “SPEED+”, “SPEED-” , “INCLINE+” 、 “INCLINE –“ to set up the
calories hat you need. The setting range is 10-999.
10

5. When setting is finished, press “START” button to start up, the treadmill ill run after 3 seconds,
press “SPEED+”, “SPEED-”, “INCLINE+”、 “INCLINE –“ to adjust the speed and the incline; press the
STOP, the treadmill ill stop.
INNER INSTALL PROGRAM
There are 15 kinds of inner install program from P1-P15 for this machine.
In initial situation, Press “SELECT” button DISTANCE indo ill display P1-P15.
Choose your favorite program, at the same time, the TIME indo is glittering. Display the advance
setting time10:00, press “SPEED+”, “SPEED-”, “INCLINE+”、 “INCLINE –“ to set up the exercise time
you ant. Press “START” button to start the program you have set. The inner install program can be
divided into 10 sections. The time for each section=Total time you have set/10. During the operation of
each section, you can press SPEED and INCLINE button to adjust speed and incline, but the machine
ill recover to be parameter have set hen enter into the next section.
When the machine finish one program, the system ill make 3 sound “B—B—B—“ and stop steadily.
PROGRAM EXERCISE CHART
TIME INTERVAL=SETTING TIME/10
1 2 3 4 5 6 7 8 9 10
P1 SPEED 3 3 5 5 7 7 5 5 3 3
INCLINE 1 1 2 2 2 3 3 2 1 1
P2 SPEED 10 3 5 7 3 7 5 7 5 3
INCLINE 1 2 2 2 2 3 3 2 3 3
P3 SPEED 3 3 5 7 7 9 7 5 5 1
INCLINE 2 3 3 2 2 3 3 3 4 4
P4 SPEED 3 5 3 7 1 5 7 5 3 1
INCLINE 2 3 3 2 2 3 3 3 4 0
P5 SPEED 5 5 5 7 9 11 9 7 7 5
INCLINE 3 3 3 4 4 5 5 5 5 2
P6 SPEED 3 5 9 11 7 12 9 11 5 3
INCLINE 3 5 5 5 4 4 4 3 4 2
P7 SPEED 3 7 9 11 9 9 9 7 5 5
INCLINE 4 4 4 4 3 3 6 6 8 3
P8 SPEED 5 5 9 9 11 5 11 11 5 3
INCLINE 4 5 5 5 6 6 6 7 10 3
P9 SPEED 2 5 5 8 8 4 6 3 3 2
INCLINE 5 5 5 6 6 6 4 4 8 2
P10 SPEED 2 3 4 6 7 5 5 6 7 3
INCLINE 5 6 6 6 7 5 8 8 5 3
P11 SPEED 3 4 5 9 5 9 5 5 6 3
INCLINE 3 6 5 3 5 3 5 5 4 2
11

P12 SPEED 1 2 3 10 7 7 10 5 4 3
INCLINE 2 5 5 3 5 5 3 3 6 2
P13 SPEED 1 1 3 5 5 5 9 3 1 1
INCLINE 5 5 8 8 8 3 3 7 8 0
P14 SPEED 3 4 7 3 4 6 3 4 5 3
INCLINE 2 4 4 4 4 2 3 3 1 0
P15 SPEED 2 3 5 5 7 7 7 6 4 3
INCLINE 3 3 5 5 5 5 2 2 1 0
SELF-DEFINE PROGRAM
Besides 15 inner installed programs, there are 3 user self-define programs: U01, U02, U03
1. User self-define program setting:
In the initial situation, press “ program” continually till U01,U02,U03, and the “ time ” indo glitter,
sho the time 15:00, press “ incline+”, “ incline-”, “speed+”, “speed-” to set the running time; press
“mode” to set program data, set the first interval time, press “speed+”, “speed-” or press speed shortcut
button to set the speed; press “incline+”, “incline-” or incline shortcut button to set the incline; then press
“mode” button to finish the first interval time and enter into the second interval time, until finish 10
interval time. The data ill be kept till the next setting, the data ill not lost for po er off.
2. User self-defines program starting:
When the machine is aiting for operation, press the “program” button continually till U1,U2,U3, set the
running time then press “start” to start the machine.
3. User self-define program instruction:
Each program ill be divided into 10 time section, set the speed and incline in each interval time, then
press “start” to run the machine.
RANGE OF PROGRAM
PROGRAM ORIGION SET UP
RANGE
DISPLAY
RANGE
TIME(MIN:SECOND) 0:00 10:00 5:00-99:00 0:00-99:59
INCLINE(SECTION) 0 0 0-15 0-15
SPEED(KM/H) 1.0 1.0 1.0-16 1.0-16
DISTANCE(KM) 0 1.0 0.5-99.9 0.00-99.9
PULSE(HYPO/MIN) P N/A N/A 50-200
CALORIE(THERM) 0 50 10-999 0-999
BODY TESTER:
At the beginning state, press “ SELECT” button until you find FAT body fat test, hold on “ SELECT“
button for about 3 seconds to set F-1 、F-2 、F-3、F-4 、F-5 ( F-1 SEX, F-2 AGE, F-3 HEIGHT, F-4
WEIGHT, F-5 BODY FAT ).
Press “SPEED+”、“SPEED -” to set F-1 – F4 ( refer to the follo ing chart), after finish setting of F-1,F-
2,F-3,F-4, press “ SELECT” to set F-5, hold the hand pulse for a hile, the indo ill display your
body quality index after 3 seconds. The body quality index is to test the relation bet een height and
eight. The body FAT suits for any male and female. The idea FAT should be 20-25, if under 19, it
means too thin. If bet een 25 and 29, it means over eight, if over 30, it means obesity. (The data is
12

just for reference, can not be as medicinal data.)
F-1 Sex 01 male 02 female
F-2 Age 10------99
F-3 Height 100----200
F-4 Weight 20-----150
F-5 FAT ≤19 Under eight
FAT =(20---25) Normal eight
FAT =(26---29) Over eight
FAT ≥30 Obesity
SAFETY LOCK FUNCTION:
Pull out the safety pulling rope, then the treadmill ill stop immediately. All the indo s
display“―――” ,the buzzer ill make 3 sound “B—B—”,no the treadmill must be stop. Attach the
magnet end of the safety pulling rope to the computer, the treadmill ill be at the beginning of running.
SAVE ON POWER FUNCTION:
The system is ith saving on po er function, at the state of aiting for operation, if ithout any operate,
the saving on po er function ill be available after 10 mins, the display ill be closed up. You can
press any button to ake up the display.
MP FUNCTION
When the po er on, connect the external MP3 equipment, the computer ill play. The voice is
adjustable from operate the external MP3 equipment; the voice should be adjusted on the proper
section to protect the computer loudhailer.
CLOSE UP:
Close up the po er: You can close up the po er to stop the treadmill; it on’t be damaged at any time.
CAUTION:
1. We recommend that you maintain a slo speed at the beginning of a session and hold on to the
handrails until you become comfortable and familiar ith the treadmill.
2. Attach the magnet end of the safety pulling rope to the computer and also attach the clip of the
safety pulling rope to your clothing.
3. To end your orkout safely, press the STOP button or pull out the safety pulling rope, then the
treadmill ill stop immediately.
13

EXERCISE INSTRUCTIONS
1. The Warm Up Phase
This stage helps get the blood flo ing around the body and the muscles orking properly. It ill also
reduce the risk of cramp and muscle injury. It is advisable to do a fe stretching exercises as sho n
belo . Each stretch should be held for approximately 30 seconds, do not force or jerk your muscles into
a stretch - if it hurts, STOP.
2. The Exercise Phase
This is the stage here you put the effort in. After regular use , the muscles in your legs ill
become Stronger. Work to your but it is very important to maintain a steady tempo throughout. The rate
of ork should be sufficient to raise your heart beat into the target zone sho n on the graph belo .
This stage should last for a minimum of 12 minutes though most people
start at about 15-20 minutes
. The Cool Down Phase
This stage is to let your Cardio-vascular System and muscles ind do n. This is a repeat of the
arm up exercise e.g. reduce your tempo, continue for approximately 5 minutes. The stretching
exercises should no be repeated, again remembering not to force or jerk your muscles into the
stretch.
As you get fitter you may need to train longer and harder. It is advisable to train at least three times a
eek, and if possible space your orkouts evenly throughout the eek.
14

To tone muscle hile on your Treadmill you ill need to have the resistance set quite high. This ill
put more strain on our leg muscles and may mean you cannot train for as long as you ould like. If you
are also trying to improve your fitness you need to alter your training program. You should train as
normal during the arm up and cool do n phases, but to ards the end of the exercise phase you
should increase resistance, making your legs ork harden than normal. You may have to reduce your
speed to keep your heart rate in the target zone.
The important factor here is the amount of effort you put in. The harder and longer you ork the more
calories you ill burn. Effectively this is the same as if you ere training to improve your fitness, the
difference is the goal.
MAINTENANCE INSTRUCTIONS
WALKING BELT CENTERING AND TENSION ADJUSTMENT
DO NOT OVERTIGHTEN the walking belt. This may cause reduced motor performance and excessive
roller ear.
TO CENTER WALKING BELT:
● Place treadmill on a level surface
● Run treadmill at approximately 3.5 mph
● If the belt has drifted to the right, turn the right adjusting bolt 1/2 turn clock ise and the left adjusting
bolt 1/2 turn counterclock ise
● If the belt has drifted to the left, turn the left adjusting bolt 1/2 turn clock ise and the right adjusting
bolt 1/2 turn clock ise and the right adjusting bolt 1/2 turn counterclock ise
Picture A If the belts has drifted to the RIGHT Picture B If the belts has drifted to the LEFT
WARNING: ALWAYS UNPLUG THE TREADMILL FROM THE ELECTRICAL OUTLET BEFORE
CLEANING OR SER ICING THE UNIT.
PIC A PIC B
15

CLEANING
General cleaning or the unit ill greatly prolong the treadmill. Keep treadmill clean by dusting regularly.
Be sure to clean the exposed part of the deck on either side of the alking belt and also the side rails.
This reduces the build up of foreign material underneath the alking belt.
The top of the belt may be cleaned ith a et, soapy cloth. Be careful to keep liquid a ay from inside
the motorized treadmill frame or from underneath the belt. Warning:Always unplug the treadmill
from the electrical outlet before removing the motor cover. At least once a year remove the motor
cover and vacuum under the motor cover.
WALKING BELT AND DECK LUBRICATION
This treadmill is equipped ith a pre-lubricated, lo maintenance deck system. The belt/ deck
friction may play a major role in the function and life of your treadmill, thus requiring periodic lubrication.
We recommend a periodic inspection of the deck.
We recommend lubrication of the deck according to the follo ing timetable:
Light user (less than 3 hours/ eek) annually
Medium user (3-5 hours/ eek) every six months
Heavy user (more than 5 hours/ eek) every three months
16

EXPLODED DRAWING
17

PARTS LIST
No. Description Specification Q’ty No. Description Specification Q’ty
1 BASE FRAME 1 52 BLUE RUBBR CUSHION 2
2 MAIN FRAME 1 53 ADJUSTABLE WHEEL 2
3 INCLINE FRAME 1 54 CONE-SHAPE CUSHION 2
4 COMPUTER FRAME 1 55 FLAT FOOT PAD 6
5 MOTOR BRACKET 1 56 WIRE PROTECTOR 2
6 LEFT UPRIGHT TUBE 1 57 THREAD AXLE 2
7 RIGHT UPRIGHT TUBE 1 58 SPEED SENSOR 1
8 BOLT M5*16 6 59 AC SINGLE WIRE BLUE 1
60 AC SINGLE WIRE BROWN 2
10 FRONT ROLLER 1 61 GROUNDING WIRE 1
11 BACK ROLLER 1 62 MAGNET RING 1
12 CYLINDER 1 63 MAGNET CORE 1
13 BUSHING 4 64 POWER WIRE 1
14 PLASTIC PAD 4 65 5# ALLEN WRENCH 5mm 1
15 TRANSPORT WHEEL PLUG 4 66 WRENCH W/SCREW
DRIVER
S=13、
14、
15 1
16 TRANSPORT WHEEL 2 67 BOLT M8 6
17 RUNNING BOARD 1 68 BOLT M10 6
18 COMPUTER TOP COVER 1 69 BOLT T2.9*6.5 16
19 COMPUTER PANEL 1 70 SCREW M8*15 12
20 BOLT M5*12 2 71 SCREW M8*20 6
21 CUSHION PAD 4 72 SCREW M8*30 1
22 ANTI-SLIP PAD OPTIONAL 2 73 SCREW M8*42 1
23 LEFT UPRIGHT TUBE COVER 1 74 SCREW M8*40 2
24 RIGHT UPRIGHT TUBE
COVER
1 75 SCREW M8*40 2
25 LEFT BACK END COVER 1 76 SCREW M8*70 2
26 RIGHT BACK END COVER 1 77 SCREW M8*80 2
27 MOTOR TOP COVER 1 78 SCREW M10*30 4
28 MOTOR BUTTON COVER 1 79 SCREW M10*45 1
29 80 SCREW M10*60 1
30 SIDE RAIL 2 81 SCREW M8*45 1
31 SAFETY KEY MAGNETIC
SENSOR
1 82 SCREW M8*35 1
32 AC SINGLE WIRE BLUE 1 83 SCREW M6*55 3
33 AC SINGLE WIRE BROWN 1 84 SCREW M6*35 2
34 PIPE END CAP 2 85 SCREW M6*25 6
35 SPEAKER NET 1 86 SCREW M5*12 8
36 87 SCREW M5*8 15
37 SAFETY KEY 1 88 SCREW ST4.2*12 12
18

38 DC MOTOR 1 89 SCREW ST4.2*12 11
39 INCLINE MOTOR 1 90 SCREW ST2.9*8 2
40 MCB BOARD 1 91 SCREW ST4.2*50 2
41 TRANSFORMER 1 92 SCREW ST4.2*30 2
42 POWER OUTLET 1 93 PCB BOARD 1
43 SQUARE SWITCH 1 94 LOCK WASHER 6 3
44 OVERLOAD PROTECTOR 1 95 LOCK WASHER 8 16
45 RUNNING BELT 1 96 LOCK WASHER 10 2
46 MOTOR BELT 1 97 SPRING WASHER 8 6
47 FOAM COVER 2 98 FLAT WASHER C 8 7
48 HANDPULSE WITH INCLINE 1 99 BIG WASHER C φ10*φ26*2.0 8
49 HANDPULSE WITH SPEED 1 100 CONSOLE UPPER WIRE 1
50 BLACK RUBBER CUSHION 4 101 CONSOLE BOTTOM
WIRE
1
51 BLUE RUBBR CUSHION 2 102 FILTER OPTIONAL 1
103 INDUCTANCE OPTIONAL 1
19

TROUBLE SHOOTING GUIDE
1. There is no display on screen after the machine is connected to the po er source:
a: Please check the overload button, if the overload protector button bounce, please press
this button;
b: Please make sure the po er source, overload protector ,the driver and the transformer
are connected ell;
c: Please make sure the ire from the driver to the computer board are connected ell.
d: Check the transformer, if it is rong, please change a ne one;
2. E01 display: Failure of signal from computer board to the driver
a: Please check the ire from the drive to the computer board, if the ire is broken, please
change a ne one.
b: Please check the electronic parts in computer board, if it is rong, change a ne one;
c: Change a ne transformer;
3. E02 display: Anti-explosion protects or motor problem
a: Please check the ire from motor, please connect the ire ell; If this is no problem
ith ire connection, please change a ne motor.
b: Please is there bad smell from the control board, if the IGBT is shorted out, please
change a ne driver;
c: Please make sure the voltage is in normal condition.
4. E03 display: No signal
a: If the E03 is displayed after start of 5 to 8 seconds, this is the failure of signal, please
check the connection of sensor is ell. If it is not connected ell, please connect again. If
the sensor do not ork ell, change a ne sensor;
b: The signal in control board is rong, please change a ne driver;
5. E04 or E06 display: The failure of incline
a: Please check the signal ire of incline motor is connected ell;
b: Please check the AC line of incline motor is connected to the right slot;
c: Please check the ire of incline motor, change a ne ire or a ne incline motor.
20
Table of contents
Other Freeform Treadmill manuals
Popular Treadmill manuals by other brands

Star Trac
Star Trac 2000 series user manual

Pro-Form
Pro-Form PFTL59508.0 user manual

CARDIOSTRONG
CARDIOSTRONG TX-50 Assembly and operating instructions

HEALTH RIDER
HEALTH RIDER SOFT STRIDER EX 831.297871 user manual

Pro-Form
Pro-Form PRO 2500 user manual

Life Fitness
Life Fitness Treadmill 95TW parts manual