FreePP MPES-4 User manual

1
FreePP MPES-4
User Guide V1.13
Model: BV1201

2
Copyright
© 2005-2008 FreePP Inc. All rights reserved.
This user guide and the software described in it are copyrighted with all rights reserved. No part of this publication may be
reproduced, transmitted, transcribed, stored in a retrieval system, or translated into any language in any form by any means without
the written permission of FreePP Inc.
Notice
FreePP reserves the right to change specifications without prior notice.
While the information in this manual has been compiled with great care, it may not be deemed an assurance of product
characteristics. FreePP shall be liable only to the degree specified in the terms of sale and delivery.
The reproduction and distribution of the documentation and software supplied with this product and the use of its contents is subject
to written authorization from FreePP Inc.
Specific trademark usage guidelines
1. Logos. You may not use any FreePP logos (including buttons and graphic symbols) without a trademark license from FreePP Inc.
All usage of trademark logos shall be pursuant to these guidelines and any other guidelines associated with that logo.
2. Merchandise items. You may not manufacture, sell, or give away merchandise items bearing FreePP trademarks or logos,
except pursuant to and express written trademark license from FreePP Inc.
3. Slogans and taglines. You may not use or imitate a FreePP slogan or tagline such as "Voice beyond Sky".

3
How to Use this Guide
This guide has been written to be understood easily and the following typographic conventions and symbols are used throughout this
document:
Very important information. Failure to observe this may result in damage.
Important information that should be observed.
Additional information that might be helpful.
Help Us to Improve this Document
Should you find any mistakes in this document or want to provide comments to improve the manual please send e-mail directly to:
FreePP Technical Support
If you have questions when installing or using this product, please go to FreePP website at www.freepp.com for:
Direct contact to the FreePP support centers.
Frequently Asked Questions (FAQ).
Feedback section to leave your message.
Download area for the latest software, user documentation and product updates.

4
Table of Contents
Copyright...........................................................................................................................................................................................................2
Notice .................................................................................................................................................................................................................2
Specific trademark usage guidelines........................................................................................................................................................2
How to Use this Guide...................................................................................................................................................................................3
Help Us to Improve this Document............................................................................................................................................................3
FreePP Technical Support............................................................................................................................................................................3
Chapter 1: Introduction .......................................................................... 7
Chapter 2: Getting to Know the MPES-4 ........................................................... 8
Front Panel Connectors................................................................................................................................................................................8
Front Panel LED Indications........................................................................................................................................................................9
Back Panel Connectors...............................................................................................................................................................................10
Chapter 3: Connecting the MPES-4............................................................... 11
Overview..........................................................................................................................................................................................................11
Instructions for connecting the MPES-4.................................................................................................................................................12
Chapter 4: Getting started with accessing the MPES-4 ............................................. 14
Overview..........................................................................................................................................................................................................14
How to use FreePP Starter..........................................................................................................................................................................15
Access to your MPES-4...............................................................................................................................................................................16

5
Chapter 5: Configuring the MPES-4 via Web Interface.............................................. 19
Overview..........................................................................................................................................................................................................19
Status & Log...................................................................................................................................................................................................24
Status & Log | Status Monitor................................................................................................................................................................25
Status & Log | Configuration..................................................................................................................................................................26
Status & Log | System Log ....................................................................................................................................................................28
Status & Log | Call Log...........................................................................................................................................................................30
Networking......................................................................................................................................................................................................31
Networking | IP Settings.........................................................................................................................................................................32
Networking | IP Settings | DHCP Client...............................................................................................................................................33
Networking | IP Settings | Static IP.......................................................................................................................................................34
Networking | IP Settings | PPPoE Client..............................................................................................................................................36
Networking | HTTP proxy.......................................................................................................................................................................37
Telephony........................................................................................................................................................................................................38
Telephony | Port Setting.........................................................................................................................................................................40
Telephony | Call forwarding Setting......................................................................................................................................................41
Telephony | Localized Dialing Plan.......................................................................................................................................................45
Telephony | FXO Outbound Policy .......................................................................................................................................................47
Telephony | FXO Inbound Policy ..........................................................................................................................................................49
Telephony | Advanced Setting...............................................................................................................................................................51
Telephony | Analog Coefficients............................................................................................................................................................53
Telephony | Analog Coefficients | Busy Tone Recognition................................................................................................................56
Telephony | Voice Volume Setting........................................................................................................................................................59
System .............................................................................................................................................................................................................60
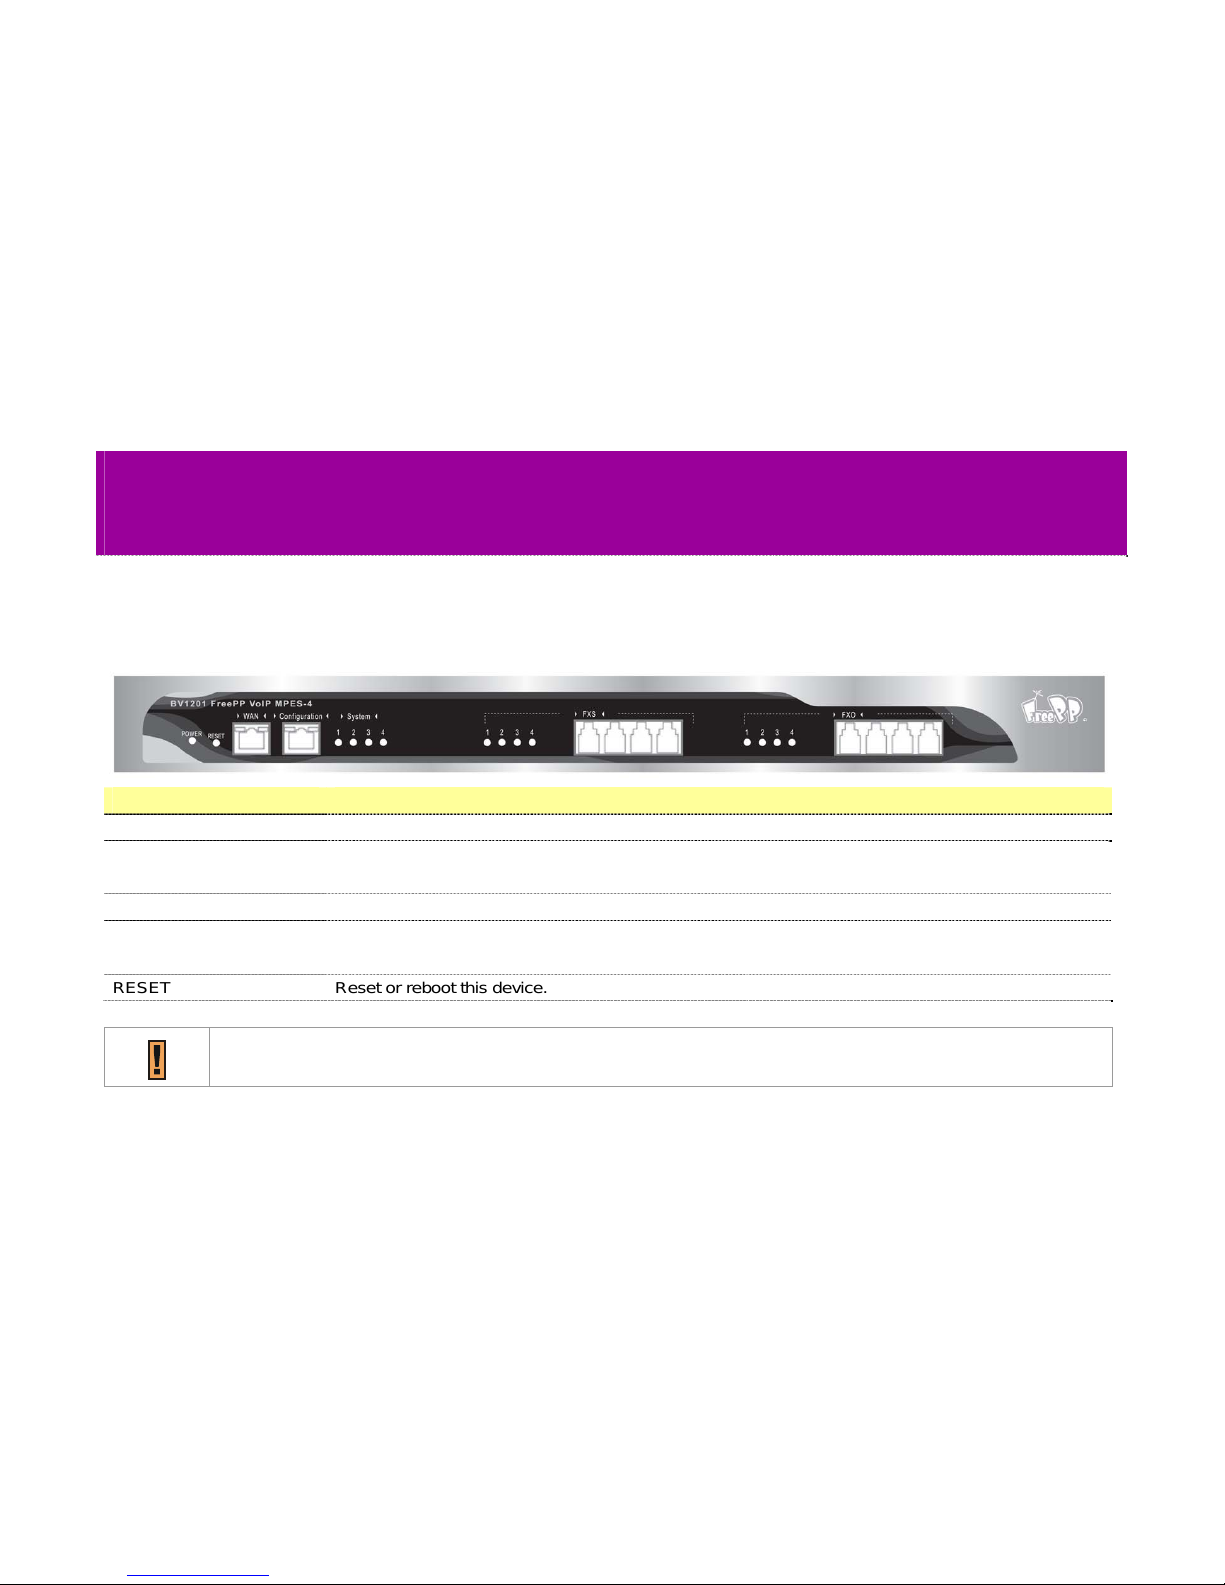
System | System log Setting..................................................................................................................................................................61

6
System | Time Setting.............................................................................................................................................................................62
System | NTP Setting .............................................................................................................................................................................63
System | Upgrade (Firmware Upgrade)...............................................................................................................................................65
System | Administrator Password.........................................................................................................................................................66
System | Reset (Restore to factory default)........................................................................................................................................67
System | System Reboot........................................................................................................................................................................68
Quick Setup....................................................................................................................................................................................................69
Quick Setup | IP Setting | DHCP Client...............................................................................................................................................71
Quick Setup | IP Setting | Static IP.......................................................................................................................................................72
Quick Setup | IP Setting | PPPoE Client..............................................................................................................................................74
Diagnostic.......................................................................................................................................................................................................75
Chapter 6: Making FreePP Calls.................................................................. 77
Place FreePP On-Net Calls.........................................................................................................................................................................77
Place FreePP Outbound Calls (FreePP OUT Service).........................................................................................................................77
Chapter 7: Adding FreePP Credit................................................................. 78
Add FreePP Credit to your FreePP account ..........................................................................................................................................78
Chapter 8: Appendix ............................................................................ 79
FCC REQUIREMENTS..................................................................................................................................................................................79

7
Chapter 1: Introduction
Thank you for choosing FreePP MPES-4. This MPES-4 will
allow you to make and receive phone calls through FreePP
network using your existing broadband connection. Our
MPES-4 is named BV1201, so BV1201 stands for this
MPES-4 here from in this Guide.
What’s in this Guide?
This user guide contains the steps for installing the BV1201.
zChapter 1 Introduction
zChapter 2 Getting to Know the MPES-4
zChapter 3 Connecting the MPES-4
zChapter 4 Getting Started with accessing the MPES-4
zChapter 5 Configuring the MPES-4 via Web Interface
zChapter 6 Making FreePP calls
zChapter 7 Adding FreePP Credit
zChapter 8 Appendix

8
Chapter 2: Getting to Know the MPES-4
Front Panel Connectors
Connector Description
FXS(1-4) The four FXS ports allow you to connect the MPES-4 to the CO lines of PBX or telephone sets.
FXO(1-4) The four FXO ports allow you to connect the MPES-4 to the extension lines of PBX or to receive
plain old telephone service from PSTN.
Configuration The Configuration port allows you to change the settings of the MPES-4 by using FreePP Starter.
WAN The WAN port allows you to connect the MPES-4 to broadband Internet access, such as modem or
router using a Cat.5 Ethernet network cable.
RESET Reset or reboot this device.
The MPES-4 supports 4 voice ports. Each port can be configured as either FXS or FXO. You can do the
configuration via web management.

9
When the reset button is pressed, the MPES-4 will reboot. When the reset button is pressed for 5 seconds, the
MPES-4 will reboot and go back to the default settings.
Front Panel LED Indications
LED Color Description
POWER Green It lights up when the MPES-4 is powered on.
FXS(1-4) Green They light up when FXS are in use. They go off when FXS are not in use.
FXO(1-4) Green They light up when FXO are in use. They go off when FXO are not in use.
System(1-4) Green They are solidly lit when registration to FreePP Server is successful.
Green Link and data transmissionWAN Orange 10/100M connection established
PBX stands for Private Branch eXchange.

10
Back Panel Connectors
Port Description
Power The power port is where you connect the included power cord to AC Outlet.
ON/OFF A switch to power on or power off MPES-4.

11
Chapter 3: Connecting the MPES-4
Overview
This chapter gives connection guidelines on how to
connect FreePP MPES-4 to your network and PBX.A
typical connection diagram is shown on the right.

12
Instructions for connecting the MPES-4
There are two ways to connected the MPES to PBX:
1. FXS port of MPES connected to FXO port of PBX.
Step1.
Plug the AC cord in and turn the switch to on.
Step2.
Connect the WAN port of MPES to ADSL/Cable modem
with network cable.
Step3.
Connect the FXS port of MPES to FXO port of PBX with
phone cable.

13
2. FXO port of MPES connected to FXS port of PBX.
Step1.
Plug the AC cord in and turn the switch to on.
Step2.
Connect the WAN port of MPES to ADSL/Cable modem
with network cable.
Step3.
Connect the FXO port of MPES to FXS port of PBX with
phone cable.
The MPES-4 can work properly without PC/Laptop except for changing the settings.
In some particular network, MAC authentication is enabled, so you have to inform the network administrator about the
MAC address of your MPES-4.
If the system light is green, it means the registration connection is successful.
There are two possible reasons for the registration failed issue
1) The MPES-4 is not activated by FreePP, and 2) the network configuration of MPES-4 is incorrect.
For the reason 1, please contact customer service representative. For the reason 2, please refer to the Chapter 5
Configuring the MPES-4 via WEB Interface.

14
Chapter 4: Getting started with accessing the MPES-4
Overview
You can configure the MPES-4’s network settings via web
interface. For the first web browser, please launch the
FreePP Starter utility that is provided with your product CD.

15
How to use FreePP Starter
The FreePP Starter is a software utility that is included on the
Product CD.
The utility automatically detects FreePP devices installed on
your network, regardless of its host IP address and lets you
configure each unit’s IP settings. It provides quick access to
your MPES-4 via HTTPS.
To install the FreePP Starter utility, please insert the
Installation CD into your CD-ROM driver. Find and install the
utility from the product CD into the computer.
If the Installation CD does not start automatically, please run “BV1201.exe” manually from the root directory of the
installation CD.

16
Access to your MPES-4
To access web management page, please launch the FreePP
Starter utility that is provided with your product CD. The
following are the instructions:
1. Connect the Configuration port of MPES to your
computer with the Ethernet cable.
2. Set your IP address in local area network of computer as
Obtain an IP address automatically.

17
3. Install the FreePP Starter utility from the Installation CD.
Click Start > Programs > FreePP > Starter > FreePP
Starter to launch the application. If the MPES-4 is
connected to your network, the utility will find your
MPES-4 automatically.
4. Select continue to this website in security certificate
window to launch the web management interface through
the secure https connection.
5. Enter the MPES-4 login settings to access the web
management interface.
FreePP ID You can find the FreePP ID number at the
bottom of the MPES-4.
Password You can find the Password of MPES-4 on the
ID card.

18
6. After successful login you will see the controller web
interface. Now you are enabled to perform your
configuration.
For the first web browser, you will be directed to Quick Setup
page.Others will be directed to Status Monitor Page.
After the procedure as above, If you can’t access the MPES-4 with FreePP Starter, please check gateway IP address
from Ethernet connection status of your computer and type it in the web browser’s address bar directly. (e.g.
https://172.17.12.1).
You can remotely login by typing WAN IP address in the web browser’s address bar. (e.g. https://60.244.104.185 ).

19
Chapter 5: Configuring the MPES-4 via Web Interface
Overview
The main web management menu is displayed as follows
after successful login. From this page all essential
configuration pages are accessed.
The web management menu has the following structure.
The FreePP logo provides quick connection to
www.freepp.com when you click on it.
This button is always blinking after Save, an alert window
will always pop up when you click on Apply button, to
double check whether you want to apply all the changes
and reboot or not.

20
You will logout and return to Login page after clicking on
Logout button.
Status & Log
Status Monitor
View the important information and monitor the status of
each port.
Configuration
Display the information about the configuration of network
and telephony.
System Log
Check the system event log messages.
Call Log
To view the call record details.
Networking
IP Settings
Setup the basic parameter to connect the network.
HTTP proxy
Set the HTTP proxy address
This manual suits for next models
1
Table of contents
Popular Gateway manuals by other brands

Citrix
Citrix EasyCall Gateway 2.1 Guide

AMX
AMX NXR-ZGW-PRO Operation/reference guide

Burkert
Burkert ME43 operating instructions

Emerson
Emerson Smart Wireless Gateway 1420 Quick installation guide

Comtrend Corporation
Comtrend Corporation VI-3223u user manual

Grandstream Networks
Grandstream Networks GXW-4104 Configuration guide