Freetalker RD-018 User manual

Freetalker
RD-018
Manual

CONGRATULATIONS!
This communicator is the newest generation in personal two-way
communications, It’s a lightweight, compact two-way communication device
that can be used to stay connected with family or friends at parks, shopping
malls, sporting events, concerts-virtually any indoor or outdoor activity.
Here are some of the communicators excellent features:
·Wrist Watch Style with Adjustable Band
·Multi Channels(Channels depend on different countries)
·38 Group CTCSS
·Up to 1.5 Mile Range
. Auto Squelch
·Auto Battery Saving
·Internal VOX
·Channel Scan
·12 Hour AM/PM Wristwatch
·Backlit LCD Display
·Lithium Ion Battery Power Source
Read this Owner’s Manual carefully and you’ll get the most out of your
two-way wristwatch communicator.
NOTE:
Maximum range varies based on terrain and environment. It wil
l
generally be greater in open fields and shorter within and around
buildings or large structures. Bear in mind, this unit may not ensure
y
our
p
rivac
y
of communication.
LCD SCREEN
1.ChannelNumber-Displayscurrentchannel
2.Transmit Indicator (TX)-Indicates when unit is
transmitting.
3.Receive Indicator (RX)-Indicates when unit is
receiving transmissions
4.VolumeSelection(8Bars)–ShowscurrentVolume
setting.
5. Call Tone Transmission (CALL)-Indicates When
unit is paging.
6.Battery Level indicator-Indicates when battery is
low or when charging the battery
7.VOX-Indicates when unit is in VOX mode
8.12-HourTime(12:00)
9.CTCSSchanneldisplay.

BUTTONS and CONTROLS
9.Power/Menu (Multi Function)-Press and hold to
Turn unit ON/OFF. A quick, single press
accesses the Menu and Watch setting.
10.Red Button (Multi Function) – Press and hold
to transmit voice communication. Press twice
in a rapid action to transmit call tone.
11.Up-Adjusts volume level (default), and makes
channel and watch adjustments in Menu mode.
12.Down-Adjusts volume level (default), and
makes channel and watch adjustments in Menu
mode.
13.Scan-PresstoenterChannelScan.
14.MIC-Built-in speaker.
15.Speaker-Built-in speaker
16.Antenna
This device complies with telecommunication management standard.
Operation is subject to the following conditions:
·This device may not cause harmful interference.
·This device must accept any interference received, including interference
that may Require undesired action.
Important: Changes or modifications to this unit not approved by
manufacturer, could void your right to operate this unit. Your communicator is
set up to transmit a regulated Signal on an assigned frequency. It is against the
law to alter or adjust the settings inside the communicator to exceed those
limitations. Any adjustment to your communicator Must be made by qualified
technicians.
TO BE SAFE AND SURE
·Never open your communicator’s case.
·Never change or replace anything in your communicator except the
battery.
Your communicator may interfere with TVs or radios, even when
operating properly. TO determine whether your communicator is causing
interference, simply turn it off. If the Interference ends, your
communicator away from the receiver. If you cannot eliminate interference
completely, please stop using this device.

Battery Compartment
Battery CoverLatch
Compartment
Cover
Charging the Battery
▲ CAUTION:Do not use charger before inserting battery!!!
Your communicator comes with an A/C Adapter charger to charge your
Lithium-Ion battery. To charge:
1.Lift the Headset/Charger Jack Cover located on the side of your unit
2.Connect the A/C Adapter Charger into an A/C Wall outlet
3.Insert the A/C Adapter Charger into the Headset/Charger Jack. During
charging the Low Battery Level icon will appear on the display, and will
disappear once the battery is Fully charged .
NOTE: Charge the battery for approximately 12 hours before initial use.
Headset/Charger
JackCover
CAUTION:
Toreducetheriskofpersonal injury, use only the battery listed in
the instruction book. The communicator has a built in Power Saver feature
for maximum battery life. When the communicator is not being used,
conserve battery power by pressing the Power Key to turn OFF the unit ,
Remove the battery if the unit will not be used for a long period of time.

NOTE:
The communicator comes with internal battery protectio
n
however, during long-term storage, it is strongly recommended tha
t
you recharge the battery every 6 months or remove the battery i
f
the unit will not be used for a long period of time.
Battery Level and Low Battery Operation
In Watch and Communicator Mode the Low Battery Level icon will not
appear on the display unless the unit detects that the battery is low. The
unit has a Low Battery Level icon which will appear when it detects a low
battery level in Communicator Mode, and in Watch Mode. When the unit
is in Communicator Mode and the battery level is low the icon will appear
for approximately 15 seconds and then will automatically change to
Watch.
Navigating through the Menu
To access the advance features, your communicator has a Menu with two
functions.
Watch Mode
1.To enter or exit watch Mode, press the Power key for around 3 seconds.
A long keybeep tone is locally generate (after a short keybeep tone) when
the unit goes into Watch Mode and the LCD will display the time segments
and battery icons for the watch.
Communicator Mode.
1.Your communicator will automatically go to communicator Mode once
The battery is installed, the watch segments and channel icons will be
Displayed on the LCD during this mode. Press the Menu key for about 3
Seconds to enter the Watch Setting Mode; a short keybeep tone will be
locally generated when the Time Setting mode is engaged.
2.In Communicator Mode, if presses of the Menu key for no longer than 1
Second will advance you through the menu until exiting to
Communicator mode. A short keybeep tone is generated at each key
press.
3. Menu mode exits to standby mode when the Menu key is pressed while
the final menu selection is active.
4.The unit automatically times out of Menu mode and enters Watch mode
In 10 seconds.

Communicator ModeWatch Mode
Menu Ke
y
Communicator Mode Channel 1-22
Hours
(
Watch
)
Minutes
(
Watch
)
38 Group CTCSS
VOX
NOTE: In Watch Mode, no button/key will function unless pressing menu
key for about 3 seconds to enter Communicator Mode.
To set the Time
Your Communicator has a 12-hour (AM/PM) Time Clock, which can be
set as follows:
1.In Communicator mode, enter to Menu mode by pressing the Menu key
repeatly unitil a short key-beep tone is heard. When the Setting mode is
engaged, the Hour segment in the LCD Display will flash.
2.Press the Up or Down key to increase or decrease the Hour number
displayed, a short keybeep tone is generated at each key press. The Time
Setting will cycle within 12 am and 12 pm . To engage auto-repeat,
press and hold the Up or Down key.
3.Advance thru the Menu by pressing the Menu key briefly until the

Minutes segment is flashing, A short keybeep tone will be generated.
4. Press the Up or Down key to increase or decrease the Minutes number
displayed, A short keybeep tone is generated at each key press. To
engage auto-repeat, press and hold the Up or Down key.
5.Exit the Menu mode to return to Communicator Mode, by pressing the
Menu key briefly or the unit will automatically time out of Menu mode
and enter Communicator Mode about 10 seconds after the last key is
pressed. Your communicator has a built in Menu function that makes
accessing its advanced features easy.
Choosing a Channel
Your Communicator has multi Channels for communicating with others.
To choose one:
1. In Communicator Mode, press the menu key briefly a keybeep tone is
locally generated and the Channel number on the LCD Display will
flash.
2. Press the Up or Down key to reach higher or lower Channels,
Auto-repeat is engaged by pressing and holding either the Up or Down
Key, you’ll hear a standard key beep with each channel change.
3.To exit the Menu, press the Red Button.
CTCSS CODE
CTCSS CODE (38 group sub codes ) help minimize interference by
providing you with a group of CTCSS CODE
1.Press Menu key until“CTCSS”starts to flash.
2.Press up or Down key to select the code.
3.To exit the menu, Press the RED Button.
Channel Scan
To scan the whole channels of the Communicator for any activity:
1.Press the Scan key found on the side of the unit. Once engaged, the unit
will start to rapidly scan the whole channels of the communicator for
any activity. The unit will pause on an active channel for 4~5seconds
before resuming Scan function.
2.To exit the Scan mode, press the Red button.
Transmitting and Receiving
To use your communicator to communicate with others:
1.In Communicator Mode, the unit is continuously in RECEIVE mode.
2.Press and hold the Red Button and speak as you normally would, holding
the microphone about 2~3inches away from your mouth.

3.When you are finished speaking, release the Red Button. You are now
ready to receive incoming transmissions. While receiving transmission,
the R X icon appears on the display.
Sending a Call Alert Tone
To send a Call Alert Tone, Press the Red Button twice in a rapid action.
The Call Alert Tone will be automatically transmitted for a factory-set
fixed length of time. During transmission, the Call icon appears on the
display. You’ll hear a brief Call Alert Tone to confirm operation. The
communicator returns to standby mode when the Call Tone sequence is
complete. For optimum performance, make sure the ANTENNA is
pointing upright.
Voice Operated Transmission(VOX)
Your communicator is equipped with an adjustable Voice Operated
Transmitter(VOX) that can be used for automatic voice transmission. In
this convenient mode, transmission is automatically initiated by speaking
into the microphone. There is no need to push the Red Button.
To adjust VOX level:
1.Enter to Menu mode. Advance through the Menu until the VOX icon
appears on the display.
2.Press the Up or Down key to toggle between On and Off function of the
VOX. When VOX feature is on ,the VOX icon will appear on the LCD
display.
To exit the Menu, press the Red Button.
To get the full advantage of the convenience of a hands free
transmission and the privacy of conversation, you can optionally use
an Ear Bud with Microphone to be used in conjunction with the VOX
feature of your communicator.
To use the Ear Bud:
1. Set your communicator to VOX Mode.
2. Lift the headset/Charger jack Cover Located at the side of your unit .
3. Insert the Ear Bud Jack into the headset Jack. Wear the Ear bud and
adjust the Microphone location.
The Auto Squelch Feature
Your communicator is equipped with an automatic squelch system that
automatically cuts off weak transmissions and unwanted noise due to
terrain conditions and range limitations.
The Automatic Power Save Feature
Your communicator has a unique circuit designed to dramatically extend

battery life. If it senses no transmission within 5 seconds, it automatically
switches to power save mode. The communicator can still receive
transmission in this mode.
The Backlit Display Feature
Your unit’s LCD backlight display automatically lights up for 5 seconds
with the press of any key.
PROBLEM SOLUTION
No power
·Check the battery. Ensure that the battery is installed
Properly.
·Battery may be weak.
·Recharge your battery by using the A/C Adapter Charger
·Your battery may be damaged. Replace old
Battery with a new Lithium-Ion battery.
Weak
Reception
·Press the UP button to increase VOLUME.
·The receiving signal may be weak and/or out of range.
·Check the antenna position. For optimum performance.
Make sure the antenna is pointing upright.
Cannot
Change
Channels
·To change channels, press the MENU key until the channel
Number flashes on the LCD Screen.
·Press the UP or DOWN key to change channel.
·Battery may be weak.
Range
Is limited
·Battery may be weak
·Recharge battery if the BATTERY LEVEL indicator is low.
·Range varies depending on terrain and environment
·Open fields provide maximum range; steel/concrete
Structures, heavy foliage, and operation in buildings and
In vehicles may significantly limit range
·Check the antenna position. For optimum performance
make sure the antenna is pointing upright.
Sound
distortion
·When transmitting, hold MICROPHONE 2 to 3 inches
From mouth and speak normally.
·When receiving, lower volume to a comfortable level.
·Communicators must be at least 10 feet apart; increase your
Your distance.
.Communicators are too far apart. Obstacles interfere with
Transmission. Talk range is up to 1.5 miles in clear
unobstructed conditions.

Hazardous Environments: Do not operate the communicator in
hazardous environments , explosion or fire may result.
Do not operate the communicator near unshielded electrical blasting
caps. Under certain conditions, communicators can interfere with blasting
operations and may cause an explosion. Turn your communicator to the
OFF position to prevent accidental transmission when in a blasting area or
in areas posted :“Turn off two-way radios.” Construction crews often use
remote control RF devices to set off explosives.
CARE AND SAFETY
To clean your communicator, use a soft cloth dampened with water. Do
not use cleaners or solvents; they can harm the body of the unit and leak
inside, causing permanent damage. Use a dry, lint-free cloth to clean the
battery contacts. Do not submerge the unit in water. If the unit gets wet,
turn it off and remove the battery immediately. Dry the battery
compartment with a soft cloth to minimize potential water damage. Leave
the battery compartment cover off overnight to ensure complete drying. Do
not use the communicator until the unit is completely dry.
Safety Information
Your wireless hand-held portable transceiver contains a low power
transmitter. When the Red Button is pushed it pushed is sends out radio
frequency (RE) signals. This device is authorized to operate at a duty
factor not to exceed 50%.
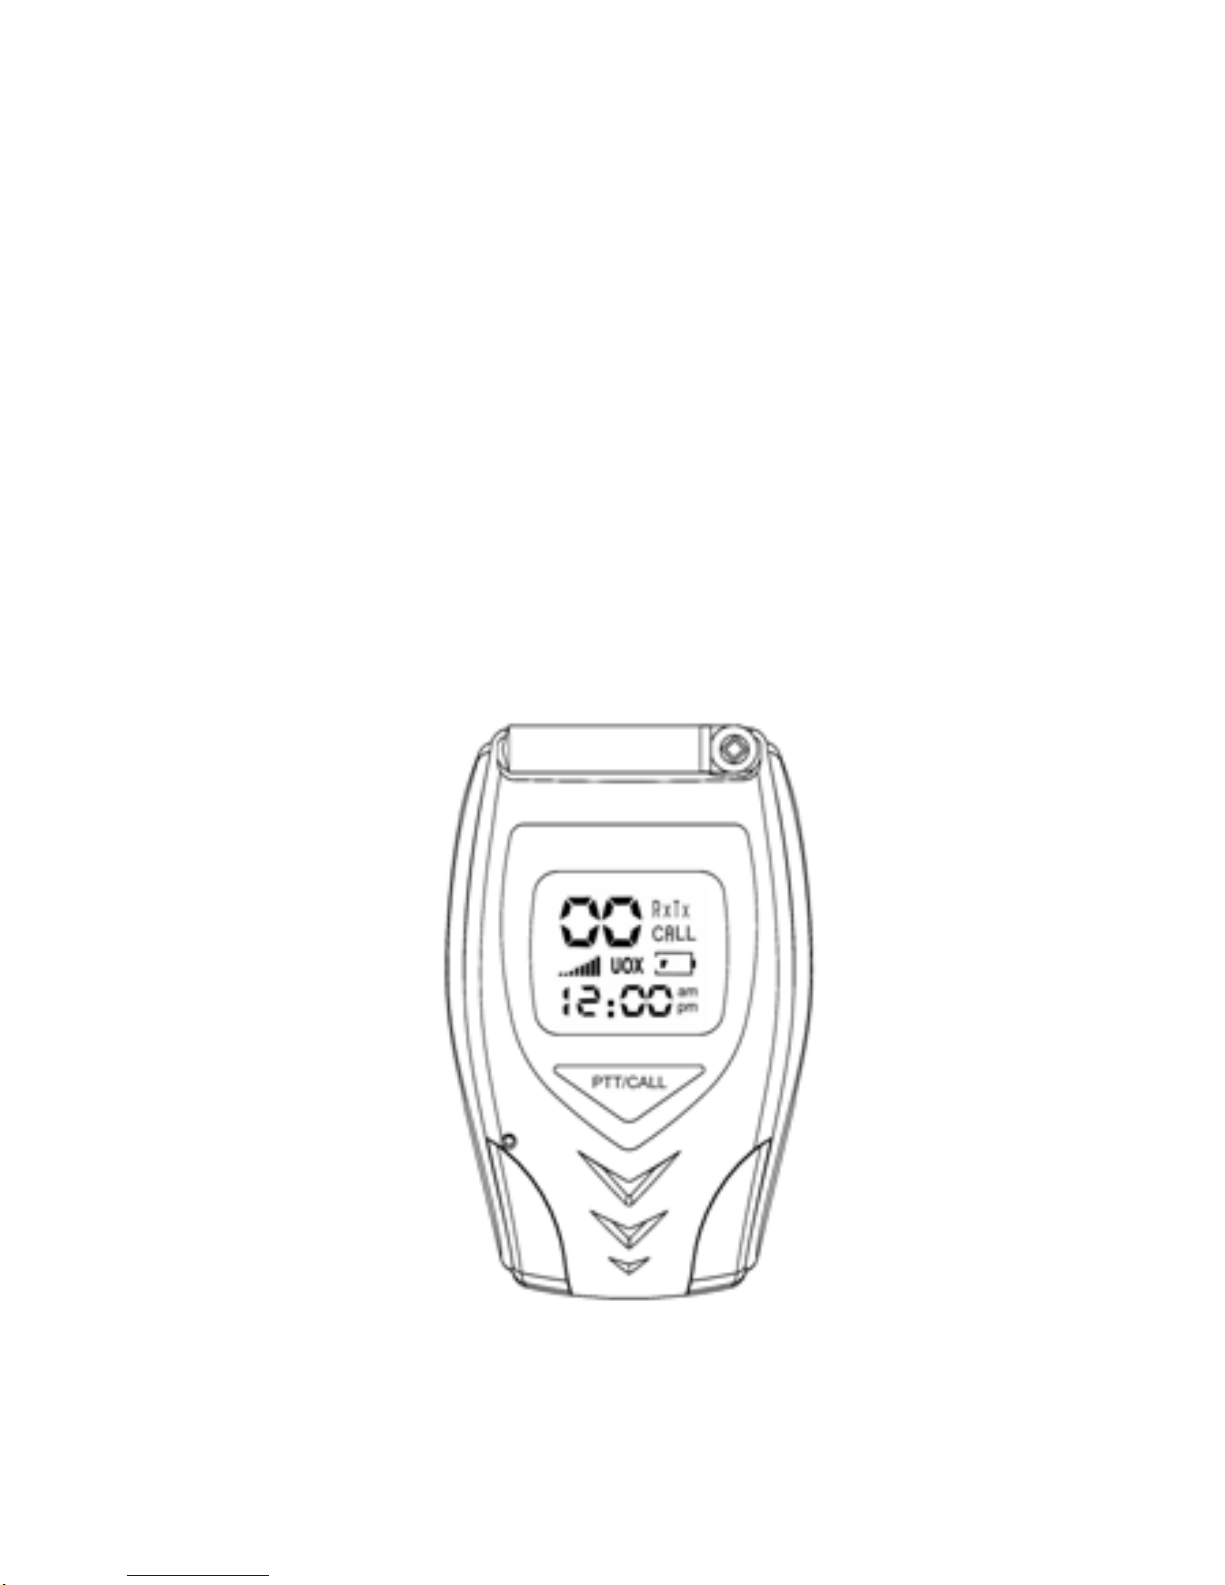
Important Note: To maintain good communication quality, hold the
transmitter and ANTENNA at least linch (2.5 centimeters) from your face
and speak in a normal voice
Use only supplied ANTENNA. Unauthorized antennas, modifications,
or attachments could damage the transmitter and may violate telecom
regulations.
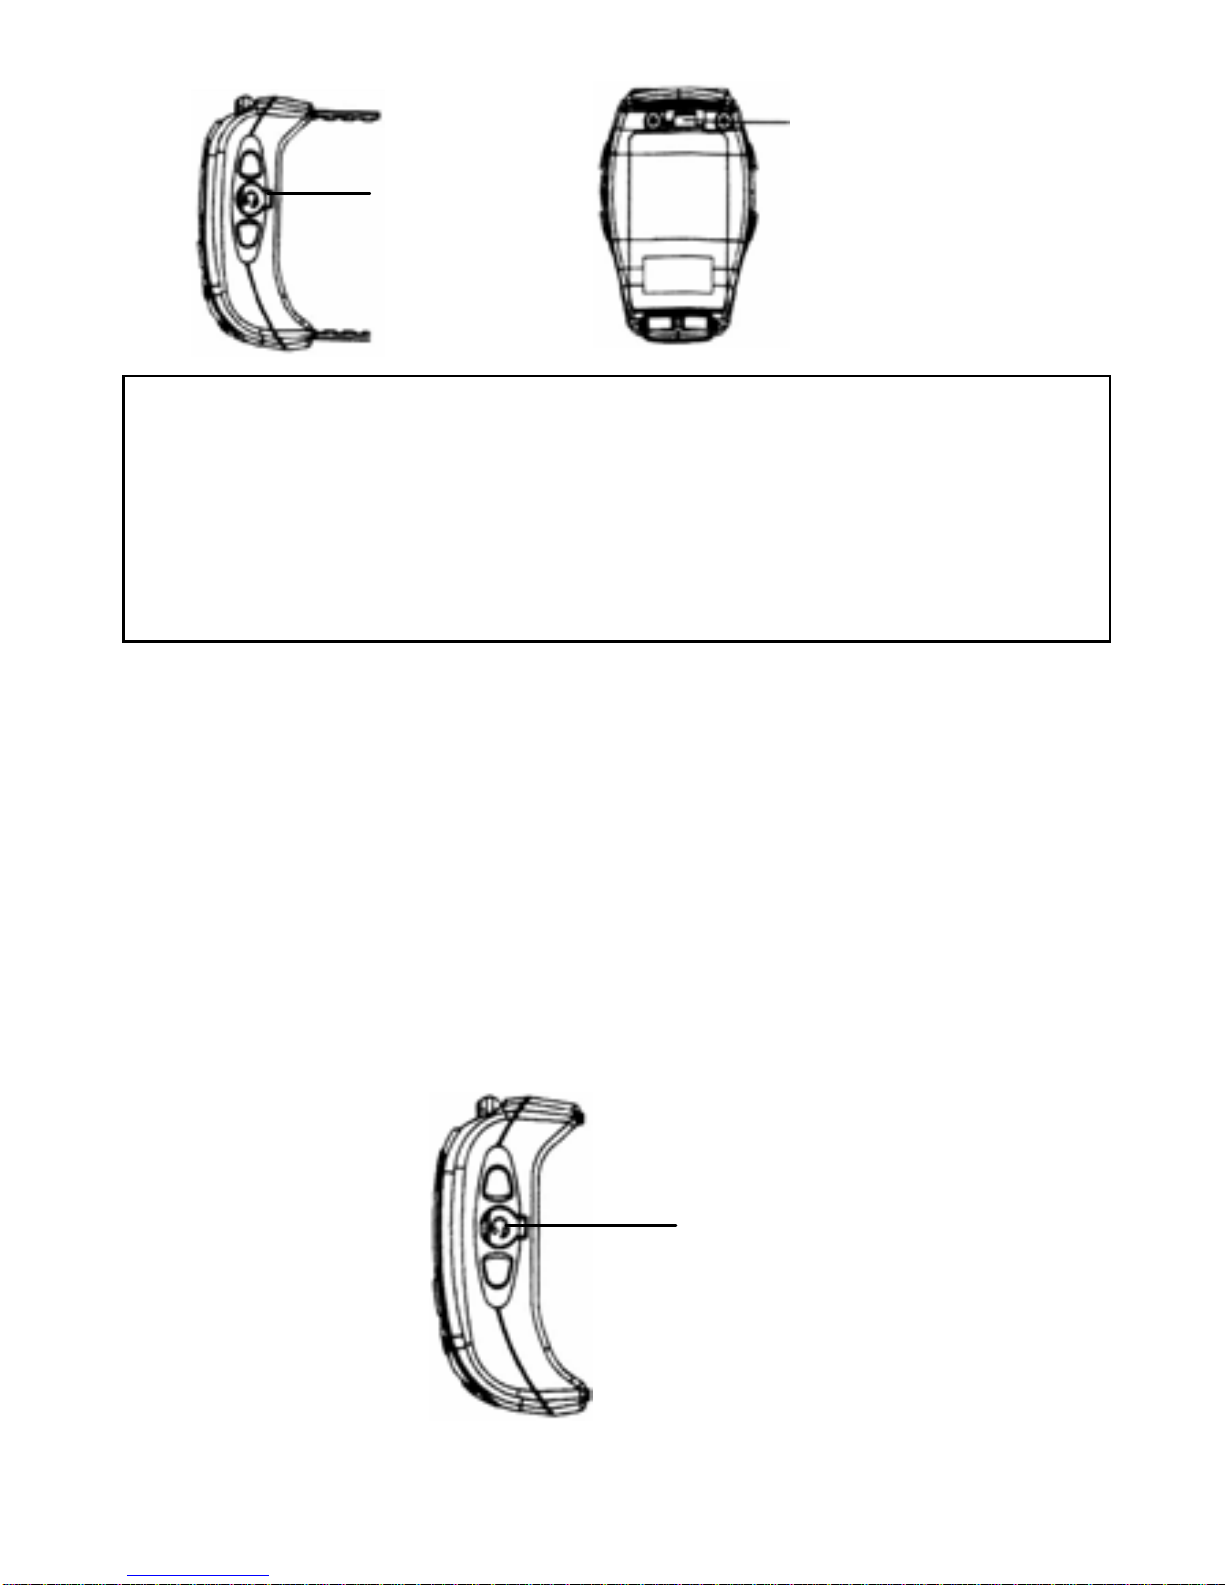
Battery Installation
Your communicator is powered by a Lithium-Ion Battery
(included).To install and replace battery:
1.Release the Battery Compartment Cover Latch located on the rear side
of the unit, and remove the cover from Battery Compartment.
2.Install the Lithium-Ion battery into the Battery Compartment. Be
certain to follow the correct orientation in the compartment. A Battery
installed incorrectly can prevent the unit from operating.
3. Replace the Cover and lock the battery Compartment Cover Latch into
position.

SPECIFICATIONS
PowerSource 3.7VLithium-IonBattery
OutputPower(TX) 0.3WERPmaximum
BatteryLife Variesperuser
Range About 1.5 Miles
Channel and Frequency (MHz) Chart**
USA(22ch)
Ch. Frequency Ch. Frequency Ch. Frequency Ch. Frequency
1 462.5625
2 462.5875
3 462.6125
4 462.6375
5 462.6625
6 462.6875
7 462.7125
8 467.5625
9 467.5875
10 467.6125
11 467.6375
12 467.6625
13 467.6875
14 467.7125
15 462.5500
16 462.5750
17 462.6000
18 462.6250
19 462.6500
20 462.6750
21 462.7000
22 462.7250
FCC INFORMATION
This device complies with Part 15 of the FCC Rules, Operation is subject
to the following conditions:
.This device may not cause harmful interference.
.This device must be accept any interference received including
interference that may cause undesired operation.

FEDERAL COMMUNICATIONS COMMISSION
This device complies with Part 15 of the FCC Rules. Operation is subject to the
following two conditions:(1) this device may not cause harmful interference, and (2)
this device must accept any interference received, including interference that may
cause undesired operation.
Changes or modifications not expressly approved by the party responsible for
compliance could void the user‘s authority to operate the equipment.
NOTE
This equipment has been tested and found to comply with the limits for a Class B
digital device, pursuant to Part 15 of the FCC Rules. These limits are designed to
provide reasonable protection against harmful interference in a residential installation.
This equipment generates, uses and can radiated radio frequency energy and, if not
installed and used in accordance with the instructions, may cause harmful interference
to radio communications. However, there is no guarantee that interference will not
occur in a particular installation If this equipment does cause harmful interference to
radio or television reception, which can be determined by turning the equipment off
and on, the user is encouraged to try to correct the interference by one or more of the
following measures:
-Reorient or relocate the receiving antenna.
-Increase the separation between the equipment and receiver.
-Connect the equipment into an outlet on a circuit different from that to which the
receiver is connected.
-Consult the dealer or an experienced radio/TV technician for help.
Note:
This device and its antenna(s) used for this transmitter must not be co-located or
operating in conjunction with any other antenna or transmitter.
This equipment complies with FCC radiation exposure limits set forth for an
uncontrolled environment. In order to avoid the possibility of exceeding the FCC
radio frequency exposure limits, human proximity to the antenna shall not be less than
20cm (8 inches) during normal operation.
When the radio is transmitting on GMRS frequencies, that operation on GMRS
frequencies requires an FCC license and such operation is subject to additional rules
specified in 47 C.F.R. Part 95.
Table of contents