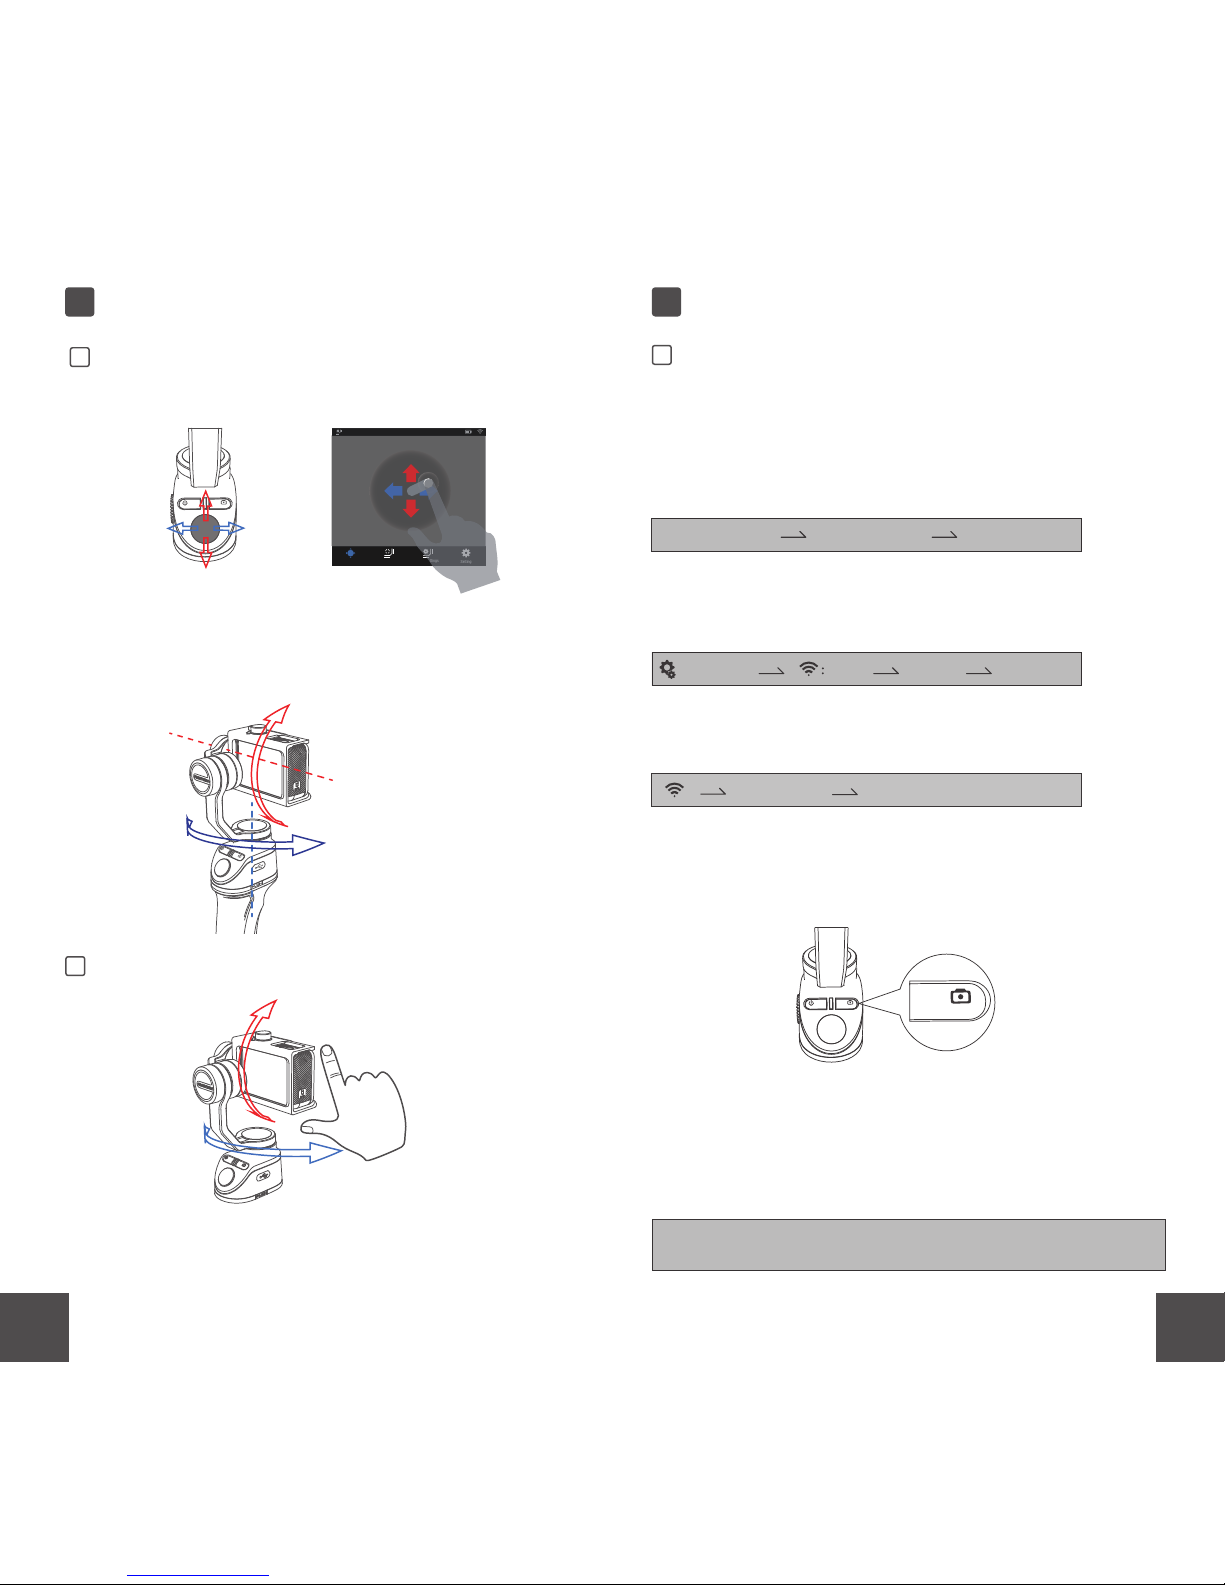
FreeVision Vilta Operator's manual

VILTA
Operation Manual
QUICK START
www.freevisiontech.com

welcome
1. VILTA contains two modes: Denoising and Performance
Denoising is default mode, suitable for all scenarios. Be sure
to select Denoising mode when you have high requirement
on audio quality.
The Performance is strengthen mode, which will greatly
improve the stability of gimbal. The motor response is radical
that will be accompanied with some noise.
The Performance only applies to scenes that require extreme
high stability accuracy and do not need camera to do audio
recording. (Denosing and Performance can be switched in App)
2. The GoPro5 adaptive recording function will greatly amplify the
background sound. Please select Wind Only mode on GoPro 5
to minimize the noise to the lowest. GoPro3 and GoPro4 do
not have this problem.
Important Statement
Please visit official website to download the latest User Mannual

01 02
1
2
3
45
6
7
8
9
10
11
11
12
13
14
17
21
17
18
19
22
20
15
16
1. Tilt Axis
2. Roll Axis
3. Pan Axis
4. Power Switch
5. Record Button
6. Status Indicator
7. Joystick
8. Charging Port
9. Dismantle Button
10. Lanyard Hole
11.Camera Knob
12.Camera Frame
13.Pan Axis Lock
14.Extended Interface
15. Trigger
16.VILTA Pocket
17. Golden Finger Connector
18. 1/4 Screw Hole
19. Accessory Mounting Port
20. Power Status Indicator
21. Charging Port
22. Charging Adapter (optional)
Product Overview

03 04
Installation
1
Unlock Gimbal
1
Install Camera
2
Handle Dismantle and Mantle
3
Install Accessory
4
Accessory Connector
1/4 Screw Hole
User Guide
1) Slide the Pan Axis Lock down
2) Twist the Tilt Aixs and Roll Axis to unlock
The Statu Indicator will flash red if any axis is locked
Insert GoPro in the Camera Frame
Fasten the knob as indicated
1. If you are Hero 3/3+/4 user, insert camera in the
VILTA Pocket before install
2. To avoid the camera falling, please ensure the
knob is fastened before power on
Dismantle: Press Dismantle Button, hold gimbal,
move forward and release
Mantle: Release Dismantle Button, match the base
with the handle, slight push the base forward
Ensure you hear a clicking sound while mantling
handle
Adapt with GoPro accessories and tripod

05 06
Control
2
Joystick
1
Connect and Shoot
3
VILTA as smart controller
1
Joystick Virtual Joystick
Y:61 P:45 100%
Setting
Quick Settings
Operation Status
Joystick
Tilt
Pan
Manual
2
1)Long press the Power Switch to power on VILTA
2)Control via joystick or virtual joystick in APP
1) Position the camera directly by hand
2) Manual Mode can be turned on/ off in App
GoPro5
GoPro 4
Power on the gimbal and camera, and follow this
step on camera
1) Long press the shutter button for 2 seconds to
shoot a video/ stop shooting
2) Short press to take a picture
CONNECTTIVITY Connect New Smart Remote
SETTING WI-FI RCPAIR
ON
When the Shutter button lights off, connection is
successful
Shutter Button
For more detailed function: check【Advanced】—【Shutter Button】
NEWWI-FI RC
GoPro 3/3+

07 08
Connect APP
2
1)Via App,you can control the gimbal and camera
2)You can select the shooting mode and preview
in the App
VIDEO
PHOTO
TIME LAPSE
Video Video+Photo Looping
Photo Night Burst
Time lapse photo Night lapse photo Time lapse video
Download and install APP
For iphone
For Andriod
Scan the QR code below to download and install
Please search FreeVision in APP Store to download
and install
The shooting mode in the APP
Charging
4
VILTA
1
Battery Indicator
2
GoPro
3
Micro USB
charging port
Charge werable and handle seperately through micro
USB port
1) Take off the GoPro USB protective cover
(it may influence on the water-proof effect of GoPro)
2) Insert charging adapter into GoPro’s charging
port, the camera will be charged by VILTA
GoPro charging adapter is an optional accessory ,
not included in standard package
2) When the handle is released, press the trigger to show
the Power Status of handle. Four lights on when fully
charged
1) When the Power Switch light is flashing, please charge
the werable or change a handle. Status Indicator turns
to green when fully charged

09 10
Mode
2
5
1
Trigger
Trigger Control
Power Switch Control
Power Switch
When the handle is released, double press Power Switch
to shift mode
Red Flash
Green Flash
Warning
Busy
LED
Yellow
Red
Green
Semi-follow
Follow
Lock
Single Press
press when recording Tag
Video/ Save
Button Function
Connected
(Light off)
Picture
Double Click
Long press
Shutter
Button
Pairing ( Light on)
Long press for 6s
Selfie
single press
Long press for 2s
Double press
On / Off
Sleep/awake
Power
Switch
Button Function
(wearable gimbal only)
Long press for 7.5s Forced Shutdown
Control Mode
Shutter Button
Power Switch
LED Indicator
Advanced
Button & Detailed Function
Tap
once
Tap
twice
Tap
four times
Tap
and Hold
Lock mode
(Return to the previous mode when trigger released)
The attitude of Tilt and Roll locked
Pan smoothly by the movement of
handle
Follow
mode
Lock
mode
Semi-Follow
mode
(Default)
The attitude of Roll locked
Pan and tilt smoothly by the movement
of handle
The attitude of Tilt, Roll, and Pan
locked
The camera keep the current attitude
The camera turn back to the center
Tap
three times
Center the
camera
The switching sequence:
Semi-Follow (Default) Follow Lock

11 12
Specifications
6
Basic Information:
1
Other Specification
3
Technical Specification:
2
Dimensions 94*41mm*258 (Folded)
Weight 430g
Supported Camera GoPro Hero3/3+/4/ 5
Pan Axis: 360° (Infinite Rotation)
Tilt Axis: -45°~100°
Roll axis: ±40°
Static Accuracy Motion Accuracy
pitch: 0.001° Pitch: 0.01°
Pan: 0.001° Roll: 0.01°
Roll: 0.002° Yaw: 0.02°
·Controllable Rotation Range
·Accuracy
Pan Axis: 360° (Infinite Rotation)
Tilt Axis: -90°to 135°
Roll Axis: -44°to 90°
Mechanical Controllable Rotation Speed:
Adaptive Rotation speed(±500 °/s)
·Mechanical Endpoint Range
Voltage 7.6 V
Battery Type Lithium
Battery Capacity 350 mAh
Energy 2.66 Wh
·Base Battery
·Gimbal
Voltage 7.6V
Working Current
Static 300mA , Dynamic 2.5A
Consumption 2.5W
Warning
1. Do not expose to fire or high heat
2. Please be cautioned dropping or collision will possibly
break VILTA
3. VILTA is not water-proof, do not allow contact water or
liquid cleanser
4. Do not disassemble, repair or modify VILTA
5. VILTA is defaulted to be performance mode, the noise
is normal phenomenon, please set it Silent mode in the
App to reduce the noise
6. The handle and the base need to be charged separately,
please use the charger according to public safety
regulations
7. Do not interfere the operation of VILTA in the working
state
8. The product is not suitable for children to use
Web: www.freevisiontech.com
US Customer Support:888-898-6853
· Operating Temperature: -10℃ to 50℃
· Wearable Gimbal Working Time: 1.2h
· Handheld Gimbal Working Time: 7h
· Handle Charging Time: 2.5 h (5V,2A)
· Gimbal Charging Time: 1.5 h (5V, 2A)
· WIFI Working Frequency 2.412-2.462 GHz
1. VILTA Handheld gimbal
2. Charging cable
3. Portable bag
4. Lanyard
5. Mannual
6. VILTA pocket
Packing list
·Handle Battery
Voltage 7.4 V
Battery Type Lithium
Handle Battery Capacity 2000mAh
Energy 14.8Wh

13
Maintenance record
Customer Information
Name:________________________
TEL:__________________________
Post Code:____________________
Email:________________________
Address:______________________
Dealer Information
Name:________________________
TEL:__________________________
Post Code:_____________________
Email:_________________________
Address:_______________________
Product Information
Mode:_________________________
Product Code:__________________
Purchase Date:_________________
Warranty Card
Non warranty rule
Warranty Information
From the purchase date, you enjoy the free repair within
12 months with this card if it occurs any qualityproblems.
1) If within 7 days of purchase and it occurs manufacturing
defect, the customer can choose to have a full refund
(based on the invoice price) or exchange the product for
a new one.
2) With 1 years of purchase, you can enjoy free repair if it is
non man-made problem.
3) The product has not been refitted, dissembled or modified.
4) Valid purchase proof is provided.
1) A man made problem affecting the quality of product;
2) Damage caused by refitting, disassemble, or opening of
the shell;
3) An uncontrollable incident( earthquake, fire, flood, war)
resulting damage;
4) Damage caused by not using as stated in the user manual
1) The customer is at first required to pay the product return
delivery fee. After Freevision after-sale service center
receives the product, it will undergo a test.
2) If the product does not conform to the conditions for free
repair, Freevision will assess the problem and cost of
repair, the customer has the right to repair or deliver it back.
3) When you receive the repair service, please provide valid
purhase proof and this warranty card. Please note: The
warranty card only becomes valid after sale. The card can
not be altered, or it will be deemed invalid.
4) Freevision reserves the right of final interpretation.
Warranty Rules
If your VILTA meets the following requirements, you can
enjoy the warranty policy:
If your VILTA falls under one of the following situations,
we will charge appropriate maintenance cost:
14

Inspection Date Repair Date Cause of Fault Result Employee Signature
15 16

17 18
Only can use battery which compliance CE for charging
Do not use the product in environment below 0℃ or
above 40℃ for charging.The RF distance between body
and product is 0cm
European standards:
EN301489-1V1.9.2:2011 EN301489-3V1.6.1:2013
EN301489-17V2.2.1:2012 EN300328V1.9.1:2015
EN300440-1V1.6.1:2010 EN300440-2V1.4.1:2010
EN50566:2013+AC:2014 EN62209-2:2010
EN62479:2010
EN60950-1:2006+A11:2009+A1:2010+A12:2011+A2:2013
CE WARNING
Caution:
Use the product in the environment with the temperature
between 0℃ and 40℃; Otherwise, it may damage your
product. It can be operating under 2000m
For the following equipment:
Product Name: VILTA
Model / Brand Name: VT01
Hangzhou Freevision Intelligent Technology Co., Ltd
hereby declares that this [Name: VILTA, Model: VT01]
is in compliance with the essential requirements and other
relevant provisions of Directive 1999/5/EC
The equipment was passed. The test was performed
according to the following
The SAR limit of USA (FCC) is 4.0W/kg averaged over one
gram of tissue. Device types VILTA / (FCC ID: 2ALQU-VT01)
has also been tested against this SAR limit. SAR information
on this and other pad can be viewed on‐line at
http://www.fcc.gov/oet/ea/fccid/.
Please use the device FCC ID number for search.
This device was tested for kept 0mm from the hand.
To maintain compliance with FCC RF exposure
requirements, use accessories that maintain a 0mm
separation distance between the user's hand. The use
of belt clips, holsters and similar accessories should not
contain metallic components in its assembly. The use of
accessories that do not satisfy these requirements may
not comply with FCC RF exposure requirements, and
should be avoided.
FCC Warning
FCC RF Exposure Information and Statement
This device complies with Part 15 of the FCC Rules.
Operation is subject to the following two conditions:
(1) This device may not cause harmful interference, and
(2) this device must accept any interference received,
including interference that may cause undesired
operation
NOTE 1: This equipment has been tested and found to
comply with the limits for a Class B digital device,
pursuant to part 15 of the FCC Rules. These limits are
designed to provide reasonable protection against
harmful interference in a residential installation. This
equipment generates, uses and can radiate radio
frequency energy and, if not installed and used in
accordance with the instructions, may cause harmful
interference to radio communications. However, there

19
NOTE 2: Any changes or modifications to this unit not
expressly approved by the party responsible for
compliance could void the user's authority to operate
the equipment.
is no guarantee that interference will not occur in a
particular installation. If this equipment does cause
harmful interference to radio or television reception,
which can be determined by turning the equipment
off and on, the user is encouraged to try to correct the
interference by one or more of the following measures:
- Reorient or relocate the receiving antenna
- Increase the separation between the equipment and
receiver
- Connect the equipment into an outlet on a circuit
different from that to which the receiver is connected
- Consult the dealer or an experienced radio/TV
technician for help
Other manuals for Vilta
5
Table of contents
Other FreeVision Camera Accessories manuals
Popular Camera Accessories manuals by other brands

Sony
Sony CSS-FEB Operating Instructions (primary... operating instructions

Olympus
Olympus PT-E02 instruction manual

Intermec
Intermec Trakker Antares 2420 supplementary guide

Ikelite
Ikelite 6138 instruction manual

Green Rhino
Green Rhino CRYSTAL 6-GREV-180 user manual

Ikelite
Ikelite 6241.81 Supplemental instructions