Frigicoll Kaysun KCCHT-03 User manual

CONTROL
KCCHT-03
Original instructions
Thank you very much for purchasing our air conditioner,
Before using your air conditioner, please read this manual carefully and keep it for future
reference.
OWNER'S MANUAL


CONTENTS
1. Safety precautions.................................................................................1
2. Technical data and characteristic...........................................................1
3. Overview................................................................................................2
4. Operation instruction..............................................................................5
5. Error handling......................................................................................17

• This manual gives detailed description of the precautions that should be brought
to your attention during operation.
• In order to ensure correct service of the wired controller please read this manual
carefully before using the unit.
• For convenience of future reference, keep this manual after reading it.

1
1. Safety precautions
WARNING
• Please assign the distributor or professionals to install the device. Improper insta-
llation may lead to electric shock or re.
• Do not install the unit in a place vulnerable to leakage of ammable gases. Once
ammable gases are leaked and left around the wire controller, re may occur.
• Do not operate with wet hands or let water enter the wire controller. Otherwise,
the device lifespan will be shortened.
2. Technical data and characteristic
2.1 Technical data
1) Input voltage: 10VAC.
2) Operating environment temperature of wired controller: -10°C~+43°C.
3) Operating RH of wired controller: RH 40%~RH 90%.
2.2 Characteristic
1) Touch key operation;
2) LCD displays operation parameters;
3) Multiple timer;
4) Real-time clock (battery life:5~8 years).

2
3. Overview
1
2
3
4
16
11
15
1. Operation icon
2. Mode area
3. Setting temperature
4. Timing On/Off
5. Function Icon
6. Unit number
7. Water Level Indica-
tion (reserved)
8. Clock
9. Water temp. 10.ON/
OFF Key 11.Left / Right Key
12. OK Key
13. Function key
14. Add and Reduce key
15. Cancel key
16. Mode key
5
6
7
8
9
10
11
12
14 13
MODE
FUNCTIONS
(Long press 3s for can-
celling timing)
(Long press 3s for un-
locking)

3
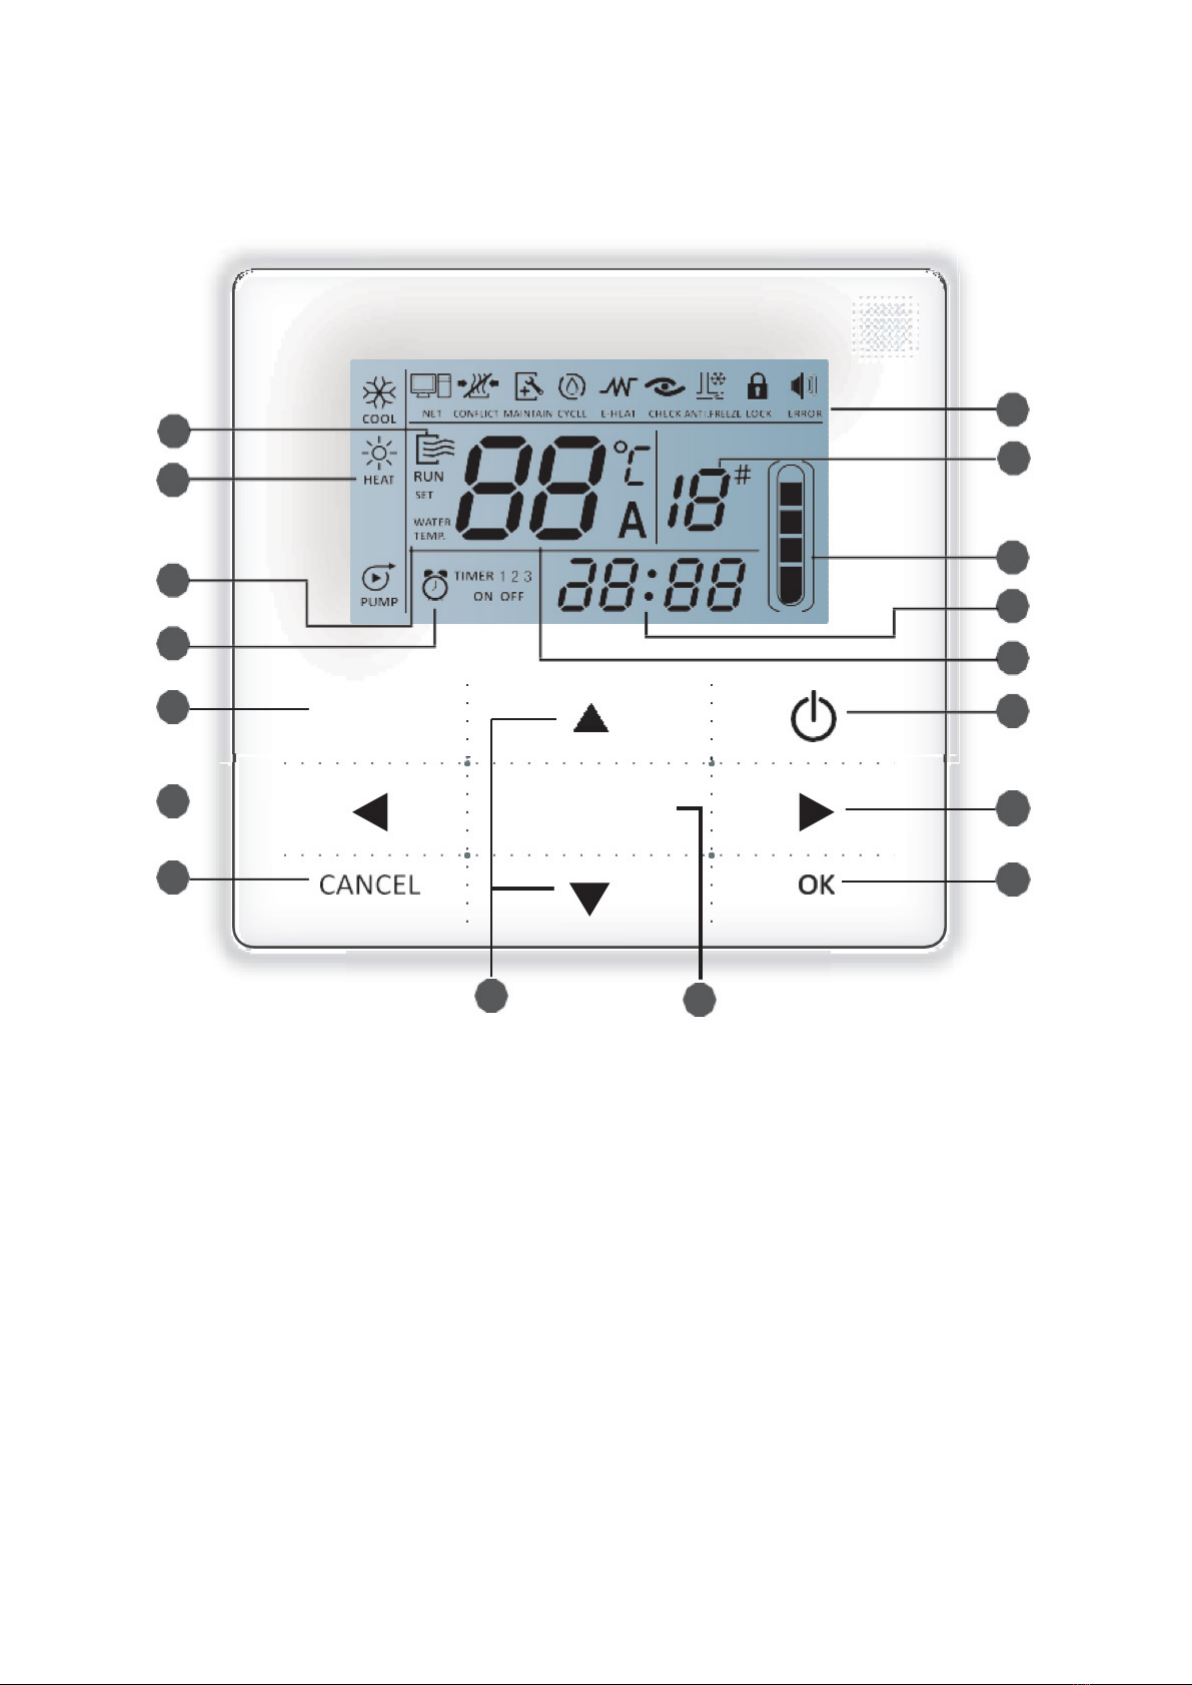
1 Operation icon: Indicate unit ON and OFF status; the icon displays when the unit
is on and does not display when the unit is off;
2 Mode area: Indicate the main unit operating mode; details refer to Page 7;
3 Water temperature: 2 status can be displayed:;
4 Timing ON/OFF indication: Indicate the timing information; details refer to Page 9;
5 Function icon
1) : Displays when the unit controlled by remote switch;
2) : Displays when the unit operation forced cooling mode;
3) : Displays when the unit is needed. Press and hold “MODE” key for 3 seconds to
cancel the icon and timing will restart until next maintenance;
4) : The reserved icon;
5) : The reserved icon;
6) : Displays when check function is on; details refer to Page 17;
7) : Displays when ambient temperature is low which means the main
unit need anti-freezing action;
8) : Displays when no key operation for 2 minutes and all keys are locked.
Press and hold “OK” key for 3 seconds to unlock;
9) : Displays when error or protection occurs and means the unit need maintainence
by professionals.
6 The unit number: The user can set the number,details refer to Page 15;
7 Water level indication: The reserved icon;
8 Clock: Under normal status displays clock; Under timing setting displays the setting
timing, details refer to Page 14;

4
9 Water temperature: Under normal status display water temperature; Under water
temperature setting status displays the setting value; Under check status displays check
parameter, details refer to Page 8;
10 ON/OFF key: Turn on and turn off functions, details refer to Page 6;
11 Right and Left key: Press these keys to check setting water temperature; Press
right key to shift to the next step setting under timing setting status; Press these keys to
turn over the unit parameter information under check status;
12 OK key: Press this key to conrm settings. Press and hold this key for 3 seconds to
unlock under locking status;
13 Function key: Setting water temperature, timing and clock etc, details refer to
Page 9-19; Press and hold this key for 3 seconds to enter check status, details refer to
Page 17; setting unit number details refer to Page 15 forced open water pump details refer
to Page 16.
14 Add and Reduce key: Move up or move down values of temperature, timing etc;
15 Cancel key: Press this key to cancel parameter setting under setting status; Press
and hold this key for 3 seconds to cancel timing when timing is valid;
16 Mode key: Power on the cooling function,heating function or water pump function,
details refer to Page 7.

5
4. Operation instruction
4.1 Turn On and Turn Off the main unit
1) Press the On/Off key to control On and Off status of the main unit.
2) Under Off status, press the On/Off key “ ” to run the main unit, at that time the LCD
of wire controller will display the operation icon “ ”. The main unit will running as the
current setting of the wire controller.
3) Under On status, press the On/Off key “ ” to turn off the main unit and the operation
icon “ ” on the LCD will disappear.
NOTE
• When outdoor unit is in restore-to-factory- default setting mode(outdoor unit dis-
plays ”OFF”),
wire controller won’t start the unit. Quit “OFF” status through outdoor unit display
operation panel.
• If outdoor unit is forced shutdown by remote control, then the unit won’t start by
using wire controller. Relieve the unit from shutdown status by remote control.
(Long press 3s for
cancelling timing)
(Long press 3s for
unlocking)
Press one time
Fig.4.1

6
4.2 Setting operating mode and function parameters
4.2.1 Setting operating mode and water temperature
1) Setting operating mode
Press “MODE” key to choose operation mode. The setting mode will change as the fo-
llowing order each time the key is pressed:
Press “OK” key or wait for 7 seconds to conrm.During the setting process pressing the
“CANCEL” key to exit without saving
2) Setting water temperature
Method 1:Press the “▲” or “▼” to adjust the water temperature under main interface.
Press “OK” key or wait for 7 seconds to conrm.
Method 2:Setting water temperature in funciton parameters.Press “FUNCTIONS” key un-
der main interface once to enter water temperature setting interface.Press the “▲” or “▼”
to adjust the water temperature .Press “OK” key or wait for 7 seconds to conrm.
Fig 4.2
(Long press 3s for
cancelling timing)
(Long press 3s for
unlocking)

7
Water temperature setting check: To check the water temprature setting vaule, press the “
” or “ ” key under the main page(the page displayed after the controller is powered on).
4.2.2 Setting function parameters
Press “FUNCTIONS” key to choose operation parameters. The setting function parameters
will change as the following order each time the key is pressed:
1) Timing setting: 3 timing periods can be set on the wire controller: Timer 1, Timer 2, Ti-
mer 3. These 3 timers can control the main unit to be turned ON and OFF 3 times at most
during a day.
Setting method: press “FUNCTIONS” key under main page twice to enter timing setting.
Then the LCD will display as the following:
(Long press 3s for
cancelling timing)
(Long press 3s for
unlocking) Fig 4.3
Fig 4.4

8
2) At this time the hour of the clock will ash, which means the current setting is the hour
of Timer 1 “On”, press the “▲” or “▼” to adjust, press “ ► ” key when nished, and then
the minute of the clock will ash, which means the current setting is the minute of Timer 1
“On”, press the “▲” or “ ▼ ” to
adjust, press “ ► ” key when nished, the LCD will display as the following:
3) At this time the hour of the clock will ash, which means the current setting is the hour
of Timer 1 “Off”, press the “▲” or “▼” to adjust, press “ ► ” key when nished, and then
the minute of the clock will ash, which means the current setting is the minute of Timing 1
“Off”, press the “▲” or “
▼” to adjust, press “ ► ” key when nished, the LCD will display as the following:
4) At this time the mode icon will ash, it means the current setting is the running
mode in the Timer 1 , press the “▲” or “▼” to adjust, press “ ► ” key when nished,the
LCD will display as the following:
Fig 4.5
(Long press 3s for
cancelling timing)
(Long press 3s for
unlocking)
Fig 4.6
Fig 4.7

9
5) At this time the water temperture icon will ash, it means the current setting is the
water tempera- ture, press the “▲” or “▼” to adjust, press “ ► ” key when nished,the LCD
will display as the following:
6) At this time the hour of the clock will ash, it means the current setting is the hour of
the Timer 2 “On”.And the follow setting method will be the same as the Timer 1. Similarly,
the setting of Timing 3 is the same as this method. After setting is nished, press “OK” key
or wait for 7 seconds to conrm the setting, and the LCD will display the effective timing
information, as the following display:
Fig 4.8
Fig 4.9
Fig 4.10

10
Example of Timing setting
Main page
Press “FUNCTIONS” key twice to enter hour setting
interface of “Timer 1 On”
Press the “▲” or “▼” key to set the hour number of
“Timing 1 On” to be 07
Press “ ” key to enter minute setting interface of “Timer
1 On”, adjust the minute number to be 10
Press “ ” key to enter hour setting interface of “Timer 1
Off ”, adjust the hour number of “Timer 1 Off” to be 12
Press “ ” key to enter minute setting interface of “Timer
1 Off”, adjust the minute number to be 30
Press “ ” key to enter running mode etting,adjust the
mode to be “HEAT”
Press “ ” key to enter water temp. setting , adjust the
temp. to be 45 C.
“Timer 1” setting
nished, after 7
seconds, the page
shift to the main
page
Successfully set the On time of “Timer 1” to be
07:10 and Off time of “Timer 1 Off ” to be 12:30.
In this time period to run heating mode. Then
back to the main page.
Finish setting the “Timer 1” , then
enter the setting of “Timer 2”.
The setting steps of “Timer 2” and “Timer 3” are the same as “Timer 1”, after setting all
the settings then press “OK” key, the 3 timing periods will be effective
Whether press “OK” key Whether press “ ►” key
NO NO
YES YES

11
During any period of timing setting to press “OK” key , the timing periods which have been
set will be effective (only if the “On” and “Off” of one timing period have been set, the set-
ting is effective).
Check timing information: to check the timing which has been set, press “ ” or “►” key
under main page, the “ On ”and “ Off ” time of Timer1, Timer 2 and Timer3 will be displayed
in turns.
Cancel timing: press and hold “CANCEL” key for 3 seconds, then all the effective timing
periods will be cancelled.
NOTE
• To avoid timing error, each period of timing should not be crossed. E.g.:
TIMER 1 TIMER 2 TIMER 3
Correct:
5:00 8:00 10:00 12:00 18:00 22:00
TIMER 1 TIMER 2
Wrong: :
5:00 7:00 8:00 12:00
• Once timer on works, the unit will run as the timer on set mode and set water tempera-
ture.
• When timing on and timing off work at the same time, wire control execution timing off.

12
5)Set clock
Press the “FUNCTIONS” key 3 times to enter clock setting. The hour of the clock will ash,
which means the current setting is the hour of the clock, press the “▲” or “▼” to adjust,
press “ ” key when nished, and then the minute of the clock will ash, it means the current
setting is the minute of the clock, press the “▲” or “▼” to adjust, press “ OK ” key when -
nished or wait for 7 seconds to conrm.During the setting process pressing the “CANCEL”
key to exit without saving.
NOTE
To get the correct timing On and timing Off time, please correctly set the clock!
Fig 4.11
(Long press 3s for
cancelling timing)
(Long press 3s for
unlocking)

13
6) Set unit number
Press the “FUNCTIONS” key 4 times to enter the unit number setting. Press “▲” or “▼”
to adjust the unit number. press “ OK ”key when nished or wait for 7 seconds to conrm.
During the setting process pressing the “CANCEL” key to exit without saving. The setting
value is 0-19.
7) Forced open water pump
Fig 4.12
(Long press 3s for
cancelling timing)
(Long press 3s for
unlocking)
Fig 4.13
(Long press 3s for
cancelling timing)
(Long press 3s for
unlocking)

14
Press the “FUNCTIONS” key 5 times to force open the water pump. The water pump icon
will ash.
Press “ OK ”key to conrm. During the setting process pressing the “CANCEL” key to re-
turn to the main interface, and log off the forced water pump mode.
NOTE
a. Forcing water pump function is only limited to stand-by mode, others modes not respon-
se.
b. Under forcing water pump function, other settings will not responsible, except stopping
c.When communication disconnects, it will show E2 error in 2 mins, the wire controller will
automatically cancel the forcing water pump function; while connected, the wire controller
keeps synchronizing with the unit( If forcing water pump function is still on-going, the con-
troller keeping showing its status).
d. The outdoor unit does not response after activating the forcing water pump function,
(eg: forcing water pump function cannot be activated under forcing heating in stand-by
mode), the function will be automatically stopped if it is not activated within 5 mins.

15
4.5 Check
1) Check function allows the user to check all the operating parameters, error and pro-
tection information of the unit.
2) Enter method: press and hold “FUNCTIONS” key for 3 seconds to enter check inter-
face, as the gure display:
3) Press “ ” or “ ” to check all the status information of the unit.
Check content:
Fig 4.14
(Long press 3s for
cancelling timing)
(Long press 3s for
unlocking)

16
Table 4-1
No. Meanings
0
When in standby mode, water pump mode, displays water inlet tem-
perature. In cooling and heating mode, displays the operating fre-
quency.
When defrosting, displays dF. when anti-freezing, displays Pb. when
oil returning, displays d0. When remote controling,displays d8.
1Running model:0-shutdown,1-Pump mode,2-Cooling,3-Heating,
4-Forced cooling, 5-Forced heating.
2 Fan speed:0-Shutdown,1~7-Fan speed.
3 Total capacity requirements
4 The revised capacity requirements.
5 Cooling/heating temp. setting.
6 Condenser temp. Value.(T3)
7 Outdoor ambient temp. Value.(T4)
8 Comp. Discharge temp. Value.(Tp)
9 Inlet water temp. Value.(Tin)
10 Outlet water temp. Value.(Tout)
11 Plate heat exchanger anti-freezing temp. Value 1.(Tb1 )
12 Plate heat exchanger anti-freezing temp. Value 2.(Tb2 )
13 T6 temp. Valu(Reserved)
14 Outdoor unit current
15 Power supply voltage AD value
16 Electronic expansion valve opening steps
17 The unit model
18 The program version number
19 The last error record
20 The second error record
21 The rst error record
22 — —
Table of contents
Other Frigicoll Remote Control manuals
Popular Remote Control manuals by other brands

Elite Screens
Elite Screens ZSP-TR01 user guide

Linksys
Linksys DMRW1000 - Controller / Wireless-N Touchscreen Remote... Quick installation guide

Honeywell
Honeywell EXCEL 5000 OPEN ZAPP user manual

Dimplex
Dimplex DPCRWS Series manual

Magnetek
Magnetek CPA HPV 900 Axial Flux PM Series Technical manual

Zenith
Zenith MBR3300 Series user manual

Reef Breeders
Reef Breeders Photon V2 user guide

Ambient Technologies
Ambient Technologies RCSTEBA Installation and operating instructions

Quick
Quick TCD 1062 Manual for use and installation

BroadLink
BroadLink RM Pro+ user manual

Continental Refrigerator
Continental Refrigerator SVI-HIFGE04 user manual

SOMFY
SOMFY KEYTIS INTERIOR Instructions for use