manuals.online logo
Brands
  1. Home
  2. •
  3. Brands
  4. •
  5. Frigidaire
  6. •
  7. Dryer
  8. •
  9. Frigidaire FSE848RHS0 User manual

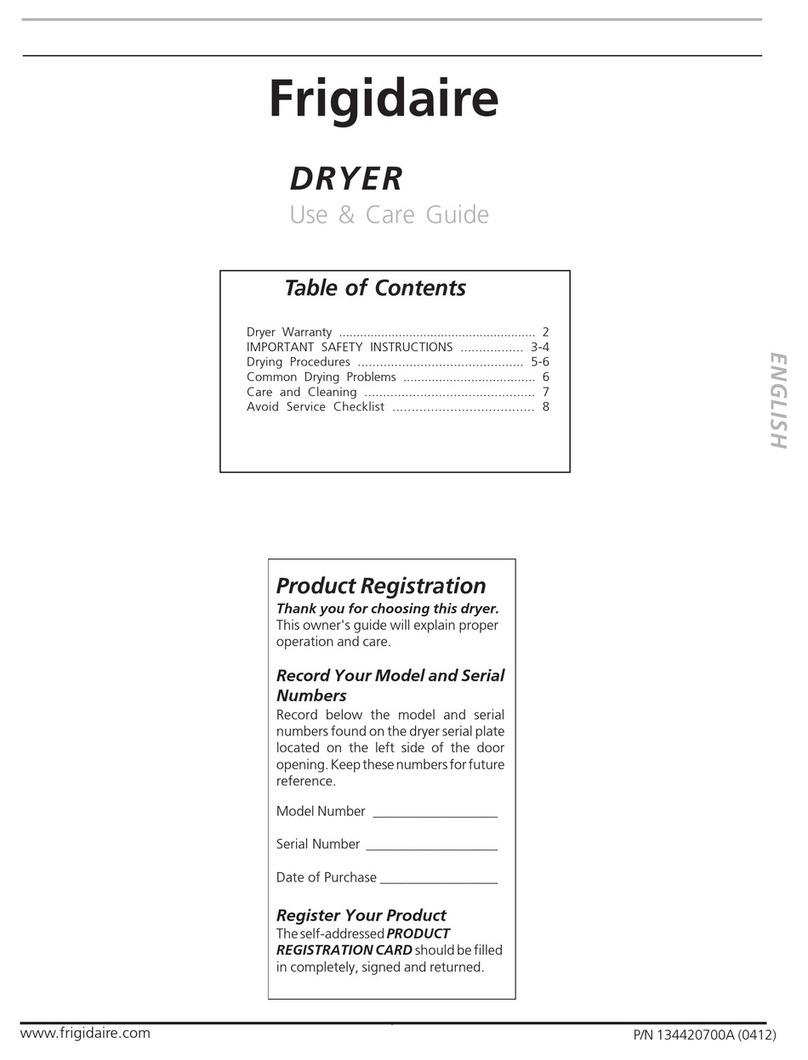
Frigidaire FSE848RHS0 User manual

Other Frigidaire Dryer manuals

Frigidaire GLER341AS0 User manual

Frigidaire

Frigidaire GLER341AS0 User manual

Frigidaire GLER331AS2 Quick start guide

Frigidaire

Frigidaire GLER331AS2 Quick start guide

Frigidaire GLGR341C User manual

Frigidaire

Frigidaire GLGR341C User manual

Frigidaire FCGD3000ES - 27 Inch Coin Operated Gas Dryer Manual

Frigidaire

Frigidaire FCGD3000ES - 27 Inch Coin Operated Gas Dryer Manual

Frigidaire FRQG7000LW0 Owner's manual

Frigidaire

Frigidaire FRQG7000LW0 Owner's manual

Frigidaire FRE5711KW User manual

Frigidaire

Frigidaire FRE5711KW User manual

Frigidaire Gas & Electric Dryer User manual

Frigidaire

Frigidaire Gas & Electric Dryer User manual

Frigidaire GLEQ442CE User manual

Frigidaire

Frigidaire GLEQ442CE User manual

Frigidaire FARE1011MW Owner's manual

Frigidaire

Frigidaire FARE1011MW Owner's manual

Frigidaire GLEQ642AS2 User manual

Frigidaire

Frigidaire GLEQ642AS2 User manual

Frigidaire FEQ1452CKS User manual

Frigidaire

Frigidaire FEQ1452CKS User manual

Frigidaire FSG747GC User manual

Frigidaire

Frigidaire FSG747GC User manual

Frigidaire Dryer User manual

Frigidaire

Frigidaire Dryer User manual

Frigidaire GLER341CDC0 User manual

Frigidaire

Frigidaire GLER341CDC0 User manual

Frigidaire AGQ6400HS1 User manual

Frigidaire

Frigidaire AGQ6400HS1 User manual

Frigidaire FRG5711KW Service manual

Frigidaire

Frigidaire FRG5711KW Service manual

Frigidaire GLGQ221A User manual

Frigidaire

Frigidaire GLGQ221A User manual

Frigidaire GLGR1042F User manual

Frigidaire

Frigidaire GLGR1042F User manual

Frigidaire LCGQ2152FE0 User manual

Frigidaire

Frigidaire LCGQ2152FE0 User manual

Frigidaire FRQG7000LW User manual

Frigidaire

Frigidaire FRQG7000LW User manual

Frigidaire Affinity FAQE7071L User manual

Frigidaire

Frigidaire Affinity FAQE7071L User manual

Frigidaire Affinity FAQG7017K W User manual

Frigidaire

Frigidaire Affinity FAQG7017K W User manual

Frigidaire MDE546RE User manual

Frigidaire

Frigidaire MDE546RE User manual

Frigidaire SGGR341AS0 User manual

Frigidaire

Frigidaire SGGR341AS0 User manual

Popular Dryer manuals by other brands

Whirlpool WED9270XL2 parts list

Whirlpool

Whirlpool WED9270XL2 parts list

Kleenmaid KED2000 Repair instructions

Kleenmaid

Kleenmaid KED2000 Repair instructions

SPI Supplies SPI-DRY Operation manual

SPI Supplies

SPI Supplies SPI-DRY Operation manual

Amana NGD5800DW Use & care guide

Amana

Amana NGD5800DW Use & care guide

Bosch WTG86402GB Installation and operating instructions

Bosch

Bosch WTG86402GB Installation and operating instructions

Maytag MED4200BW0 installation instructions

Maytag

Maytag MED4200BW0 installation instructions

ffuuss eos user manual

ffuuss

ffuuss eos user manual

KitchenAid 53-3498 installation instructions

KitchenAid

KitchenAid 53-3498 installation instructions

Schulthess Spirit topLine TW 8340 operating instructions

Schulthess

Schulthess Spirit topLine TW 8340 operating instructions

Whirlpool LGR4624BW0 parts list

Whirlpool

Whirlpool LGR4624BW0 parts list

World Dryer AirMax D M5-972A manual

World Dryer

World Dryer AirMax D M5-972A manual

Alliance Laundry Systems ADEE9BSS user guide

Alliance Laundry Systems

Alliance Laundry Systems ADEE9BSS user guide

Miele PDR 910 EL Operating and installation instructions

Miele

Miele PDR 910 EL Operating and installation instructions

Amana NGD5800TQ0 parts list

Amana

Amana NGD5800TQ0 parts list

Bosch WTA79200GB Installation and operating instructions

Bosch

Bosch WTA79200GB Installation and operating instructions

AEG TR838P4OB user manual

AEG

AEG TR838P4OB user manual

Asko T760 user guide

Asko

Asko T760 user guide

Electrolux EW2H328R2 user manual

Electrolux

Electrolux EW2H328R2 user manual

manuals.online logo
manuals.online logoBrands
  • About & Mission
  • Contact us
  • Privacy Policy
  • Terms and Conditions

Copyright 2025 Manuals.Online. All Rights Reserved.

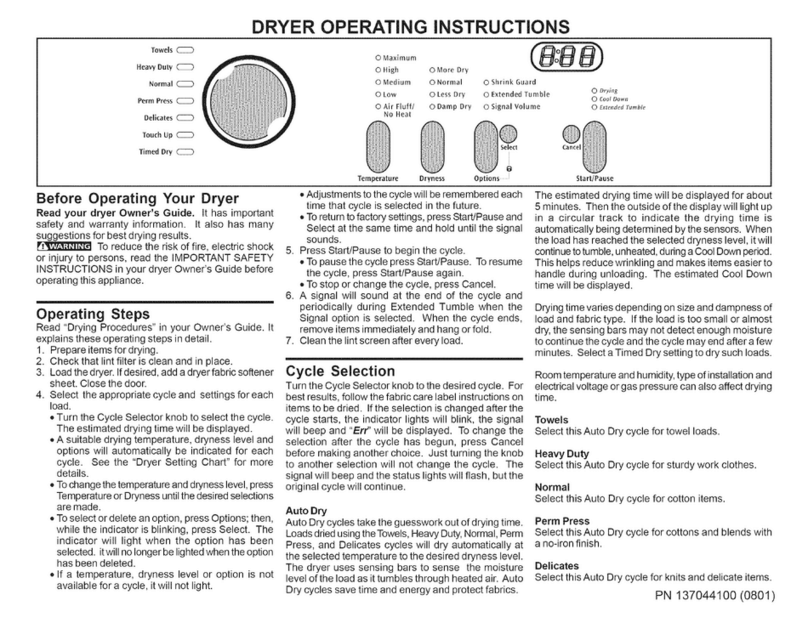
OPERAOPERA
OPERAOPERA
OPERATING INSTRUCTIONSTING INSTRUCTIONS
TING INSTRUCTIONSTING INSTRUCTIONS
TING INSTRUCTIONS
Printed in U.S.A.
ReRe
ReRe
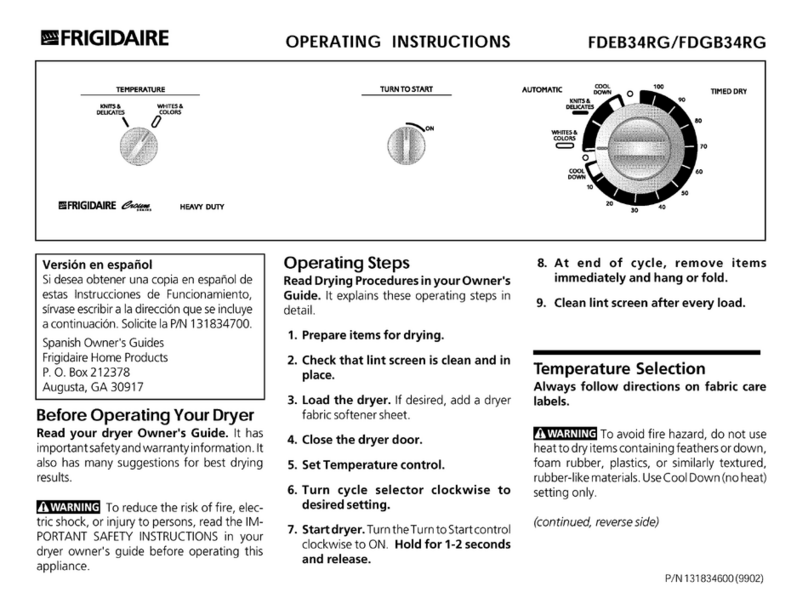
Read Drying Procedures in your Owner's Guide.ad Drying Procedures in your Owner's Guide.
ad Drying Procedures in your Owner's Guide.ad Drying Procedures in your Owner's Guide.
ad Drying Procedures in your Owner's Guide.
It explains these operating steps in detail.
1. Pr1. Pr
1. Pr1. Pr
1. Prepare items for drying.epare items for drying.
epare items for drying.epare items for drying.
epare items for drying.
Operating StepsOperating Steps
Operating Steps
P/N131930100(0006)
Versión en españolVersión en español
Versión en español
Si desea obtener una copia en español de estas
InstruccionesdeFuncionamiento,sírvaseescribirala
dirección que se incluye a continuación.
Solicite la P/N 131972200.
SpanishOwner'sGuides
FrigidaireCompany
P.O.Box212378
Augusta,Georgia 30917
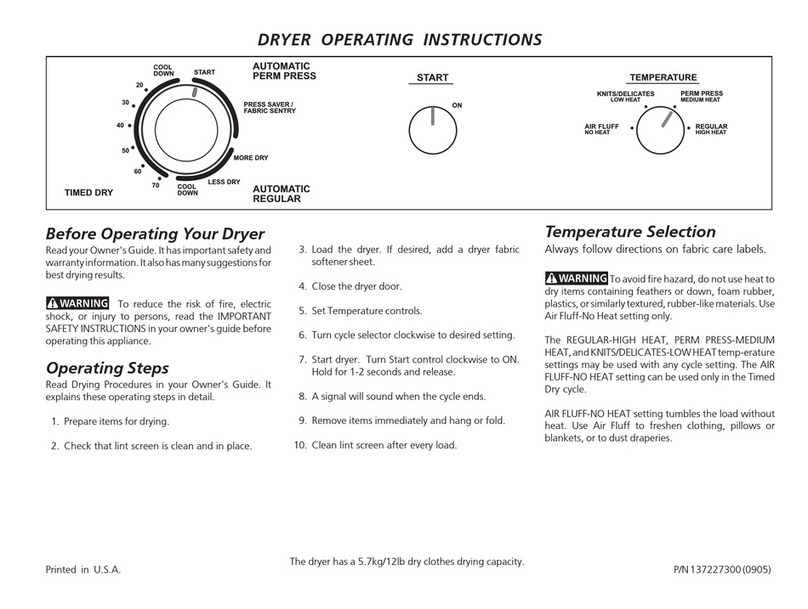
The REGULAR-HIGH HEAT, PERM PRESS-MEDIUMREGULAR-HIGH HEAT, PERM PRESS-MEDIUM
REGULAR-HIGH HEAT, PERM PRESS-MEDIUMREGULAR-HIGH HEAT, PERM PRESS-MEDIUM
REGULAR-HIGH HEAT, PERM PRESS-MEDIUM
HEATHEAT
HEATHEAT
HEAT, and KNITS/DELICATES-LOWHEATKNITS/DELICATES-LOWHEAT
KNITS/DELICATES-LOWHEATKNITS/DELICATES-LOW HEAT
KNITS/DELICATES-LOW HEAT temperature
settings may be used with any cycle setting. The AIRAIR
AIRAIR
AIR
FLUFF-NO HEATFLUFF-NO HEAT
FLUFF-NO HEAT setting can be used only in the Timed
Dry cycle.
AIR FLUFF-NO HEATAIR FLUFF-NO HEAT
AIR FLUFF-NO HEAT setting tumbles the load without
heat. Use Air Fluff to freshen clothing, pillows or
blankets, or to dust draperies.
Cycle SelectionCycle Selection
Cycle Selection
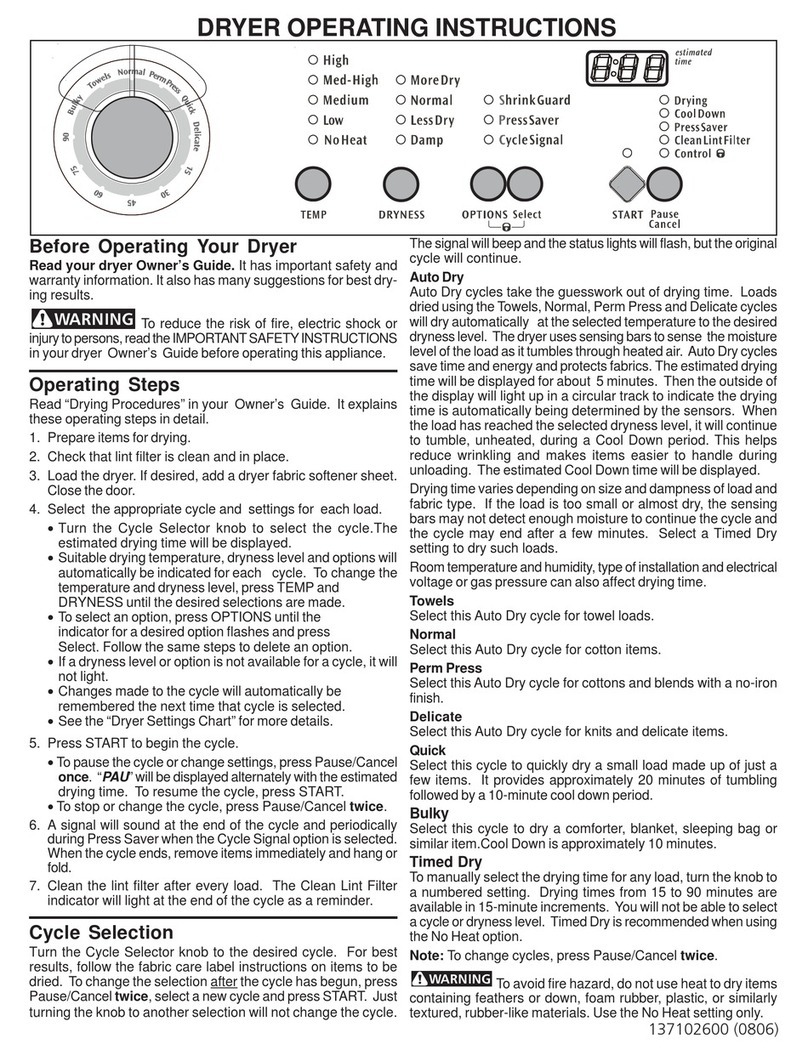
Turn cycle selector clockwise to desired cycle and
setting.
Each cycle ends with a cool down period. The heat
automaticallyturnsoffandtheloadcontinuestotumble
duringthecooldownperiod.Thisreduceswrinklingand
makes items easier to handle during unloading.
Dryingtimevariesdependingonsizeanddampnessof
load, weight and fabric type. Room temperature and
humidity, type of installation and electrical voltage or
gas pressure can also affect drying time.
2.2.
2.2.
2. Check that lint screen is clean and in place.Check that lint screen is clean and in place.
Check that lint screen is clean and in place.Check that lint screen is clean and in place.
Check that lint screen is clean and in place.
3.3.
3.3.
3. Load the dryer.Load the dryer.
Load the dryer.Load the dryer.
Load the dryer. If desired, add a dryer fabric
softenersheet.
4.4.
4.4.
4. Close the dryer door.Close the dryer door.
Close the dryer door.Close the dryer door.
Close the dryer door.
5.5.
5.5.
5. Set Dry Temperature control. Select EXTRASet Dry Temperature control. Select EXTRA
Set Dry Temperature control. Select EXTRASet Dry Temperature control. Select EXTRA
Set Dry Temperature control. Select EXTRA
CARE if desired.CARE if desired.
CARE if desired.
6.6.
6.6.
6. Turn cycle selector clockwise to desired setting.Turn cycle selector clockwise to desired setting.
Turn cycle selector clockwise to desired setting.Turn cycle selector clockwise to desired setting.
Turn cycle selector clockwise to desired setting.
7.7.
7.7.
7. Startdryer.Startdryer.
Startdryer.Startdryer.
Startdryer. Push theStart button andhold for 1-
2 seconds, or turn the Turn to Start control
clockwisetoON.Holdfor1-2secondsandrelease.
8.8.
8.8.
8. A signal will sound toward the end of the coolA signal will sound toward the end of the cool
A signal will sound toward the end of the coolA signal will sound toward the end of the cool
A signal will sound toward the end of the cool
down period.down period.
down period.
9.9.
9.9.
9. Remove items immediately and hang or fold.Remove items immediately and hang or fold.
Remove items immediately and hang or fold.Remove items immediately and hang or fold.
Remove items immediately and hang or fold.
10.10.
10.10.
10. Clean lint screen after every load.Clean lint screen after every load.
Clean lint screen after every load.Clean lint screen after every load.
Clean lint screen after every load.
TT
TT
Temperaturemperatur
emperaturemperatur
emperature Selectione Selection
e Selectione Selection
e Selection
Always follow directions on fabric careAlways follow directions on fabric care
Always follow directions on fabric care
labels.labels.
labels.labels.
labels.
To avoid fire hazard, do not use heat
todryitemscontainingfeathersordown,foamrubber,
plastics, or similarly textured, rubber-like materials.
Use Air Fluff-No Heat setting only.
BeforBefor
BeforBefor
Before Operating Ye Operating Y
e Operating Ye Operating Y
e Operating Your Drour Dr
our Drour Dr
our Dryeryer
yeryer
yer
Read your dryer Owner's Guide.Read your dryer Owner's Guide.
Read your dryer Owner's Guide. It has important
safety and warranty information. It also has many
suggestionsforbestdryingresults.
To reduce the risk of fire, electric
shock, or injury to persons, read the IMPORTANT
SAFETY INSTRUCTIONS in your dryer owner's guide
beforeoperating this appliance.
P/N131930100(0006)
Cycle SelectionCycle Selection
Cycle Selection (continued)(continued)
(continued)(continued)
(continued)
AuAu
AuAu
Autoto
toto
to Regular CycleRegular Cycle
Regular CycleRegular Cycle
Regular Cycle
This cycle is best for cotton items. Drying time is
determinedautomaticallyatthetemperatureselection
of your choice.
• High heat is suggested for cotton items.
• Initially set cycle selector on NORMAL DRY.NORMAL DRY.
NORMAL DRY.NORMAL DRY.
NORMAL DRY.
• For items requiring more drying time, set cycle
selector on MORE.MORE.
MORE.MORE.
MORE.
• For items requiring less drying time, set cycle
selector on LESS.LESS.
LESS.LESS.
LESS.
AuAu
AuAu
Auto Delicate Cycleto Delicate Cycle
to Delicate Cycleto Delicate Cycle
to Delicate Cycle
Thiscycleisbestforknitanddelicateitems.Dryingtime
isdeterminedautomaticallyatthetemperatureselection
of your choice.
• Low heat is suggested for knit and delicate items.
• Initially set cycle selector on NORMAL DRYNORMAL DRY
NORMAL DRYNORMAL DRY
NORMAL DRY.
• For items requiring more drying time, set cycle
selector on MOREMORE
MOREMORE
MORE.
• For items requiring less drying time, set cycle
selector on LESSLESS
LESSLESS
LESS.
• Asignalwillsoundtowardtheendofthecooldown
period.
• If the Extra CareExtra Care
Extra CareExtra Care
Extra Care option is turned on, the cycle
selector will advance to the Extra CareExtra Care
Extra CareExtra Care
Extra Care setting.
UnheatedtumblingcontinuesduringExtraCareExtraCare
ExtraCareExtraCare
ExtraCarefor
16minutestohelpreducewrinklingifthedriedload
cannot be removed promptly. A signal will sound
briefly every five minutes as a reminder to remove
the load.
Timed DTimed D
Timed DTimed D
Timed Dry Regulary Regula
ry Regulary Regula
ry Regular Cycler Cycle
r Cycler Cycle
r Cycle
Thiscycleprovidesapproximately60minutesofdrying
time at the temperature selection of your choice.
Auto Perm Press CycleAuto Perm Press Cycle
Auto Perm Press Cycle
This cycle is best for permanent press items. Drying
time is determined automatically at the temperature
selection of your choice.
• Medium heat is suggested for permanent press
items.
• Initially set cycle selector on NORMAL DRY.NORMAL DRY.
NORMAL DRY.NORMAL DRY.
NORMAL DRY.
• For items requiring more drying time, set cycle
selector on MORE.MORE.
MORE.MORE.
MORE.
• Foritemsrequiringlessdryingtime,setcycleselector
on LESS.LESS.
LESS.LESS.
LESS.
• Asignalwillsoundtowardtheendofthecooldown
period.
• If the Extra CareExtra Care
Extra CareExtra Care
Extra Care option is turned on, the cycle
selector will advance to the Extra CareExtra Care
Extra CareExtra Care
Extra Care setting.
UnheatedtumblingcontinuesduringExtraCareExtraCare
ExtraCareExtraCare
ExtraCarefor
16minutestohelpreducewrinklingifthedriedload
cannot be removed promptly. A signal will sound
briefly every five minutes as a reminder to remove
the load.
EnerEner
EnerEner
Energy Saving Tgy Saving T
gy Saving Tgy Saving T
gy Saving Tipsips
ipsips
ips
• Keep the lint screen clean and exhaust the dryer
correctly.
• Sortlaundryproperlyandselectpropertemperature
and cycle settings. Choose an automatic dry cycle
whenever possible for accurate drying time.
• Dry only full loads. Single items and small loads
usually take longer to dry.
• Avoid overloading, adding wet items to a partially
dry load, and overdrying.
• Dry one load after another to take advantage of a
warmdryer.
• Opening the door needlessly causes warm air to
escape, which prolongs drying time.
• If possible, use the dryer on low humidity days.
• Install the dryer in an area where the room
temperature is at least 45°F (7°C).