FRIGOGLASS Super-5 User manual

Super-5
[R600a]
Super-8 FFD
[R290]
Super-9
[R290]
Super-16SD
[R290]
Super-16 FFSD S
[R290]
MAX-900HD [R290] C
MAX-1000HD [R290] C
MAX-1000SD
[R290] C
CMV-375 NC
[R290] D
CMV-375
[R290] D
CMV-750 W
[R290]
Smart-300 LC
[R290]
Smart-360
[R290] C
MAX-500
[R290] C
MAX-700
[R290] C
MAX-450
[R290] C
Smart-1300 HD LC
[R290]
Super-5 [R600a]
Super-8 FFD [R290]
Super-9 [R290]
Super-16SD [R290]
Super-16 FFSD S [R290]
CMV-375 NC [R290] D
CMV-375 [R290] D
CMV-750 W [R290]
Smart-300 LC [R290]
Smart-360 [R290] C
Smart-1300 HD LC [R290]
MAX-450 [R290] C
MAX-500 [R290] C
MAX-700 [R290] C
MAX-900HD [R290] C
MAX-1000HD [R290] C
MAX-1000 SD [R290] C
Plus-500 [R290]
Plus-500
[R290]


ENG
User Manual
This User Manual was originally written in English.
Please read the instructions carefully before using this ICM.
RUS
Руководство пользователя
Язык оригинала данного руководства пользователя - английский.
Перед началом пользования холодильной витриной, просим Вас
внимательно ознакомиться с данными инструкциями.
Please see below the meaning of the symbols used throughout the manual, for your better
understanding.
Для лучшего понимания, oзнaкoмьтecь со знаками, которые используются в данном
документе.
WARNING
ПРЕДУПРЕЖДЕНИЕ
INFORMATION
ИНФОРМАЦИЯ
CAUTION
ВНИМАНИЕ
FIRST AID
ПЕРВАЯ ПОМОЩЬ

ENG
RUS
Table of Contents
Содержание
1. Foreword..........................................
2. Technical description.....................
2.1 General............................................
2.2 Climate classification.....................
2.3 Technical specifications................
2.4 Physical dimensions......................
2.5 Maximum weight per shelf.............
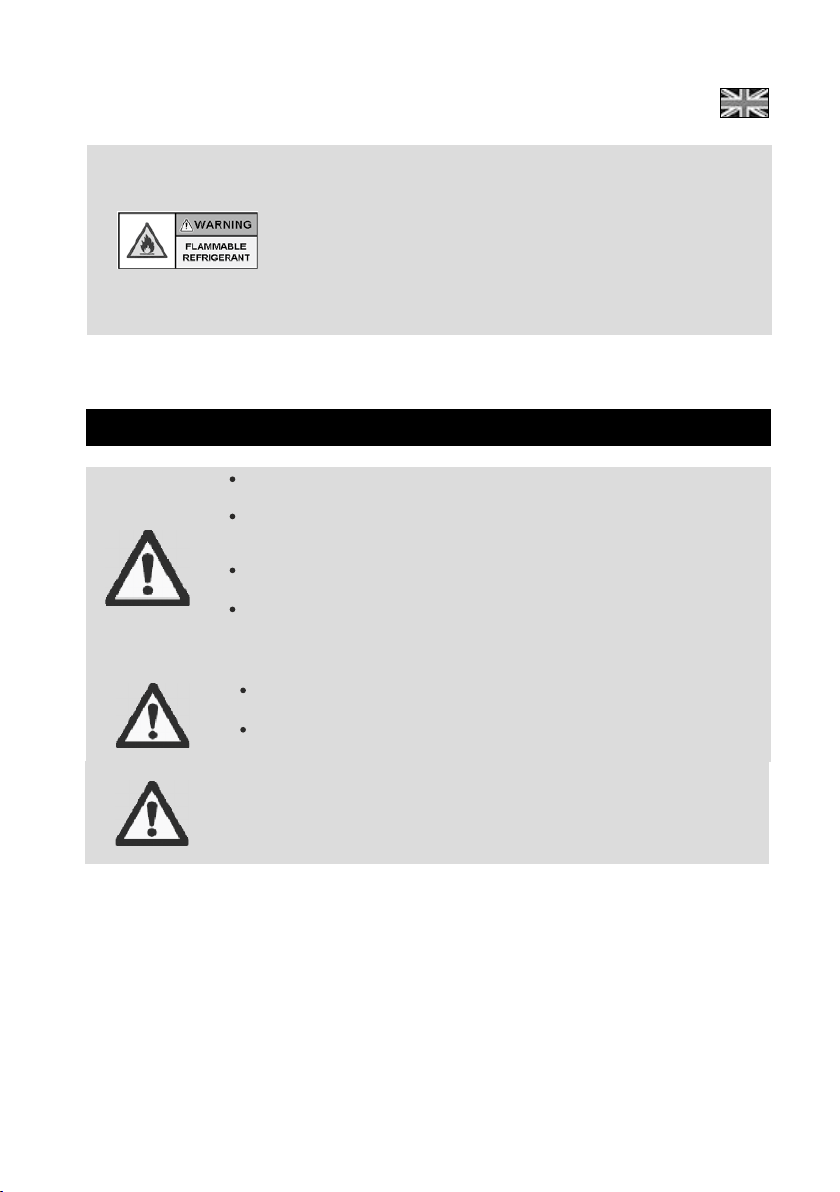
3. Safety Requirements.......................
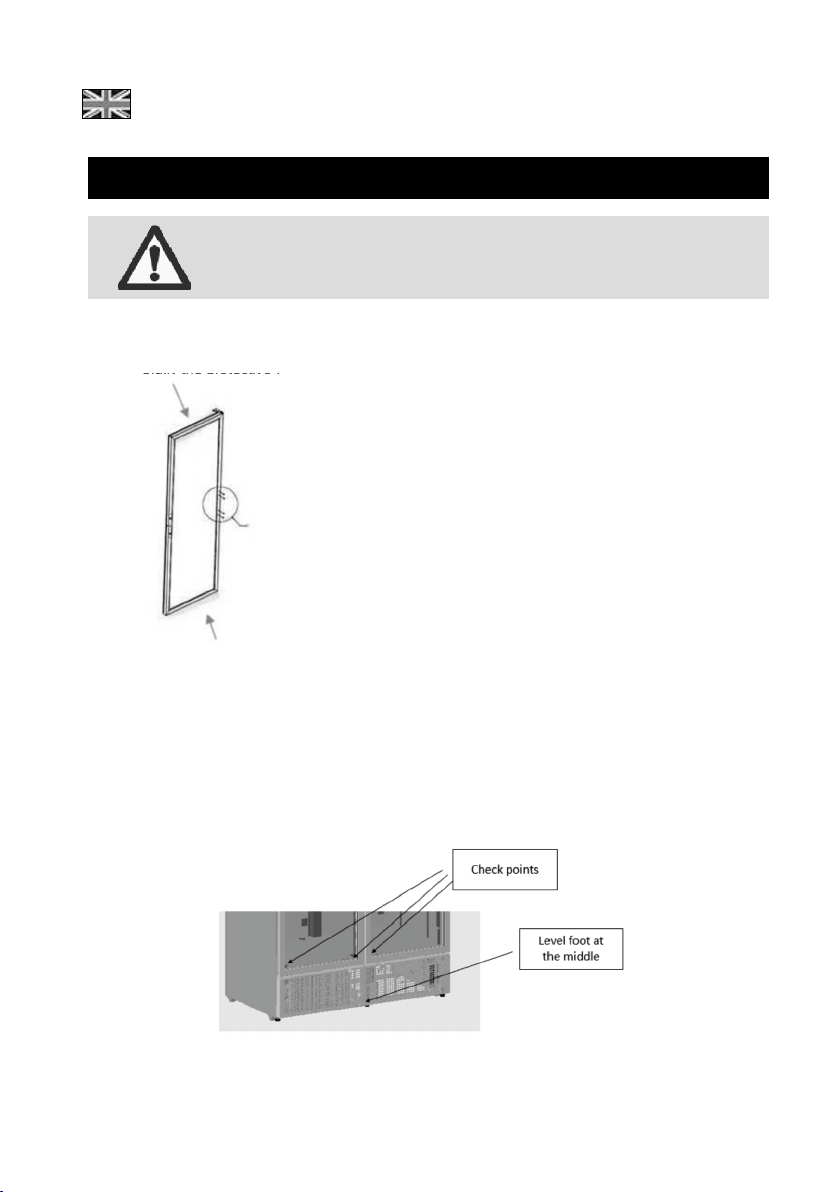
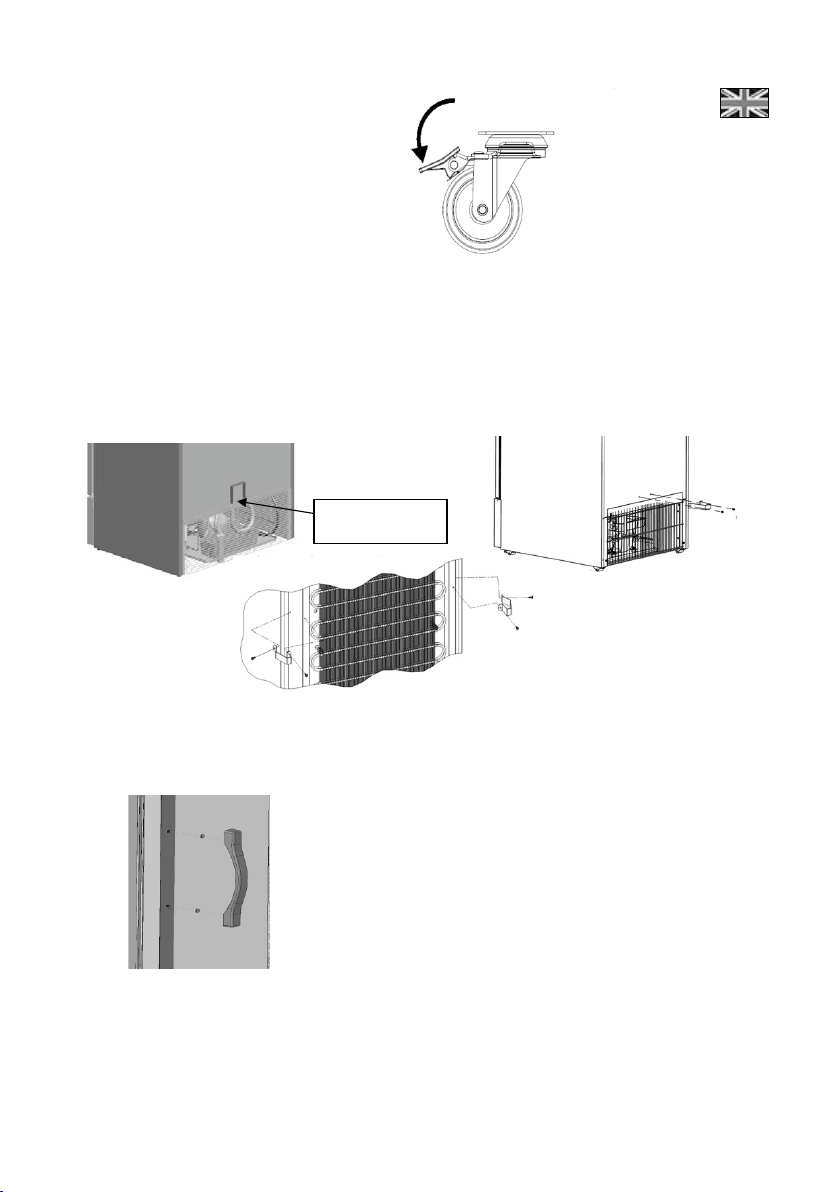
4. Installation & operation..................
4.1 Installation instructions.................
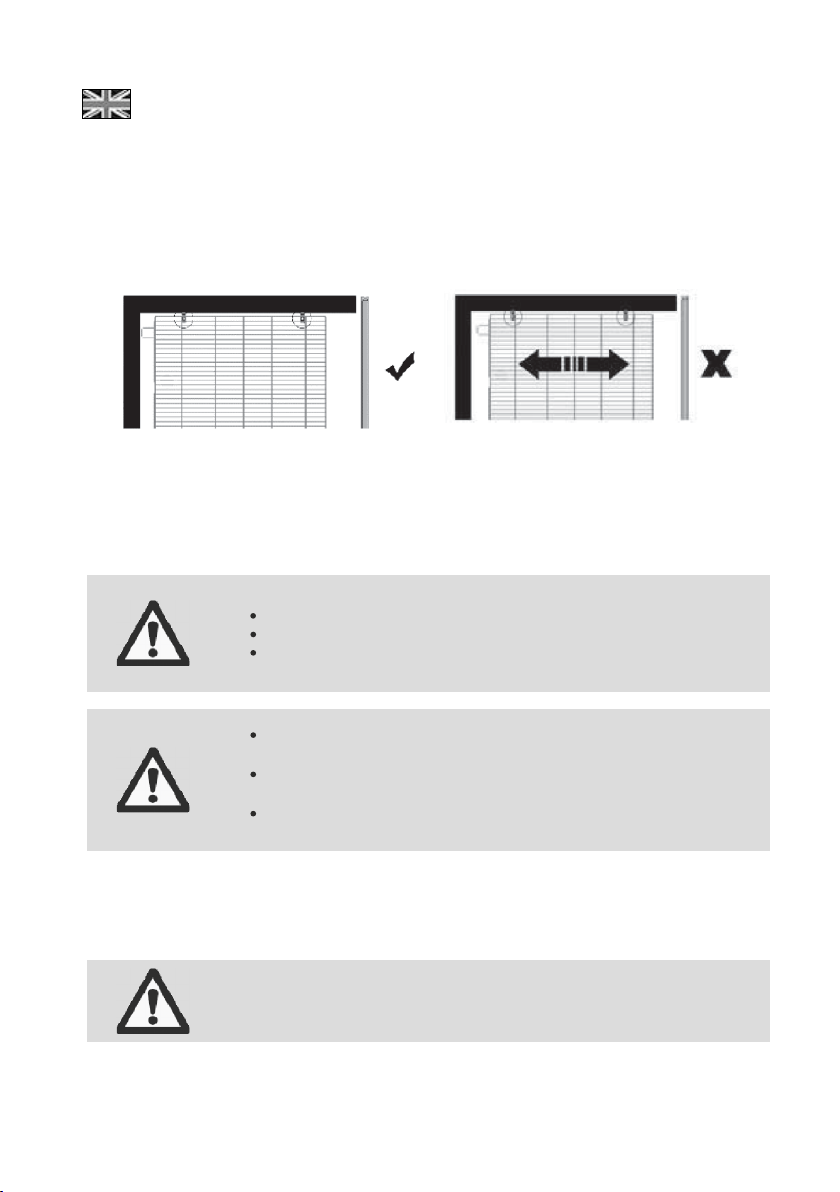
4.2 Adjusting the shelf (not applicable
to units with plastic inner liner)...
4.3 Connection to the mains supply..
4.4 Operation instructions..................
5. Electronic controllers (optional) ...
6. Door blocking system...................
6.1 Application with hinged
door ICMs.......................................
6.2 ................. Frameless door option
6.3 Application with sliding
door ICMs......................................
7. Locking system.............................
7.1 Instructions for using the
padlock provision.........................
7.2 Instructions for using the
eye-lock..........................................
8. RCCB.............................................
9. Care & cleaning .............................
10. Troubleshooting............................
11. First aid...........................................
12. Disposal of the unit.......................
13. Recycling information...................
14. Warranty.........................................
APPENDIX A: Handling &
transportation guidelines.............
APPENDIX B: Preventive maintenance
guidelines......................................
APPENDIX C: Guidelines to prevent
corrosion of the cabinet...............
APPENDIX D: Link to instructions for
rehanging the door........................
1. Предисловие....................................
2. Техническое описание....................
2.1 Общая информация........................
2.2 Климатический класс.....................
2.3 Технические спецификации..........
2.4 Размеры............................................
2.5 Энергопотребление........................
2.6 Максимальная нагрузка на
экспозиционную полку...................
3. Требования безопасности.............
4. Установка и эксплуатация.............
4.1 Инструкции по установке..............
4.2 Установка экспозиционной полки
(не применяется в устройствах с
пластмассовой внутренней
облицовкой).....................................
4.3 Подключение к главной сети........
4.4 Инструкции по эксплуатации........
5. Электронные регуляторы.............
6. Система блокирования дверей....
6.1 Холодильные витрины с
откидной дверью............................
6.2 Безрамочные двери
(опционально).................................
6.3 Холодильные витрины с
раздвижной дверью.......................
7. Запорная система...........................
7.1 Инструкция по использованию
навесного замка..............................
7.2 Инструкция по использованию
встроенного замка..........................
8. Устройство защитного
отключения (УЗО)*..........................
9. Уход и чистка...................................
10. Устранение неполадок...................
11. Первая помощь................................
12. Утилизация устройств....................
13. Информация по утилизации
14. Гарантийные условия....................
ПРИЛОЖЕНИЕ I: Правила обращения
и транспортирования.....................
ПРИЛОЖЕНИЕ II: Правила
профилактического
обслуживания..................................
ПРИЛОЖЕНИЕ III: Правила
предотвращения коррозии в
камере...............................................
ПРИЛОЖЕНИЕ IV: Ссылка на
инструкцию по перенавесу...........
5
5
5
5
5
5
6
7
8
8
10
10
10
11
11
11
12
12
13
13
13
14
15
16
18
18
19
20
20
20
21
22
23
23
25
28
29
30
30
31
31
32
32
31
33
36
38
40
23
23
23
23
24
26
26
26
29
30
35
38
38
40
40
41
42

ENG
5
1. Foreword
Thank you for purchasing this new Ice Cold Merchandiser (ICM) from Frigoglass. Before using this
unit please read the instructions below carefully. A well-maintained Frigoglass ICM will help you
increase your sales and profits.
Manufacturer:
FRIGOGLASS EURASIA LLC,
Address:
Novosilskoe Shosse 20A,
Orel 302031, RUSSIA
2. Technical description
2.1 General
The merchandiser must be connected to a grounded mains outlet with fuse rating between 10A-16A.
The outlet must be easily accessible for the purposes of installation and servicing. During installation,
other authorities may impose additional requirements in respect of lighting, alarm equipment and
similar.
2.2 Climate classification
According to climate specifications, all concerned models are Class "4" (as per ISO23953-2) namely
ambient temperature of 30°C and 55% humidity.
2.3 Technical specifications
Rating Voltage 220-240V, 50Hz
Thermostat 2.0°C ~ 10.0°C
Defrosting Automatic
Noise Level No more than 69 dB(a)
2.4 Physical dimensions
Model Width
(mm)
Depth1
(mm)
Height2
(mm)
Volume
(Lt)
Net Weight
Super-8 FFD [R290] 660 693 2126 608 109
Super-9 [R290] 738 750 2144 795 115
1 Excluding handle
2 Including rollers & feet
Super-5 [R600a] 500 608 870 145 45
Super-16SD [R290] 1225 822 2130 1306 185
Super-16 FFSD S [R290]
CMV-375 NC [R290] D
CMV-[R290] D
CMV-750 W [R290]
1225
590
590
800
750
620
620
805
2130
1915
2075
2080
1500
355
355
812
194
83
83
140

ENG
Model Width
(mm)
Depth1
(mm)
Height2
(mm)
Volume
(Lt)
Net Weight
495
613
1997 341 75
Smart-300 LC [R290] 495 625 1619 258 75
595 690 2162 504 101
Smart-360 LC [R290] C
Smart-1300 HD LC [R290]
696 783 2140 712 125
MAX-450 [R290]C
895 770 2012 887 146
MAX-500 [R290]C
964 783 2140 1020 163
MAX-700 [R290]C
964 736 2126 905 161
MAX-900 HD [R290]C
MAX-1000 HD [R290]C
MAX-1000 SD [R290]C
1310
740
2139 1282 200
595
676
2012 472 100
660 724 2016 522 125
Plus-500 [R290]
2.5 Maximum weight per shelf
Model Maximum weight per shelf
~ 25kg
~ 100kg
~ 25kg
~ 24kg
~ 37kg
~ 72kg
~ 40kg
~ 100kg
~ 67kg
~ 50kg
~ 50kg
~ 62kg
~ 58kg
~ 25kg
~ 24kg
~ 37kg
~ 66kg
~ 40kg
6
Super-8 FFD [R290]
Super-9 [R290]
Super-5 [R600a]
Super-16SD [R290]
Super-16 FFSD S [R290]
CMV-375 NC [R290] D
CMV-[R290] D
CMV-750 W [R290]
Smart-300 LC [R290]
Smart-360 LC [R290] C
Smart-1300 HD LC [R290]
MAX-450 [R290]C
MAX-500 [R290]C
MAX-700 [R290]C
MAX-900 HD [R290]C
MAX-1000 HD [R290]C
MAX-1000 SD [R290]C
Plus-500 [R290]

The merchandiser is equipped with HC refrigerant, and
have been tested and proven to be safe according to related
All necessary actions for safe usage & maintenance of this
appliance are described in this manual. Read carefully before
using the appliance and follow all precautions included in this
manual.
To reduce the possibility of fire, this appliance must be installed
only by a suitably qualified person.
ENG
7
standards.
3. Safety Requirements
Lamp or LED replacement must be carried out by authorized
service agent.
Do not operate the merchandiser if the front or back, grilles and
fans’ enclosures are removed or not properly attached.
All repairs and maintenance of the merchandizer should be
performed by qualified personnel only.
The ICM may only be connected to a single fixed and grounded
socket taking into account all applicable safety standards. Operation
without grounding is prohibited.
Usage of extension cables and multiple sockets is strongly
prohibited.
Do not operate the merchandizer if the power cord is damaged. If
the power cord is damaged, it must be replaced with a new one.
Power cord replacement must be carried out by authorized service
agent.
Before selecting the placement location for your merchandiser you must
read the information about IP protection degree in the name plate
attached to the internal wall of the Cabinet. Outdoor installation is only
allowed for refrigerated cabinets with IP24 degree of protection. For lower
degree of protection outdoor placement of the unit is prohibited.

4. Installation & operation
Failure to comply with the instructions may result in high-energy
consumption, poor performance of the unit and void warranty.
4.1 Installation instructions
i. In case the cooler is packed by the full face packaging, after unpacking, you need to remove
carefully the protective films that are stuck on the door profiles.
ii. After unpacking, check the cabinet for any damage caused during transportation. In the event of
damage, please contact the forwarding company.
iii. Always ensure that your merchandiser is installed on a stable surface/floor. There are adjustable
feet at the front, under the chassis. The cooler must be leveled through proper adjustment of the
leveling feet in all installations. It must be ensured that the cooler does not exhibit any inclination
towards its front side and/or its lateral sides, after adjustment. A slight inclination toward its back side
will further facilitate the good circulation of the fluid and support the door closing mechanism. The use
of a spirit level is highly advisable to check leveling. Verify that the cooler sits firmly on the leveling feet.
The front cooler wheels (if available) should be able to rotate by hand after cooler installation and
adjustment. There are 2 or 3 (depending on the size) adjustable feet for all models at the front under
the chassis. The level foot must be adjusted in such a way that the lower edges of the internal cabin
are aligned. The below given check points must be on the same line.
When the cooler has small rotating castor wheels (optional feature) the brake must always be applied
when cooler is at the final position.
ENG
8

Take necessary precautions if lifting is needed during installation. Keep unauthorised people
away from the cooler until installation is completed.
iv. The merchandiser must stand upright for at least 1 hour after transportation and prior to start-up.
This gives the oil time to run back to the compressor after transit and installation.
v. Allow a minimum gap of 100mm at the top, 100mm at the rear and 50mm at the sides of the
vi. Do not place anything on top of the cooler.
vii. Handle placement instructions. Single door cooler (frameless door option).
Open the door. Screw the handle from the back side of the door, using the respective slotted
cheese head screws and place the handle spacer inside glass hole.
CASTOR BREAKS
MUST BE APPLIED
AT ALL TIMES WHEN
THE COOLER IS AT
THE FINAL POSITION
Rotate back spacer,
where applicable
Note: Relocation of the ICM inside the outlet
a. Empty the ICM and unplug from mains supply.
b. Do not fully extract the leveling feet.
c. Fully extract the leveling feet.
d. Move the unit to the desired location with the assistance of another person.
ENG
9
(depending on your model Fig. a, Fig. b or Fig. c ), to secure a gap behind the cooler for proper
Fig. a Fig. b
Back spacer should be
fixed with two screws.
Install two 40 mm spacers behind
the unit by 4 self tapping screws
2
2
Fig. c
cooler for proper ventilation. Install the spacers behind the unit as shown in the following sketch
heat dissipation.

Do not connect the merchandiser to:
a non grounded wall socket or power line
improper supply voltage and frequency
power supply that does not comply with the safety regulations of
the appliance or with current legislation on electrical installations
Do not plug the cooler into a multiple outlet strip or use
extension cables.
If the supply cord is damaged, it must be replaced by the
manufacturer or authorized service provider.
Route the power cables in such a way that they are protected
from damage and they do not pose a risk of tripping.
4.4 Operation instructions
The thermostat is located inside the ICM. The thermostat is factory set to approx. +4.1 °C. If you
require a higher temperature (warmer), turn the thermostat knob anticlockwise. If you require a lower
temperature (colder), turn the thermostat knob clockwise.
Do not use electrical appliances inside the storage compartments of the
appliance, unless recommended by the manufacturer.
ENG
10
4.3 Connection to the mains supply
Connect the ICM to a 220-240 Volts power supply on a min 10A fused & grounded socket. Do not use
extension cables.
4.2 Adjusting the shelf
To adjust the shelf first unload it, lift it and unclip the shelf clips. Place the clips in the desired
position and reposition the shelf. Make sure that the horizontal metal rods at the bottom of the shelf
are between the front and back shelf clips.

• Avoid opening the door for long periods of time.
5. Electronic controllers (optional)
For instructions of the functionality of Controller and its related optional features, please visit the
following website link: http://www.frigoglass.com/manuals/.
6. Door blocking system*
In using the door blocking system, please follow the steps below
6.1 Application with hinged door ICMs
To block the Door at 90 degree:
Step 1: Open the door to an angle slightly greater than 90 degrees
Step 2: Remove the door blocker from bracket below the door (as shown in the picture)
Step 3: Rotate the door blocker towards the cabin and insert it in bracket located at front grid (as
shown in the picture)
ENG
11
Do not use the merchandiser to store unpacked food.
This appliance is not intended for use by young children or handicapped
or infirm persons unless they are adequately supervised by a responsible
person who will ensure the safe operation of the appliance on their part.
Young children should be supervised to ensure that they do not play with
the appliance.
Do not use mechanical devices or means other than those recommended
by the manufacturer to accelerate the defrosting process.
Energy saving tips:
For energy saving and for the ICM’s better performance:
• Load your ICM at night-time so that the drinks are cold once you get there in the morning.
• Store your back-up stock in a cool and/or dark place so that when reloaded, the ICM will need
much less time to cool them down.
• Wipe moisture off the products before you place them in the ICM.
*optional feature

6.2 Frameless door option
To block the door, just open the door to an angle ter than 110 degrees. slightly grea
6.3 Application with sliding door ICMs
Step 1: Open the left door (same procedure also for right door)
Step 2: Lift up and rotate the door blocker towards the cabin (as shown in the picture)
Step 3: Place door blocker vertical to door guides (as shown in the picture). Door blocker will be
blocked at door guides walls and prevent the door to close.
Step 4: Release the door blocker from the stopping point and rotate to the initial position
ENG
12
Automatic removal of door blocker from bracket located at front grid is
for accidental purpose only.
To unblock the Door:
Step 1: Open the door slightly greater than 90 degrees and remove the door blocker manually from
bracket located at front grid
Step 2: Rotate the door blocker towards door and snap fit in bracket below the door (Initial position)
Step 1 Step 2-3

7.2 Instructions for using the eye-lock
Step 1: Close the door
Step 2: Place the key to the front grilles lock and rotate 90° (as shown in the picture)
Step 3: Door is locked. Key withdrawals in both locked and unlocked position
Step 2 Step 3
For sliding door coolers the eye-lock is positioned on the middle of external door plastic profile side.
ENG
13
7. Locking system*
7.1 Instructions for using the padlock provision
Step 1: Open the door
Step 2: Rotate the locking system blade placed on the grid (as shown in the picture)
Step 3: Rotate the locking system blade placed on the door (as shown in the picture)
Step 4: Close the door and place the pad lock through the blade holes to secure cooler
*optional feature

Sliding door version coolers
8. RCCB*
In accessing the RCCB, please follow the steps below
Step 1: Remove the grid to get access to the electrical box
Step 2: Remove the gasket
Step 3: Access the RCCB switch (that is marked in circle in the respective picture below)
ENG
14
Step 2 Step 3
*optional feature
MAX series:
SMART series:

9. Care & cleaning
PRIOR TO ANY CLEANING (INSIDE OR OUTSIDE THE DEVICE)
PROCEDURE, UNPLUG THE ICM! REMOVE THE PLUG AND MAKE SURE
THAT THE OPERATOR CAN CHECK FROM ANY OF THE POINTS WHICH
HE HAS ACCESS THAT THE CABLE IS UNPLUGGED.
It is important to clean the merchandiser twice a year. In order to avoid mould formation, odours, etc.
product compartments must also be thoroughly cleaned. The interior of the ICM should be cleaned
with a mildly soapy cloth and the glass surface using a window-cleaning agent.
ENG
15
The PRCD device is integrated to the power cord of the unit (as shown in picture below), close to the
wall plug.
The PRCD device features two buttons; the small one is the “test” button and is used to check the
operational status of the PRCD. The bigger button is the “reset” and is used to rearm the PRCD after a
triggering event.
When plugging off the power cord a test needs to be perfomred to ensure proper operation of the
PRCD. Please follow the steps below:
Step 1: Plug into power.
Step 2: Press (small) “TEST” button. The (big) “RESET” button should pop-up.
Step 3: Press the “RESET” button again. Do not use the device if it fails!
Other series (RCCB is covered by plastic
cover and located in cooling mechanism are)

Do not clean with sharp objects, flammable or corrosive liquids or sprays.
If one or more of the bottles break while in the appliance and liquid spills
inside the cabinet or the space surrounding the appliance gets wet,
unplug the cooler before you clean the liquid around and inside the
cooler. Remember to take all necessary actions to protect yourselves
from broken glass (use protective gloves when cleaning).
Do not damage the refrigerant circuit.
10. Troubleshooting
ALL ACCESS TO THE COOLING SYSTEM AND ELECTRICAL PARTS
(CHANGING A LAMP OR REFRIGERATION DECK) MUST BE
BY AUTHORIZED SERVICE PERSONNEL ONLY.
The merchandiser is equipped with HC refrigerant. All
service operations on cooling mechanism & gas charging
should be performed in a well ventilated environment or in open
air. Do not smoke during maintenance.
ENG
16
PERFORMED
Never use a water hose or high-pressure jet to clean the cooler.
Do not remove the safety devices (grates, guards, groundings, etc.).
Keep the cooler in a stable position during cleaning, do not step on or
lean over the cooler.

The Cooling Mechanism & Light switches cannot be assumed to cut
the power of the cooler for service purposes. Unplugging of the
cooler is required, as described by the service instructions.
If the ICM is not functioning properly or is out of order, please check the following before calling the
authorized service provider:
FAULT POSSIBLE REASONS HANDLING
The ICM does not
work.
Power cord not plugged in. Plug it in.
No power coming through the
socket. Check for fuse/MCB on the mains.
The cooler does not
cool enough. The
products are warm.
The thermostat setting is not correct. Rotate the thermostat knob clockwise.
The ICM has recently been reloaded
with warm products. It takes 8-16
hours to cool them down.
Preferably, reload the ICM before night
closing.
The ICM is loaded in such a way
that the air circulation in the interior
is getting blocked.
Load the ICM according to the
standards you have been provided
with by the company.
The door does not seal properly.
Repair the doors for proper closing
(this type of repair should be
performed by an authorized
technician).
Leakage in the cooling system.
Repair the leakage (this type of repair
should be performed by an authorized
technician).
ENG
17
UNPLUG THE COOLER PRIOR TO ANY MAINTENANCE OR SERVICE
OPERATIONS. REMOVE THE PLUG AND MAKE SURE THAT THE
OPERATOR CAN CHECK FROM ANY OF THE POINTS WHICH HE
HAS ACCESS THAT THE CABLE IS UNPLUGGED.
After maintenance operations, make sure that the grounding
connections are in place before assembling the covers. Make sure
you use the same fastening components and covers.
If any electrical components need to be replaced, use only the
identical components in the spare part list supplied by the technical
service department of Frigoglass.
Keep the glass door of the cooler closed during cooling mechanism
maintenance. The appliance could be unstable when the compressor
is disassembled. If the compressor needs to be replaced, use
adequate support to fix the cooler.
After maintenance operations make sure that the strain relief, which
supports the supply cord, is assembled properly.

11. First aid
In case of accident, it is recommended:
ACCIDENT IMMEDIATE ACTION
Inhalation of refrigerant Take deep breaths of clean air. If irritation persists, contact a
doctor.
Contact with eyes Wash your eyes thoroughly with plenty of water for at least 15 minutes
and then consult a doctor.
Contact with skin Wash immediately with water.
12. Disposal of the unit
For detailed information regarding the recycling of this product, please contact your local city office,
your waste disposal service or the manufacturer through its service agent. By ensuring this product is
disposed of properly, you will help prevent potential negative consequences for the environment and
human health, which could otherwise incur by this product’s inappropriate disposal.
In general, the merchandizer should be decommissioned and either refurbished or recycled if one or
more of the following are verified by an authorized service agent:
ENG
18
The ICM sometimes
makes noise.
For this particular ice cold
merchandiser, a powerful
mechanism is needed and
Ice Cold Merchandisers are of
dynamic type, according to the
specifications that the company is
consequently a certain amount of
noise cannot be avoided.
offering.
Intense metallic noise. Call a service technician.
Inclined or curved floor.
Level the ICM properly by adjusting its
feet. Placing a spirit level on the top of
the ICM will assist you in leveling it.
There is water on the
floor.
The drainage hole for the
condensate water is blocked. Unblock the drainage hole.
There is a leakage in the tray. Call a service technician.
The lights don’t
work.
The fluorescent tubes or ballast or
starter are out of order. Call a service technician.
If after all the above-mentioned checks the problem with your ICM remains, contact the customer
service department of your supplie r and provide the following information:
Type of ICM
Serial number of the ICM
Brief description of the problem / observation
FAULT POSSIBLE REASONS HANDLING

Note: The disposal of electronic and electrical appliances in landfill sites or through incineration
creates a number of environmental problems. When obsolete materials are not recycled, raw materials
have to be processed to make new products. This represents significant loss of resources as the
energy, transport and environmenta l damage caused by these processes is considerable.
Another problem is that these types of appliances may contain gases such as hydrofluorocarbons
(HFCs) used as the refrigeration coolant. HFCs are greenhouse gases which when emitted into the
atmosphere contribute to climate change.
Fluorescent lighting from the appliance may contain potentially harmful substances such as toxic
heavy metals, in particular mercury, cadmium and lead. If they enter the body, these substances can
cause damage to liver, kidneys and the brain. Mercury is also a neurotoxin and has the ability to build
up in the food chain.
• To help in the recovery and re cycling process of this appliance, do not dismantle or break parts
off the appliance prior to collection. By removing parts off the appliance, you can reduce its
recyclability rate.
2. The symbol shown in Fig 1 below, which is also on the Product Label inside the appliance,
indicates the need for separate collection of electrical and electronic equipment based on the
European Community (EC) WEEE Directive.
Figure 1 - Crossed-Out Wheeled Bin
ENG
19
Corroded external or internal cabin
Destruction of the insulation of electrical wires or electrical components
Destruction of refrigeration system components.
Destruction of the door system
13. Recycling information
1. Based on the objectives of environmental policy according to the European Community (EC)
directives for Waste Electrical and Electronic Equipment (WEEE)4 which aim to preserve,
protect and improve the quality of the environment, protect human health and utilize natural
resources prudently and rationally. As an end user, you are kin dly requested to do the following:
• If the appliance has stopped working, even after troubleshooting; first check if it can be
repaired, before disposing it. Contact your distributor or supplier for further information on
possible repairs of your appliance, if in doubt.
• If the appliance has reached its “End of Lifecycle” (EOL), in other words, the appliance is not
repairable or re-usable, do not dispose of the appliance as unsorted municipal waste. Instead,
call the relevant recycling company or the local Frigoglass Sales Office to separately collect the
appliance for treatment and recycling.
4 References
Waste Electrical and Electronic Equipment (WEEE) European Community (EC) Directive Nr. 2002/96/EC

FOR AUTHORISED SERVICE PERSONNEL ONLY
APPENDIX A
HANDLING & TRANSPORTATION GUIDELINES
The merchandiser should always be transported:
in upright position (unless otherwise authorized by the supplier)
with the doors closed and stoppers for the sliding door models
on appropriate vehicles (e.g. with air shock absorbers and tail lift)
and from appropriate roads
strapped on a pallet ensuring proper protection of the cooling
mechanism
packed and stored properly, ensuring proper protection of the
cooling mechanism
Cooler temperature during storage or transportation should not be below
o
-20 C or above +60o
C
APPENDIX B
PREVENTIVE MAINTENANCE GUIDELINES
PRIOR TO ANY CLEANING (INSIDE OR OUTSIDE THE DEVICE) OR
MAINTENANCE PROCEDURE, UNPLUG THE ICM! REMOVE THE PLUG
AND MAKE SURE THAT THE OPERATOR CAN CHECK FROM ANY OF
THE POINTS WHICH HE HAS ACCESS THAT THE CABLE IS
UNPLUGGED.
ENG
20
Note: As an end-user, it is your responsibility and contribution to recycling to ensure that the appliance
is not thrown away with unsorted municipal waste, but is collected separately from a recycling
company. Please contact the relevant recycling company or the local Frigoglass Sales for Office
further information regarding collection arrangements
3. Finally, observe any recycling la ws applicable to your community or country.
14. Warranty
The appliance is covered by a warranty as this has been agreed upon sale.
The service life of an Ice Cold Merchandiser operating under proper conditions is 12 years5
The shelf life of the merchandizer stored in its original packaging, in a place protected from direct
sunlight and precipitation is 18 months.
5
after the last production of a model, we will continue supplying spare parts for 10 years
Other manuals for Super-5
1
This manual suits for next models
17
Table of contents
Languages:
Other FRIGOGLASS Commercial Food Equipment manuals