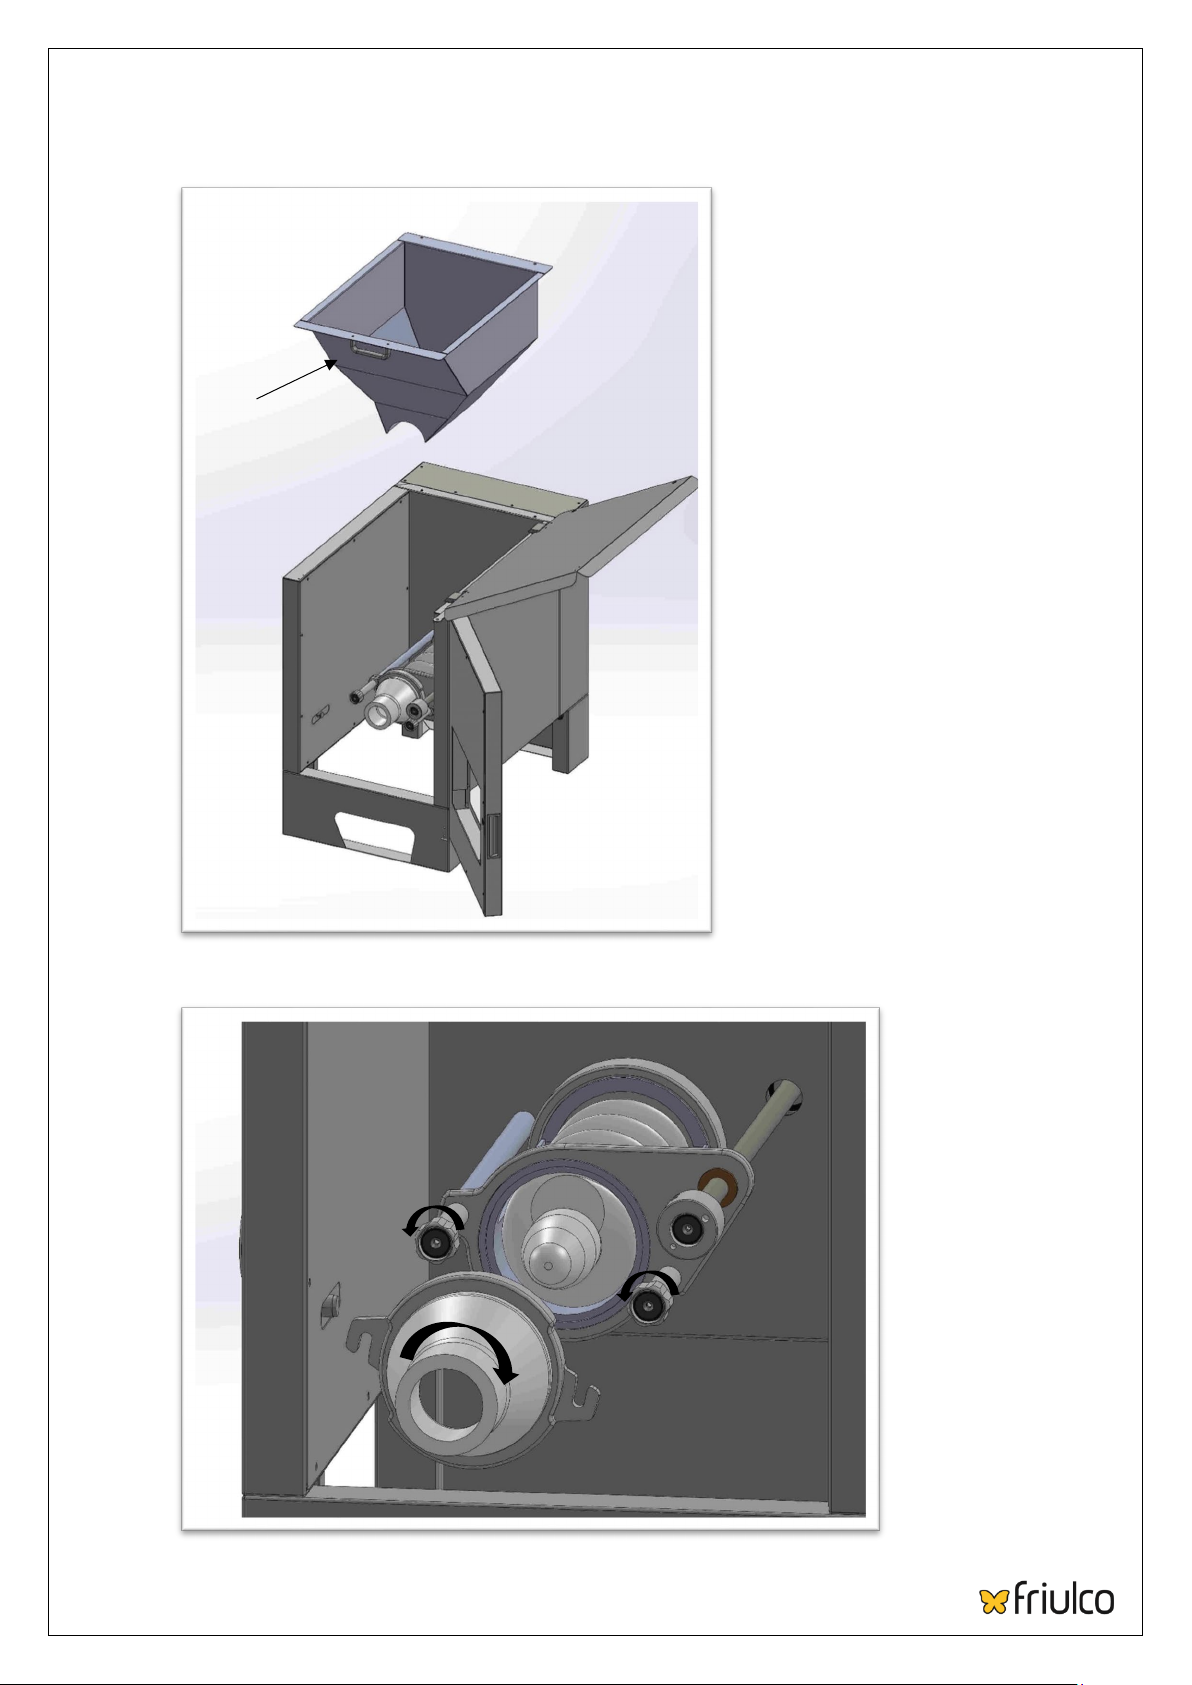
Friulco CUBO User manual

1. GENERAL INFORMATION AND SAFETY SPECIFICATIONS
CUBO has been designed and manufactured to cut pizza and bread dough portions (at room
temperature) from 20 to 240 grams.
On request, some optional extras are available:
•two cones to obtain smaller portions from 20 grams
•a Teflon-coated hopper and chute to process highly hydrated doughs (over 58%)
•an auger for not very elastic doughs
The dough is extruded and cut by a knife.
The machine must be used ONLY after having carefully read this manual.
The cover and the protection door prevent any possibilities of reaching dangerous or moving parts.
2. INDICATION OF DANGEROUS POINTS, OF RESIDUAL RISKS AND OF THE PRECAUTIONS TO BE TAKEN
CAUTION: through the dough portions exit chute under the front door, you can reach a
dangerous part of the machine with your hand, i.e. the knife.
CAUTION: DO NOT introduce your hand in this chute.
Always place the machine on an even (level), dry flooring, at a safety distance from the user.
In order to ensure a correct ventilation of the motors, which are at the back, make sure to leave at
least twenty centimeters clearance between the machine and the wall or other equipment.
20 cm
www.linda-lewis.co.uk
0161 633 5797

3. DESCRIPTION OF THE CONTROL DEVICES AND OF THEIR FUNCTION
The machine has a green start push button (Ref.38), a red stop push button (Ref.39), an emergency
push button (Ref.37) and a weight regulation knob (Ref.40).
To start the machine, press on the green start push button ON (Ref.38).
To stop the machine, press on the red push button OFF (Ref.39).
www.linda-lewis.co.uk
0161 633 5797

The weight regulation knob (Ref.40) is used to increase or decrease the portions weight but if turned
beyond the minimum point (-), it can work as a “reset” device: the knife is brought back to its original
position, if displaced.
Theemergency push button (Ref.37) must be used ONLY in case of emergency. If activated, it must
be unblocked turning it clockwise.
4. FORBIDDEN USES AND REASONABLY FORESEEABLE INCORRECT USES
WARNING: do not introduce into the machine frozen, half frozen dough or other products which
are not foreseen in this manual.
Should there be one or more dough balls accumulated on the chute (Ref.2), thus blocking the dough
exit hole, DO NOT take them away while the machine is on.
www.linda-lewis.co.uk
0161 633 5797

Always turn off the machine pressing on the red push button OFF (Ref.39).
Alternatively, open the door (Ref.1) before proceeding.
CAUTION: DO NOT wash the machine with water jets.
5. TRANSPORT, LIFTING AND INSTALLATION
The machine is placed on a wooden pallet.
It is then closed from the above with a cardboard box without bottom and strapped to the pallet.
Each cardboard box contains a complete machine, its operating and maintenance manual with
declaration of conformity.
www.linda-lewis.co.uk
0161 633 5797

To extract the machine out of its packing, you need to cut the straps and to lift the cardboard box
up.
Lift the machine with a forklift and place it on an even (level) dry flooring, at a safety distance from
the user.
In order to ensure a correct ventilation of the motors, which are at the back, make sure to leave at
least twenty centimeters clearance between the machine and the wall or other equipment.
20 cm
The machine is provided with two motors and a regulatory “Schuko” plug.
Make sure that the tension and the frequency correspond to those indicated on the machine data
plate and that the intake is grounded and properly protected against overloading.
N.B. The protection grade is I.P.55.
Place the machine far from any heat sources, the temperature around the machine should never be
higher than 55°C.
6. CLEANING AND SANITATION
Before using the machine for the first time, wash all the parts that come into contact with food
with a sponge, warm water and liquid detergent.
CAUTION: DO NOT wash the machine with water jets.
www.linda-lewis.co.uk
0161 633 5797

7. REGULATION
The best regulation for CUBO is done by steps since it should suit the different types of dough.
7.1. Cubo can cut dough portions from 20 to 240 grams.
7.2. For portions over 120 grams use the cone (Ref.5)
7.3. For portions weighing from 20 to 60 grams, use the optional cone ø30 (Ref.43)
7.4. For portions weighing from 60 to 120 grams, use the optional cone ø40 (Ref.44).
www.linda-lewis.co.uk
0161 633 5797

7.5. For more accuracy in the regulation of the weight, use the “WEIGHT” regulation knob (Ref.40):
weigh the first dough portions; if they are smaller than foreseen, turn the “WEIGHT” knob
towards +, if they are bigger, turn it towards -.
Repeat this operation until you get the required weight.
7.6. For highly hydrated doughs (over 58%) it is advisable to use the optional Teflon coated hopper
(33B) and the optional Teflon coated chute (Ref.2B).
7.7. For not very elastic doughs, it is advisable to use the optional auger (Ref.6).
www.linda-lewis.co.uk
0161 633 5797

8. USE
8.1. Prepare the dough with a normal spiral mixer.
8.2. The mixing time should be 5-10% less than for a manual dough portioning.
8.3. IMMEDIATELY place the dough just prepared into the divider hopper without adding flour or oil.
8.4. Begin at once the cutting operation of the dough without stopping the machine until the dough
hopper is empty. DO NOT leave part of the dough inside the hopper.
8.5. The above suggestions are to prevent the rising process of the dough.
8.6. Press on the green push button to start the machine.
8.7. Take the portions that come out from the chute and place them into their proving drawers.
8.8. Stop the machine pressing on the red push button.
9. DISASSEMBLY AND CLEANING
WARNING: before opening any part of the machine, pull the plug.
Before opening or disassembling any part of the machine, be sure that the motors are off.
9.1. Open the front door (Ref.1).
9.2. Take at the same time the chute (Ref.2) and the knife (Ref.8) and pull them towards you.
www.linda-lewis.co.uk
0161 633 5797

9.3. Lift the upper cover (Ref.34). Seize the removable hopper (Ref.33) by its front handle.
9.4. Turn the spacer knobs (Ref.4) counterclockwise, pull out the cone (Ref.5) turning it clockwise.
www.linda-lewis.co.uk
0161 633 5797

9.5. Unscrew the rear knob (Ref.42), seize the spiral support (Ref.7) and take it away together with
the spiral (Ref.6) pulling them towards you.
9.6. Clean everything and before reassembling, remove possible dough remains from the
interlocking areas.
9.7. Reassemble the rest of the parts in the reverse order of disassembly, being careful to insert the
spiral support (Ref.7) from the correct side: the pin should get inserted into the groove.
www.linda-lewis.co.uk
0161 633 5797

9.8. Reassemble the knife (Ref.8) after having placed the chute (Ref.2).
As far as the cleaning of the housing is concerned, a daily dry cleaning of all dough and flour remains
is sufficient. It should never be washed with sodium hypochlorite-based solutions or with abrasive
detergents since these could damage the external parts of the machine.
WARNING: do not wash the machine with water jets for safe working.
10. REGULAR MAINTENANCE
The machine does not need any peculiar lubrications and maintenance.
Regularly check the good state of the mains cable.
Turning the weight regulation knob beyond its minimum point (-), the knife (Ref.8) goes back to its
original position.
www.linda-lewis.co.uk
0161 633 5797

11. REPAIR
For repairs, controls or replacement of damaged parts, we suggest you to apply directly to the
manufacturer or to replace the damaged parts with equivalent materials, especially as far as safety
is concerned:
- power cord with plug (2 phases + ground)
- switch (push button)
Before any mechanical or electrical maintenance, it is compulsory to switch the machine off and to
pull the plug.
WARNING: the repairs are to be carried out by qualified people.
Regularly check the goods conditions of the machine, of the power cord and plug.
12. LOUDNESS
The pondered equivalent continuous level of acoustic pressure A produced by the machine while
operating under load is under 70 decibels (A) and that the maximum pondered instantaneous value
of acoustic pressure C is under 130 decibels.
13. ESSENTIAL REQUIREMENTS.
All the machines have been designed and manufactured strictly in compliance with the current
national and international norms, more particularly:
UNI EN ISO 7010: 2015.
UNI EN ISO 12100: 2010.
UNI EN ISO 13849-1: 2016.
UNI EN ISO 13857: 2008 + EC1: 2010.
UNI EN ISO 14119: 2013.
UNI EN ISO 14120: 2015.
CEI EN 60204-1: 2006 + EC1: 2010. Part 1.
UNI EN 1672-2: 2009. Part 2.
It must be underlined that, once assembled and before being packed, all the machines undergo a
checking test carried out by an electronical equipment called “CHECKING DESK” which controls:
Earth continuity
Dielectrical rigidity
Insulation
Starting of the machine empty, recording: the absorbed power, the applied tension and absorbed
Ampères.
www.linda-lewis.co.uk
0161 633 5797

GUIDE TO OPTIONAL EXTRAS
To simplify work and satisfy all customers’ needs, FRIUL CO can provide various optional
components on request.
1.1 OPTIONAL CONE ø30
The optional cone ø30 (Ref.43) is for portions weighing from 20 to 60 grams.
1.2 OPTIONAL CONE ø40
The optional cone ø40 (Ref.44) is for portions weighing from 60 to 120 grams.
www.linda-lewis.co.uk
0161 633 5797

1.3 AUGER
An optional auger (Ref.6) is available to process not very elastic doughs.
1.4 TEFLON COATED HOPPER AND CHUTE
The optional Teflon coated hopper (33B) and chute (Ref.2B) allow to process highly hydrated doughs
(over 58%).
www.linda-lewis.co.uk
0161 633 5797
Table of contents
Other Friulco Commercial Food Equipment manuals
Popular Commercial Food Equipment manuals by other brands

Resfab
Resfab MB-50AT Installation & operation manual

Salvis
Salvis GreenVac instruction manual

Rational
Rational iVario Pro L Original installation manual

Royal Catering
Royal Catering RC_TT_7 user manual

SERV-WARE
SERV-WARE SELECT SS-SGF-40L Service, installation and care manual

Festive
Festive Avon ACCL9 Installation and operating manual