manuals.online logo
Brands
  1. Home
  2. •
  3. Brands
  4. •
  5. FROGGYS FOG
  6. •
  7. Fog Machine
  8. •
  9. FROGGYS FOG Fire Base 1300 Cased User manual

FROGGYS FOG Fire Base 1300 Cased User manual

FireBase is a registered trademark of Froggys Fog
Manual
Firebase 1300
and Fire Base 1300 Cased
Froggys Fog
302 Rutherford Lane
Columbia, TN 38401
877-376-4499
[email protected]
www.froggysfog.com
www.trainingsmoke.com
1
Introduction
The
SG-1300
is a very powerful fog generator. It unites the current
digital
technology with proven
technique and power. New features guarantee a much more simple
operation,
reducing the
amount of time needed to set up the
machine.
2 Safety
instructions
A fog machine is not a toy!
2.1 Hazard
•
Occasionally
hot
droplets of fluid may escape when in operation. Thus never aim at persons
directly and keep
a
minimum distance of 3 m to the
nozzle.
•
Never touch the nozzle when in operation.
2.2 General Safety
•
Never open the machine and leave the machine unattended when connected to a
power supply.
•
Do not swallow the fog fluid. Keep it away from children. In case of eye contact, rinse with a
lot
of
water. Consult a doctor should you have accidentally swallowed some
fluid.
•
Fog may activate smoke
detectors.
•
Spilled fluid or splashed fluid droplets can cause slip hazard. Mop up the fluid and dispose of
it
according to regulations. Froggys Fog Fluids are environmentally safe products and
can
be
recycled
biologically.
•
Artificially-made fog can be produced in many different ways. The method used here
to
produce
fog, with a device which works according to the vaporizer principle, is the
most
harmless one. No
case has so far been reported in which ahuman being has been
harmed
because of using our
device to produce artificial fog. However, this can only be guaranteed
if
the professional fog
generators are used accordingly, i.e. at the correct
vaporization
temperatures as well as with the
correctly mixed fog
fluid.
We, however,
recommend:
People with health problems or problems of the respiratory tract
or with an
inclination
for allergies should avoid any contact with artificially-made
fog.
3 Operating the
SG-1300 or SG-1300-CASED
3.1 Selecting of the location
•
The location in which the
SG-1300
is to be operated must be
dry.
•
Free from dusty or polluted
air.
•
Free from
vibrations.
•
Located on a non-flammable place or
surface.
•
Well-ventilated with fog-free air keeping the ambient operating temperature between 5° C
and
45° C and the relative air humidity below
80%.
3.2 Changing the fluid container
•
Disconnect the fluid tube from the lid by retracting the brass collar and removing the
coupling
.
•
Remove the container from the tank housing of the
SG-1300 or SG-1300-CASED
•
Unscrew the lid of the empty container and screw it onto the new
container.
•
Place the full container into the tank
housing.
•
Push the brass coupling into the brass collar until you hear a click. The brass collar is
now
locked
firmly.
4 Fog
liquids
The
SG-1300 and SG-1300-CASED
have been designed to be used with
Froggys Fog – Training
Smoke
fog
fluids.
•
Fire Rescue Fog High Density – Long Lasting Smoke Fluid
Use only Original Froggys Fog – Fog Fluids. Other fluids can cause considerable
damage
to
the unit and void the warranty. You can get more general information about fog
fluids
from
your dealer or www.froggysfog.com / www.trainingsmoke.com
directly.
Froggys Fog liquid is an environmentally safe product and it can be
recycled biologically.
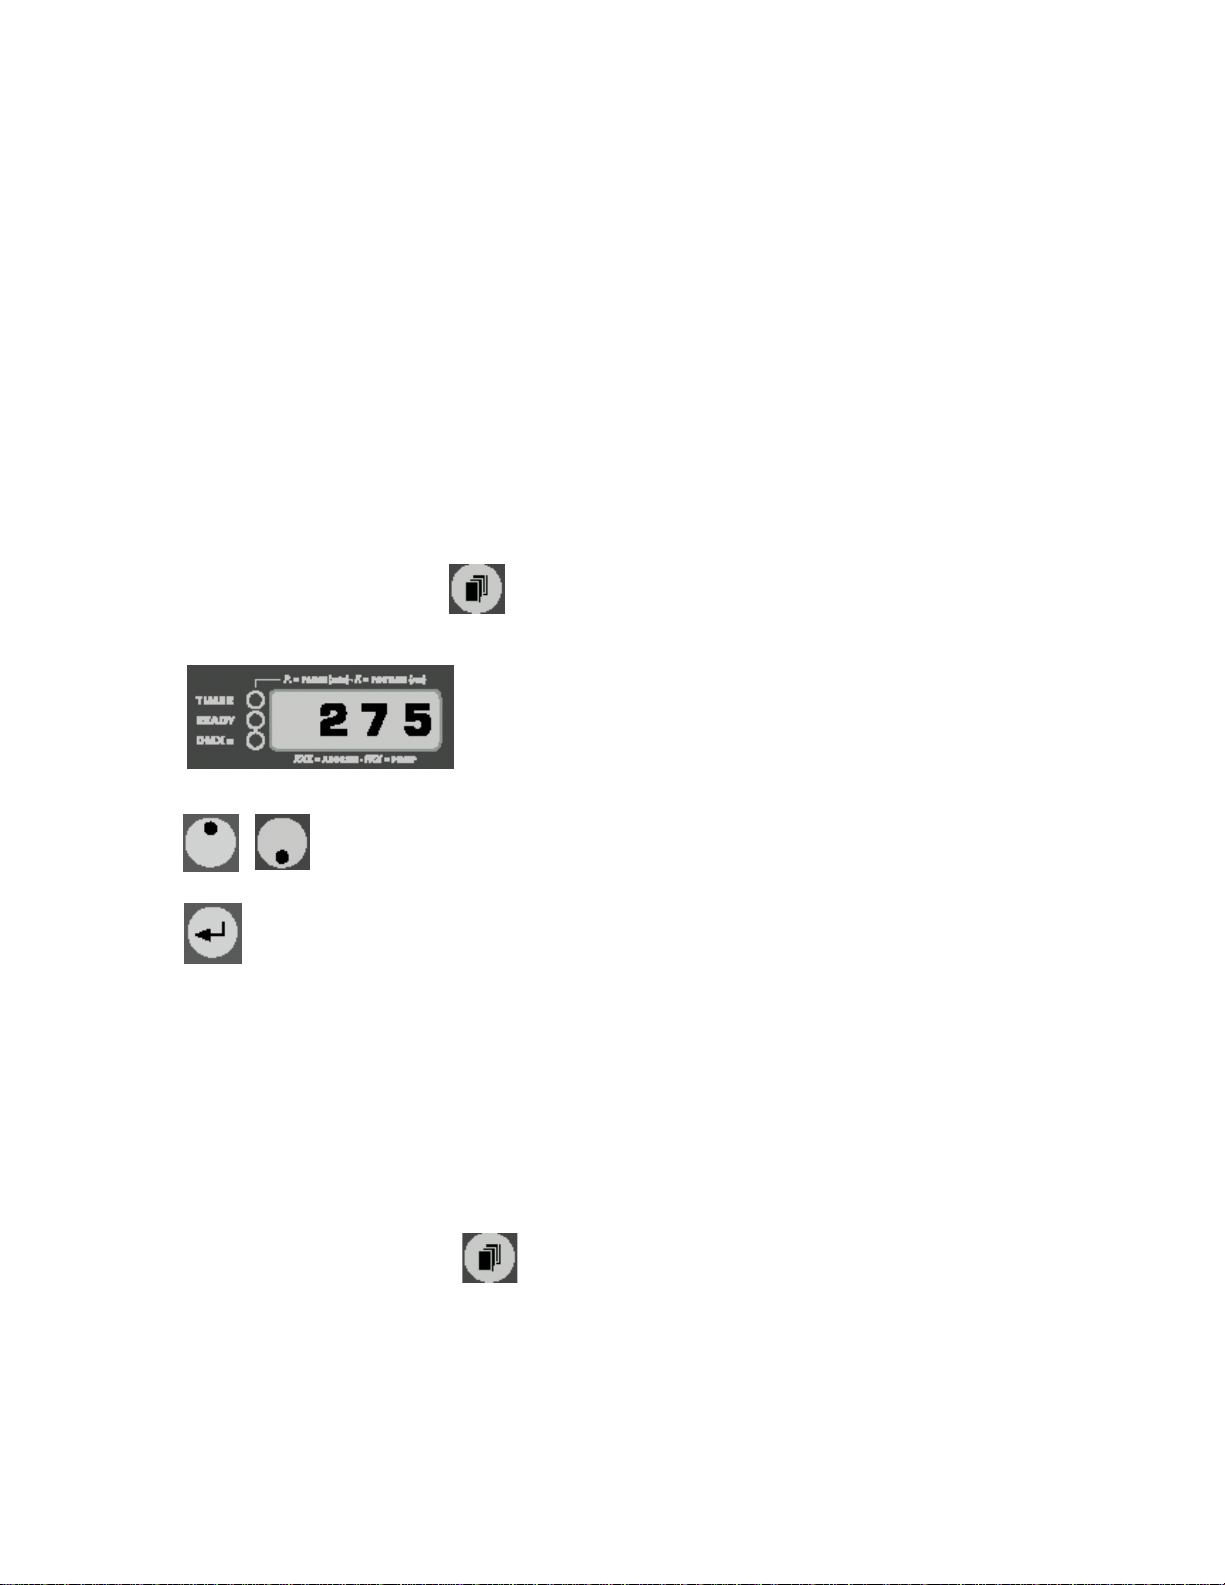
5 Putting into operation
Connect to the mains supply. Make sure the correct voltage
is
selected (230 V/50
Hz).
A “P” and two figures appear on the display
like P
15
.
After a warm up time of approx. seven minutes the
SG-1300
is ready to start. The green
Ready-
Led blinks if the working temperature is reached. As soon as the final temperature is reached, the
LED
llumates permanently. Adjust the required output via the control panel and press the Enter-
button
once
to start and once to end the fogging
process.
6 Operating the
SG-1300 and SG-1300-CASED
The
SG-1300
is a powerful fog generator, producing every desired effect from a tiny puff of
smoke
to the thickest fog. Digital technology makes fine adjustments of the pump possible. In steps of 1%
the
output can be adjusted from
1-99%.
6.1 Control panel
SG-1300
•
TIMER-LED, red
•
READY-LED, green
•
DMX IN-LED, yellow
•
MODE
•
UP/DOWN
•
ENTER
6.2 Switch of the
SG-1300
Press the Mode butten til „OFF“ appears on the
display.
After 15 seconds the machine will switch off automatically. On the right bottom edge of the display
a
red decimal point
appear.
You can also switch off the machine within these 15 seconds by pressing the
Enter-button.
When you switch off the DMX signal, the machine will be switched off automatically after
15
seconds.
Please note that the Mode button is not designed to scroll between the different
menus. If
you
press the mode button longer than 2 sec. the display will change into the timer
menue.
7 Control
choices
7.1 External control
You may control the SG-1300 or SG-1300-CASED externally through the XLR sockets
.
Please note: DMX takes priority. That means: when the machine is
controlled
via 5-PIN DMX 512
this data takes priority over the 0-10 V (+) 3-PIN XLR Analog Remote and Stand-alone
operation.
7.2 Operating via DMX 512
Connecting the SG-1300 or SG-1300-CASED to a DMX-desk use the 5pin XLR socket . As soon
as the
machine
receives a correct DMX signal, the yellow DMX-LED shines. Now the pump can be
adjusted via
the desk.
Adjusting the DMX start
address
Press the Mode-button at the control panel, until three figures will
appear
on the
LED
display
Adjust the requested start address by pressing the Up/Down-buttons
.
Save the start address by pressing the Enter-button once. The start address will also
be
saved when you disconnect the machine from the mains
supply.
Now the pump can be adjusted via the
desk.
When you switch off the DMX signal, the machine will be switched off automatically after
15
seconds.
7.3 Stand-alone
The SG-1300 can be used in the Stand alone mode. In this mode the control of the pump must
be
adjusted at the
machine.
Press and release the Mode- button until a „P” and two figures appear on
the
display
.
Adjust the pump output with the
Up/Down-buttons
.
Press the Enter-button once to start the fogging process. The machine now produces fog
until
the Enter-button is pressed again. The output can be changed during the fogging
process.
Press Mode again to standard
menu.
7.4 Operating with firebase SG-RM-XLR remoteand 0-10V (+) DC
Connect the SG-1300 or SG-1300-CASED to the SG-RM-XLR remoteusing the 3pin XLR socket
at the back of the
machine.
The knob on the cable remote will control
the
level of the
pump.
Pressing the On/Off switch at the
cable remote starts the fog
process.
7.5 Control via FireBase SG-RM-WR - Wireless Remote for FireBase Series
A wireless remote is available as an option. It will be delivered with a 3pin XLR plug. Connect the
receiver
of the radio remote to the machine by using the 3pin XLR socket on the back of the
machine.
Adjust the requested pump output at the machine (see point 6.3.3). Press the first button
at
the
transmitter of the radio remote as long as you want fog to be
produced.
XLR 3pol connector radio receiver
Start button fogging process transmitter.
7.6 Wiring of DMX und Analog 0-10V DC
DMX:
Pin 1 = Ground (Masse), Pin 2 = DMX-, Pin 3 = DMX+, Pin 4 und 5 =
nc
3pol-XLR
(analog):
Pin 1 = Ground (Masse), Pin 2 = 0-10 V + DC in, Pin 3 = 12 V + DC out,
max.
50mA
7.7 Operating with the internal timer
With the internal timer the „fog time” and ”wait time” as well as the output can be
adjusted.
To
start
the
Timer-Mode,
press
the
Mode-button
for more than 2 seconds.
The red Timer-LED] shines as soon as the machine has switched to the Timer-Mode. As long as
the timer is
in
operation, the red Timer-LED
blinks.
With the Up/Down-buttons you can adjust the output (Pxx),
(
1-99%)
Pressing the Mode button once, will bring you to the setting for the
wait-time.
With the Up/Down-buttons you can adjust the wait-time( 0.1-99 minutes).
Pressing
the
Mode
button once, will bring you to the setting for the
fog-time.
With the Up/Down-buttons, you can adjust the fog time in seconds (1-99 sec.)
Pressing
the
Mode
button once, will bring you to
„Escape“
Pressing the Enter button will bring you back to the standard menu where you start
the
programming.
Pressing the enter button during the programming in Timer-menus will start the cycle
with
the last time shown on the display. (P.xx = Starts with wait time, F.xx = Starts with fog
time).
You can switch back to the Standard-Menu by pressing the Mode-button for more than 2
seconds or
by
switching to „ESC” (Escape) in the Timer-Mode and then press the
Enter-
button.
8
Autostart
If the timer is in operation and you disconnect the machine from the mains cable, the
SG-1300
will
re-start in the Timer-Mode as soon as it‘s reconnected to the mains. To stop this press the
Mode-
button
for more than 2 seconds or by switching to “ESC“ in the Timer-Mode and then press the
Enter- button.
9 Cleaning, care and
maintenance
•
Ensure the air vents are not clogged by dust. If necessary remove the
dust.
•
Take care that the machine cannot get
overheated.
•
Do not run the
SG-1300
without any fluid, as the pump will run
dry.
•
Wipe up spilled fluid immediately. Moisture – also fluid – can destroy the
electric
of the
machine.
•
Check the state of the air valve filter from time to time and clean or replace it when
necessary.
When frequently using the same fluid can, it should be cleaned thoroughly before adding
new
fluid.
This reduces the chances of the machine clogging
up.
•
If you install the
SG-1300
make 100% sure that a permanent fog-free air supply for
the
unit is guaranteed. Cooling air with too high fog concentration (very often in clubs and
discos)
can
condense inside the machine and cause moisture
damage.
•
For cleaning the surface of the device use a suitable, solvent-free
cleaner.
10
Trouble-Shooting
The
SG-1300
does not
fog
•
Check external control
signals
•
Check mains
supply
•
Check fluid tank
(empty?)
•
Check for correct connections at the fluid
bottle
•
Check for fluid in the fluid
tube
•
Check if fluid filter is
clogged
The
SG-1300
fogs
uncontrollably
•
Check mains
supply
•
Check unit for moisture (moisture inside the machine, especially on the PCB can
cause
fogging)
The
SG-1300
switches off
suddenly
•
The “Temperature cutout” has switched off due to overheating. Remove external heat
source
(for instance projector shining right onto the housing) and/or make sure sufficient fresh
air
supply. After 15 to 30 minutes the unit should switch back to “on”
again.
Loud droning sound during
fogging
•
The pump is running dry. Avoid this
absolutely!
•
Refill fluid
bottle
•
Double check connection fluid tube and fluid
bottle.
E-4 appears on the LED
display
•
The machine is getting too hot. The heating switches off and the machine cools
down.
Solution: Disconnect the machine from the main supply for a moment and then re-connect
it.
E-1/E-2/E-3 appears on the LED
display
•
Please send the machine to the service-station or your local
dealer.
11
Specifications
Procedure: Simulated Smoke – Vaporizing Fog Generator
Power requirement: 1300
Watt
Voltage: 110 V/ 60
Hz
Warm up time: approx. 7
min.
Fluid Consumption: at max. output 120
ml/min
at cont. output 35
ml/min
Fluid tank capacity: 5
Liter
Fog output: adjustable in steps of 1% (
0-99)
Fogging time: at 100% output approx. 40
sec.
at <=65% output continuous
output
Control: DMX
512
Onboard Digital Timer
Stand alone
mode
0 - 10 V
analog
XLR Remote (Included)
Wireless Radio Remote
(Optional)
Temperature control: Microprocessor
controlled
Overheating protection: Heater
block/Thermostat
Pump/Thermal
switch
Dimension (L x B x H ): 53cm x 23cm x
24cm
Weight without Fluid: 12
kg
12 Warranty
conditions
For the fog machine
SG-1300
Froggys Fog guarantee
is:
1. Free of charge, subject to the following conditions (No. 2 - 6) we will repair any defect
or
fault in
the unit if it is caused by a proven factory fault and has been advised
immediately
after appearance
and within 24 month of delivery to the end user. Insignificant
deviations
of the regular production
quality does not guarantee replacement rights, nor do
faults
or defects caused by water, by
generally abnormal environment conditions or
force majeure.
2. Guarantee Service will be done in the following way: Faulty parts will be repaired
or
replaced
(our choice) with correct parts. Faulty units have to be brought to us or
our
service centers or to be
sent to us or our service centers at customer‘s expenses.
The
invoice and/or receipt showing the
purchase date and the serial number have to
come
with the faulty unit, otherwise this will not be
guarantee service. Replaced parts
become
our
property.
3. The customer loses all rights for guarantee services, if any repairs or adjustments are
not
done
to the units by unauthorized persons and/or if spare parts are used which are
not
approved by us.
The right of guarantee service is also lost if fluids other than
Froggys Fog
Fluids have been used
or if units are sent to us with full fluid bottles.
Also
noncompliance with the instructions in this
manual or mistakes by incorrect
handling/
treating of the machine will lead to a loss of guarantee
and also any faults and
damages
caused by undue
force.
4. Certain parts of the machine are “consumable parts” and are not covered by the
warranty.
5. Guarantee services do not cause an extension of the guarantee time or the start of
a
new
guarantee time. The warranty for replaced parts ends with the guarantee time
of the
whole
unit.
6. If a defect/fault cannot be repaired by us in a satisfactory time, we will, within 24
months
after
sale of the unit, on choice of the manufacturer, will replace the whole unit for free.
7. Further claims, especially for damages, losses etc. outside the unit are
excluded.
If you should send the unit for service, do not forget to remove any liquid from
the
fluid
bottle.

This manual suits for next models

1

Other FROGGYS FOG Fog Machine manuals

FROGGYS FOG Fobbles F2 User manual

FROGGYS FOG

FROGGYS FOG Fobbles F2 User manual

FROGGYS FOG Titan H2 User manual

FROGGYS FOG

FROGGYS FOG Titan H2 User manual

FROGGYS FOG Fobbles F3 User manual

FROGGYS FOG

FROGGYS FOG Fobbles F3 User manual

FROGGYS FOG Firebase SG-Z1200 User manual

FROGGYS FOG

FROGGYS FOG Firebase SG-Z1200 User manual

FROGGYS FOG TITAN 1500 PRO User manual

FROGGYS FOG

FROGGYS FOG TITAN 1500 PRO User manual

FROGGYS FOG Thanos A-1 User manual

FROGGYS FOG

FROGGYS FOG Thanos A-1 User manual

FROGGYS FOG FFM-SNOW User manual

FROGGYS FOG

FROGGYS FOG FFM-SNOW User manual

FROGGYS FOG Titan HT6 User manual

FROGGYS FOG

FROGGYS FOG Titan HT6 User manual

FROGGYS FOG Poseidon A4 User manual

FROGGYS FOG

FROGGYS FOG Poseidon A4 User manual

Popular Fog Machine manuals by other brands

Beamz S2500 instruction manual

Beamz

Beamz S2500 instruction manual

Antari F-4D Fazer user manual

Antari

Antari F-4D Fazer user manual

American DJ Fog Fury 3000 WiFly User instructions

American DJ

American DJ Fog Fury 3000 WiFly User instructions

JEM Glaciator X-Stream user manual

JEM

JEM Glaciator X-Stream user manual

Aero Mist Nozzle Fogging Kit 52469 installation instructions

Aero Mist

Aero Mist Nozzle Fogging Kit 52469 installation instructions

MDG ICE FOG Compack user guide

MDG

MDG ICE FOG Compack user guide

Global F-400 user manual

Global

Global F-400 user manual

High End Systems F-100 user guide

High End Systems

High End Systems F-100 user guide

Velleman VDP700SM user manual

Velleman

Velleman VDP700SM user manual

EuroLite DYNAMIC FOG 1200 user manual

EuroLite

EuroLite DYNAMIC FOG 1200 user manual

Antari Z-3000II user manual

Antari

Antari Z-3000II user manual

MDG ICE FOG Q user guide

MDG

MDG ICE FOG Q user guide

EuroLite N-11 user manual

EuroLite

EuroLite N-11 user manual

American DJ F-700 User instructions

American DJ

American DJ F-700 User instructions

Beamz Pro HZ3000 user manual

Beamz Pro

Beamz Pro HZ3000 user manual

Techni-Lux FM-9 manual

Techni-Lux

Techni-Lux FM-9 manual

Cameo CLPHANTOM5 user manual

Cameo

Cameo CLPHANTOM5 user manual

MAGMATIC MAGMA PRIME user manual

MAGMATIC

MAGMATIC MAGMA PRIME user manual

manuals.online logo
manuals.online logoBrands
  • About & Mission
  • Contact us
  • Privacy Policy
  • Terms and Conditions

Copyright 2025 Manuals.Online. All Rights Reserved.