FROGGYS FOG TITAN 1500 PRO User manual

FFM-TITAN-1500-PRO USER MANUAL V1.0
Froggys Fog
302 Rutherford Lane
Columbia, TN 38401
615.469.4906

FFM-TITAN-1500-PRO USER MANUAL
< 2 >
CONTENTS
1
BEFORE YOU BEGIN .................................................................................................................................................................................................... 3
1.1 What Is Included .............................................................................................................................................................................................. 3
1.2 Unpacking Instructions .................................................................................................................................................................................. 3
1.3 Symbols ............................................................................................................................................................................................................. 3
1.4 Disclaimer .......................................................................................................................................................................................................... 3
1.5 Safety Notes ..................................................................................................................................................................................................... 3
1.5.1 Personal Safety ................................................................................................................................................................................................................. 3
1.5.2 Mounting and Rigging ................................................................................................................................................................................................... 3
1.5.3 Power and Wiring ............................................................................................................................................................................................................ 4
1.5.4 Operation ........................................................................................................................................................................................................................... 4
2
INTRODUCTION ........................................................................................................................................................................................................... 4
2.1 Description ........................................................................................................................................................................................................ 4
2.2 Features ............................................................................................................................................................................................................. 5
3
Technical SPECIFICATIONS ........................................................................................................................................................................................ 5
4
SETUP .............................................................................................................................................................................................................................. 5
4.1 AC Power ........................................................................................................................................................................................................... 5
4.2 AC Plug .............................................................................................................................................................................................................. 6
4.3 Resetting the Breaker ..................................................................................................................................................................................... 6
4.4 DMX Linking ..................................................................................................................................................................................................... 6
4.5 Mounting ........................................................................................................................................................................................................... 6
4.5.1 Orientation ......................................................................................................................................................................................................................... 6
4.5.2 Rigging ................................................................................................................................................................................................................................ 6
5
OPERATION ................................................................................................................................................................................................................... 6
5.1 Preparing for Operation ................................................................................................................................................................................ 6
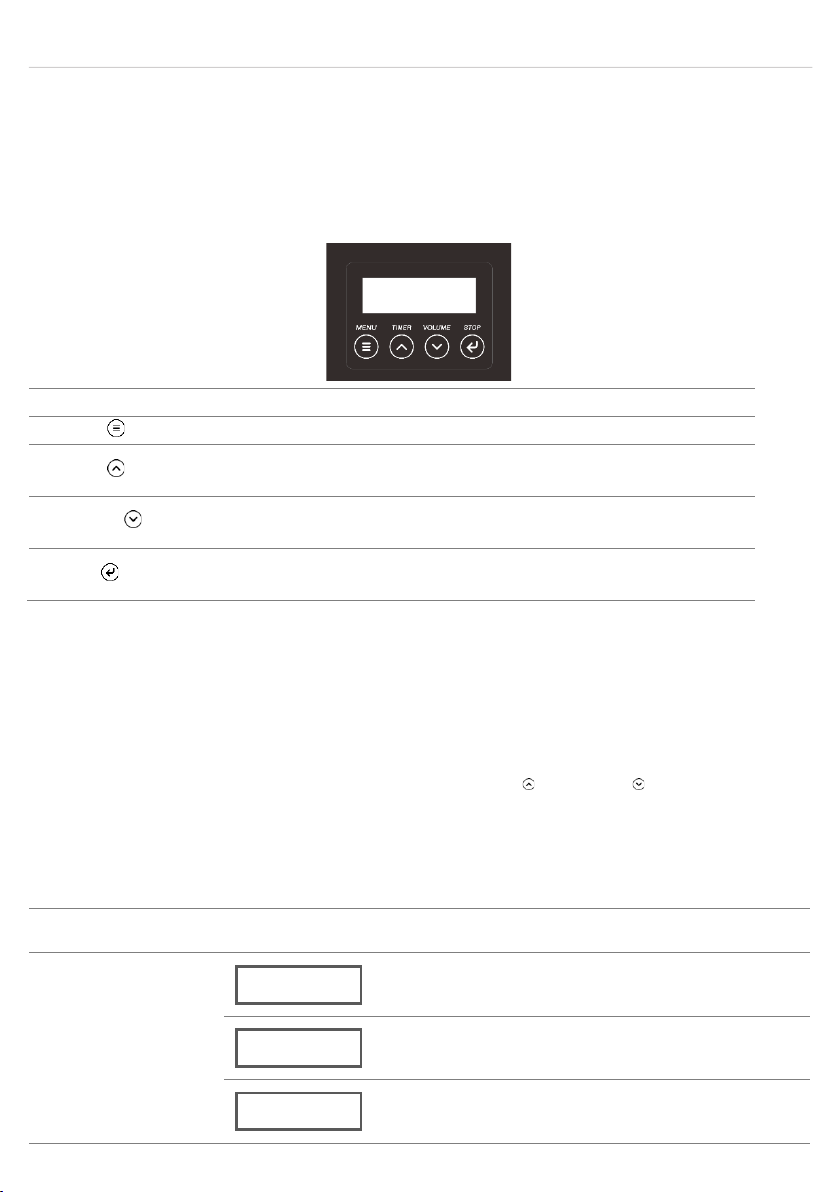
5.2 On-device Control Panel ............................................................................................................................................................................... 7
5.3 On-device Control Mode & Operation ...................................................................................................................................................... 7
5.3.1 Programming .................................................................................................................................................................................................................... 7
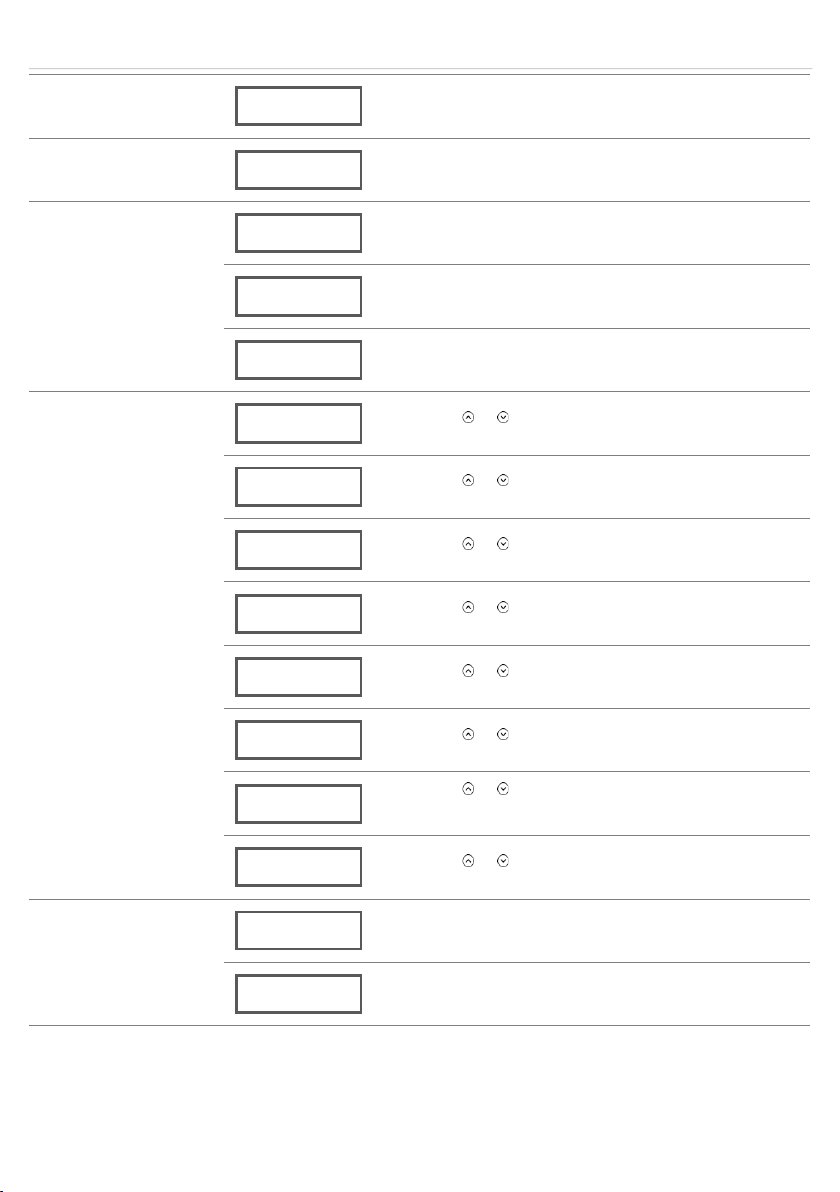
5.3.2 Menu Map .......................................................................................................................................................................................................................... 7
5.4 Wireless Remote-Control Mode & Operation ......................................................................................................................................... 8
5.5 DMX Channels .................................................................................................................................................................................................. 9
5.6 Fluid Sensor ...................................................................................................................................................................................................... 9
5.6.1 Trigger “No-Fluid Protection” ................................................................................................................................................................................ 9
5.6.2 Clear “No-Fluid Protection” Warning .................................................................................................................................................................. 9
6
technical information ............................................................................................................................................................................................... 10
6.1 Maintenance .................................................................................................................................................................................................. 10
6.2 Storage ............................................................................................................................................................................................................ 10
6.2.1 Machine Storage ........................................................................................................................................................................................................... 10
7
Warranty Information .............................................................................................................................................................................................. 10
7.1.1 .......................................................................................................................................................................................................................................................... 10

FFM-TITAN-1500-PRO USER MANUAL V1.0
< 3 >
1
BEFORE YOU BEGIN
1.1
What Is Included
Machine
Power Cord
Hanging Bracket
Wireless Transmitter
1.2
Unpacking Instructions
Carefully unpack the product immediately and check the container to make sure all the parts are in the package and are in good condition.
If the box or the contents (the product and included accessories) appear damaged from shipping, or show signs of mishandling, notify the
carrier or dealer/seller immediately. In addition, keep the box and contents for inspection.
1.3
Symbols
Symbol
Meaning
Caution
Critical installation, configuration, or operation information. Not following these instructions may make
the product not work, cause damage to the product, or cause harm to the operator.
Important
Important installation or configuration information. Failure to comply with this information may keep the
product from working correctly.
Information
Useful information.
1.4
Disclaimer
The information and specifications contained in this User Manual are subject to change without notice. FROGGYS FOG assumes no
responsibility or liability for any errors or omissions and reserves the right to revise or to create this manual at any time.
Copyright © 2018 FROGGYS FOG. All rights reserved.
1.5
Safety Notes
Please read the following Safety Notes carefully before working with the product. The notes include important safety information about
installation, usage, and maintenance.
1.5.1
Personal Safety
• Always connect the product to a grounded circuit to avoid the risk of electrocution.
• During heating up and operation, the housing will be scalding hot. Do not touch.
• The product is very hot during operation and it remains hot for a long time after operation has stopped. Do not touch the
products nozzle.
• Make sure that children, unauthorised people and animals do not obtain access to the machine.
1.5.2
Mounting and Rigging
• The product is for indoor use only! To prevent risk of fire or shock, do not expose the product to rain or moisture.

FFM-TITAN-1500-PRO USER MANUAL
< 4 >
• CAUTION: When transferring product from extreme temperature environments, (e.g. cold truck to warm humid ballroom) condensation
may form on the internal electronics of the product. To avoid causing a failure, allow product to fully acclimate to the surrounding
environment before connecting it to power.
• Do not mount the product on a flammable surface (linoleum, carpet, wood, paper, carton, plastic, etc.).
• Do not use in a confined space. Always install the product in a location with adequate ventilation, at least 20 in (50 cm) from adjacent
surfaces.
• When hanging this product, always secure to a fastening device using a safety cable.
• Be sure that no ventilation slots on the product’s housing are blocked or clogged by dust. If necessary, remove the dust.
1.5.3
Power and Wiring
• Always make sure that the voltage of the outlet to which you are connecting the product is within the range stated on the decal or rear
panel of the product.
• Make sure the power cord is not crimped or damaged.
• Never connect this product to a dimmer pack or rheostat.
• Never disconnect the product from power cord by pulling or tugging on the cord.
• To eliminate unnecessary wear and improve its lifespan, during periods of non-use completely disconnect the product from power via
breaker or by unplugging it
1.5.4
Operation
• Do not operate this product if you see damage to the housing or cables. Have the damaged parts replaced by an authorized technician
at once.
• Do not use the product as a space heater.
• Make sure there are no flammable materials close to this product while it is operating.
• The maximum ambient temperature (Ta) is 104 °F (40 °C). Do not operate the product at higher temperatures.
• Do not cover the ventilation slots when operating to avoid internal overheating.
• Do not cover or plug the output nozzle during operation.
• Wipe up spitted fluid immediately. Moisture – also fluid – can destroy the electric.
• You may hear a loud popping sound during operation. This is normal.
• Never carry the product by the power cord or any moving part. Always use the handles of the machine.
• Drain the tank before transporting the product.
• Always disconnect the product from the power source before cleaning.
• In the event of a serious operating problem, stop using the product immediately.
• This product contains no user-serviceable parts. Any reference to servicing in this user manual will only apply to properly trained, certified
technicians. Do not open the housing or attempt any repairs which can lead to damage or malfunction.
Keep this User Manual for future use. If you sell the product, be sure that the purchaser receives this document.
2
INTRODUCTION
2.1
Description
The Titan 1500 PRO features an Over-sized Heater Core to increase run times, Quick Ready Fog Technology (QRFT) has you ready to fog in
less than 10 seconds after full cycle and it is ready to fog, and Advanced Low Fluid Sensing shuts down the machine when you run out of
fluid to protect the heater core. The 1500 PRO also boasts a whopping 1600W heater core to produce over 30,000 CFM. Instant Stop
Technology (IST) pulls fluid out of core to reduce spitting and give precise fog output.

FFM-TITAN-1500-PRO USER MANUAL V1.0
< 5 >
2.2
Features
• 1600W Fog Machine
• Quick Ready Fog Technology (QRFT) - Less than 10 seconds after full cycle and it is ready to fog
• Instant Stop Technology (IST)
• Pulls fluid out of core to reduce spitting and give precise fog output
• IP65 Power Connection and Button
• Touch Screen LCD
• Built-in Wireless Control
• Durable 5 Liter Fluid Tank with Aluminum Cap
• 2 Year Warranty
3
TECHNICAL SPECIFICATIONS
AC Power
Input Voltage & Rate
120 V, 60 Hz
Current Limiter Type
Fuse 15A 250V
Total Power Consumption
1,600 W
Heating
Heat Up Time
4 Minutes
Capacity
Fluid Tank Capacity
5L (1.3 Gal)
Output
Adjustable Output
Y
Max Output Volume
30,000 CFM
Fluid Consumption (100% Output)
120 ml/min
Maximum Continuous Duration (100% Output)
~1 Minute
Continuous Output
~30%
Placement &
Mounting
Horizontal
Y
Inclined
Y
Rigging & Trussing
Y
Control
On-device Manual Control
LCD control board
Wireless Control
Y
Wired Control
DMX
Control Protocol
DMX512
DMX Channel Range
1
Consumable
Consumable
Froggys Fog Water Based Fog Fluid
Weight &
Dimensions
Net Weight
31 lbs
Gross Weight
36.4 lbs
Machine Dimensions
22.7 / 12 /11.5 in
Packing Dimensions
27 / 14.4 / 13.6 in
4
SETUP
4.1
AC Power
The machine has a fixed voltage power supply and can work with an input voltage of AC 120 V, 60 Hz, depending on the specific model.
To determine the products power requirements (circuit breaker, power outlet, and wiring), use the current value listed on the label affixed to
the products back panel, or refer to the products specifications chart. The listed current rating indicates the product's average current draw
under normal conditions.
Always connect the product to a protected circuit (circuit breaker or fuse). Make sure the product has an appropriate electrical
ground to avoid the risk of electrocution or fire.

FFM-TITAN-1500-PRO USER MANUAL
< 6 >
Never connect the product to a rheostat (variable resistor) or dimmer circuit, even if the rheostat or dimmer channel serves
only as a 0 to 100% switch.
4.2
AC Plug
The TITAN 1500 PRO comes with a power input cord terminated with a Lockable Powercon IP65 connector If you need the change the plug,
use the table below to wire the new plug:
Connection
Wire (U.S.)
Wire (Europe)
AC Live
Black
Brown
AC Neutral
White
Blue
AC Ground
Green/Yellow
Green/Yellow
4.3
Resetting the Breaker
This product is equipped with a resettable breaker. If the breaker trips, all sections of this product will lose power.
• Remove the power cord from mains power.
• Allow unit to cool for 15 minutes.
• After 15 minutes, you may attempt to reset the breaker by pressing the button with your finger.
• Plug the product's power cord into the power outlet and continue using as recommended.
4.4
DMX Linking
You can link the TITAN 1500 PRO to a DMX controller using a 3- or 5-pin DMX connection. If using other DMX-compatible products with
this product, you can control each individually with a single DMX controller. Instructions for connecting and configuring this product for DMX
operation are in the User Manual.
4.5
Mounting
Before mounting the product, read and follow the safety recommendations indicated in the Safety Notes.
4.5.1
Orientation
Always mount this product in a safe position and make sure there is adequate room for ventilation, configuration, and maintenance. Please
Note: the fluid bottle must be oriented in an upright position to avoid spilling fluid from the top of the container.
4.5.2
Rigging
FROGGYS FOG recommends using the following general guidelines when mounting this product.
• Before deciding on a location for the product, make sure there is easy access to the product for maintenance and programming purposes.
• Make sure that the structure or surface onto which you are mounting the product can support the product's weight (see the Technical
Specifications).
• When mounting the product on the floor, make sure that the product and cables are away from people and vehicles.
5
OPERATION
5.1
Preparing for Operation
To prepare the TITAN 1500 PRO for operation, perform the following steps.
• After checking that all the parts are intact and complete, position the machine on flat.
• Withdraw the fluid tank from its compartment and remove its cap.
• Verify that the two plastic hoses attached to the cap are in place and in good condition.
• Return the tank back to its compartment in the TITAN 1500 Pro.

FFM-TITAN-1500-PRO USER MANUAL V1.0
< 7 >
• Make sure the plastic hose entering the TITAN 1500 Pro from the fluid tank cap is not bent or kinked.
• Always connect the product to a grounded circuit. Before power on, make sure it is connected with the rated voltage.
• Turn on the machine, and “Heating Up” shows on the display during the heating-up process. After approx. 4 minutes, the display
changes to “Ready to Fog” when the machine is ready to output.
5.2
On-device Control Panel
To access the control panel functions, use the four buttons located underneath the LCD display.
Button
Function
<MENU> /
Switch menu pages to select a function
<TIMER> /
Increases the numeric value of current function
Triggers TIMER output mode
<VOLUME> /
Decreases the numeric value of current function
Triggers VOLUME output mode.
<STOP> /
Save current setting and return to standby page.
STOP output
5.3
On-device Control Mode & Operation
5.3.1
Programming
• Refer to the Menu Map to understand the menu options. The menu map shows the main level and a variable number of programming
levels for each option.
• To go to the desired main level, press <MENU> repeatedly until the option shows on the display. This will take you to the first
programming level for that option.
• To select an option or value within the current programming level, press <TIMER> / or <VOLUME> / until the option shows on the
display. If there is another programming level, you will see that first option, or you will see the selected value.
• Press <MENU> repeatedly to switch menu pages.
• Press <STOP> to go back to Standby Page at any time.
5.3.2
Menu Map
Display
Description
Parameter
Range
Starting Pages
Titan 1500 Pro
Version XX
Titan 1500 Pro
AC-120V 60Hz
WirelessPairing
>>>>>>>>>>>>>>>

FFM-TITAN-1500-PRO USER MANUAL
< 8 >
Preparing Pages
Heating Up
>>>>>>>>>>>>>>>
The machine is heating up
Standby Page
Ready to Fog
Titan 1500 Pro
The machine has heated up and ready to fog
Working Pages
Interval 600s
Titan 1500 Pro
Interval output of TIMER mode
Duration 300s
Titan 1500 Pro
Duration output of TIMER mode
Fog Output 100%
Titan 1500 Pro
Output of VOLUME mode
Settings Page
Fog Output
100%
Press or to set fog output
1%-100%
Timer Interval
600s
Press or to set timer interval
1-600S
Timer Duration
300s
Press or to set timer duration
1-300S
Timer Fog Output
100%
Press or to set timer fog output
1%-100%
DMX Address
512
Press or to select DMX starting address
1-512
Fluid Sensor
OFF
Press or to turn ON/OFF fluid sensor
ON/OFF
Wireless
OFF
Press or to turn ON/OFF wireless
control
ON/OFF
Keypad Tone
OFF
Press or to turn ON/OFF keypad tone
ON/OFF
Warning Pages
Fog Fluid Low
Refill
While showing this page, please refill fluid
Heating Failure
Contact Service
While showing this page, please contact
service for help
5.4
Wireless Remote-Control Mode & Operation
This mode will allow you to control the machine ON and OFF with RF wireless controller W-4.

FFM-TITAN-1500-PRO USER MANUAL V1.0
< 9 >
When press ON, the machine will run with the parameter of VOLUME mode accordingly. LCD will display the following page:
Fog Output 100%
Titan 1500 Pro
• All the machines have been paired with the controller included (with certain address code) before leaving the factory.
• When “Wireless” function is ON,
Wireless
ON
there will have a Wireless Pairing process at the start-up of the machine. New wireless remote controller(s) can be paired with
machine during this process before the progress bar reaches the end.
WirelessPairing
>>>>>>>>>>>>>>>
• If no new pairing happens during the paring process at the start-up, the previous paired remote controller(s) will be retained.
• Once there a new pairing occurs during pairing process, all the previous paired remote controller(s) in previous pairing process
will be forgotten.
• During the wireless pairing process (if wireless mode is on), one machine can be paired with up to 5 RF wireless remote
controllers with different address codes and controlled by all of them simultaneously.
• All the paring of RF wireless remote controllers (up to 5 units) must be done during the same paring process.
• Once a machine is paired with a remote with certain address code, it can be controlled by all the same type pf controller with
same address code.
• One wireless remote controller can be paired and memorized by multiple machines simultaneously and control all the paired
machines at the same time (if within range).
• If the machine doesn't need to be controlled by wireless, then just turn off the wireless option in the menu.
Wireless
OFF
5.5
DMX Channels
DMX CH 1 – Fog Volume
5.6
Fluid Sensor
This machine uses software-based fluid sensor to detect whether there is fluid inside tube so as to protect the pump from being damaged.
Turn on the “Fluid Sensor” to activate “No Fluid Protection” function.
5.6.1
Trigger “No-Fluid Protection”
When the Fluid Sensor is ON, the software-based “no-fluid protection” function will be activated. After the program continues to detect
the machine working with no fluid inside the tube for 1 minute, the pump-shutoff will be activated with the flickering warning page showing
on the screen.
5.6.2
Clear “No-Fluid Protection” Warning
When the machine is under the no-fluid protection, after refilling the fluid, there are three ways to clear the warning.
• Press and hold ENTER until the fluid is pumped and fill the tube.
• Under the DMX control mode, bring down channel 1 to OFF (value 0-9), then up to ON (value 10-255),
• Turn off “Fluid Sensor” in the menu.

FFM-TITAN-1500-PRO USER MANUAL
< 10 >
6
TECHNICAL INFORMATION
6.1
Maintenance
Do not allow the TITAN 1500 Pro to become clogged. After every 40 hours of continuous operation, use distilled water or for a more thorough
clean Froggys Fully Clean after use to prevent the accumulation of particulate matter in the heating element.
The recommended cleaning procedure is as follows.
1) Unplug the product from power.
2) Empty all fluid from the machine.
3) Dip fluid intake tube into 1 cup of cleaning solution/ distilled water.
4) Connect the product to power and allow it to warm up.
5) Run the product in a well-ventilated area until the cup is empty. Do not allow the pump to run dry.
6) Repeat until satisfied with fog output.
7) Refill with fog fluid to continue using the TITAN 1500 Pro. Run the machine briefly to clear any cleaning solution from the pump
and heater.
8) Excessive dust, fluid residue and dirt will degrade performance and cause overheating. Remove dust from air vents with air
compressor, vacuum or soft brush. The casing could be cleaned by the damp cloth.
Test-run your FROGGYS FOG® TITAN 1500 Pro on a monthly basis to achieve the best performance.
6.2
Storage
6.2.1
Machine Storage
Before storing the machine, clean it as described in the cleaning procedure above;
7
WARRANTY INFORMATION
7.1.1
Save these instructions. 2 Year Limited Warranty: Valid from the date of purchase. Warranty covers manufacturing defects only and does not
cover misuse or abuse of the machine. Serial number, place of purchase with dated valid receipt must be submitted at time of service.
Warranty is only valid with-in the United States. Buyer may be responsible for shipping fees associated with repairs.
Table of contents
Other FROGGYS FOG Fog Machine manuals

FROGGYS FOG
FROGGYS FOG Titan HT6 User manual

FROGGYS FOG
FROGGYS FOG Titan H2 User manual

FROGGYS FOG
FROGGYS FOG Fobbles F2 User manual

FROGGYS FOG
FROGGYS FOG Thanos A-1 User manual

FROGGYS FOG
FROGGYS FOG Fire Base 1300 Cased User manual

FROGGYS FOG
FROGGYS FOG Poseidon A4 User manual

FROGGYS FOG
FROGGYS FOG Firebase SG-Z1200 User manual

FROGGYS FOG
FROGGYS FOG FFM-SNOW User manual

FROGGYS FOG
FROGGYS FOG Fobbles F3 User manual