3 Safety Installation 12
SAFETY RULES
ATTENTION! BECOME ALERT! YOUR SAFETY IS INVOLVED!
Safety is a primary concern in the design and
manufacture of our products. Unfortunately, our
efforts to provide safe equipment can be wiped
out by an operator’s single careless act.
In addition to the design and configuration of
equipment, hazard control and accident preven-
tion are dependent upon the awareness,
concern, judgement, and proper training of
personnel involved in the operation, transport,
maintenance and storage of equipment.
It has been said “The best safety device is an
informed, careful operator.” We ask you to be that
kind of operator.
TRAINING
■■Safety instructions are important! Read all
attachment and tractor manuals; follow all safety
rules and safety decal information. (Replacement
manuals are available from selling dealer.)
Failure to follow instructions or safety rules can
result in serious injury or death.
■■If you do not understand any part of this man-
ual and need assistance, see your dealer.
■■Operators must be instructed in and be capa-
ble of the safe operation of the equipment, its
attachments, and all controls. Do not allow any-
one to operate this equipment without proper
instructions.
■■Never allow children or untrained persons to
operate equipment.
■■
Train all new personnel and review instructions
frequently with existing workers. A person who has
not read and understood all operating and safety
instructions is not qualified to operate the
machine. An untrained operator exposes himself
and bystanders to possible serious injury or death.
PREPARATION
■■Always wear relatively tight and belted clothing
to avoid getting caught in moving parts. Wear stur-
dy, rough-soled work shoes and protective equip-
ment for eyes, hair, hands, hearing, and head; and
respirator or filter mask where appropriate.
■■Make sure attachment is properly secured,
adjusted, and in good operating condition.
■■Tractor
must be equipped with ROPS or ROPS
cab and seat belt. Keep seat belt securely fas-
tened. Falling off
tractor
can result in death from
being run over or crushed. Keep foldable ROPS
system in “locked up” position at all times.
■■A heavy load can cause instability in driving a
tractor. Make sure the rear of the tractor is
properly counter-balanced with weights. Always
drive slowly – especially around turns. An unsta-
ble tractor could steer badly and possibly tip
over, causing injury or death.
The use of the optional rear 3 pt. ballast box is
recommended. Ask your dealer.
■■Do not exceed the lift capacity of your loader
or attachment. See loader specifications.
■■Know your equipment's capabilities, dimen-
sions, and operations before operating. Visually
inspect your equipment before you start, and
never operate equipment that is not in proper
working order with all safety devices intact.
Check all hardware to ensure it is tight. Make cer-
tain that all locking pins, latches, and connection
devices are properly installed and secured.
Remove and replace any damaged, fatigued, or
excessively worn parts. Make certain all safety
decals are in place and are legible. Keep decals
clean, and replace them if they become worn or
hard to read.
■■Move wheels to the widest recommended set-
ting to increase stability.
■■Do not work under raised loaders without sup-
porting them. Do not use support material made
of concrete blocks, logs, buckets, barrels, or any
other material that could suddenly collapse or
shift positions. Make sure support material is
solid, not decayed, warped, twisted, or tapered.
Lower loaders to ground level or on blocks.
Lower loaders and attachments to the ground
before leaving the cab or operator's station.
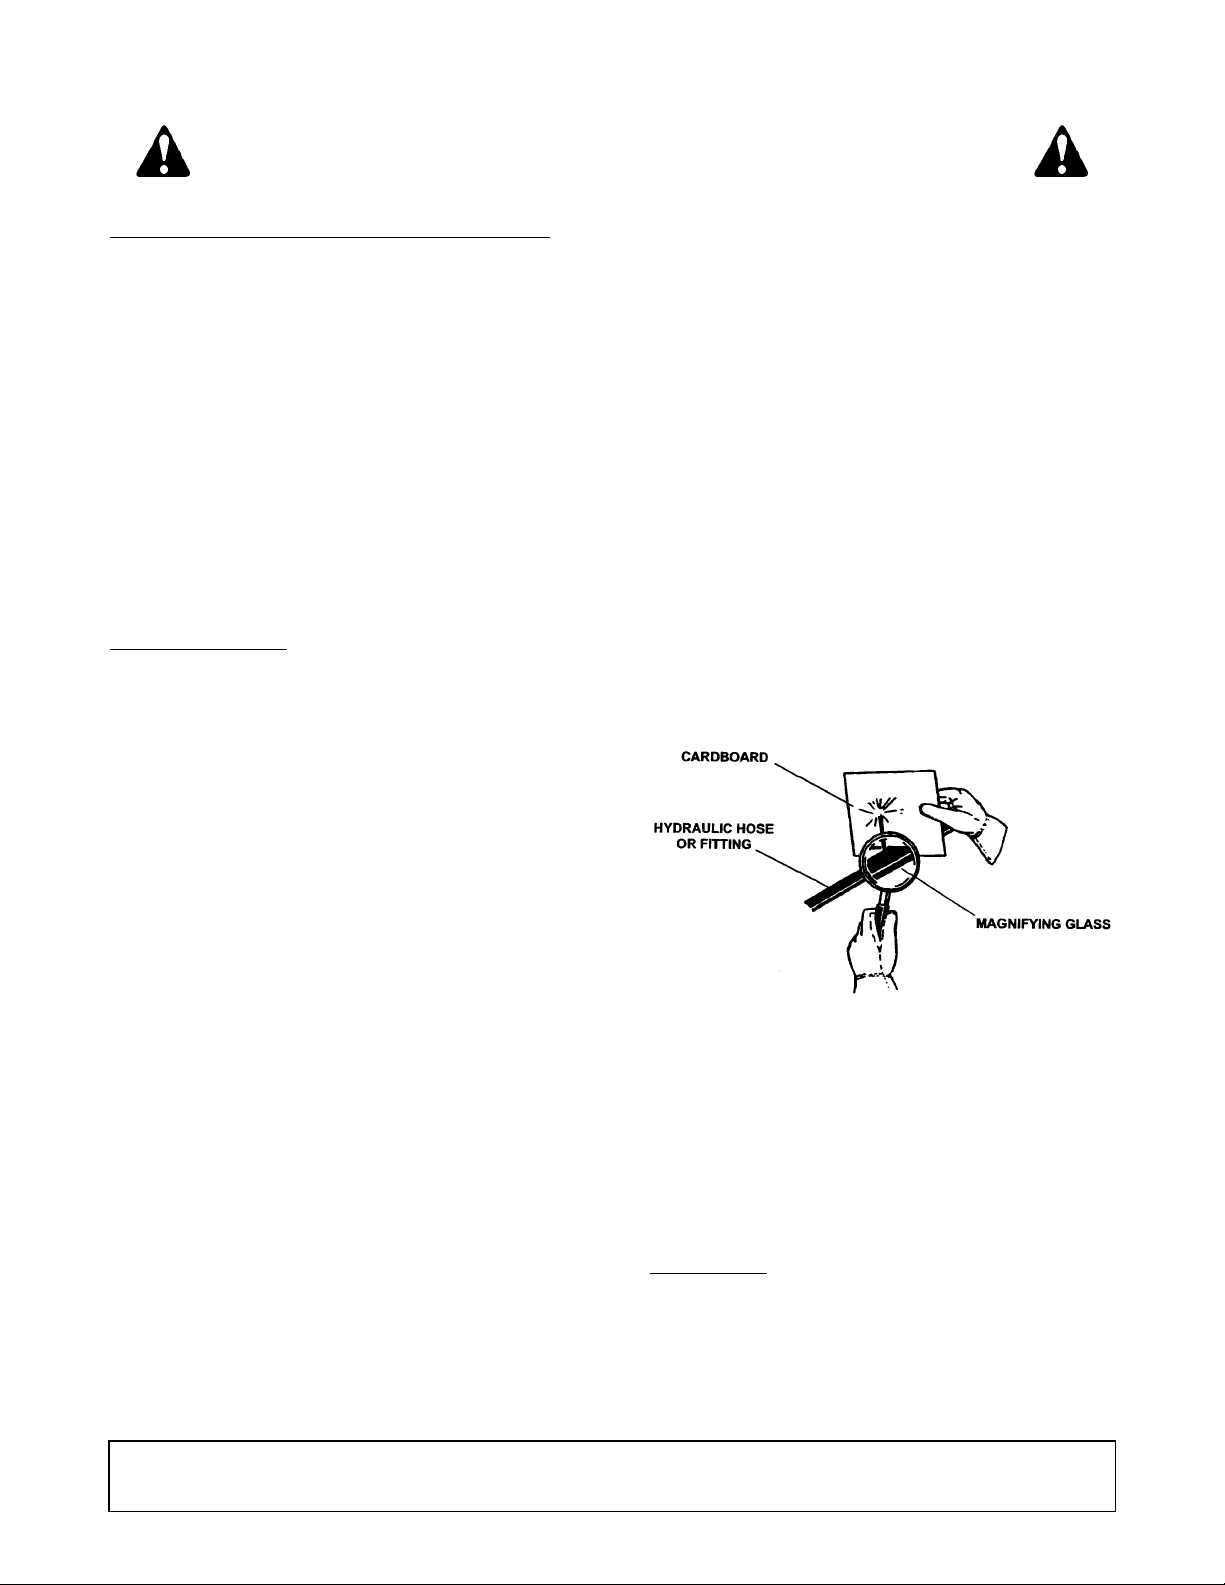
■■Check the tractor's hydraulic system. Be sure
the hydraulic oil and filter have been serviced
according to manufacturer's recommendations.
Refer to your tractor loader operator's manual or
dealer for any adjustments necessary to put the
hydraulic system in good working order.
INSTALLATION
ATTACHING AND DETACHING IMPLEMENTS
NOTE: Procedure is the same for all attachments/implements.
Figure 2. Coupler Handles - Unlocked
DETACHING
1. If possible, find a level solid location to place the implement. This makes it easier to disconnect and to re-con-
nect later on.
2. Lower the implement to the ground.
3. Engage the parking brake and shut down the tractor. Be sure to relieve pressure to the auxiliary hydraulic lines
(if used).
4. Unfasten safety restraints and exit tractor.
5. Disconnect the implement hydraulic lines from the tractor (if used). Connect quick couplers together to keep
clean.
6. Disengage attachment-locking mechanism (mechanical type). Figure 2.
7. Enter tractor, fasten safety restraints and start the tractor.
8. Disengage the parking brake, and back away from the implement.