FSR Magellan MDC-MK1 User manual

FSR MDC – MK1 Operations Manual [Page 1of 28]
SPECIFICATIONS ARE SUBJECT TO CHANGE WITHOUT NOTICE
M a g e l l a nM a g e l l a n
MDC – MK1
Computer To Video Down Converter
INSTALLATION &
OPERATION MANUAL
PROPRIETARY INFORMATION
All information in this manual is proprietary to and the property of FSR inc.
This publication is protected by the Federal Copyright Law, with all rights reserved.
No part of this document may be reproduced, transcribed, or transmitted,
in any form or by any means, without prior explicit written permission from FSR inc.
244 Bergen Boulevard, West Paterson, NJ 07424 Tel 973.785.4347 Fax 973.785.4207

FSR MDC – MK1 Operations Manual [Page 2of 28]
SPECIFICATIONS ARE SUBJECT TO CHANGE WITHOUT NOTICE
Table Of Contents
1. INTRODUCTION 4
2. HARDWARE CHECKLIST 4
3. HARDWARE SETUP 5
3.1 Connecting the Magellan MDC - MK1 5
4. ABOUT THE MAGELLAN MDC – MK1 6
4.1 Quick-Set buttons 6
4.2 Special button usage on Power-up 6
4.3 Special multi-hold buttons 7
5. MENU STRUCTURE AND FEATURE CONTROL 7
5.1 Status 7
5.2 Adjust 8
5.3 Screen Size 9
5.4 Zoom 10
5.6 Manual Set 11
6. ADVANCED MENUS & FEATURES 11
6.1 Advanced Settings 12
Video Standards – PAL / NTSC 12
Image Smoothing 12
AutoSet function 12
IR Control 12
RGB Term. - Input impedance 13
RS232 – Control / Mouse 13
Baud rate - for RS232 control 13
RS232 ID 13
Sound - on/off 13

FSR MDC – MK1 Operations Manual [Page 3of 28]
SPECIFICATIONS ARE SUBJECT TO CHANGE WITHOUT NOTICE
Sync In 14
C. Sync in Freq. 14
6.2 Engineering 15
ADC Ref. - input RGB level 15
DAC Ref. - output video level 15
CV Filter - for Composite Video 15
Y/C delay - for video output 16
7. IR Remote Control 16
7.1 Remote Control 16
7.2 How to do a manual set 18
8. Mouse Control 18
8.1 Introduction 18
8.2 Hardware setup 18
8.3 Magellan MDC - MK1 setup 19
8.4 Using the mouse emulator 19
8.5 Toggling Zoom/Pan and Mouse modes 20
9. RS232 Control 20
10. Appendix A - Getting the most from your unit 23
11. Appendix B - Trouble Shooting 24
12. Appendix C - Technical Specifications 27
13. FCC statement 28
14. Warranty & Returns Procedure 28

FSR MDC – MK1 Operations Manual [Page 4of 28]
SPECIFICATIONS ARE SUBJECT TO CHANGE WITHOUT NOTICE
Magellan MDC – MK1
Computer To Video Down Converter
1. INTRODUCTION
The Magellan MDC-MK1 is a PC and Macintosh compatible computer to video down converter. The
MDC-MK1 automatically scales the incoming computer image to fit the screen and outputs it as a
Composite Video and S-Video signal that is NTSC/PAL switchable. With superior digital processing and
filtering, the MDC-MK1 accepts any computer signal from 640 x 480 (VGA) up to 1024 x 765 (VGA).
Designed for ease of operation the MDC-MK1 provides front panel controls for the Overscan/Underscan,
Freeze, and Menu selections. The menu selection controls work with the on-screen display to provide
complete control of the set-up and operation of the down converter. It can also be controlled by the
included handheld IR Remote or via RS-232 control. The IR Remote also emulates mouse control for the
PCs. The non-volatile memory retains all of the settings for each of the computer resolutions input into
the MDC-MK1.
The MDC-MK1 provides a computer monitor loop-thru to allow the use of a local monitor and the
composite and S-Video outputs are active at the same time. The outputs of the Magellan MDC-MK1 can
also be fed to one of FSR’s Distribution Amplifiers, Navigator Series of Video Switchers or Pocket
Navigators to distribute and control the converted signal. The convenient 1/2 rack, 1 rack unit high, down
converter comes complete with IR Remote, Rack Mount, and AC Adapter.
Applications: Boardrooms, Education, Training Rooms, Rentals, Staging Events, Conferences
Centers, Videoconferencing, Video Recording.
Functions: Computer Image Freeze, NTSC / PAL Output Selection, Brightness Control, Horizontal
& Vertical Size, Position Controls, Underscan / Overscan Presets, 2X Image Zoom and Pan.
2. HARDWARE CHECKLISTS
The Magellan MDC - MK1 desktop is supplied with the following items:
§Magellan MDC - MK1 unit.
§Power Supply
§IR Remote Control (MDC – RC )
§Rack Mount
§Magellan MDC - MK1 Instruction Manual.

FSR MDC – MK1 Operations Manual [Page 5of 28]
SPECIFICATIONS ARE SUBJECT TO CHANGE WITHOUT NOTICE
3. HARDWARE SETUP
We recommend switching off all equipment before starting the setup.
3.1 Connecting the Magellan MDC - MK1
Disconnect the monitor from the computer at the computer's video output. Connect this cable to the
“Local Monitor” connection on the back of the Magellan MDC - MK1. Apple Macintosh and
workstations may require an additional cable or adapter. This will let you see the monitor as before,
even when there is no power to the Magellan MDC - MK1.
Use a VGA or HD-15 Male to HD-15 Male cable to connect the Magellan MDC - MK1 to the
computer monitor output. Apple Macintosh and workstations may require an additional cable or
adapter. Connect this to the “COMPUTER IN” connection on the back of the Magellan MDC - MK1
and to the monitor output of the computer.
Connecting the video outputs
The MDC - MK1 provides several different output types to allow connection to various video displays
and capture equipment (such as TV’s and VCR’s). The choice of output type depends on what your
equipment can accept.
§Composite Video - Use the composite video output on the back of the MDC - MK1 (the BNC
connector labeled “Composite Out”) to the composite video input of your video equipment.
§S-Video - Use the S-Video output on the back of the MDC - MK1 to connect to the S-Video input
of your video equipment. S-Video provides improved performance over Composite Video.
Connecting the serial / remote cable (optional)
The Magellan MDC - MK1 can be controlled from a computer, and used as a remote “Microsoft ®
Serial Mouse Emulator” by connecting its RS232 port to a computer's RS232 port. See the section
on 'RS232 Computer Control' later in this manual on how to use this control feature (mouse
emulation is the default, and merely requires connecting a suitable RS232 cable). This unit can also
be controlled via an external control system like AMX or Crestron.
Connecting the AC adapter
The Magellan MDC - MK1 comes with a 12v DC minimum 500-mA power supply included - see
'Technical Specifications' for further information on suitable power supplies. Plug the round 'DC
power plug' of the AC adapter into the “Power” socket on the back of the MDC - MK1. Plug the wall
wart into an outlet and the power LED on the front of the unit will light.

FSR MDC – MK1 Operations Manual [Page 6of 28]
SPECIFICATIONS ARE SUBJECT TO CHANGE WITHOUT NOTICE
4. ABOUT THE MAGELLAN MDC – MK1
There are 3 ways to control the Magellan MDC - MK1:
§By the buttons on the front panel
§By the infra-red remote control unit
§Directly from the computer via the serial (RS-232) port
However, this manual's description of controlling the unit is based on the operation of the front panel.
Descriptions of the IR control method, and serial control from the computer, are described later.
Shown below is a picture showing the front panel of the MDC-MK1.
§MENU BUTTON is used to initiate front panel control of the unit, and select the various options and
features to change.
§OVERSCAN / - this is a dual-purpose button that will be described in a moment, but is normally used
to decrease (or de-select) the currently displayed option or feature.
§FREEZE / + this is another dual-purpose button, but normally used to increase (or set) the currently
displayed option or feature.
§POWER LED this is illuminated when the Magellan MDC - MK1 has power
§OVERSCAN LED this will illuminate when in the “Overscan Mode”
§FREEZE LED this will illuminate when the MDC – MK1’s image has been frozen.
§The internal sounder is used to confirm that a setting has changed, and to indicate that the Magellan
MDC - MK1 is saving settings to non-volatile memory. You will hear it during normal use, but it can
be disabled if needed.
4.1 Quick-Set buttons
These are the dual-purpose buttons described earlier, and only function when in Status mode. They
are provided for quick access to certain often-used functions - i.e. Toggling Underscan and
Overscan, and Freeze.
4.2 Special button usage on Power-up
Certain buttons can be held down when applying power to the unit, to perform certain special
functions:
§Factory Reset hold down both the OVERSCAN and FREEZE buttons when powering the unit
up. This will reset the unit to Factory settings (and set the unit into PAL video mode). It should
only be used if the unit's settings give an invalid output that the user cannot exit from, as this will
erase all user-settings.

FSR MDC – MK1 Operations Manual [Page 7of 28]
SPECIFICATIONS ARE SUBJECT TO CHANGE WITHOUT NOTICE
§Set to NTSC mode this is done by holding the OVERSCAN button down when powering on the
unit. This changes the non-volatile PAL / NTSC setting to NTSC, and will be remembered even
when power is removed.
§Set to PAL mode this is done by holding the FREEZE button down when powering on the unit.
This changes the non-volatile PAL / NTSC setting to PAL, and will be remembered even when
power is removed.
4.3 Special multi-hold buttons
Certain buttons can be held together when the unit is on to perform other functions.
§Store Current Settings this is done by holding the MENU and FREEZE / + buttons in together
for about 2 seconds, and can be done at any time. This stores the current settings (e.g.
Overscan, Underscan, etc.) in Non-Volatile Memory, which will be read back the next time the
unit is powered up.
This option will emit a high-pitched beep when complete to indicate that data has been successfully
stored. If you manage to store an invalid setting, you may need to do a Factory Reset (see above).
If you hear high pitch beeps at other times, it indicates that other data is being stored into memory
(e.g. information the Magellan MDC - MK1 has deduced about the graphics resolution coming from your
computer, such as when you change your screen resolution.)
5. MENU STRUCTURE AND FEATURE CONTROL
This section goes through the main menus available via the On – Screen Display, and what control they
have over the unit. Internally, the IR and serial control links change the features in the same way as the
buttons, so this section is required reading whatever the final method of control is likely to be. Advanced
features are covered in the next chapter.
5.1 Status
In Status mode, you are presented with a summary of some of the current settings. Almost all of
these are repeated (and adjustable) elsewhere in the menu system, but some are not:
Overscan - Quick Set
This is called Quick Set because you do not have to scroll through menus to alter this option. The
center button (marked OVERSCAN and +) toggles between underscan and overscan displays on the
TV set:
§Underscan is where a border is left around the edge of the computer image when displayed on
the TV.
§Overscan is where the image is intentionally too large to fit on the TV, thus ensuring that no
border or edge can be seen.
If underscan and overscan do not give you the image sizes you expect (for example, overscan still
shows a border), then make sure you do an AutoSet - described later in this section of the manual.
Both sizes are user-adjustable, and the method of doing so will be described later under the 'Screen
Size...' section.

FSR MDC – MK1 Operations Manual [Page 8of 28]
SPECIFICATIONS ARE SUBJECT TO CHANGE WITHOUT NOTICE
Freeze - Quick Set
This is another quickset button, labeled 'FREEZE'. When pressed the first time, the unit will enter a
special mode where the video image and all other features are frozen.
Freeze will remain active until disabled by pressing 'FREEZE' again, and the whole unit will remain
frozen until this happens.
No other features are accessible while in Freeze mode, except the RESET button on the remote
control unit.
Total Lines - Information
This will appear when in Status mode to show how many scan lines are in the incoming PC picture.
This is including blanked lines that are not normally viewable, so a 1024 x 768 image might actually
have a total of 806 lines in it, with 38 of them used for 'vertical blanking'.
Vert Frequency - Information
Again, this is just for information, and shows the vertical refresh rate of the incoming PC signal.
Multiply this by the 'Total Lines' value to give the horizontal refresh rate. High refresh rates are
generally more acceptable when displayed on computer monitors, the Magellan MDC - MK1 prefers
a low refresh rate so that it's capture circuitry has more time to capture more pixels, thus giving a
clearer picture.
5.2 Adjust
You can enter this from 'Status' mode by pressing the MENU button once. This enters the beginning
of a number of menus that allow complete control over the unit's features. All menus time-out after
about 25 seconds of inactivity (returning you to the Status display), or you can press the + button
when 'Exit' is displayed at the end of each menu list to return to the previous menu.
The various options from this menu are all selected by pressing MENU repeatedly:
Flicker Reduction
The unit defaults to using a 4-line filter, which is best for 800 x 600 displays. Pressing the + or -
buttons when this option is displayed will change this to 2-line or 6-line.
§2-line mode is not advisable, unless the vertical image softening that is present because of
higher flicker reduction modes needs to be avoided. Line dropping will be common in this setting.
§4-line mode is best for resolutions around 800 x 600 and 1024 x 768, but is down to personal
taste, and the exact nature of the graphics or text being displayed. Thin horizontal lines cause
the most flicker and if this is seen, then the highest flicker reduction filtering should be used.
§6-line offers the maximum amount of flicker reduction, and allows images (even CAD wire-frame
drawings) to be displayed up to a resolution of 1600 x 1200 without line dropping. This mode
may not be suitable for low resolutions, because of excessive vertical softening of the image -
but again this is down to personal preference.

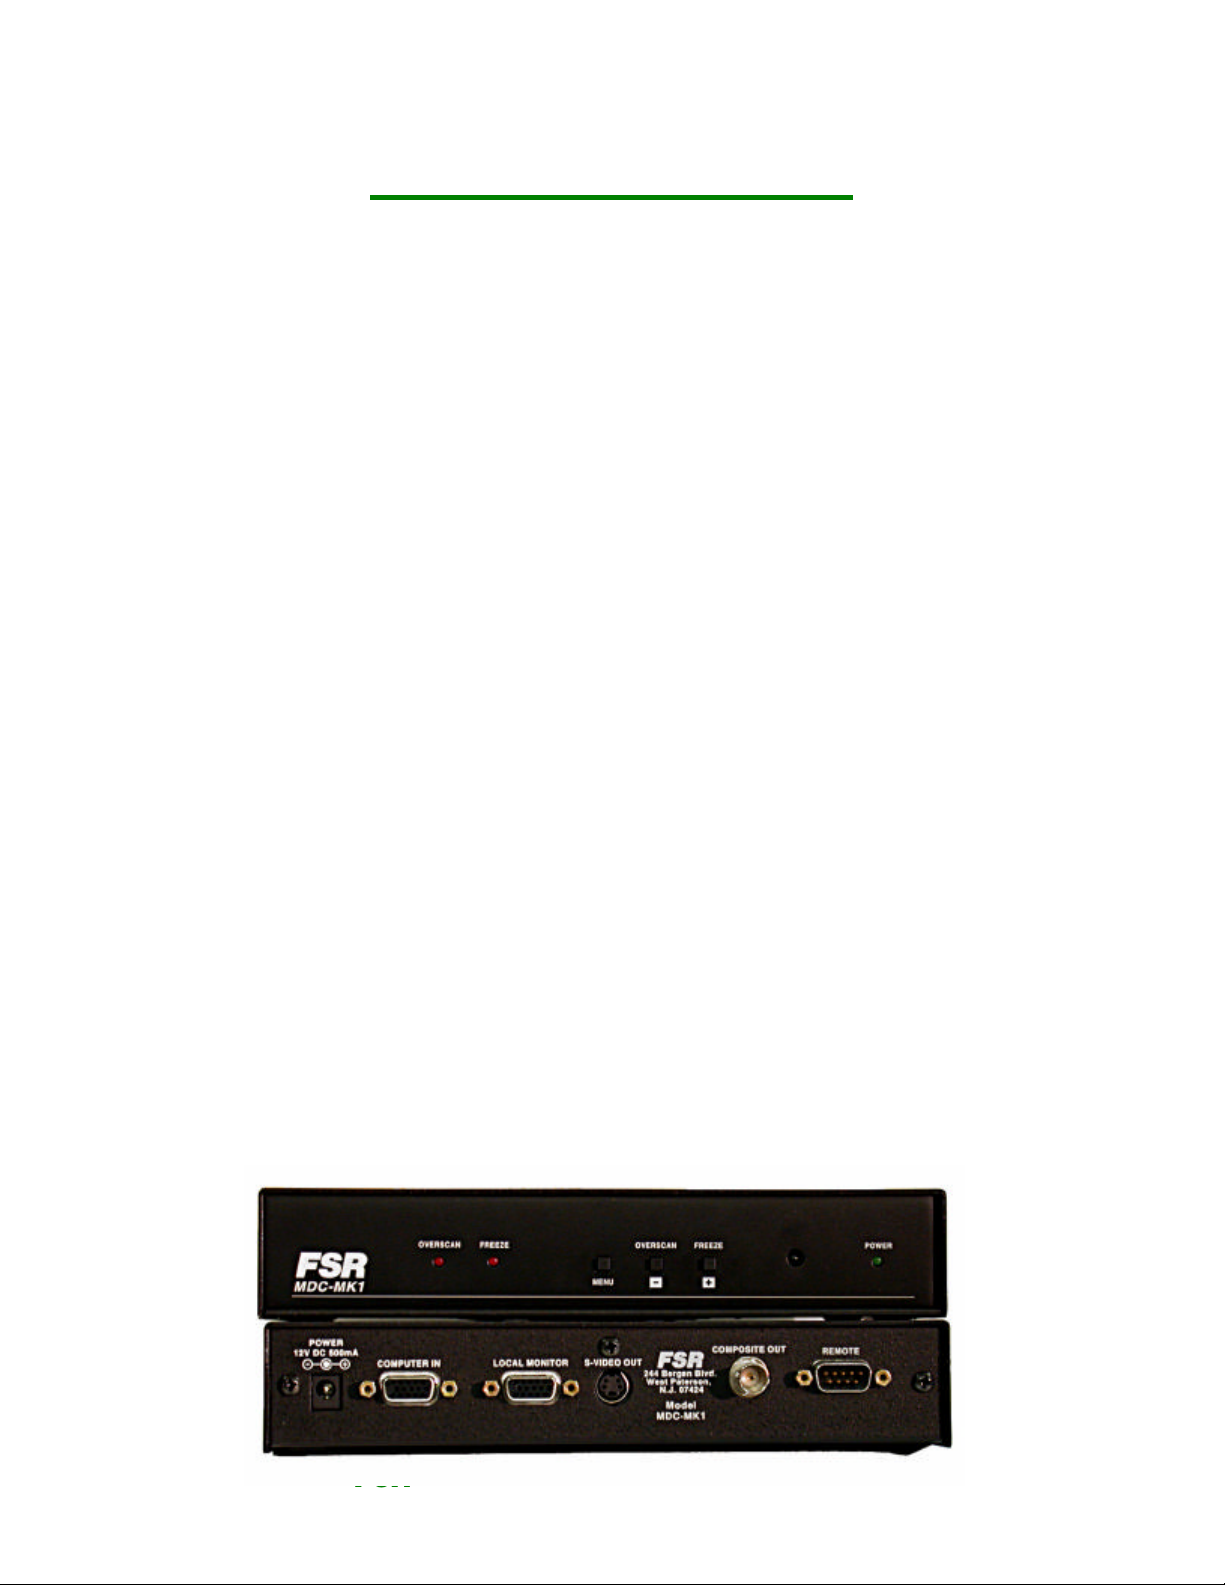
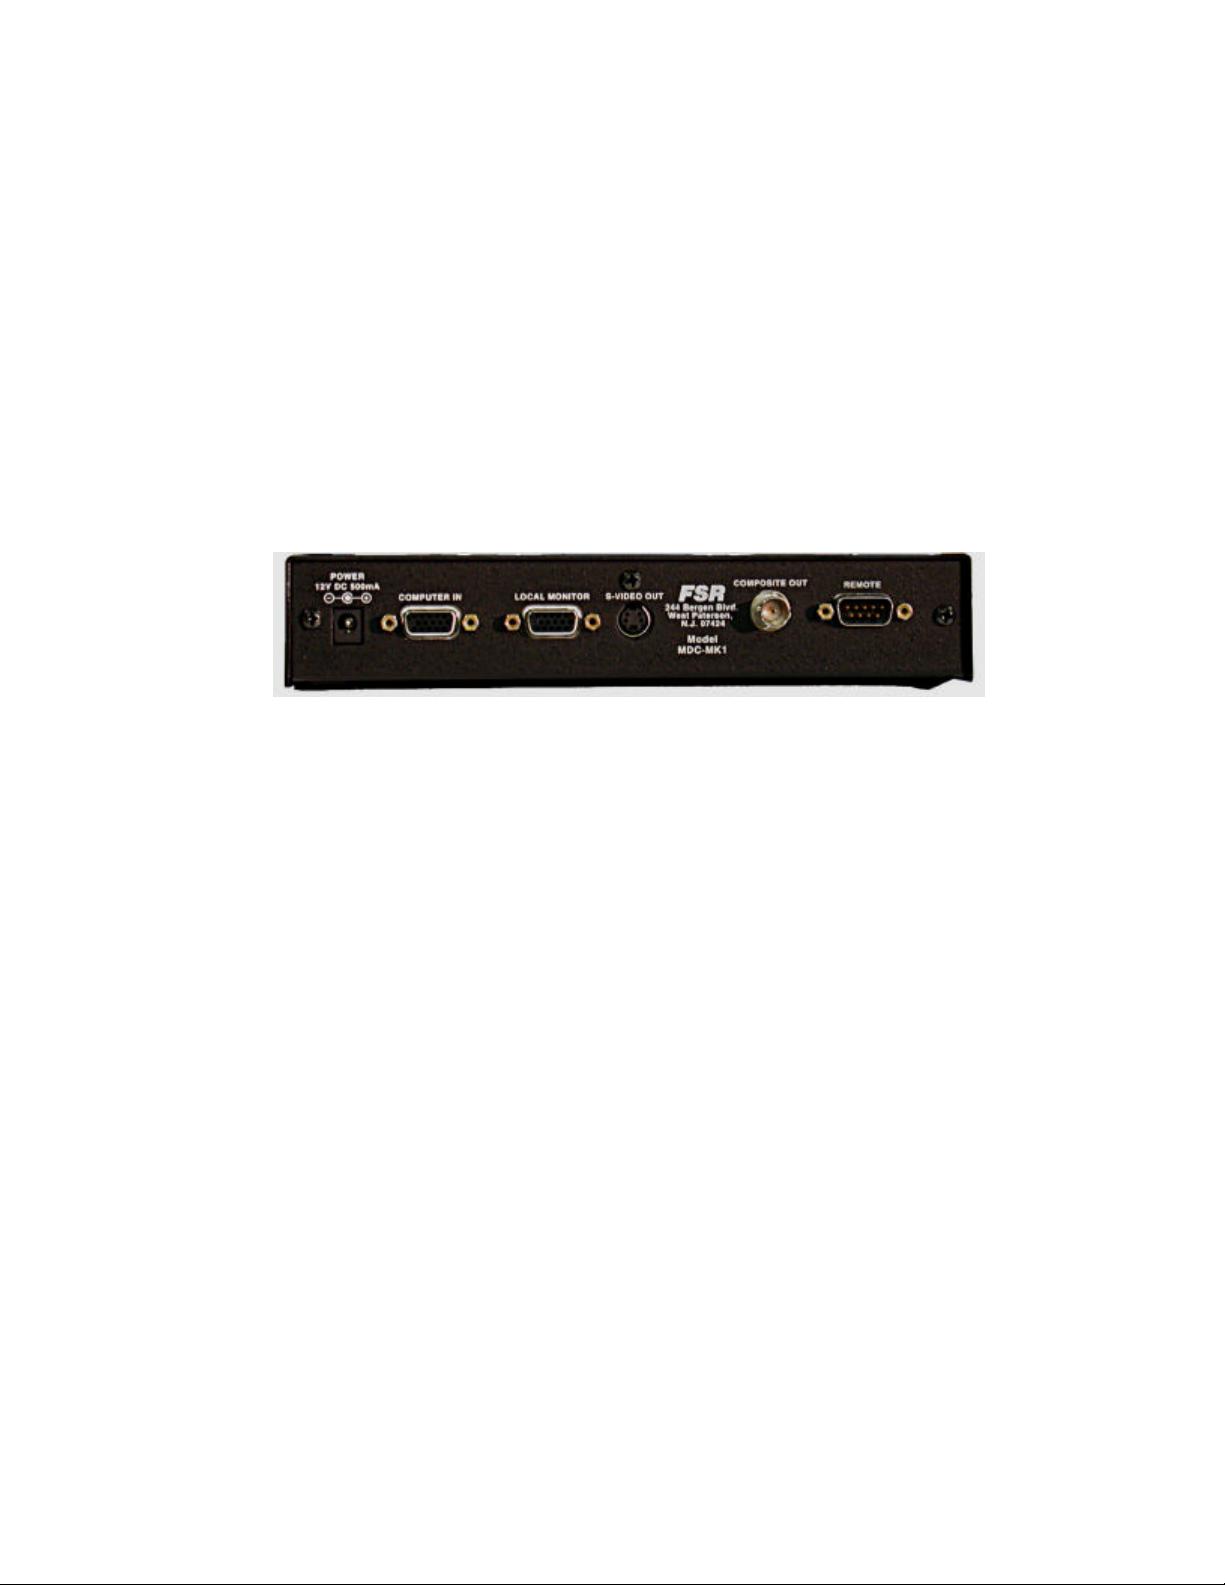
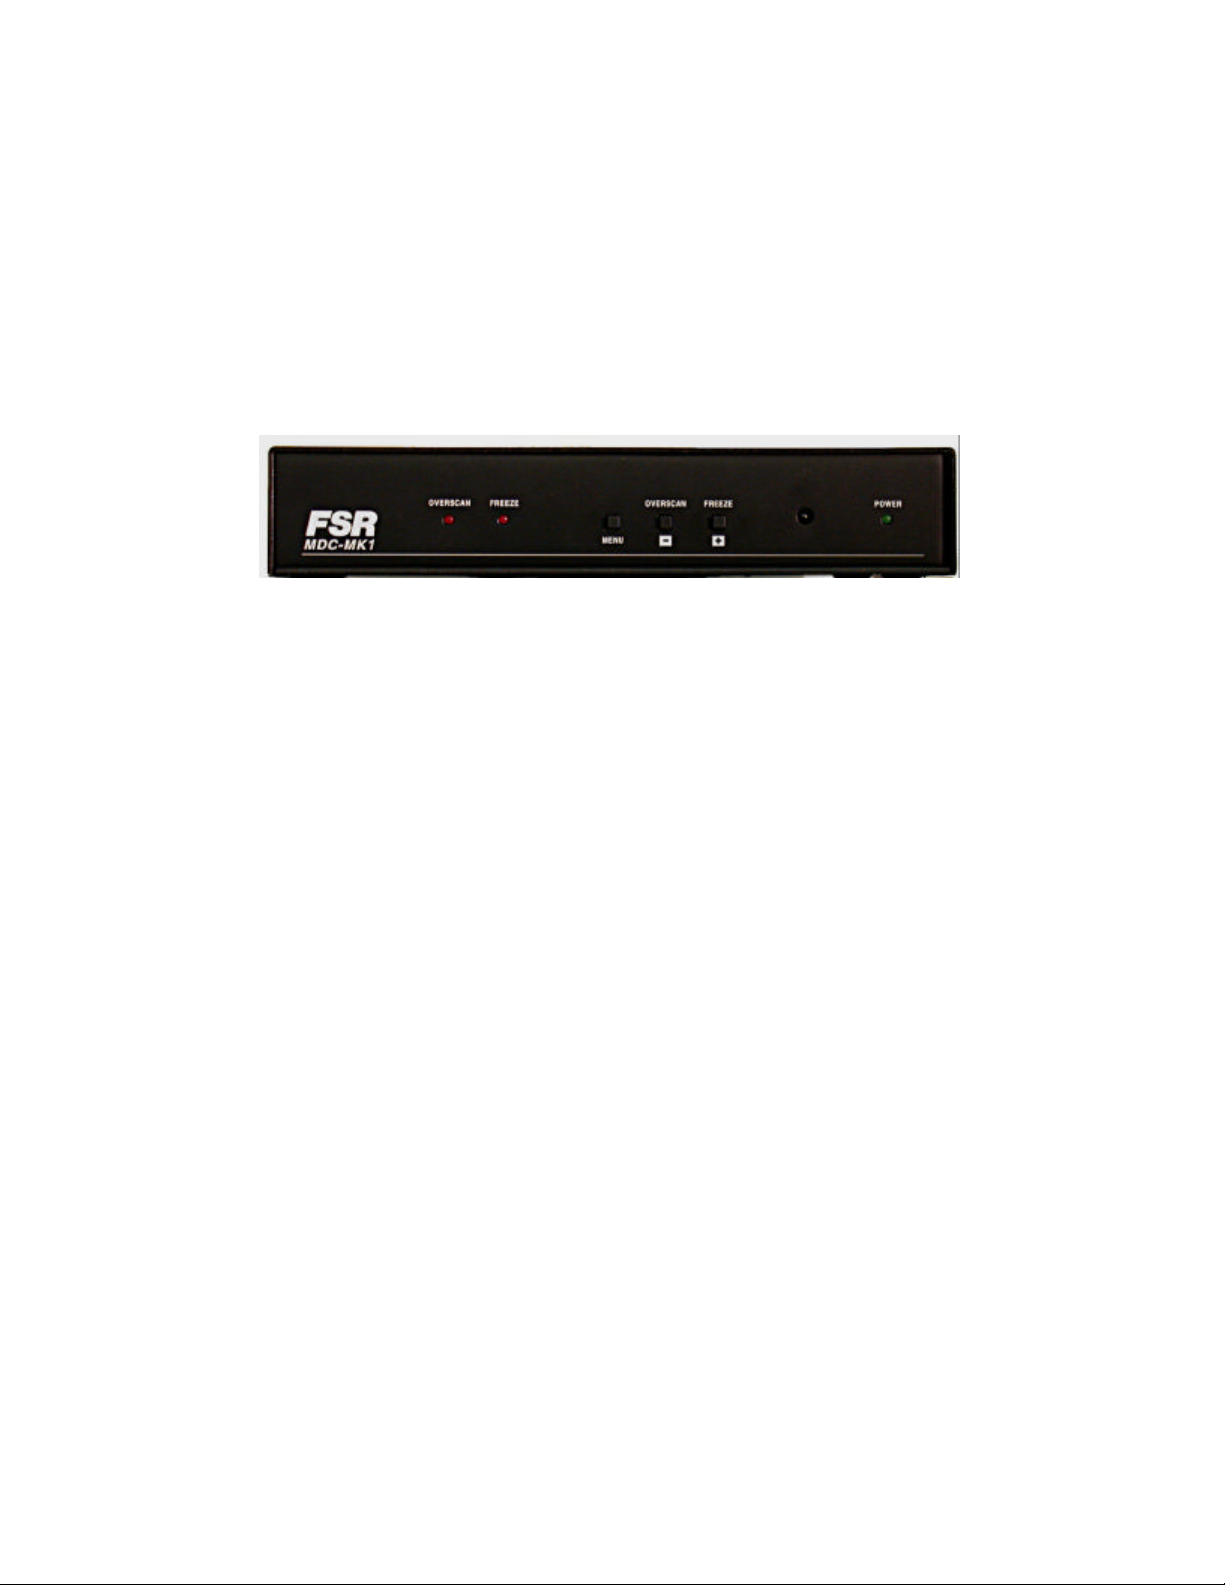
FSR MDC – MK1 Operations Manual [Page 9of 28]
SPECIFICATIONS ARE SUBJECT TO CHANGE WITHOUT NOTICE
Auto Set
This is a powerful feature of the Magellan MDC - MK1 unit, and will make the unit automatically
examine the computer image to determine its size and position within the RGB signal that it is
receiving. This then lets the unit scale and position this on the TV set automatically, without further
user intervention.
Pressing the + button will start this scanning, and it will take about 15 seconds. During this time, the
image on the TV will move around, but at the end of this the image should be stable and correctly
centered.
Note that:
§Until you run this feature (assuming you have not previously done so), the unit will have
'guessed' the right settings in order to give a video output that is centered and sized correctly.
This 'first guess' is exactly that: a guess - as graphics cards in computers have very few
'standard' resolution / refresh rate settings, and all other settings vary drastically from computer
to computer.
§This feature requires that the top, bottom, left, and right edges are of a certain minimum
brightness i.e. certainly not black, but the actual level can be adjusted and the method to do so is
described later. Almost all Windows programs will use the full size of the display which is fine,
but some DOS programs (especially at the DOS prompt) may not do so which will cause a
problem for the unit. Refer to the Sense - for AutoSet function section later in the manual for
alternate settings of the signal brightness.
§Only use this feature when the full area of the computer screen is being used - this will ensure
that the unit 'sees' the edges correctly, and performs its task without errors.
§If you have a problem, a 'Manual Set' mode is available to fine tune the values created by this
mode. Or simply re-activate this feature when your computer screen is being more fully used.
§Once complete, the Auto Set routine will remember this particular computer resolution so that
you should not need to re-do the routine (you will hear a high-pitched beep to indicate this). The
only exception is if you change the refresh rate (then Auto Set should be run again), or do a
Factory Reset (which will delete all settings learnt by the unit).
5.3 Screen Size
This is a sub-menu, selected by pressing the + button when the above message is displayed.
It displays a number of values that can be used to adjust the Magellan MDC - MK1's output to suit
your video display device. Note that you should have ideally already done an Auto Set, so that the
unit knows what area of the computer image actually contains the display you want converted to
video otherwise you may have to repeat the adjustments for different screen resolutions.
§The values shown depend on whether you are in Underscan or Overscan mode, so make sure
you have the appropriate one selected before proceeding to change the values.
§The values are also separately stored for NTSC and PAL outputs - adjusting one will not affect
the other.
§When you finish adjusting the values, press the + button when you reach the 'Exit' message.
This will return you to the 'Screen Size...' menu option, and you can continue to further sub-
menus by pressing MENU as before.

FSR MDC – MK1 Operations Manual [Page 10 of 28]
SPECIFICATIONS ARE SUBJECT TO CHANGE WITHOUT NOTICE
If you like the new settings, use the multi-button features described earlier to remember the settings
in Non-Volatile Memory. Holding the appropriate button allows fast increasing & decreasing.
Out H – Center: altering the display's left / right position
This adjusts the horizontal position of the computer image on the screen. Increasing the value (+
button) moves the display to the right, decreasing it (- button) moves it to the left.
Out H – Width: altering the display's width
Press the + button to increase the width of the picture and the - button to decrease it.
Out V – Center: altering the display's vertical screen position
Press the - button to move the picture up and the + button to move it down
Out V – Height: altering the display's height
Press the + button to increase the picture height and the - button to decrease it. You can return to the
previous menu by pressing the + button when the 'Exit' message appears.
5.4 Zoom
Zoom allows you to view a section of the video picture at twice the normal size. Panning in the zoom
mode allows you to select exactly what part of the screen is displayed. Note that:
§Again, it is highly recommended that the user should have already run the AutoSet routine, so
that the unit knows exactly where the start and end of the computer image is within the incoming
computer signal. Otherwise, the user may be able to pan to areas of the computer image that are
completely empty.
§The Panning settings are remembered when Zoom is subsequently turned off. This could be
useful in training applications.
§It is possible to make the unit start up (from power on) in Zoom mode, and in a particular pan
position. This may be useful for certain applications, and is done by using the special multi-hold
buttons described earlier.
Enter the Zoom... sub-menu by pressing the + button when this message appears.
Zoom - turning on and off
Press the + button when 'Zoom Off' is displayed to turn the zoom on and the - button to turn the
zoom off again. Pressing MENU will move to the options to alter the panning position.
Pan X Position - adjusting the horizontal panning position
Press the - button once to pan left one step (i.e. move the zoomed image to the left). Similarly, press
the + button once to pan right one step.
Pan Y Position - adjusting the vertical panning position
Press the + button once to pan down one step. Press the - button once to pan up one step.
Press + when the 'Exit' message is displayed to exit this sub-menu. However, zoom will still be active
until disabled.

FSR MDC – MK1 Operations Manual [Page 11 of 28]
SPECIFICATIONS ARE SUBJECT TO CHANGE WITHOUT NOTICE
5.6 Manual Set
This sub-menu should only be needed when the Auto Set has failed for some reason. See the notes
on Auto Set before adjusting these parameters, in case something else will solve the problem.
Otherwise, you can 'teach' the unit the correct horizontal and vertical position and size of the
computer's RGB output - and thus the Magellan MDC - MK1 will be able to capture this 'input
window' and display it correctly on the video output.
Whatever adjustments you make, the unit will continually try to fit the 'input window' to your preferred
video output size and position setting. It is highly recommended that this mode is only used when in
Underscan mode, or you will not know if you've adjusted the values correctly as some parts of the
output video picture will be off the screen.
Once adjusted, the 'VGA Store' option can be invoked to remember the new settings in Non-Volatile
Memory (thus overwriting any previous setting for this screen resolution and refresh rate
combination).
VGA Left - start of image capture
Increasing this value will move the left edge of the 'input window' further to the right -i.e. less of the
computer image will be captured into internal memory. Increase this value until the computer image
just starts to be cut off, and then decrease by one.
VGA Width - width of capture
Increasing this value will make the input window wider, thus capturing more pixels into the internal
memory. Ideally, only capture just enough pixels to display the whole image.
VGA Top / 4 - start line of capture
Similar to VGA Left, increasing this value will move the top of the 'input window' down, and start to
cut off the computer's image. Decrease by one when this happens. The / 4 appears because the
value shown is the actual line number at which capture starts into the internal memory divided by 4.
VGA Bottom / 4 - end line of capture
Like VGA Top / 4, this determines the last line captured. Decrease until the image just starts to be
cut off, and then increase by one.
VGA Store - store new VGA settings
Press the + button once to store your new settings.
6. ADVANCED MENUS & FEATURES
These features control the basic operation of the unit in order to comply with the operating environment - e.g.
selecting PAL or NTSC video standards. They are accessed in the same way as the previous features - i.e.
from the STATUS mode press the MENU button repeatedly until the LCD displays the message 'Advanced'.
Then press the '+' button to select the Advanced sub-menu. Subsequent pressing of the MENU button will
select the next Advanced Feature to alter.
Any of these new settings can be stored using the 'Store Settings' multi-buttons
(Hold MENU and the + button together for approximately 2 seconds).

FSR MDC – MK1 Operations Manual [Page 12 of 28]
SPECIFICATIONS ARE SUBJECT TO CHANGE WITHOUT NOTICE
6.1 Advanced Settings
Video Standard – PAL / NTSC
The Magellan MDC - MK1 can switch between PAL and NTSC standards with ease.
§Press the - button to switch to NTSC mode. Press the + button to switch to PAL.
Screen Size settings are remembered separately for PAL and NTSC, so changing the Screen Size
settings in NTSC will not affect the PAL settings.
H. Soften - Image smoothing
Horizontal filtering (softening) enables the user to smooth pixels, text, and lines in the horizontal
direction, where flicker filtering only allows control over the vertical line flickering.
§This is used to improve the recordability of a video signal - i.e. to reduce its bandwidth.
§H. Soften is not active during Zoom mode - it is temporarily disabled.
§Press the + button to switch the horizontal soften on, the - button to switch it off.
Sense - for AutoSet function
The sense level relates to how the AutoSet routine views the video input from the computer. If
running AutoSet produces a resulting image that is torn, mis-aligned, or too big for the TV, it may be
because the image is too dark for the MDC - MK1 to correctly find the edges of the picture. Altering
the “Sense” setting will change the brightness needed to find the edges satisfactorily.
§A setting of 1 will sense 30% brightness levels, 2 will sense 60%, and 3 will sense 90%
(approximately). 1 is the default, and should be fine for almost all screen displays.
§Run the AUTO SET after changing the sense setting to ensure a good image on the TV. If the
image is still not good enough it may be necessary to set the Magellan MDC - MK1 manually -
see Manual Set.
§To increase the sense value press the + button. To decrease it the press - button.
IR – On / Off
As there are many different methods of controlling the Magellan MDC - MK1, multiple uses could be
confusing.
§It can be used in situations where stray or random IR signals may be picked up - or even as a
lockout to prevent others from remotely altering the unit's features.
§In order to disable input from the IR remote control press the - button, or press the + button to
accept it.

FSR MDC – MK1 Operations Manual [Page 13 of 28]
SPECIFICATIONS ARE SUBJECT TO CHANGE WITHOUT NOTICE
RGB Termination - Input impedance
This relates to whether or not the Magellan MDC - MK1 is terminating the computer monitor output from
the computer with 75-Ohm impedance.
§Usually the MDC - MK1 will set the termination automatically ('Auto' mode), by sensing whether a
computer monitor is linked into the circuit as well (i.e. to the “Local Monitor” connector).
§However, if necessary, it is possible to turn the termination off. For example if the MDC - MK1 does
not sense that the monitor is attached, this could result in ‘double-termination’ of the RGB signals.
§Press the - button to turn the termination off, the + button to switch to automatic mode.
RS-232 Port – Control Via RS – 232 / Mouse Emulation
This switches the use of the RS – 232 serial port between computer control and Microsoft ® serial mouse
emulation
§In order to use the remote control to emulate a mouse, this RS – 232 adjustment must be set to
'Mouse' mode. Similarly, to use a serial link from the computer to control the MDC - MK1, it must be
set to RS – 232 Control mode.
§Note that the default is 'Control' mode - you must switch to 'Mouse' mode in order to enable the
mouse emulation.
§Press the - button to switch to Mouse mode, and the + button to switch to RS – 232 Control mode.
Baud Rate - for RS – 232 Control
In order to control the Magellan MDC - MK1 from the computer it is necessary to set the same baud rate
for both the unit and the controlling computer.
§Press the + and - buttons to change to the required number. The Magellan MDC - MK1 does not
display the actual baud rate, but a number relating to it. The table in a later section on 'RS232
Control' shows which Baud rate each number relates to. For example: to set to 9600 Baud the number
must be 23.
§"9600, N, 8, 1" is the default setting - i.e. no parity is used, 8 data bits are required, and 1 stop bit.
§This number is only used in RS – 232 Control Mode.
§Mouse Mode ignores this number, and always uses 1200 baud.
RS – 232 ID
This ID code can be used where multiple Magellan MDC - MK1's are all linked via a serial cable to the
same computer. The ID can be altered so that each unit's ID is unique, and thus each unit could be
adjustable by itself with one serial port. This feature is described further in a later section.
Sound – on / off
The internal sounder is used to give an indication of whether a variable has been changed, or if the MDC
- MK1 is saving settings to non-volatile memory. If you do not wish any audible indications to be present,
the sounder can be switched off.

FSR MDC – MK1 Operations Manual [Page 14 of 28]
SPECIFICATIONS ARE SUBJECT TO CHANGE WITHOUT NOTICE
§Normal beeps indicate that a feature or value has been changed.
§High-tone beeps indicate that something has been written to the unit's Non-Volatile Memory for
example when doing a Store Settings, Factory Reset, AutoSet, or when a new screen resolution /
refresh rate combination has been detected.
§Press the - button to turn the sound off, the + button to turn it on again.
Sync In – from “Computer In” connector
The Magellan MDC - MK1 does not need to have separate Horizontal and Vertical sync inputs
provided by the computer, it can also accept composite sync signals, or sync-on-green (see next
option). This ensures compatibility with as many different types of computers as possible.
§If your computer outputs a composite sync signal, it is necessary to switch the Magellan MDC -
MK1 to accept it, as the default is to accept separate horizontal and vertical sync only.
§A composite sync signal can be fed into the unit in 3 different ways, corresponding to one of the
options listed in the table below.
§Press the + button to cycle forward through the options, and the - button to go back.
Sync – In Option Description
VGA H & V Positive or negative horizontal sync on pin 13.
Positive or negative vertical sync on pin 14.
Green + Sync Negative composite sync present on green.
Pin 13 Negative composite sync on pin 13.
Pin 15 Negative composite sync on pin 15.
C Sync in Freq. - composite sync input frequency
When using a composite sync signal on the Computer In connection (either separate, or on the green
signal), you may need to adjust this setting to suit the scanning rate.
§The default of 70 should suit frequencies around 55 Hz.
§Reduce it to around 50 for 75 Hz inputs.
§Reduce it below 50 to suit even higher frequencies.
§Note that it is the horizontal scanning frequency that is important - not the vertical frequency.
(Multiply the vertical frequency by the number of lines in the picture to give a guide to the
horizontal frequency.)

FSR MDC – MK1 Operations Manual [Page 15 of 28]
SPECIFICATIONS ARE SUBJECT TO CHANGE WITHOUT NOTICE
6.2 Engineering
Items in this section will alter the basic operation of the Magellan MDC - MK1. The changes are generally
of a highly technical nature and should only be made when they are understood. Please read each item in
this section carefully before making any alterations.
When the Engineering message appears, press and hold both the + and - buttons simultaneously for
approximately 2 seconds, and then release both buttons.
Settings changed in this mode can be stored in Non Volatile Memory the same way as other settings.
ADC Ref. - input RGB level
The Magellan MDC - MK1 takes the analog signal destined for the computer monitor and converts it to a
digital signal in order to perform some signal processing and scan conversion. The actual device that
does this is an analogue to digital converter (ADC), and changing the upper reference level to this is
similar to a brightness control, but will also clip colors that are too bright to the maximum brightness level.
If this is incorrectly set then certain colors, such as yellow, may appear washed out, or even come out as
white. This adjustment is factory set and should not normally need altering.
§It is highly recommended that this value is only adjusted when problems arise, and even then only
when a full color bar is displayed on the computer screen and an oscilloscope is connected to a video
output - thus allowing monitoring of the effects.
§Pressing the + button increases the voltage at the ADC reference input (thus making the sampled
image darker, and reducing 'clip' effects), the - button decreases it (making the image brighter, but at
some point will start to 'clip' the RGB input).
§The factory setting allows for an input up to 0.8v, thus allowing for out-of-tolerance RGB inputs.
DAC Ref. - output video level
The digital to analogue converter (DAC) changes the digital data output from the processing circuit into an
analog form that can be displayed on a standard video monitor or TV. Altering the reference level has an
effect similar to changing the contrast of the output signal.
§It is highly recommended that this value is only adjusted when problems arise, and even then only
when a full color bar is displayed on the computer screen and an oscilloscope is connected to a video
output - thus allowing monitoring of the effects.
§Pressing the + button increases the voltage at the DAC reference input, the - button decreases it.
CV Filter - for Composite Video
The MDC - MK1 allows some control over the amount of filtering on the Composite Video output. Altering
this may give a clearer image, or reduce dot-crawl.
§In most circumstances, this should never need changing.
§Pressing the + button increases the value thus applying more filtering, while the - button decreases it.

FSR MDC – MK1 Operations Manual [Page 16 of 28]
SPECIFICATIONS ARE SUBJECT TO CHANGE WITHOUT NOTICE
Y/C delay - for video output
The Y/C delay setting allows control of the delay between the luminance (Y) and chrominance (C)
parts of the video signal.
§This affects ALL video outputs - composite video and S-video.
§Pressing the + button increases the delay (thus making any color smearing move left), the -
button reduces it (making any color smearing move right).
§The default of 1 should give correct luminance and chrominance line-up.
7. IR Remote Control
7.1 Remote Control
The remote control can be used to control the features of the Magellan MDC - MK1, change its settings,
and control the computer's mouse.
Make sure you have read the previous sections on controlling the features of the Magellan MDC - MK1
before using the IR controller.
The Magellan MDC - MK1's LED’s will change to show the features altered by the remote control, and a
beep will be emitted from the sounder (if it has not been disabled).
RESET
As its name implies, this resets the unit back to the last-saved user settings. It is useful if you want to
clear any changes made to screen size or position. If you've saved an invalid setting to the non-volatile
memory, you may want to do a Factory Reset - as described earlier.

FSR MDC – MK1 Operations Manual [Page 17 of 28]
SPECIFICATIONS ARE SUBJECT TO CHANGE WITHOUT NOTICE
STORE
This button is used for saving new settings to the unit's memory and will be remembered even after the
unit has been switched off.
U. SCAN / O. SCAN
(Underscan / Overscan) will toggle you between Underscan and Overscan modes.
FREEZE
The Freeze function allows you to freeze the current image on the screen, and all the settings of the
unit itself. Pressing the freeze button again will unfreeze the image.
AutoSet
This powerful feature will scan the incoming computer image to determine its size and position. This
will optimize it for display on the desired TV unit.
§If the AutoSet feature does not look like it is finding the edges of the display correctly, then you
can press RESET to stop it going any further.
§See the 'MANUAL SET' option later in this section for details on how to manually adjust this
feature.
FILTER
This button will toggle between 4 and 6 line flicker reduction modes.
SIZE & POSITION
These buttons allow you to adjust the Underscan or Overscan size and position on the TV (whichever
is currently selected). You can then use the arrow keys to adjust the horizontal and vertical size or
position of the image being displayed.
Please Note: You should do an AutoSet before making these adjustments. This way the unit knows
the size of the "incoming" computer image.
§Only SIZE or POS. is active at any one time, but you can easily switch from one to the other.
§Once adjusted, STORE the setting for future use.
ZOOM
Enter the Zoom function by pressing ZOOM on the IR remote control. Pressing ZOOM again will
return you to the normal viewing size.
§You can adjust other settings while in Zoom mode.
§You may need to press the PAN button to restore control over the Zoom position, after adjusting
other settings.

FSR MDC – MK1 Operations Manual [Page 18 of 28]
SPECIFICATIONS ARE SUBJECT TO CHANGE WITHOUT NOTICE
LOCK / Executive Mode
Pressing this button once will disable the unit's front panel buttons. To re-enable the front panel
buttons simply press the LOCK button again. This setting can be stored to prevent people from
adjusting the unit without the remote control.
This feature is intended for use where the settings of the unit should not be disturbed or to set the
unit into an Executive Mode so that only the IR Remote or Control System is in control of the down
converter.
7.2 How to do a manual set
This function should only be needed when the AutoSet has failed for some reason, or the Computer
image that you are using has a dark background, which AutoSet cannot see. Please read the notes
on AutoSet & Level adjustments in the IR Remote Control section before adjusting these parameters,
in case something else will solve the problem.
With these adjustments, you can manually set what area of the computer's image is to be used for
display on your TV.
It is highly recommended that this method is only used when in Underscan mode, or you will not
know if you have adjusted the values correctly.
§Press AutoSet on remote control twice (within 1.5 seconds) two 'beeps' will be heard.
§Adjust Top and left-hand edge by pressing the arrow keys.
§Press AutoSet again.
§Adjust Bottom and right-hand edge by pressing the arrow keys.
§Press AutoSet - this will give a high beep to indicate that this has been saved.
Note: Manual set mode times-out after 20 seconds - ignoring any settings and returns to previous
settings.
8. Mouse Control
8.1 Introduction
The Magellan MDC - MK1 has an RS – 232 communications port that can be made to emulate a
Microsoft ® Serial Mouse, and all the features are controlled from the IR remote control. This section
details how to setup and use this feature.
8.2 Hardware setup
Setup of this feature requires the connection of an RS – 232 cable.
§Use a (null-modem) serial cable to link from the Magellan MDC - MK1's RS – 232 connection to
the first spare COM port on your PC (usually COM2, but use COM1 if it's available)
§Alternatively, disconnect your mouse from your PC and use an RS – 232 “Y Adapter” cable to
link from your PC to the Magellan MDC - MK1 - plugging the mouse back into the RS – 232 “Y
Adapter” unit.

FSR MDC – MK1 Operations Manual [Page 19 of 28]
SPECIFICATIONS ARE SUBJECT TO CHANGE WITHOUT NOTICE
8.3 Magellan MDC - MK1 setup
Make sure that RS – 232 mode is set to Mouse (and not 'Control') within the Advanced menu of the
On-screen Display. (This is the default.)
8.4 Using the mouse emulator
The MDC – MK1 uses the computer's standard mouse driver, saving the need to load additional
software, just turn your computer on with Magellan MDC - MK1 attached as described above.
If you are using an RS – 232 “Y Adapter” cable, both the existing mouse and the Magellan MDC -
MK1 will share the same COM port and software driver.
If you are using a separate COM port for the Magellan MDC - MK1, your PC may recognize that a
Mouse is attached when booting up. If it does not, run "Add New Hardware" from the Control Panel to
automatically install the "Standard Serial Mouse" driver. You can now use the four arrow buttons to
move your mouse pointer around the screen.
§L.CLICK (left click) has the same function as a single left click of a standard mouse button.
§D.CLICK (double click) has the same function as a double left click of a standard mouse button.
§R. CLICK (right click) has the same function as a single right click of a standard mouse button.

FSR MDC – MK1 Operations Manual [Page 20 of 28]
SPECIFICATIONS ARE SUBJECT TO CHANGE WITHOUT NOTICE
8.5 Toggling Zoom / Pan and Mouse modes
Both the Pan feature and Mouse emulation feature can be used at the same time and you can toggle
the arrow-key usage by pressing the PAN button on the remote control. If you find the arrow-keys not
controlling the mouse pointer, simply press PAN once to de-select PAN mode. Similarly, to re-
activate PAN mode (to slide a zoomed image around the screen) press PAN again.
9. RS – 232 CONTROL
All of the functions of the Magellan MDC - MK1 can be controlled from the Computer, using the RS –
232 port on the unit. Using an appropriate cable and software, it is easy to communicate with the
Magellan MDC - MK1, but before the communications can be established, first set the computer's serial
port to:
§8 bit data, 1 stop bit, no parity
§Either no flow control, or hardware (RTS / CTS) flow control
§Set the Baud rate on the computer and the Magellan MDC - MK1 to the same value (usually 9600).
Commands are sent over the RS – 232 in one of two ways:
§Send the 'adjust name' followed by = and a number (plus a carriage return) to alter any setting you
see displayed on the lower line of the LCD display. E.g. If you were using a terminal emulator
program, you could type the following command to immediately set flicker reduction to 6 lines:-
§Flicker Red = 6
§Send just the 'adjust name' (plus a carriage return) to retrieve back the current value for a setting.
E.g. Typing the following returns the correct value back from the Magellan MDC - MK1 unit (e.g. '6'):-
Flicker Red
Responses to commands
The response from the Magellan MDC - MK1 can be one of three things:
§“?” if something is not understood, e.g. an adjust name is misspelled;
§“>” if the command has been executed;
§“nnnnn” (i.e. a five digit number from 0 to 99999, followed by a CR and LF) if a setting value is
returned.
Notes on sending commands
§Settings that are one of two values (e.g. NTSC or PAL) have to be sent as 0 or 1.
§You only have to send a maximum of 4 characters in order for the command name to be recognized
- e.g. "Flicker Red = 6" could be shortened to "Flic = 6".
§Spaces and line-feeds (ASCII code 10) are completely ignored.
§You must always send a carriage-return (ASCII code 13) at the end of your command or value
request.
Table of contents
Other FSR Media Converter manuals