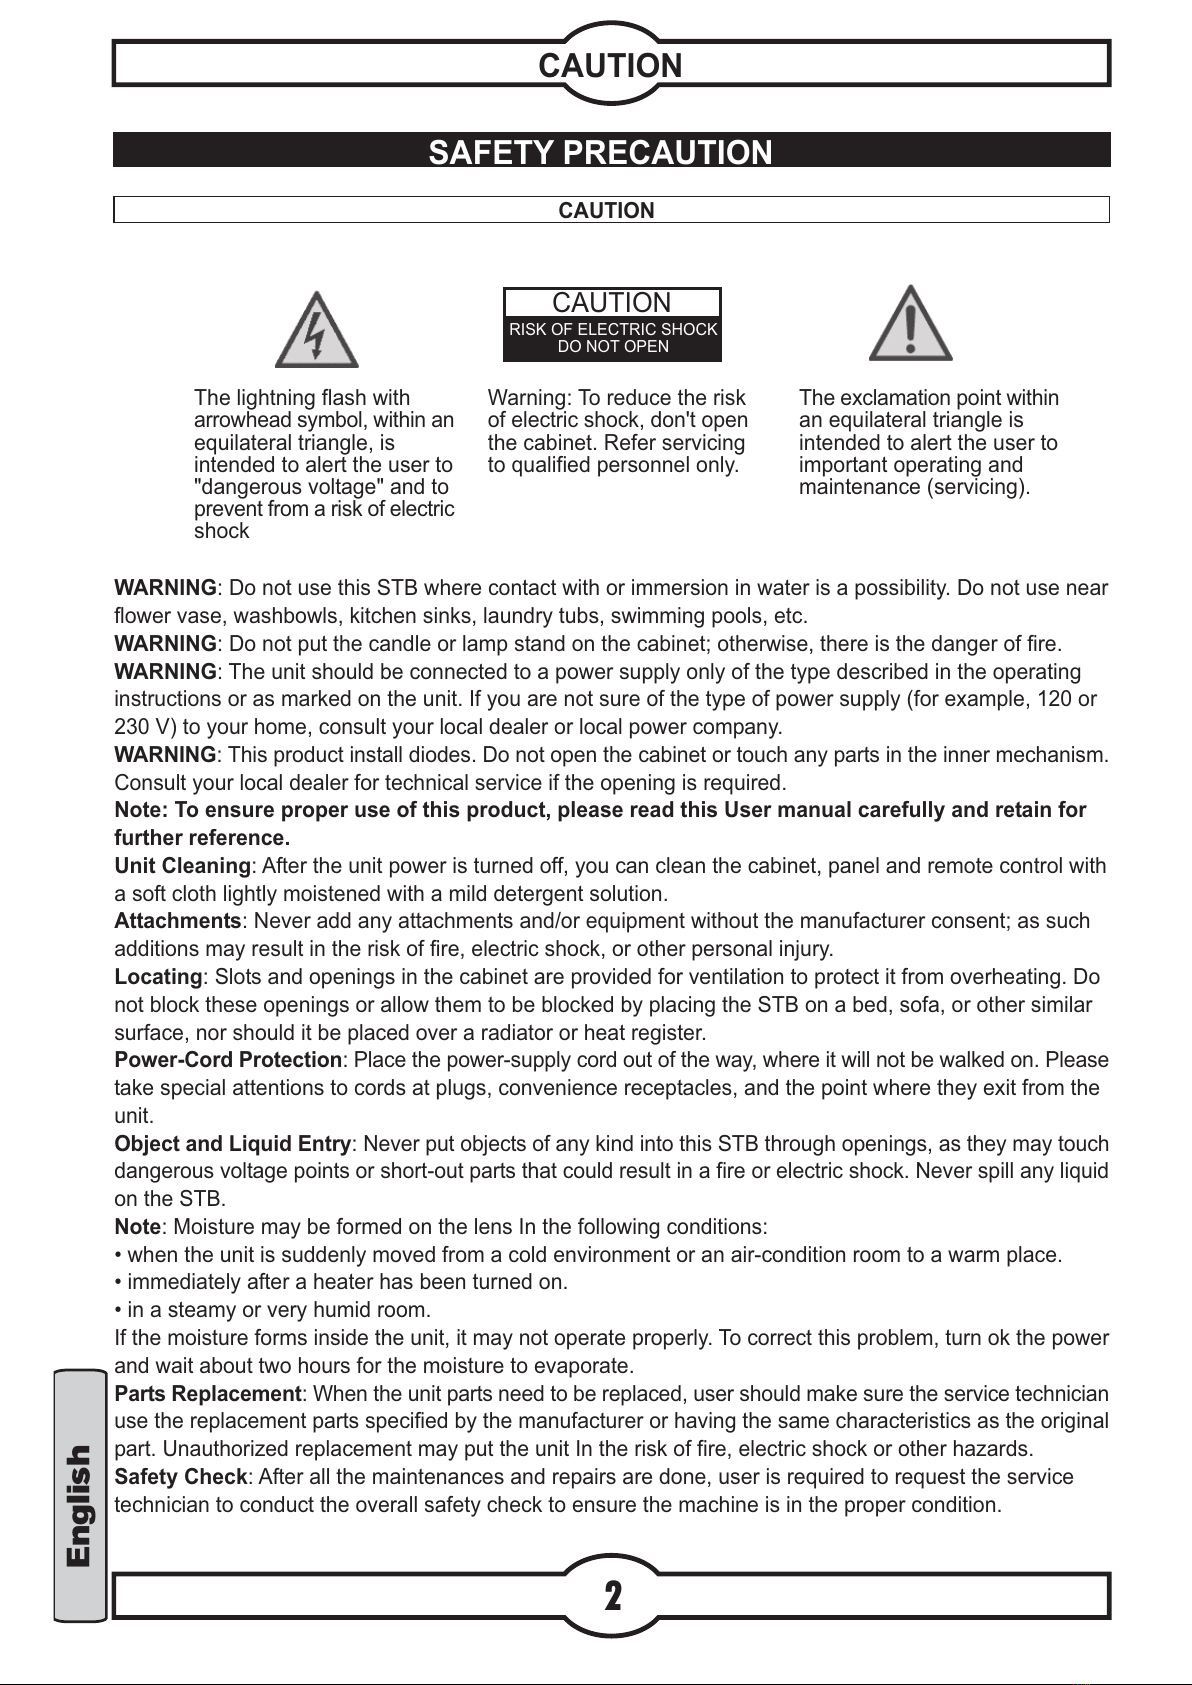
FTE UNIVERS U4150 User manual

U4150
Digital
terrestrial
receiver
ENGLISH
DEUTSCH
ESPAÑOL
ITALIANO
FRANÇAIS
Manuel d'installati n
Manuale prima dellus
Bedienung sanleitung
Instrucci ns manual
Manual de instrucci nes
All manuals and user guides at all-guides.com
all-guides.com

ENGLISH
DEUTSCH
ESPAÑOL
ITALIANO
FRANÇAIS
All manuals and user guides at all-guides.com

English
Quick Installation Guide.
Coaxial cable (Not included)
SCART (Not included)
Follow next steps for the correct installation of this receiver.
Step 1: Connections
Connect a coaxial cable fro the output socket to the Antenna Input connector. Connect a
coaxial cable fro the Loop out connector at the receiver to your TV input connector as it is
shown in Sche e1.
Model without odulator (U 4150):
Sche e1
This receiver has not built in odulator so it has to be connected to the TV through a SCART
cable.
Include
U4150
Terrestrial
digital
receiver
ENGLISH
DEUTSCH
ESPAÑOL
ITALIANO
FRANÇAIS
Manual de instrucci nes
Manuale prima dellus
Re ote control Manual
2 Batteries of 1,5 V,Digital terrestrial receptor
All manuals and user guides at all-guides.com

English
Quick Installation Guide.
Step 2: Basic configuration of the receiver
The receiver includes an installation assistant that will help you to setup the different para eters.
When the receiver is turned on at first ti e (using the button at the rear panel of the receiver),
the next enu is shown on the TV:
In order to ove through the different options of this enu, please use the keys of the re ote
control. If an Overloading! Tuner Power is Off essage is shown on the TV, please disconnect
the Antenna Input cable and change the Tuner Power option into Off
OSD Language: select the language of the enu and other infor ation of the receiver. To
choose between the different languages, use keys of the re ote control.
First Audio: press the keys of the re ote control to choose the favourite audio language for
TV and Radio channels.
Second Audio: press the keys of the re ote control to choose the second audio language.
In case of, when selecting a TV or Radio channel that has not the favourite language, the second
language selected will be auto atically listened (if this action is allowed).
Country: select your country using keys.
Tuner Power: this receiver has the possibility of feeding a 5V indoor antenna directly through
the coaxial cable. If you have not an indoor antenna and the receiver is connected to a MATV
antenna, you should turn off this option using keys until [Off] option appears on the TV.
Auto Scan: before aking an auto scan be sure that the data of the Country option (I age 1)
is correct, in other case the search of channels will be ade wrongly. Once the Country option
is confir ed, please select the option Auto Scan and press [OK].
I age 1
All manuals and user guides at all-guides.com

English
Quick Installation Guide.
I age 2
.
Dont ake any action with the receiver until the
Auto scan has finished. For ore infor ation about
this option, please read point 4.1 of the co plete
anual.
Main Menu: if all the previous steps have finished correctly, you can exit the installation enu,
by using Main Menu option and press [OK].
Step 3: Time configuration
It is reco ended to setup the clock before starting to enjoy the receiver, because correct ti e
aybe is required by so e applications. Please co plete following options:
Press the [Menu] key of the re ote control for appearing the ain enu. Select the Syste
Configuration option and confir pressing [OK].
Once in the Syste Configuration option, please select Region and Ti e option and press
[OK]. I age 3 is watched on the TV. For setting up the ti e, please co plete:
1. Country: Confir that the correct country has been selected during the quick installation.
2. GMT Usage: this option will allow you to select if the
date and ti e will be introduced anually (Use GMT:
Off), if you prefer that it will be auto atic by country
(Use GMT: By Region) or if you wish to introduce the
offset respect GMT anually (Use GMT: Defined by
user).
3. GMT Offset: If Use GMT defined by user has been
chose, the offset respect GMT has to be configured
depending on your region or country. Use the keys to
choose the offset. Re e ber that the offset values are
between -12:00 and +12:00
4. Date / Ti e: In order to introduce anually the ti e
and date. Before these values can be odified, the auto atic control of GMT has to be
turned Off.
5. Su er Ti e: Selecting On this option, the ti e of the receiver will change auto atically
during su er ti e. This option can only be odified when use GMT by region is selected.
6. Ti e Display: Selecting On this option, the ti e will be shown in the screen.
7. Press [Exit] to exit the enu "Region and Ti e".
I age 3
All manuals and user guides at all-guides.com

English
TV Channel List: This option shows the list of TV stored channels.
Radio Channel List: This option shows the list of Radio stored channels.
Delete All Favourites: This option deletes all the favourite lists created.
Delete All Channels: This option deletes all TV and Radio stored channels.
Auto Scan: This option ake a full scan of all TV and Radio channels received.
Channel Scan: This option ake a co pete scan of only one Multiplex.
Channel Setup: This option shows the infor ation of stored channels. It is
possible to change the video and audio PID.
Aerial Adjust ent: This option allows turns on or off 5V feeding throughcoaxial
cable. It allows watch, by eans of indicators, the level of the received signal
of each channel
OSD Language: This option allows selecting different enu and options
languages.
TV Syste : This option allows choosing the video Standard and other
para eters of the screen.
Start up Service: This option allows setting the receiver to start in a predefined
channel.
Region and Ti e: In this option, the ti e of the receiver and user region or
country can be configured.
Ti er Setting: Ti er setting enu.
OSD Setting: In this option, the subtitles of the channel infor ation can be
configured. Parental Lock: In this option, user can lock the access to the enu
and change the password of the receiver.
RCU Position: To choose the RCU Position of the re ote control.
Infor ation: This option shows all the technical infor ation for the selected
channel.
Ga e: In this option user can find so e ga es like TETRIS, SNAKE
Load Factory Default: If this option is selected, a reset of the receiver will be
done and it will load the factory default values.
Software Upgrade: To update the receiver with other receiver.
WELCOME PAGE: If this option is selected, the welco e page or quick
installation enu will be loaded.
Quick Installation Guide.
All manuals and user guides at all-guides.com
all-guides.com

English
INDICE
1
Safety precaution
Caution..........................................................................................................................2
1. Re ote control & panel description
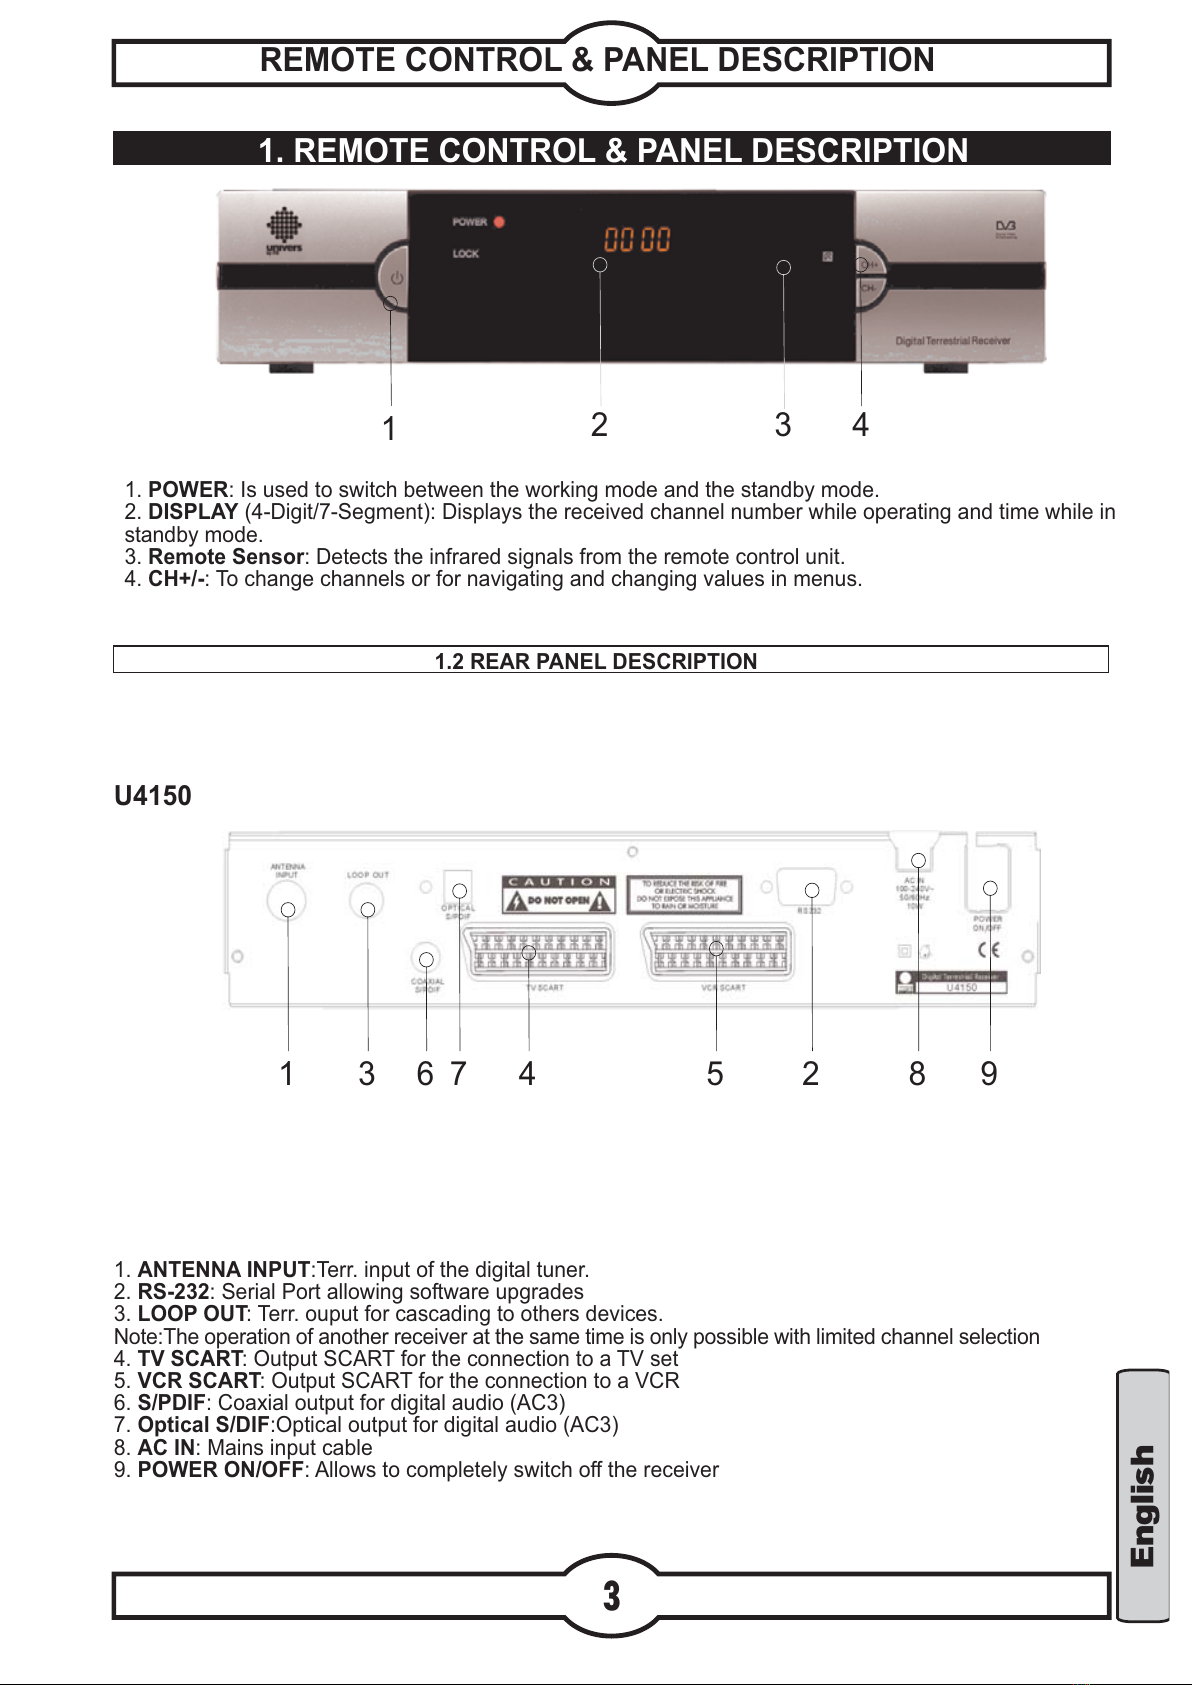
1.1.Front panel description........................................................................................................3
1.2.Rear panel description..........................................................................................................3
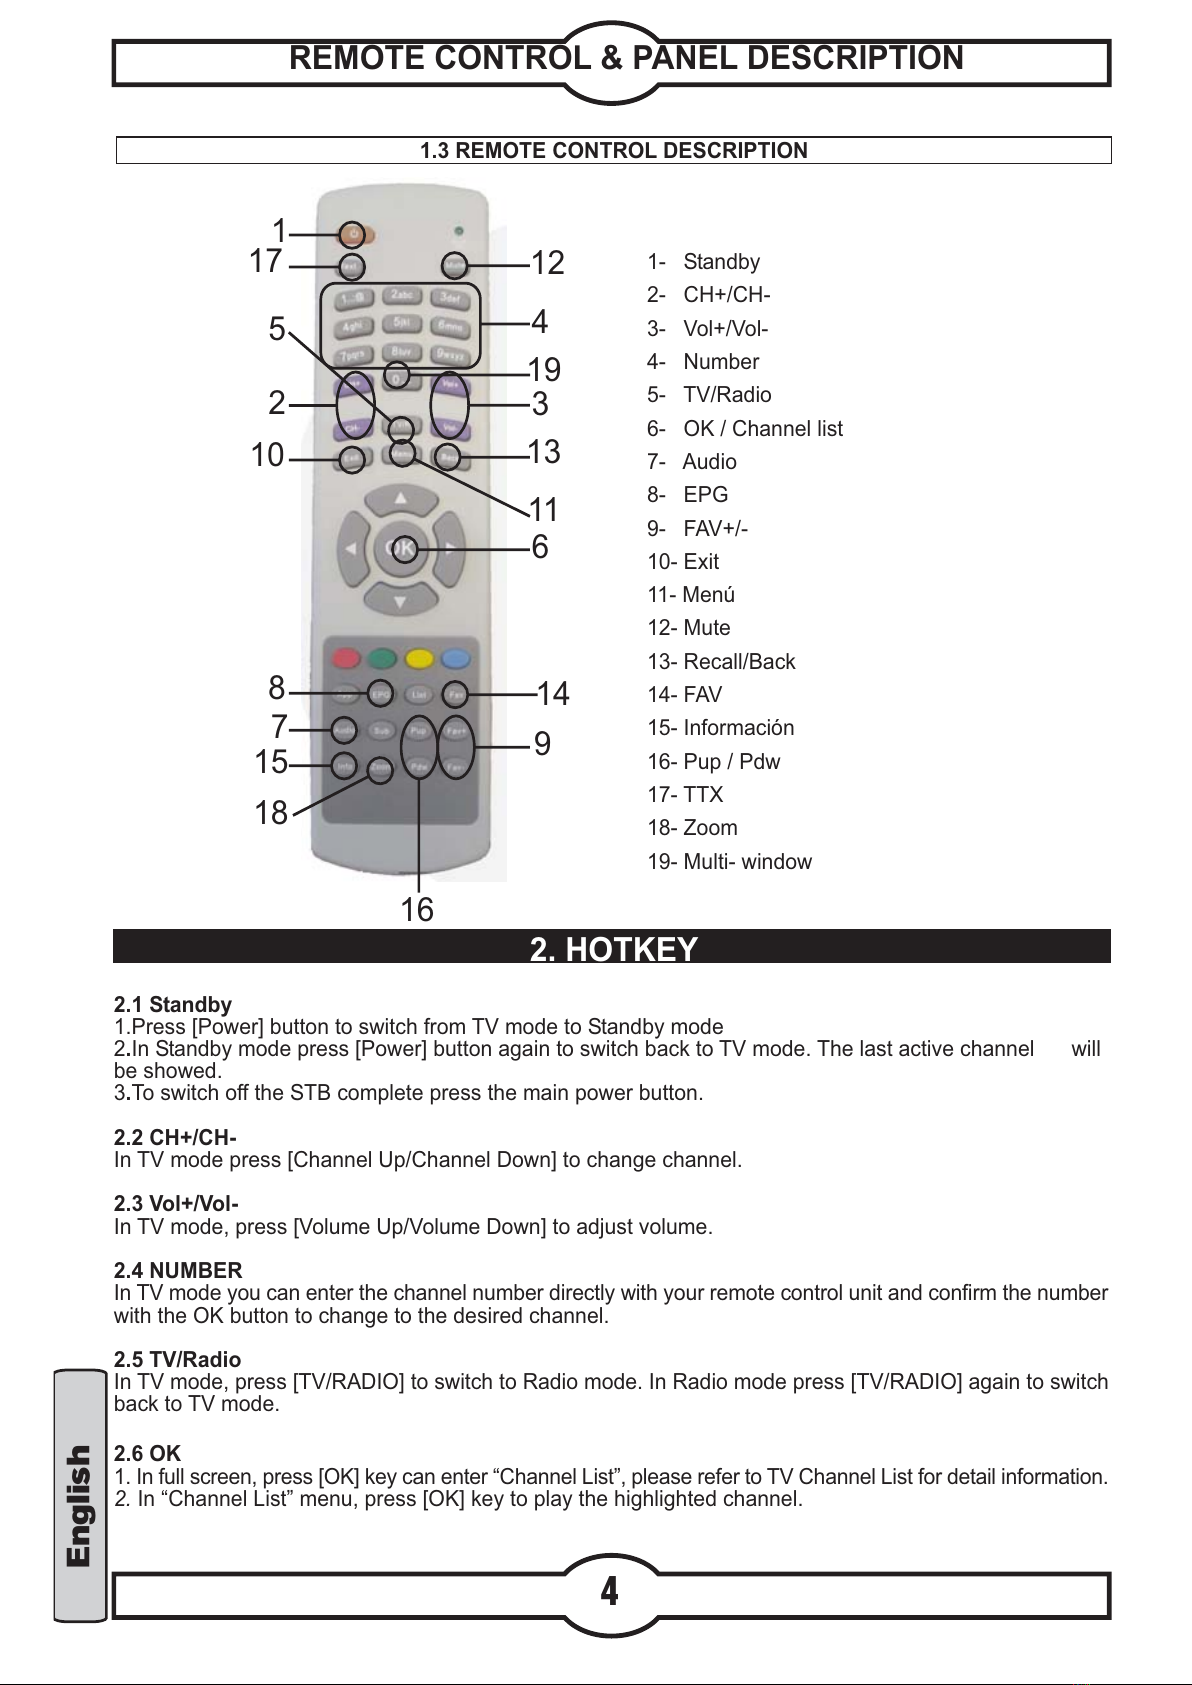
1.3.Re ote control description................................................................................................4
2. Hotkey
2.1.Standby..................................................................................................................4
2.2.CH+/CH-.....................................................................................................................4
2.3.Vol+/Vol-....................................................................................................................4
2.4.Nu ber...................................................................................................................4
2.5.TV/Radio..................................................................................................................5
2.6.OK................................................................................................................5
2.7.Audio.................................................................................................................5
2.8.EPG.................................................................................................................5
2.9.FAV+/-.................................................................................................................5
2.10.Exit.................................................................................................................5
2.11.Menu................................................................................................................5
2.12.Mute................................................................................................................5
2.13.BAC.............................................................................................................5
2.14.FAV......................................................................................................................5
2.15.Infor ation..............................................................................................................6
2.16.Pup+/Pdown-...........................................................................................6
2.17.TTX...........................................................................................................6
2.18.Zoo ......................................................................................................................6
2.19.Multi-window...........................................................................................................................6
3. Channel
3.TV Channel List.....................................................................................................................7
3.1.1.Favorite...........................................................................................................7
3.1.2.Move.................................................................................................................7
3.1.3.Find.................................................................................................................7
3.1.4.Sort.................................................................................................................8
3.1.5.TV Channel list edit........................................................................................8
3.1.5.1.Delete.............................................................................................8
3.1.5.2.Skip.................................................................................................8
3.1.5.3.Lock...............................................................................................8
3.1.5.4.Edit..........................................................................................9
3.1.5.5.Delete all..................................................................................9
3.2.Radio Channel list............................................................................................................9
3.3.Delete all favorites............................................................................................................9
3.4.Delete all...........................................................................................................................10
4. Installation
4.1.Auto scan..........................................................................................................................10
4.2.Channel scan.........................................................................................................11
4.3.Channel setup.......................................................................................................................11
4.4.Aerial adjust ent...................................................................................................... 11
5. SYste setup
5.1.OSD language..........................................................................................................12
5.2.TV syste .............................................................................................................12
5.3.Start up service...............................................................................................................13
5.4.Region and ti e...................................................................................................................13
5.5.Ti er setting..........................................................................................................................14
5.6.OSD setting........................................................................................................15
5.7.Parental lock..............................................................................................................15
5.8.RCU position..............................................................................................................16
6. Tools
6.Tools...........................................................................................................................16
6.1.Infor ation............................................................................................................17
6.2.Ga e..................................................................................................................17
6.3.Load factory default.........................................................................................................17
6.4.Software upgrade.........................................................................................................18
7.Technical Specification
7.Technical specification...........................................................................................................18
All manuals and user guides at all-guides.com

English
CAUTION
CAUTION
RISK OF ELECTRIC SHOCK
DO NOT OPEN
CAUTION
SAFETY PRECAUTION
2
Warning: To reduce the risk
of electric shock, don't open
the cabinet. Refer servicing
to qualified personnel only.
The excla ation point within
an equilateral triangle is
intended to alert the user to
i portant operating and
aintenance (servicing).
The lightning flash with
arrowhead sy bol, within an
equilateral triangle, is
intended to alert the user to
"dangerous voltage" and to
prevent fro a risk of electric
shock
WARNING: Do not use this STB where contact with or i ersion in water is a possibility. Do not use near
flower vase, washbowls, kitchen sinks, laundry tubs, swi ing pools, etc.
WARNING: Do not put the candle or la p stand on the cabinet; otherwise, there is the danger of fire.
WARNING: The unit should be connected to a power supply only of the type described in the operating
instructions or as arked on the unit. If you are not sure of the type of power supply (for exa ple, 120 or
230 V) to your ho e, consult your local dealer or local power co pany.
WARNING: This product install diodes. Do not open the cabinet or touch any parts in the inner echanis .
Consult your local dealer for technical service if the opening is required.
Note: To ensure proper use of this product, please read this User anual carefully and retain for
further reference.
Unit Cleaning: After the unit power is turned off, you can clean the cabinet, panel and re ote control with
a soft cloth lightly oistened with a ild detergent solution.
Attach ents: Never add any attach ents and/or equip ent without the anufacturer consent; as such
additions ay result in the risk of fire, electric shock, or other personal injury.
Locating: Slots and openings in the cabinet are provided for ventilation to protect it fro overheating. Do
not block these openings or allow the to be blocked by placing the STB on a bed, sofa, or other si ilar
surface, nor should it be placed over a radiator or heat register.
Power-Cord Protection: Place the power-supply cord out of the way, where it will not be walked on. Please
take special attentions to cords at plugs, convenience receptacles, and the point where they exit fro the
unit.
Object and Liquid Entry: Never put objects of any kind into this STB through openings, as they ay touch
dangerous voltage points or short-out parts that could result in a fire or electric shock. Never spill any liquid
on the STB.
Note: Moisture ay be for ed on the lens In the following conditions:
when the unit is suddenly oved fro a cold environ ent or an air-condition roo to a war place.
i ediately after a heater has been turned on.
in a stea y or very hu id roo .
If the oisture for s inside the unit, it ay not operate properly. To correct this proble , turn ok the power
and wait about two hours for the oisture to evaporate.
Parts Replace ent: When the unit parts need to be replaced, user should ake sure the service technician
use the replace ent parts specified by the anufacturer or having the sa e characteristics as the original
part. Unauthorized replace ent ay put the unit In the risk of fire, electric shock or other hazards.
Safety Check: After all the aintenances and repairs are done, user is required to request the service
technician to conduct the overall safety check to ensure the achine is in the proper condition.
All manuals and user guides at all-guides.com

English
1
3
1 3 6 7 4 5 2 8 9
U4150
1. POWER: Is used to switch between the working ode and the standby ode.
2. DISPLAY (4-Digit/7-Seg ent): Displays the received channel nu ber while operating and ti e while in
standby ode.
3. Re ote Sensor: Detects the infrared signals fro the re ote control unit.
4. CH+/-: To change channels or for navigating and changing values in enus.
REMOTE CONTROL & PANEL DESCRIPTION
1. REMOTE CONTROL & PANEL DESCRIPTION
234
1.2 REAR PANEL DESCRIPTION
1. ANTENNA INPUT:Terr. input of the digital tuner.
2. RS-232: Serial Port allowing software upgrades
3. LOOP OUT: Terr. ouput for cascading to others devices.
Note:The operation of another receiver at the sa e ti e is only possible with li ited channel selection
4. TV SCART: Output SCART for the connection to a TV set
5. VCR SCART: Output SCART for the connection to a VCR
6. S/PDIF: Coaxial output for digital audio (AC3)
7. Optical S/DIF:Optical output for digital audio (AC3)
8. AC IN: Mains input cable
9. POWER ON/OFF: Allows to co pletely switch off the receiver
All manuals and user guides at all-guides.com

English
1
23
4
5
6
7
8
9
10
11
12
13
14
1- Standby
2- CH+/CH-
3- Vol+/Vol-
4- Nu ber
5- TV/Radio
6- OK / Channel list
7- Audio
8- EPG
9- FAV+/-
10- Exit
11- Menú
12- Mute
13- Recall/Back
14- FAV
15- Infor ación
16- Pup / Pdw
17- TTX
18- Zoo
19- Multi- window
15
4
16
18
17
REMOTE CONTROL & PANEL DESCRIPTION
1.3 REMOTE CONTROL DESCRIPTION
2. HOTKEY
2.1 Standby
1.Press [Power] button to switch fro TV ode to Standby ode
2.In Standby ode press [Power] button again to switch back to TV ode. The last active channel will
be showed.
3.To switch off the STB co plete press the ain power button.
2.2 CH+/CH-
In TV ode press [Channel Up/Channel Down] to change channel.
2.3 Vol+/Vol-
In TV ode, press [Volu e Up/Volu e Down] to adjust volu e.
2.4 NUMBER
In TV ode you can enter the channel nu ber directly with your re ote control unit and confir the nu ber
with the OK button to change to the desired channel.
2.5 TV/Radio
In TV ode, press [TV/RADIO] to switch to Radio ode. In Radio ode press [TV/RADIO] again to switch
back to TV ode.
2.6 OK
1. In full screen, press [OK] key can enter Channel List, please refer to TV Channel List for detail infor ation.
2. In Channel List enu, press [OK] key to play the highlighted channel.
19
All manuals and user guides at all-guides.com

English
BASIC OPERATIONS
OSD 1
5
OSD 2
OSD 3
OSD 4
2.7 AUDIO
1.In TV ode, press the [Audio] button to open the Audio
Mode window. ( OSD 1).
2.Select the ite you want to adjust with and change
the value with .
3. Pres the [Exit] key to exit.
2.8 EPG
1.The STB has an Electronic Progra Guide (EPG) to help
you navigate channels through all the possible viewing
options. The EPG supplies infor ation such as channel
listings and starting and ending ti es for all available
channels. Press [EPG] key to display EPG screen.(OSD2)
2.Press [OK] key can play the current channel in full screen.
3.Press nu ber key [1] can display all progra s schedule
infor ation of the selected channel. The window is like below
(OSD 3):
4.Press nu ber key [2] can display the current channel
detail infor ation. The window is like below (OSD4):
5.Press nu ber key [2] in schedule and detail window can
open the ti er window directly. This operation can add the
highlighted progra to a ti er quickly.
2.9 FAV +/-
1. In TV ode press the [FAV +/-] buttons to switch between
the favorite channels in the current Favorite Group directly.
2. The sequence of the favorite channels is following the
sequence in the related Favorite Group list.
2.10 EXIT
[Exit] key can exit current enu.
2.11 Menu
[Menu] key can enter the enu or exit current enu.
2.12 MUTE
1.Press the [Mute] button to ute the sound. On the screen
an icon will be displayed to indicate the uted sound.
2.Press the [Mute] button again to restore the
2.13 BACK
Pressing the [Recall] button allows you to toggle between
the actual and the last selected channel.
2.14 FAV
1. In TV ode press the [Favorite] button to display the
Favorite Group window on the screen as the picture beside
shows (OSD 5).
2. In the Favorite Group window you can select the desired
favorite channel with and confir it with [OK] to
switch to it. In bigger groups you can navigate with .
All manuals and user guides at all-guides.com
all-guides.com

English
2. Funciones basicas
6
BASIC & MENU OPERATIONS
3.CHANNEL
OSD 5
OSD 6
OSD 7
3. With [Volu e Up / Down] you can select different Favorite Groups.
4. Press [Exit] to close the Favorite Group window.
2.15 INFORMATION
In TV ode, press [INFO] button can open infor ation screen, in the window
shows the para eters of current channel.
2.16 Pup+/Pdown-
In full screen, press [Page Up/Page Down] key can switch group directly.
2.17 TTX
1.Press [TXT] button in TV ode to open the teletext page. This service is
depending on the support of the channel provider.
2.If the channel does not support teletext infor ation, it will show No Teletext
Data on the screen.
Press [Menu] in the TV ode to enter the ain enu.
1. Press [Channel Up/Down] to select the Channel ite .
2. Press [OK] to enter the selected ite .
In the Channel enu:
1. Press [Channel Up/Down] to select the wanted enu
ite a ong TV Channel, Radio Channel and Delete All.
2. Press [OK] to enter the selected ite .
2.18 Zoo
2.19 Multi-window
The scree will display 9 channels preview window (static)
fro the current channel. And only the highlight preview
progra can play nor ally.
OSD 5.1
All manuals and user guides at all-guides.com

English
3.1 TV CHANNEL LIST
7
MENU OPERATIONS
OSD 8
OSD 9
OSD 10
OSD 11
When you enter to Channel List enu, there will display
the screen like below (OSD 8).
1.You can ove highlight by press [Up/Down] key and press
[OK] key to preview the current highlighted progra in the
right side preview window.
2.You can press [Page Up/Page Down] key to i ple ent
the Page Up/Page Down function.
3.You can use [Left/Right] key to switch Group.
4.You can press [Menu] or [Exit] keys to enter full screen
playing ode.
5.Press the nu ber key [1] ~ [5] can i ple ent the corresponding function in Channel List.
3.1.1 Favorite
1. Press nu ber key [1] can open the Favorite window
like above (OSD 9)
2.You can ove highlight between 8 favorite groups by
press [Up/Down] key and press [OK] key to ake a favorite
ark in the right side of the selected Favorite group.
3. Press [OK] key on the arked Favorite group can cancel
the exist favorite ark.
4. After arking, press [Exit] key can back to TV Channel
List , there will show a favorite ark beside the arked
channel.
3.1.2 Move
1. Press nu ber key[2] ,there will show a oving ark
in the right side of the selected channel like above (OSD10)
2. You can ove the selected channel to the position that
you want to place by press [Up/Down] key. And press [OK]
key to confir your decision.
3.1.3 Find
1. Press nu ber key [3] can open the Find window like
above (OSD 11). You can press nu ber [0] key to [9] key
to input letter or nu ber into the dialogue. Every ti e you
press nu ber key it will change the letter or nu ber. For
exa ple, every ti e you press nu ber [2], it will show
a->b->c->2 ->a->
2. After input each character, the progra list on the left will
search the channel according your input, and list the atched
channel.
3. Press [Exit] key can close Find window and you can
select channel fro the channels list directly.
All manuals and user guides at all-guides.com

English
8
OSD 12
OSD 13
OSD 14
OSD 15
OSD 16
3.1.4 Sort
1. Press nu ber key [4] can open the Sort window like
above (OSD 12). There are five kinds of sorting ways. You
can press [Up/Down] key to ove highlight and press [OK]
key to confir you selection
2. The five kinds of sorting way are:
Default: Sorting by scanning result.
Na e (A-Z): Sorting in Alphabetical Order, ignore sy bol.
Na e (Z-A): Sorting in Alphabetical Order, ignore sy bol.
FTA: Sieved out all free fare channels.
Lock: Accu ulated all locked channels and list in the last
of TV Channel List.
3.1.5 TV Channel List Edit
1. Press nu ber key [5] will open a essage box for you
to enter password, and the default password is 0000
2. There are five ite s of TV Channel List Edits: Delete,
Skip, Lock, Edit, and Delete all. (OSD 13)
3. Press [Exit] can exit TV Channel List Edit enu. The
syste will show up a essage box to inquire you
whethersaving or not.
3.1.5.1 Delete
In TV Channel List Edit enu, press nu ber key [1] can
ake a delete ark in the right side of the highlighted
channel. After save and exit TV Channel List Edit enu,
the arked channel will be deleted. (OSD 14)
3.1.5.2 Skip
In TV Channel List Edit enu, press nu ber key [2] can
ake a skip ark in the right side of the highlighted
channel. After save and exit TV Channel List Edit enu,
the channel will be skip while user change channel in the
full screen. (OSD 15)
3.1.5.3 Lock
In TV Channel List Edit enu, press nu ber key [3] can
ake a lock ark in the right side of the highlighted
channel. After save and exit TV Channel List Edit enu,
STB will request you to input the password while you want
to watch the locked channel. (OSD 16)
MENU OPERATIONS
All manuals and user guides at all-guides.com

English
9
OSD 17
OSD 18
OSD 19
OSD 20
3.1.5.4 Edit
In TV Channel List Edit enu, press nu ber key [4] can
enter edit box like below (OSD 17):
1 .On the Na e ite , press [OK] key can display keypad
to edit the na e of selected channel.
2. Video PID, Audio PID and PCR PID ite s are grey
and can not be edited.
3. After odification, ove highlight to Save ite and
press [OK] key can save the odified value and exit Edit
ode. Otherwise, ove highlight to [Exit] ite and press
[OK] key can exit Edit ode and wont save any
odification.
3.1.5.5 Delete all
1. In TV Channel List Edit enu, press nu ber key [5]
can ark all the channel with delete ark (OSD 18).
2. Press nu ber key [5] again can cancel all the delete
ark.
Basically, the operation of Radio Channel List is sa e as
TV Channel List, but there is one point different: In Radio
Channel List ode, there is no video infor ation, so it will
always display Radios logo in the right side preview window.
(OSD 19)
3.2 RADIO CHANNEL LIST
3.3 DELETE ALL FAVORITES
In Delete All ite (OSD 20):
1. There will display an dialogue for user to key in password.
The default Password is 0000.
2. When you input the correct password, there will show
up a warning essage box to inquire you whether delete
all or
not.
3. If you select Yes, all favorite channels will be deleted.
4. In step 1 and step 2, press [Exit] key can exit the function
directly without save
MENU OPERATIONS
All manuals and user guides at all-guides.com

English
3.4.DELETE ALL
4.INSTALLATIÓN
10
4.1.AUTO SCAN
OSD 21
OSD 22
OSD 23
OSD 24
In Delete All ite (OSD 21):
1. There will display an dialogue for user to key in password.
The default Password is 0000.
2. When you input the correct password,there will show
up a warning essage box to inquire you whether delete
all or not.
3. If you select Yes, all channels will be deleted.
4. In step 1 and step 2, press [Exit] key can exit the function
directly without save.
When you enter to Installation enu, there will display the
screen like below (OSD 23): In Installation enu;
1.Press [Left/Right] key to select enu pages a ong
Channel, Installation, Syste and Tools.
2.Press [Up/Down] key to select enu ite s a ong each
ite s.
3.Press [OK] key to enter the selected ite .
When you enter to Auto Scan enu, there will display the
screen like below (OSD 24):
1. Firstly please select the country in Syste Setup Menu
/ Region and Ti e / Region
2 .In Scan Mode ite , press [Left/Right] key to select
scans all channels or just scans free channels.
3 Moving the highlight to Search ite and press [OK] key
to start scanning. 4 In the Auto Scan enu, press [Exit]
key to draw back fro the scanning.
MENU OPERATIONS
All manuals and user guides at all-guides.com
all-guides.com

English
11
OSD 25
OSD 26
OSD 27
OSD 28
When you enter to Channel Scan enu, there will display
the screen like below (OSD 25):
1. There is two ode. You can scan channel by channel or
by frequency .
2. When scan band is UHF, the range of Ch No. is fro 21
to 69.
3. When you co plete your odification, ove highlight to
Search ite and press [OK] key, then it will begin to scan.
4.In the Channel Scan ite , press [Exit] key to exit the
scanning and save the current para eters.
When you enter to Channel Setup enu, there will display
the screen like below:
1. You can see the channel infor ation like the picture
displaying (OSD 26).
2. Move the [Up/Down] key can ove the highlight to select
the channel.
3. When press [OK] key again, you can see the window
like below (OSD 27):
4. Input PID infor ation,then ove highlight to Search
ite and press [OK] key, then it will begin to scan.
When you enter to Aerial Adjust ent enu, there will
display the screen like below (OS28): In Aerial Adjust ent
ode:
1. Ch No.: Press [Left/Right] to select the
Ch No. The range is fro 2 to 69.
2. Tuner Power: On / Off
4.2 CHANNEL SCAN
MENU OPERATIONS
4.3 CHANNEL SETUP
4.4 AERIAL ADJUSTAMENT
All manuals and user guides at all-guides.com

English
12
OSD 29
OSD 30
OSD 31
OSD 32
When you enter to Syste Setup enu, you will see the
screen like below (OSD 30): In Syste Setup enu:
1. Press [Left/Right] key to select enu pages a ong
Channel, Installation, Syste and Tools.
2. Press [Up/Down] key to select enu ite s a ong each
ite s.
3. Press [OK] key to enter the selected ite .
When you enter to Language enu, you will see the
screen like below (OSD 31):
1. Language: press [Left/Right] key to select languages,
the selections of languages include: English, French,
Ger an, Italian, Portuguese, Spanish and Turkish.
2. First Audio: So e channels have ore than one audio
language for choosing; by this function you can set the first
audio for this channel. If the playing channel has the sa e
audio as the First Audio you set, syste will play this audio
language as default. If the channel hasnt the suited audio
language, then the syste will co pare auto atically with
second audio language. The selections of audio languages
include: English, French, Ger an, Russian, Arabic, Portuguese, Turkish, Spanish, Polish and Italian.
3. Second Audio: If the channel has no correspond audio with First Audio but have corresponded audio
with Second Audio, syste will play the second audio language as default. If no audio language corresponds
with the Second Audio, then the default language of current channel will be played auto atically. The
selections of audio languages include: English, French, Ger an, Russian, Arabic, Portuguese, Turkish,
Spanish, Polish and Italian.
4 .Press [Exit] key to draw back fro Language e
When you enter to TV Syste enu, you will see the
screen like below (OSD 32):
1. Display Mode is use for switching the screen-displaying
ode. Now we provide below options: Auto / PAL-M / PAL-
BG / NTSC/ PAL-N. You can press [Left/Right] key to select
each ode circularly.
2. Aspect Mode is used for switching the screen aspect
ratio ode. Now we provide below options: 4:3 PS / 4:3 LB
/ 16:9. You can press [Left/Right] key to select each ode
circularly.
5. SYSTEM SETUP
5.1 OSD LANGUAGE
MENU OPERATIONS
5.2 TV SYSTEM
All manuals and user guides at all-guides.com

English
13
OSD 34
OSD 33
3. Dolby Digital can select AC3 on or off.
4. Video Output is use for switching the video output ode. Now we provide below options: CVBS,
CVBS+RGB. You can press [Left/Right] key to select each ode circularly.
5. LCN Mode can control the channel whether sort by the infor ation in the strea s. The options is: On /
Off. You [Left/Right] key to select each ode circularly.
6.You can choose between VCR Master ( You see the VCR in the TV although the receiver is on ) or Receptor
aster ( you can see the receiver in the TV although the VCR is on).
7. Press [Exit] key to draw back fro TV Syste enu.
1. Startup Channel: Press [OK] key to enter Startup up
Service enu, and you will see the screen like below
(OSD33):
If the setting of Boot on Channel is On, it eans the
following two ite s can be work. If the setting is Off, it
eans the Boot on Channel function cant work.
In the Mode ite , you can set the Startup Channel as
TV ode or Radio ode.
In Startup Channel enu, you can press [OK] key to
open the channel list, and select the channel that you want
it to startup, press [OK] key again to confir .
2. Press [Exit] to draw back fro Channel Setup enu.
When you enter to Region & Ti e enu, you will see
window like below (OSD 34):
Region is used for selecting the country which you are
in. You can press [Left/Right] key to select each ode
circularly.
GMT Usage: This ite is use for open the usage of GMT.
You can press [Left/Right] keys to switch Off / User Define
/ By Region.
The GMT Offset ite is valid only when the setting of
GMT Usage is Uesr Define. You can press [Left/Right]
keys to switch GMT Offset value, and the range is -12:00
~ +12:00, increase each half hour progressively.
Date and Ti e ite s are valid only when the setting
of GMT Usage is Off. You can press [Left/Right] keys
to oving highlight and use nu ber keys to input directly.
Su er Ti e ite s are valid only when the setting of GMT Usage is By Region. You can press
[Left/Right] keys to switch.
Ti e display function can control whether the ti e will be displayed on screen or not.
Press [Exit] key to draw back fro Ti e enu.
MENU OPERATIONS
5.3 START UP SERVICE
5.4 REGION AND TIME
All manuals and user guides at all-guides.com

English
14
OSD 38
OSD 37
OSD 36
OSD 35
When you enter Ti er Setting, you will see the window
like below(OSD 35):
1. Progra Ti er: Select Progra Ti er ite and pres
[OK] key to enter Progra Ti er enu.
Current ti e infor ation will display on the first colu n;
if the current ti e is incorrect, please odify the ti e
infor ation in Ti e ite .
Ti er Nu ber: You can press [Left/Right] keys to set
Ti er nu ber, and there are 8 ti ers in total.
Ti er Mode: There are several odes for Ti er to setting,
include Off, Once, Daily, Weekly, Monthly and Yearly.
Ti er Service: There are two options for Ti er Service,
include Channel (ti er setting for channel change and
wakeup/Sleep) and Message (re inding essage).
When you select Channel (ti er setting for channel
change and Wakeup/Sleep) option in Ti er Service, the
screen will display like below:
Wakeup Channel: press [OK] key to enter channel list and
select channel that you want to setting.
Wakeup Date: use nu ber keys to input your wakeup date.
Wakeup Ti e: use nu ber keys to input your wakeup ti e.
Once the ti es up, no atter what the syste is in standby
ode or in playing ode, the syste will auto atically
switch to the channel you want and start to play.
Duration: After you set a ti e for Duration ite , once the
ti es up, the syste will auto atically switch to standby
ode.
When you select Message (re inding essage) option
in Ti er Service, the screen will display like below:
Wakeup Message: press [Left/Right] key to select re inding
essage as Birthday, Anniversary and General.
Wakeup Date, you can use nu ber key to input your
wakeup date.
Wakeup Ti e: use nu ber keys to input your wakeup ti e.
Once the ti es up, no atter what the syste is in standby
ode or in playing ode, the syste will auto atically pop
a re inding essage.
The essage will always display on the screen, you can
press [Exit] key to close it.
Press [Exit] key to draw back fro Progra Ti er enu.
MENU OPERATIONS
5.5 TIMER SETTING
All manuals and user guides at all-guides.com
Table of contents
Other FTE Receiver manuals