FTM Technologies TINNING ROBOT TP90 User manual

Fume hoods
Soldering - Desoldering
Specialized tools for wiring and tinning
Petit outillage, consommables et équipement de l’atelier
info@ftm-technologies.com –+33 (0)1 40 86 00 09 –www.ftm-technologies.com 1
USER MANUAL
TINNING ROBOT TP90
For further information, please contact:

Fume hoods
Soldering - Desoldering
Specialized tools for wiring and tinning
Petit outillage, consommables et équipement de l’atelier
info@ftm-technologies.com –+33 (0)1 40 86 00 09 –www.ftm-technologies.com 2
The purpose of these instructions is to help you familiarize yourself with the machine and make use of its
possibilities depending on the intended goal.
The manual contains important instructions that allow you to operate the machine safely and in an
appropriate and economical manner. Compliance with these contributes to avoiding risks, reducing repair
costs and downtime and increasing the reliability and lifespan of the machine. When reading this manual,
compare the illustrations to the machine itself.
The instruction manual must always be available at the place of operation of the machine.
The instruction manual should be read and applied by anyone who needs to use the machine.
The machine is intended exclusively for the use described in this manual. Another use, or a use going beyond
what is permitted, cannot be considered as conforming to the intended use. The manufacturer declines all
responsibility for damage that would result from such use.
The user alone assumes the risk.
The intended use also includes observing the service manual and observing the inspection and maintenance
conditions.
Carry out the adjustment, maintenance and inspection operations prescribed by the service manual,
respecting the intervention intervals also provided for by the latter as well as the indications relating to the
replacement of parts / partial equipment.
Only qualified personnel can carry out this work.
Read this manual carefully before using this equipment

Fume hoods
Soldering - Desoldering
Specialized tools for wiring and tinning
Petit outillage, consommables et équipement de l’atelier
info@ftm-technologies.com –+33 (0)1 40 86 00 09 –www.ftm-technologies.com 3
INFORMATION FOR THE OPERATOR
Instructions for safe use
The responsibility of the user is to comply with the following instructions:
•Only entrust the use of the machine to responsible persons who are familiar with the instructions in
this manual.
•read, understand and follow all machine instructions and instructions.
•Familiarize yourself with the controls and operation of the machine before starting it.
•Take note of all the safety and operating labels present on the machine, equipment and accessories.
•Learn the location and operation of each command.
•Use the machine only for its intended use.
•Keep the work area clean and orderly. A messy workplace increases the risk of accidents.
•Wear appropriate clothing.
•Wear safety glasses.
•Wear gloves suitable for the use of the machine.
•Wear safety shoes.
General contraindications
•Do not wear loose clothing, wide hanging belts or anything that can be grabbed.
•Do not operate the machine while under the influence of alcohol, drugs or medication which may
cause drowsiness or affect the ability to use it.
•Never operate the machine without its safety devices, risk of serious injury (casing, radar, etc.).
•Do not operate the machine when a person is present in the secure enclosure.
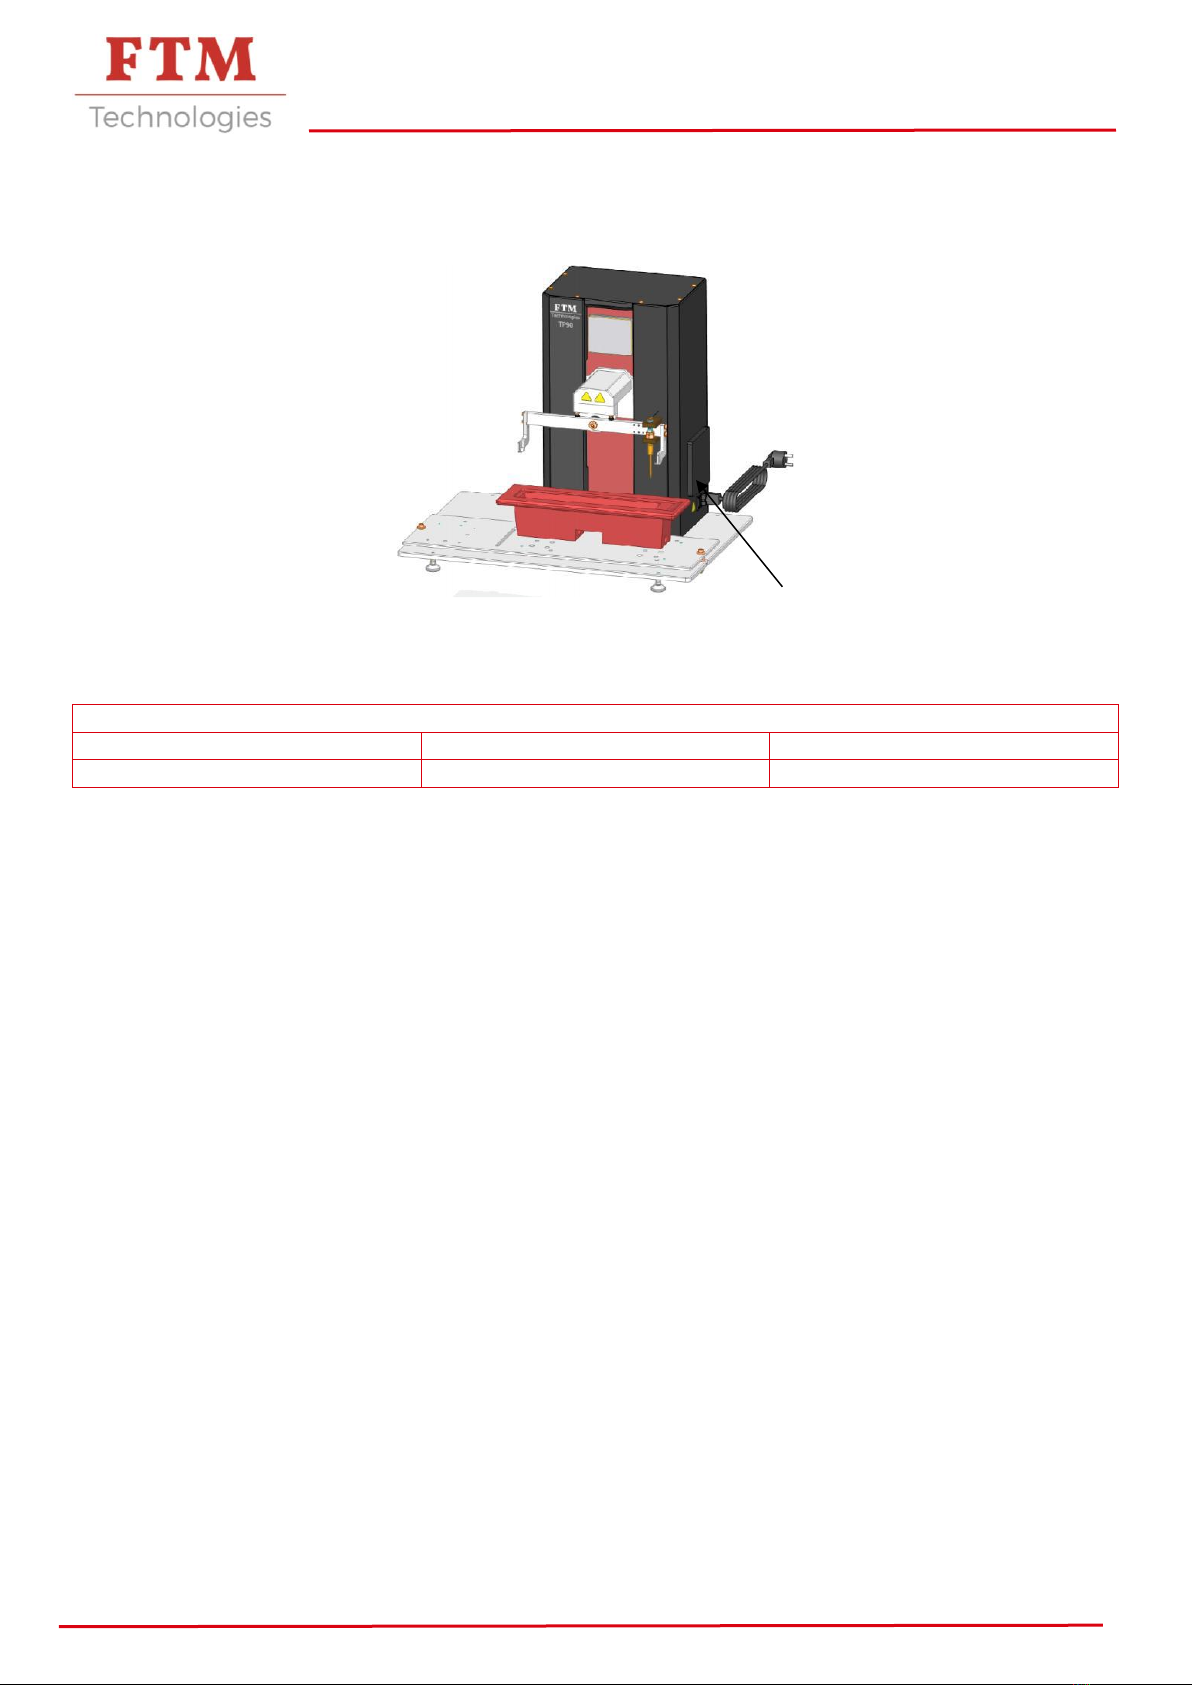
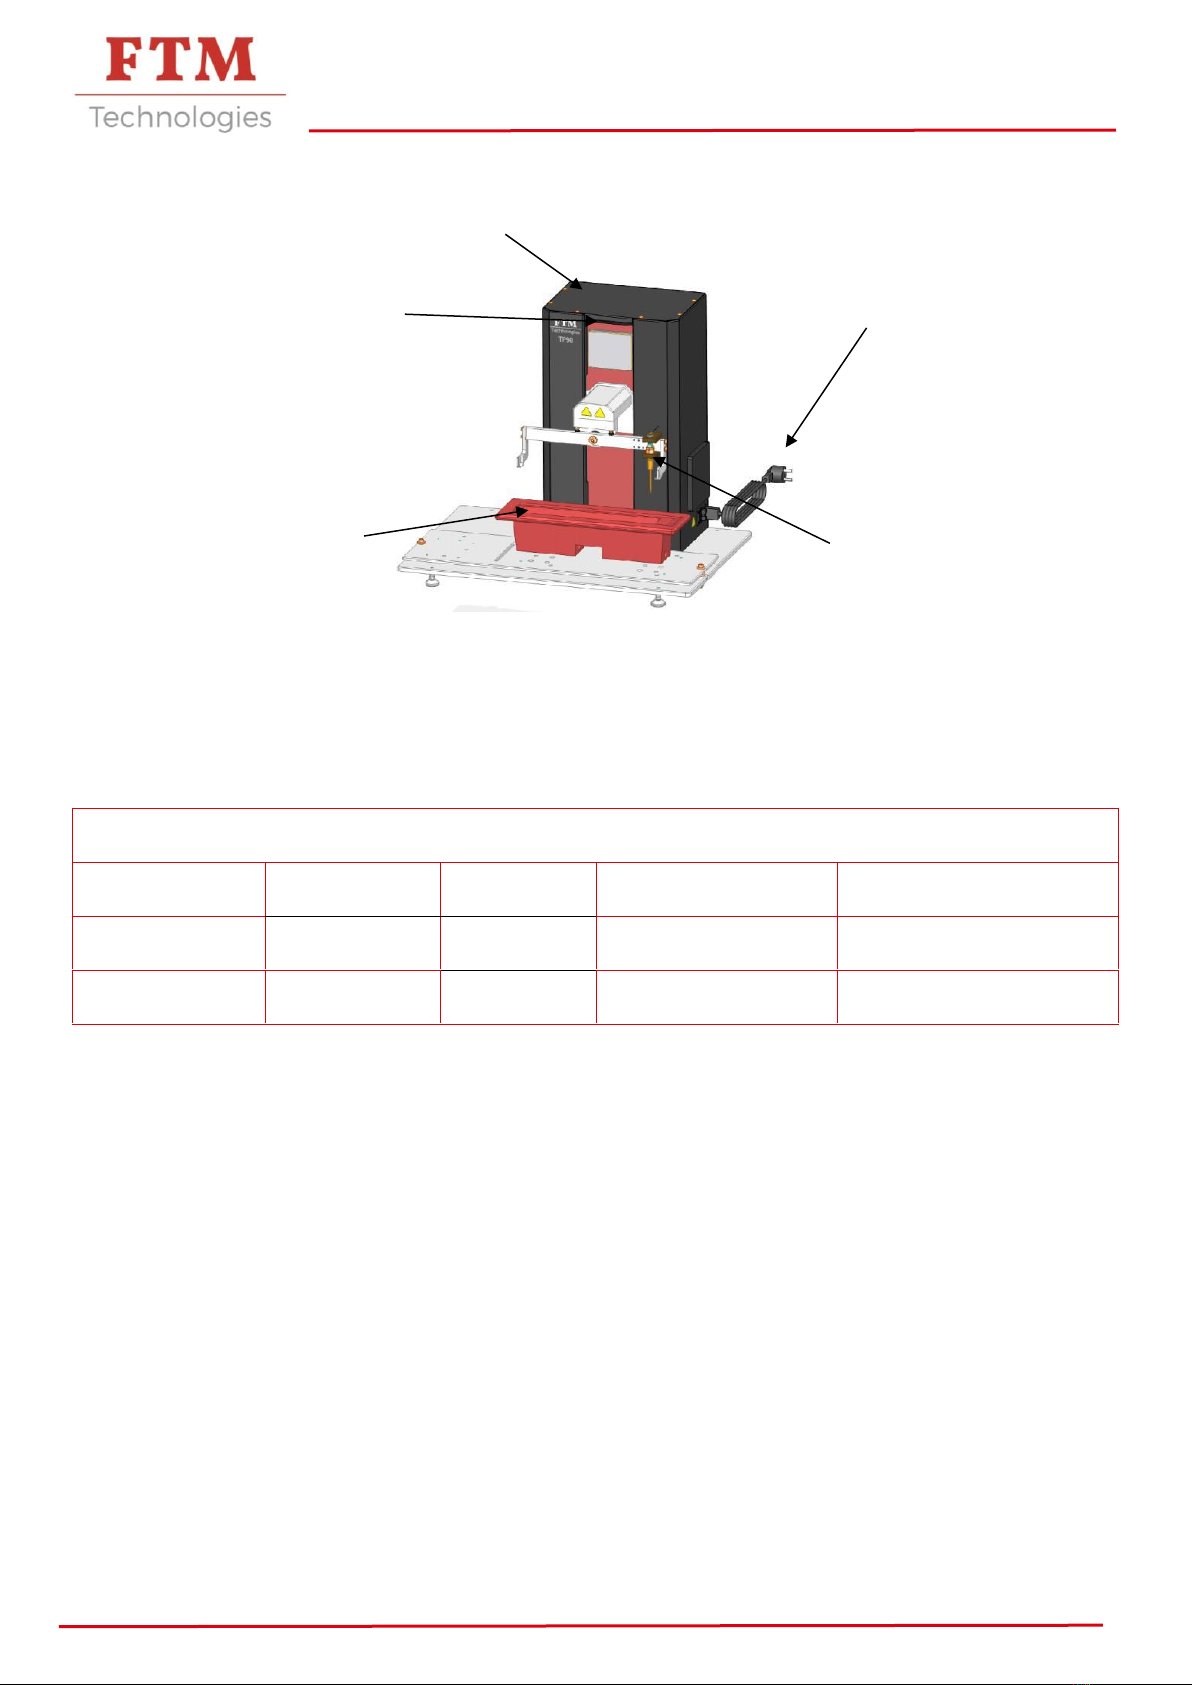
•Do not handle the machine without having read the paragraph "Description of Handling"
•Do not use the machine with any other parts than those defined in the paragraph “List of incoming
products”
•Disconnect the electric cable before dismantling the casing
Specific Risks
Electrical risks Risks of pinching Risks of burns

Fume hoods
Soldering - Desoldering
Specialized tools for wiring and tinning
Petit outillage, consommables et équipement de l’atelier
info@ftm-technologies.com –+33 (0)1 40 86 00 09 –www.ftm-technologies.com 4
INSTALLATION
1. Site environment
Environnement conditions
Temperature : 15°C to 30°C
Hygrometry : <80 %
Mains supply
Energy
Characteristics
Connection
Electricity
230 V 50 Hz 1Ph+N+ Ground
Installed power : < 1,5 KW.
24 Vdc for secondary circuit
European plug 2P+G standard 16
A
Technical data
•Weight : 30 kg (without tinning bath)
•Length : 600 mm
•Width : 300 mm
•Height : 600 mm
Description of handling and setting
Number of package : 1.
Type of handling : Hand pallet truck manual.
Pick-up points under the plate
Dismantling of the machine
Pollution when disposing of the equipment: Refer to the manuals of the suppliers of the various components
of the machine, observing the standards and directives in force on the date of disposal.

Fume hoods
Soldering - Desoldering
Specialized tools for wiring and tinning
Petit outillage, consommables et équipement de l’atelier
info@ftm-technologies.com –+33 (0)1 40 86 00 09 –www.ftm-technologies.com 5
2. Electric panel
Localisation
Electric panel
Buttons
Panel
Type
Function
Colour
Main switch
Machine powered up
Black
Connetion
Electrical connection: On standard socket outlet with earth - 220V - 50Hz.
3. Presentation of the machine
Main function
This machine is intended to perform the tinning of components contact.
Operating cycle:
1) Selection and transfer of the program corresponding to the product to be tinned.
2) Installation of the contacts to be tin plated on the laying.
3) Cycle start.
4) Lower the tool until the tin level is detected.
5) Movement of the tool towards the pre-heating position.
6) Lowering of the laying in position 2 for tinning.
7) Raising the tool.

Fume hoods
Soldering - Desoldering
Specialized tools for wiring and tinning
Petit outillage, consommables et équipement de l’atelier
info@ftm-technologies.com –+33 (0)1 40 86 00 09 –www.ftm-technologies.com 6
Construction of machine assemblies
Motoreductor
Mains connection
HMI
Thermoregulated bath Alloy level probe
Cycle time
The cycle time is variable, it depends on the program selected for the type of contacts to be tinned.
The different speeds are variable.
Preventive maintenance
OP N°
INTERVENOR
FREQUENCE
STATE OF THE
MACHINE
INTERVENTION
1
Production
Daily
Switched off
Machine cleaning and
visual inspection.
2
Maintenance
Monthly
Switched off
Lubrication of sliding
units.

Fume hoods
Soldering - Desoldering
Specialized tools for wiring and tinning
Petit outillage, consommables et équipement de l’atelier
info@ftm-technologies.com –+33 (0)1 40 86 00 09 –www.ftm-technologies.com 7
HUMAN MACHINE INTERFACE
1. Opening window « MENU »
This menu allows navigation between the different pages of the HMI.
Button
Password
Description
Programs
No
Access to Programs menu
Paramètres
Yes
Access to Parameters menu
Manual Mode
Yes
Allows access to the Manual Mode page, the
operating mode
"Manu" is activated
Défaults
No
Access to historical page of defaults
System
Yes
Access to System menu
Cycle counter
No
Access to Cycle counter menu
Production
No
Allows access to the Production page, if no fault is
active the "Auto" operating mode is activated
No
Return to the previous page
No
Return to the Menu page

Fume hoods
Soldering - Desoldering
Specialized tools for wiring and tinning
Petit outillage, consommables et équipement de l’atelier
info@ftm-technologies.com –+33 (0)1 40 86 00 09 –www.ftm-technologies.com 8
2. Programs menu window
This page allows access to the different pages for selecting and modifying programs.
Button
Password
Description
Program selection
No
Allows access to the Program Selection page if
the "Titanium finger" parameter is activated
Program modification
Yes
Allows access to the Change Programs page
Manual program without level
detection
Yes
Allows access to the Manual program page if the
"Titanium Finger" parameter is disabled
No
Return to the previous page
No
Return to the Menu page

Fume hoods
Soldering - Desoldering
Specialized tools for wiring and tinning
Petit outillage, consommables et équipement de l’atelier
info@ftm-technologies.com –+33 (0)1 40 86 00 09 –www.ftm-technologies.com 9
3. Program selection window
This page is used to view the list of saved programs, to transfer the selected program to the machine and to
view the content of the machine program..
Button
Description
Pressing the line highlights the program selected
Allows you to navigate in the list of recorded programs
Used to transfer the selected program to the machine.
A message appears to indicate that the transfer was
successful.
Used to view the content of the machine program.
Return to the previous page
Return to the Programs menu page

Fume hoods
Soldering - Desoldering
Specialized tools for wiring and tinning
Petit outillage, consommables et équipement de l’atelier
info@ftm-technologies.com –+33 (0)1 40 86 00 09 –www.ftm-technologies.com 10
4. Program modification window
This page is used to view the list of saved programs, to modify a program, to copy a program, to modify the
name of a program and to delete a saved program.
Button
Description
Pressing the line highlights the program selected
Allows you to navigate in the list of recorded programs
Allows access to the Program Modification pages
Allows you to copy (duplicate) the selected program
Change the name of the selected program
Used to delete the selected program, after confirmation
Return to the previous page
Return to the Programs menu page

Fume hoods
Soldering - Desoldering
Specialized tools for wiring and tinning
Petit outillage, consommables et équipement de l’atelier
info@ftm-technologies.com –+33 (0)1 40 86 00 09 –www.ftm-technologies.com 11
This page is used to define the program values to modify or create, the other program values will be defined
on the next page.
Button
Description
Pressing the framed part allows you to define a
product reference associated with the program (max:
10 alphanumeric characters)
Pressing the value allows you to modify the height
between the axis of the tool holder and the bottom of
the component (min: 0.0 and Max: 60.0mm)
Pressing the value changes the height of the titanium
finger mounted on the machine (min: 0.0 and Max:
100.0mm)
Pressing the value on the right (10.00 mm / s) allows
you to define the rapid descent speed (min: 5.0 and
max: 15.0 mm / s)
Pressing the value on the right (15.00 mm) allows
you to define the preheating height, distance between
the bottom of the component and the bath level (min:
0.0 and max: 60.0 mm)
Pressing the value on the right sets the preheating
time (min: 0.0 and Max: 1000.0 s)
Return to the previous page
Return to the Programs menu page
*

Fume hoods
Soldering - Desoldering
Specialized tools for wiring and tinning
Petit outillage, consommables et équipement de l’atelier
info@ftm-technologies.com –+33 (0)1 40 86 00 09 –www.ftm-technologies.com 12
This page allows you to define the last values of the program to modify or create, then to save the program.
Button
Description
This area displays the product reference defined on
the previous page.
Pressing the value on the right (5.0 mm / s) allows
you to define the tinning input speed (min: 1.0 and
Max: 15.0 mm / s)
Pressing the value on the right (3.00 mm) allows you
to define the tinning depth (min: 0.00 and Max: 40.00
mm)
Pressing the value on the right (2.0 s) allows you to
define the tinning stop time (min: 0.0 and Max: 60.0 s)
Pressing the value on the right (5.0 mm / s) allows
you to define the tinning output speed (min: 0.1 and
Max: 20.0 mm / s)
Pressing the value on the right (15.0 mm / s) allows
you to define the rapid rate of climb (min: 1.0 and
Max: 20.0 mm / s)
Return to the previous page
Icon allowing, after confirmation, to save the modified
or created program
Return to the Programs menu page
5. Manual program window for bath level
When the titanium finger, for automatic detection of the bath level, is not used, therefore deactivated in the
"Parameters" page, the manual program must be used.
This page allows you to teach the machine the level of the tinning bath, with the "INIT" command, make the
initial machine reference to determine the level 0.00mm.

Fume hoods
Soldering - Desoldering
Specialized tools for wiring and tinning
Petit outillage, consommables et équipement de l’atelier
info@ftm-technologies.com –+33 (0)1 40 86 00 09 –www.ftm-technologies.com 13
With the "Up" and "Down" commands, position the bottom of a component tangent to the bath, then press
the "Validate Level" key, the learned level value is displayed to the right of the key. To define the other values
of the manual program go to the next page.
Button
Description
Pressing the value allows you to modify the descent
speed (min: 0.0 and Max: 15.0mm / s)
Pressing the value allows you to modify the climb
speed (min: 0.0 and Max: 15.0mm / s)
Pressing the value on the right (20.00mm) allows you
to define a maximum relative displacement value
(value between 0 and 100mm)
The absolute position relative to the machine origin is
displayed in the central part
Pressing the key activates homing if the pressure is
maintained. The ascent will be made at high speed to
the origin sensor, then a descent, at slow speed, will
be made automatically to exit the sensor. , the
position counter will be set to 0
Pressing the key activates the climb, if the key is held
down the maximum displacement achieved will be the
value entered on the Displacement line on the right
side (20.00mm)
Pressing the key activates the descent, if the key is
held down the maximum displacement achieved will
be of the value entered on the Displacement line on
the right side (20.00mm)
Return to the previous page
Icon indicating the presence of an active alarm,
pressing this icon allows access to the "Fault History"
page

Fume hoods
Soldering - Desoldering
Specialized tools for wiring and tinning
Petit outillage, consommables et équipement de l’atelier
info@ftm-technologies.com –+33 (0)1 40 86 00 09 –www.ftm-technologies.com 14
Icon allowing access to the next page
Return to the Programs menu page
6. Manual program window
This page is used to define the values of the manual program, for the other values of the manual program go
to the next page.
Button
Description
Pressing the framed part allows you to define a
product reference associated with the program (max:
10 alphanumeric characters)
Visualize the height, compared to the original zero
point, of the bath level learned on the previous page
Pressing the value on the right (10.00mm / s) allows
you to define the rapid descent speed (min: 5.0 and
Max: 10.0mm / s)
Pressing the value on the right (15.00mm) allows you
to define the preheating height, distance between the
bottom of the component and the bath level
Pressing the value on the right sets the preheating
time (min: 0.0 and Max: 18.0s)
Icon allowing access to the next page

Fume hoods
Soldering - Desoldering
Specialized tools for wiring and tinning
Petit outillage, consommables et équipement de l’atelier
info@ftm-technologies.com –+33 (0)1 40 86 00 09 –www.ftm-technologies.com 15
This page is used to define the last values of the manual program and to transfer the manual program to the
machine.
Button
Description
Allows you to view the product reference defined on
the previous page
Pressing the value on the right (5.0mm / s) allows
you to define the tinning input speed (min: 1.0 and
Max: 15.0mm / s)
Pressing the value on the right (3.00mm) allows you
to define the tinning depth (min: 0.00 and Max:
40.00mm)
Pressing the value on the right (2.0s) allows you to
define the tinning stop time (min: 0.0 and Max: 60.0s)
Pressing the value on the right (5.0mm / s) allows
you to define the tinning output speed (min: 0.1 and
Max: 20.0mm / s)
Pressing the value on the right (15.0mm / s) allows
you to define the rapid rate of climb (min: 1.0 and
Max: 20.0mm / s)
Used to transfer the selected program to the
machine. A message appears to indicate that the
transfer was successful
Icon allowing access to the next page
Return to the Programs menu page

Fume hoods
Soldering - Desoldering
Specialized tools for wiring and tinning
Petit outillage, consommables et équipement de l’atelier
info@ftm-technologies.com –+33 (0)1 40 86 00 09 –www.ftm-technologies.com 16
7. Parameters window
This page allows you to define the configuration parameters related to the machine.
Button
Description
Enables or disables the exchange of information
between the bath thermoregulator and the machine.
This information indicates when the bath is hot
enough and authorizes the descent into the bath (see
instructions below)
Allows you to enable or disable the detection of the
bath level by the titanium finger. When this parameter
is disabled only the manual program can be used
Allows you to define a time on the activation of the
"bath ready" information, the cycle start will be
authorized after this time has elapsed (min: 0 and
Max: 60 min)
Allows you to define a time on deactivation of the
"bath ready" information, the cycle start will no longer
be authorized after this time has elapsed (min: 0 and
Max: 60 min)
Height linked to the machine: distance between the
level of the work surface
and the upper level of the bath (+ 10.00mm safety).
This height is used to calculate the approach course
at high speed.
Icon allowing access to the next page
Return to the Programs menu page

Fume hoods
Soldering - Desoldering
Specialized tools for wiring and tinning
Petit outillage, consommables et équipement de l’atelier
info@ftm-technologies.com –+33 (0)1 40 86 00 09 –www.ftm-technologies.com 17
Instructions for using the bath thermoregulator to configure the operating temperature alert (valid for
baths with Fuji PXF4 thermoregulators)
This paragraph specifies the operations to be carried out in order to create a dependence between the
tinning bath and the robot.Its goal is to :
• Configure a reference temperature which ensures the liquidus of the alloy (a time delay
programmed in the tin bath parameters allows to guarantee a lag time between reaching this
temperature and releasing the robot start command. )
• Create a referral of information between the bath and the tinning robot
•Like this,
o The operator ensures that he has the operating temperature required for his tinning process
o The titanium finger cannot be damaged by coming into contact with an insufficiently molten
alloy.
1) Creation of the reference temperature:
a. at. Short press on SEL
b. Go down with the arrow down to AL2
c. Short press on SEL and adjust temperature by up and down arrows
d. Confirm by short press on SEL
2) Configure communication with the TP90
a. at. Long press on SEL
b. Go down to CH7 with the down arrow
c. Short press on SEL
d. Go down to LEV2 with down arrow
e. Short press on SEL
f. Use arrows to reach the value 0111
g. Validate by short press on SEL
3) Connect the cord connecting the two M12 outputs of the bath and the robot

Fume hoods
Soldering - Desoldering
Specialized tools for wiring and tinning
Petit outillage, consommables et équipement de l’atelier
info@ftm-technologies.com –+33 (0)1 40 86 00 09 –www.ftm-technologies.com 18
8. Manual mode window
This page is used to activate the descent and ascent movements by pressing and holding a key. To activate
a downward movement, you must first have taken an origin by pressing the "INIT" key.
Button
Description
Pressing the value allows you to modify the descent
speed (min: 0.0 and Max: 15.0mm / s)
Pressing the value allows you to modify the climb
speed (min: 0.0 and Max: 15.0mm / s)
Pressing the value on the right (20.00mm) allows you
to define a maximum relative displacement value
(value between 0 and 100mm)
The absolute position relative to the machine origin is
displayed in the central part
Pressing the key activates homing if the pressure is
maintained. The ascent will be made at high speed to
the sensor origin, then a descent, at slow speed, will
be made automatically to exit the sensor. , the
position counter will be set to 0. INIT touch will
become light blue.
Pressing the key activates the climb, if the key is held
down the maximum displacement achieved will be the
value entered on the Displacement line on the right
side (20.00mm)
Pressing the key activates the descent, if the key is
held down the maximum displacement achieved will
be of the value entered on the Displacement line on
the right side (20.00mm)
Return to the previous page
Icon indicating the presence of an active alarm,
pressing this icon allows access to the "Fault History"
page

Fume hoods
Soldering - Desoldering
Specialized tools for wiring and tinning
Petit outillage, consommables et équipement de l’atelier
info@ftm-technologies.com –+33 (0)1 40 86 00 09 –www.ftm-technologies.com 19
Icon allowing access to the next page
Return to the Programs menu page
9. Faults window
The fault history page brings together all faults that have occurred on the machine, these faults are time-
stamped.
Button
Description
Fault display area, the time stamp corresponds to the
appearance of the fault, the selected fault is framed
Icon for navigating in the fault display area
Icon indicating the presence of an active alarm,
pressing this icon allows access to the "Fault History"
page
Icon allowing access to the next page

Fume hoods
Soldering - Desoldering
Specialized tools for wiring and tinning
Petit outillage, consommables et équipement de l’atelier
info@ftm-technologies.com –+33 (0)1 40 86 00 09 –www.ftm-technologies.com 20
Return to the Programs menu page
10. System window
This window allows access to the different system setting and visualization pages..
Buttons
Description
Language
Allows access to the page for selecting the HMI display
language (French / English)
Offline mode
Allows access to the HMI offline mode, this mode is
reserved for advanced HMI settings
Date and time modification
Allows access to the date and time modification page of
the GUI
Password modification
Allows access to the password modification page.
Faults history clearing
Allows access to the Clear fault history page.
Unacknowledged faults will not be erased
Input/output state
Allows access to the visualization pages of the logic
states of the inputs (sensors) and outputs (actuators) of
the machine
Icon allowing access to the previous page
Return to the Programs menu page
Table of contents