EnglishDeutsch
 logo
Brands
  1. Home
  2. •
  3. Brands
  4. •
  5. Fuji Electric
  6. •
  7. Media Converter
  8. •
  9. Fuji Electric ZDL05 User manual

Fuji Electric ZDL05 User manual

Other Fuji Electric Media Converter manuals

Fuji Electric RHC132S-4DE User manual

Fuji Electric

Fuji Electric RHC132S-4DE User manual

Fuji Electric ZKM User manual

Fuji Electric

Fuji Electric ZKM User manual

Fuji Electric RHC-D 690V Series User manual

Fuji Electric

Fuji Electric RHC-D 690V Series User manual

Fuji Electric ZDL03 User manual

Fuji Electric

Fuji Electric ZDL03 User manual

Popular Media Converter manuals by other brands

SoundTraxx Blunami BLU-2200 user guide

SoundTraxx

SoundTraxx Blunami BLU-2200 user guide

SPROLINK VA1 user manual

SPROLINK

SPROLINK VA1 user manual

Acclaim Lighting DDC-1-AC user guide

Acclaim Lighting

Acclaim Lighting DDC-1-AC user guide

Nikon AF-S TC-20E III user manual

Nikon

Nikon AF-S TC-20E III user manual

Axis AXIS Q7406 user manual

Axis

Axis AXIS Q7406 user manual

Omega TAC80B-J instruction sheet

Omega

Omega TAC80B-J instruction sheet

Zoom Thunderbolt TAC-2R Operation manual

Zoom

Zoom Thunderbolt TAC-2R Operation manual

OST iConverter 10/100M quick start guide

OST

OST iConverter 10/100M quick start guide

Vertiv Netsure user manual

Vertiv

Vertiv Netsure user manual

birddog MINI user guide

birddog

birddog MINI user guide

Roland GI-10 owner's manual

Roland

Roland GI-10 owner's manual

Wallenstein WX310 Operator's manual

Wallenstein

Wallenstein WX310 Operator's manual

Pace MSS 200-1 Service manual

Pace

Pace MSS 200-1 Service manual

Solar Converters EQ 12/24-50 manual

Solar Converters

Solar Converters EQ 12/24-50 manual

CYP EL-7400V Operation manual

CYP

CYP EL-7400V Operation manual

TIE MIDI 1i1o user manual

TIE

TIE MIDI 1i1o user manual

DCS Vivaldi Upsampler user manual

DCS

DCS Vivaldi Upsampler user manual

Westermo MCW-211 SERIES user guide

Westermo

Westermo MCW-211 SERIES user guide

https://manuals.online logo
https://manuals.online logoBrands
  • About & Mission
  • Contact us
  • Privacy Policy
  • Terms and Conditions

Copyright 2026 Manuals.Online. All Rights Reserved.

CAUTION
Precautions under this mark is stated
when wrong handling may cause
hazardous situation. Possibility of
Medium level damage or injury, and
physical damage is predicted.
CAUTION
Global Sales Section
Instrumentation & Sensors Planning Dept.
1, Fuji-machi, Hino-city, Tokyo 191-8502, Japan
http://www.fujielectric.com
Phone: +81-42-514-8930 Fax: +81-42-583-8275
http://www.fujielectric.com/products/instruments/
Preface
We thank you very much for purchasing Fuji’s NO2/NO
Converter.
● Pleasereadthisinstructionmanualthoroughlybeforeinstalling,
using and applying maintenance this device.
Damage or accident may be caused when mishandled.
● SpecificationofthisNO2/NO converter may alter without
notice for modification.
● Donot remodel or modifythis NO2/NO converter without the
manufacturer’s permission. Fuji Electric will not accept any
liability whatsoever for any trouble or accident caused by such
modification.
● OperatoroftheNO2/NO converter should keep this instruction
manual.
● Operatorshouldkeepthisinstructionmanualnearathandatall
times, after thoroughly reading it.
Safety precautions
Please read the safety precautions written as bellow before
use, for correct use of the converter.
Please observe cautions stated bellow, for it contains important
information on safety.
●Installation, wiring and piping should be carried out by
professionals or suppliers. Incomplete installation may cause
fall of the device, electric shock or fire.
●Gas analyzer should be turned OFF when wiring, maintenance
or inspection is carried out. This is to prevent electric shock and
injury.
●Use wires with proper wire rods and diameters that meets this
device. Wrong ones may cause electric shock or fire.
●Do not insert metal rod or fingers to the power supply terminal.
It may cause electric shock.
●Remove any metal objects such as wristwatch while operating
maintenance or inspection. It may cause electric shock.
●Use pipes with proper material and joints stated in the
instruction manual. It may cause gas leakage.
●Use replacement parts that are specified by the manufacturer.
Otherwise, it may cause malfunction, electric shock or gas
leakage.
●Do not touch the converter section, due to high temperature.
Wear protective gloves while exchanging catalyst. It may cause
burn injury.
1. Overview
The NO2/NO converter is to be coupled with a NOx gas
analyzer or NH3gas analyzer for flue exhaust. It is
converter using a special catalyst which efficiently
converts NO2in sample gas to NO.
2. Major Specifications
Catalyst : Carbon, replacement, required
every 8 months
(when NO2concentration is 10
ppm or lower)
Gas flow rate : About 0.5L/min.
Settemperature : 220±10°C
Thermocouple : K
Power supply : 100 to 240V AC, 50/60Hz
Power consumption : About 85VA
Altitude : Up to 2,000 m
Installation category : II
Pollution Degree : 2
Gas inlet/outlet connection method:
Insert Teflon tube ø6 mm/ø4 mm into Viton
connection port of inner diameter ø5.5 mm.
(Withstand pressure: 10 kPa)
Contact output : for temperature alarm
SPST-NC contact, 220 VAC / 30
V DC, 1A (resistive load)
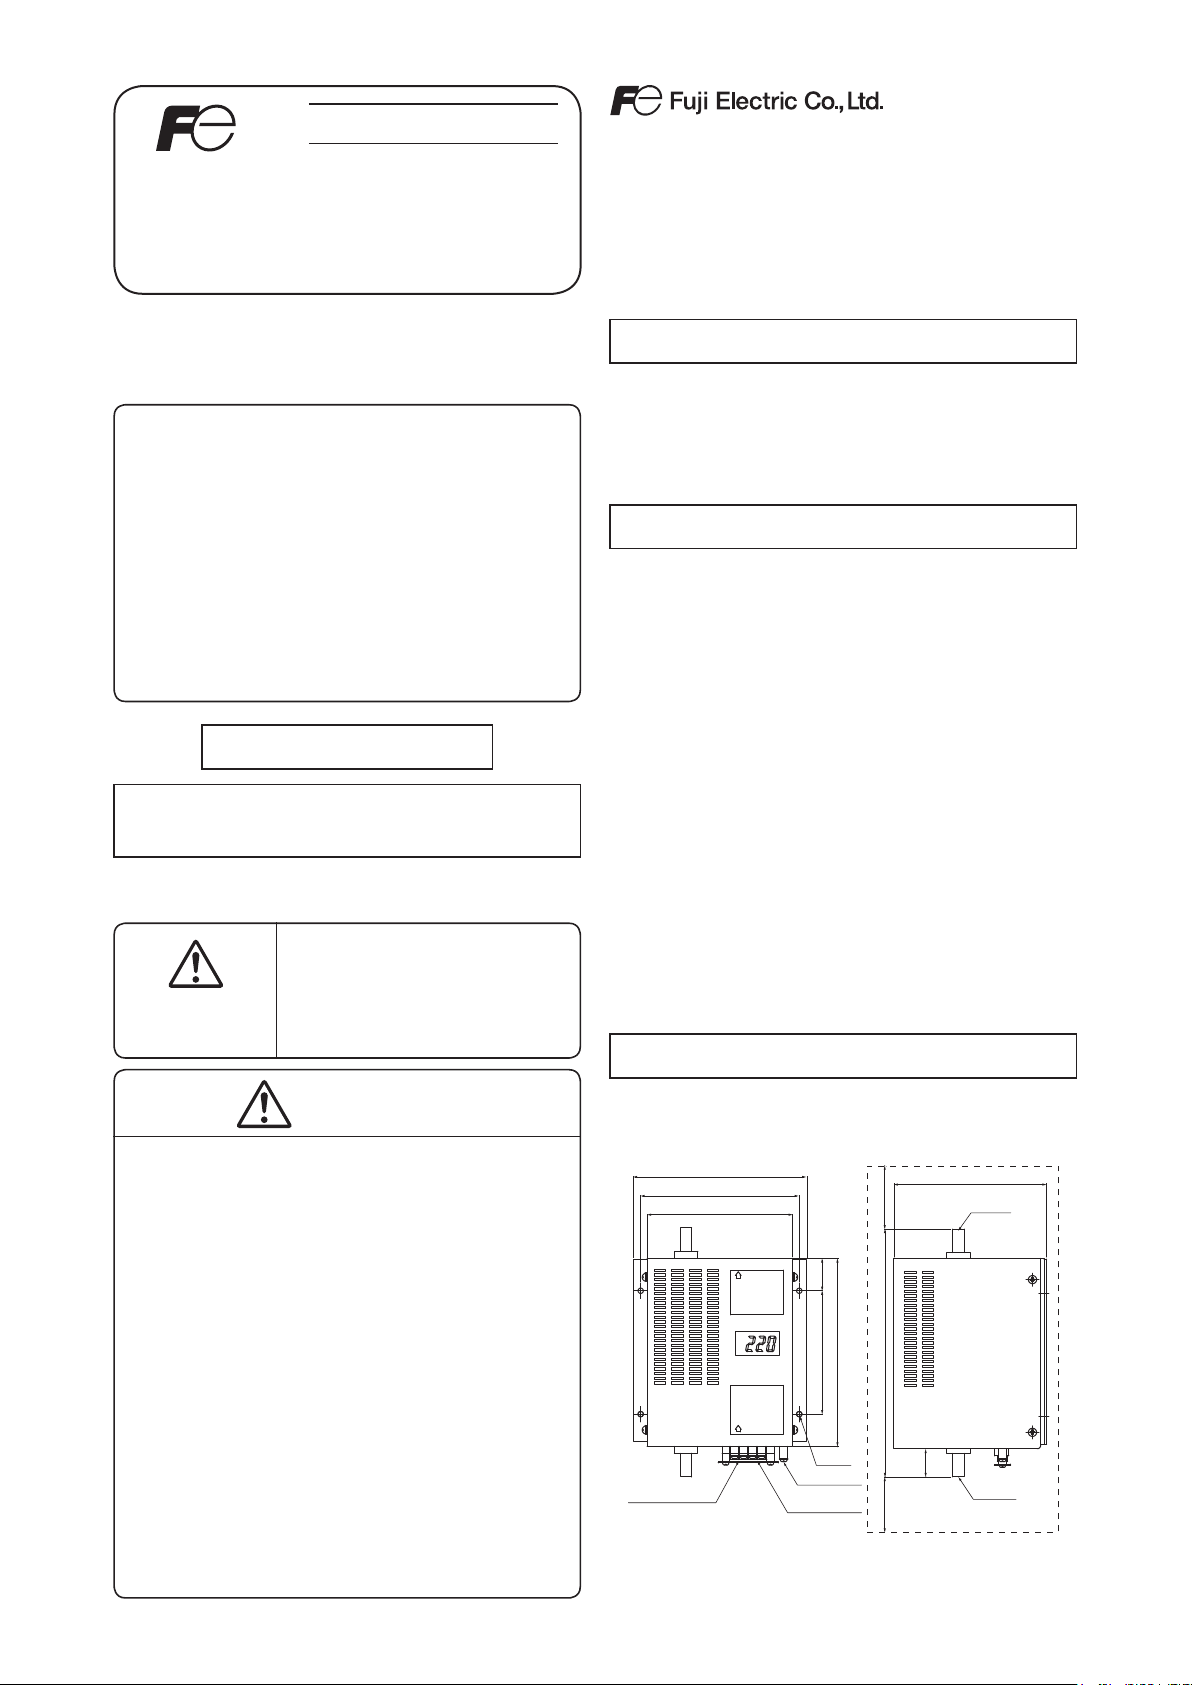
3. Outline Drawing
This gas converter is composed of the converter and the
temperature controller.
Maintenance space
Approx. 120
(Upper side)
Maintenance space
RIGHT SIDE VIEW
Approx. 120
(Lower side)
FRONT VIEW
(NP)
OUTLET
INTLET
(NP)
124
135
148
Outlet
ø9.5/5.5
(VITON)
130
4-ø4.5
160
105 27
(212)
100 to 240V AC
Power supply
terminal
220V AC
30V DC, 1A
Contact output (1b)
Earth terminal
Inlet
ø9.5/5.5
(VITON)
(26)
Fig. 1 Outline drawing
INSTRUCTION MANUAL
NO2/ NO Converter
Model: ZDL05
INZ-TN1ZDL05-E
4. Installation, Piping,
Wiring
(1) The main frame should be installed vertically to the
ground. Avoid installing it obliquely or laying it on
its side.
(2) Pipes should be connected so that the bottom port of
converter block becomes an inlet and the top port
becomes an outlet. (Refer to “3. Outline Drawing.”)
(3) Connect power supply to the terminals indicated in
the wiring diagram. (Use type D for grounding.)
(4) ABreakerthatmeetIEC60947-1andIEC60947-3
should be included in installation.
(5) A Breaker should be installed near the Converter
where an operator can access it.
(6) Confirm the piping and wiring before turning ON
the converter.
(7) Be careful of the high temperature after turning the
power on. The temperature controller (*) is set at
220°C.Sincetemperaturehasbeenfactory-set,the
temperature controller need not be operated.
(8) Whenthetemperaturereaches±20°Cfromthe
setpoint of the temperature controller, the contact is
opened.
(*) Temperature controller for NO2/NO converter
(PXE4TAY1-0Y000).
5. How to Replace Catalyst
CAUTION
During catalyst replacement, carefully protect your body
from a burn because the converter block is hot.
Catalyst should be replaced with new ones once every
eight months. (when flow rate is 0.5L/min or lower and
NO2concentration is 10 ppm or lower)
(1) Turn off the main power supply for converter.
(2) Remove cover when it has cooled down. The cover
is fastened by the screws on the side face.
(3) By using a pair of pliers or the like, loosen and
remove the spring clamps on the joint (1) and the
joint (5). Then, remove the two joints. Be careful
not to damage the ceramic heater.
(4) Pull out the metal fitting plates (2).
[CAUTION] Place a catch pan or sort to receive the
falling catalyst (3) and glass wools (4).
(5) Place (4) at the end of metal fitting plate (long) (2),
insert it from the lower side of the ceramic heater,
then inject the new (3) from the top, using a funnel
or alike.
(6) Attach new joints (1) and (5) to the heater, and then
put on the spring clamps on both joints.
(7) Connect only the lower joint (5) to the pipe. Turn on
the power and then flow the zero gas through the
pipe manually, for about 20 minutes. (This is to
remove moisture from the catalyst.)
(8) Connect the upper joint (1) to the pipe.
(2) Metal fitting plate (long)
Ceramic heater
(1) Joint
Spring clamp
(4) Glass wool
(3) Catalyst
Metal fitting plate
(short)
Spring clamp
(4) Glass wool
(5) Joint
Lower side
Fig. 2 Replacement of catalyst
6. Scope of Delivery
(1) Main unit
(2) NO2/NO catalyst (already set into the main unit)
(3) Glass wool (already set into the main unit)
7. Comsumables
Q’ty Item No.
(1) NO2/NO catalyst 2 TK726891C1
(2) Glass wool 2 TK726890C1
(0.3 to 0.5 g)
(3) Joint 4 TK7G6890P1
8. Compatible Standards
(1) Productsafety: EN61010-1:2010
(2) EMC : EN61326-1:2013