manuals.online logo
Brands
  1. Home
  2. •
  3. Brands
  4. •
  5. FujiFilm
  6. •
  7. Digital Camera
  8. •
  9. FujiFilm FinePix E550 Assembly instructions

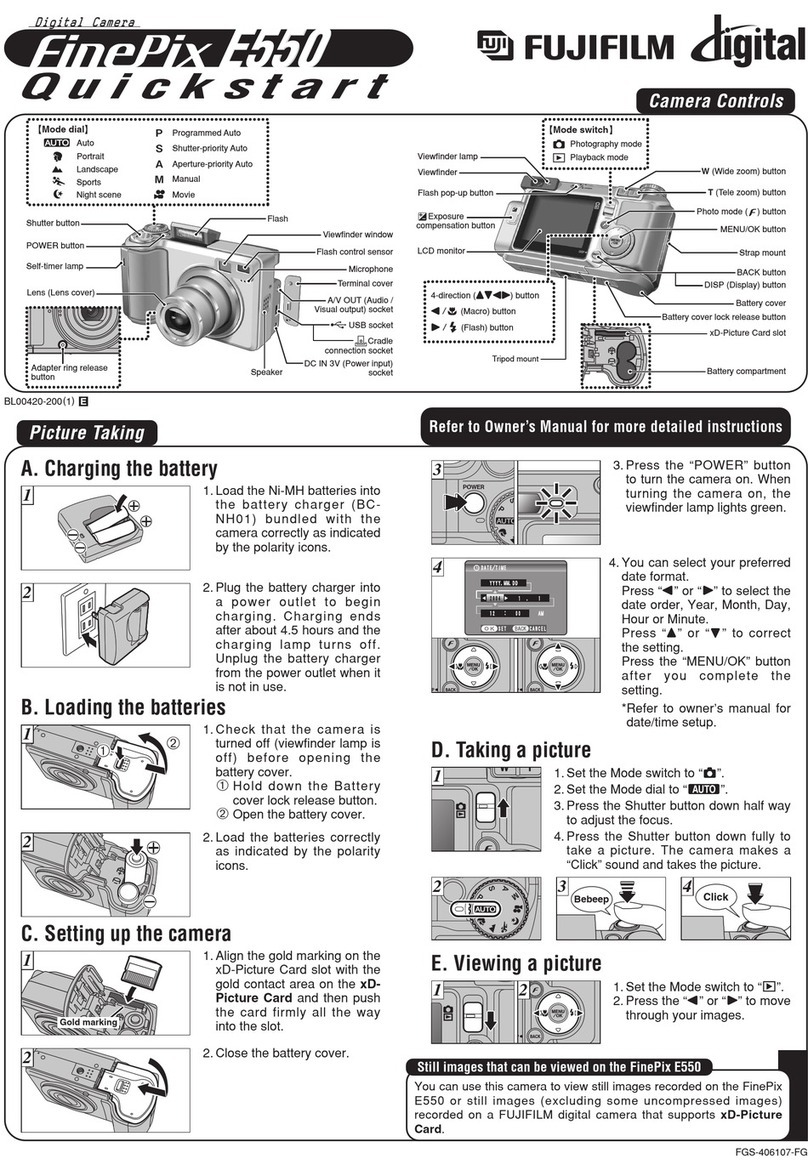
FujiFilm FinePix E550 Assembly instructions

Other manuals for FinePix E550

6

Other FujiFilm Digital Camera manuals

FujiFilm instax mini70 User manual

FujiFilm

FujiFilm instax mini70 User manual

FujiFilm Finepix A350 User manual

FujiFilm

FujiFilm Finepix A350 User manual

FujiFilm X20 User manual

FujiFilm

FujiFilm X20 User manual

FujiFilm FinePixA204 User manual

FujiFilm

FujiFilm FinePixA204 User manual

FujiFilm FinePix F610 User manual

FujiFilm

FujiFilm FinePix F610 User manual

FujiFilm FinePix Z85 User manual

FujiFilm

FujiFilm FinePix Z85 User manual

FujiFilm X-E2S User manual

FujiFilm

FujiFilm X-E2S User manual

FujiFilm Finepix F850EXR User manual

FujiFilm

FujiFilm Finepix F850EXR User manual

FujiFilm FinePix 50i User manual

FujiFilm

FujiFilm FinePix 50i User manual

FujiFilm FinePix 30i User manual

FujiFilm

FujiFilm FinePix 30i User manual

FujiFilm 600021381 User manual

FujiFilm

FujiFilm 600021381 User manual

FujiFilm X-Pro1 Owner's manual

FujiFilm

FujiFilm X-Pro1 Owner's manual

FujiFilm FINEPIX JX500 Series User manual

FujiFilm

FujiFilm FINEPIX JX500 Series User manual

FujiFilm FinePix S1 Pro User manual

FujiFilm

FujiFilm FinePix S1 Pro User manual

FujiFilm FINEPIX XP30 Series User manual

FujiFilm

FujiFilm FINEPIX XP30 Series User manual

FujiFilm FinePix S100 User manual

FujiFilm

FujiFilm FinePix S100 User manual

FujiFilm FinePix S8100fd Installation guide

FujiFilm

FujiFilm FinePix S8100fd Installation guide

FujiFilm 2400 User manual

FujiFilm

FujiFilm 2400 User manual

FujiFilm FINEPIX A340 User manual

FujiFilm

FujiFilm FINEPIX A340 User manual

FujiFilm FINEPIX S4000 Series User manual

FujiFilm

FujiFilm FINEPIX S4000 Series User manual

FujiFilm instax Mini 40 User manual

FujiFilm

FujiFilm instax Mini 40 User manual

FujiFilm FinePix BL00710-201(1) User manual

FujiFilm

FujiFilm FinePix BL00710-201(1) User manual

FujiFilm Fujica ST705 User manual

FujiFilm

FujiFilm Fujica ST705 User manual

FujiFilm FinePix Z70 series User manual

FujiFilm

FujiFilm FinePix Z70 series User manual

Popular Digital Camera manuals by other brands

Canon WP-DC35 user guide

Canon

Canon WP-DC35 user guide

Xiaomi 70mai Dash Cam Lite user manual

Xiaomi

Xiaomi 70mai Dash Cam Lite user manual

Samsung PL70 Quick start manual

Samsung

Samsung PL70 Quick start manual

GE E1680W user manual

GE

GE E1680W user manual

Canon EOS 1200D instruction manual

Canon

Canon EOS 1200D instruction manual

Tevion MD 86497 user guide

Tevion

Tevion MD 86497 user guide

Exakta VX Features

Exakta

Exakta VX Features

Kodak Digital Science DC120 user guide

Kodak

Kodak Digital Science DC120 user guide

Nikon FM3A Specifications

Nikon

Nikon FM3A Specifications

Vectra Fitness H1 Quick reference guide

Vectra Fitness

Vectra Fitness H1 Quick reference guide

Nikon COOLPIX 775 quick start guide

Nikon

Nikon COOLPIX 775 quick start guide

Olympus IR 500 - 4MP Digital Solutions Camera Manuel de Référence

Olympus

Olympus IR 500 - 4MP Digital Solutions Camera Manuel de Référence

Samsung EC-L100ZBBA brochure

Samsung

Samsung EC-L100ZBBA brochure

Panasonic DMC-L10KPP Service manual

Panasonic

Panasonic DMC-L10KPP Service manual

Hyundai Electric HYU-CC-CHBF12001 Quick installation guide

Hyundai Electric

Hyundai Electric HYU-CC-CHBF12001 Quick installation guide

Sony DSC-WX80 specification

Sony

Sony DSC-WX80 specification

Nikon Nuvis S - Point & Shoot instruction manual

Nikon

Nikon Nuvis S - Point & Shoot instruction manual

Olympus CAMEDIA C-3030ZOOM overview

Olympus

Olympus CAMEDIA C-3030ZOOM overview

manuals.online logo
manuals.online logoBrands
  • About & Mission
  • Contact us
  • Privacy Policy
  • Terms and Conditions

Copyright 2025 Manuals.Online. All Rights Reserved.

swheeler Page 1 of 34
IMT – Cholla Training Center
Getting to Know Your Digital Camera
Objectives:
Participants in this course will learn the basic functions of a digital camera.
Course instruction will also include information about image si e and resi ing, and uploading
images to a computer.
•Students are encouraged to bring their own camera.
Getting to Know Your Digital Camera ............................................................................1
Focusing Your Camera .............................................................................................2
Camera Shake ........................................................................................................3
Zoom.....................................................................................................................5
Flash......................................................................................................................7
Digital Camera Scene Modes.....................................................................................9
Si e of Picture....................................................................................................... 13
Protecting Your Images ..........................................................................................15
Resi e in the Camera .............................................................................................16
Movie Capabilities.................................................................................................. 16
Multiburst .............................................................................................................16
Ten Tips for Great Pictures + One............................................................................17
Capturing and Printing Digital Images ...................................................................... 23
Digital Photography Glossary .................................................................................. 30
swheeler Page 2 of 34
IMT – Cholla Training Center
Focusing Your Camera
Center AF (Auto Focus)
Most digital cameras use contrast detection to auto focus (AF). Usually, the focus
point is a small rectangle in the middle of the viewfinder frame (Center AF), though
many digital cameras now also offer additional AF points (Multi-Point AF).
Center AF
If you look in the LCD monitor of your digital camera, there will usually be a
rectangle at the center of the screen, commonly called the AF Frame. When your
digital camera is set to Center AF mode, this rectangle in the middle of the screen is
your AF point.
Multi-Point AF
Multi-Point AF automatically selects between a number of AF points (the most
common seems to be 5 or 9 AF points -- i.e. 4 or 8 AF points clustered around a
center focus point) and finds the most contrasty subject among those AF points.
An Example
If your default AF mode is Multi-
Point AF and some of your shots
are sometimes out of focus, it
may be that Multi-Point AF is
the culprit.
Here is an example of how
Multi-Point AF focused on the
more contrasty background well
behind my main subject (the
lone green leaf left on the
bush).
Even though the green leaf is in
the center of the frame, Multi-
Point AF has chosen to focus on
the more contrasty background
around it instead.
The result is that the ground of
fallen leaves come out in focus,
while my main subject is out of
focus.
I took a couple more shots with
the same result before I reali ed
what the problem was. I
immediately went into the
camera's menu to switch AF
mode from Multi-Point AF to
Center AF. This time, I got the
result that I was after: the lone
green leaf in focus against a
nicely blurred backdrop!
Summary
Multi-Point AF works pretty well
usually but sometimes the
camera will focus on something
else besides your main subject if
http://www.photoxels.com/tutorial_center-af.html
Sony DSC-P150 Cyber-shot: 5 Area Multi-Point AF
Program AE, Multi-Pattern Metering, Macro N
7.9mm, 1/250 sec., F2.8, IS 400
Sony DSC-P150 Cyber-shot: Center AF
Program AE, Multi-Pattern Metering, Macro N
7.9mm, 1/200 sec., F2.8, IS 400
swheeler Page 3 of 34
IMT – Cholla Training Center
that something else happens to
fall under one of the AF points
and is also more contrasty than
your main subject. In these
instances, switch AF mode to
Center AF, point the AF Frame
on your subject and half-press
the shutter release button to
lock focus on your main subject,
then reframe, if necessary,
before fully pressing the shutter
release button to take the shot.
Macro Setting
http://drscavanaugh.org/digitalcamera/macro.htm
While you can use a digital camera at the standard settings, you can often see much
more detail by using the macro setting on the camera. A macro setting changes the
focus of the camera so it can focus on very close objects. The macro setting is for
photographing objects within a few inches or feet away. One of my digital cameras
has a macro setting that works within one centimeter, to get very close shots (light
can be an issue when you get that close). You can use the macro setting to improve
your ability to see small details, similar to using a magnifying glass. You might want
to use a small tripod to hold the camera steady. I also find that an active display
screen is the easiest to use, since you don't have to estimate which portion of the
viewfinder is focusing for the macro setting. Don't forget to change away from the
macro setting when you are finished (if the camera doesn't do it automatically).
People who wear bifocals especially should be careful to remember to change the
camera setting back to normal when finished with macro, as it may appear out of
focus when looking at the LCD screen with the glasses. If the camera is set at macro
and you are trying to take a normal picture then the focus will be set wrong and the
image will be out of focus. I know of one teacher who took a few pictures up close
on the macro setting, and then forgot to change back to the normal setting, and she
used up the rest of her camera memory space with the pictures all out of focus.
Top of Page
Camera Shake
If your digital camera makes even a slight
movement when you take a picture, the
chance of having a blurred photo
increases. To help minimi e camera shake,
take a few moments to learn under what
conditions it can happen as well as the
ways to help prevent, if not completely
eliminate, it.
Camera shake typically happens in low-
light situations when the digital camera
aperture is wide-open, or when using a
long telephoto lens. The best way to
prevent camera shake is to mount your
camera on a tripod or other flat, level
support. When using a tripod, if you don't
have a remote, use the self-timer to
trigger the shutter button.
swheeler Page 4 of 34
IMT – Cholla Training Center
If you don't have a tripod, hold the camera
with both hands and keep it steady by
leaning and bracing yourself against a wall,
tree or pole, the roof of a car, anything.
You can also hold your camera in both
hands and brace your elbows against your
body.
Another way to help minimi e camera
shake is to use the viewfinder instead of
the LCD to compose shots. Bracing the
camera against your face helps steady it.
Digital cameras with long telephoto lenses
are more prone to camera shake when
hand-held. Some cameras use image
stabili ation technology, which helps
prevent images from becoming blurred due
to camera shake.
Don't forget to depress the shutter-release
button down in two steps. More photos
have been improperly exposed and
focused, as well as blurred, because
individuals do not use the shutter-release
button correctly.
swheeler Page 5 of 34
IMT – Cholla Training Center
Zoom
ptical Zoom v. Digital Zoom
Most digital cameras come with a oom lens, which allows you to adjust the length of
the lens to either move closer to the object (a long lens) or to move farther away
from the object (a short lens).
Digital cameras usually come with two types of oom on them. The first is the optical
oom which is identical to that found on traditional cameras. When using optical
oom, you can get closer to a particular object without any sacrifice in image quality.
Digital oom is a new type of oom that is found only in digital cameras. When using
digital oom, the camera itself modifies the image electronically to bring the object
you are photographing closer. It does this by cropping the image and then blowing
up the middle of the image resulting grainy, blocky images.
NOTE:
•If possible, walk closer to your subject rather than using the Zoom feature on
your camera.
•Frame your subject… Look at the four corners of the view finder making
certain there is not “icky” content distracting from your subject.
oIf you can’t move in closer try the Zoom
oIf you still have “icky” content, use the crop tool in your favorite image
tool to capture your subject.
There is a world of difference between
the digital and optical oom.
See the photo examples below of
pictures taken with both types of
ooms to illustrate the differences:
Here is a photo taken utili ing the
digital oom. You can see that the
image is blurry and digiti ed.
Click here for content source web site.
Here is the same picture, taken using
only the optical oom. With most
cameras, that range is much smaller
and the oom isn't as close. The
quality of the image is far better
though.
swheeler Page 6 of 34
IMT – Cholla Training Center
Even if you can't get as close, use
photo editing software to crop instead
of using the digital oom. You can't
crop a tremendous amount, but you
can get closer while retaining quality.
This is the same image shown above
as the optical oom example.
Top of Page
swheeler Page 7 of 34
IMT – Cholla Training Center
Flash
Lucky for us, an automatic flash is
included on just about every camera sold
today. And most include a fill-flash
setting for those less-than-perfect
lighting situations that need a little
boost. That doesn't mean the camera is
fail-proof. You still need to know how and
when to use these features.
Click here for content source website.
General flash tips
Our favorite flash tips bear repeating:
•Stay within flash range. Check
your camera manual for the
recommended range (usually 4 to
10 feet).
•Batteries that are approaching
exhaustion will not give full flash
power even if the camera is still
working.
•Prevent red eye by asking your
subjects to look slightly away
from the camera, and turn on all
the room lights to shrink their
pupils.
•Avoid use of the "red eye
reduction" flash setting—to many
people it's distracting and
confusing.
Fill flash
Fill flash is included on most of today's
cameras, and is a favorite feature. It is
just enough flash to fill in areas of a
picture that would otherwise be too dark.
Use fill flash for sunny day portraits to fill
in those dark shadows under the eyes,
nose, or under the rim of a baseball hat.
It can even help in a difficult lighting
situation, such as a dark complexion on a
beach, or a child playing in the snow.
Fill flash is also useful for side-lit and
back-lit pictures. For instance, a backlit
scene may have enough bright areas in
the background to provide an "average"
brightness for the entire picture, but the
actual subject is left in the dark. Fill flash
balances the scene so that the subject is
properly exposed, and the background is
left alone.
Fill Flash
No
Flash
swheeler Page 8 of 34
IMT – Cholla Training Center
Flash off
There are occasions when your camera
thinks the flash is needed, but in fact it
isn't. You probably have a "Flash Off" (or
similar wording) setting on your camera.
Here are a few examples of when to use
it:
•When you are too far away from
your subject for the flash to be
effective.
•When the flash would create
annoying reflections from mirrors
and other shiny surfaces.
•At sunset or in other low-light
situations where you'd like a
foreground subject to be
silhouetted.
•Where the quality of the existing
light is beautiful, like a kitten
sleeping in the sunbeam.
oWhere flash is not allowed
(steady yourself against a
wall and anchor your
elbows at your side).
Flas Range Click here for content source web site.
A camera's flash range tells you how far from the camera the flash will provide
proper exposure. If the subject is out of range, you'll know to close the distance.
Most digital cameras can tolerate some underexposure before the image suffers
noticeably.
Top of Page
swheeler Page 9 of 34
IMT – Cholla Training Center
Digital Camera Scene Modes
W at are all t ose symbols for?
Click here for content source web site.
You went out and purchased a digital camera and the instruction book mentions
"Scene Modes" and you see a lot of funny icons on one of the dials of your camera.
So what are they and what do they do?
The first thing to remember is this is a still a camera and you get a picture by having
the right amount of light hit the film or light sensor in a digital camera. You do this
by adjusting the si e of the lens opening (Aperture), or the length of time the shutter
is open (Shutter Speed). How you adjust the two of these in tandem will create a
different picture. Without going into a long photography course, I will briefly explain
what each of these does.
The Aperture controls how much light is hitting the sensor at any instant and the
depth of focus. If I want everything in the picture to be in focus, both near and far
objects, I will choose a small aperture. If I want selective focus, for example taking a
portrait with a blurred background, you adjust the camera the other way.
The Shutter Speed controls how long the shutter is open so the light can get to the
sensor. For a sporting event where you want to stop the action, you would use a
short shutter speed, but if you want to burl the movement to imply motion, you
would use a longer shutter speed. You would also use a very long shutter speed for
night shots with motion you want to capture like fireworks.
How does this relate to Scene Modes? In its default setting, the camera guesses at
the best exposure, adjusting the Aperture and Shutter Speed without really knowing
what you are taking a picture of. It goes for an average setting. By selecting a
"scene" on your camera, you are telling the camera what you are taking a picture of
so it can make a better choice of how to set the camera. It generally gives more
accurate and pleasing results than the default auto mode.
Digital cameras have a variety of modes,
which are optimi ed for specific scenes
and automatically select focus and
exposure. Settings such as white balance
are preprogrammed by the
manufacturer.
Backlig t - eliminates dark shadows
when light is coming from behind a
subject, or when the subject is in the
shade. The built-in flash automatically
fires to "fill in" the shadows.
Beac /Snow – photographs of beach,
snow and sunlit water scenes. Exposure
and white balance are set to help prevent
the scene from looking washed out.
Fireworks - shutter speed and exposure
are set for shooting fireworks; pre-
focusing & use of tripod recommended.
Click here for content source web site.
Panorama - obtain extra wide vistas;
take a series of shots then stitch them
together with software to make a single
photo.
NOTE: Your
camera’s icons
may differ.
swheeler Page 10 of 34
IMT – Cholla Training Center
Landscape - take photos of wide
scenes. Camera automatically focuses on
a distant object.
Macro - take close-up shots of small
objects, flowers and insects. Lens can be
moved closer to the subject than in other
modes. Hold the camera steady or use a
tripod.
Nig t Portrait - take photos of a subject
against a night scene. The built-in flash
and red-eye reduction are enabled;
shutter-speeds are low. Use of tripod
recommended.
Nig t Scene - photograph nightscapes.
Preprogrammed to use slow shutter
speeds. Use of tripod recommended.
Panning - "free e" the action of a
subject, such as a runner or moving car,
while blurring the background to give the
"feel" of motion. Prefocus on a point
where the subject will come, track the
subject smoothly with the camera and
depress the shutter-release button while
still moving the camera. You can also use
burst mode while panning.
Party mode - take photos in a dim lit
room; exposure and shutter speed are
automatically adjusted for room
brightness. Captures indoor background
lighting or candlelight. Hold the camera
very steady when using this mode.
Portrait - main subject is clearly focused
and the background is out of focus (has
less depth of field). Best when taking
shots outside during the day. Shoot using
a mid to long telephoto lens, stand close
to your subject within the recommended
camera range and, when possible, select
an uncomplicated background that is far
from the subject.
Sports - take photos of a fast moving
subject; fast shutter speeds "free e" the
action. Best when shots are taken in
bright light; pre-focusing recommended.
Sunset - take photos of sunsets and
sunrises; helps keep the deep hues in the
scene.
Click here for content source.
Nig t P otograp y
Night photography has an attraction all its own. There's something about scintillating
lights from office windows hanging in the dark of the night -- a modern version of
the starry skies -- that appeal to us. Whether it's a city skyline, lamp posts on a dark
and deserted street, or the front of your house all decked out with holiday lights, the
challenge of capturing the mood of a night scene depends on whether your digital
camera is capable of night photography and on a couple of simple techniques.
Can My Camera Do Nig t P otograp y?
For successful night photography you need a digital camera that allows you to keep
the shutter open for a long time, anywhere from 3 to 30 seconds. Check your
camera specifications in the User's Manual under Shutter Speed. The shutter speeds
available will be given as a range, e.g. 30 sec. - 1/2,000 sec.
If you are seriously into night photography, then you would want to ensure you
purchase a digital camera that allows the longest shutter speed possible, and even
Bulb (where the shutter remains open as long as you depress the shutter release
button).
But before you plunk down your money for that digital camera, there's two more
features to verify -- and one accessory to purchase, if you don't have it already.
S ooting Modes
For an image to be captured by a digital camera's image sensor, the latter requires
exposure to light. But at night, light is what we don't have enough of.
Some of you may have noticed that, if you select a shooting mode of Auto (A) or