Fujikura QRG-03 User manual

Quick Reference Guide
QRG-03
R-02
1
Tools for Splicing Operation
Setup & Preparation Before Splicing
Install battery pack or DC adaptor
Plug AC adaptor into the DC adaptor.
*No need when using battery pack.
Turn splicer ON.
Confirm Heater Mode
Check Wireless Communication
Clean before splicing
Setup & Preparation complete
Confirm Splice Mode
Wireless communication with accessories
Splicr can connect to the CT50 cleaver and RS02/03
ribbon stripper.
When wireless comunication is established, the splicer
monitors the conditon of these tools. If the splicer sees
that the tool has an issue, it alerts the operator with an
on-screen alarm.
After initial pairing, the devices are always paired.
Communication between splicer, cleaver and stripper
resumes automatically even after power cycling.
Refer to the setting guide “SG-03”or instruction manual
for wireless communication function details.
LED
Turning ON
Press key until green
LED turns on.
Turning OFF
Press key until red
LED
turns on.
Select the adequate heater mode according to the sleeve.
The [READY] screen shows the current heater mode.
When using a protection sleeve which is not made by
Fujikura, please set parameters based on the specific
sleeve.
Heater Mode
Optical Fiber
Cleaver
Protection sleeve
Ribbon Fiber
Stripper
Mass Fusion
Splicer
Fiber Holder
Consumables for
cleaning
Cotton
Cotton swab
Alcohol
Splice Mode
Select ”SM AUTO” to splice standard SM fibers (ITU-T
G.652).
*Basic operations can be performed from the
touch screen after the power is turned on.

Quick Reference Guide
QRG-03
2
R-02
Splice Operation
Clean fiber coating/Place protection sleeve
Set the fiber into fiber holder
Strip fiber
Clean fiber
Splicing starts automatically
Visually inspect monitor during splice
After splicing, wind protector open
Slide the splice joint to the center of the
sleeve.
Place sleeve in center of tube heater
Heater lid opens after finishing heating
Check shrunk sleeve
Cleave fiber
Heating starts automatically
Grab the fiber at the position marked ◆
Load fiber into splicer
Completed
Marking the fiber coating is convenient to avoid
“twisting fiber” during transfer to the heater.
Tips for single fiber
Clean the fiber coating as well as the bare fiber.
Use pure ethyl alcohol, >99%.
Press the holder lid
Place fiber holders in the
splicer so that the model
number reads left to right.
If reversed, you may
mismatch fibers.
Note
Press firmly at the points
indicated above
In case of single fiber
When setting a single fiber
in the fiber holder, adjust
the fiber so 3mm of coating
protrudes from the flat front
surface of the fiber holder.
3mm
Grab the fiber
Pull
◆
Keep holding
fiber
◆
60mm
40mm
Apply proper tension to the fiber during transition to the
tube heater to avoid bending of the fiber.
There are two slots, one for 40mm and one for 60mm.
Use the appropriate slot according to sleeve size.
Keep applying tension to the fiber until the heater
clamps hold it.
Pull
Keep pinching here
◆
Marking

Quick Reference Guide
QRG-03
R-02
3
Cleaning before Splice Operation
Replacing V-grooves
Cleaning Cautions
・Do not allow contact onto the electrode tips.
・Use only 99% or better purity of alcohol.
・Use new lint-free cotton swab every time you clean.
・Clean the clamp chips and bottom of the V-grooves with a thin lint-free cotton swab moistened with alcohol.
・Remove excess alcohol with a clean dry swab.
・Dislodge debris in the V-groove by using Brush [VCB-01] and/or the cleaved fiber end face if there is a
remaining deposit in the bottom of the V-groove.-
V-groove Clamps
Clamp chips
V-grooves
Tools
Optical fiber cleaver
・Clean rubber pads.
・Clean rubber anvil.
・Clean cleaving blade.
Ribbon fiber stripper
・Clean stripping blade
Electrode Replacement
・When the “Replace electrodes” message
appears, or when the tip is damaged, replace
electrodes.
・If the electrodes appear heavily worn, it is
recommended to replace the electrodes even if
the alarm message hasn’t appeared.
・Execute [Replace Electrodes] in Maintenance
Menu.
・
Using properly cleaned or new V-grooves simplifies fiber viewing and handling when loading ribbons into the
splicer. After extended use or improper splicer care, excessive glass particles and debris will accumulate on the
V-grooves, making them impossible to clean. This splicer has replaceable V-grooves to solve this problem. Instead
of returning for maintenance, users can resume splicing within minutes by replacing the V-grooves.
・When the lens is dirty, clean it
with a thin cotton swab
moistened with alcohol.
・Remove the electrodes or V
groove inserts when cleaning
the lenses.
・
Take care not to damage the lens
surface by using a rigid or hard
object when cleaning.
Objective Lens
Lens
Cotton swab
“A”
Remove two screws.
Second, rock the
V-grooves towards you.
First, pull the V-grooves
insert straight up
Note: V-grooves orientation,
use side “A” as reference.
1
2
3
4
<How to replace>
There is a slot on the
heater side inside of the
wind protector.
Slot
Heater
LCD
5
7
Lower V-grooves
straight down.
“A”
6
Install V-grooves in splicer
such that side “A” is
inserted in the slot.
8
Tighten the screws to
secure. Proper torque is
20cNm.
Fiber
Brush [VCB-01]
Cotton swab
V-grooves

Quick Reference Guide
QRG-03
4
R-02
Error Message
Reason
Solution
Too Long Fiber
・The fiber end-face is placed on the
electrode centerline, or beyond it
・The cleave length (bare fiber part) is too
long
・Dust or dirt is on the objective lens
・Press RESET, and set the fiber end-face between the
electrode centerline and the V-groove edge.
・Confirm the set position of the stripped fiber end on the
fiber cleaver. Check the cleave length.
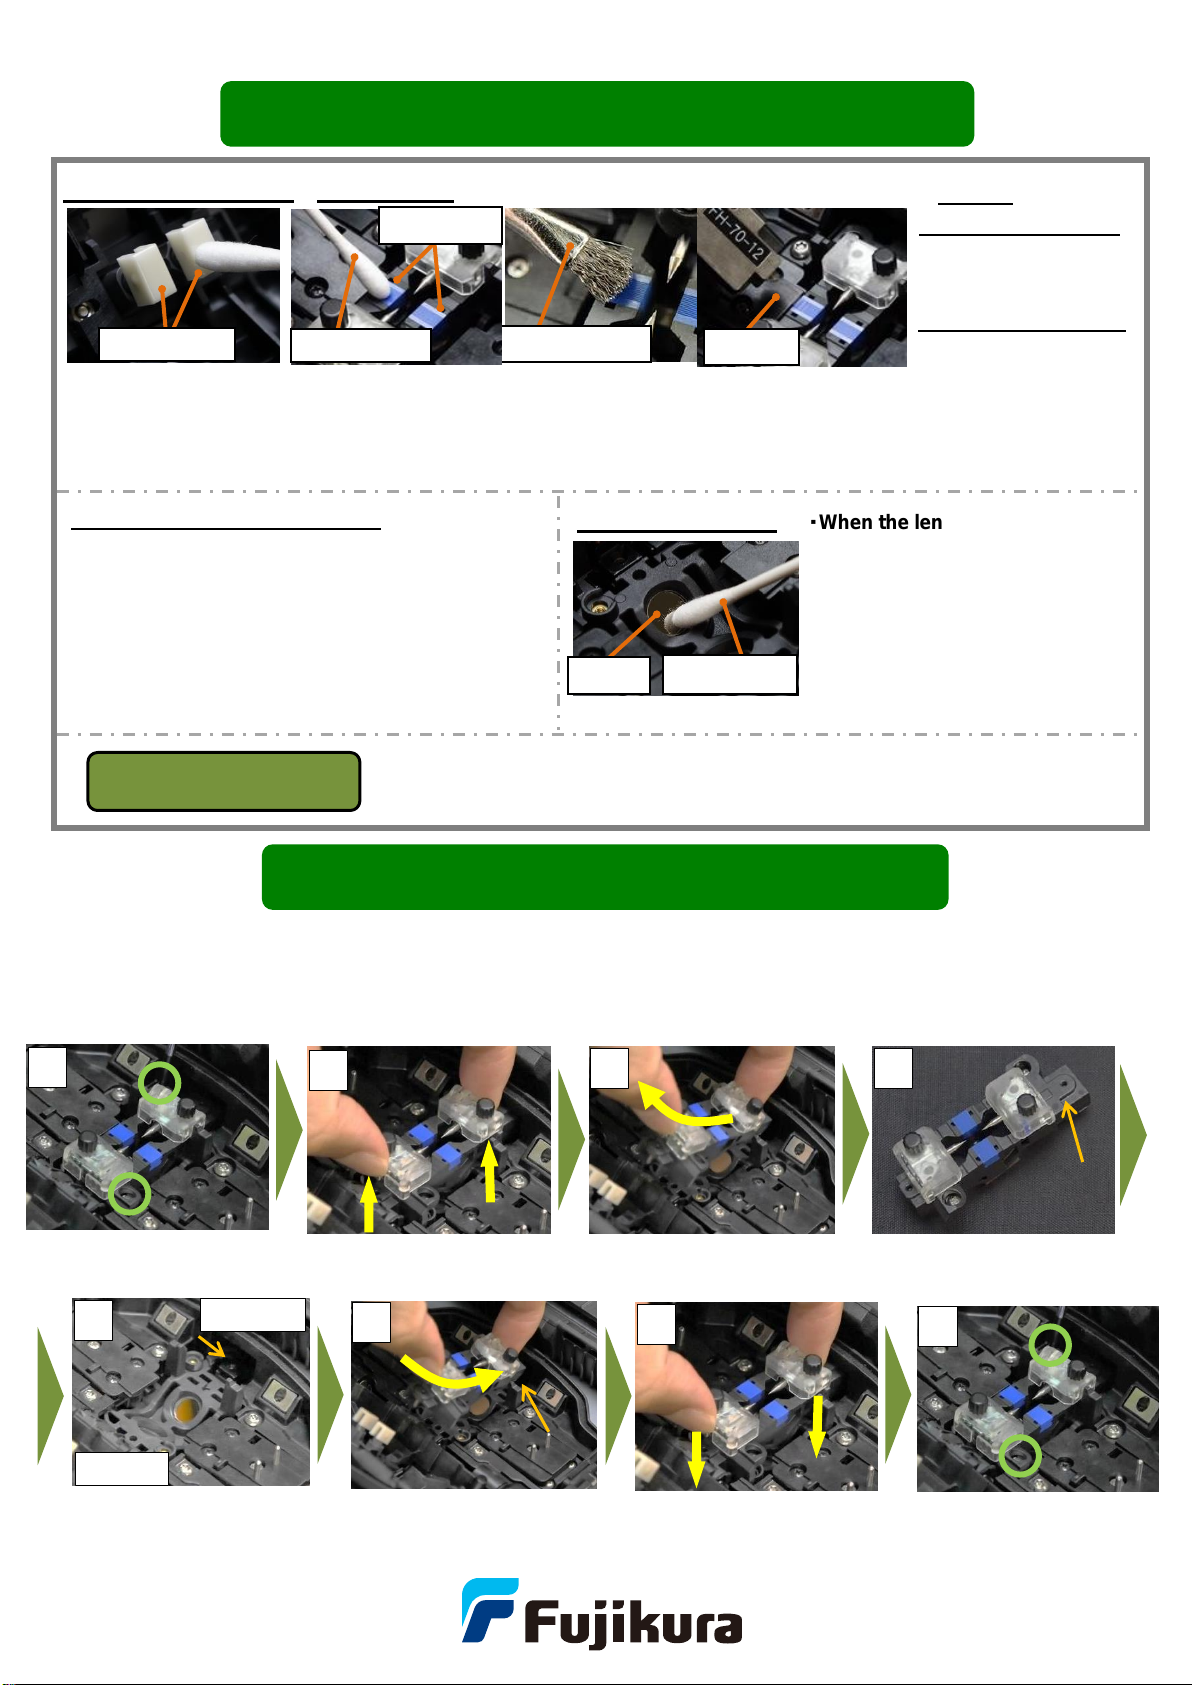
・Execute [Dust Check]. Clean the lens when dust or dirt
exists.
Too Dusty Fiber
・Dust or dirt is on the fiber surface
・Dust or dirt is on the objective lens.
・[Cleaning Arc] time is too short or “OFF.”
・Completely prepare the fiber again (strip, clean and cleave).
・Execute the [Dust Check]. Clean the lens if dust or dirt
exists.
・Increase the [Cleaning Arc] time in small increments.
ZL/ZR Motor
Overrun
・The bare fiber is too far back and does
not reach the electrodes.
・The cleave length (bare fiber) is too short.
・Press RESET, re-position the fiber again with the end-face
closer to the electrodes.
・Confirm the set position of the stripped fiber end on the
fiber cleaver. Check the cleave length.
Large Cleave
Angle
・Bad fiber end-face
・[Cleave Limit] is set too low
・Check the condition of the fiber cleaver. If the blade is
worn, rotate the blade to a new position. If dirty, clean
clamp pads, anvil, or blade.
・Load the default value from the splice mode database.
Cleave Shape NG
・Bad fiber end-face
・Clean and check the condition of the fiber cleaver. If the
blade is worn, rotate the blade to a new position. If dirty,
clean clamp pads, anvil, or blade.
High Estimated
Loss
・Dust or dirt is on the fiber surface
・Bad fiber end-face
・Unstable arc discharge
・Completely prepare the fiber again (strip, clean and cleave).
・Check the condition of the fiber cleaver. If the blade is
worn, rotate the blade to a new position.
・Electrodes might be worn. Perform [Electrode Stabilization]
or replace electrodes.
*This table only shows a few possible errors. Refer to the instruction manual for a more comprehensive list.
Fujikura Ltd.
1-5-1, Kiba, Koto-ku, Tokyo 135-8512, Japan
General inquiries: +81-3-5606-1164
Service & support: +81-3-5606-1534
https://www.fujikura.com
Fujikura Asia Ltd.
438A Alexandra Road,Block A Alexandra Technopark #08-03,Singapore 119967
General inquiries, service & support : +65-6-278-8955
https://www.fujikura.com.sg
Fujikura Europe Ltd.
C51 Barwell Business Park, Leatherhead Road, Chessington, Surrey, KT9 2NY, UK
General inquiries : +44-20-8240-2000
Service & support : +44-20-8240-2020
https://www.fujikura.co.uk
AFL
260, Parkway East, Duncan, SC29334, USA
General inquiries : +1-800-235-3423
Service & support : +1-800-866-3602
https://www.aflglobal.com
Fujikura (CHINA) Co., Ltd
7thFloor, Shanghai Hang Seng Bank Tower, 1000 Lujiazui Ring Road, Pudong New Area,
Shanghai 200120, CHINA
General inquiries, service & support : +86-21-6841-3636
http://www.fujikura.com.cn
Authorized Splicer Distributor
Solutions for Common Splicer Errors
Contact Information
Other Fujikura Industrial Electrical manuals
Popular Industrial Electrical manuals by other brands

Murata
Murata GRM219R71E104MA01 Series Reference sheet

Murata
Murata GRM1885C1H5R6CA01 Series Reference sheet

Murata
Murata GRM1885C1H122JA01 Series Reference sheet

SMC Networks
SMC Networks MXZ12 Series Operation manual

Murata
Murata GRM2165C1H201JA01 Series Reference sheet

LEGRAND
LEGRAND Wattstopper DSW-100 installation instructions