Full Boar FBT-1200 User manual

INSTRUCTION MANUAL
WARNING: Read all safety warnings and all instructions. Failure to follow the
warnings and instructions may result in electric shock, fire and/or serious injury.
Save all warnings and instructions for future reference.
DEMOLITION
HAMMER
• 40 Joules
• 1150min-1
0217

Power: 1500W
Input: 230-240V ~ 50Hz
Impact Energy: 40 joule
Impact Rate: 1150min-1
Breaking Capacity: 200mm
Bit Fitment: Hex
Weight (tool only): 14.2kg
2
1. Front Han le (with soft grip)
2. On/Off Trigger
3. Lock-on Button
4. Rear Han le (with soft grip)
5. Carbon Brush Access
6. Grease Cap
7. Han le Locking Knob
8. Quick Release Bit Lock
1
5
2
7
3
4
SPECIFICATIONS – MODEL NO. FBT-1200
KNOW YOUR PRODUCT
86

3
SPECIFICATIONS…………………………………………
KNOW YOUR PRODUCT……………………………….
INTRODUCTION………………………………………...
SAFETY INSTRUCTIONS………………………………..
ASSEMBLY………………………………………………..
OPERATION ……………………………………………..
MAINTENANCE …………….…………………………..
CONTENTS ……………………………………………...
WARRANTY………………………………………………
Page 2
Page 2
Page 4
Page 4
Page 8
Page 9
Page 10
Page 13
Page 14
TABLE OF CONTENTS

4
Congratulations on purchasing a Full Boar Demolition Hammer.
Your Full Boar Demolition Hammer FBT-1200 has been
esigne for rapi breaking an chipping of concrete, block
an masonry pro ucts.
Warning! When using mains-powere equipment, basic safety
precautions, inclu ing the following, shoul always be followe to re uce
risk of fire, electric shock, personal injury an material amage.
Rea an un erstan the manual prior to operating this tool.
Save these instructions an other ocuments supplie with this tool for
future reference.
The electric motor has been esigne for 230V an 240V only. Always check that the
power supply correspon s to the voltage on the rating plate.
Note: The supply of 230V an 240V on Full Boar tools are interchangeable for
Australia an New Zealan .
If the supply cor is amage , it must be replace by an electrician or a power
tool repairer in or er to avoi a hazar .
Using an Extension Lead
Always use an approve extension lea suitable for the power input of this tool.
Before use, inspect the extension lea for signs of amage, wear an ageing.
Replace the extension lea if amage or efective.
When using an extension lea on a reel, always unwin the lea completely. Use of
an extension lea not suitable for the power input of the tool or which is amage
or efective may result in a risk of fire an /or electric shock.
It is recommen e that the extension lea is a maximum of 25m in length. Do Not
use multiple extension lea s.
!
INTRODUCTION
SAFETY INSTRUCTIONS
ELECTRICAL SAFETY

5
WARNING! Rea all safety warnings an all instructions. Failure to follow the
warnings an instructions may result in electric shock, fire an /or serious
injury.
Save all warnings an instructions for future reference. The term “power tool”
in the warnings refers to your mains-operate (cor e ) power tool or battery-
operate (cor less) power tool.
1. Work area safety
a. Keep work area clean and well lit. Cluttere or ark areas invite acci ents.
b. Do not operate power tools in explosive atmospheres, such as in the presence
of flammable liquids, gases or dust. Power tools create sparks which may ignite the
ust or fumes.
c. Keep children and bystanders away while operating a power tool. Distractions
can cause you to lose control.
2. Electrical safety
a. Power tool plugs must match the outlet. Never modify the plug in any way. Do
not use any adapter plugs with earthed (grounded) power tools. Unmo ifie plugs
an matching outlets will re uce risk of electric shock.
b. Avoid body contact with earthed or grounded surfaces, such as pipes,
radiators, ranges and refrigerators. There is an increase risk of electric shock if your
bo y is earthe or groun e .
c. Do not expose power tools to rain or wet conditions. Water entering a power
tool will increase the risk of electric shock.
d. Do not abuse the cord. Never use the cord for carrying, pulling or unplugging
the power tool. Keep cord away from heat, oil, sharp edges or moving parts.
Damage or entangle cor s increase the risk of electric shock.
e. When operating a power tool outdoors, use an extension cord suitable for
outdoor use. Use of a cor suitable for out oor use re uces the risk of electric shock.
f. If operating a power tool in a damp location is unavoidable, use a residual
current device (RCD) protected supply. Use of an RCD re uces the risk of electric
shock.
3. Personal safety
a. Stay alert, watch what you are doing and use common sense when operating a
power tool. Do not use a power tool while you are tired or under the influence of
drugs, alcohol or medication. A moment of inattention while operating power tools
may result in serious personal injury.
b.Use personal protective equipment. Always wear eye protection. Protective
equipment such as ust mask, non-ski safety shoes, har hat, or hearing protection
use for appropriate con itions will re uce personal injuries.
c. Prevent unintentional starting. Ensure the switch is in the off-position before
connecting to power source and/or battery pack, picking up or carrying the tool.
Carrying power tools with your finger on the switch or energising power tools that
have the switch on invites acci ents.
!
GENERAL SAFETY INSTRUCTIONS

6
d. Remove any adjusting key or wrench before turning the power tool on. A
wrench or a key left attache to a rotating part of the power tool may result in
personal injury.
e. Do not overreach. Keep proper footing and balance at all times. This
enables better control of the power tool in unexpecte situations.
f. Dress properly. Do not wear loose clothing or jewellery. Keep your hair,
clothing and gloves away from moving parts. Loose clothes, jewellery or long
hair can be caught in moving parts.
g. If devices are provided for the connection of dust extraction and collection
facilities, ensure these are connected and properly used. Use of ust collection
can re uce ust-relate hazar s.
. Power tool use and care
a. Do not force the power tool. Use the correct power tool for your
application. The correct power tool will o the job better an safer at the rate for
which it was esigne .
b. Do not use the power tool if the switch does not turn it on and off. Any
power tool that cannot be controlle with the switch is angerous an must be
repaire .
c. Disconnect the plug from the power source and/or the battery pack from
the power tool before making any adjustments, changing accessories, or
storing power tools. Such preventive safety measures re uce the risk of starting
the power tool acci entally.
d. Store idle power tools out of the reach of children and do not allow
persons unfamiliar with the power tool or these instructions to operate the
power tool. Power tools are angerous in the han s of untraine users.
e. Maintain power tools. Check for misalignment or binding of moving parts,
breakage of parts and any other condition that may affect the power tool’s
operation. If damaged, have the power tool repaired before use. Many
acci ents are cause by poorly maintaine power tools.
f. Keep cutting tools sharp and clean. Properly maintaine cutting tools with
sharp cutting e ges are less likely to bin an are easier to control.
g. Use the power tool, accessories and tool bits etc. in accordance with these
instructions, taking into account the working conditions and the work to be
performed. Use of the power tool for operations ifferent from those inten e
coul result in a hazar ous situation.
5. Service
a. Have your power tool serviced by a qualified repair person using only
identical replacement parts. This will ensure that the safety of the power tool is
maintaine .
b. If the supply cord of this power tool is damaged, it must be replaced by a
specially prepared cord available through the service organization.
GENERAL SAFETY INSTRUCTIONS cont.)

!
!
7
•Wear ear protectors. Exposure to noise can cause hearing loss.
•Use auxiliary handle(s), if supplied with the tool. Loss of control can cause personal injury.
•Hold power tool by insulated gripping surfaces, when performing an operation
where the cutting accessory may contact hidden wiring or its own cord. Cutting
accessory contacting a “live” wire may make expose metal parts of the power tool “live”
an coul give the operator an electric shock.
WARNING! This appliance is not inten e for use by persons (inclu ing chil ren) with
re uce physical, sensory or mental capabilities, or lack of experience an knowle ge,
unless they have been given supervision or instruction concerning use of the appliance by
a person responsible for their safety.
Recommendations for the use of a residual current device with a rate resi ual current of
30mA or less.
• Always use an approve extension lea suitable for the power input of this tool. Before
use, inspect the extension lea for signs of amage, wear an ageing. Replace the
extension lea if amage or efective.
• When using an extension lea on a reel, always unwin the lea completely. Use of an
extension lea not suitable for the power input of the tool or which is amage or
efective may result in a risk of fire an electric shock.
• It is recommen e that the extension lea is a maximum of 25m in length. Do Not use
multiple extension lea s.
• Before rilling into walls, ceilings etc, ensure there are no conceale power cables or pipes
in the cavity.
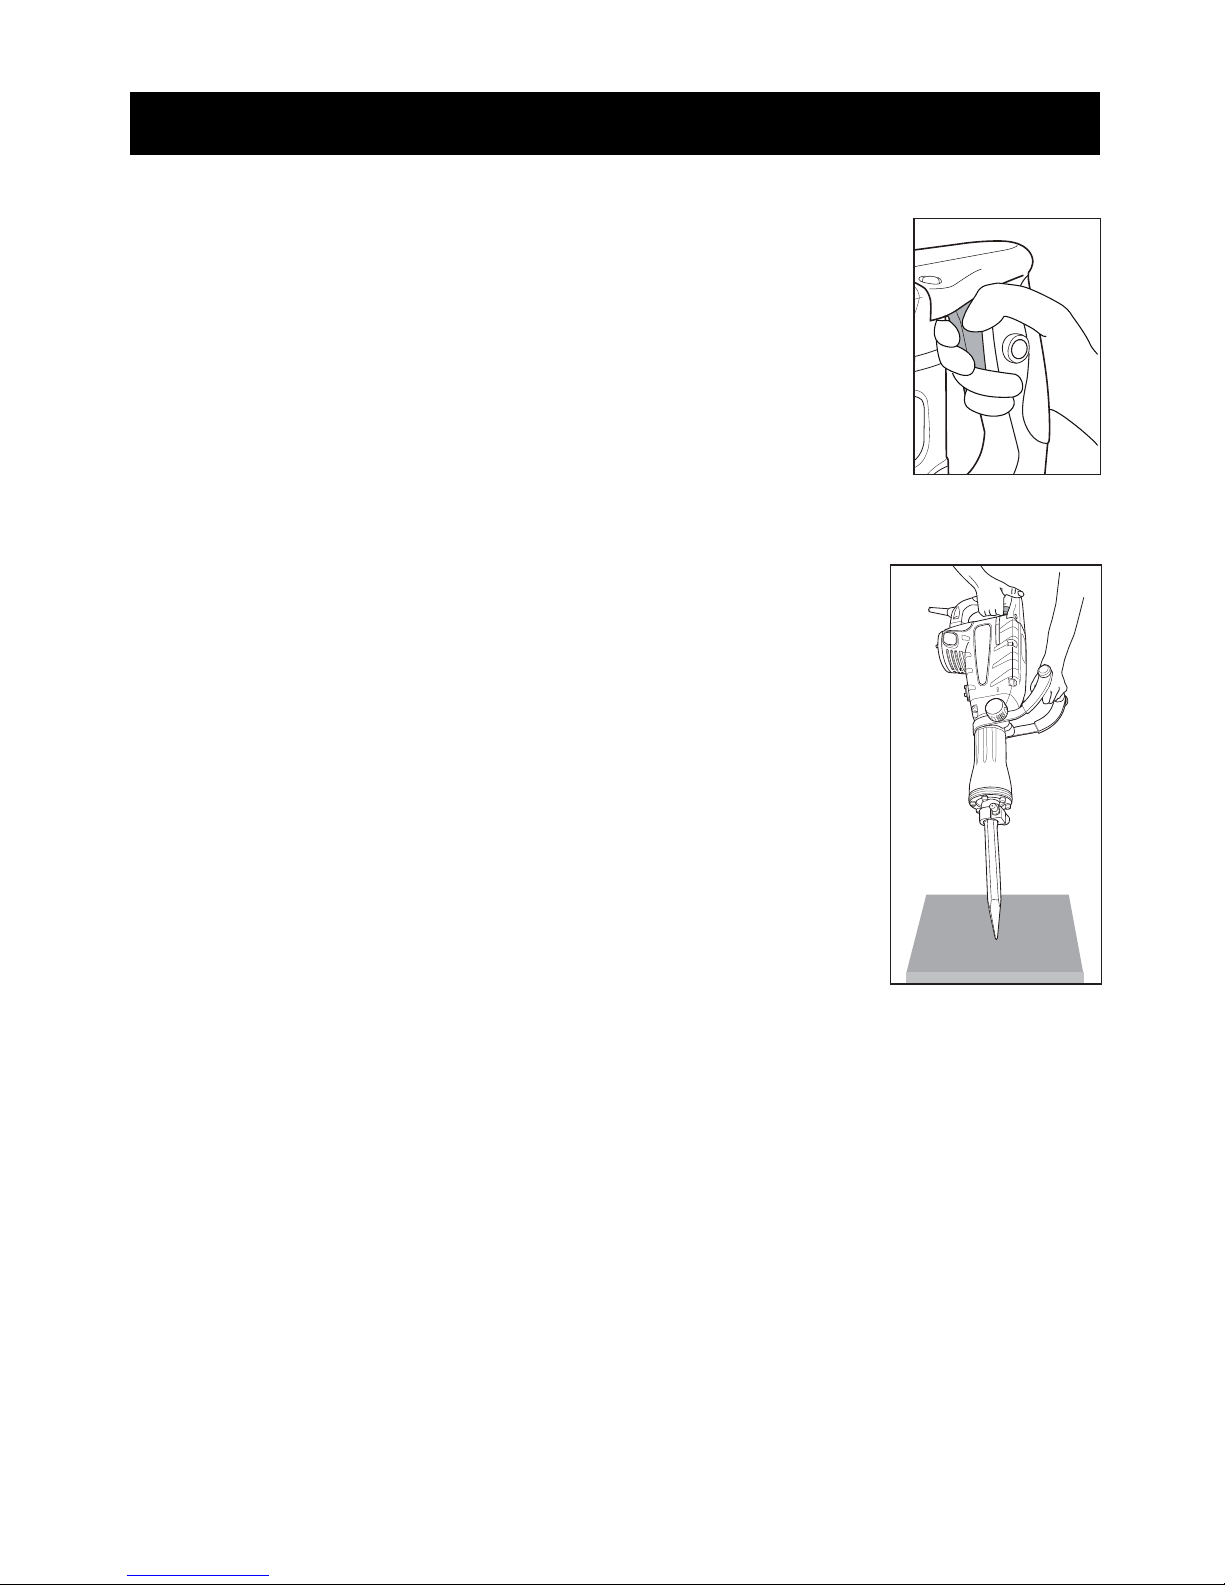
• Always use the si e han le, this gives you greater control if the accessory shoul
become jamme .
• Keep the cor clear of the accessory being use , o not wrap the cor aroun your arm
or wrist.
• Hol the tool by the insulate gripping surfaces when performing an operation where the
accessory may contact hi en wiring or its own cor .
• Use thick cushione gloves an limit the exposure time by taking frequent breaks.
• Vibration cause by the hammer action may be harmful to your han s an arms.
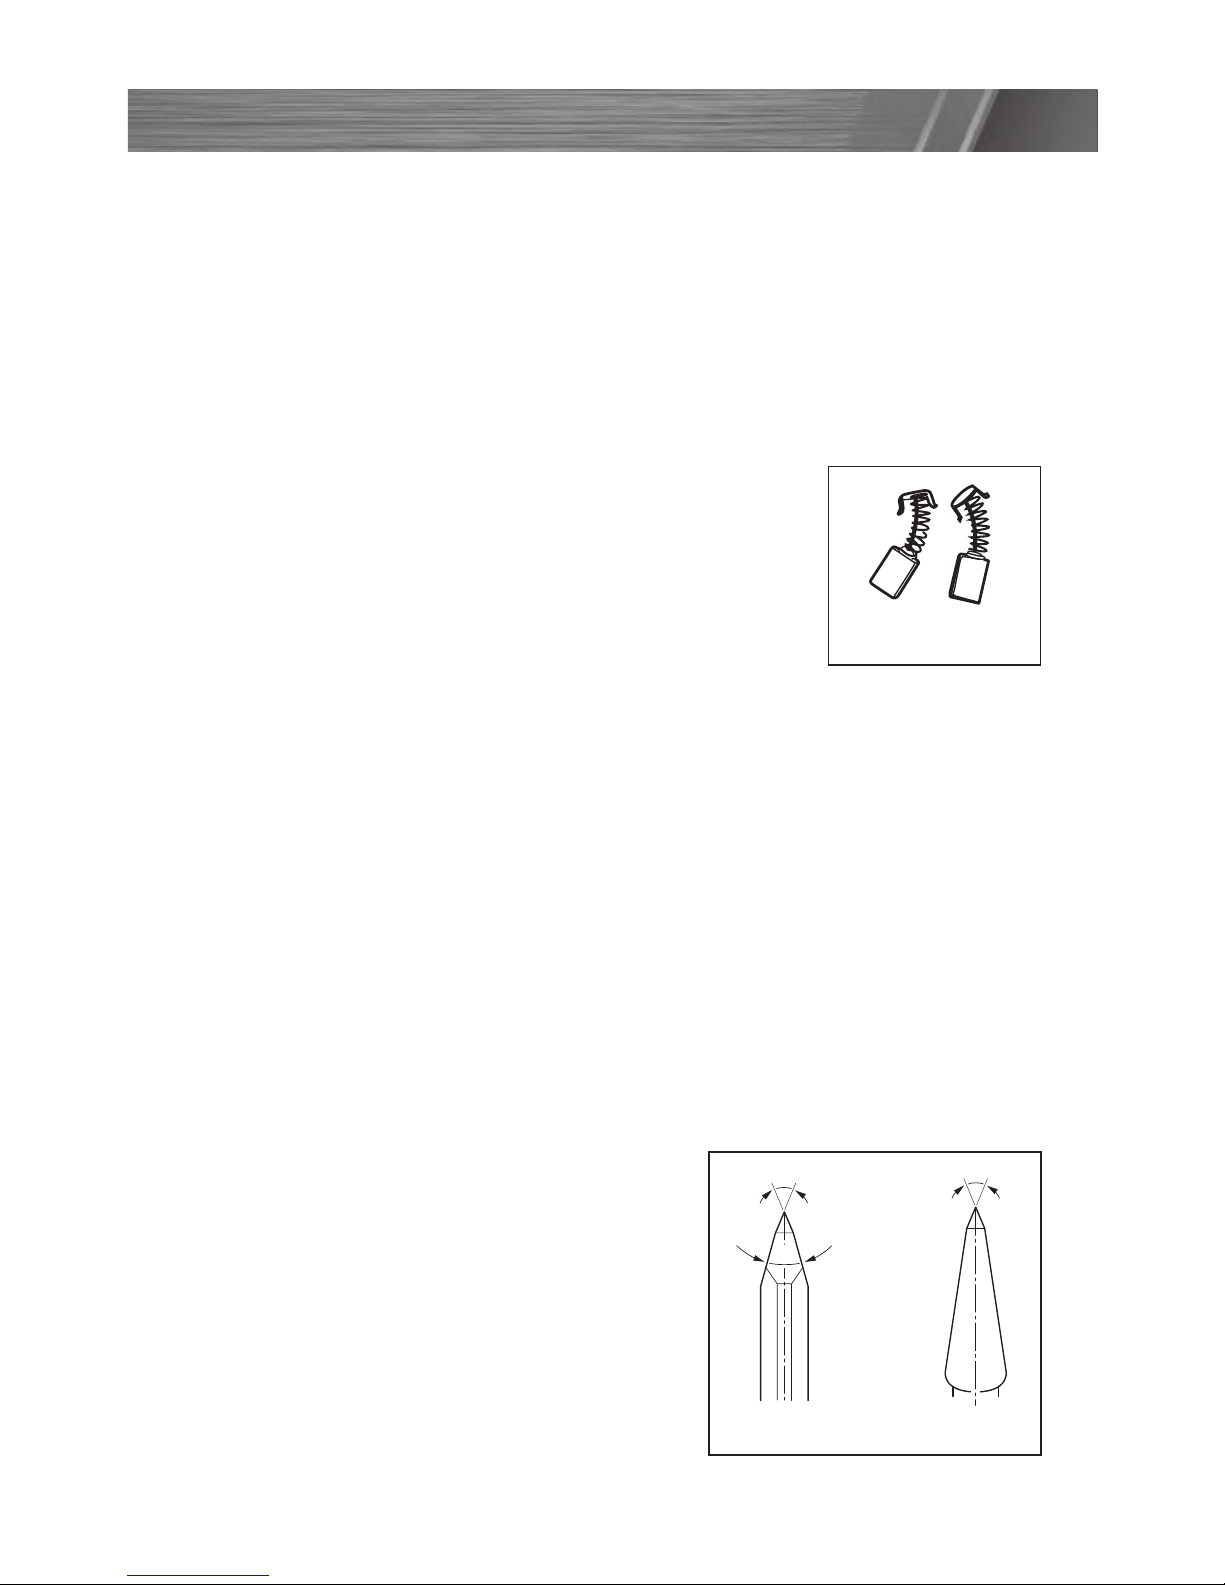
• When removing an accessory from the tool avoi contact with skin an use proper protective
gloves when grasping the bit or accessory. Accessories may be hot after prolonge use.
WARNING! Some ust create by power san ing, sawing, grin ing, rilling an
other construction activities contain chemicals known to cause cancer, birth efects
or other repro uctive harm.
Some examples of these chemicals are:
• Lea from lea -base paints;
• Crystalline silica from bricks, cement an other masonry pro ucts, an ;
• Arsenic an chromium from chemically-treate timber.
The risk from such exposures vary epen ing on how often you o this type of work. To
re uce your exposure to these chemicals; work in a well ventilate area, an work with
approve safety equipment, such as those ust masks that are specifically esigne to filter
out microscopic particles.
Always wear eye protection an a ust mask for usty applications an when rilling/chiselling
overhea . San ing particles can be absorbe by your eyes an inhale easily an may cause
health complications.
ADDITIONAL SAFETY RULES FOR DEMOLITION HAMMERS

8
WARNING! BEFORE ATTACHING OR REMOVING ANY ACCESSORIES, BE SURE TO
DISCONNECT THE DEMOLITION HAMMER FROM THE POWER SUPPLY
Adjusting the Front Handle
The front han le (1) is a justable to any position aroun the 360°
han le collar mount.
1. Rotate the front han le (1) aroun the collar mount to the
esire position.
2. Tighten the accessory locking knob (7) by turning clockwise to
secure the han le into place.
Fitting and Removing Accessories
Important! Always lubricate the accessory fitment prior to
inserting them into the emolition hammer. Using your
finger, apply grease sparingly to the shaft of the accessory
from the supplie tub of grease. Lubricating the accessories will prolong the life of your
emolition hammer. Non-lubrication of accessories will voi your warranty.
Note: Prior to fitting an accessory, remove any ust or ebris from the shank of the accessory.
1. Pull out the quick release bit lock (8) an rotate it 180º.
2. Insert the shank of the accessory into the nose of the tool.
Ensure the notch on the shank is positione as per the
illustration shown. The notch in the shank of the accessory
has to face the flat of the accessory hol er as illustrate . If
the notch is in an incorrect position, the shank will not
lock into position.
3. Lock the shank into the nose of the tool by pulling out the quick
release bit lock (8) an rotating it 180º.
. Pull on the accessory to ensure it is properly secure .
Note: The accessories will have a small amount (approx. 10-12mm) of
back an forth movement from the accessory hol er, this is normal.
Note: To avoi amage to the quick release bit lock (8), only use roun hex shank bits.
Damage cause to the bit lock (8) by using incorrect accessories will not be covere un er
warranty.
Warning! Accessories can be hot after use, always wear gloves to prevent burns or
lacerations.
ASSEMBLY
Fig.1
Fig. 3
Pull and
rotate 180°
Fig. 2
Fig. 4

9
OPERATION
On/Off Switch
To turn the emolition hammer on, squeeze the On/Off Trigger (2).
To turn the emolition hammer off, release the On/Off Trigger (2).
Lock-on Button
To lock the On/Off Trigger (2). in the on position that the
emolition hammer continually works, squeeze the On/Off Trigger
(2) an then press the Lock-On Button (3). Take pressure off the
On/Off Trigger (2). before releasing the Lock-on Button (3).
Note: Always wait until the accessory has stoppe moving before
putting own the emolition hammer.
Cold Hammering
If the emolition hammer is store for long perio s of time or
at col temperatures, the lubrication may become stiff an the
emolition hammer may not hammer initially or the hammering
may be weak.
Shoul this occur, insert an accessory into the emolition
hammer, turn the emolition hammer on an apply the en of
the accessory against a scrap piece of concrete or timber. Turn
the emolition hammer on an off every few secon s. After 15
secon s to 2 minutes, the emolition hammer shoul have
starte to hammer normally. The col er the emolition hammer,
the longer it may take to warm up an function like normal.
Note: Always wait until the accessory has stoppe moving
before putting own the emolition hammer.
Operating the Demolition Hammer
For the best penetration rates in concrete, run the emolition hammer with a
stea y pressure, but o not use excessive force as this will ecrease the efficiency
of the emolition hammer.
Do not use the flat chisel as a “pry bar”. Using the flat chisel for prying or pushing
ebris away from your work area will amage the flat chisel an potentially cause
amage to your emolition hammer. Such amage will voi your warranty.
Fig. 6
Fig. 5

10
MAINTENANCE
• Keep the ventilation vents of the demolition hammer clean at all times, if
possible, prevent foreign matter from entering the vents.
• After each use, blow air through the demolition hammer housing to ensure it is
free from all dust particles which may build up. Build up of dust particles may
cause the demolition hammer to overheat and fail.
•If the enclosure of the demolition hammer requires cleaning, do not use solvents,
but a moist soft cloth only. Never let any liquid get inside the demolition hammer;
never immerse any part of the demolition hammer into a liquid.
Carbon brushes
When the carbon brushes wear out, the demolition hammer
will spark and/or stop. Discontinue use as soon as this
happens. They should be replaced prior to recommencing use
of the demolition hammer. Carbon brushes are a wearing
component of the demolition hammer, therefore not covered
under warranty. Continuing to use the demolition hammer
when the carbon brushes need to be replaced may cause
permanent damage to the demolition hammer. Carbon
brushes will wear out after many uses but when the carbon brushes need to be
replaced, take the demolition hammer to an electrician or a power tool repairer for a
quick and low cost replacement. Always replace both carbon brushes at the same time.
Gear Box Grease Replenishment
The grease in the gearbox will require replenishment after approximately 50 hours of
accumulative use. After this time, add approximately 30 / 50 grams (approx 2-3
teaspoons) from the supplied tub of grease into the gearbox.
First remove the grease cap (6) from the demolition hammer by using the hex key to
loosen all four bolts. Once removed, add the grease through this hole. Ensure the
grease cap (6) is secured back into position with all four bolts properly fastened prior
to operation.
Note: Ozito Industries will not be responsible for any damage or injuries caused by
the repair of the demolition hammer by an unauthorised person or by mishandling of
the demolition hammer.
Re-sharpening the chiselling tools
Good results are only achieved with sharp chisels,
therefore sharpen the chiselling accessories
regularly. This prolongs the service life of the tools
and ensures good working performance.
Sharpen chiselling tools using grinding wheels (e.
g., ceramic bonded corundum wheel) with a
steady supply of water. Recommended values for
this purpose are shown below. Take care that no
annealing coloration appears on the cutting
edges, otherwise the hardness of the chiselling
tools will be impaired
Carbon brushes
60°
60°
20°
Pointed Chisel Flat Chisel

11
TROUBLE SHOOTING
Symptom Solution
Accessory is falling out Ensure that the accessory locking bolt
has been rotate to the correct position.
Not chiseling or low
breaking power
Tool temperature low
Accessories not lubricate
Refer to insert or Col Hammering section
for instructions on how to resolve this issue
A small amount of sparking
is visible through the housing
air vents
This is normal an oes not in icate
a problem
Excessive sparking is visible
through the housing air vents
an /or the emolition
breaker is failing to operate
This may in icate the carbon brushes have
worn out an nee to be replace . Carbon
brushes shoul only be replace by a
qualifie electrician or power tool repairer.
Accessory is jamme / stuck
in concrete uring use
Release the accessory locking mechanism,
allowing the emolition breaker to be
separate from the accessory. The accessory
shoul be easily remove from concrete once
it is etache from the emolition breaker.
Accessory repeate ly
becomes stuck while in use
Free the accessory as escribe above.
Refrain from penetrating too eeply with the
chisel bit, as it is prone to becoming stuck
when emolishing large pieces of concrete.

12
Power tools that are no longer usable shoul not be ispose
of with househol waste but in an environmentally frien ly way.
Please recycle where facilities exist. Check with your local
council authority for recycling a vice.
Recycling packaging re uces the nee for lan fill an raw
materials. Reuse of recycle material ecreases pollution in the
environment. Please recycle packaging where facilities exist.
Check with your local council authority for recycling a vice.
CARING FOR THE ENVIRONMENT
DESCRIPTION OF SYMBOLS
VVolts Hz Hertz
~Alternating current WWatts
/min Revolutions or
reciprocation per minute
øDiameter dB Decibel level
Double insulated Regulator compliance mark
/bpm Impact rate Warning
no No load speed

Distributed by:
Ozito Industries Pty Ltd
AUSTRALIA (Head Office)
1-23 Letcon Drive, Bangholme Victoria, Australia, 3175
Telephone: 1800 069 486
1 x FBT-1200 Demolition Hammer
1 x Pointed chisel
1 x Flat chisel
1 x Grease pot
1 x Hex key
1 x Carry case
1 x Side handle (fitted)
CONTENTS
13

WARRANTY EXCLUSIONS
The following actions will result in the warranty being void.
If the tool has been operated on a supply voltage other than that specified on the tool.•
If the tool shows signs of damage or defects caused by or resulting from abuse, accidents•
or alterations.
Failure to perform maintenance as set out within the instruction manual.•
If the tool is disassembled or tampered with in any way.
The warranty excludes damage resulting from product misuse or product neglect.
•
•
This warranty is given by Ozito Industries Pty Ltd.
ABN: 17 050 731 756
Ph.1800 069 486
Australia/New Zealand (Head Office)
1-23 Letcon Drive, Bangholme, Victoria, Australia 3175
FB1
WARRANTY
TO ENSURE A SPEEDY RESPONSE PLEASE HAVE THE MODEL NUMBER AND DATE OF
PURCHASE AVAILABLE. A CUSTOMER SERVICE REPRESENTATIVE WILL TAKE YOUR CALL
AND ANSWER ANY QUESTIONS YOU MAY HAVE RELATING TO THE WARRANTY POLICY
OR PROCEDURE.
The benefits provided under this warranty are in addition to other rights and remedies which
are available to you under law. The warranty covers manufacturer defects in materials,
workmanship and finish under normal use.
1 YEAR WARRANTY
Your product is guaranteed for a period of 12 months from the original date of purchase.
If a product is defective it will be repaired in accordance with the terms of this warranty.
Warranty excludes consumable parts, for example: wheels, bearings.
Our goods come with guarantees that cannot be excluded under Australian Consumer law &
Consumer Guarantees Act 1993 (NZ). You are entitled to a replacement or refund for a major
failure and to compensation for other reasonably foreseeable loss or damage. You are also
entitled to have the goods repaired and replaced if the goods fail to be of acceptable quality
and the failure does not amount to a major failure.
`Australia 1800 069 486
New Zealand 0508 069 486
YOUR WARRANTY FORM SHOULD BE RETAINED BY YOU AT ALL TIMES. IN ORDER TO MAKE A
CLAIM UNDER THIS WARRANTY YOU MUST RETURN THE PRODUCT TO YOUR NEAREST
BUNNINGS WAREHOUSE (see www.bunnings.com.au or www.bunnings.co.nz for store locations)
WITH YOUR BUNNINGS REGISTER RECEIPT. PRIOR TO RETURNING YOUR PRODUCT FOR
WARRANTY PLEASE TELEPHONE OUR CUSTOMER SERVICE HELPLINE:
Table of contents
Other Full Boar Power Hammer manuals
Popular Power Hammer manuals by other brands

Graphite
Graphite 58G876 instruction manual

Hilti
Hilti TE 300-AVR manual

Metabo
Metabo MHE 95 operating instructions

Hitachi
Hitachi H 70SA Technical data and service manual

Scheppach
Scheppach 5808201985 Translation from original manual

Bosch
Bosch 11318EVS - SDS-max Demolition Hammer Operating/safety instructions

Alpha tools
Alpha tools A-H 1600 Original operating instructions

Makita
Makita HM001G instruction manual

Parkside
Parkside 353936 2010 Translation of the original instructions

EINHELL
EINHELL TC-DH 1600/1 Original operating instructions

VONROC
VONROC DH501AC Original instructions

Graphite
Graphite 58G876 instruction manual