Full Traction JK LONG ARM User manual

Part Number FTS7330 3.0” System
2007-14JEEPJKSUSPENSIONSYSTEM
MADE IN THE U S A
4.0” Kit Shown
JK LONG ARM
3.0”

Component Box A QTY
50-7330H1 Master Hardware Box
CA2005 Bracket, Front Brake Line / Left 1
CA2006 Bracket, Front Brake Line / Right 1
CA2007 Bracket, Rear Brake Line / Left 1
CA2008 Bracket, Rear Brake Line / Right 1
Nutsert Installation Hand Tool w/ 3/8” dia hole 1
Nutsert Nuts 3/8” Diameter 2
1/2” Tab Nuts 2
70-7340 Master Hardware Kit
Spacer, 2.68 x 0.97 x .62 ID Frame Crush 4
9/16” x 1-1/4” Bolt 2
9/16” x 4” Bolt 6
9/16” x 4-1/2” Bolt 2
9/16” MetalLock Nut 10
9/16” Flat Washer 20
1/2” x 4” Flat Head Tapered Cap Screw/Bolt 6
1/2” x 1-1/4” Bolt 2
1/2” x 5-1/2” Bolt 4
1/2” MetalLock Nut 10
1/2” Flat Washer 26
1/4” x 3/4” Bolt 4
1/4” Metalock Nut 4
1/4” Flat Washer 8
3/8”-16 x 1-1/2” Tapered Cap Screw 2
3/8” x 2-1/2” Bolt 1
3/8” x 4” Bolt 4
3/8” x Flat Washer 12
3/8” Metalock Nut 6
3/8” X 1-1/4” Bolt 2
12mmDia x 60mm Bolt 2
12mmDia x 65mm Bolt 2
12MM LockNut 4
JFX12 3/4” Chromoly Female Rod End 2
3/4” Jam Nut 2
50-713315 JK Track Bar Mis-Alignment Spacers 4
70-7535 Control Arm Heim Joint Kit
JM-16T 1” x 1-1/4”-12 Male Rod End 4
1-1/4” Jam Nut 4
70-7539 High Mis-Alignment Spacer Kit
50-750608-04 9/16” High Mis-Alignment Spacer 8
Component Box A QTY
Continued
50-710201 JK Front Track Bar Component 1
With Pre-installed Rubber eyelet bushing
50-710202 JK Rear Track Bar Component 1
With Pre-installed Rubber eyelet bushing
Components in Carton “A”
50-7309 Rear Upper Control Arm -Assembled 2
50-7302 Rear Lower Arm Frame Bracket, Right 1
50-7303 Rear Lower Arm Frame Bracket, Left 1
50-7304 Front Upper Arm Frame Bracket, Right 1
50-7305 Front Upper Arm Frame Bracket, Left 1
Control Arm Starting Measurements
The following dimensions listed here work on JK Factory
installed axles and may also be applied to other
Aftermarket axles.
Front Upper: Approx 22-1/4” Center to Center
Front Lower: Approx 30-1/4” Center to Center
Rear Upper: Approx 20.00” Center to Center
Measured outside of bracket when mounted on
vehicle.
Rear Lower: Approx 31.00” Center to Center
The Lower control arms are the most critical
measurement. The upper arms are for the fine adjustment.
Track Bars
Front: Approx: 32.5” Center to Center
Rear: Approx: 40.5” Center to Center
INSTALLATION INSTRUCTIONSINST ALLA TION INSTRUCTIONS
Read instructions from start
to finish before installation.
It is recommended to use the
services of a professional
installer.
Part Number FTS7330 3.0” Long Arm Suspension System
2013-07 Jeep Wrangler JK

FTS7330C Component Box QTY
FTS7340D Component Box QTY
50-750301 3.0” JK Front Coil Springs 2
50-710302 3.0” JK Rear Coil Springs 2
50-7305 JK Lower Crossmember Skid Plate 1
FTS7330B Component Box QTY
FTS306071 JK NEW GEN. Front Sway Bar Link Kit
(Assembled)
50-710301 JK Front Sway Bar Link Rod 2
50-5008 JK Base Pin threaded 1/2-13 2
U0120677 Bail Pins 4
MOO392-BK-01 5/8” Hourglass Bushing 4
SLE104 1/2” x 1-3/8” Sleeves 4
70-4180 12” Radius Shank Rear Sway Bar Link Kit
(Assembled)
12” 30 Degree Radius Shank Rear Sway Bar Links 2
SLE104 1/2” x 1-3/8” Sleeves 4
MOO392-BK-01 5/8” Hourglass Bushing 4
50-7340H2 Bump Stop & Hardware Kit
70-7119 Bump Stop Hardware Bag 1
50-7106 JK 4.0” Rear Bump Stop Block 2
CA1019 Jeep 3” X 3” Bump Stop Ext. 2
50-750610 Front & Rear Lower Control Arms 29.25” 2
50-730800 Front Upper Control Arm Uni 2

IMPORTANT NOTES
WARNING: This suspension system will enhance the off-road
performance of your vehicle. It will handle differently, both on and
off-road, from a factory equipped passenger car or truck.
Extreme care must be used to prevent loss of control or vehicle
rollover during abrupt maneuvers. Failure to drive this vehicle
safely may result in serious injury or death to the driver and
passengers. ALWAYS WEAR your seat belts. Reduce your
speed, and AVOID sharp turns and other abrupt maneuvers.
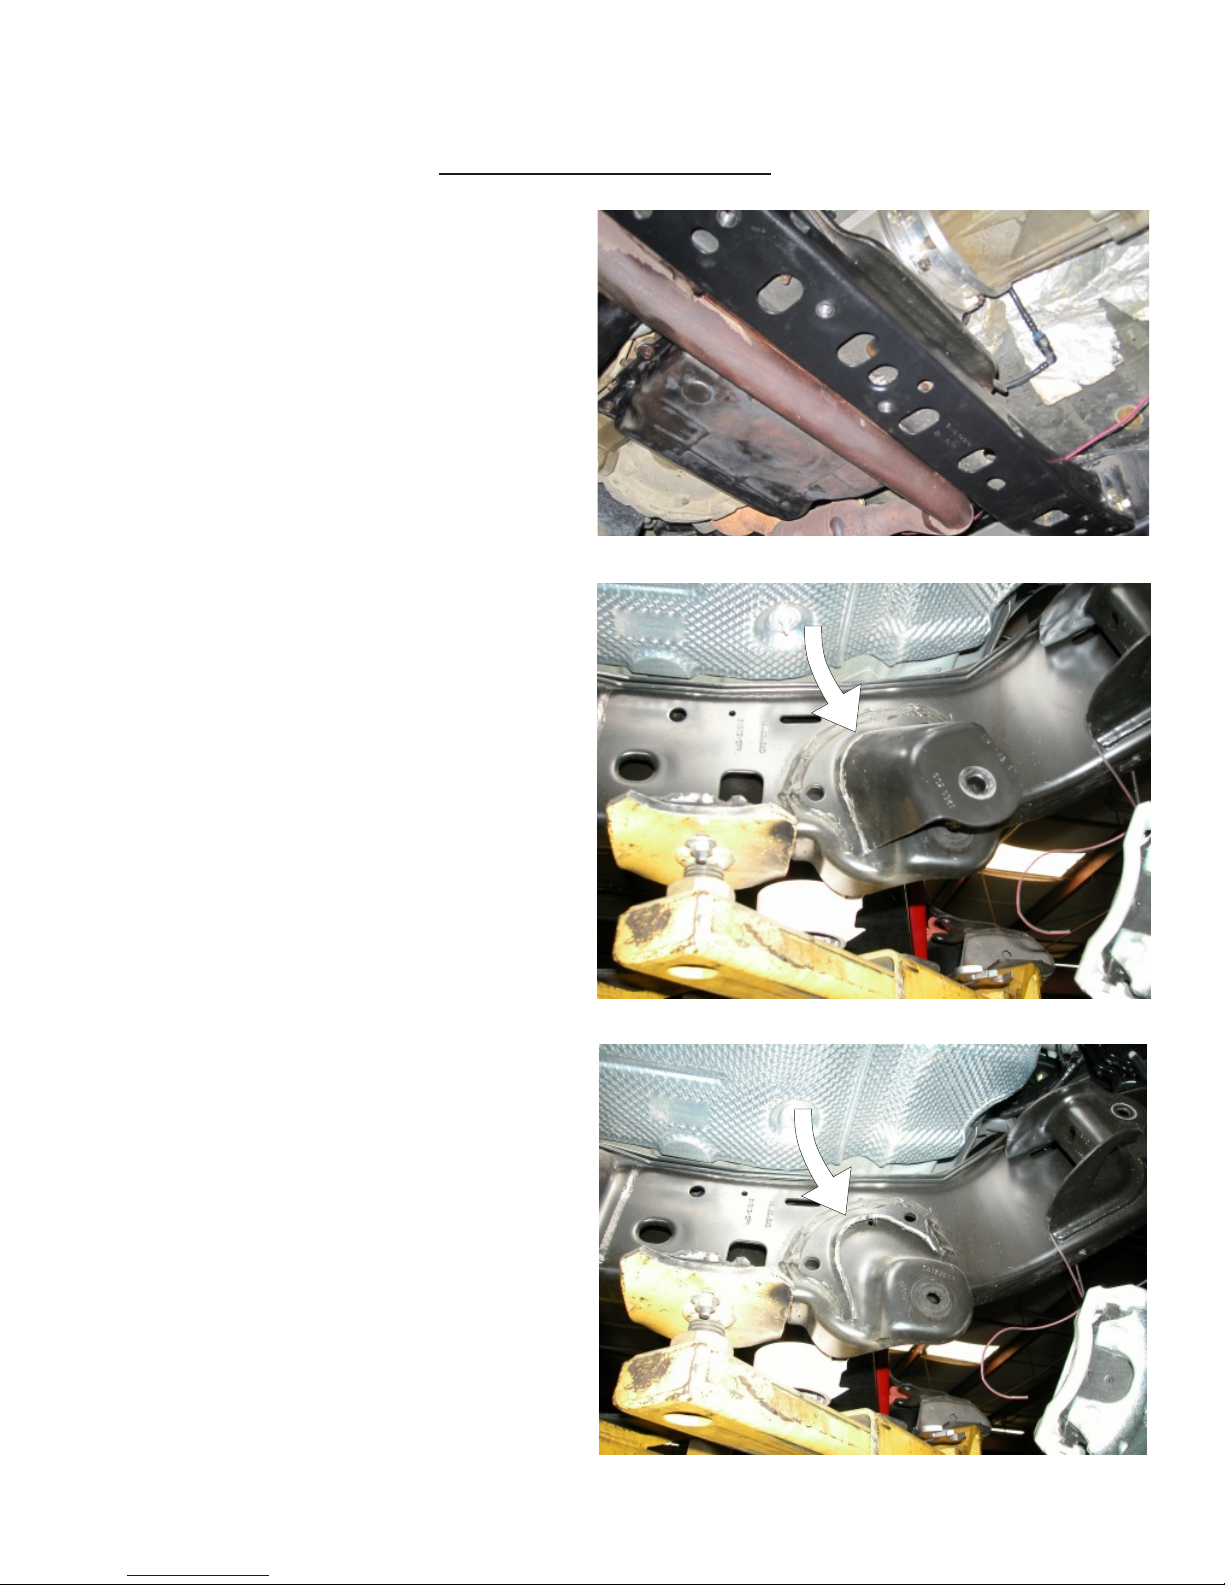
Before installing this system, have the vehicle’s alignment
checked by a certified technician. The alignment must be within
factory specifications and the frame of the vehicle must be sound
(no cracks, damage or corrosion).
Do not chrome, cad or zinc plate any of the components in this
system. Changing the coated surface of components will void the
warranty of your Full Traction Suspension.
This suspension system was developed using the following tire &
wheel combination: 35” x12.50 tire, 17 x 8 wheel with 4.5 inches
of wheel backspacing. Before installing any other combination,
consult your local tire and wheel specialist.
Mandatory Requirements
The required installation time for this system is approximately
12-15 hours. Installation time will vary. NO transfer case or
exhaust modifications are required for 2007-2009 or 2012
You’ve made a purchase of the best suspension system
available. For a correctly installed system, follow these
instructions. If you do not have the tools or are unsure of your
abilities, have this system installed by a certified technician.
FULL TRACTION SUSPENSION IS NOT RESPONSIBLE FOR
DAMAGE OR FAILURE RESULTING FROM AN IMPROPER OR
MODIFIED INSTALLATION.
ADDITIONAL INFORMATION
Congratulations on your purchase of the highest quality
suspension system available for the Jeep JK. Some of the
service procedures require the use of special tools designed for
specific procedures. The following common tools and supplies
are recommended for proper installation of this system,
However, not all of the items listed are required.
- Jeep Factory Service Manual
- Coil Spring Compressor
- Universal Steering Linkage Puller
- Ball Joint Separator
- Prevailing Torque Nuts (for steering linkage)
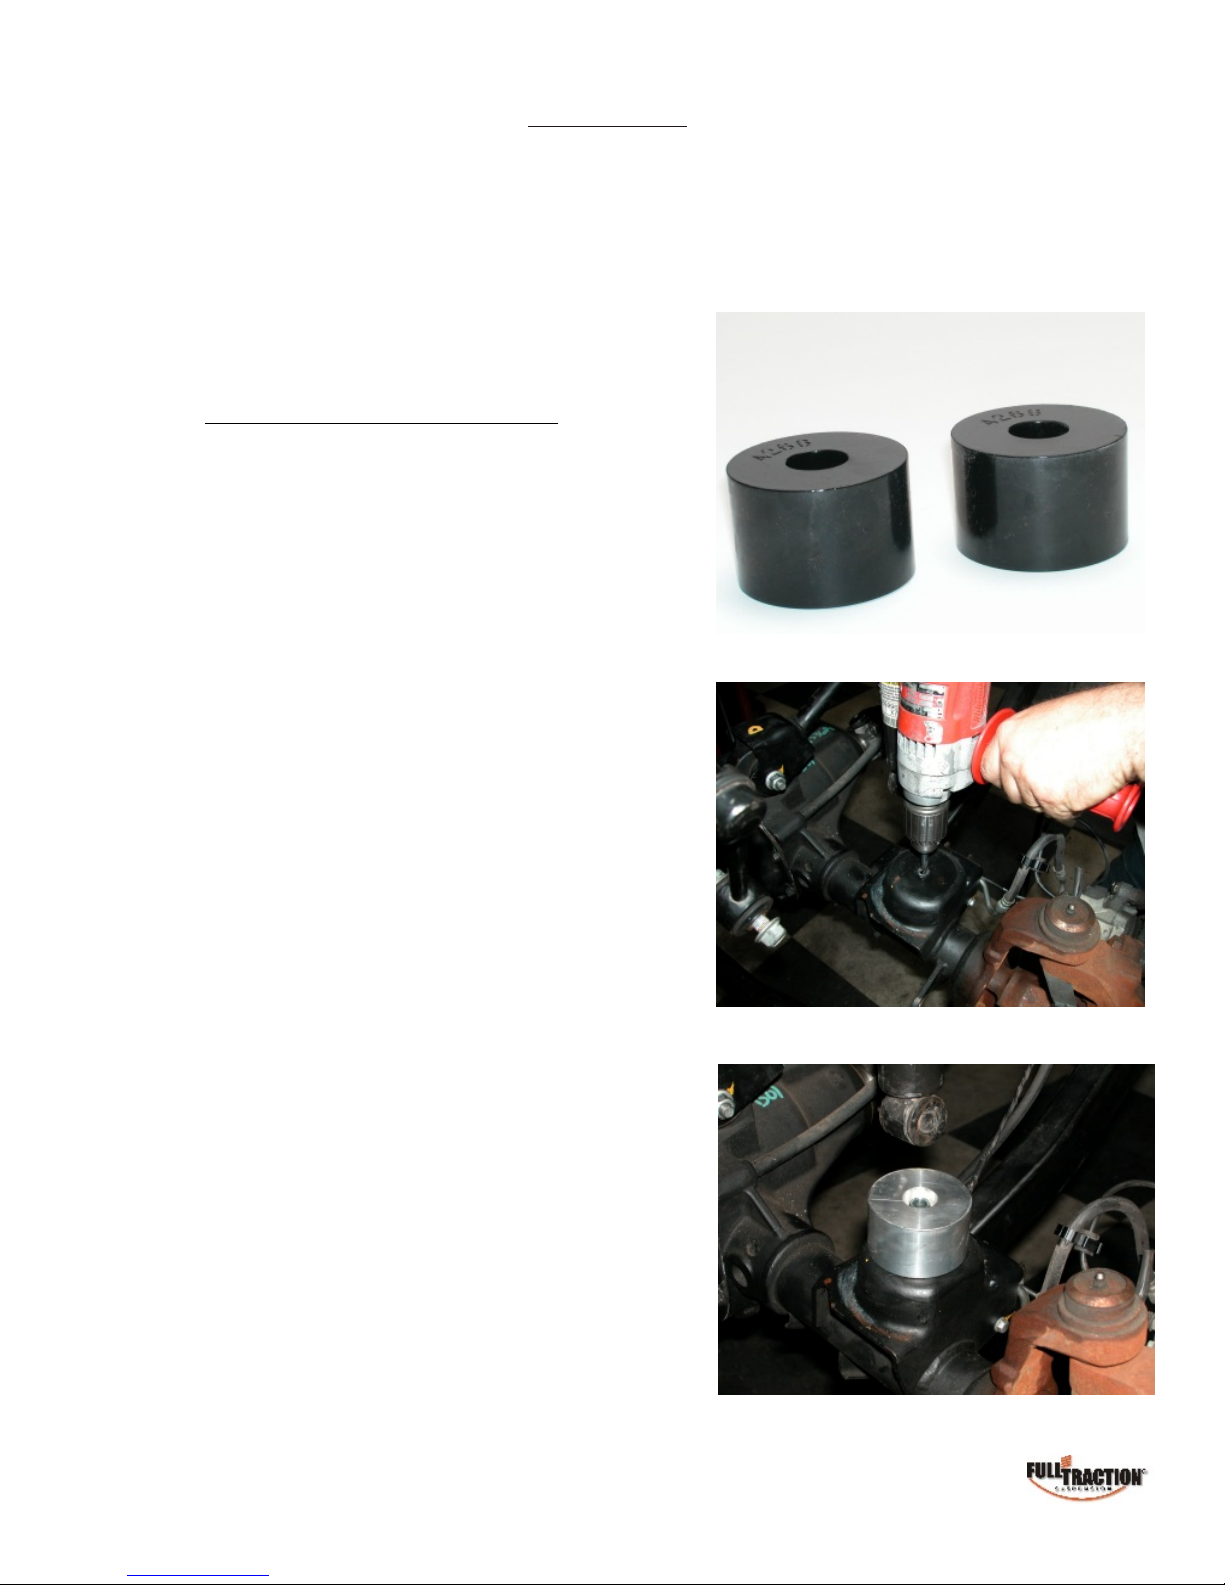
- Die Grinder
- Drill Motor
- Assorted Drills: 1/8” & larger
- Tie Down Strap
- Torque Wrench
- 1/2” drive Ratchet and Sockets
- Assorted Combination Wrenches
- Heavy Duty Jack Stands
- Wheel Chocks or Blocks
- Hydraulic Floor Jacks
- Center Punch
- File
- Large “C” Clamps, Bench Vise and Adjustable Straps.
- Hammer
- Hole Saw
- Wire Brush ( to clean mounting surfaces)
- Assembly Grease
- Tape measure
- Safety Glasses ( wear safety glasses at all times)
- Semi Gloss Black Spray Paint

Important Safety Warning
2013-07 Jeep Wrangler JK
with Electronic Stability Program (ESP)
Must Read:
Standard on the all-new 2007 Jeep Wrangler is an Electronic Stability Program (ESP), which aids the driver in
maintaining vehicle directional stability in severe driving maneuvers on any type of surface. ESP features three
modes – “full on,” “full off” and “partial on. ESP provides the greatest benefit in critical driving situations such as
turns, and is especially valuable when driving on mixed surface conditions including snow, ice or gravel. If there's
a discernible difference between what the driver directs through the steering wheel and the vehicle's path, ESP
applies selective braking and throttle input in order to put the vehicle back onto the driver's intended path.
Note:
ESP system activation will occur on a lifted Jeep JK when the steering wheel and the front steering system are
not in proper alignment. Full-Traction Suspension recommends a professional front end alignment of the vehicle
immediately following installation of any lift system. Proper alignment includes adjusting the Steering Drag Rod
and Centering the Steering Wheel. Failure to align the front of the vehicle will result in automatic activation of the
ESP system while driving.
Safety Warning:
Suspension systems or components that enhance the off-road performance of your vehicle may cause it to
handle differently, on and off-road, than it did from the factory. Care must be taken to prevent loss of control or
vehicle rollover during sudden maneuvers. Failure to drive the vehicle safely may result in serious injury or death
to driver and passengers. We recommend you always wear your seatbelt, drive safely and avoid quick turns and
other sudden maneuvers. Constant maintenance is required to keep your vehicle safe. Thoroughly inspect your
vehicle before and after every off road use.
Installation Warning:
We recommend that certified technicians perform the installations of our products.Attempts to install these
products without knowledge or experience may jeopardize the safety of the vehicle. These instructions only cover
the installation of our products and may not include factory procedures for disassembly and reassembly of factory
components. Read instructions from start to finish and be sure all parts are present before disassembling the
vehicle. Included instructions are guidelines only for recommended procedures and in no way are meant to be
definitive. Installer is responsible to insure a safe and controllable vehicle after performing modifications. Do not
perform test drives on public roads with partially completed installations. Always double and triple check your
work before use. Eye protection is recommended when using power tools.
Pg.5

PLEASE NOTE:
The required wheel size - minimum diameter of 16".
Recommended width of 8” with a 4.0” offset from the inward
side. Maximum recommended tire size-35”
This system is designed to reuse many of the factory
installed metric bolts and hardware, except where noted.
BEFORE YOU BEGIN:
Check the parts and hardware against the parts list to assure
that your kit is complete. Read the instructions and separate
the parts according to the area where they will be used on the
vehicle. Separating and placing the hardware with the brackets
before you begin will save installation time.
Always wear safety glasses when using power tools.
A Jeep Wrangler JK Factory Service manual will aide in the
installation of this kit.
DISASSEMBLY - FRONT
1. Raise and support vehicle with jack stands. Support axle
with a floor jack. Remove wheels and tires.
2. Working on one side of the vehicle, remove front shock
absorber. Disconnect and remove the sway bar link at the axle.
Leave the front sway bar attached at the frame/crossmember.
Sway bar link is shown in Fig.1
3. Remove the front track bar from the vehicle. Save hardware.
Fig.2
4. Lower axle until coil spring is free from upper mount.
Remove coil spring. Fig.3
NOTE: Shock absorbers that are longer than factory are
required to perform this installation.
Fig.2
Fig.3
Fig.1
Pg.6

MUST READ
The installer of this system should be prepared to remove the exhaust system before installation to
allow installation of the new suspension system. Check the parts and hardware against the parts list to
assure that your kit is complete. Refer to page #4 of these instructions for a list of tools and supplies
needed to perform the installation. Use these instructions as a guide, however experienced installers
may want to change the order of installation procedures to suit their needs.
INSTALLFRONT BUMP STOPS
Perform the work to the vehicle doing one side of the
vehicle at a time. We will start on the left side (driver side)
1. To install the new front bump stop extension, mark the
center of the lower Coil Spring Pad. Use a center punch to
mark the location on the pad.
2. Using a 11/32" diameter drill bit, drill a pilot hole in the
previously marked area. Install using 3/8" X 2.5” self-
tapping hardware provided.
Torque to 30 ft/lbs. Fig.4 & 5 Repeat step #1 for the
opposite side of the vehicle.
Fig.4
Fig.5
Pg.7

INSTALLATION PROCEDURE
1. Drain gas from gas tank.
2. Remove the gas tank skid plate.
3. Disconnect all hoses related to the gas tank.
Remove gas tank completely from vehicle.
4.Un-bolt exhaust at the manifolds from both
sides of engine and remove exhaust system
from vehicle complete.
5.Note: The factory frame cross-member is not
removed during installation. Fig.1
6. Support the front axle assembly. Remove both
upper and lower control arms from both sides of
vehicle. You are preparing the area to remove
the brackets from the frame.
7. Next, remove front lower control arm frame
mount using an electric grinder, make an incision
grind mark to use as a guide to grind off the
factory weld. Fig. 2 Grind both inside and
outside frame surfaces. Finish frame smooth
with a dual action sander and paint with semi-
gloss black spray paint.
Grind off in stages as shown
and indicated by arrows.
Fig.1
Fig.2
Fig.3
Pg.8

Drill 3/8” hole from inside
these holes to outside of frame
Do not use this hole
*** NOT USED***
Finish grinding off
remaining metal
as shown
Fig.4
Pg.9

Upper control arm mount- ready for removal.
Using a die grinder and cutoff wheel, cut
around the base of the upper mount.
Here, we have used a plasma cutter to remove
mount. An electric grinder or die grinder w/cut off
wheel will work.
Grind area completely flat to frame rail. This
grind work is strictly cosmetic.
Fig.5
Fig.6
Fig.7
Fig.8
Pg.10

Installing Full-Traction Upper Front Control Arms
New Full-Traction upper control arm support brackets are Left and Right.
2. Continue to mount the control arm support bracket(s) to the frame using 3/8” x 4”
bolts, washers, and metal lock nuts. Install 3/8” bolts from the inside of the frame as
shown. Mount the Lower 9/16 x 1.5” bolt as shown. The red arrow indicates the
frame access hole for the nut tab to be inserted for the bottom bolt. continued....
Pg.11
Right
Left
9/16” x 4” Bolt
9/16” x 1-1/4” Bolt
3/8” x 4” Bolt
3/8” x 4” Bolt
Fig.9 Fig.10
Fig.11
1.Insert 1/2” x 5-1/2” bolts & washers from rear of transmission cross-member
with thread pointing to the front of the vehicle.

Continued from previous page.....
If any bolts do not line up, slowly tighten the 1/2”
bolts up to pull the bracket towards the
transmission cross-member.
3. Insert the 9/16” x 4” bolt with crush sleeve
loosely in the side of the frame.
4. Tighten all of the bolts including the one with
the crush sleeve. Once they are all tight, loosen
the one with the crush sleeve for later when the
skid plate is installed.
5. Complete rear mount assembly and reinstall
gas tank.
Note: Refer to page 25 for all details related to mounting the skid plate. Fig.51
Modification to factory exhaust system for 2010 & 2011 only
For 2010-2011 models, rotation of the front catalytic converter is required on the driver side.
2010-2011 Jeep JK Factory exhaust removed from vehicle
Fig.12
Pg.12
Fig.51

System shown with modifications.
Arrows indicate the location to cut,
rotate 180 degrees and re-weld to
allow for proper clearance.
continued....
Fig.16A
Fig.16
Fig.13 Fig.14
Fig.15
Pg.13
Driver Side on USA models
Table of contents
Popular Automobile Accessories manuals by other brands

DRAGONFIRE
DRAGONFIRE 07-1900 installation guide

Cruz
Cruz 909-457 Assembly instructions

Hutchinson
Hutchinson RODGARD RUNFLAT Installation instructions and user guide

EchoMaster Pro
EchoMaster Pro FCTP-DP1504 installation guide

Cruz
Cruz Cargo XPro Assembly instructions

Kensington
Kensington K33410US Important safety information