furmates HAULER User manual

USER MANUAL
scan me
ANOTHER QUALITY PRODUC T
DISTRIBUTED BY
MELBOURNE, AUSTRALIA
valiantbrands.com.au
Find us on:
furmates.com.au
IMPORTANT! KEEP FOR FUTURE REFERENCE
PET MOBILITY
SYSTEM

SPECIFICATIONS
PARTS
• PLEASE NOTE: This stroller is specifically designed for use with pets only! NEVER use with babies or children.
•Follow the Manufacturer’s instructions.
•The Hauler Pet stroller is suitable for use with pets up to a maximum weight 25kg.
•Make sure children/ pets are clear of the Hauler pet stroller when folding, unfolding or even adjusting the
Hauler, failure to do so could result in injury.
•Your Hauler Carrier can be installed in the chassis facing in either direction.
•Attaching any additional load to your Hauler Pet Stroller chassis wil negatively affect its stability.
•Always keep fingers away from moving parts when folding, unfolding, or adjusting your Hauler Pet stroller to
prevent finger/body part entrapment or pinching.
•It is unsafe to use replacement parts other than those supplied or approved by the manufacturer
•Be aware of the risk of open fire and other sources of strong heat, such as electric bar fires, gas fires, heaters,
etc., in the near vicinity of the Hauler Pet Stroller.
•Our convenientmesh basket provides up to 2 kg's of additional storage for whatever you need to take with you!
•Please make sure all parts are securely engaged and connected before using.
• Contact at info@valiantbrands.com.au to obtain the most up to date information.
Stroller main body
Carry cot
Inner liner
Rear wheels x 2Front wheels x 2
1

ASSEMBLY INSTRUCTIONS
1. 2.
Assemble the front and rear wheels.
3.
Place the frame on a flat and safe place. Put
cardboard on the floor so as not to scratch
the floor.
Push the folding lock away from the frame (2a) until
it clears the locking pin and pull up on the handle
bar. Continue opening the frame (2b) until the side
locks engage with an audible "click".
Always test that the frame is fully locked in the open
position before use.
Align each wheel axle with the corresponding
channel in each side of the rear frame axle
(3a) and insert until you feel it engage. Pull
outward slightly to test that it has fully
engaged.
Each wheel can be removed by pressing the
metal spring in the rear leg housing (3b) and
simultaneously pulling the wheel outward.
Align each wheel pin with
the corresponding channel
in each front leg (3c) and
insert upward until you feel
it engage. Pull down slightly
to test that it has fully
engaged.
2a
2a
2b
3a
3c
3b
click
click
click
Rear wheels
Front wheels
2

ASSEMBLY INSTRUCTIONS (continued)
4. Push the brake pedal down to engage the brake. Lift up the brake pedal to release.
5. Each front wheel can be individually locked by aligning the wheel into the front facing position and
pushing down on the swivel lock. Lift the lock to return the wheel to full 360 degree swivel movement.
6.
Install the inner liner.
To raise the top section of the carrier, push/pull each of the two wire arms (6a) outward toward each
end of the carrier. Secure each arm by pulling it using the attached fabric tab (6b) and locking it
under the corresponding plastic lock in the carrier base (6c).
7.
Erect the Carrier:
3
6a
6b
6c 6c
6c
6b Wire arm
Plastic lock
6a 6a

ATTACHING THE CARRIER TO THE FRAME
8. Align the "male" housings at either side of the Carrier (8a) with their "female" counterparts on
the stroller frame (8b) and insert. The locks will emit an audible "click" when engaged.
NOTE: The Carrier can be installed facing in either direction.
9.
Optional safety leash for attaching up to 2 pets. Caution:Total weight up to 25kg.
10.
Your Carrier can be removed and used in your vehicle. Pass the car seat belt through the fabric
channel at either side of the carrier body (10a) (it can be installed facing in either direction) and
insert into the buckle. Check that the seat belt has securely engaged.
Your pet carrier system is designed to aid in the securing of your pet(s) in your vehicle - not to protect life.
D-Ring
NOTE
When in use with your pet(s), the
Carrier should be completely enclosed.
Insert the zipper (8c) from the canopy
to the corresponding section in the
Carrier body (8c) and close.
4
Seat belt Seat belt
Buckle
Buckle
8b
10a 10a
8a
8c

push
Slide the safety lock (2a) in the middle of the handle to the left. Holding it in place, press the primary
fold button (2b) to release the lock and move the handle downward/backward (2c). Continue folding
down until the automatic frame lock engages (2d).
1.
2.
FOLDING THE STROLLER
5
1a
2a
2c 2c
2d
2a
2b
Remove the Carrier by simultaneously pressing the buttons at either side of the stroller (1a) while lifting
the carrier upward.

SAFETY INSTRUCTIONS
CARE AND MAINTENANCE
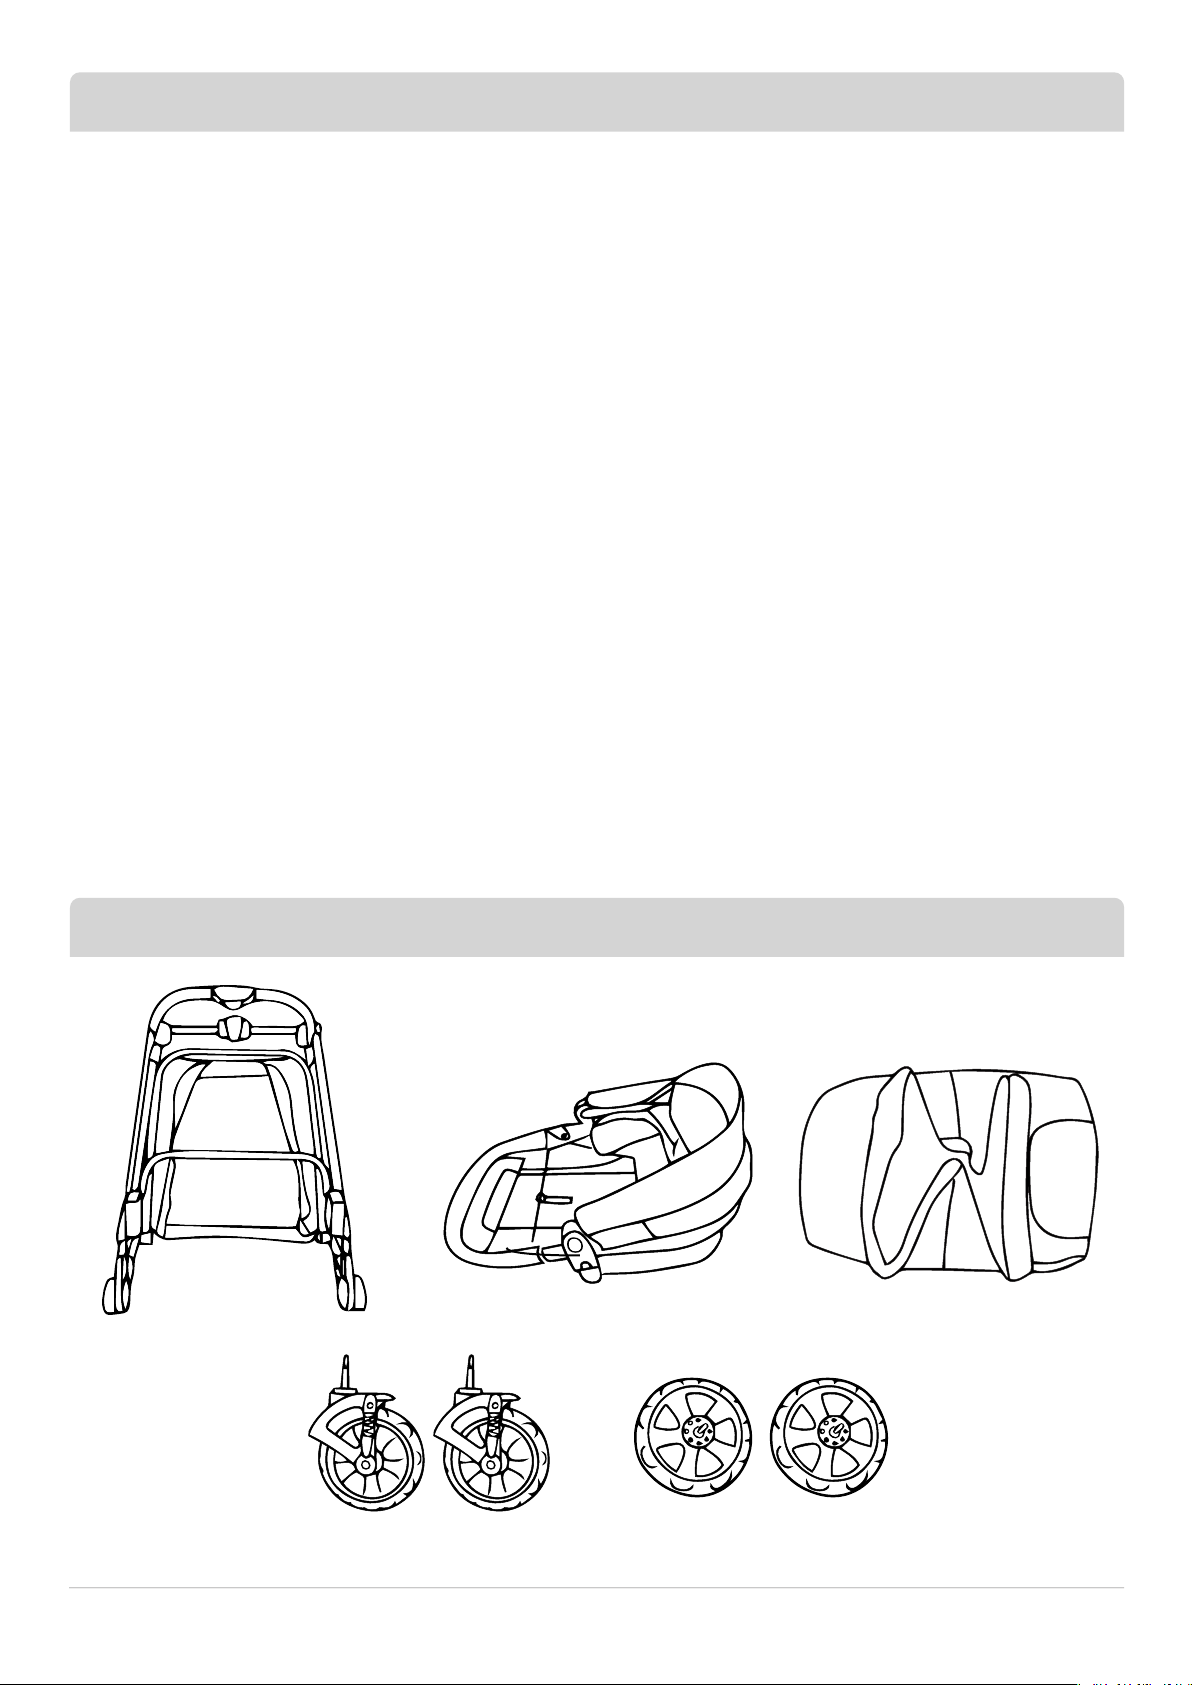
9
• This prod
uct has been designed and developed with safety, comfort and functionality in mind.
•Please take the time to read this manual carefully before using this product and keep it in a safe place
for future reference.
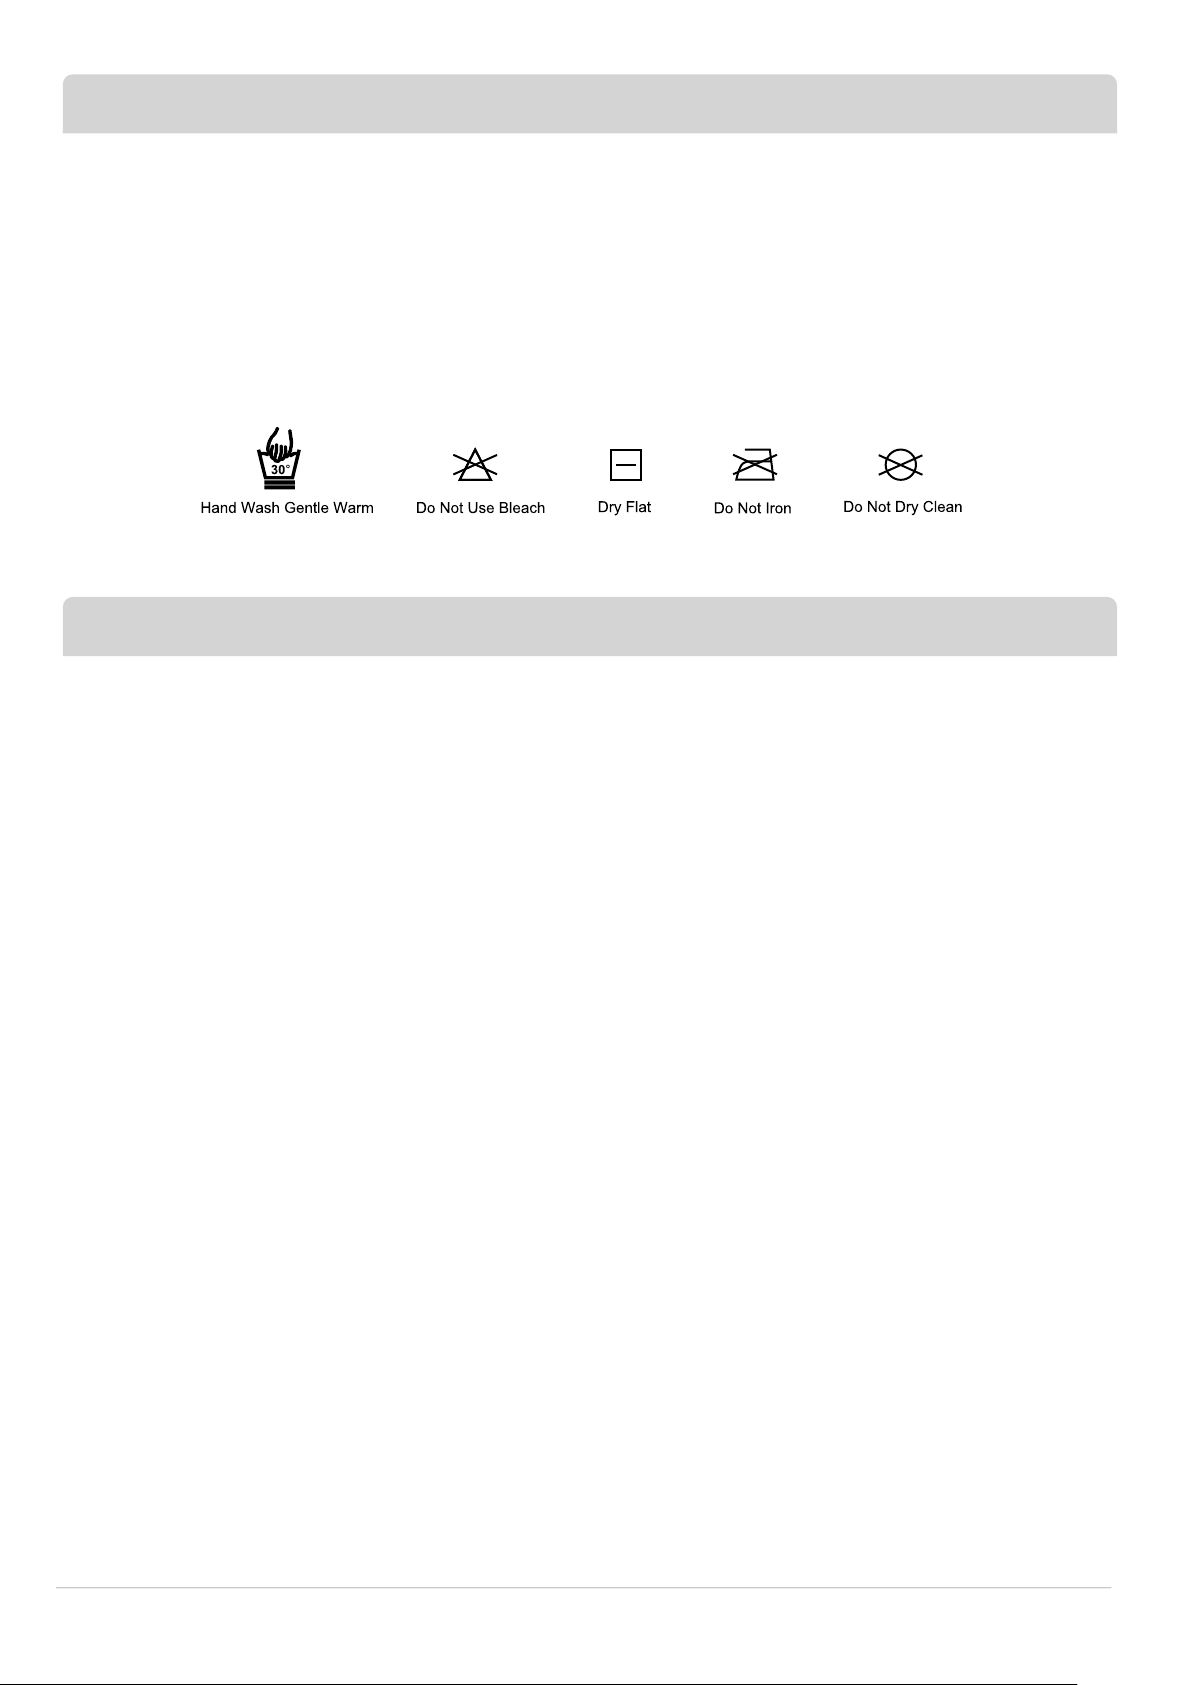
•To ensure the long-lasting use of HAULER Pet Stroller, do not use solvents, abrasives or aggressive
cleaning products. After each wash check the resistance of the fabric and the stitching. For washing of
the fabric, carefully comply with instructions indicated on the label (listed below).
• PLEASE READ AND UNDERSTAND ALL INSTRUCTIONS AND SAFETY WARNINGS PRIOR TO USING:
•ALWAYS CHECK THAT THE BRAKES ARE SECURELY ENGAGED BY MOVING THE STROLLER BACK AND
FORTH.
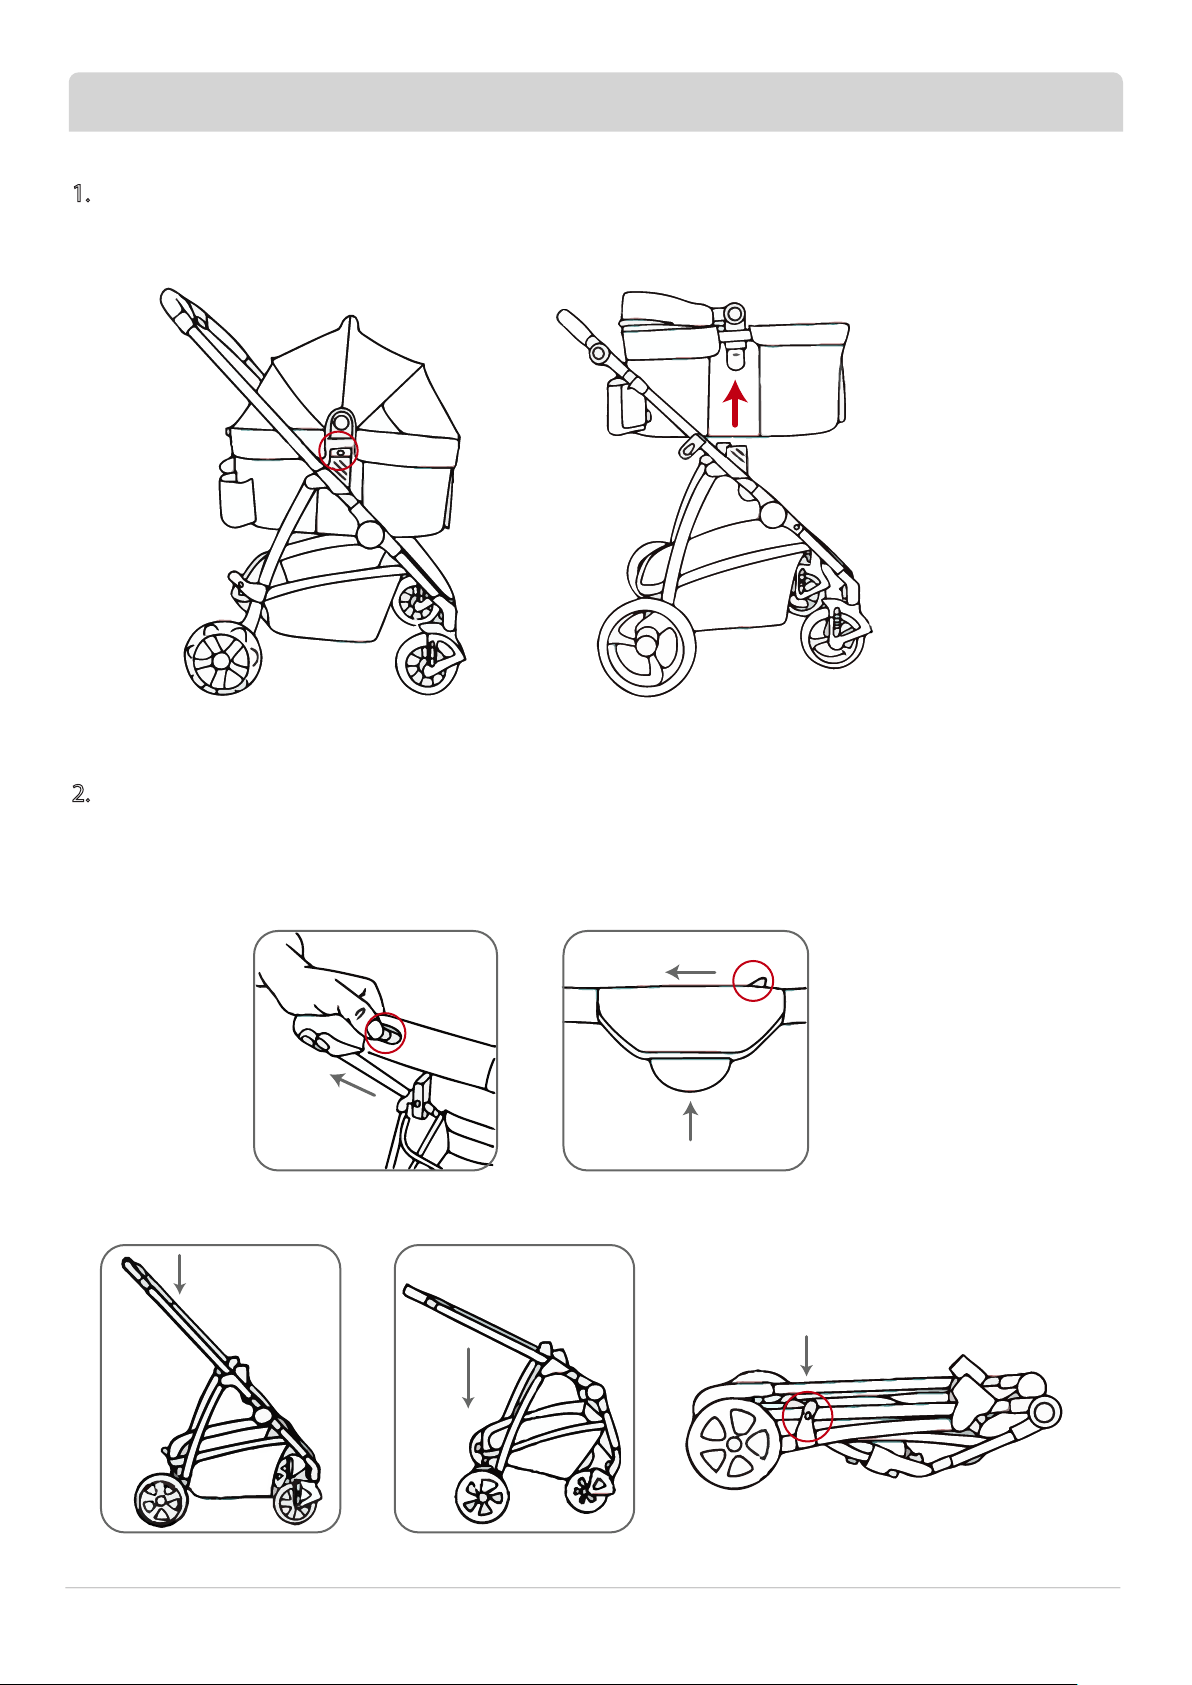
• ALWAYS CHECK THAT THE CARRIER BAG AND CANOPY ARE SECURELY ATTACHED BEFORE USE.
• DO NOT USE HAULER PET STROLLER UNLESS YOUR PET IS COMFORTABLE AND SECURED COMPLETELY.
•WHEN USING THE STROLLER, ENSURE THAT YOUR PET IS CORRECTLY ATTACHED TO THE JUMP-OUT
PREVENTION LEAD IN THE CARRIER AND ADJUST THE LENGTH SO YOUR PET CANNOT JUMP OUT.
• ALWAYS HOLD THE HANDLE TIGHTLY WHEN THE STROLLER IS IN USE. ENSURE TO LOCK THE REAR
FOOT BRAKES WHEN YOU’VE STOPPED. DO NOT STOP THE STROLLER ON SLOPING ROADS/UNEVEN
ROADS/ROUGH ROADS.
•NEVER LEAVE YOUR PET IN THE STROLLER UNATTENDED. THIS MAY RESULT IN AN ACCIDENT, SUCH AS
THE STROLLER ROLLING AWAY, OR TIPPING OVER, OR YOUR PET MAY HAVE SUFFER HEAT STROKE OR
BECOME DEHYDRATED. AVOID LEAVING YOUR PET IN THE CARRIER FOR AN EXTENDED TIME.
•THE HAULER PET STROLLER IS DESIGNED FOR PETS WITH A MAXIMUM WEIGHT OF 25 KG/ 55 LBS. THE
MAXIMUM WEIGHT IN THE STROLLER BASKET IS UP TO 2 KG/ 4.4 LBS.
•YOUR PET MUST ALIGHT BEFORE REACHING PAVEMENT EDGES, STAIRS, STEEP PATHS, TIGHT CORNERS,
AND/OR WHILST MANOEUVRING BACKWARD.
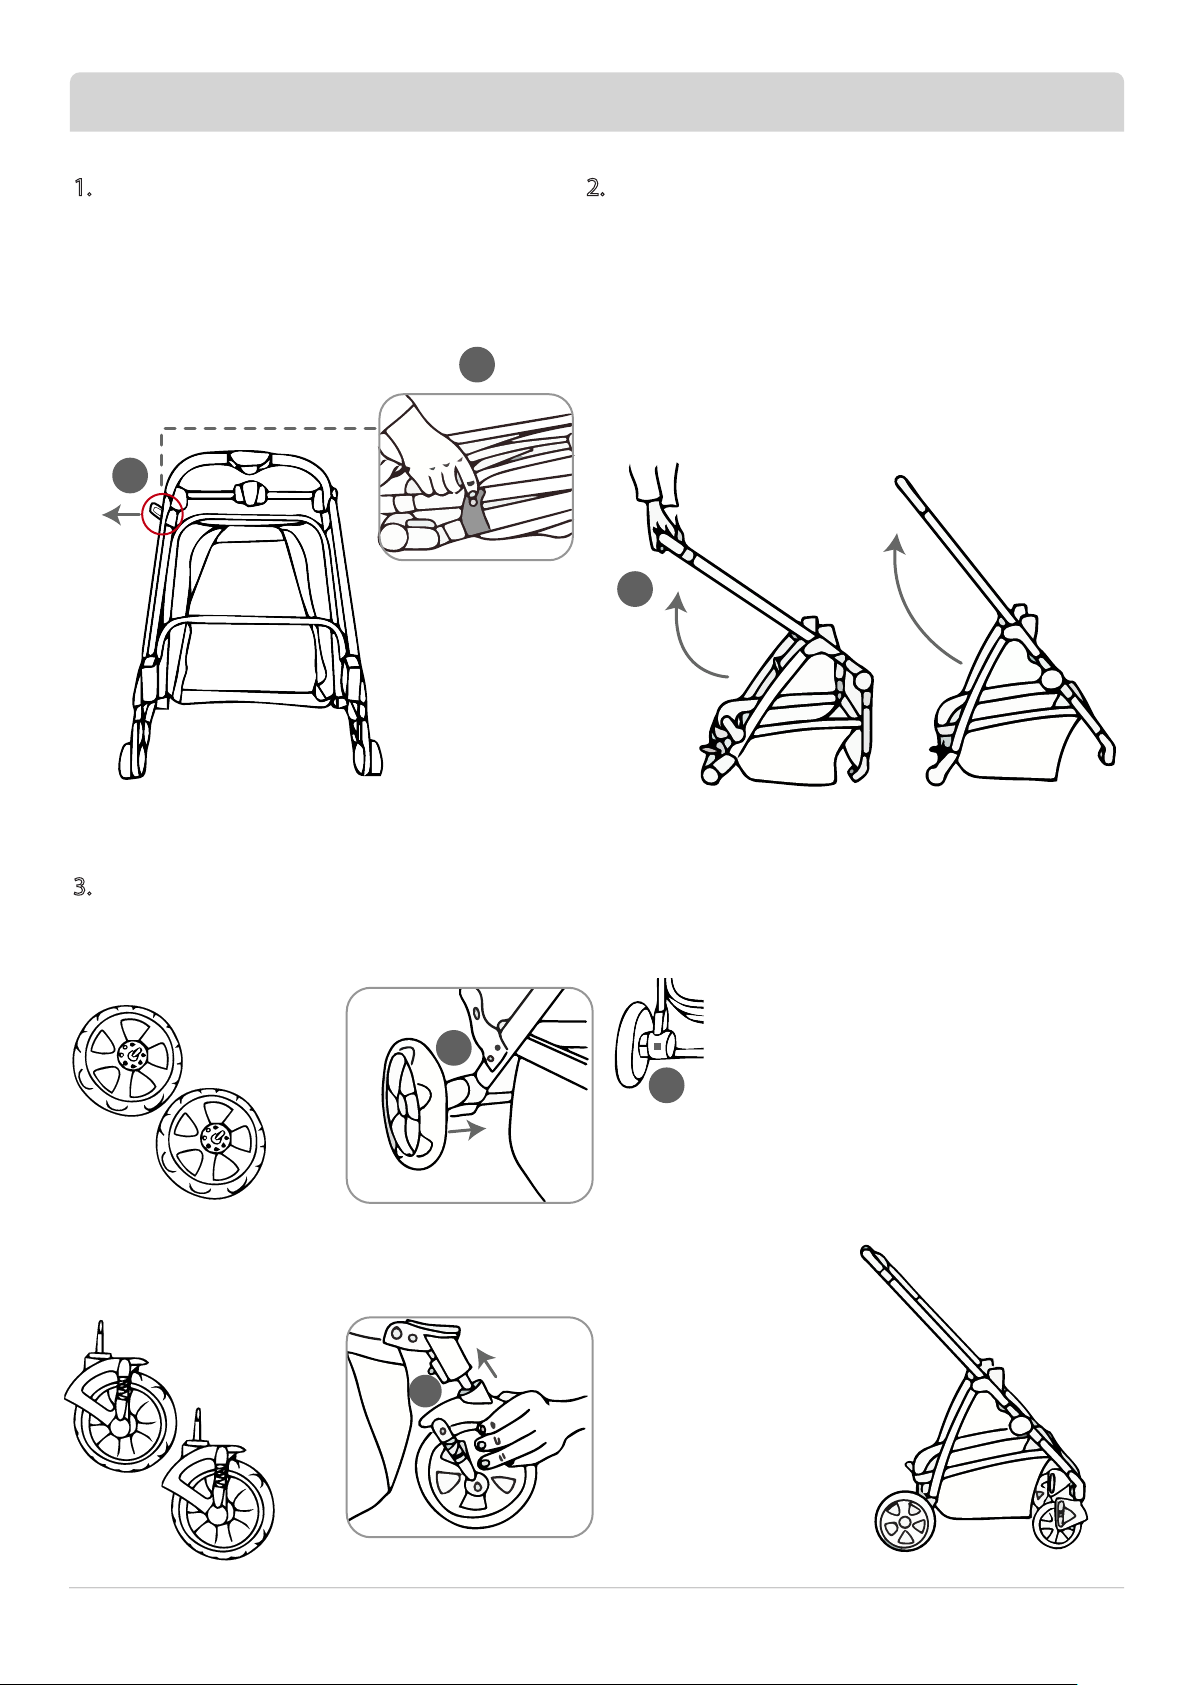
• ENSURE ALL SCREWS AND MOUNTINGS OF THE PRODUCT ARE FIRMLY ENGAGED AND ALL PARTS ARE
CONNECTED PROPERLY.
•NEVER MAKE ALTERATIONS TO THE HAULER PET STROLLER TO AVOID COMPROMISING ITS SAFETY.
• CLEAN ALL THE PARTS AND WHEELS FROM TIME TO TIME WITH WARM SOAPY WATER. DRY
THOROUGHLY.
• PLEASE KEEP THE HAULER PET STROLLER PACKAGING MATERIALS AWAY FROM PETS AND CHILDREN.

furmates.com.au
SAFETY INSTRUCTIONS (continued)
•IN THE EVENT OF ANY POSSIBLE DAMAGE TO THE HAULER PET STROLLER, ONLY ORIGINAL
REPLACEMENT PARTS FROM THE MANUFACTURER MUST BE USED FOR REPAIR.
• KEEP THE INSTRUCTION MANUAL CAREFULLY FOR FUTURE REFERENCE AND ANY POSSIBLE
SUBSEQUENT USERS.
• THE HAULER PET STROLLER IS NOT A TOY. IT IS NOT SUITABLE FOR CHILDREN.
•TO GUARANTEE THE SAFETY AND FUNCTIONALITY OF THIS DEVICE, AVOID ANY OVERLOADING.
• UNDER NO CIRCUMSTANCES, CAN THE HAULER BE USED FOR TRANSPORTING ADDITIONAL ITEMS OR
OCCUPANTS.
•EXCESSIVE WEIGHT ON THE CARRY BAG MAY CAUSE HAZARDOUS CONDITIONS.
• DO NOT HANG ITEMS ON THE HANDLE OR PLACE ITEMS ON THE CANOPY. THIS MAY CAUSE THE
STROLLER TO BECOME UNBALANCED AND TIP OVER.
•NEVER USE YOUR HAULER PET STROLLER ON STAIRS OR ESCALATORS.
•DO NOT LEAVE THE STROLLER IN THE CAR IN EXCESSIVE TEMPERATURE OR HEAT. AS PARTS MAY
BECOME DEFORMED AND THE STROLLER MAY NOT FUNCTION PROPERLY.
•MAKE SURE TO DRY THE STROLLER OFF AFTER USE IN THE RAIN TO AVOID RUSTING AND MOULD.
• STOP USING THE STROLLER IMMEDIATELY, IF THERE IS ANY BREAKAGE.
Table of contents