FWG Nevada User manual

John Lewis
Nevada 150cm Storage Bed
King Stock number: 810/84803
Thank you for purchasing this Nevada Storage Bed. Please read the instructions carefully before use to
ensure safe and satisfactory operation of this product.
For product support or spare parts please
call the John Lewis Helpline;
T: 01244 689949
Pre-assembly Preparation
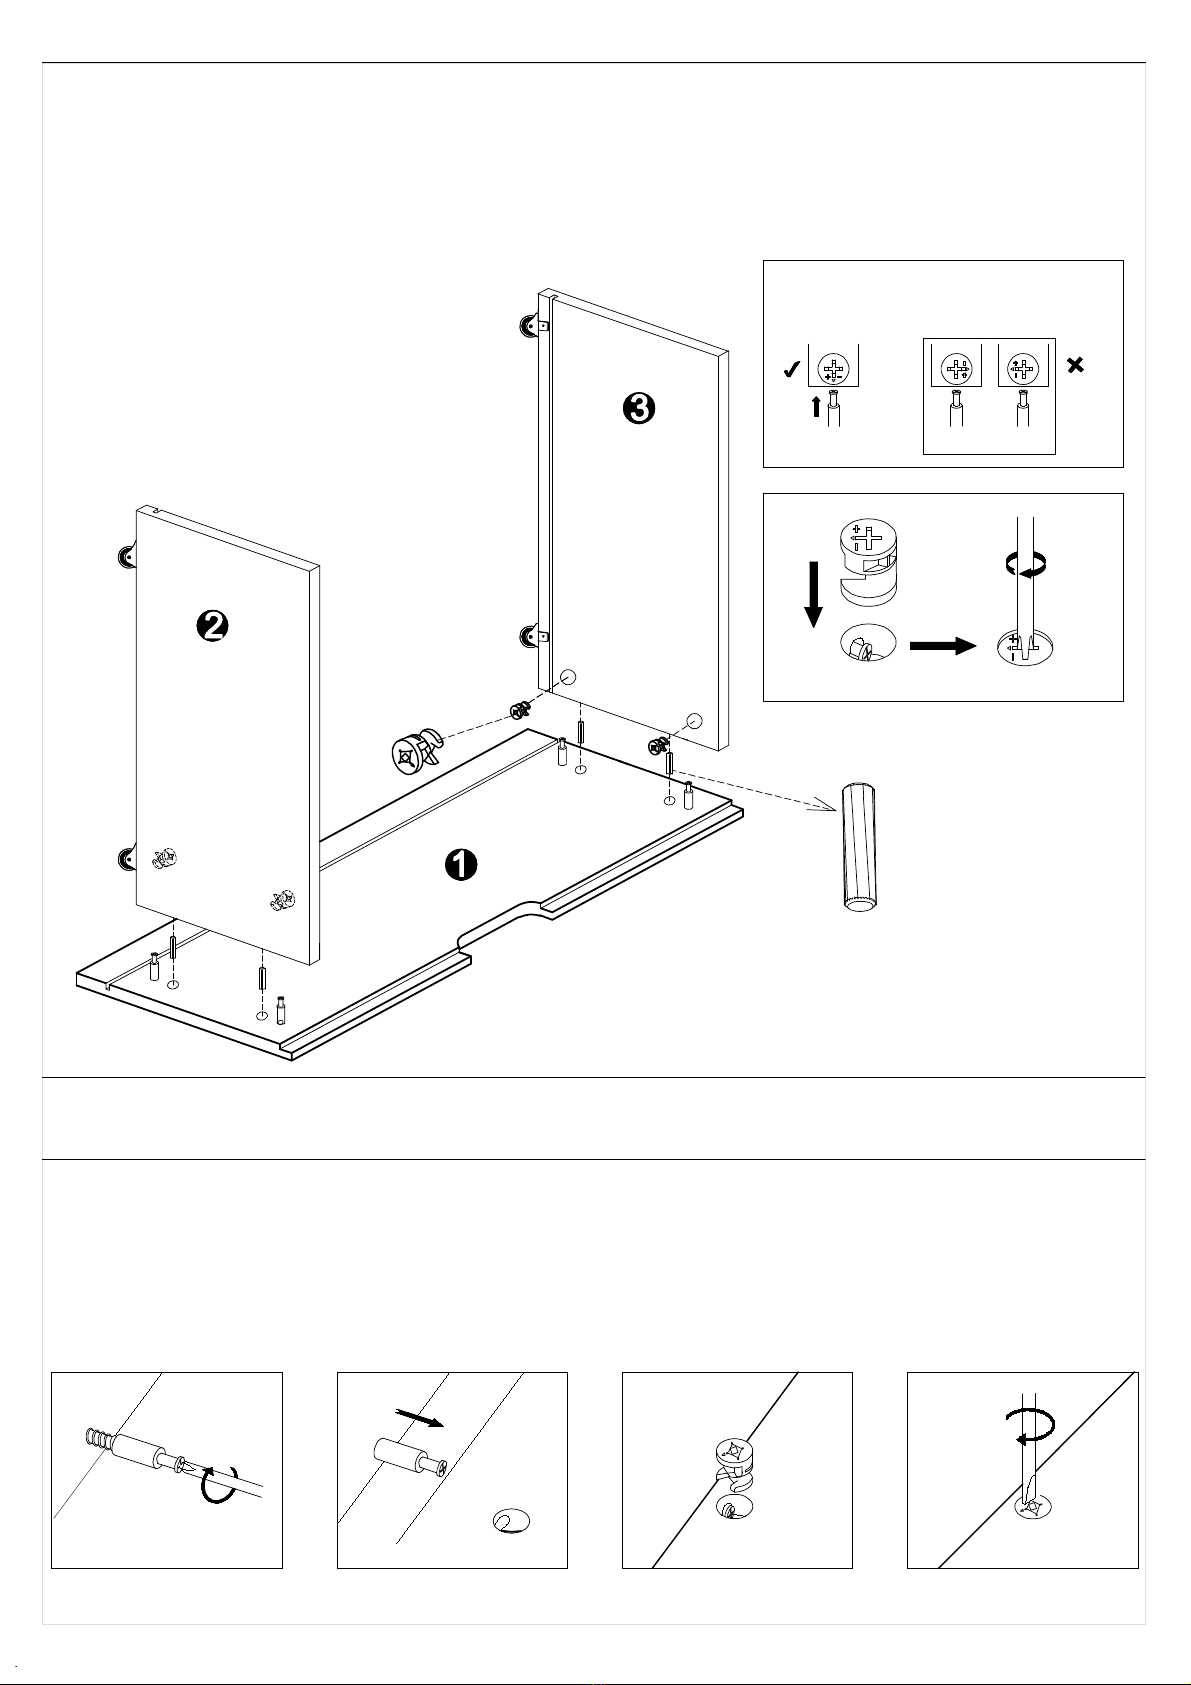
Please ensure instructions are read in full before attempting to assemble this product.
Necessary Tools
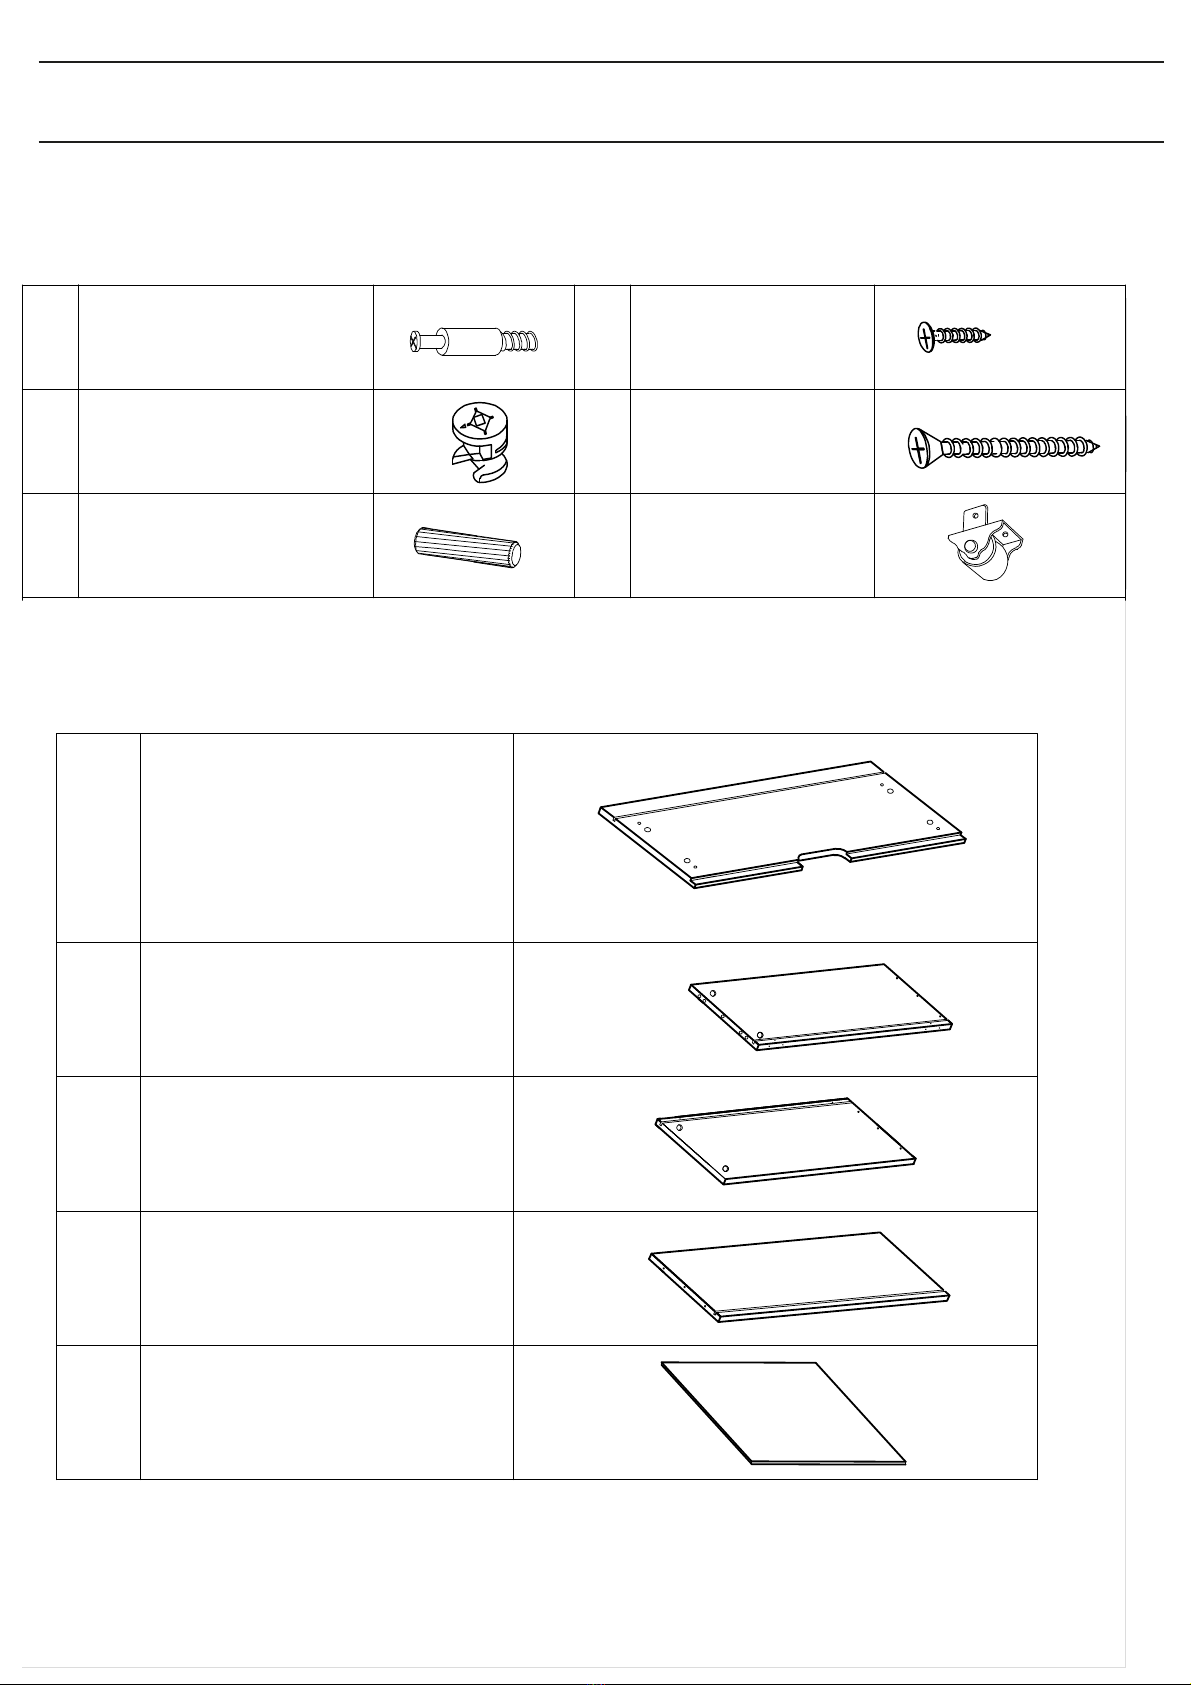
Please check the pack contents before attempting to assemble this product. A full checklist of
components is given in this leaflet. If any components are missing, please contact the John Lewis Helpline.
This product takes approximately 45 MINUTES to assemble with 2 PEOPLE.
The fittings pack contains SMALL PARTS which should be KEPT AWAY FROM YOUNG
CHILDREN.
Read this leaflet in full before commencing assembly.
If you require any additional information or have any issues with this product please call the John Lewis
This product is HEAVY. It should be assembled as near as possible to the point of use. TAKE CARE
WHEN LIFTING to avoid personal injury and (or) damage to the product.
1/11

Fittings and parts checklist
Bedstead Parts
2/11
Headboard x 11 2
34
5
Footboard x 1
Side Rails x 2 Slat Set x 1
Centre Rail x 1
Fittings
A B
C
Allen Key 4mm x 1 Bolt x 8
(M8 x 22 mm)
Screw x 6
(30mm)

Step by step assembly instructions - bedstead
Step One
Fix the Side Rail (3) to the Headboard (1) and Footboard (2) using Bolts (B) as shown.
Tighten using Allen Key (A).
Step Two
Lower the Centre Rail (5) onto the hooks on the Headboard and Footboard.
3/11
B x 8 pcs
B
B
B
A
PLEASE NOTE THERE ARE
ARROWS ON THE SIDE RAILS
INDICATING WHICH WAY UP
THEY SHOULD BE

Step Three
Fix the Slats (4) at both ends using Screws (C).
4/11
C x 6 pcs
C
C
C
C
C
C

Nevada Storage Bed - drawers
The maximum weight that can be held in each drawer is 15kg.
5/11

Parts
Fittings and parts checklist - drawers
Fittings
A
B
C
D
E
F
Cam x 8
(6 x 24 mm)
Cam Lock x 8
(12 x 10.5 mm)
Dowel x 8
(8 x 30 mm)
Screw x 24
(12mm)
Screw x 12
(35mm)
Castor x 8
(40 x 40 mm)
1
2
3
4
5
Drawer Fronts x 2
Drawer Left Side Panel x 2
Drawer Right Side Panel x 2
Drawer Back x 2
Drawer Bottom x 2
6/11
PLEASE NOTE: THE DRAWERS COME IN PACKS OF TWO SO THE ABOVE CONTENTS
IS WHAT EACH PACK INCLUDES.

Step by step assembly instructions
Step One
Attach the Castors (F) to the Drawer Left Panel (2) and Drawer Right Panel (3) using the 12mm Screws (D)
and tighten using a screw driver as shown in the diagram below.
D
D
F
D x 24 pcs
D
D
F
D
D
F
D
D
F
F x 4 pcs
Step Two
Screw the Cam Bolts (A) into the Drawer Fronts (1) as detailed below.
A x 4 pcs
7/11
A
A
A
A
CAM LOCK
Tighten until shoulder is flush
with panel. Do not overtighten
or undertighten (see example below).
Shoulder
NO GAP
panel panel

WHEN FITTING CAMS
ENSURE STARTING POSITION IS CORRECT
BEFORE YOU INSERT CONNECTING CAM-PILLAR.
TURN CLOCKWISE UNTIL SECURE.
Step Three
Insert 8 x 30 mm Dowels (C) into the Drawer Fronts (1), then insert the Cam Locks (B).
Now place the Drawer Left Side Panel (2) and Drawer Right Side Panel (3) and secure by
tightening the Cam Lock with a screwdriver as shown below.
CORRECT WRONG
C x 4 pcs
B x 4 pcs
B
B
B
B
C
C
C
C
Function of cam & cam lock
8/11
Step 1
Fix the cam into
the wooden panel.
Step 2
Push the wooden
panel with the cam onto
the other wooden panel.
Step 3
Place the cam lock
into the hole, arrow
pointing towards the
cam.
Step 4
Tighten by turning
the cam lock to the
right.
1 2 3 4

Step Four
Slide the Drawer Bottom (5) into the groove along the Drawer Left Panel (2), Drawer Right Panel (3)
and Drawer Front (1) as detailed in the diagram below.
Step Five
Attach the Back (4) to the Drawer Left Panel (2) and Drawer Right Panel (3) using the 35 mm Screws (E)
and screw driver. Please ensure you slide the Drawer Bottom into the groove on the Drawer Back (4)
before securing.
9/11
E x 6 pcs
E
E
E
E
E
E

Step Six
The Drawer can now be placed under the bed and the bed is now ready for use.
10/11

Care and Maintenance
Safety Instructions
Wood Furniture
Wood displays different grain patterns depending on which way they cut - for example, the 'medullary ray'
which can appear on oak furniture is a mark of good quality timber - these are just characteristics of the
natural beauty of the wood. Some furniture is also deliberately aged and rustic.
Wood veneers also allow distinctive patterns to be created on flat surfaces, such as table tops and drawer
fronts by the way the slivers are arranged.
All timber surfaces will change colour and mellow over time. New furniture will initially vary in shade from
items that have been previously purchased.
How to care for your wood furniture
Furniture with a hard lacquer, wax polish or painted surface should be dusted with a dry cloth.
Waxed furniture will need to be given a coat of beeswax a couple of times a year to help maintain its lustre.
Spray polishes are best avoided as they contain silicones which may spoil the furniture's surface by building
up over time.
Our furniture will endure most temperatures in the home but it is best to avoid placing furniture next to heat
sources such as radiators or fires. Be particularly careful with solid wood as the lack of humidity caused by
central heating can cause damage such as warping.
Never drag furniture when moving it. Always lift it.
Periodically check all fixings to ensure none have come loose and re-tighten where necessary.
Please take care when handling or moving the furniture as careless handling may cause damage or injury.
Furniture can be dangerous if incorrectly installed. Assembly should be carried out by a competent adult.
No liability will be accepted for damage or injury caused by incorrectly installed or assembled furniture. During
assembly children should be kept away from the product due to possible risk of injury. Do not use this item if
any components are missing or damaged.
It is recommended that before moving heavy objects to a new location they are completely dis-assembled to
avoid personal injury or damage to the furniture. Please be careful to retain all fittings when doing this.
If you require any additional information or have any issues with this product please call the John
John Lewis Partnership 171 Victoria Street London SW1E 5NN
www.johnlewis.com
This product complies with BS EN 1725:1998.
11/11
Table of contents
Other FWG Indoor Furnishing manuals
Popular Indoor Furnishing manuals by other brands

Nowy Styl
Nowy Styl eModel Desk Assembly instructions

Simpli Home
Simpli Home 3AXCGREBEN Assembly guide

Simpli Home
Simpli Home 3AXCBUR-004 Assembly guide

SouthShore
SouthShore 7550 Assembly instructions

TREX
TREX Monterey Bay TXFBT3772 Assembly instruction

Jason.L
Jason.L Switch System Boardroom installation guide