Fysic B26 User manual

Fully Automatic Upper Arm
Blood Pressure Monitor
Model Number: B26 / FB150
USER’S MANUAL

CONTENTS
1Introduction and Intended Use..............................................................................................................2
2Important Information on Blood Pressure and its Measurement..........................................................3
3Components of your blood pressure monitor.......................................................................................5
4Using your Monitor for the First Time...................................................................................................6
5Measurement Procedure ......................................................................................................................8
6Care and Maintenance........................................................................................................................ 14
7Warranty/Service.................................................................................................................................14
8Certifications .......................................................................................................................................14
9Technical Specifications .....................................................................................................................15
10 EMC Declaration.................................................................................................................................15

2
1 Introduction and Intended Use
It enables reliable measurement of systolic and diastolic blood pressure as well as pulse through the
oscillometric method.
Before using, please read this instruction manual carefully and then keep it in a safe place.
1.1 Remember…
⚫Only a health-care professional is qualified to interpret blood pressure measurements.
⚫This device is NOT intended to replace regular medical checkups.
⚫Blood pressure readings obtained by this device should be verified before prescribing or making
adjustments to any medications used to control hypertension. Under no circumstances should YOU
alter the dosages of any drugs prescribed by your physician.
⚫This monitor is intended for use by adults only. Consult with a physician before using this instrument
on a child.
⚫In cases of irregular heartbeat, measurements made with this instrument should only be evaluated
after consultation with a physician.
⚫Host products, including accessories, shall be processed in accordance with local regulations after
reaching the life cycle.
1.2 Warnings and Precautions
Warning:
The use of other accessories other than those specified or provided by the equipment
manufacturer may cause electromagnetic radiation to increase or decrease
electromagnetic immunity resulting in operational failure
Warning:
This system may fail to yield specified measurement accuracy if operated or stored in
temperature or humidity conditions outside the limits stated in the specifications section
of this manual.
Warning:
The separate ac adapter which is intended to connect USB interface of Blood Pressure
Monitor has not been evaluated according to IEC 60601-1. The safety of the product
shall be reappraised when it power supply by a separate ac adapter.
Warning:
The user must check that the equipment functions safely and see that it is in proper
working condition before being used.
Warning:
The device is not suitable for use in the presence of flammable anesthetic mixtures with
air or with oxygen or nitrous oxide.
Warning:
The patient is an intended operator, the functions of monitoring blood pressure and pulse
rate can be safely used by patient. The routine clean and changing batteries can be
performed by the patient.
Warning:
This device can not be used together with hf surgical equipment.
Warning:
Use of power adapters
1. Adapter: input 100-240V, 50/60hz output DC 5V 1A
2. Do not to position the device to make it difficult to operate the disconnection device
while using adaptor.
3. Avoid usage in wet, moisture, high temperature, corrosive gas environments and in
direct sunlight.
Warning:
Too frequent measurements can cause injury to the PATIENT due to blood flow
interference.

3
Warning:
Don’t place the cuff over wound part.
Warning:
Pressurization of the CUFF can temporarily cause loss of function of simultaneously
used monitoring EQUIPMENT on the same limb.
Caution:
To avoid any possibility of accidental strangulation, keep this unit away from children and
do not drape tubing around your neck.
Caution:
To avoid damaging the device, keep this unit away from children and pets.
Caution:
The standard material used for the bladder and tubing is latex-free.
Attention:
Self-measurement means control, not diagnosis or treatment. Unusual values must
always be discussed with a physician. Under no circumstances should you alter the
dosages of any drugs prescribed by a physician.
Attention:
The pulse display is not suitable for checking the frequency of heart pacemakers!
Attention:
In cases of irregular heartbeat, measurements made with this instrument should only be
evaluated after consultation with a physician.
Note:
To obtain the greatest accuracy from your blood pressure instrument, it is recommended
that the instrument be used within the specified temperature and the relative humidity,
please see the Technical Specifications.
Note:
The cuff is treated as the applied part. The user should contact the manufacturer for
assistance, if needed, in setting up, using or maintaining the device.
Note:
This device contains sensitive electronic components. Avoid strong electrical or
electromagnetic fields in the direct vicinity of the device (e.g. mobile telephones,
microwave ovens) during use. These can lead to erratic results.
Note:
Do not attempt to service or repair this device yourself. Should a malfunction occur, refer
to local distributor or the manufacturer.
2 Important Information on Blood Pressure and its Measurement
2.1 How does high or low blood pressure arise?
Your level of blood pressure is determined in the circulatory center of the brain and adjusts to a variety of
situations through feedback from the nervous system. To adjust blood pressure, the strength and speed
of the heart (Pulse), as well as the width of circulatory blood vessels is altered. Blood vessel width is
controlled by fine muscles in the blood vessel walls.
Your level of arterial blood pressure changes periodically during heart activity: During the “blood ejection”
(Systole) the value is highest (systolic blood pressure value). At the end of the heart’s “rest period”
(Diastole) pressure is lowest (diastolic blood pressure value).

4
2.2 Which values are normal?
Please refer to the diagram below (Picture-01)
Picture-01
There are six grids in the display of device. Please refer to the picture-01-01. Different grids represent
different interval scales of WHO.
Blood pressure value
WHO grids in device
WHO Classification
DIA<80 & SYS<120
1
Optimal blood pressure
DIA<85 & SYS<130
2
Normal blood pressure
DIA<90 & SYS<140
3
High normal value
DlA<100 & SYS<160
4
Mild hypertension
DIA<110 8<SYS<180
5
Moderate hypertension
DIA>= 110 or SYS>= 180
6
Severe hypertension
Picture-01-01

5
3 Components of your blood pressure monitor
3.1 Measuring unit
Picture-02
Picture-03
10
11
12
13

6
3.2 The symbols on the LCD display
1. Systolic blood pressure
2. Diastolic blood pressure
3. Heartbeat symbol (Flashes during
measurement)
4. Pulse display
5. WHO Function symbol
6. Average value symbol
7. Date/Time display
8. Battery low symbol
9. Mute symbol
10. Irregular heartbeat symbol
11. Movement error symbol
12. USER B
13. USER A
14. Cuff self-checking function
15. Memory symbol
3.3 Features B26 / FB150
1. Date/time display
2. Double users: 2 x 120 sets memory
3. Average value function
4. Irregular heartbeat checking
5. WHO function
6. Low battery display
7. External power adapter support
8. Auto power-off
9. Cuff self-checking function
4 Using your Monitor for the First Time
4.1 Activating the pre-installed batteries
Battery Installation
Use only 1.5V “AAA” alkaline batteries with this device.
1. Press the hook on the bottom of the battery cover and lift the cover off in the direction of the arrow
(Picture-04).
2. Install 4 “AAA” size batteries and make sure the + (positive) and - (negative) polarities match the
polarities of the battery compartment, then close the battery cover. Make sure that the battery cover is
securely in position.
Picture-04
Battery replacement
Low Battery Indicator
1. When the Low Battery Indicator appears on the display, turn the monitor off and remove all the

7
batteries. Replace with 4 new batteries at the same time. Long-life alkaline batteries are
recommended.
2. To prevent the damage of monitor from leaked battery fluid, please take out of battery if the monitor
unused in a long time (generally more than 3 months). If battery fluid should get in your eyes,
immediately rinse with plenty of clean water. Contact a physician immediately.
3. Dispose of the device, components and optional accessories according to applicable local regulations.
Unlawful disposal may cause environmental pollution.
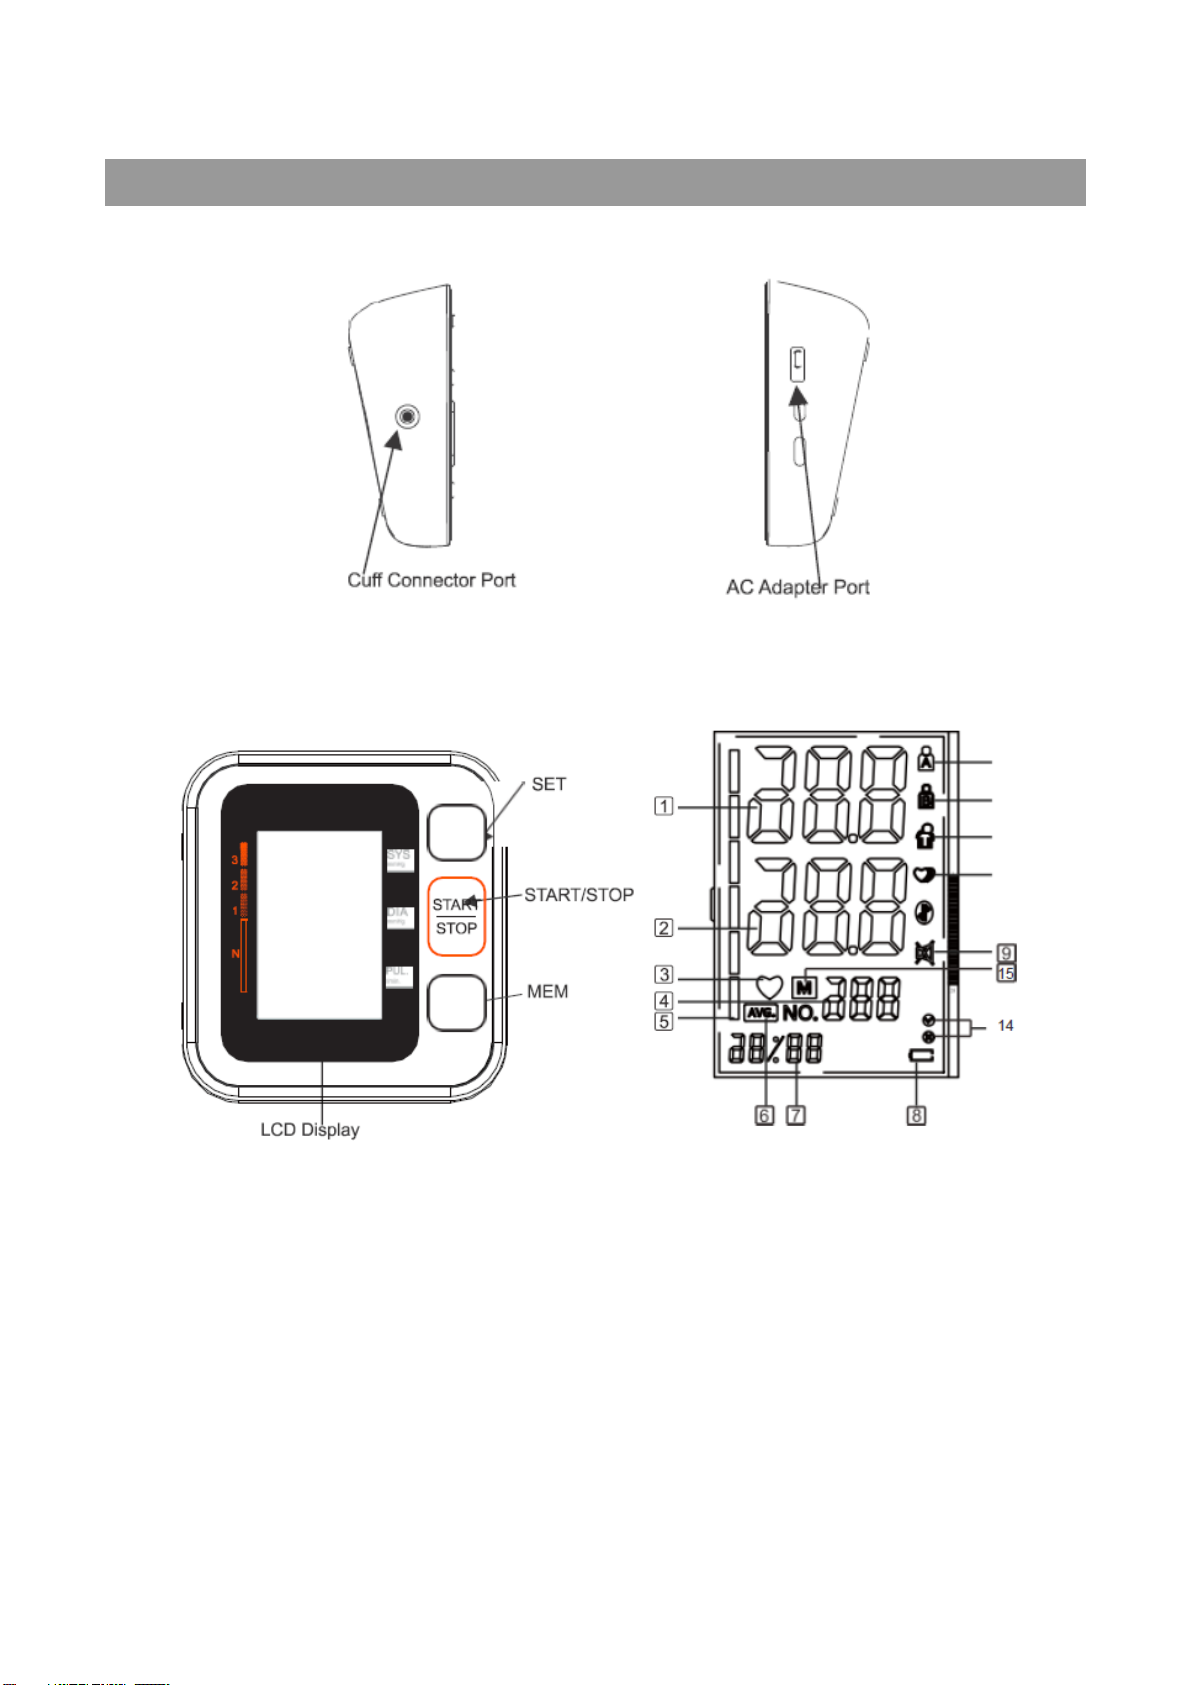
4.2 System Settings
After you load the battery or connect power for the monitor, long press the SET button for more than 3s,
and then you can start to set.
Setting the User:
Press the MEM button to select User A or User B. When display A (/B) on the screen, press the MEM
button to switch to user B (/A). Press the SET button to confirm.
Setting the Year:
When the year display is flashing, press the MEM button continuously and it will increase continuously 1
by 1 until 2049, and then return the original year , once the year set is OK, press SET button to confirm.
Setting Month/Date:
Initial Month/Date is 1/01, when the Month display is flashing, press the MEM button, the month will
increase by 1, press SET button to confirm, and do in the same way to set the date. Press SET button to
confirm.
Setting Time:
When the hour display is flashing, press the MEM button, the hour will increase by 1, press SET button to
confirm, and do in the same way to set the minute. Press SET button to confirm.
Record Delete:
When you checking the memory data, long press MEM button to delete existing user measurement data.
Note:
If you decide to delete all the records, please keep the records in another way, in case you need it some
days later. Take the battery out won’t lead to a record missing.
4.3 Cuff tube connection
Insert the cuff tube into the opening on the left side of the monitor indicated by the drawing of a cuff.

8
5 Measurement Procedure
5.1 Before measurement:
⚫Avoid eating and smoking as well as all forms of exertion directly before measurement. These factors
influence the measurement result. Find time to relax by sitting in an armchair in a quiet atmosphere
for about ten minutes before taking a measurement.
⚫Remove any garment that fits closely to your upper arm.
⚫Always measure on the same arm (normally left).
5.2 Fitting the Cuff
Please refer to picture-05
a) Wrap the cuff around your upper left arm. The rubber tube should be on the inside of your arm
extending downward to your hand. Make certain the cuff lies approximately 2 to 3 cm above the elbow.
Important! The on the edge of the cuff (Artery Mark) must lie over the artery which runs down the
inner side of the arm.
b) To secure the cuff, wrap it around your arm and press the hook and loop closure together.
c) There should be little free space between your arm and the cuff. You should be able to fit 2 fingers
between your arm and the cuff. Cuffs that don’t fit properly result in false measurement values.
Measure your arm circumference if you are not sure of proper fit.
d) Lay your arm on a table (palm upward) so the cuff is at the same height as your heart. Make sure the
tube is not kinked.
Picture-05

9
5.3 Measure Procedure
Refer to picture-06
1. Sit comfortably in a chair with your feet flat on the floor.
2. Select your User ID (A or B).
3. Stretch your arm forward on the desk and keep relaxing, make sure the palm of hand is upturned.
Make sure arm is in correct position, to avoid body movement. Sit still and do not talk or move during
the measurement. After the cuff has been appropriately positioned on the arm and connected to the
blood pressure monitor, the measurement can begin:
a) Press the START/STOP button. The pump begins to inflate the cuff. In the display, the increasing cuff
pressure is continually displayed.
b) After automatically reaching an individual pressure, the pump stops and the pressure slowly falls. The
cuff pressure is displayed during the measurement.
c) When the device has detected your pulse, the heart symbol in the display begins to blink.
d) When the measurement has been concluded, the measured systolic and diastolic blood pressure
values, as well as the pulse will be displayed.
e) The measurement results are displayed until you switch the device off. If no button is pressed for 60
seconds, the device switches off automatically.
f) Cuff self-checking symbol ( )
The cuff correct symbol ( ) will be displayed if the cuff position is correct, otherwise the wrong
symbol ( ) will be displayed. Please check again the cuff if the wrong symbol ( ) is displayed.
g) Movement error symbol ( )
The Movement Error Symbol ( ) is displayed if you move your body during the measurement.
Please remove the cuff, and wait 2-3 minutes. Reapply the cuff and take another measurement.
NOTE:
Patient Position:
1) Comfortably seated
2) Legs uncrossed
3) Feet flat on the floor
4) Back and arm supported
5) Middle of the CUFF at the level of the right
atrium of the heart

10
Picture-06
5.4 Irregular Heartbeat Detector
This symbol - indicates that certain pulse irregularities were detected during the measurement.
In this case, the result may deviate from your normal basal blood pressure –repeat the measurement.
Information for the physician on frequent appearance of the Irregular Heartbeat Symbol.
This instrument is an oscillometric blood pressure monitor device that also analyzes pulse frequency
during measurement. The instrument is clinically tested.
If pulse irregularities occur during measurement, the irregular heartbeat symbol is displayed after the
measurement. If the symbol appears more frequently (e.g. several times per week on measurements
performed daily) or if it suddenly appears more often than usual, we recommend the patient to seek
medical advice. The instrument does not replace a cardiac examination, but serves to detect pulse
irregularities at an early stage.
5.5 Error Indicates
The following symbol will appear on the display when measuring abnormal
SYMBOL
CAUSE
CORRECTION
No display appears
Weak battery or improper
placement
Replace both batteries with new ones.
Check the battery installation for proper
placement of the battery polarities.
Er 1
Sensor abnormal
Check if the pump is working or not. If it is
working, then the problem is sensor
abnormal. Please send it to the local
distributor.

11
SYMBOL
CAUSE
CORRECTION
Er 2
Monitor could not detect pulse
wave or cannot calculate the blood
pressure data
Check if the air releasing is too slow or
not. If it is too slow, please check if there is
any dust in the tube plug of the cuff and
the cuff port in the device. If yes, please
clean and start the measurement again. If
no, please send the device back to the
local distributor.
Er 3
Measurement result is abnormal
(SYS≤35mmHg, DIA≤23mmHg)
Occasionally-measure for one more time /
Always - send it to local distributor
Er 4
Too loose cuff or air leakage
(Cannot inflate to 30mmHg within
15s)
Tie the cuff correctly and make sure the air
plug is properly inserted in the unit
Er 5
The air tube is crimped
Correct it and make the measurement
again
Er 6
The sensor is sensing great
fluctuation in the pressure
Please keep quiet and don’t move
Er 7
The pressure that the sensor
sensing is over the limit
Please send back to the local distributor
Er 8
The demarcation is incorrect or the
device has not been demarcated
Please send back to the local distributor
Trouble removal
Problem
Check
Cause and solutions
No Power
Whether battery has enough
power
Replace new one
Whether polarity is correct
Installation for proper placement
of the batteries polarities
No Inflation
Whether the plug is correctly
inserted
Insert into the air socket tightly
Whether the plug broken or leak
Change a new cuff
Err and stop working
Whether move the arm when
inflate
Keep the body calm
Whether the chatting icon when
measured is on
Keep quite when measure
Cuff leak
Whether the cuff wrap too loose
Wrap the cuff tightly
Whether the cuff broken
Change a new cuff
Please contact the distributor if you can't solve the problem, do not disassemble the unit by
yourself!

12
SYMBOL DESCRIPTIONS
The following symbols may appear in this manual, on the Digital Blood Pressure Monitor B26 / FB150, or
on its accessories. Some of the symbols represent standards and compliances associated with the Digital
Blood Pressure Monitor B26 / FB150 and its use.
Authorized Representative in the European Community
CE Mark: conforms to essential requirements of the Medical Device Directive
93/42/EEC.
Date of manufacture.
Manufacturer
Specifies serial number
Type BF applied part
Direct current
DISPOSAL: Do not dispose this product as unsorted municipal waste. Collection of such
waste separately for special treatment is necessary.
Follow instructions for use
Put up
Fragile
Afraid of the rain
Fear of the sun
Class ll equipment

13
Handle gently
Temperature range
No Sterilize requirement
Not category AP / APG equipment
Mode of operation: continuous
5.6 Memory
Each unit stores 120 sets measurements for 2 users, totally 240 sets (User A and B).
Viewing the stored values
With the unit off, press the Memory button. The display first shows "A", then shows an average of all
measurements stored in the unit. Please note: Measurements for each user are averaged and stored
separately. Be certain that you are viewing the measurements for the correct user. Pressing the Memory
button again displays the previous value. To view a particular stored memory, press and hold the Memory
button to scroll to that stored reading.
5.7 Discontinuing a Measurement
If it is necessary to interrupt a blood pressure measurement for any reason (e.g the patient feels unwell),
the Start/Stop button can be pressed at any time. The device then immediately lowers the cuff pressure
automatically.
5.8 Using the AC Adapter
You may also operate this monitor using a CE approved AC adapter (output 5V DC1A with Micro
connector).
a) Ensure that the AC adapter and cable are not damaged.
b) Plug the adapter cable into the AC adapter port on the right side of the blood pressure monitor.
c) Plug the adapter into your electrical outlet. When the AC adapter is connected, no battery current is
consumed.
Note: No power is taken from the batteries while the AC adapter is connected to the monitor. If electrical
power is interrupted,(e.g., by accidental removal of the AC adapter from the outlet) the monitor must be
reset by removing the plug from the socket and reinserting the AC adapter connection.

14
6 Care and Maintenance
Wash hands after each time measurement.
If one device is used by different patients, wash hands before and after each use.
a) Do not expose the device either to extreme temperatures, humidity, dust or direct sunlight.
b) The cuff contains a sensitive air-tight bubble. Handle this cuff carefully and avoid all types of stress
through twisting or buckling.
c) Clean the device with a soft, dry cloth. Do not use gas, thinners or similar solvents. Spots on the cuff
can be removed carefully with a damp cloth and soapsuds. The cuff with bladder must not be washed
in a dishwasher, clothes washer, or submerged in water.
d) Handle the tube carefully. Do not pull on it. Do not allow the tubing to kink and keep it away from
sharp edges.
e) Do not drop the monitor or treat it roughly in any way. Avoid strong vibrations.
f) Never open the monitor! This invalidates the manufacturer’s warranty.
g) Batteries and electronic instruments must be disposed of in accordance with the locally applicable
regulations, not with domestic waste.
7 Warranty/Service
Your blood pressure monitor is guaranteed for 24 months against manufacturers‟ defects for the original
purchaser only, from date of purchase. The warranty does not apply to damage caused by improper
handling, accidents, professional use, not following the operating instructions or alterations made to the
instrument by third parties.
Warranty only applies to the main device and its cuff. All other accessories are not covered by warranty.
There are no user serviceable parts inside. Batteries or damage from old batteries is not covered by the
warranty.
8 Certifications
Device standard:
This device is manufactured to meet the European blood pressure monitors: EN1060-3 / IEC 80601-2-30
/ ISO81060-1 / IEC60601-1-11 / IEC60601-1
Electromagnetic compatibility:
Device fulfills the stipulations of the International standard IEC60601-1-2
The declaration of conformity is available on:
http://DOC.hesdo.com/FB150-DOC.pdf

15
9 Technical Specifications
Model: B26 / FB150
Weight: 261.3g (Batteries included)
Display: 48*65mm【2.56"x1.89"】LCD Digital Display
Size: 118 (W) x 110 (L) x 52 (H) mm【4.65"(W)x4.33"(L)x2.05"(H)】
Accessories: 1×Main Device, 1×Cuff, 1×Users manual
Operating Conditions: Temperature: 5°C to 40°C; Humidity: 15% to 93% RH;
Storage And Shipping Conditions: Temperature: -25°C to 70°C; Humidity: ≤ 93% RH;
Atmospheric pressure range:70kPa~106kPa
Measuring method: Oscillometric Pressure sensor: Resistive
Measuring range: DIA: 40-130mmHg; SYS: 60-230mmHg Pulse: 40 to 199 per minute
Cuff pressure display range: <300mmHg
Memory: Automatically stores the last 120 measurements for 2 users (total 240)
Measuring resolution: 1 mmHg
Accuracy: Pressure within ± 3 mmHg / pulse ± 5 % of the reading Power source: a) 4*AAA batteries, 1.5 V
b) AC adapter INPUT:100-240VAC 50/60HZ OUTPUT:5V DC 1A Accessories: Wide range rigid cuff 8.7”
–15.7” (22 - 40 cm)
Automatically power off: 60 seconds
Users: Adult
10 EMC Declaration
1) *This product needs special precautions regarding EMC and needs to be installed and put into service
according to the EMC information provided, and this unit can be affected by portable and mobile RF
communications equipment.
2) * Do not use a mobile phone or other devices that emit electromagnetic fields, near the unit. This may
result in incorrect operation of the unit.
3) * Caution: This unit has been thoroughly tested and inspected to assure proper performance and
operation!
4) * Caution: this machine should not be used adjacent to or stacked with other equipment and that if
adjacent or stacked use is necessary, this machine should be observed to verify normal operation in
the configuration in which it will be used
Guidance and manufacture’s declaration –electromagnetic immunity
The device is intended for use in the electromagnetic environment specified below. The customer or
the user of device should assure that it is used in such an environment.
Immunity test
IEC 60601 test level
Compliance level
Electromagnetic environment -
guidance
Electrostatic
discharge (ESD)
IEC 61000-4-2
±8 kV contact ±2 kV,
±4 kV, ±8 kV, ±15 kV
air
±8 kV contact ±2
kV, ±4 kV, ±8 kV,
±15 kV air
Floors should be wood, concrete
or ceramic tile. If floor are covered
with synthetic material, the
relative humidity should be at
least 30%.

16
Electrical fast
transient/burst IEC
61000-4-4
±2 kV for power
supply lines ±1 kV
for input/output lines
Not applicable
Mains power quality should be
that of a typical commercial or
hospital environment.
Surge IEC
61000-4-5
± 1 kV line(s) to
line(s)
± 2 kV line(s) to
earth
Not applicable
Mains power quality should be
that of a typical commercial or
hospital environment.
Voltage dips, short
interruptions and
voltage variations
on power supply
input lines IEC
61000-4-11
0 % UT; 0.5 cycle at
0°,45°,90°, 135°,
180°, 225°, 270°,
315°
Not applicable
Mains power quality should be
that of a typical commercial or
hospital environment. If the user
of the device requires continued
operation during power mains
interruptions, it is recommended
that the device be powered from
an uninterruptible power supply or
a battery.
0 % UT ; 1 cycle
70 % UT; 25/30
cycle
0% UT; 250/300
cycle
Power frequency
(50Hz/60Hz)
magnetic field IEC
61000-4-8
30 A/m
50/60Hz
30 A/m
50/60Hz
Power frequency magnetic fields
should be at levels characteristic
of a typical location in a typical
commercial or hospital
environment.
NOTE UT is the a.c. mains voltage prior to application of the test level.
Guidance and manufacture’s declaration – electromagnetic immunity
The device is intended for use in the electromagnetic environment specified below. The customer or
the user of the device should assure that it is used in such an environment.
Immunity test
IEC 60601 test level
Compliance level
Electromagnetic environment
- guidance
Conducted RF
IEC 61000-4-6
3 Vrms
150 kHz to 80 MHz 3
V RMS outside the
ISM band, 6 V RMS
in the ISM and
amateur bands
80% AM at 1kHz
Not applicable
Portable and mobile RF
communications equipment
should be used no closer to any
part of the device, including
cables, than the recommended
separation distance calculated
from the equation applicable to
the frequency of the transmitter.
Recommended separation
distance
d=0.35√p
d=1.2√p

17
Radiated RF
IEC 61000-4-3
10 V/m
80 MHz to 2.7 GHz
80% AM at 1kHz
10 V/m
80 MHz to 2.7 GHz
80% AM at 1kHz
80MHz to 800MHz
:
d=1.2√p
800MHzto 2.7GHz
:
d=2.3√p
Where, P is the maximum
output power rating of the
transmitter in watts (W)
according to the transmitter
manufacturer and d is the
recommended separation
distance.
Field strengths from fixed RF
transmitters, as determined by
an electromagnetic site survey,
should be less than the
compliance level in each
frequency range.
Interference may occur in the
vicinity of equipment marked
with the following symbol:
NOTE 1 At 80 MHz and 800 MHz, the higher frequency range applies.
NOTE 2 These guidelines may not apply in all situations. Electromagnetic propagation is
affected by absorption and reflection from structures, objects and people.
A
Field strengths from fixed transmitters, such as base stations for radio (cellular/cordless)
telephones and land mobile radios, amateur radio, AM and FM radio broadcast and TV
broadcast cannot be predicted theoretically with accuracy. To assess the electromagnetic
environment due to fixed RF transmitters, an electromagnetic site survey should be
considered. If the measured field strength in the location in which the device is used
exceeds the applicable RF compliance level above, the device should be observed to
verify normal operation. If abnormal performance is observed, additional measures may
be necessary, such as re-orienting or relocating the device.
B
Over the frequency range 150 kHz to 80 MHz, field strengths should be less than 3 V/m.

18
Guidance and manufacture’s declaration – electromagnetic emission
The device is intended for use in the electromagnetic environment specified below. The customer of
the user of the device should assure that it is used in such an environment.
Emission test
Compliance
Electromagnetic environment –guidance
RF emissions
CISPR 11
Group 1
The device use RF energy only for its internal function.
Therefore, its RF emissions are very low and are not likely to
cause any interference in nearby electronic equipment.
RF emission
CISPR 11
Class B
The device is suitable for use in all establishments, including
domestic establishments other than domestic and those
directly connected to the public low-voltage power supply
network that supplies buildings used for domestic purposes.
Harmonic
emissions IEC
61000-3-2
Not applicable
Voltage
fluctuations/
flicker emissions
IEC 61000-3-3
Not applicable
Recommended separation distances between
portable and mobile RF communications equipment and the device
The device is intended for use in an electromagnetic environment in which radiated RF disturbances
are controlled. The customer or the user of the device can help prevent electromagnetic interference by
maintaining a minimum distance between portable and mobile RF communications equipment
(transmitters) and the device as recommended below, according to the maximum output power of the
communications equipment.
Rated maximum output
power of transmitter (W)
Separation distance according to frequency of transmitter (m)
150 KHz to 80 MHz
80 MHz to 800 MHz
800 MHz to 2.7 GHz
0.01
0.12
0.12
0.23
0.1
0.38
0.38
0.73
1
1.2
1.2
2.3
10
3.8
3.8
7.3
100
12
12
23
For transmitters rated at a maximum output power not listed above, the recommended separation
distance d in meters (m) can be estimated using the equation applicable to the frequency of the
transmitter, where P is the maximum output power rating of the transmitter in watts (W) according to
the transmitter manufacturer.
NOTE 1 At 80 MHz and 800 MHz, the separation distance for the higher frequency range applies.
NOTE 2 These guidelines may not apply in all situations. Electromagnetic propagation is affected by
absorption and reflection from structures, objects and people.

19
Guidance and manufacturer’s declaration - electromagnetic immunity
The device is intended for use in the electromagnetic environment specified below. The customer or the
user of the device should assure that it is used in such an environment.
Test
frequency
(MHz)
Band a)
(MHz)
Service
a)
Modulation
a)
Maximum
power (w)
Distance
(m)
IMMUNITY
TEST
LEVEL
(V/m)
385
380-390
TETRA 400
Pulse Modulation
b)
18 Hz
1.8
0.3
27
450
430-470
GMRS 460,
FRS 460
FM
c)
±5 kHz deviation
1 kHz sine
2
0.3
28
710
704-787
LTE Band 13,
17
Pulse Modulation
b) 217 Hz
0.2
0.3
9
745
780
810
800-960
GSM 800/900,
TETRA 800,
iDEN 820,
CDMA 850,
LTE Band 5
Pulse Modulation
b)
18 Hz
2
0.3
28
870
930
1720
1700-1990
GSM 1800;
CDMA 1900;
GSM 1900;
DECT;
LTE Band 1,3
4,25;UMTS
Pulse Modulation
b)
217 Hz
2
0.3
28
1845
1970
2450
2400-2570
Bluetooth,
WLAN
802.11 b/g/n,
RFID 2450,
LTE Band 7
Pulse Modulation
b)
217 Hz
2
0.3
28
5240
5100-5800
WLAN 802.11
a/n
Pulse Modulation
b)
217 Hz
0.2
0.3
9
5500
5785
NOTE If necessary to achieve the IMMUNITY TEST LEVEL, the distance between the transmitting
antenna and the ME EQUIPMENT or ME SYSTEM may be reduced to 1 m. The 1 m test distance is
permitted by IEC 61000-4-3.
a)
For some services, only the uplink frequencies are included.
b)
The carrier shall be modulated using a 50% duty cycle square wave signal.
c)
As an alternative to FM modulation. 50% pulse modulation at 18 Hz may be used because while it
does not represent actual modulation, it would be worst case.
Other manuals for B26
1
This manual suits for next models
1
Table of contents
Other Fysic Blood Pressure Monitor manuals