Gabotronics XScopes User manual

XScopes
User’s Manual
DS-XScopes-3.5 –December, 2014 Page | 1
Description:
The XScopes (Xminilab and Xprotolab) are a combination
of three electronic instruments: a mixed signal
oscilloscope, an arbitrary waveform generator, and a
protocol sniffer; all housed in a small breadboard friendly
module. The XScopes can also be used as development
boards for the AVR XMEGA microcontroller.
Main Features:
Mixed Signal Oscilloscope: Simultaneous sampling of
2 analog and 8 digital signals.
Arbitrary Waveform Generator with advanced sweep
options on all the wave parameters.
Protocol Sniffer: SPI, I2C, UART
Advanced Triggering System: Normal / Single / Auto /
Free, with many trigger modes; adjustable trigger level,
and ability to view signals prior to the trigger.
Meter Mode: VDC, VPP and Frequency readout.
XY Mode: For plotting Lissajous figures, V/I curves or
checking the phase difference between two waveforms.
Spectrum Analyzer with different windowing options
and selectable vertical log and IQ visualization.
Channel Math: add, multiply, invert, and average.
Horizontal and Vertical Cursors with automatic
waveform measurements, and waveform references.
Gabotronics
PO BOX 110332
Lakewood Rch, FL. 34211
www.gabotronics.com
Figure 1: Xprotolab, Xminilab, and the Portable models
Figure 2: XScopes Block Diagram

XScopes
User’s Manual
DS-XScopes-3.5 –December, 2014 Page | 2
About this manual
This manual targets both novice and advanced users, providing a full resource for everyone. However, for a full
understanding of the operation of the XScopes, the user should be familiar with the operation of a regular oscilloscope.
The features documented in this manual are for units with firmware version 2.40+.
Conventions
XScope: Xprotolab, Xminilab, Xprotolab Portable or Xminilab Portable.
Portables: Xprotolab Portable or Xminilab Portable
CH1: Analog Channel 1
CH2: Analog Channel 2
CHD: Logic Inputs
Fast Sampling: 10ms/div or faster time base
Slow Sampling: 20ms/div or slower time base
Helpful tip Warning
Technical Detail
Manual Revision History
Version Date Notes
3.0 December 2013 Updated protocol interface information
3.1 February 2014 Minor error corrections
3.2 May 2014 Firmware update on Linux
3.3 October 2014 Updated interface protocol
3.4 November 2014 Counter mode
3.5 December 2014 New Sniffer ASCII mode

XScopes
User’s Manual
DS-XScopes-3.5 –December, 2014 Page | 3
TABLE OF CONTENTS
1. General Overview....................................................................................................................................... 7
1.1 Xprotolab & Xminilab Pin Description .................................................................................................... 7
1.2 Xprotolab Portable and Xminilab Portable Overview......................................................................... 8
1.2.1 Input Coupling Switch ...................................................................................................................................8
1.2.2 Curve Tracer Switch .......................................................................................................................................8
1.2.3 MENU / Power button ....................................................................................................................................8
1.2.4 USB Port / Device Charging..........................................................................................................................8
1.3 Specifications ............................................................................................................................................ 9
1.4 Dimensions ............................................................................................................................................... 10
1.5 Absolute Maximum Ratings................................................................................................................... 11
1.6 Factory Setup .......................................................................................................................................... 11
1.7 Quick Start Guide ................................................................................................................................... 11
1.8 User Interface .......................................................................................................................................... 12
1.9 Saving the settings .................................................................................................................................. 12
2. Mixed Signal Oscilloscope.......................................................................................................................13
2.1 Horizontal Settings................................................................................................................................... 13
2.1.1 Time Base .......................................................................................................................................................13
2.1.2 Technical Details...........................................................................................................................................13
2.1.3 Explore Wave ................................................................................................................................................13
2.1.4 Auto Setup .....................................................................................................................................................13
2.2 Vertical Settings....................................................................................................................................... 14
2.2.1 Disable Channel ...........................................................................................................................................14
2.2.2 Channel Gain................................................................................................................................................14
2.2.3 Channel Position ...........................................................................................................................................14
2.2.4 Channel Invert...............................................................................................................................................14
2.2.5 Channel Math ...............................................................................................................................................14
2.3 Trigger Settings ........................................................................................................................................ 15
2.3.1 Trigger Types ..................................................................................................................................................15
2.3.2 Trigger Modes................................................................................................................................................16

XScopes
User’s Manual
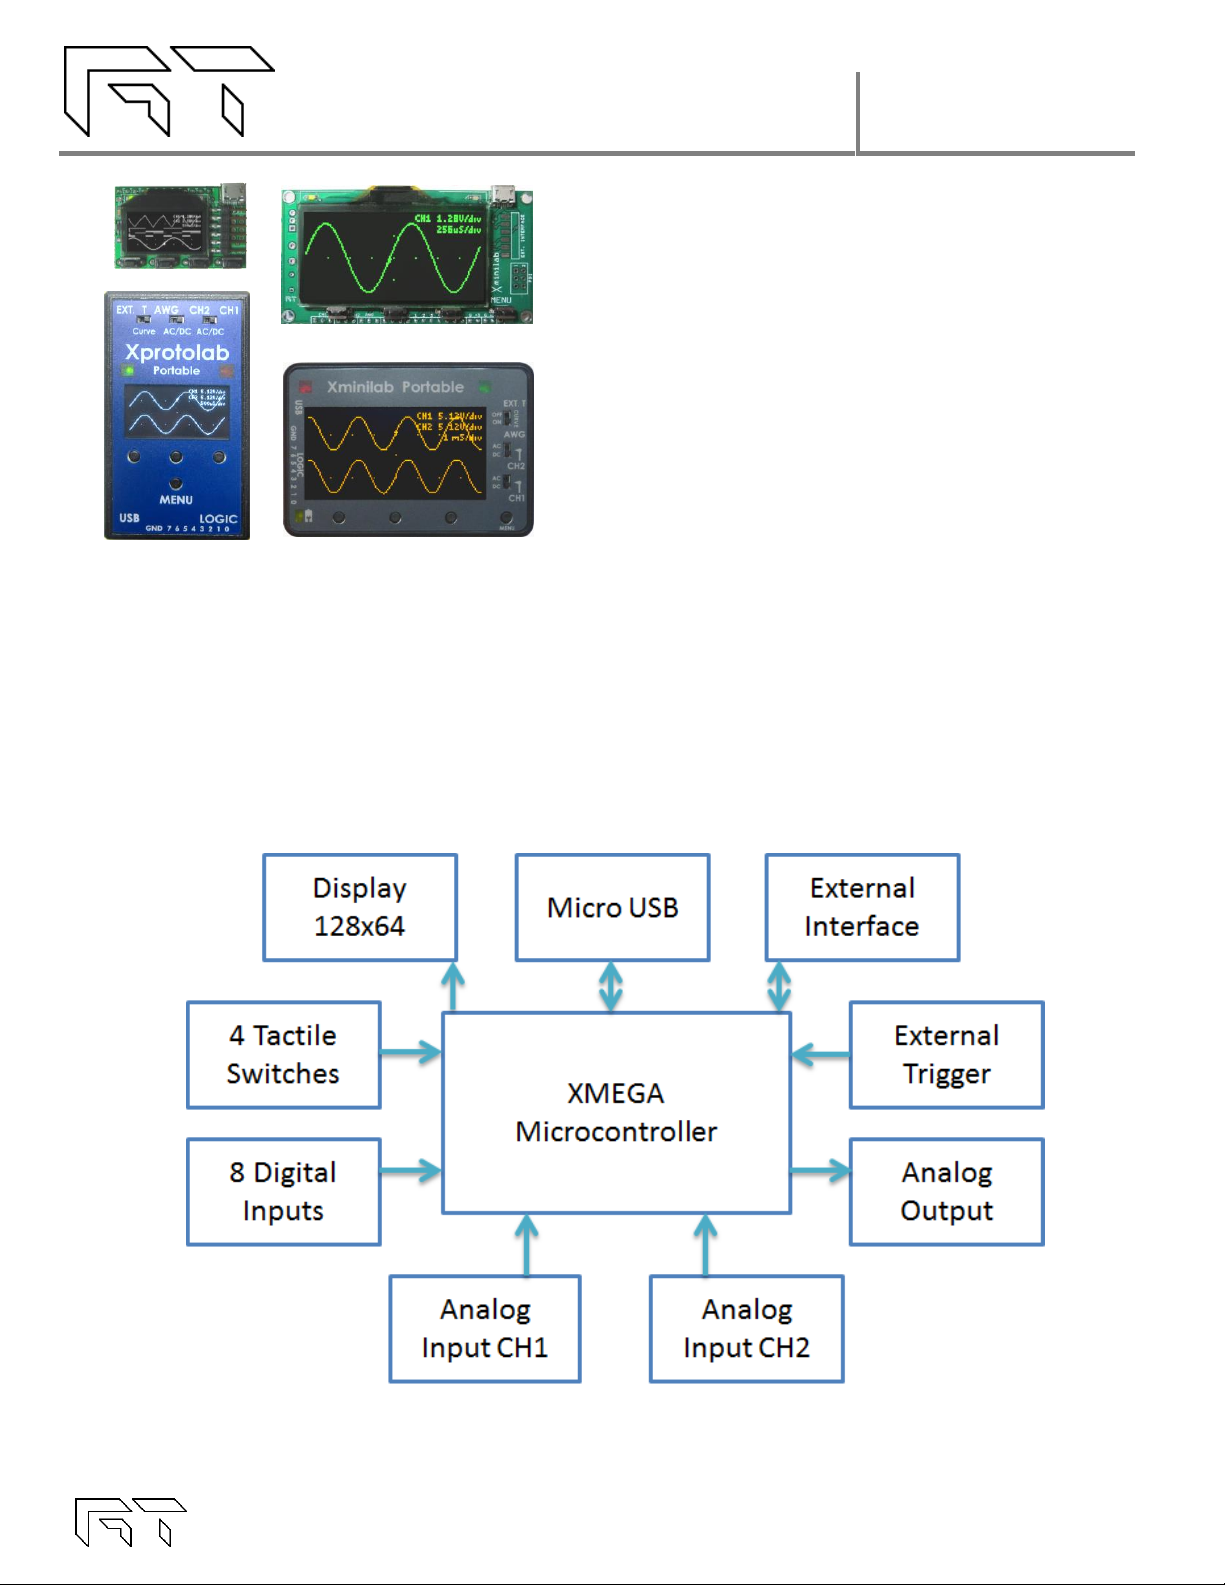
DS-XScopes-3.5 –December, 2014 Page | 4
2.3.3 Trigger Hold....................................................................................................................................................17
2.3.4 Post Trigger.....................................................................................................................................................17
2.3.5 Trigger Source................................................................................................................................................17
2.4 Device Modes ......................................................................................................................................... 18
2.4.1 Oscilloscope Mode ......................................................................................................................................18
2.4.1.1 Roll Mode.......................................................................................................................................................18
2.4.1.2 Elastic Traces.................................................................................................................................................18
2.4.1.3 XY Mode ........................................................................................................................................................19
2.4.2 Meter Mode...................................................................................................................................................19
2.4.2.1 Frequency Measurements .........................................................................................................................19
2.4.2.2 Pulse Counter................................................................................................................................................19
2.4.3 Spectrum Analyzer .......................................................................................................................................20
2.4.3.1 IQ FFT Mode ..................................................................................................................................................20
2.4.3.2 Logarithm display.........................................................................................................................................20
2.4.3.3 FFT Windows ..................................................................................................................................................20
2.5 Cursors ...................................................................................................................................................... 21
2.5.1 Vertical Cursors .............................................................................................................................................21
2.5.2 Horizontal Cursors .........................................................................................................................................21
2.5.3 Automatic Cursors ........................................................................................................................................21
2.5.4 Track Horizontal Cursors...............................................................................................................................21
2.5.5 Reference Waveform ..................................................................................................................................21
2.5.6 Cursors in XY Mode.......................................................................................................................................21
2.6 Display Settings........................................................................................................................................ 22
2.6.1 Persistent Display...........................................................................................................................................22
2.6.2 Line / Pixel Display ........................................................................................................................................22
2.6.3 Show scope settings.....................................................................................................................................22
2.6.4 Grid Type ........................................................................................................................................................22
2.6.5 Flip Display......................................................................................................................................................22
2.6.6 Invert Display .................................................................................................................................................22
3. Logic Analyzer and Protocol Sniffer......................................................................................................... 23

XScopes
User’s Manual
DS-XScopes-3.5 –December, 2014 Page | 5
3.1 Input Selection ........................................................................................................................................ 23
3.2 Channel Position ..................................................................................................................................... 23
3.3 Invert Channel......................................................................................................................................... 23
3.4 Thick Logic ‘0’.......................................................................................................................................... 23
3.5 Parallel Decoding ................................................................................................................................... 24
3.6 Serial Decoding....................................................................................................................................... 24
3.7 Protocol Sniffer ........................................................................................................................................ 24
3.8 Sniffers Modes.......................................................................................................................................... 24
3.9 I2C Sniffer ................................................................................................................................................. 25
3.10UART Sniffer .............................................................................................................................................. 25
3.11SPI Sniffer .................................................................................................................................................. 25
4. Arbitrary Waveform Generator ................................................................................................................26
4.1 Predefined Waveforms .......................................................................................................................... 27
4.2 Parameter Sweep................................................................................................................................... 27
4.2.1 Sweep Modes ...............................................................................................................................................27
4.3 Technical Details..................................................................................................................................... 27
5. PC Interface............................................................................................................................................... 28
5.1 Connecting the device ......................................................................................................................... 28
5.1 Controlling the device ........................................................................................................................... 28
5.2 Custom AWG Waveform ....................................................................................................................... 29
5.3 Saving Waveforms and Screenshots.................................................................................................... 29
6. Interface Protocol .....................................................................................................................................29
6.1 Interface settings .................................................................................................................................... 29
6.2 Control Data............................................................................................................................................ 29
6.2.1 Bitfield variables ............................................................................................................................................31
6.3 Vendor ID and Product ID ..................................................................................................................... 32
6.4 Command Set......................................................................................................................................... 32
6.4.1 Auto Send ......................................................................................................................................................33
6.4.2 METER measurement data .........................................................................................................................33

XScopes
User’s Manual
DS-XScopes-3.5 –December, 2014 Page | 6
7. BMP Screen Capture................................................................................................................................. 34
7.1 To send a BMP screen capture to a PC:.............................................................................................. 34
7.2 To send a BMP screen capture to Linux:.............................................................................................. 35
8. XScope’s Examples ..................................................................................................................................36
8.1 Resistor Voltage Divider ......................................................................................................................... 36
8.2 Measurement of an RC time constant ................................................................................................ 36
8.3 Half Wave Rectifier with Smoothing Capacitor.................................................................................. 36
8.4 BJT Amplifier............................................................................................................................................. 37
8.5 Component V/I Curves.......................................................................................................................... 37
8.6 Frequency Plots....................................................................................................................................... 37
9. Firmware Updating....................................................................................................................................38
9.1 Firmware upgrade using an external programmer ........................................................................... 38
9.1.1 Tools required ................................................................................................................................................38
9.1.2 Instructions to install the tools .....................................................................................................................38
9.1.3 Instructions to update the firmware..........................................................................................................38
9.2 Firmware upgrade using the bootloader............................................................................................ 39
9.2.1 Tools required ................................................................................................................................................39
9.2.2 Activating the bootloader..........................................................................................................................39
9.2.1 Firmware update in Windows: FLIP............................................................................................................39
9.2.2 Firmware upgrade in Linux: AVRDude......................................................................................................39
10. Frequently Asked Questions ....................................................................................................................40
11. Troubleshooting......................................................................................................................................... 41
12. XScope Design.......................................................................................................................................... 42
12.1System Architecture ............................................................................................................................... 42
12.2Schematics .............................................................................................................................................. 43

XScopes
User’s Manual
DS-XScopes-3.5 –December, 2014 Page | 7
1. General Overview
1.1 Xprotolab & Xminilab Pin Description
Name
Description
Comment
+5V
+5V Input voltage
Do not apply +5V if using the USB port
-5V
-5V Output voltage
50mA max output
GND
Ground
It is recommended use all ground pins to
reduce voltage offset errors.
+3.3V
+3.3V Output voltage
200mA max output
Logic 0
Digital Channel 0
I2C Sniffer signal: SDA
Logic 1
Digital Channel 1
I2C Sniffer signal: SCL
Logic 2
Digital Channel 2
UART Sniffer signal: RX
Logic 3
Digital Channel 3
UART Sniffer signal: TX
Logic 4
Digital Channel 4
SPI Sniffer signal: /SS
Logic 5
Digital Channel 5
SPI Sniffer signal: MOSI
Logic 6
Digital Channel 6
SPI Sniffer signal: MISO
Logic 7
Digital Channel 7
SPI Sniffer signal: SCK
EXT. T
External Trigger
Digital input, max 5.5V
AWG
Arbitrary Waveform Generator
Output range: +/- 2V
CH2
Analog Channel 2
Input range: -14V to +20V
CH1
Analog Channel 1
Input range: -14V to +20V
PWR
Power up output signal
3.3V signal, 10mA max output
RX
Interface RX input
Connect to host’s TX
TX
Interface TX output
Connect to host’s RX
LNK
Interface link input
3.3V level input, with internal pull up
Table 1: Pin description
Figure 4: Front and Top Signals
Figure 5: Back Signals
K1
K4
K2
K3
K1
K4
K2
K3
K1
K4
K2
K3
Figure 3: Xminilab HW 2.1 & 2.2 Front Signals
Figure 6: Xminilab HW 2.3 Front Signals

XScopes
User’s Manual
DS-XScopes-3.5 –December, 2014 Page | 8
1.2 Xprotolab Portable and Xminilab Portable Overview
1.2.1 Input Coupling Switch
The coupling switch is electrically placed between the input connector and
the oscilloscope’s input amplifier. The switch selects a direct path for DC or AC
measurements, or a path thru a capacitor, for AC only measurements.
1.2.2 Curve Tracer Switch
This switch connects the AWG to the input channels, this is used in particular for creating V/I curve traces. An example
of setting the device for curve tracing is showed in section 8.5.
1.2.3 MENU / Power button
The device is powered on by pressing the MENU button. To power off, press the MENU button for 2 seconds. Some of
the device modes disable this command, so to power off, set the device in Scope mode. The device is also powered off
when the shutdown timer expires (regardless of the device mode).
1.2.4 USB Port / Device Charging
The USB port is also used to charge the device. The device can be charged either when the powered on or off. When
the device is powered off, the battery can be fully charged in about 2 hours.
Figure 7: Xprotolab Portable
Curve Tracer Switch
Input Coupling Switch
ON
OFF
Analog Inputs
Arbitrary Waveform
External Trigger
Digital Inputs
USB Port /
Device Charging
K3
K1
K2
MENU /
Power button
Figure 9: Input Coupling Switch
Figure 10: Curve Tracer Switch
Do not connect CH2 to a voltage
source while the CURVE switch is on.
Damage to the device will occur.
Curve Tracer Switch
External Trigger
Arbitrary Waveform
Analog Inputs
Input Coupling Switch
Digital Inputs
USB Port /
Device Charging
MENU /
Power button
Figure 8: Xminilab Portable
K1
K2
K3

XScopes
User’s Manual
DS-XScopes-3.5 –December, 2014 Page | 9
1.3 Specifications
Xprotolab
Xminilab
Xprotolab Portable
Xminilab Portable
General
Microcontroller
ATXMEGA32A4U 32KB+4KB Flash, 4KB SRAM, 1KB EEPROM
Display Type
Graphic OLED, 128x64 pixels, max. refresh rate 122Hz
Display Size
0.96 inches
2.42 inches
1.3 inches
2.42 inches
Display Life Time
10,000 hours min.
40,000 hours min.
10,000 hours min.
40,000 hours min.
Device size
1.615” x 1.01”
3.3” x 1.75”
1.83" x 3.13" x 0.7"
3.17” x 2.22” x 0.7”
Weight
8.6 grams
25 grams
60 grams
75 grams
Interfaces
4 Tactile Switches, USB (Micro USB connector), UART, PDI for debugging
Battery
N/A
Li-Ion 3.7V 600mAh
Li-Ion 3.7V 750mAh
Active current1
40mA to 60mA
45mA to 75mA
40mA to 60mA
45mA to 75mA
Sleep current
3.6mA
1uA
Logic Analyzer
Logic Inputs
8 Digital Inputs
Logic Input levels
3.3V only
3.3V, 5V tolerant
Input Pull
None, 24kΩ Pull Up, or 24kΩ Pull Down
820kΩ Pull Down
Max. Sampling rate
2Msps
Buffer Size
256
Frequency Counter
16MHz, 1Hz resolution, +/- 100ppm accuracy
Sniffer Protocols
UART, I2C, SPI
Oscilloscope
Analog Inputs
2 Analog Inputs
Max. Sampling rate
2Msps
Analog Bandwidth
200kHz
Resolution
8 bits
Input Impedance
1MΩ
Buffer size
256 on each channel
Input Voltage Range
-14V to +20V
Vertical Sensitivity
80mV/div to 5.12V/div
AWG
Analog Outputs
1 Analog Output
Max. Conversion rate
1Msps
Resolution
8bits
Buffer Size
256
Output current
> +/- 7mA
Output Voltage
+/- 2V
+/- 4V
Low Pass Filter
44.1kHz
53kHz
Table 2: XScopes Specifications
Notes: 1. The Active current varies depending on the number of pixels lit on the display.

XScopes
User’s Manual
DS-XScopes-3.5 –December, 2014 Page | 10
1.4 Dimensions
Figure 11: Xprotolab Dimensions
Figure 12: Xminilab 2.1 & 2.2 Dimensions
Figure 13: Xminilab 2.3 Dimensions
Figure 14: Xprotolab-Portable Dimensions
Figure 15: Xminilab-Portable Dimensions

XScopes
User’s Manual
DS-XScopes-3.5 –December, 2014 Page | 11
1.5 Absolute Maximum Ratings
Xprotolab & Xminilab
Portable Variants
Parameter
Minimum
Maximum
Minimum
Maximum
Unit
Supply Voltage (+5V)
-0.5
5.5
N/A (Battery Powered)
V
Analog Inputs1
-30
30
-180
180
V
Digital Inputs
-0.5
3.8
-0.5
5.5
V
External Trigger
-3.5
6.8
-3.5
6.8
V
Operating Temperature
-40
70
-40
70
°C
Storage Temperature
-40
80
-40
80
°C
Table 3: Absolute Maximum Ratings
1. The maximum voltage on the analog inputs has only been tested to these limits. The device may tolerate higher voltages, but it is not recommended for safety.
1.6 Factory Setup
The device can enter factory options if the MENU key is pressed during power up. The following options are available:
1) Offset calibration: The unit is calibrated before being shipped, but calibration is required again if the firmware
is updated. During calibration, two graphs are shown that represent the calibration on each channel.
2) Shut off timeout: Sets the time to shut down the device after the last key has been pressed. On the non-
portable devices, it will only shut off the display and put the microcontroller to sleep.
3) Restore defaults: Select this function to restore to the default the settings. There are many settings on the
device, if you are not familiar with them, this function is useful to set the device to a known state.
1.7 Quick Start Guide
-Take the device out of the packaging. There is a protective film on the display which can be removed.
-Power on the device. The non-portable devices can be powered with either the USB or with an external power
supply, by applying +5V on the corresponding pin. Double check your connections because the device WILL get
damaged if applying power on the wrong pin. The portable variants are powered with the MENU button.
-Connect the AWG pin to CH1. On the portable variants, you can flip the Curve switch instead.
-The tactile switches are named (from left to right) K1, K2, K3 and K4. The K4 is the Menu button.
-Press and hold the K1 key (auto setup). The screen should look like figure 16.
-Pressing K2 or K3 will change the sampling rate.
Figure 16: Quick start
Additional examples
on how to use the device are
presented in chapter 8.

XScopes
User’s Manual
DS-XScopes-3.5 –December, 2014 Page | 12
1.8 User Interface
The K4 button is the MENU button, used to navigate thru all the menus. The K1 - K3 buttons action depend on the current
menu. The green arrows represent the flow when pressing the MENU button. When the MENU button is pressed on the
last menu, the device settings are saved and the menu goes back to the default. Figure 17 shows the main menus in blue
and some secondary menus in yellow. Further ramifications are shown on the respective chapters.
Figure 17: Main Menus
1.9 Saving the settings
All settings are stored to non-volatile memory only when exiting from the last menu. This method is used to reduce
the number of write cycles to the microcontroller’s EEPROM. The settings are not saved if the VCC voltage is under 3.15V.
If confused while
navigating the menus, it is
easy to go back to the default
menu by pressing the MENU
button a few times.
A green arrow
represents the flow when
pressing the MENU button

XScopes
User’s Manual
DS-XScopes-3.5 –December, 2014 Page | 13
2. Mixed Signal Oscilloscope
The XScope is a mixed signal oscilloscope; it has 2 analog channels and 8 digital channels. This chapter will focus on the
analog signals. More information about the digital channels is presented in chapter 3.
2.1 Horizontal Settings
The horizontal settings are controlled
on the default menu. The menu is
shown on figure 18.
2.1.1 Time Base
The time base can be varied from
8µs/div to 50s/div. Table 4 shows all the
possible time bases. One time division
consists of 16 pixels. Example: 8µs / division = 8µs / 16 pixels 500ns / pixel.
Table 4: Time divisions *At 8µs/div, CH2 is not displayed.
2.1.2 Technical Details
There are two distinct sampling methods: Fast Sampling and Slow Sampling.
-Fast Sampling (10ms/div or faster): All samples are acquired to fill the buffer, and then they are displayed on
the screen.
oPre-trigger sampling (ability to show samples before the trigger) is available only with fast sampling.
oOnly 128 samples are visible at a time, varying the horizontal position allows exploring the full buffer.
-Slow Sampling (20ms/div or slower): Single samples are acquired and simultaneously displayed on the display.
oThe ROLL mode (waveform scrolls to the left during acquisition) is only available with the slow sampling.
oAll 256 samples are visible on the display (each vertical line will have at least two samples)
2.1.3 Explore Wave
The horizontal position can be varied on the Fast Sampling time bases. There are 256 samples for each channel, but
only 128 are displayed on the screen. When the acquisition is stopped, the full sample buffer can be explored with the K2
and K3 buttons. Pressing K2 and K3 simultaneously on the default menu will center the horizontal position.
When setting the XY mode, the graph can be moved vertically (Section 2.4.1.3).
2.1.4 Auto Setup
The Auto Setup feature will try to find the optimum gain and time base for the signals being applied on CH1 and CH2.
Time Base
( s / div )
Fast
*8µ
16µ
32µ
64µ
128µ
256µ
500µ
1m
2m
5m
10m
Slow
20m
50m
0.1
0.2
0.5
1
2
5
10
20
50
Figure 18: Horizontal Menus

XScopes
User’s Manual
DS-XScopes-3.5 –December, 2014 Page | 14
2.2 Vertical Settings
The analog channel controls are discussed in this section. Figure 19 shows the Vertical menu flow.
Figure 19: Vertical menus
2.2.1 Disable Channel
Any channel can be disabled; this is useful to reduce clutter on the display.
2.2.2 Channel Gain
Table 5 shows the possible gain settings for the analog channels. One gain division consists of
16 pixels. The current gain settings for the analog channels are shown in the top right part of
the display (If the SHOW setting of the display is enabled).
2.2.3 Channel Position
The position of the waveform can be moved up or down in the Channel Position menu.
2.2.4 Channel Invert
The channel can be inverted. The displayed waveform and channel calculations will be affected.
2.2.5 Channel Math
-Subtract: The channel trace will be replaced with the difference.
-Multiply: The channel trace will be replaced with the product.
-Average: The channel samples will be averaged to reduce
aliasing. (See Figure 20).
Channel Math Examples:
Gain Settings
(Volts / Division)
5.12
2.56
1.28
0.64
0.32
0.16
80m
CH1 and CH2
have identical settings.
To display CH1+CH2, first invert CH2 and then select the SUBTRACT
function.
Figure 22: Two signals
Figure 21: CH1+CH2
Figure 23: CH1xCH2
8 µs/div: 1 sample (no average)
16 us/div: 1 sample (no average)
32 µs/div to
10 ms/div: 2 samples are averaged
20 ms/div: 1 sample (no average)
50 ms/div: 2 samples are averaged
100 ms/div: 4 samples are averaged
200 ms/div: 8 samples are averaged
500 ms/div: 20 samples are averaged
1 s/div: 40 samples are averaged
2 s/div: 80 samples are averaged
5 s/div: 200 samples are averaged
10 s/div: 400 samples are averaged
20 s/div: 800 samples are averaged
50 s/div:2000 samples are averaged
Table 5: Gain Settings
Figure 20: Number of samples averaged when
enabling the channel AVERAGE option. The device’s
sampling rate is normally faster than needed to be
able to average samples

XScopes
User’s Manual
DS-XScopes-3.5 –December, 2014 Page | 15
2.3 Trigger Settings
The XScope has an advance triggering system, it has most of the trigger controls of a professional oscilloscope. Figure
24 shows the trigger menus.
Figure 24: Trigger menus
2.3.1 Trigger Types
There are four different trigger types, which determine when to display the trace on the screen:
Normal: Trace only when the trigger event occurs.
Single: Only one trace is displayed when the trigger event occurs.
Auto: Trace when the trigger event occurs, or after a timeout.
Free: Trace continuously ignoring the trigger.

XScopes
User’s Manual
DS-XScopes-3.5 –December, 2014 Page | 16
2.3.2 Trigger Modes
Three triggering modes are available: Edge, Window, and Slope. The Edge and Slope have selectable direction. When
selecting an analog trigger source, the trigger direction is changed in the “Adjust Trigger Level” menu, by moving up or
down the trigger level. When selecting a digital trigger source, the trigger direction is toggled on every button press.
Edge Trigger: The trigger occurs when the signal crosses the trigger level in a certain direction. The trigger level is
represented on the display as a rising ( ), falling ( ) or dual arrow ( ).
oRising edge: The trigger occurs when the signal crosses the level from below to above.
oFalling Edge: The trigger occurs when the signal crosses the level from above to below.
oDual Edge: The trigger occurs when the signal crosses the trigger level in any direction.
To select the Dual Edge mode, deselect Window, Edge, and Slope in the “Trigger Mode Menu”, the trigger
mark will change to a dual arrow:
Window Trigger: The trigger occurs when the signal leaves a voltage range. This mode is useful for detecting
overvoltages or undervoltages. Two arrow trigger marks represent the window levels.
Slope Trigger: The trigger occurs when the difference between two consecutive samples is greater or lower than
a predefined value. This is useful for detecting spikes or for detecting high frequency signals. The trigger mark is
represented on the screen as two small lines, with a separation proportional to the trigger value.
Figure 26: Window Trigger
Figure 27: Slope trigger
Figure 25: Edge Trigger
Edge Trigger:
The signal crosses a level.
Window Trigger:
The signal is outside a range.
Slope Trigger:
The difference of two points
in the signal is above a value.

XScopes
User’s Manual
DS-XScopes-3.5 –December, 2014 Page | 17
2.3.3 Trigger Hold
The trigger hold specifies a time to wait before detecting the next trigger. It is useful when the signal can have multiple
trigger events occurring close to each other, but you only want to trigger on the first one.
2.3.4 Post Trigger
The oscilloscope is continuously acquiring samples in a circular buffer. Once the trigger event occurs, the oscilloscope
will acquire more samples, specified by the Post Trigger value. The ability to show samples before or after the trigger is
one of the most powerful features of a digital sampling oscilloscope. The post trigger is only available on the fast sampling
rates.
Depending on the post trigger settings, different parts of a signal can be displayed. Consider the signal on figure 28:
Figure 28: Sample signal
Even though the buffer sample is relatively small, any section of the shown figure can be analyzed by varying the post
trigger value. Examples:
-Post trigger = 0 (don’t acquire more signals after the trigger).
Only the signals that occurred before the trigger event are shown.
Figure 29: Post trigger value equal zero
-Post trigger = 50% of the sample buffer (default setting).
Half of the buffer contains samples before the trigger,
and half contains the samples after the trigger.
Figure 30: Post trigger = 50% of sample buffer
-Post trigger = 100% of the sample buffer
Only signals immediately after the trigger event are shown.
Figure 31: Post trigger = 100% of buffer
The actual post trigger value can vary between 0 and 32768 samples, so you can explore the signal after a very long
time after the trigger event has occurred, but with a high post trigger value, the refresh rate of the scope will be reduced.
2.3.5 Trigger Source
Any analog or digital channel can be the trigger source. If selecting a digital channel as trigger source, the slope and
window modes are not applicable; the device will use edge triggering. The external trigger input is an additional digital
trigger source which tolerates voltages up to 5.5V.

XScopes
User’s Manual
DS-XScopes-3.5 –December, 2014 Page | 18
2.4 Device Modes
There are multiple device modes that can be selected; the menus shown on figure 32 allow selecting the Scope Mode,
the Meter Mode or the Spectrum Analyzer Mode (FFT). Another device mode is the Protocol Sniffer, which is discussed in
section 3.8.
Figure 32: Device mode menus
2.4.1 Oscilloscope Mode
This is the default mode of the XScope. The 2 analog and 8 digital channels are sampled simultaneously. Any of these
10 channels can be shown on the display. Figure 33 shows the oscilloscope mode and the various sections of the display
are detailed.
2.4.1.1 Roll Mode
The data on the display is scrolled to the left as new data comes in. This is only available on the Slow Sampling rates.
The Roll mode and Elastic mode cannot be selected simultaneously. The Roll mode disables the triggering.
2.4.1.2 Elastic Traces
This is also called “Display average” on other digital oscilloscopes. It works by averaging the trace data with the new
data. The result is a more stable waveform displayed on the screen. However, using this setting only makes sense when
the scope is properly triggered on a periodic signal. The Elastic trace computes this equation for every point in the trace:
In the “Mode Menu”,
press K1 and K3 simultaneously,
to display both the Scope and FFT.
Grid
Scope Settings:
Channel Gain Time Base
Trigger level mark
Green LED: Flashes after
every screen refresh
Red LED: Flashes with USB
or LINK signal activity
The scope can also display
the traces in XY mode, which is
described in section 2.4.1.3
Figure 33: Oscilloscope Mode

XScopes
User’s Manual
DS-XScopes-3.5 –December, 2014 Page | 19
2.4.1.3 XY Mode
The XY mode changes the display from volts vs. time, to volts vs. volts. You can use XY mode to compare frequency
and phase relationships between two signals. The XY mode can also be used with transducers to display strain versus
displacement, flow versus pressure, volts versus current, or voltage versus frequency. Lissajous figures can be plotted
using the XY Mode. Component V/I curves can also be plotted, see section 8.5.
2.4.2 Meter Mode
The XScope can function as a dual digital voltmeter. The font used is bigger
in meter mode to facilitate reading. The available measurements in meter mode
are: Average Voltage (DC), Peak to Peak Voltage, Frequency, and Pulse counting.
A small trace of the analog signals is displayed below the voltage measurements.
2.4.2.1 Frequency Measurements
The device can measure frequencies on any channel (analog or digital). The measurements on the analog channels are
always shown, and the trigger source (see section 2.3) selects which digital channel to measure.
Frequency measurements on the analog channels are done using the FFT of the acquired data, so measured
frequencies have discrete steps. The frequency range is determined by the highest frequency of the analog channels. If
there is a high frequency on one channel and a low frequency on the other, the channel with the lowest frequency will
have low resolution. Frequency measurements with the FFT are best suited for analog signals. Frequency measurements
on the digital inputs are done counting the pulses on the pin over one second. The resolution of the measurement is 1Hz.
Frequency measurements with the Frequency counter are best suited for digital signals.
FFT (Analog channels)
Frequency Counter (Digital channels)
Maximum voltage range
-14V to 20V
Logic level range (or Ext. Trig -2.2V to 5.5V)
Maximum Frequency
500kHz
16MHz (or 12MHz on the Ext. Trig)
Resolution
Variable, depending on frequency
range. From 6.25Hz to 7.812kHz
1Hz
Signal is noisy, or is
mixed with other signals
Finds the fundamental frequency
Not suitable
Signal has a high offset
Still works
Stops working when the offset is above the
logic threshold.
2.4.2.2 Pulse Counter
The device can count the number of pulses on a digital input. The counter will roll over after reaching 99,942,399. The
counting can be stopped by stopping the acquisition (K1 button on the main menu). Pressing any button will reset the
counter. A stopwatch displays the time since the Pulse Counter started, and can reach 255 hours, 59 minutes, 59 seconds.
Figure 35: Meter Mode
Figure 34: XY Mode
When using the XY modes with a Slow Sampling rate, activating the
ROLL mode will display a continuous “beam”.
Table 6: FFT vs. Frequency Counter
You can use the “Explore Wave” menu to move the graph vertically.

XScopes
User’s Manual
DS-XScopes-3.5 –December, 2014 Page | 20
2.4.3 Spectrum Analyzer
The spectrum analyzer is done by calculating the Fast Fourier Transform (FFT)
of the selected analog channels (or the channel math functions if enabled). When
the FFT is enabled, the spectrum is plotted as frequency vs. magnitude. The
horizontal axis represents the frequency (Hertz), and the vertical axis represents
the magnitude. Figure 36 shows the XScope in Spectrum Analyzer Mode. The
Nyquist frequency is shown on the top right corner of the display.
2.4.3.1 IQ FFT Mode
When the IQ FFT is disabled, the XScope calculates two independent 256 point FFTs of the analog channels, the Real
and Imaginary components of the FFT have the same data. The output of the FFT is symmetrical, but only half of the result
is shown on the display. When the IQ FFT is enabled, only one FFT is calculated, the Real component is filled with the CH1
data, and the Imaginary component is filled with the CH2 data. The result is a 256 point FFT, you can use the horizontal
controls described in section 2.1.3 to explore all the data (since only 128 points can be shown on the display). The IQ FFT is
useful to monitor RF Spectrums with the proper hardware mixer.
2.4.3.2 Logarithm display
The log is useful when analyzing low level components on the signal. When analyzing audio, it is also very useful as it
maps more directly to how humans perceive sound. The actual function performed is: y = 16 * log2(x).
Example:
2.4.3.3 FFT Windows
To reduce the spectral leakage, an FFT window function can be applied. Four FFT window types are available:
Rectangular: No window applied
Hamming:
Hann:
Blackman:
Figure 40: Window and sine frequency response, from left to right: Rectangular, Hamming, Hann and Blackman
Figure 36: Spectrum Analyzer Mode
Figure 37: Triangle Wave
Figure 39: FFT without Log
Figure 38: FFT with Log
If only interested in one channel, turn off the other channel to maximize the vertical display.
Table of contents
Popular Test Equipment manuals by other brands

Atten
Atten ADS1000D Series Service manual

Tokyo Gas Engineering Solutions Corporation
Tokyo Gas Engineering Solutions Corporation Laser Methane Mini Operation manuals

ASSOCIATED EQUIPMENT CORPORATION
ASSOCIATED EQUIPMENT CORPORATION 6036B-24 Operator's manual

Ecom
Ecom Ex-DT 12 operating instructions

Sanwa
Sanwa SP-18D manual

Fluke
Fluke 5560A Service manual

Megger
Megger MTO210 instruction manual

Agilent Technologies
Agilent Technologies InfiniiVision 5000 Series Programmer's guide

Alcofind
Alcofind DA-7100 instruction manual

Tektronix
Tektronix 7B85 instruction manual

TSI Instruments
TSI Instruments DICKEY-john GAC 2700-LF quick start guide

Viavi
Viavi HST-3000 Quick Card