Gadspot N600E User manual

User’s Manual
H.264 Series 2-Megapixel Network
Camera
N600E
Version: 1.5
Date: 12/26/2011

1
Contents
Notices .........................................................................................................................................................2
Introduction..................................................................................................................................................3
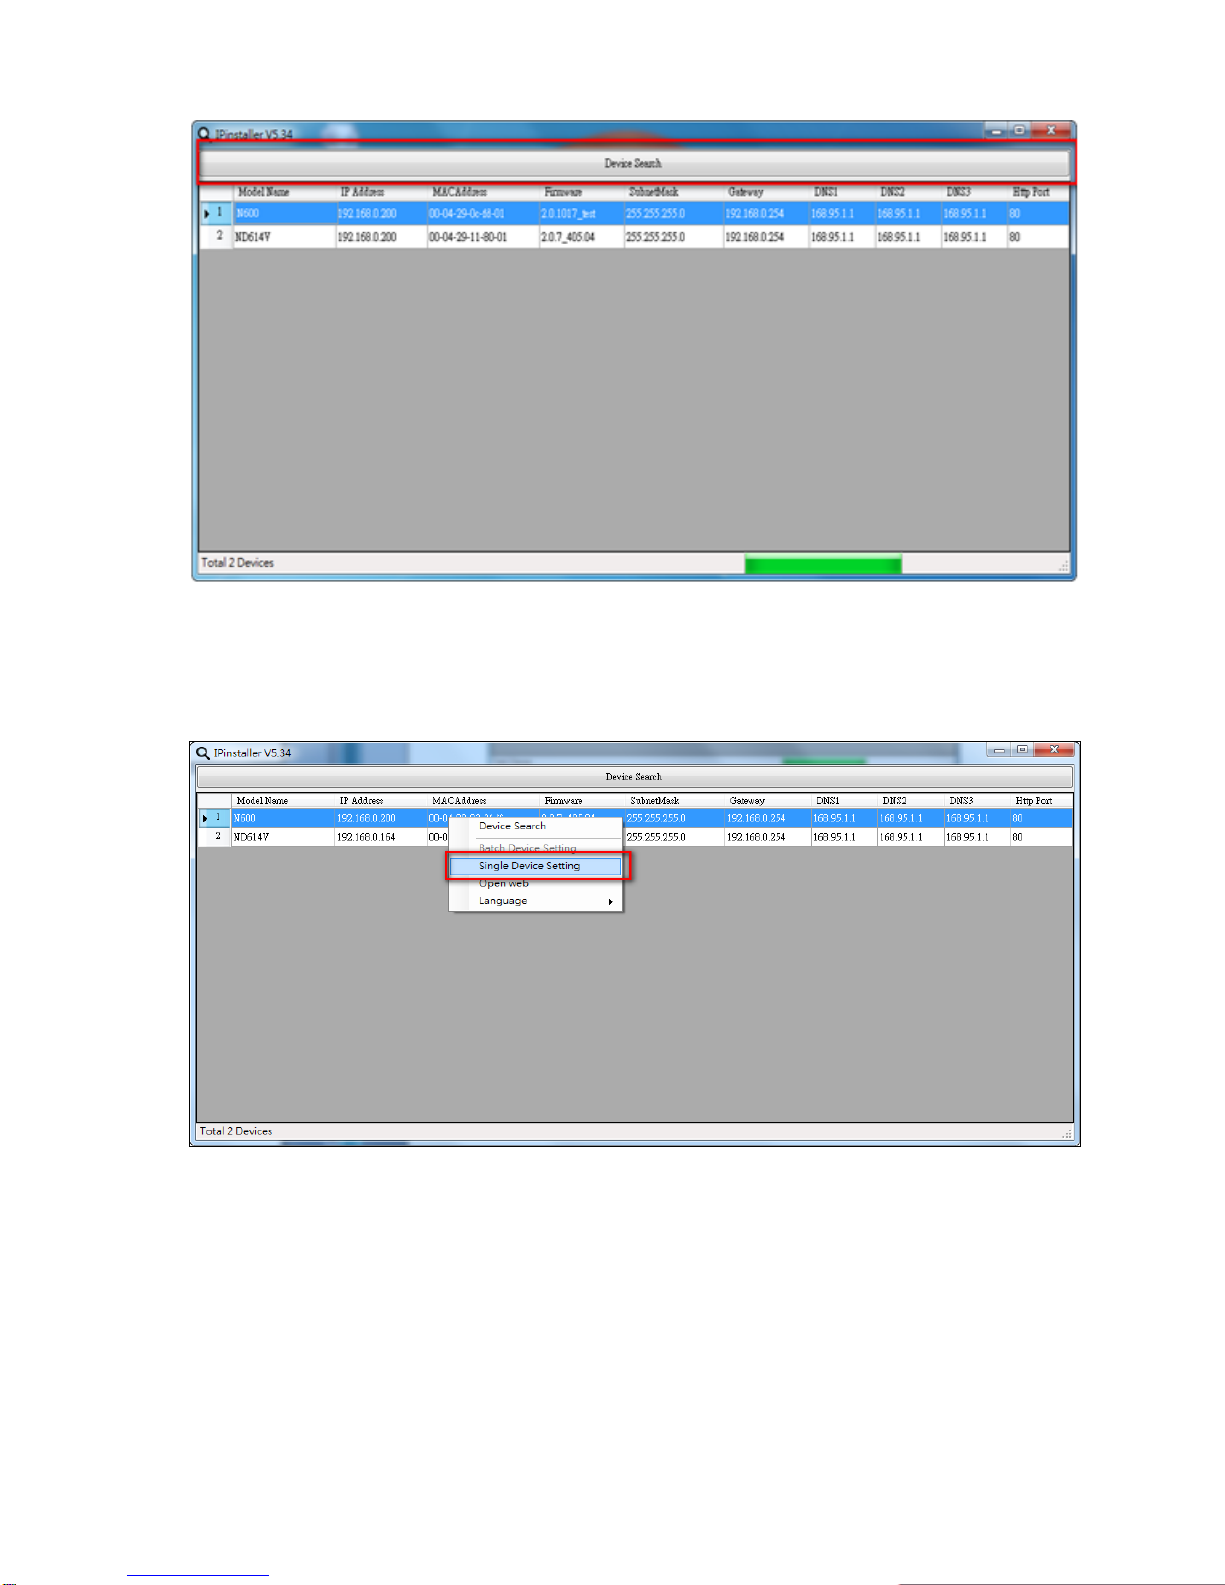
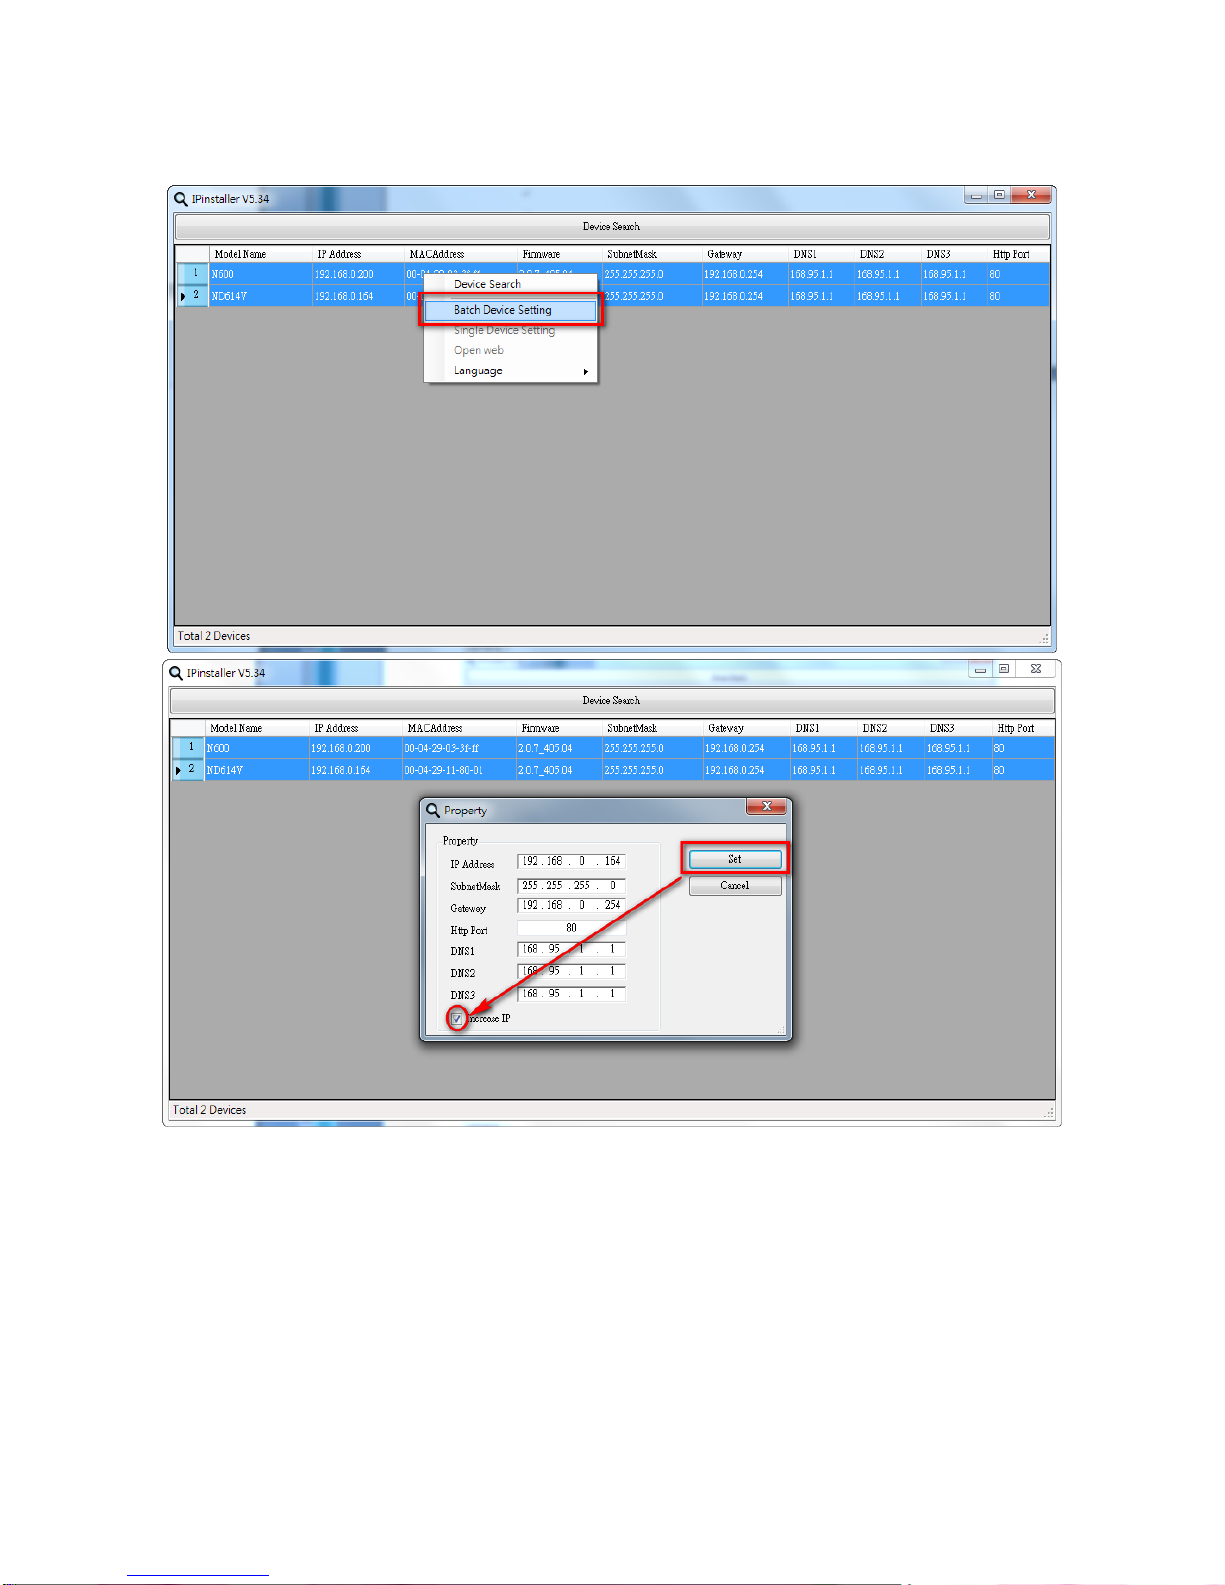
Installation....................................................................................................................................................4
Using the Web UI.......................................................................................................................................12
1. Live View.......................................................................................................................................13
2.Video...............................................................................................................................................16
3.Camera............................................................................................................................................19
General.......................................................................................................................................19
Advanced ...................................................................................................................................21
4 .Event ..............................................................................................................................................23
5. Schedule.........................................................................................................................................29
General.......................................................................................................................................29
Storage .......................................................................................................................................30
6. Network..........................................................................................................................................33
General.......................................................................................................................................33
Advanced ...................................................................................................................................34
SMTP (E-Mail)..........................................................................................................................35
DDNS.........................................................................................................................................36
7. System............................................................................................................................................37
User............................................................................................................................................38
Date & Time...............................................................................................................................39
Server Maintenance ...................................................................................................................40
Log Service................................................................................................................................41
8. Customize ......................................................................................................................................42
FAQ............................................................................................................................................................44
1. Connectors .....................................................................................................................................44
View of Back panel....................................................................................................................44
DC-Iris .......................................................................................................................................44
Composite Video Output............................................................................................................45
Audio Out...................................................................................................................................45
SD Card Slot..............................................................................................................................46
2. I/O Terminal Connector - Pin Assignment.....................................................................................47
Restore Factory Default Settings ...............................................................................................49
3. Technical Specifications ................................................................................................................50
Product Specifications ...............................................................................................................50
Video Streams Specification......................................................................................................53

2
Notices
This user manual is intended for administrators and users of the H.264 Series Network Camera, including
instructions for using and managing the camera on your network. The use of surveillance devices may be
prohibited by law in your country. It is the user’s responsibility to ensure that the operation of such devices is legal
before installing this unit for its intended use.
Before the Network Camera is installed, all the safety and operating instructions should be carefully read and
followed to avoid damage due to faulty assembly and installation. This also ensures the product is used properly as
intended.
Heed all warnings
Do not drop or strike this equipment
Sensitive electronics inside the camera are vulnerable to excessive strike.
Do not install the equipment near any flames or heat sources
Excessive heat could damage this equipment.
Do not cover cloth or to install this equipment in poorly ventilated places.
Overheating could damage this equipment.
Do not expose this equipment to rain or moisture. Do not touch the power connection with wet
hands
Risk of short circuit, electric shock or fire
Do not damage the power cord or leave it under pressure
Risk of fire or shock circuit
To reduce the risk of electric shock, do not remove the Cover (or Back).
No user-serviceable parts inside. Misusage, improper, and negligence could damage this equipment.
Need to refer servicing to qualified service personnel.
Do not continue to operate if there appears to be fault.
If the unit ceases to function, contact qualified service personnel for help.
All work related to the installation of this product should be made by qualified service personnel
or system installers.

3
Introduction
H.264 N600 Series Network Camera delivers superior H.264-AVC performance, state of the art design and
function. N600 Series is specifically adapted for maximum performance indoor applications, such as
commercial, banking, government buildings, schools, universities and airports.
H.264-AVC video compression can lower bandwidth and storage requirements without compromising image
quality; Motion JPEG is supported for increased flexibility, as well as multiple independent video streaming.
N600 Series value-added features include; on-board video motion detection, SD slot for storage recording, and
two-way audio. N600E, the PoE model, is available with full PoE (IEEE-802.3af) feature that supplies function of
power to the camera via the network, eliminating the need for power cables, reducing installation costs and
complexity. Consequently, N600 Series is “Best in Class” for maximum performance IP video surveillance
systems, demanding superior image quality, ease of installation, and intelligent video capabilities.

4
Installation
1. Hardware Connection

5
2. Software Installation
The following software is necessary for the proper display and use of the N600 from the Web site. The
software will be available from the Software Package CD.
IP Installer
The IP Installer is used to locate and configure network cameras and video servers on the LAN. This utility is
useful for conveniently configuring the network settings of the device, or for finding a device once the network
settings have been modified. To install the IP Installer, from the Software Package CD UI, select IP installer,
then follow the on screen instructions.
XVID Codec
An H.264 codec is applied for displaying the video stream and playing the recoded AVI files. If the video
stream can’t be displayed or the recorded AVI files can’t be play on PC, install this software from the Software
Package CD.
VLC
Though not necessary, this can be used for viewing the streaming without a Web browser.

6
3. Network Configuration
IP Installer is a utility that provides an easier, more efficient way to configure the IP address and network
settings of the devices. It even provides a convenient way to set the network settings for multiple devices
simultaneously using the batch setting function. Moreover, IP Installer can save the network settings for all
devices as a backup and restore them when necessary. NOTE: Default mode for N600 is DHCP.
Preparation before IP Assignment
1. Always consult your network administrator before assigning an IP address to your server in order to avoid
using a previously assigned IP address.
2. Ensure the N600 is powered on and correctly connected to the network.
3. MAC Address: Each device has a unique Ethernet address (MAC address) shown on the label of the device
as the serial number (S/N) with 12 digits (e.g. 000429-XXXXXX).
4. Although the IP Installer is able to find and configure any N600 on the LAN except those that are behind a
router, it is a good idea to set the host PC to the same subnet. In order to connect to the Web-based user
interface of the camera, the host PC must be in the same subnet. For more information about subnets, please
consult your network administrator.
Using IP Installer to Assign an IP Address to N600
1. Once IP Installer has been successfully installed on the PC, double click the IP Installer icon on the desktop
2. Click the [Device Search] to search the device in the LAN.
*0004290000
B1

7
3. From the list, select the device with the MAC Address that corresponds to the N600 that is to be configured.
The MAC Address is identical to the unit’s S/N (Serial Number).
4. Double click the select item to open the Property Page or right click the item to select the
[Single Device Setting]
5. Modify the network settings of the camera

8
6. After filling in the properties, click [Set] button to complete the configuration settings.

9
7. Click the [Batch Device Setting] to set several devices.
8. Language support for Chinese, English and Spanish.

10
Open the Web-based UI of the selected camera
1. To access the Web-based UI of the selected unit, run the View > Open Web on the menu bar.
2. For first time user, there will be a prompt to install the ActiveX control. Confirm the installation as it is required
to view the video stream and some operations.

11
3. If the device has been configured correctly, the default Web browser will open to the home page of the
selected device.
Verify and Complete the Installation from Your Browser
When browsing the Home Page for the first time with the Microsoft Internet ExplorerTM, you must temporarily lower
your security settings to perform a one-time-only installation of the ActiveX component onto your workstation, as
described below:
1. From the Tools menu, select [Internet Options]
2. Click the [Security] tab and then click [Custom Level] button to see your current security settings.
3. Set the security level to Low and click [OK].
4. Type the URL or IP address of your camera into the Address field.
5. A dialog box will pop up asking if the ActiveX control should be installed. Click [Yes] to start the installation.
Once the ActiveX installation is complete, return the security settings to their original value, as noted above.

12
Using the Web UI
Start your Web browser and enter the URL or IP address in the Address field. The Home page of the camera is now
displayed
1. Launch a web browser,
2. Enter the IP address of the camera in the address field of the browser,
3. The login process will require username and password for a new session connection. The default
username/password is admin/admin.
4. After authorized, the web will be directed to the main page of the camera with the live video.

13
1. Live View
Button
Description
Click for more general/Advanced camera settings
Select languages among English, traditional Chinese and simplify Chinese
Check actual size to view the actual size (resolution) of the image
Triggers manually a preset event in the configuration page
Choose among the 3 streams for viewing,Digital PTZ is only available with stream 2

14
Button
Description
Full screen
Listen the audio input from local end
Talking function
Record instant live video
Snapshot the image

15
Configuration Pages List
Video
General
Advanced
Camera
General
Advanced
Event
Event Server
Motion Detection
I/O Ports
Event Configuration
Schedule
General
Storage
Network
General
Advanced
SMTP (E-mail)
DDNS
System
Information
User
Date & Time
Server Maintenance
Log Service
Customize
Style Layout

16
2.Video
This section describes how to configure the video streaming from the device, and the related camera image
configurations. Users with Administrator or Operator authority are intended for these configurations.
Click on SETUP button to enter in the configuration pages.
General
Video General Setting: Check each box to enable streams (max 3) for live viewing
Note: Digital PTZ is only available with stream 2
OSD Setting
Enable the On Screen Display (OSD) information. A line of text message (e.g. Camera Name or Position) and the
date/time string are available to be selected for displaying or hiding on the images.

17
Digital PTZ is only available with stream 2
Choice the Stream 2, the web wills display the control panel to control e-PTZ function of N600
1: Zoom: Digital zooms in/out.
2: Pan Arrow: Click to control Pan function.
3: Step: Setting the speed of Pan function. (1、5、10)
Advanced
The Video Advanced setting page provides more detail stream configurations. These settings can affect video
size, quality. The expected transferring performance must be under the condition of full network bandwidth
Stream Setting:
Note:
1:Configuration of stream 2 is the same as stream 1, but Stream 2 can only be set to 320x240 or 640x480,
2:Stream3 only RTSP path、image format and frame rate can be adjusted, the rest of the settings are fixed.
RTSP Path -
The RTSP Path is the stream ID used for RTSP client streaming connection, such as VLC player. The default
values are v00, v01 and v02 for the three streams respectively. The string can be any combination of number or
capital/small letters. It cannot be empty however.
3
1
2

18
Resolution -
The resolution here describes an image size counted by width and height, e.g. 640x480, referring to pixel
resolution. The 1st stream can be set from more options of resolution; 1600x1200 (2 megapixels), 1280x720(HD),
800x600(SVGA), 640x480(VGA), 320x240(QVGA). While Stream2 has the options of VGA and QVGA, stream3 is
in a fixed resolution, the QVGA.
Video Mode -
This option allows the selection of two bit rate modes, the Constant Bit Rate (CBR) or Variable Bit Rate (VBR).
CBR refers to the setting of a fixed Target Bit Rate (configuration in the rage of 64Kbps to 6Mbps) that would apply
in the case of limited bandwidth or/and storage requirement. While CBR concerns a fixed data rate transmitting, the
video quality is of high priority for VBR mode selected. VBR therefore is configured with the Quality Level
(Standard, Good, Best). In general, CBR predicts the provided condition; if image activity requires higher bit rates
than configured, the frame rate and quality would be affected as not likely to increase bandwidth (bit rate). In spite
of the required recording storage estimation, VBR is by way of compensation that adjustable bit rate fits the actual
image activity.
Image Format -
H.264 and MJPEG are available for image format selection. The term, “image format”, is referring to compression /
encoding technique. The selection of image format decides the performance of bandwidth and storage requirement.
In the request of same video quality, H.264 contributes to less bandwidth and storage requirement, which is more
efficient than MJPEG.
GOP -
In H.264 video coding, GOP (group of pictures) describes how the different types of frames are arranged. The
frame types implemented here are I-frame (full image information) and P-frame (motion-compensated difference
information). This setting configures the GOP length which is the number of frames before next I-frame appears.
Having more I-frames usually increases the stream size, and therefore more bandwidth and storage are required.
Frame Rates -
The Frame Rates defines the number of frames that will be displayed per second. The frame rate setting can affect
the target bit rate (bandwidth requirement) and storage requirement.
Note:
While multiple streaming is possible, each stream has its limitation and dependency to other stream. See “Video
Stream Specification”.

19
3.Camera
This page provides the basic image color appearance and further image settings.
General
Table of contents
Other Gadspot Security Camera manuals