Gadspot NB670E User manual

H.264 Series Fish-Eye Compact
Network Camera
NB670E
User’s Manual
Version: 1.03
Date: 07/09/2012

1
Contents
Revision History ..................................................................................................................................2
Notices .................................................................................................................................................3
Introduction..........................................................................................................................................4
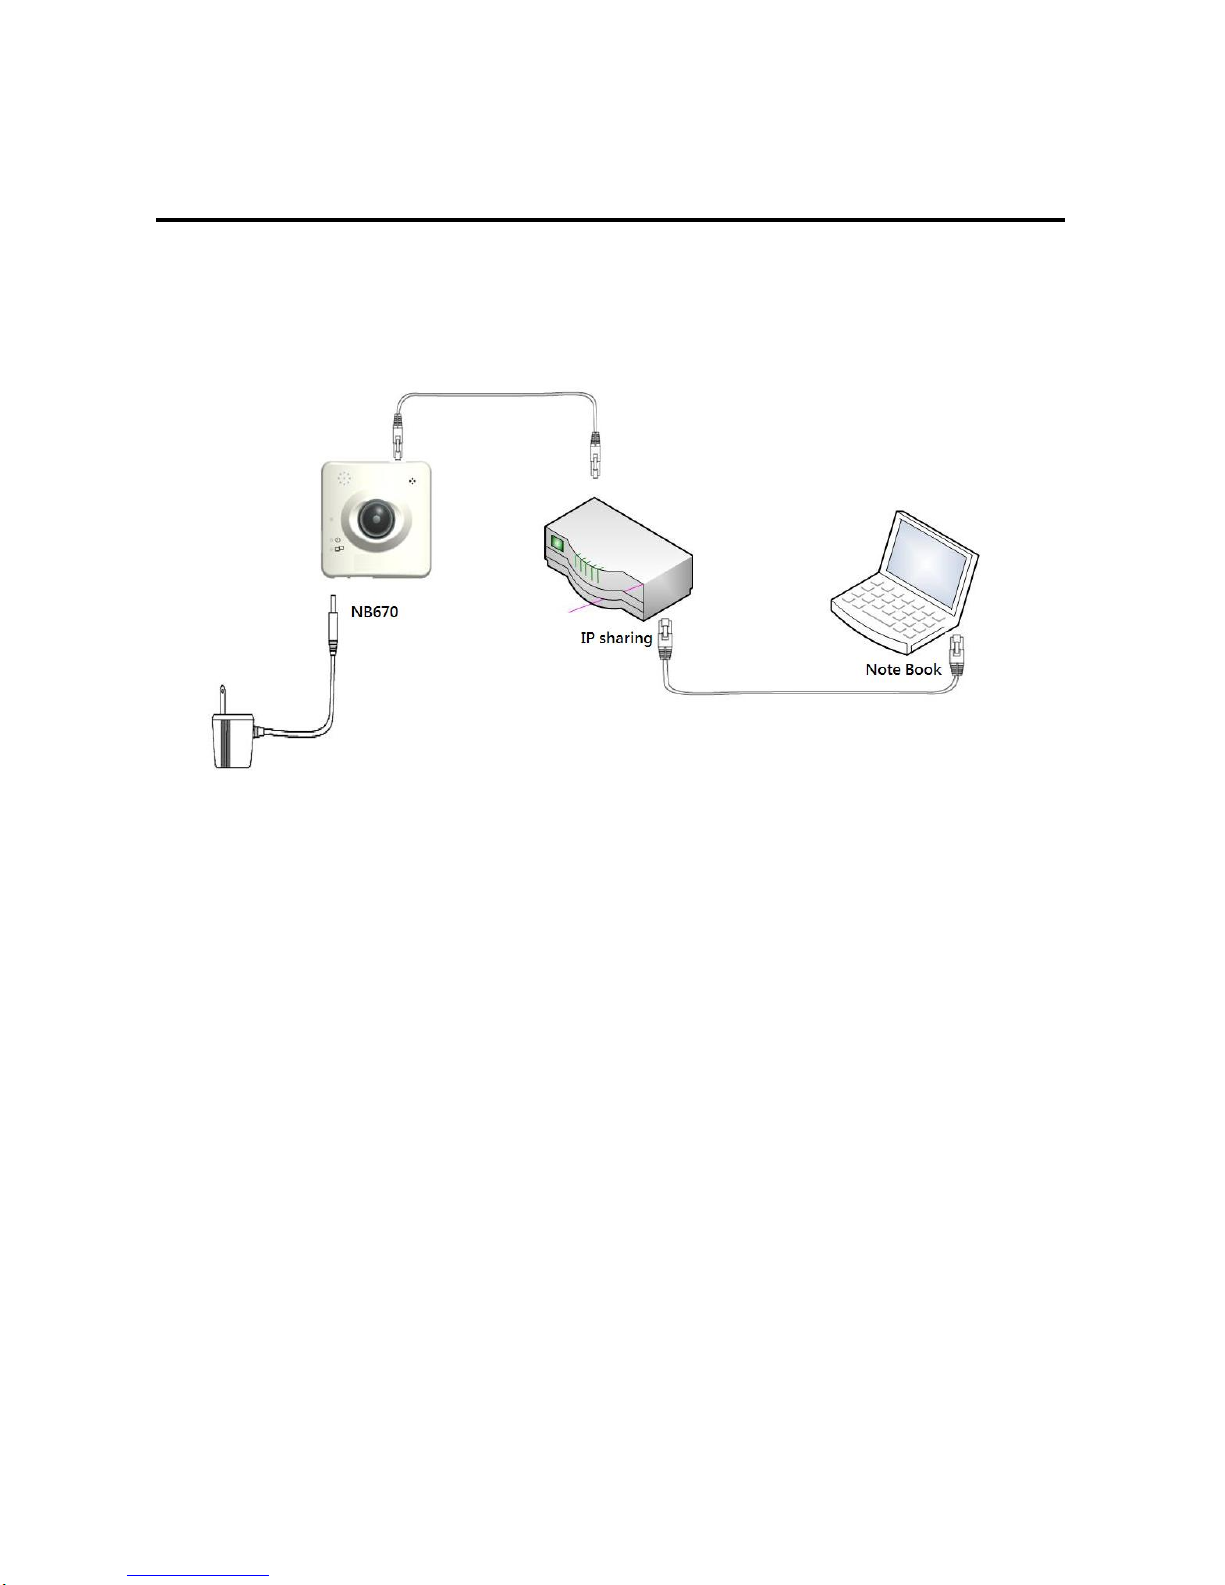
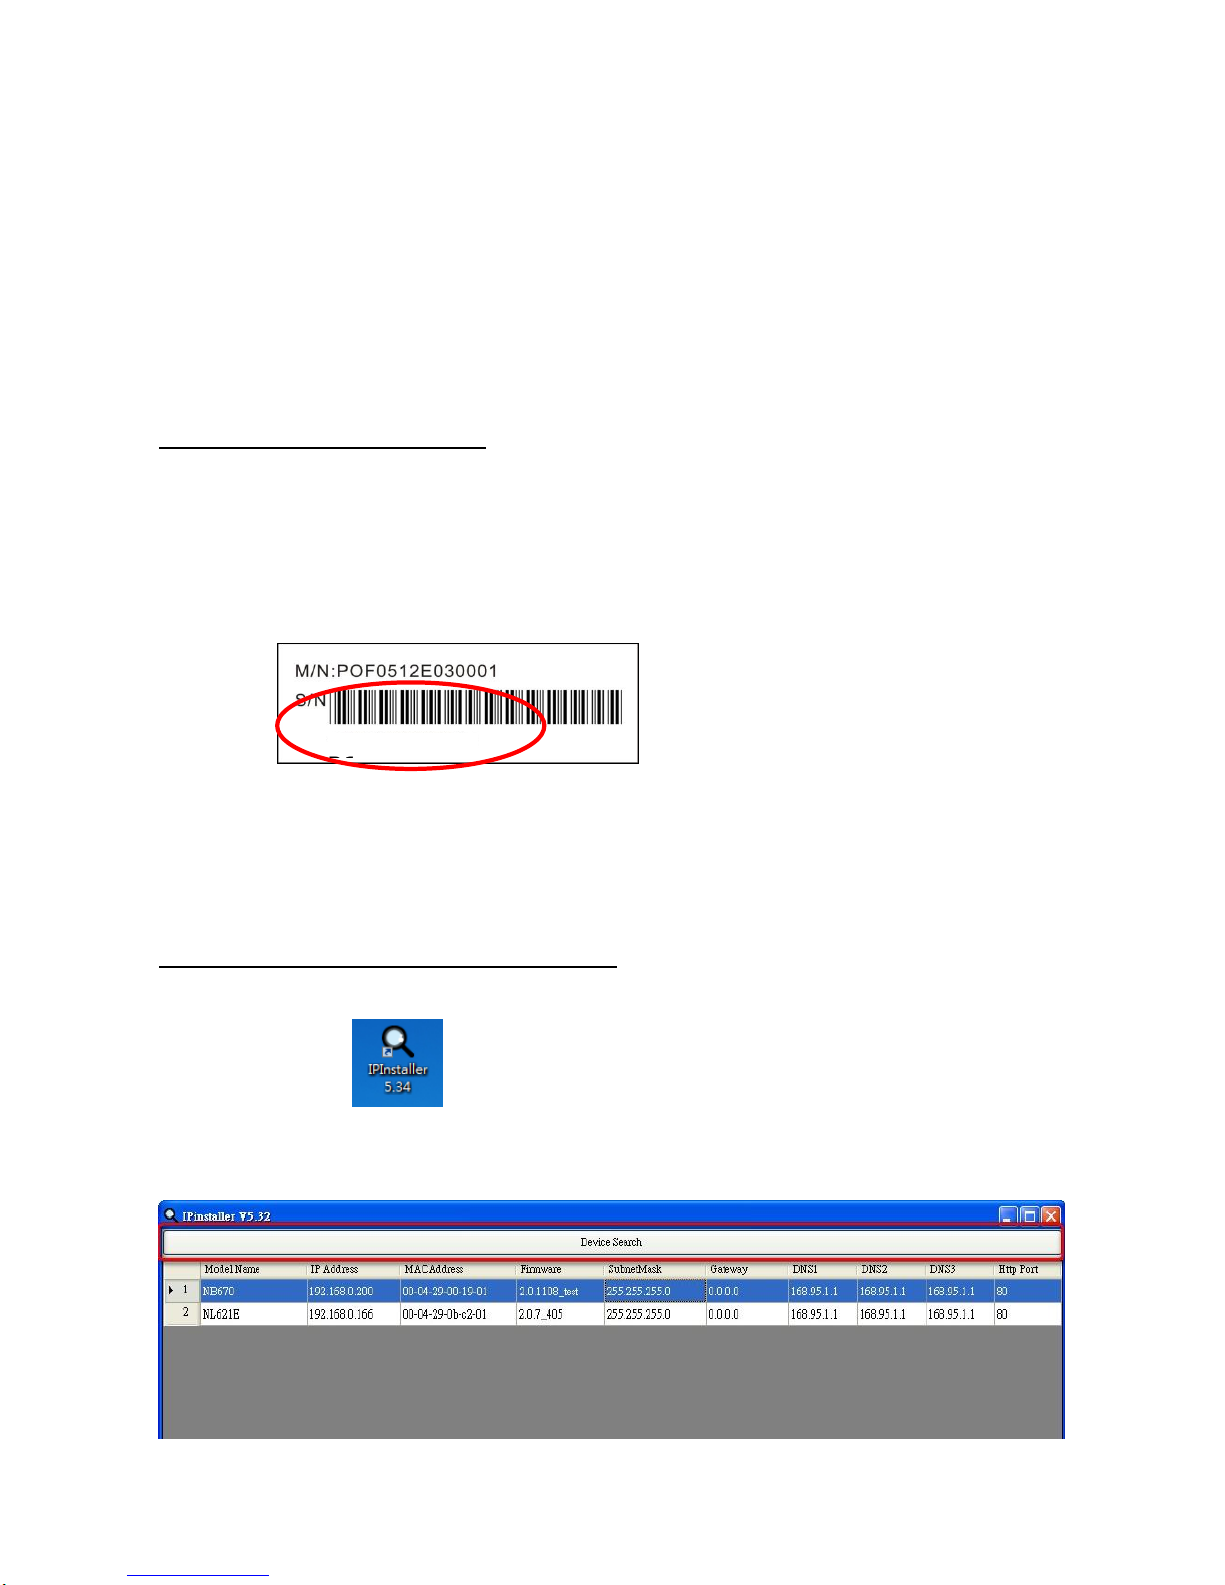
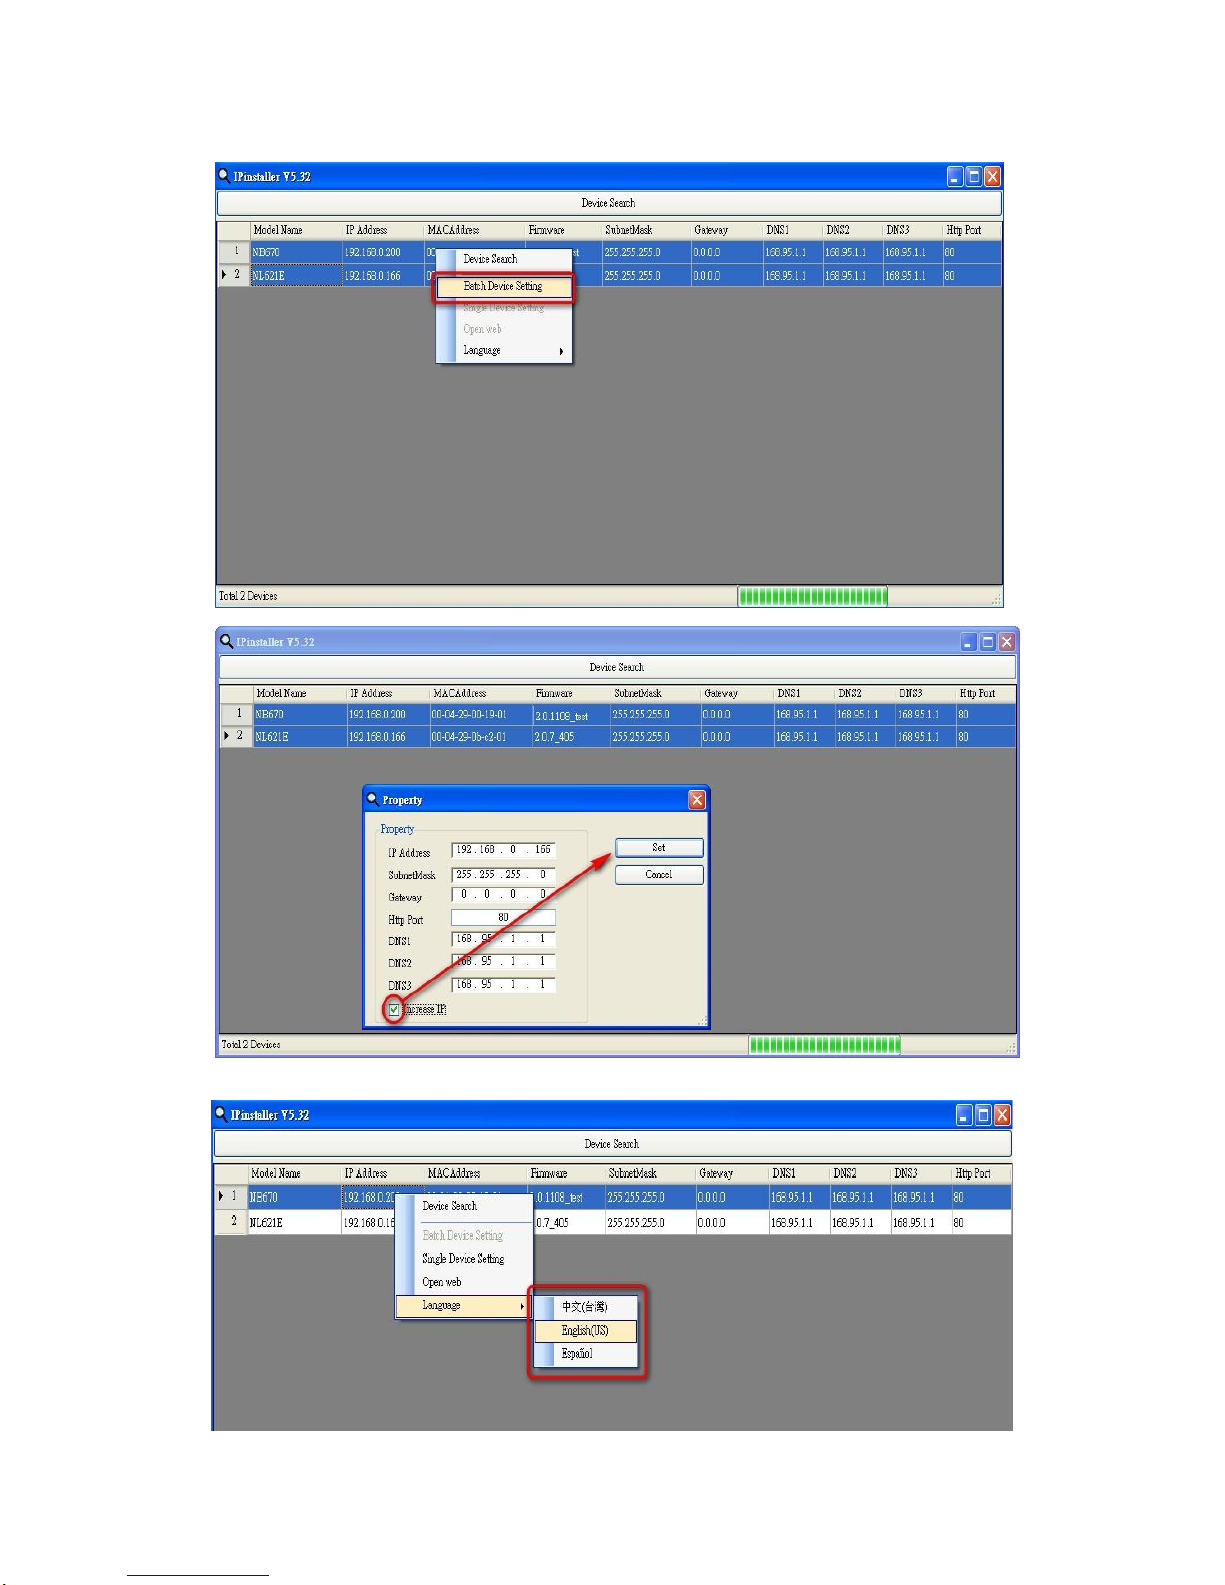
Installation............................................................................................................................................5
Using the Web UI...............................................................................................................................12
1. Live View...............................................................................................................................13
2. Video ......................................................................................................................................16
General...............................................................................................................................16
Advanced ...........................................................................................................................19
3. Camera ...................................................................................................................................20
General...............................................................................................................................20
Advanced ...........................................................................................................................22
4. Event ..................................................................................................................................28
Event Server.......................................................................................................................29
Motion Detection ...............................................................................................................31
I/O Ports.............................................................................................................................34
Event Configuration...........................................................................................................35
5. Schedule.................................................................................................................................36
General...............................................................................................................................36
Storage ...............................................................................................................................37
6. Network..................................................................................................................................39
General...............................................................................................................................39
Advanced ...........................................................................................................................40
SMTP (E-Mail) ..................................................................................................................41
DDNS.................................................................................................................................42
7. System....................................................................................................................................43
Information.........................................................................................................................43
User....................................................................................................................................44
Date & Time.......................................................................................................................45
Server Maintenance............................................................................................................46
Log Service ........................................................................................................................47
8. Customize...............................................................................................................................48
FAQ....................................................................................................................................................50
I/O Terminal Connector - Pin Assignment.................................................................................50
Restore Factory Default .............................................................................................................51
Upgrade device firmware...........................................................................................................52

2
Revision History
Version
Description
Author
1.01
Original document
Anthony
1.02
Modify the GPIO picture
Eric_Y
1.03
Change Wall 720P Mount
SamKao

3
Notices
This user manual is intended for administrators and users of the NB670 Series Network Camera,
including instructions for using and managing the camera on your network. The use of surveillance
devices may be prohibited by law in your country. It is the user’s responsibility to ensure that the
operation of such devices is legal before installing this unit for its intended use.
Before the Network Camera is installed, all the safety and operating instructions should be carefully
read and followed to avoid damage due to faulty assembly and installation. This also ensures the
product is used properly as intended.
Heed all warnings
Do not drop or strike this equipment
Sensitive electronics inside the camera are vulnerable to excessive strike.
Do not install the equipment near any flames or heat sources
Excessive heat could damage this equipment.
Do not cover cloth or to install this equipment in poorly ventilated places.
Overheating could damage this equipment.
Do not expose this equipment to rain or moisture. Do not touch the power connection
with wet hands
Risk of short circuit, electric shock or fire
Do not damage the power cord or leave it under pressure
Risk of fire or shock circuit
To reduce the risk of electric shock, do not remove the Cover (or Back).
No user-serviceable parts inside. Misusage, improper, and negligence could damage this
equipment. Need to refer servicing to qualified service personnel.
Do not continue to operate if there appears to be fault.
If the unit ceases to function, contact qualified service personnel for help.
All work related to the installation of this product should be made by qualified service
personnel or system installers.

4
Introduction
NB670 is a Fish-Eye Network Camera; it is featured with superior H.264-AVC performance and
rich functions. Fish-Eye Camera includes a fish-eye lens for 360°wide angle view without blind
spot. Thus Fish-Eye Camera is very suitable to view a wide area with single camera such as
hallway, store, office, etc.
The H.264-AVC video compression enables to lower bandwidth and storage requirements without
compromising image quality; Motion JPEG is supported for increased flexibility, as well as
multiple independent video streaming.
The hardware based panorama video processing ability can provide user multiple video modes
including source image, double broad view, triple mode view and quad view. , and it is support
Wall, Ceiling, Table, Wall 720P high performances many mounts.
NB670 offers the Keystone Correction function, and it can adjust image to the best display mode
The e-PTZ function, including preset point without moving parts, can replace part of traditional
PTZ camera and thus save lost of traditional mechanical Pan/Tilt maintain cost.
The camera offers optional POE and POE (NB670E) type for installation; the PoE (IEEE802.03af)
feature provides an easy installation through a single Ethernet cable, lessening the installation of
power plugs or extensions. Further functions include two-way audio and micro SD card support for
local storage application.

5
Installation
1. Hardware Connection
1. Prepare a PC with Ethernet link to the network
2. Connect LAN port (RJ45) of the camera to a network switch/hub
3. Connect power jack / POE support only for NB670E
4. Ensure the power adaptor specification matches the power system (110V or 220V) and
connect the adaptor to the outlet
5. Check LED status (Power/Network)

6
2. Software Installation
The following software is necessary for the proper display and use of the Fish-eye camera
from the Web site. The software will be taken from the Software Package CD.
IPInstaller
The IP Installer is used to locate and configure network cameras and video servers on the LAN.
This utility is useful for conveniently configuring the network settings of the device, or for
finding a device once the network settings have been modified.
To install the IP Installer, from the Software Package CD UI, select IP installer, then follow the
on screen instructions.
XVID Codec
An H.264 codec is applied for displaying the video stream and playing the recoded AVI files.
If the video stream can’t be displayed or the recorded AVI files can’t be play on PC, install this
software from the Software Package CD.
VLC
Though not necessary, this can be used for viewing the streaming without a Web browser.

7
3. Network Configuration
IP Installer is a utility that provides an easier, more efficient way to configure the IP address
and network settings of the devices. It even provides a convenient way to set the network
settings for multiple devices simultaneously using the batch setting function. Moreover, IP
Installer can save the network settings for all devices as a backup and restore them when
necessary.
Preparation before IPAssignment
1. Always consult your network administrator before assigning an IP address to your server in
order to avoid using a previously assigned IP address.
2. Ensure the camera is powered on and correctly connected to the network.
3. MAC Address: Each device has a unique Ethernet address (MAC address) shown on the label
of the device as the serial number (S/N) with 12 digits (e.g. 000429-XXXXXX).
4. Although the IP Installer is able to find and configure any device on the LAN except those that
are behind a router, it is a good idea to set the host PC to the same subnet. In order to connect
to the Web-based user interface of the camera, the host PC must be in the same subnet. For
more information about subnets, please consult your network administrator.
Using IP Installer to Assign an IP Address to NB670
1. Once IP Installer has been successfully installed on the PC, double click the IP Installer icon
on the desktop,
2. Click the [Device Search] to search the device in the LAN.
*0004290000
B1

8
3. From the list, select the device with the MACAddress that corresponds to the camera that is to
be configured. The MAC Address is identical to the unit’s S/N (Serial Number).
4. Double click the select item to open the Property Page or right click the item to select the
[Single Device Setting].
5. Modify the network settings of the camera.
6. After filling in the properties, click [Set] button to complete the configuration settings.

9
7. Click the [Batch Device Setting] to set several devices.
8. Language support for Chinese, English and Spanish.

10
Open the Web-based UI of the Selected camera
1. To access the Web-based UI of the selected unit, run the View > Open Web on the menu bar.
2. For first time user, there will be a prompt to install the ActiveX control. Confirm the
installation as it is required to view the video stream and some operations.

11
3. If the device has been configured correctly, the default Web browser will open to the home
page of the selected device.
Verify and Complete the Installation from Your Browser
When browsing the Home Page at the first time with the Microsoft Internet Explorer TM, you must
temporarily lower your security settings to perform a one-time-only installation of theActiveX
component onto your workstation, as described below:
1. From the Tools menu, select [Internet Options]
2. Click the [Security] tab and then click [Custom Level] button to see your current security
settings.
3. Set the security level to Low and click [OK].
4. Type the URL or IP address of your camera into the Address field.
5. A dialog box will pop up asking if the ActiveX control should be installed. Click [Yes] to start
the installation.
Once the ActiveX installation is complete, return the security settings to their original value, as
noted above.

12
Using the Web UI
Start your Web browser and enter the URL or IP address in theAddress field. The Home page
of the camera is now displayed.

13
1. Live View
Button
Description
Click for more general/Advanced camera settings
Select languages among English, traditional Chinese and simplify
Chinese
Click on different video modes to display different views
Check actual size to view the actual size (resolution) of the image
Triggers manually a preset event in the configuration page
Choose among the 2 streams for viewing
IP address of the camera
Video format
Resolution
Frame Rate
Bit rate

14
Button
Description
Full screen
Listen the audio input from local end
Talk function
Record instant live video
Snapshot the image

15
Configuration Pages List
Video
General
Advanced
Camera
General
Advanced
Event
Event Server
Motion Detection
I/O ports
Event Configuration
Schedule
General
Storage
Network
General
Advanced
SMTP (E-mail)
DDNS
System
Information
User
Date & Time
Server Maintenance
Log Service
Customize
Style Layout

16
2. Video
General
OSD Setting
Enable the On Screen Display (OSD) information. A line of text message (e.g. Camera Name or Position)
and the date/time string are available to be selected for displaying or hiding on the images.
The PTZ function will display in Quad with source view,Double with source view , Double view and
Triple view of Wall and Wall 720P Mount
Click on the PTZ icon, the web will popup the control panel to control e-PTZ function of NB670

17
Double with source view PTZ control panel:
1. Step: Setting the speed of Pan function. (1~10)
2. Pan Arrow: Click to control Pan function.
3. Move the control panel.
4. Close the control panel.
5. Zoom: Digital zoom in/out.(1~10)
6. List of preset points. (1~16)
1
3
4
2
5
6

18
Triple & Quad with source & Double view PTZ control panel:
1. Ch:Select the channel. (1~4) & (2~4)
2. Step:Sets the speed of Pan/Tilt function. (1~10)
3. Pan Tilt Arrow:Click to control the Pan/Tilt function.
4. Zoom:Digital zoom in/out. (1~10)
5. Move the control panel.
6. Close the control panel.
7. List of preset points. (1~16)
1
2
6
5
7
4
3

19
Advanced
Stream 1 Setting:
RTSP Path: It is the stream ID used for RTSP client streaming connection, such as VLC player.
(default
v00)
Resolution: 1600x1200, 800x600, 640x480.
Video Mode: Choose between variable bit rate (VBR) and constant bit rate (CBR)
<1>: VBR-> Choose quality level from best to standard, for some environment it is very
important to ensure the video quality level but after selecting video quality level,
the bandwidth consumption will be variable.
<2>: CBR-> Choose target bit rate range from 1000kb to 6000kb, for some environment it is
very helpful for network bandwidth management but the video quality will be
variable up to the complexity of video scene.
Image Format: 2 kinds of format to choose from; MJPEG and H.264.
GOP: Choose the number of P-frame or B-frame between I-frame from 2 to 32, the shorter of
the number
Indicates the higher video quality you may get, while it will consume more network
bandwidth and storage size.
Frame Rates (FPS): input the number of frames to display per second from 5 to 15
Table of contents
Other Gadspot Security Camera manuals
Popular Security Camera manuals by other brands

Bosch
Bosch LTC 0630 Series Brochure & specs

Arecont Vision
Arecont Vision MicroDome Specifications

SecurityMan
SecurityMan IPCAM-SD user manual

Wonwoo
Wonwoo WCA series Installation & operating instructions

Dahua Technology
Dahua Technology HFW5241E-ZE quick start guide

D-Link
D-Link DCS-4603 Quick installation guide