manuals.online logo
Brands
  1. Home
  2. •
  3. Brands
  4. •
  5. Gaines
  6. •
  7. Outdoor Furnishing
  8. •
  9. Gaines Keystone Series Guide

Gaines Keystone Series Guide

Keystone Series®Deluxe Post (KDX)
Installation and Assembly Instructions
Tools needed:
7/16”, ½”, and 9/16” #2 Phillips head
Socket drive or wrench screwdriver
Hardware: (Not to scale)
2x 1x 4x 2x
1x
4x
2x 2x
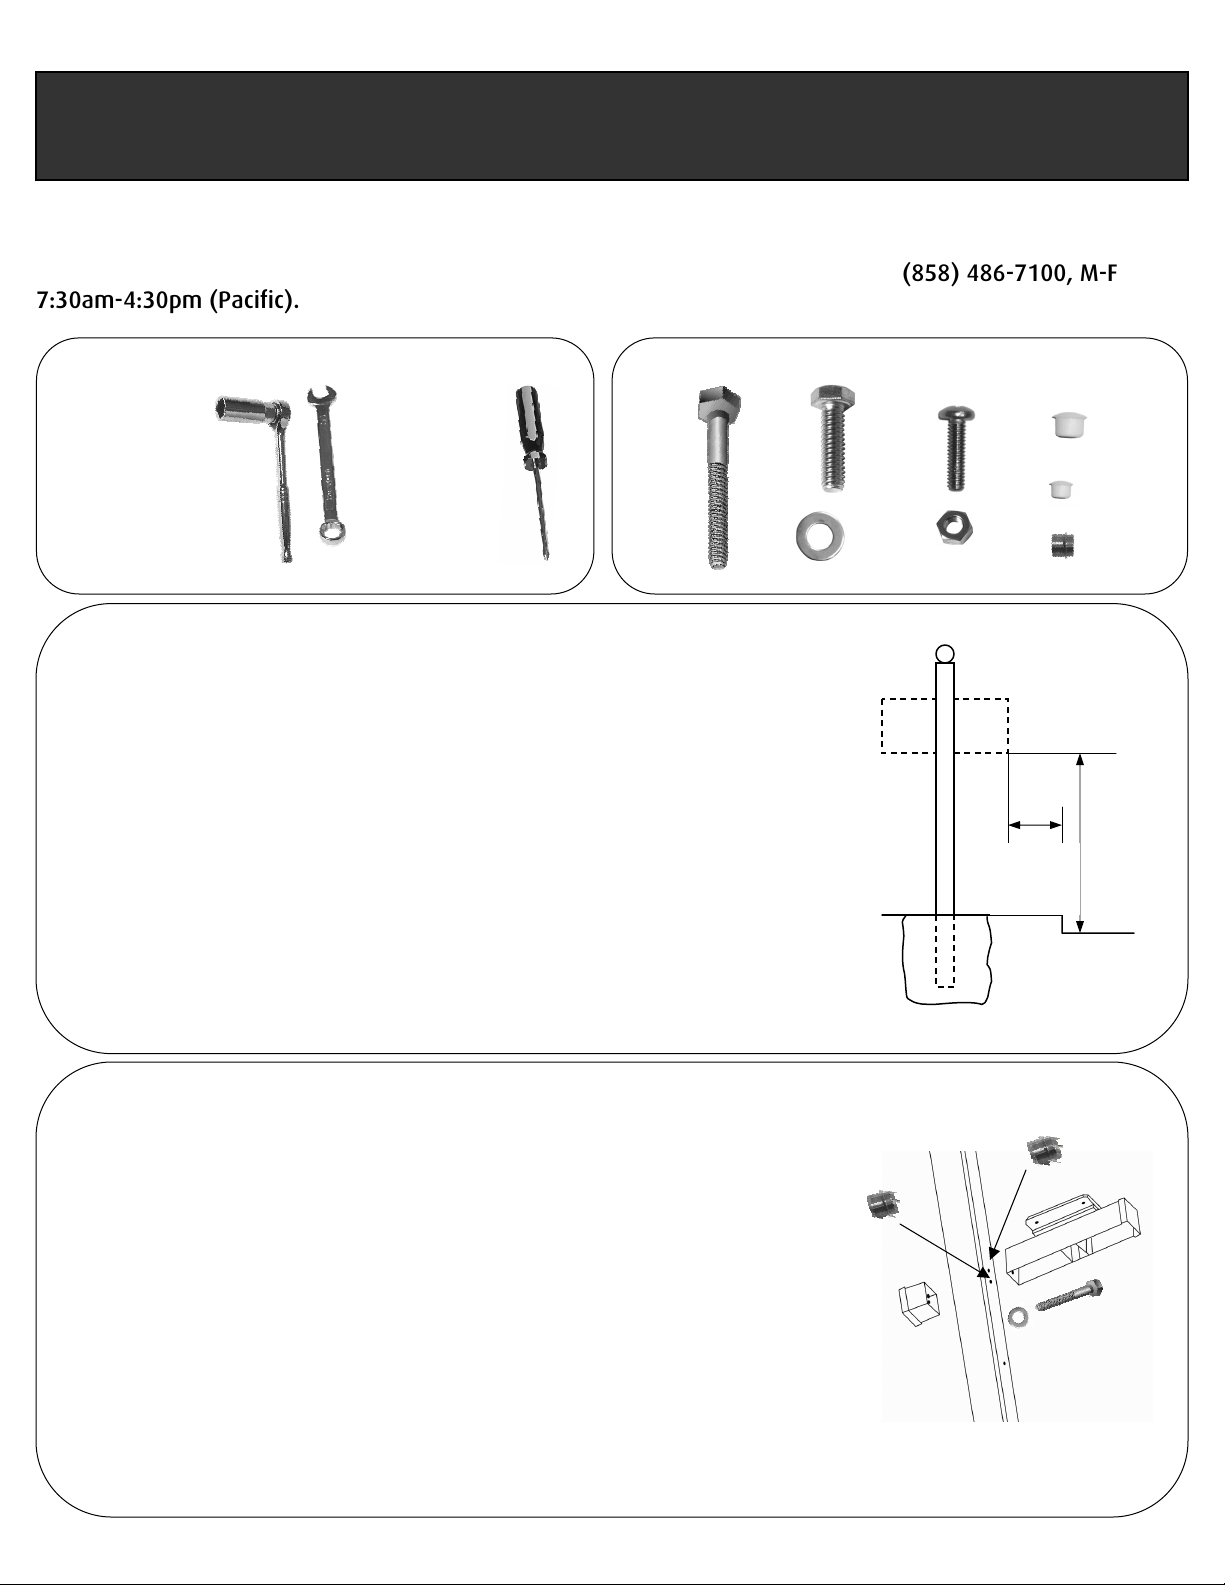
oAttach Beam and End Cap to Post
NOTE: If you purchased a Decorative Post Cuff, please install the Cuff before proceeding.
A. Determine which side of the post (left or right) the beam is to be mounted on.
B. Install Bushings into the two holes on the selected side with long end into post holes
(see diagram).
C. Position Beam holes over short end of Bushings. (Bushings should now be installed
between beam and post.)
D. Locate washer and 5” bolt. Place washer on bolt and insert bolt through the top of the
two mounting holes. The bolt should pass through the mounting face of the beam and all
the way through the opposite side of the post.
E. Match one of the threaded holes in the End Cap with the protruding bolt inserted in
previous step.
F. Turn machine bolt 2 or 3 turns to loosely hold Beam and End Cap in place in preparation
for installation of the second 5” bolt. Be careful not to move parts as excessive movement
can damage paint finish.
G. Visually align Beam and End Cap. Using wrench or socket drive, securely tighten both
bolts. DO NOT OVER-TIGHTEN.
nPost Installation
A. Determine the proper height of the mailbox above ground. (Check with local postmaster
for specific details. The height from road level is typically between 40”-44”).
To determine the
appropriate amount of post to bury subtract your desired height from 55. The result will be the length of post that
should be buried (Example: Desired 40” mailbox height would require 15” of post burial. (55”-40”= 15”)
B. Locate site for the mailbox and dig a 12” diameter hole. The depth of the hole will
depend on your desired height of mailbox. Note: If you desire additional length or
stability, the Keystone Deluxe Post is designed to slide over a wood 4”x4” post (available
at your local hardware store). Make sure the hole is set back from the road such that the
distance from the curb to the mailbox door meets post office requirements, normally
between 6 and 8 inches.
C. Place the post into the hole (two larger holes should be on the top) with the end resting
on the bottom of the post-hole and the holes in the post facing to either side. (The front
face of the post should not show any holes).
D. Use a spirit level to set post to true vertical position in the post hole. Be sure to align the
face of the post with the driveway, sidewalk, walkway, roadway, etc.
E. Pour concrete completely around the post, taking care to maintain the level of the post.
Thank you for purchasing a Keystone Series Deluxe Post. We’re sure you’ll enjoy your new post for many
seasons to come. If you have any questions about how to install or use this post, if you need any assistance
during installation, or if you require replacement parts, please phone us directly at (858) 486-7100, M-F
7:30am-4:30pm (Pacific).
Height
from road
per local
postmaster
- typically
40”-44”.
Set back
from road,
typically
6”-8”.
800-824-9985
pAttach Curved Arm
A. Position the Curved Arm with square cut end pointing up and the opposite end (has ‘mouse
hole’ cutout) facing toward the post.
B. Push the square end of the Curved Arm into socket in the center underside of the Beam.
(Don’t be concerned if Curved Arm does not seat entirely against the underside of the beam).
C. Install 5/16” 18x1” bolt through the access ‘mouse hole’ in lower end of the Arm and
firmly tighten to secure the Curved Arm against the post.
rAttach Finial to Top of Post
A. The square base of the Finial will press fit into the open square top of the post.
B. If desired, clear exterior silicone adhesive (available at your local hardware store) may be
applied to the inside walls of the post before inserting the Finial into the top of the post.
qAttach Mailbox
A. Place the Mailbox onto the mounting tray portion of the horizontal Beam.
B. With the Mailbox door pointing in the desired direction, align the four mounting holes in
the floor of the Mailbox with the corresponding holes in the tray portion of the Beam.
C. From the inside of the Mailbox, install 4 bolts (¼” – 20 X 1”) through the 4 holes in the
mailbox and mounting tray and place nuts onto the exposed end of the bolts. Using the
Phillips screwdriver and the socket or wrench, tighten the nuts securely.
Congratulations. You have successfully completed the installation of your Gaines Keystone Series Mailbox and Post. You will enjoy many years of service from this product.
CUSTOMERS ARE REQUESTED TO CONTACT THE LOCAL POST OFFICE BEFORE ERECTING THE BOX TO ENSURE ITS CORRECT PLACEMENT AND
HEIGHT AT THE STREET.
©2007, GAINES MANUFACTURING, INC. REV. 2007B
The small plastic caps
are included for your
convenience and may
be used to cover any
unused screw or bolt
holes on the main post.

This manual suits for next models

1

Popular Outdoor Furnishing manuals by other brands

felton industries FELEPG5T6 Assembly instruction

felton industries

felton industries FELEPG5T6 Assembly instruction

Dreamo OTF-503S quick start guide

Dreamo

Dreamo OTF-503S quick start guide

Garden Furniture Direct Borrowdale Assembly instructions

Garden Furniture Direct

Garden Furniture Direct Borrowdale Assembly instructions

Rowlinson Clarendon Assembly instructions

Rowlinson

Rowlinson Clarendon Assembly instructions

Garden Treasures 8201268 Assembly instructions

Garden Treasures

Garden Treasures 8201268 Assembly instructions

Safavieh Outdoor Marson PAT7062 quick start guide

Safavieh Outdoor

Safavieh Outdoor Marson PAT7062 quick start guide

SSC-LUXon 990070716 Assembly & operating instructions

SSC-LUXon

SSC-LUXon 990070716 Assembly & operating instructions

supremo LEISURE 2-Seat Stool 110*40cm Assembly instruction

supremo LEISURE

supremo LEISURE 2-Seat Stool 110*40cm Assembly instruction

Hatteras Hammocks DCA1-K-HH instructions

Hatteras Hammocks

Hatteras Hammocks DCA1-K-HH instructions

Lemeks Palmako PA120-5959 Assembly, installation and maintenance manual

Lemeks

Lemeks Palmako PA120-5959 Assembly, installation and maintenance manual

OLT 24 Assembly manual

OLT

OLT 24 Assembly manual

forest-style HACIENDA 2354 Building instructions

forest-style

forest-style HACIENDA 2354 Building instructions

Courtyard Creations RUS0188-WM Assembly instructions

Courtyard Creations

Courtyard Creations RUS0188-WM Assembly instructions

kingsley-bate MC-55 Assembly instructions

kingsley-bate

kingsley-bate MC-55 Assembly instructions

Weltevree Carrier product manual

Weltevree

Weltevree Carrier product manual

Grange Fencing Elite Arch Assembly instructions

Grange Fencing

Grange Fencing Elite Arch Assembly instructions

Grosfillex AUVENT YR14 Assembly instructions

Grosfillex

Grosfillex AUVENT YR14 Assembly instructions

X-METAL EAGLE 33511 Assembly instructions

X-METAL

X-METAL EAGLE 33511 Assembly instructions

manuals.online logo
manuals.online logoBrands
  • About & Mission
  • Contact us
  • Privacy Policy
  • Terms and Conditions

Copyright 2025 Manuals.Online. All Rights Reserved.