logo
Brands
  1. Home
  2. •
  3. Brands
  4. •
  5. Hatteras Hammocks
  6. •
  7. Outdoor Furnishing
  8. •
  9. Hatteras Hammocks DCA1-K-HH User manual

Hatteras Hammocks DCA1-K-HH User manual

This manual suits for next models

1

Other Hatteras Hammocks Outdoor Furnishing manuals

Hatteras Hammocks DURAWOOD GLIDER NHDWGL1-K User manual

Hatteras Hammocks

Hatteras Hammocks DURAWOOD GLIDER NHDWGL1-K User manual

Hatteras Hammocks ADIRONDACK ROCKER HHAC1TQ User manual

Hatteras Hammocks

Hatteras Hammocks ADIRONDACK ROCKER HHAC1TQ User manual

Popular Outdoor Furnishing manuals by other brands

Belleze 014-HG-20074 manual

Belleze

Belleze 014-HG-20074 manual

Kozyard Morgan Aluminum Pergola Assembly manual

Kozyard

Kozyard Morgan Aluminum Pergola Assembly manual

Lemeks Palmako PA120-5959 Assembly, installation and maintenance manual

Lemeks

Lemeks Palmako PA120-5959 Assembly, installation and maintenance manual

OLT 24 Assembly manual

OLT

OLT 24 Assembly manual

forest-style HACIENDA 2354 Building instructions

forest-style

forest-style HACIENDA 2354 Building instructions

Courtyard Creations RUS0188-WM Assembly instructions

Courtyard Creations

Courtyard Creations RUS0188-WM Assembly instructions

RPR OLLIE CHAIR manual

RPR

RPR OLLIE CHAIR manual

kingsley-bate MC-55 Assembly instructions

kingsley-bate

kingsley-bate MC-55 Assembly instructions

Weltevree Carrier product manual

Weltevree

Weltevree Carrier product manual

Grange Fencing Elite Arch Assembly instructions

Grange Fencing

Grange Fencing Elite Arch Assembly instructions

Grosfillex AUVENT YR14 Assembly instructions

Grosfillex

Grosfillex AUVENT YR14 Assembly instructions

X-METAL EAGLE 33511 Assembly instructions

X-METAL

X-METAL EAGLE 33511 Assembly instructions

Anova FBW6R Assembly instructions

Anova

Anova FBW6R Assembly instructions

Outsunny 84A-090 manual

Outsunny

Outsunny 84A-090 manual

Ivy Terrace IVTD212 Assembly instructions

Ivy Terrace

Ivy Terrace IVTD212 Assembly instructions

Breezesta FANBACK ADIRONDACK AD-0101 Assembly

Breezesta

Breezesta FANBACK ADIRONDACK AD-0101 Assembly

hanit SUTTON 1 Assembly instructions

hanit

hanit SUTTON 1 Assembly instructions

Country Living WT-TJ01 Assembly instruction

Country Living

Country Living WT-TJ01 Assembly instruction

https://manuals.online logo
https://manuals.online logoBrands
  • About & Mission
  • Contact us
  • Privacy Policy
  • Terms and Conditions

Copyright 2025 Manuals.Online. All Rights Reserved.

CASUAL DINING CHAIR
& CASUAL DINING CHAIR W/ARMS
INSTRUCTIONS
• CHAIR BACK/BACK LEGS
• CHAIR SEAT
• LEFT FRONT LEG
• RIGHT FRONT LEG
• FRONT SPREADER BAR
• LOWER FRAME
• RUBBER MALLET
• PHILLIPS HEAD SCREWDRIVER
• DRILL
DC1: Hardware Pack Weight: 3.5 oz. DCA1: Hardware Pack Weight: 6.5 oz.
*Only included in Casual Dining Chair w/Arms hardware pack.
(2) BARREL NUTS*
(2) 2” BARREL BOLTS*
(4) 2” SCREWS
(6) 3” SCREWS
(6) 4”
SCREWS
(1) ALLEN WRENCH*
(1) SQUARE-HEAD BIT
HARDWARE PACK
CHAIR PARTS
SUGGESTED TOOLS
STEP 1. Attach front spreader bar to left and right front legs.
ASSEMBLY
• LEFT CHAIR ARM
• RIGHT CHAIR ARM
LEFTLEFT
FRONTFRONT
LEGLEG
RIGHTRIGHT
FRONTFRONT
LEGLEG FRONT SPREADER BARFRONT SPREADER BAR
Congratulations on purchasing this Durawood Casual Dining Chair or Casual Dining Chair w/Arms. QUESTIONS REGARDING THIS PRODUCT? Call our customer service team, 252-758-0641.
RESIDENTIAL WARRANTY - This quality product includes a FULL LIFETIME WARRANTY for RESIDENTIAL CUSTOMERS. In the unlikely event any splintering, rotting, cracking, peeling,
chipping, insect infestation or other damage should ever occur, The Hammock Source will replace this furniture, at no charge to you. Note that an original sales receipt must accompany any
returned product, along with a Return Authorization Number from Hammock Source customer service; call toll-free at 252-758-0641.
CONTRACTOR WARRANTY - CONTRACTORS receive a FULL 7-YEAR WARRANTY. Follow the same steps outlined above.
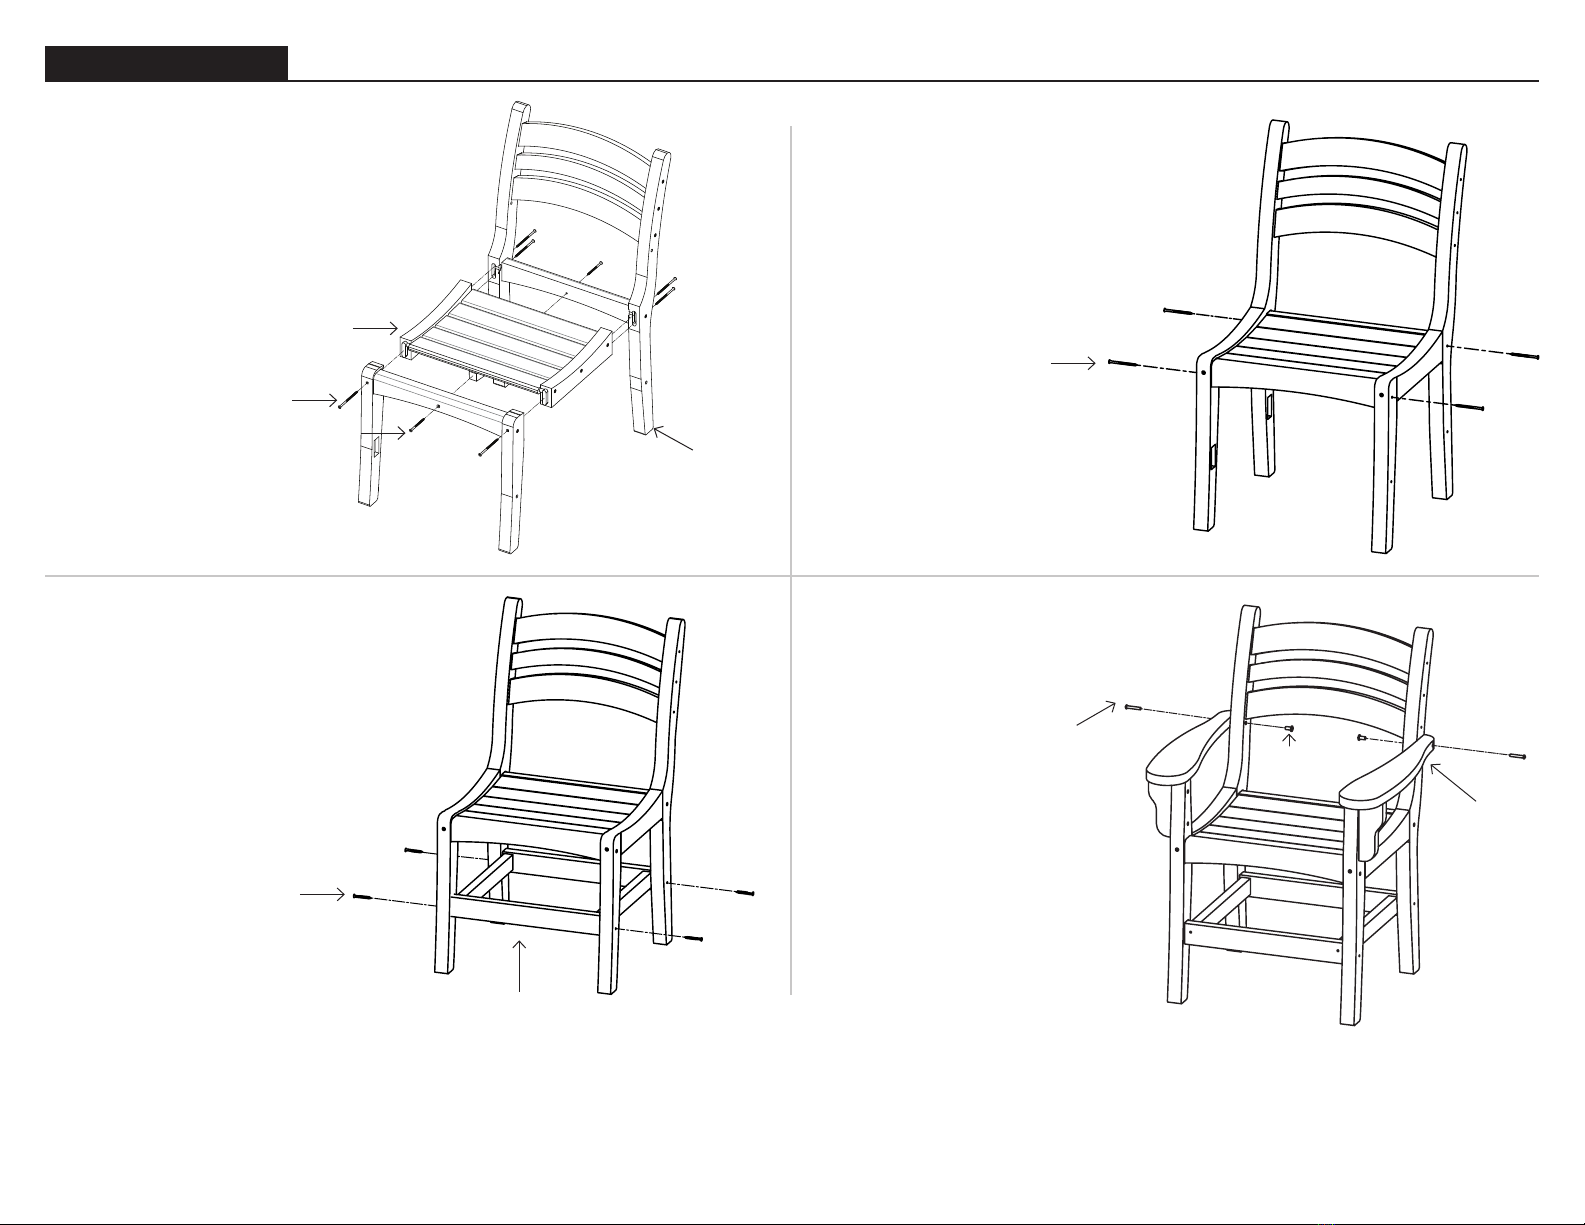
ASSEMBLY
LOWER FRAME
4” SCREW
3” SCREW
2” SCREW
#6092 / 0317
STEP 2. Use (4) 4” screws and (2) 3”
screws to attach front chair legs, chair
seat and chair back.
The 3” screws go into the hole in the
center of the front/back spreader.
STEP 4. Use (4) 2” screws to attach
lower frame to front and back chair
legs. The screws on the front of
the lower frame should be oset
towards the top side.
(Continue to Step 5 if you have
purchased a Casual Dining Chair
w/Arms.)
STEP 5. Use (2) 2” barrel bolts and
(2) barrel nuts to attach chair arms
to chair back.
STEP 3. Use (4) 3” screws to attach front
chair legs, chair seat and chair back.
(Make sure step 2 is finished before
this step or assembly won’t be
correct.)
CHAIR
SEAT
CHAIR BACK/
BACK LEGS
3” SCREW
2”
BARREL
BOLT BARREL
NUT
CHAIR
ARM