Galanz KWS1530LQ-D2 User manual

HƯỚNG DẪN SỬDỤNG
Lò Nướng Điện
Model No.: KWS1530LQ-D2
CHỈSỬDỤNG CHO GIA ĐÌNH
Vui lòng đọc kỹhướng dẫn trước khi sửdụng. Giữtài liệu để tham khảo thêm.

BIỆN PHÁP BẢO VỆQUAN TRỌNG
Khi sửdụng thiết bịđiện, bạn phải luôn tuân thủcác biện pháp an toàn cơ bản, bao gồm những điều sau đây:
1. Đọc tất cảcác hướng dẫn.
2. Không chạm vào bềmặt nóng. Sửdụng tay cầm hoặc núm vặn.
3. Cần có sựgiám sát chặt chẽkhi bất kỳthiết bịnào được sửdụng bởi hoặc để gần trẻem.
4. Để phòng tránh điện giật, không đặt bất kỳbộphận nào của lò nướng điện vào nước hoặc chất lỏng khác.
5. Không để dây điện trên cạnh bàn hoặc quầy, hoặc chạm vào bềmặt nóng.
6. Không vận hành thiết bịcó dây hoặc phích cắm bịhỏng hoặc sau khi thiết bịgặp trục trặc hoặc bịhỏng theo bất
kỳcách nào, hãy đưa thiết bịtrởlại Trung tâm dịch vụủy quyền gần nhất để kiểm tra, sửa chữa hoặc điều
chỉnh.
7. Việc sửdụng các linh phụkiện không được nhà sản xuất thiết bịkhuyến nghịcó thểgây nguy hiểm hoặc thương
tích.
8. Khi vận hành lò, giữít nhất 10cm khoảng cách từtất cảcác mặt của lò để cho phép không khí lưu thông đầy đủ.
9. Rút phích cắm ra khỏi ổcắm khi không sửdụng hoặc trước khi vệsinh. Để lò nguội trước khi lắp đặt hoặc tháo
rời các bộphận, hoặc trước khi làm vệsinh.
10. Để ngắt kết nối điện, xoay núm sang vịtrí STOP trước, sau đó rút phích cắm. Luôn luôn giữphích cắm để rút
khỏi ổcắm, không bao giờkéo dây điện.
11. Không che KHAY HỨNG hoặc bất kỳphần nào của lò nướng bằng giấy bạc hoặc lá kim loại. Điều này có thểlàm
lò bịnóng quá mức cho phép.
12. Không làm sạch bằng miếng cọrửa kim loại. Các mảnh có thểlàm vỡmiếng đệm và chạm vào các bộphận điện,
tạo ra nguy cơ bịđiện giật.
13. Thực phẩm có kích thước quá lớn, hoặc dụng cụkim loại không được cho vào lò nướng điện vì chúng có thểgây
cháy hoặc có nguy cơ bị điện giật.
14. Hỏa hoạn có thểxảy ra nếu lò được phủhoặc chạm vào vật liệu dễcháy, bao gồm rèm cửa, màn cửa, tường và
những thứtương tự. Không để bất cứvật nào lên trên lò trong khi hoạt động.
15. Cần hết sức thận trọng khi sửdụng các hộp, chén bát đĩa… làm từ vật liệu không phải kim loại hoặc thủy tinh.
16. Không đặt bất kỳvật liệu nào sau đây vào lò nướng: bìa cứng, nhựa, giấy hoặc bất cứthứgì tương tự.
17. Không lưu trữ bất kỳvật liệu nào, ngoài các phụkiện khuyến nghịcủa nhà sản xuất, trong lò này khi không sử
dụng.
18. Luôn luôn đeo găng tay cách nhiệt khi chèn hoặc lấy đồ ra khỏi lò nóng.
19. Lò điện này có cửa kính cường lực an toàn. Kính cường lực bền hơn kính thường và có khảnăng chống vỡcao
hơn. Kính cường lực có thểvỡ, nhưng các mảnh sẽkhông có cạnh sắc. Tránh làm trầy xước bềmặt cửa hoặc làm
sứt mẻcạnh cửa. Nếu cửa có vết xước hoặc sứt mẻ, hãy liên hệvới sốđiện thoại bảo hành của chúng tôi trước
khi sửdụng lò nướng.
20. Không sửdụng thiết bịnày ngoài trời.
21. Không sửdụng thiết bịcho mục đích nào khác ngoài mục đích nướng.
22. Thiết bịnày CHỈSỬDỤNG CHO GIA ĐÌNH.
23. Nhiệt độ của cửa hoặc bềmặt bên ngoài của sản phẩm có thểnóng hơn khi sản phẩm hoạt động.
24. Luôn tránh tổn thương bởi cạnh sắc khi sửdụng sản phẩm.
25. Nhiệt độ ởcác bềmặt tiếp cận có thểcao khi thiết bịhoạt động.
26. Không để dụng cụnấu ăn hoặc nướng các món ăn trên cửa kính.
27. Thiết bịnày không dành cho những người (kểcảtrẻem) bịgiảm khảnăng về thểchất, giác quan hoặc tinh thần
hoặc thiếu kinh nghiệm và kiến thức; trừkhi họđược người chịu trách nhiệm bảo vệhoặc hướng dẫn sửdụng
thiết bị.
28. Trẻem cần được người lớn giám sát. Phải đảm bảo rằng trẻem không chơi với thiết bị.
29. Trọng lượng của thực phẩm được đặt trên Khay đựng thức ăn / Vỉnướng là tối đa 3.0kg (chỉ tham khảo). Thực
phẩm không được tập trung ởmột bên của Khay đựng thức ăn / Vỉnướng, bạn nên nên đặt thức ăn đều trên
Khay thức ăn / Vỉnướng.

30. Nếu dây điện cung cấp bịhỏng, phải được thay thếbởi nhà sản xuất, trạm bảo hành ủy quyền hoặc những người
có trình độ tương đương để tránh nguy hiểm.
31. Bềmặt phía sau của các thiết bịnên được đặt quay vào tường.
32. CẢNH BÁO: Thiết bịnày bao gồm chức năng làm nóng. Các bề mặt, ngoài các bềmặt chức năng có thể gây nhiệt
độ cao. Vì mỗi người có cảm nhận khác nhau vềnhiệt độ, thiết bịnày nên được sửdụng THẬN TRỌNG. Phải
luôn sửdụng các biện pháp cách nhiệt như đeo Găng tay bảo vệnhiệt hoặc dùng giá đỡ nồi. Các vịtrí bềmặt
phải được cung cấp đủ thời gian để làm nguội.
CHÚ Ý: BỀMẶT THIẾT BỊLUÔN NÓNG SAU KHI SỬDỤNG. LUÔN LUÔN đeo găng tay bảo vệcách nhiệt khi
chạm vào lò nướng nóng hoặc các món ăn và thực phẩm nóng, hoặc khi lắp hoặc tháo giá, chảo hoặc các bát
đĩa nướng.
LƯU GIỮ TÀI LIỆU HƯỚNG DẪN NÀY
Trước khi sửdụng Lò nướng của bạn
Trước khi sửdụng lò điện đối lưu lần đầu tiên, hãy chắc chắn rằng:
1. Lấy thiết bịra khỏi vỏhộp bao bì.
2. Tháo rời tất cảcác giá đỡ và khay. Rửa các giá đỡ và khay trong nước nóng có xà phòng hoặc trong máy rửa
chén.
3. Làm khô hoàn toàn tất cảcác phụkiện và lắp ráp lại trong lò. Cắm dây lò vào ổcắm và bạn đã sẵn sàng sửdụng
Lò nướng điện mới của mình.
4. Sau khi lắp ráp lại các phụkiện vào lò, chúng tôi khuyên bạn nên bật lò ởnhiệt độ CAO (MAX) trong khoảng 15
phút để loại bỏbất kỳloại dầu đóng gói nào còn sót lại sau khi vận chuyển.
CÁC BỘPHẬN PHỤKIỆN:
Sửdụng lò nướng điện
Vui lòng làm quen với các chức năng và phụ kiện lò sau đây trước khi sửdụng lần đầu:
⚫Vỉnướng: Để nướng bánh, bánh mì, và nấu ăn thông thường trong nồi và chảo tiêu chuẩn.
⚫Khay thức ăn: Để sửdụng trong việc nướng thịt, gia cầm, cá và các loại thực phẩm khác.
⚫Dụng cụXiên quay: Để sửdụng trong việc nướng thịt, gia cầm.
⚫Tay cầm Khay thức ăn: Dùng để lấy Khay thức ăn và Vỉnướng.
⚫Khay Hứng: Để chứa thức ăn vụn rơi xuống..
⚫Tay cầm Xiên quay: Để lấy Dụng cụXiên quay ra.
⚫Núm Nhiệt độ: dùng để chọn nhiệt độ mong muốn Thấp-90°C-230°C
⚫Núm Thời gian: xoay sang trái (ngược chiều kim đồng hồ) và lò sẽHOẠT ĐỘNG cho đến khi được tắt
bằng tay. Để kích hoạt bộhẹn giờ, quay sang phải (theo chiều kim đồng hồ) để sửdụng. Một tiếng

chuông sẽvang lên vào cuối thời gian đã chọn.
⚫Núm Chức năng:có 6 chếđộ ( nhiệt trên bềmặt nhiệt dưới bềmặt nhiệt trên và dưới, nhiệt
trên bềmặt+xiên quay nhiệt dưới bềmặt + đối lưu,nhiệt trên dưới + đối lưu)
⚫Đèn báo:đèn sáng bất cứkhi nào bật lò.
BẢNG ĐIỀU KHIỂN
HƯỚNG DẪN VẬN HÀNH
1. CHỨC NĂNG hoặc
Chức năng này rất lý tưởng để nướng lát thịt heo, chân gà, cánh gà, khoai tây, thịt
gia cầm, sườn, cá, vv với việc làm nóng đều hơn.
Vận hành
1) Làm nóng lò theo hướng dẫn trong công thức.
2) Xoay Núm Nhiệt độ đến 230°C.
3) Xoay Núm Chức năng đến hoặc
4) Xoay Núm Thời gian để chọn thời gian phù hợp.
5) Kiểm tra đồ nướng 5 ~ 10 phút trước khi hoàn thành dựkiến.
6) Xoay Núm Thời gian vềTẮT/OFF khi nướng xong.
2. CHỨC NĂNG
Chức năng này rất lý tưởng để làm bánh mì, pizza và nướng thịgia cầm.
Vận hành
1) Cho Vỉnướng vào đường rãnh ởgiữa bên trong lò.
2) Xoay Núm Chức năng đến .
3) Đặt thức ăn muốn nấu lên Khay Thức ăn và sau đó đặt khay thức ăn lên Vỉ
nướng.
4) Xoay Núm Thời gian để bật, chọn thời gian phù hợp và kiểm tra tiến độ để
đảm bảo độ chín mong muốn.
5) Để kiểm tra hoặc lấy thực phẩm, sửdụng tay cầm được cung cấp để tránh
bịbỏng nhiệt.
6) Xoay Núm Thời gian vềTẮT/OFF khi nướng xong.
Lưu ý: tất cảthời gian nướng được dựa trên thịt ởnhiệt độ tủlạnh. Thịt đông lạnh có thểmất nhiều thời gian
hơn. Do đó, khuyến khích việc sửdụng nhiệt kếthịt.
Trọng lượng của thực phẩm được đặt trên Khay đựng thức ăn / Vỉnướng là tối đa 3.0kg (chỉ tham khảo). Thực
phẩm không được tập trung ởmột bên của Khay đựng thức ăn / Vỉnướng, bạn nên nên đặt thức ăn đều trên
Khay thức ăn / Vỉnướng.

3. CHỨC NĂNG HOẶC
Chức năng này lý tưởng cho việc nướng bánh nói chung.
Vận hành
1) Cho Vỉnướng vào đường rãnh ởgiữa bên trong lò.
2) Đặt thức ăn muốn nấu lên Khay Thức ăn và sau đó đặt khay thức ăn lên Vỉnướng.
3) Xoay Núm Chức năng đến hoặc .
4) Xoay Núm Thời gian để bật, chọn thời gian phù hợp và kiểm tra tiến độ để đảm bảo độ chín mong muốn.
5) Để kiểm tra hoặc lấy thực phẩm, sửdụng khay / tay cầm được cung cấp để tránh bịbỏng nhiệt.
6) Xoay Núm Thời gian vềTẮT/OFF khi nướng xong.
4. CHỨC NĂNG
Chức năng này dùng để nướng nguyên con gà.
Dùng Dụng cụXiên quay: Lắp đầu nhọn của trục xiên xuyên qua nĩa , đảm bảo rằng đầu nhọn của nĩa nằm cùng
hướng với đầu nhọn của trục xiên. Trượt đến phần vuông của trục xiên và cốđịnh bằng đinh vít. Đặt thực
phẩm cần nướng trên xiên quay bằng cách đâm trục xiên trực tiếp vào giữa thực phẩm. Lắp chiếc nĩa thứ hai
vào đầu còn lại của thịt hoặc gia cầm. Kiểm tra xem thực phẩm đã nằm ởgiữa xiên quay hay chưa. Gắn đầu
nhọn của xiên quay vào ổxoay, vịtrí bên phải của vách lò. Đảm bảo rằng đầu vuông của trục xiên nằm trên giá
đỡ xiên, vịtrí bên trái của vách lò.
Vận hành
1) Đặt Khay Thức ăn vào đường rãnh thấp nhất trong lò.
2) Làm nóng lò theo hướng dẫn trong công thức.
3) Xoay Núm Nhiệt độ đến 230°C.
4) Xoay Núm Chức năng đến .
5) Kiểm tra đồ nướng 5 ~ 10 phút trước khi hoàn thành dựkiến.
6) Xoay Núm Thời gian vềTẮT/OFF khi nướng xong.
Lưu ý:Trọng lượng của thực phẩm được đặt trên Khay đựng thức ăn / Vỉ nướng là tối đa 3.0kg (chỉ tham
khảo). Thực phẩm không được tập trung ởmột bên của Khay đựng thức ăn / Vỉ nướng, bạn nên nên đặt thức
ăn đều trên Khay thức ăn / Vỉnướng.
HƯỚNG DẪN CÁCH BẢO DƯỠNG
Thiết bịnày đòi hỏi một chút bảo dưỡng. Nó không chứa các bộphận mà người tiêu dùng có thểsửa chữa được.
Bạn đừng cốgắng tựsửa chữa. Hãy liên hệvới kỹthuật viên sửa chữa thiết bịđủ điều kiện nếu sản phẩm cần được
bảo dưỡng..
HƯỚNG DẪN VỆSINH THIẾT BỊ
RÚT DÂY ĐIỆN VÀ ĐỂ NGUỘI THIẾT BỊTRƯỚC KHI LÀM VỆSINH.
Để chống lại nguy cơ bị điện giật, không nhúng thiết bị, dây hoặc cắm vào nước hoặc chất lỏng khác.
Lò nướng của bạn có lớp phủlàm sạch nhanh. Nếu muốn, lau vách lò bằng vải ẩm nhúng chất tẩy nhẹ. KHÔNG SỬ
DỤNG MIẾNG CỌRỬA BẰNG KIM LOẠI HOẶC LÀM SẠCH BẰNG CHẤT ĂN MÒN, HOẶC VỀSINH VÁCH LÒ BẰNG KIM
LOẠI VÌ CHÚNG CÓ THỂLÀM HỎNG LỚP PHỦLÀM SẠCH NHANH BÊN TRONG LÒ.
Rửa tất cảcác phụkiện trong nước xà phòng ấm hoặc trong máy rửa chén. Lau cửa sạch bằng khăn ẩm và lau khô
bằng giấy hoặc khăn vải. Làm sạch bên ngoài bằng vải ẩm.
ĐỂ KHÔ TẤT CẢCÁC BỘPHẬN VÀ BỀMẶT LÒ TRƯỚC KHI CẮM ĐIỆN SỬDỤNG.

CẤT GIỮKHÔNG SỬDỤNG
Rút phích cắm của thiết bị, cho phép nó nguội và làm sạch trước khi cất giữ. Cho Lò nướng điện vào trong hộp và để
ởnơi khô ráo, sạch sẽ. Không cất giữthiết bịkhi còn nóng hoặc vẫn cắm điện. Không bao giờquấn dây chặt quanh
thiết bị. Không tạo lực ép nào lên dây điện ởvịtrí đi vào thiết bị, vì nó có thểkhiến dây bịsờn và đứt.
THÔNG SỐKỸTHUẬT:
Model
KWS1530LQ-D2
Điện áp
220V-240V
Tần số
50Hz-
Công suất
1500W
Dung tích
30 Litres
Chỉsửdụng cho gia đình, KHÔNG NGÂM NƯỚC.
Guangdong Galanz Enterprises Co., Ltd.

INSTRUCTION MANUAL
Electric Oven
Model No.: KWS1530LQ-D2
HOUSEHOLD AND INDOOR USE ONLY

IMPORTANT SAFEGUARDS
When using an electrical appliance, basic safety precautions should always be followed, including the
following:
1. Read all instructions.
2. Do not touch hot surfaces. Use handles or knobs.
3. Close supervision is necessary when any appliance is used by or near children.
4. To protect against electric shock, do not place any part of the electric oven in water or other liquid.
5. Do not let cord hang over edge of table or counter, or touch hot surfaces.
6. Do not operate appliance with damaged cord or plug or after the appliance malfunctions, or has been damaged
in any manner, return appliance to the nearest Authorized Service Center for examination, repair, or adjustment.
7. The use of accessory attachments not recommended by the appliance manufacturer may cause hazard or injury.
8. When operating the oven, keep at least four inches of space on all sides of the oven to allow for adequate air
circulation.
9. Unplug from outlet when not in use, or before cleaning. Let it to cool before putting on or taking STOP parts, or
before cleaning.
10. To disconnect, turn the control to STOP, then unplug the plug. Always hold the plug, but never pull the cord.
11. Do not cover CRUMB TRAY or any part of the oven with metal foil. This may cause overheating of the oven.
12. Do not clean with metal scouring pads. Pieces can break off the pad and touch electrical parts, creating a risk of
electric shock.
13. Oversized foods or metal utensils must not be inserted in a electric oven as they may create a fire or risk of
electric shock.
14. A fire may occur if the oven is covered or touching flammable material, including curtains, draperies, walls, and
the like, when in operation. Do not store any item on the oven during operation.
15. Extreme caution should be exercised when using containers constructed if anything other than metal or glass.
16. Do not place any of the following materials in the oven: cardboard, plastic, paper, or anything similar.
17. Do not store any materials, other than manufacturer’s recommended accessories, in this oven when not in use.
18. Always wear protective, insulated oven mitts when inserting or removing items from the hot oven.
19. This appliance has a tempered, safety glass door. The glass is stronger than ordinary glass and more resistant to
breakage. Tempered glass can break, but the pieces will not have sharp edges. Avoid scratching door surface or
nicking edges. If the door gas a scratch or nick, contact our consumer relations line before using the oven.
20. Do not use outdoors.
21. Do not use appliance for other than intended use.
22. This appliance is for HOUSEHOLD USE ONLY.
23. The temperature of the door or the outer surface may be higher when the appliance is working.
24. Protect against hurt by sharp edge when action.
25. Temperature of accessible surfaces may be high when the appliance is operating.
26. Do not rest cooking utensils or baking dishes on glass door.
27. This appliance is not intended for use by persons (including children) with reduced physical, sensory or mental
capabilities or lack of experience and knowledge, unless they have been given supervision or instruction
concerning use of the appliance by a person responsible for their safety.
28. Children should be supervised to ensure that they do not play with the appliance.
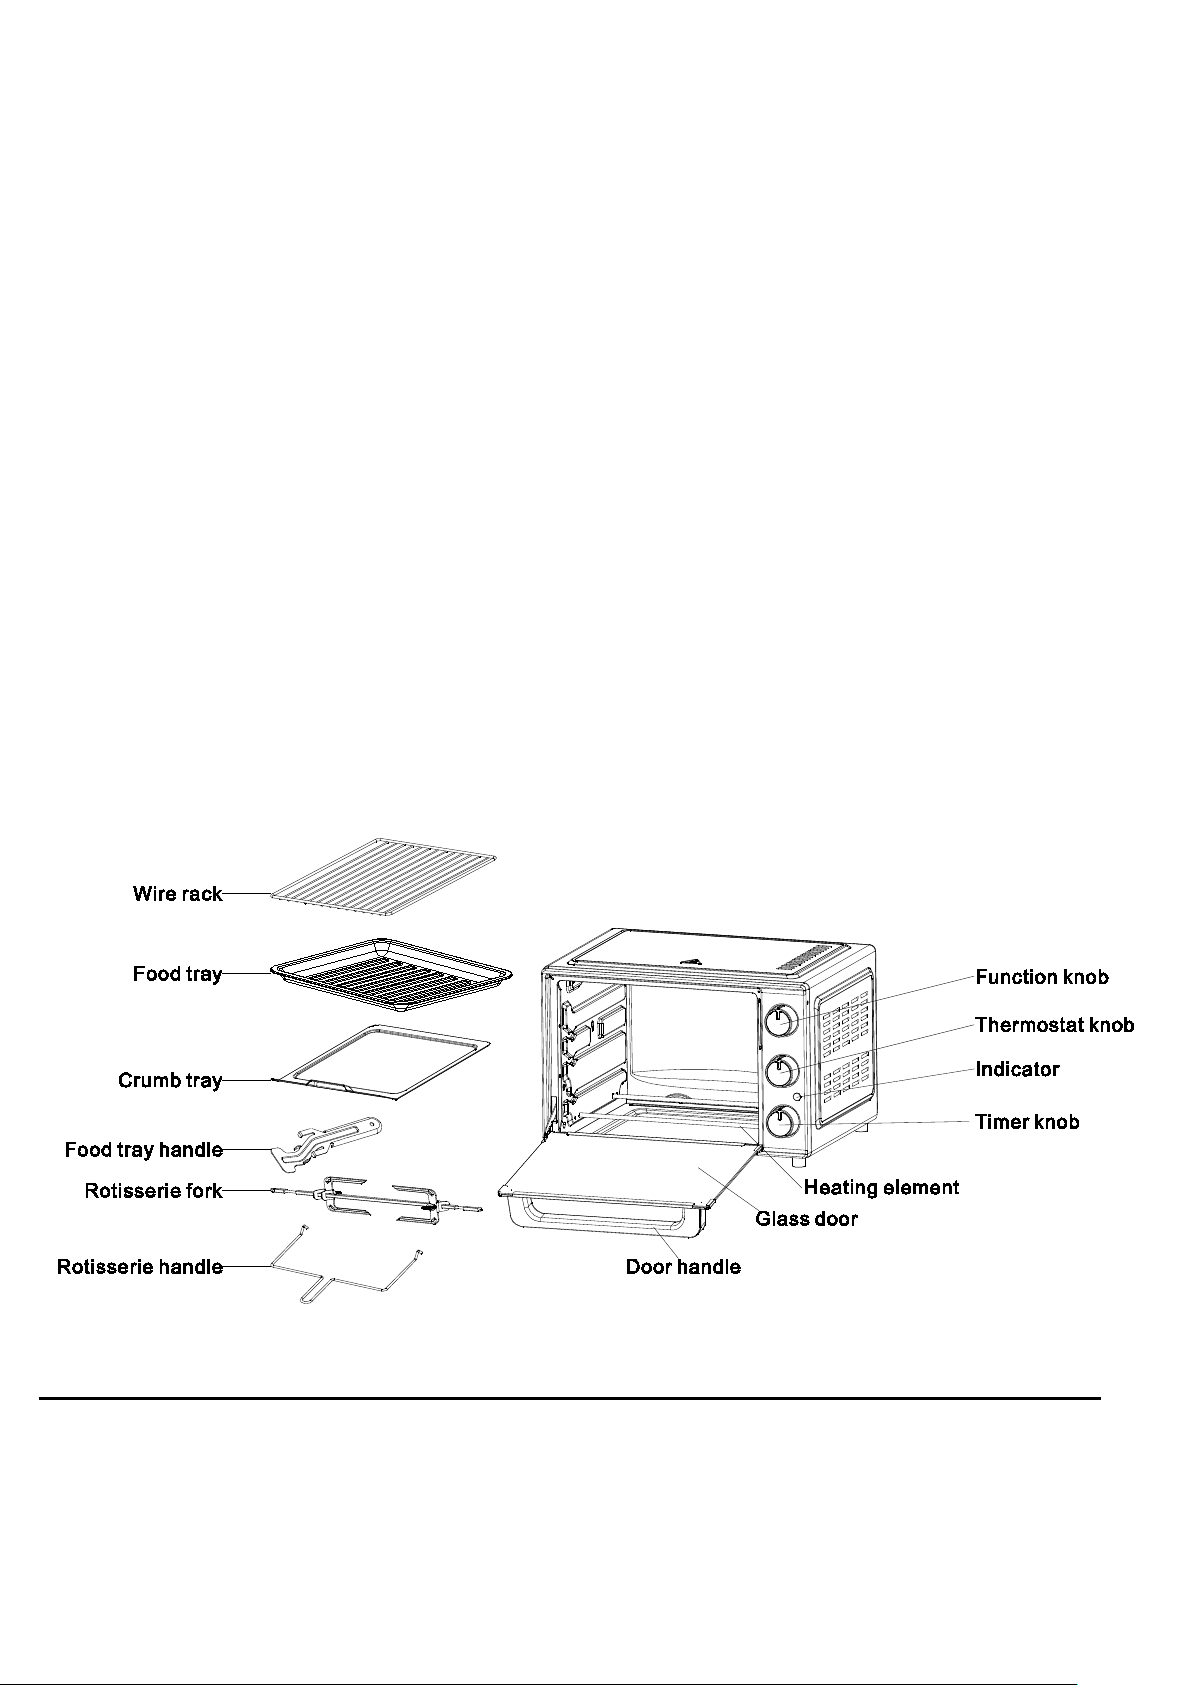
29. The weight of the food which is put on the S3 Food Tray/Wire Rack can not be over 3.0kg. (just for reference)
(The food can not concentrate on one side of the S3 Food Tray/Wire Rack, you would better try you best to
make the food put on the S3 Food Tray/Wire Rack evenly).
30. For appliance with type Y attachment, if the supply cord is damaged, it must be replaced by the manufacturer, its
services agent or similarly qualified persons in order to avoid a hazard。
31. Rear surface of appliances should be placed against a wall.
32. WARNING: This appliance includes a heating function. Surfaces, other than the functional surfaces may develop
high temperatures. Since temperatures are perceived differently by different people, this device should be used

with CAUTION. Hold the appliance exclusively to grip surfaces intended to hold and use such heat protection
measures as heat protection Gloves or pot holders. Areas which are not intended to grips must be given
sufficient time to cool.
33. Do not place on or near a hot gas or electric burner, or in a heated oven.
34. Extreme caution must be used when moving an appliance containing hot oil or other hot liquids.
35. Turn the timer knob to “LOW” position to shut off the appliance.
36.appliances are not intended to be operated by means of an external timer or separate remote-control system
CAUTION: APPLIANCE SURFACES ARE HOT AFTER USE.ALWAYS wear protective, insulated oven gloves
when touching hot oven or hot dishes and food, or when inserting or removing rack, pans or baking dishes.
SAVE THESE INSTRUCTIONS
Before Using Your Electric Oven
Before using your convection electric oven for the first time, be sure to:
1. Unpack the unit.
2. Remove all racks and pans. Wash the racks and pans in hot sudsy water or in dishwasher.
3. Thoroughly dry all accessories and re-assemble in oven. Plug oven into outlet and you are ready to use your new
Electric Oven.
After re-assembling your oven, we recommend that you run it at MAX temperature for approximately 15 minutes to
eliminate any packing oil that may remain after shipping.
Components
Using Your Electric Oven
Please familiarize yourself with the following oven functions and accessories prior to first use:
Glass Door: For front viewing of food.
Heating Element: For heating food.
Wire Rack: For toasting, baking, and general cooking in casserole dishes and standard pans.
Food Tray:For use in broiling and roasting meat, poultry, fish, and various other foods.
Food Tray Handle: For picking up wire rack or food tray.

Crumb Tray: For collecting fallen oil or food crumb.
Rotisserie fork: Use to roast a variety of meats and poultry.
Rotisserie Handle: Allow you to pick up Rotisserie Fork.
Thermostat knob: choose desired temperature from Low- 90℃- 230 ℃(Low is cooking at the room
temperature)
Timer knob: turn control to the left: "Stay On"(counter - clockwise) and the oven will STAY ON until manually
shut off. To activate timer, turn to right (clockwise) for other use. A bell will sound at end of programmed time.
Function knob: there are six modes ( upper heating elements,lower heating elements, upper
and lower heating elements,upper heating elements +rotisserie , upper and lower heating
elements +convection, upper heating elements +convection.)
Control Panel:
OPERATION INSTRUCTIONS
1. FUNCTION or
This function is ideal for cooking cake and cookie in general.
Operation
(1)Place the food to be cooked on the Wire Rack, insert the rack
into the middle support guide of the oven.
(2)Turn the Function knob to or .
(3)Set the Thermostat knob to 230°C.
(4)Set the Time knob to the desired cooking time
(5)To check or remove food ,use the handle to help side food in
and out.
(6)When toasting is complete, a bell will sound and the Timer
knob will back to the Off position automatically. Open door
completely and remove the food immediately or the heat
remaining in the oven will continue to toast and dry out your
toast.
CAUTION: Cooked food, metal rack, and door can be very hot,
handle with care. Do not leave the oven unattended.
2. FUNCTION &
This function is ideal for baking pork slice, chicken legs, chicken
wings, potato flakes, poultry meat, chops, fish and so on with more
evenly heating up.
Note: All toasting times are based on meats at refrigerator
temperature. Frozen meats may takes considerably longer.
Therefore, use of a meat thermometer is highly recommended.

Operation
(1)Place the food to be cooked on the Wire rack. Insert the rack into the middle support guide of the oven.
(2)Turn the Function knob to & .
(3)Set the Thermostat knob to the desired cooking temperature..
(4)Set the Timer knob to the desired cooking time
(5)To check or remove food ,use the handle to help side food in and out.
(6)When toasting is complete, a bell will sound and the Timer knob will back to off position automatically.
Open door completely and remove the food with handle.
CAUTION: Cooked food, metal rack, and door can be very hot, handle with care. Do not leave the oven unattended.
3. FUNCTION
This function is idealfor cooking bread, pizza, and fowl in general.
Operation
(1)Place the food to be cooked on the Wire rack / food tray. Insert the rack/tray into the middle support guide
of the oven.
(2)Turn the Function knob to .
(3)Set the Thermostat knob to the desired temperature as needed or recipe.
(4)Set the Timer knob to the desired cooking time.
(5)To check or remove food ,use a handle to help side food in and out.
(6)When toasting is complete, a bell will sound the Timer knob will back to off position automatically. Open
door completely and remove the food immediately or the heat remaining in the oven will continue to toast
and dry out your toast.
CAUTION: Cooked food, metal rack, and door can be very hot, handle with care.
4. FUNCTION
This function is idealfor cooking whole chickens and fowl in general.
Note: All toasting times are based on meats at refrigerator temperature. Frozen meats may takes considerably
longer. Therefore, use of a meat thermometer is highly recommended.
Rotisserie fork use: insert pointed end of spit through fork, making sure points of fork face same direction as
pointed end of spit, slide towards square of spit and secure with thumbscrew. Place food to be cooked on spit by
running spit directly through center of food. Place second fort into other end of roast or poultry. Check that food
is centered on spit. Insert pointed end of spit into drive socket, located on right-hand side of oven wall. Make
sure the square end of spit rests on spit support, located on left-hand side of oven wall.
Operation
(1)Place the food to be cooked on the Rotisserie fork. Insertthe spit into the forks of the oven.
(2)Turn the Function knob to .
(3)Set the Thermostat knob to the desired temperature as needed or recipe.
(4)Set the Timer knob to the desired cooking time.
(5)To check or remove food ,use a handle to help side food in and out.
(6)When toasting is complete, a bell will sound the Timer knob will back to off position automatically. Open
door completely and remove the food with handle.
CAUTION: Cooked food, metal spit, and door can be very hot, handle with care. Do not leave the oven unattended.

USE MAINTENANCE INSTRUCTIONS
This appliance requires little maintenance. It contains no user serviceable parts. Do not try to repair it
yourself. Contact a qualified appliance repair technician if the product requires servicing.
CLEANING INSTRUCTIONS
CAUTION: To protect against electrical shock, DO NOT IMMERSE THE OVEN IN WATER OR ANY OTHER
LIQUIDS.
Your toaster oven should be cleaned regularly for best performance and long life. Regular cleaning will also reduce
the risk of fire hazard.
Step 1. Remove plug from electrical outlet. Allow it to cool.
Step 2. Remove the Removable Crumb Tray, Rack, Tray by pulling out of the oven. Clean them with damp, soapy
cloth. Make sure to only use mild, soapy water.
Step 3. To clean inside of oven, wipe the oven walls, bottom of oven, and glass door with a damp, soapy cloth.
Repeat with a dry, clean cloth.
Step 4. Wipe outside of oven with a damp cloth.
CAUTION: DO NOT USE ABRASIVE CLEANERS OR METAL SCOURING PADS. Make sure to only use mild,
soapy water. Abrasive cleaners, scrubbing brushes and chemical cleaners will damage the coating on this unit.
Pieces can break off the and touch electrical parts involving a risk of electrical shock.
Step 5. Allow the appliance to cool and dry completely before storing. If storing the oven for long periods of time
make certain that the oven is clean and free of food particles. Store the oven in a dry location such as on a
table or countertop or cupboard shelf. Other than the recommended cleaning, no further user maintenance
should be necessary.
Any other servicing should be performed by an authorized service representative.
TO STORE
Unplug unit, allow it to cool, and clean before storing. Store the Electric Oven in its box in a clean, dry place. Never
store appliance while it is hot or still plugged in. Never wrap cord tightly around the appliance. Do not put any stress
on the cord where it enters the unit, as it could cause the cord to fray and break.
SPECIFICATION:
Model KWS1530LQ-D2
Rated voltage
220-240V
Rated frequency
50Hz
Rated power
1500W
Oven capacity
30Litres
Household use only , DO NOT IMMERSEIN WATER
Guangdong Galanz Enterprises Co., Ltd.
Table of contents
Languages:
Other Galanz Oven manuals

Galanz
Galanz GLOMJB19S2SWZ-10 User manual

Galanz
Galanz KWS2042LQ-H8UK User manual

Galanz
Galanz BIOUK003B Operator's manual

Galanz
Galanz GRSK2A15BEMA18 User manual

Galanz
Galanz GTH12A09S2EWAC18 User manual

Galanz
Galanz GTS311S2ETWAQ18 User manual

Galanz
Galanz GRSK2A15RDMA18 User manual

Galanz
Galanz MOUK001B Operator's manual

Galanz
Galanz BIOUK004BL Operator's manual

Galanz
Galanz GRH1209RDRM151 User manual