Galaxy Print Finishing VR-930 User manual

VR-930
BOOKLET MAKER
Email: info@galaxyprintnishing.com
Telephone: 0161 8832 722
www.galaxyprintnishing.co.uk
INSTRUCTION MANUAL
Please read this Operation Manual before using this machine.
Keep the Instruction Manual with care in a xed storage place so that it may
be available when required.

2
Introduction:
Congratulations on the purchase of your new Galaxy VR-930 Booklet Maker,
a professional and heavy duty booklet making machine. Your booklet maker
was designed with a full range of function and premium quality components
to guarantee you an effortless and professional job, as well as many years of
trouble-free services.
Important:
We recommend that you take a few minutes to familiarise yourself with the
functions of your new booklet maker. You will nd that just with a little practice,
any person can achieve professional results.
Features:
Paper out
Paper width
adjust knob
Control Panel
Paper-in Tray
Tools & Accessories
Storage Drawer
Option knob for
Fold N’ Staple or
Staple only
Weight: 35kg
Size: 57cm x 50cm x 38cm

3
Contents:
2
4
5
6
7
8
9
10
Introduction
Features
Assembly & Safety
Operation Instructions
Setting up the Fold & Staple
Setting up the Staple Heads
Move Staple Head
Loading Staples
Adjusting the Paper Width & Length
Feeding Papers
Troubleshooting
Danger:
This symbol stands for immediate danger, threatening the
life and health of persons. Disregarding these instructions
may cause severe damage to health and even serious
injuries.
Caution:
This symbol stands for an endangering situation that may
occur. Disregarding these instructions may lead to slight
injuries or damage to property.
Note:
This symbol stands for notes, operational hints and other
useful information. They are convenient for exploiting the
machine’s functional abilities.

4
Assembly & Safety:
1. Place your new Galaxy VR-930 Booklet Maker on top of a sturdy
working table.
2. Plug the power cord into the back of the machine.
3. To reduce the risk of electric shock, do not operate the booklet maker
near water.
4. Do not use the booklet maker if the power cord is damaged.
5. Do not allow the electric cord to be in contact with hot surfaces.
6. In case of malfunction, return the unit back to your distributor for service.
This equipment does not contain any part that can be serviced by the
consumer or operator.
Operation Instructions
1. Keep ngers, hair, jewlery, neck tie and any loose clothing or objects away
from the mahcine, as they mmay be accidentally pulled inside.
2. As part of its safety features, the booklet maker is equipped with sensors in
various places of the machine. As a result, the machine will not work when the
cover is open, the paper is not in postion and no staple is inside the Stapler
Head.
3. Clean the machine by a soft and damp cloth only. Never use chemical or
alcohol base liquids as they may damage the rubber rollers or the surface of
the machine.
4. Lubricate the machine from time to time following the illustration below
(lubricant is included in the tools drawer).
5. Only use our standard staples as others may damage the booklet maker.
Electricity:
115VAC/ 60Hz
230VAC/ 50Hz
Tools & Accessories delivered with this machine:
1 Universal
Wrench (works
as a Stapler
Head screw
driver,
staples picker
and staples
remover.
1 bottle of
lubricant.
2 Staple
Pushers for
spare
replacement.
1 box of our
standard
staples, 26/6,
5000 pcs
per box.

5
Setting up the Fold & Staple:
1. To make a booklet with a folding line in the middle to then be stapled, push
the two knobs down as shown in picture 1.
2. To make a booklet with staples only, without any folding, set the two knobs
as shown in picture 2.
3. To have the paper folded without any stapling, push the two knobs down as
shown in picture 1, but do not load any staples into the Staple Heads.
Setting up the Staple Heads:
The Galaxy VR-930 Booklet Maker comes witrh 2 Staple Heads positioned
80mm apart from eachother, which is suitable for most booklet formats from
5-1/2” x 4-1/4” (or A6 size) up to a letter size (or A4 size). For booklets larger
than the Letter size, you can choose to purchase 1 or 2 more Staple Heads or
set your current Staple Heads further apart form eachother. This will create a
more secure and professional booklet. Contact ourselves for more information.
Follow the steps in the next page to install and remove the Staple Heads.

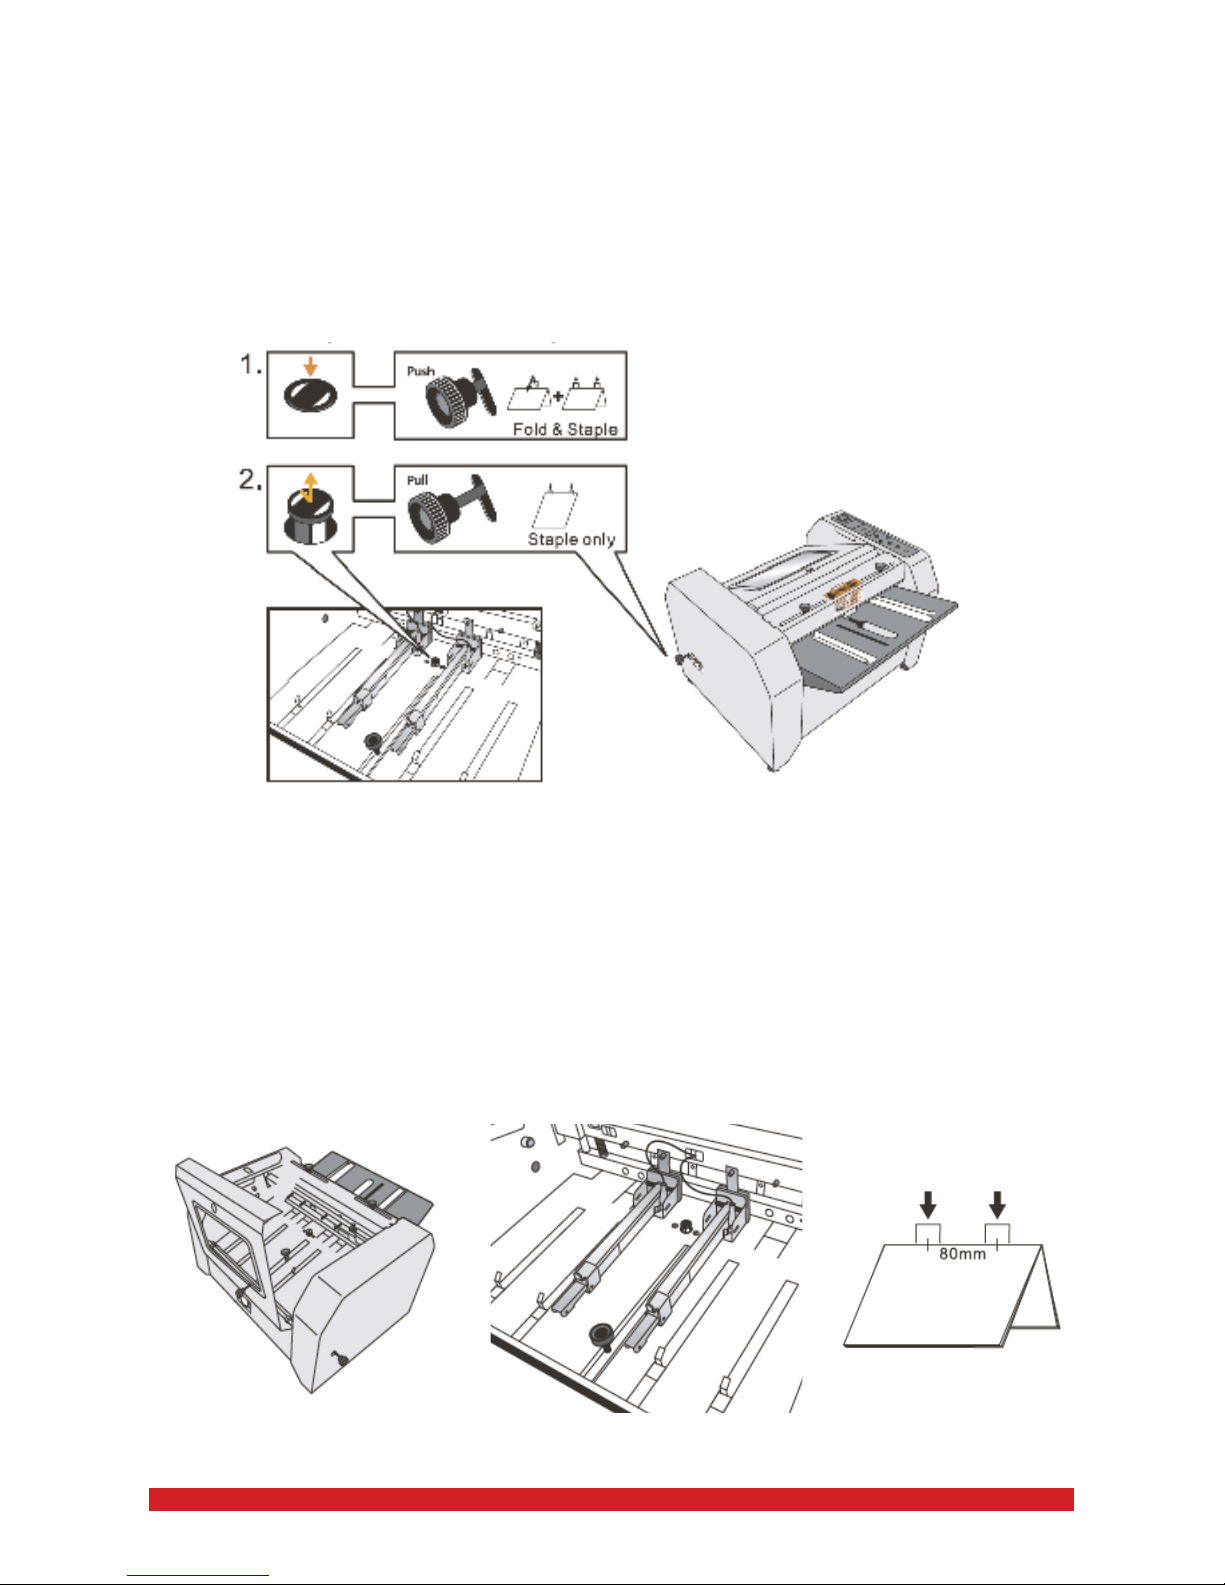
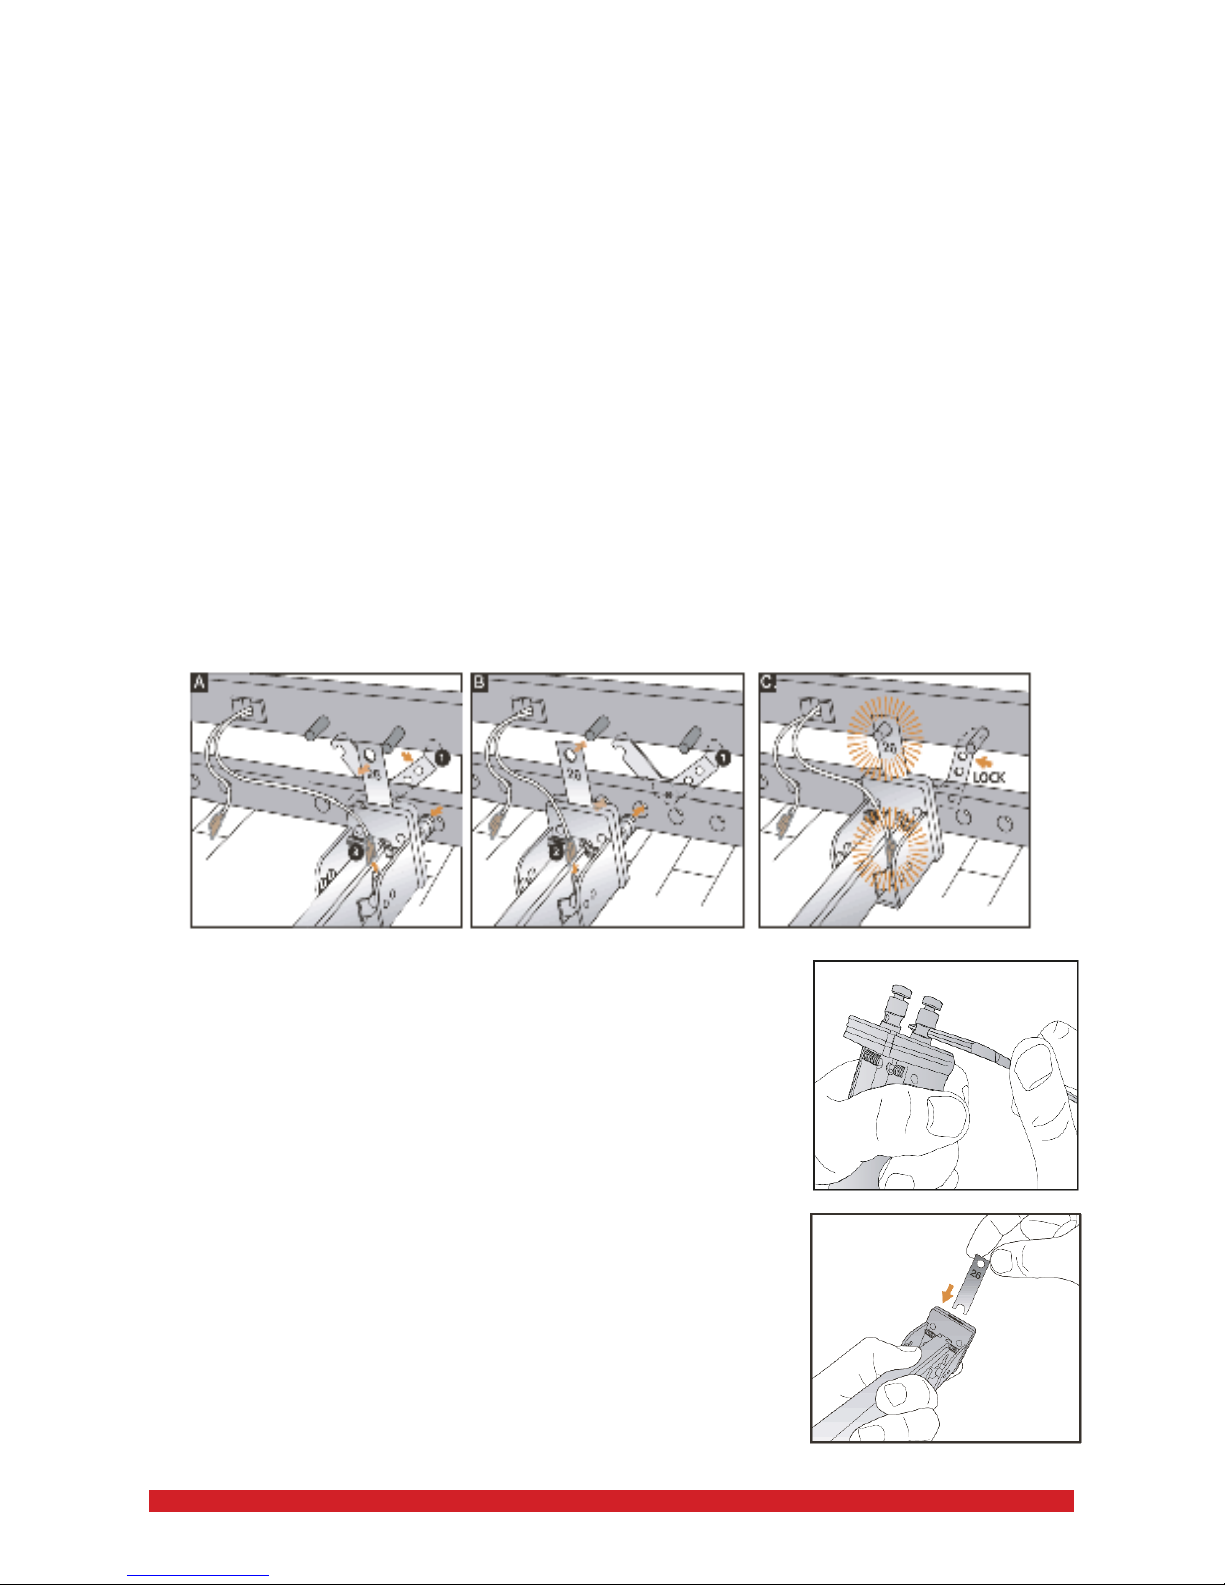
Moving the Staple Heads:
Follow the steps below if you wish to remove or install the Staple Heads at
different positions:
A. Turn the latch counter-clockwise to position 1 to unlock the Staple Head.
Unplug the cord socket from the Staple Head.
B. Remove the Staple Head and insert it in a different Staple Head position.
C. Make sure the hole on the Staple Pusher is hinged onto the pin, and the
mark “26” on the Staple Pusher is shown towards the rear of the machine.
Turn the latch clockwise to lock it, and plug in the cord socket back to the
Staple Head.
IMPORTANT:
aa. To avoid problems during the operation, the hole of the Staple Pusher
must be hinged onto the pin, with the mark “26” shown towards the rear of the
machine.
bb. The latch must be securely locked onto the Staple Head. Otherwise, the
Staple Head may fall out during the operation and cause the machine to be
seriously
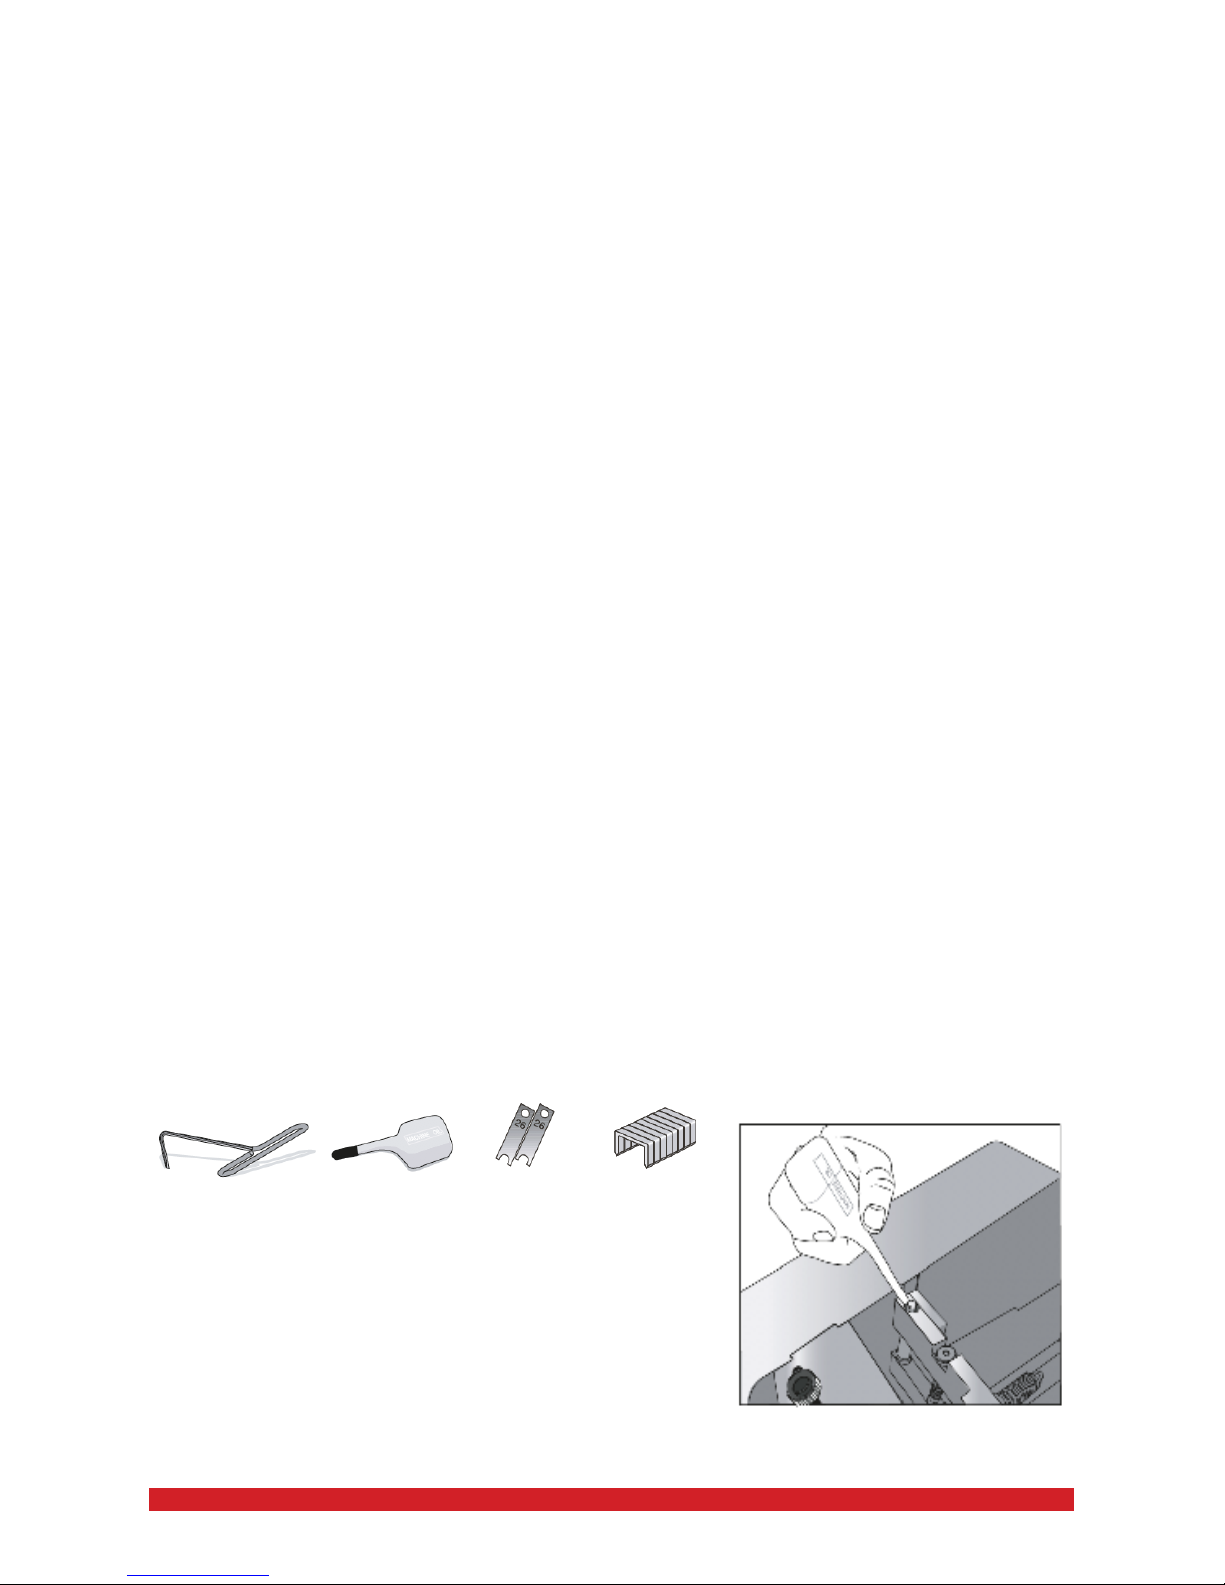
Tips to remove jammed staples from Staple Heads:
Repeat the above steps to remove the Staple
Head from the machine and then use the Universal
Wrench to unscrew the front plate of the Staple Head.
Remove the jammed staples and clean it. Screw the
front plate back onto the Staple Head. Repeat the
above steps to install the Staple Head back to the
machine.
Tips to replace new Staple Pusher:
The Staple Pusher should be replaced from time
to time to ensure efcient and smooth stapling
operation. If a staple jam occurs more frequently
than usual, or abnormal stapling occurs during
operation of the machine, follow the steps above
to remove the Staple Pusher and check if it is
scratched or worn out. To purchase a new Staple
Pusher, contact ourselves. Then, follow the steps
as above to replace the Staple Pusher.
6

Load Staples:
1. Pull the staples magazine cap backwards until it’s locked into place.
2. Open staples magazines cover.
3. Load the staples (Must use our standard 26/6 or 26/8 staples)
4. Close the magazine cover and gently unlock the staples magazine cap and
push it towards the machine’s front side. Do not let the staples magazine cap
snap forward as it will smash the stick of staples.
IMPORTANT:
Use only standard staples as shown on
the right. Other staples may damage the
Staple Head or lead to bad results.
The ‘No Staple’ light will be turned ON
when there are only 5 staples left in the
staples magazine. Also, the machine
will stop working at this point. Remove
the remaining 5 staples and rell the
staples to the stapler magazine following
the above instructions (maximum 210
staples per load).
26/6 Staples
5,000 pcs/box
26/8 Staples
5,000 pcs/box
Tips:
Some defective staples may fall on
surface below Staple Heads.
Use the magnetic Universal Wrench
to pick them up as needed.
Caution: Opening the machine through
any of the openings using the Universal
Wrench may cause an electric shock,
therefore beeing considered as a hazard.
Our Universal Wrench can also be used
to remove staples too.
7

8
Adjusting Paper Width & Length:
1. Adjust the Left Side Guide to the
proper position on that paper scale
sticker, according to your sheet format.
Secure it with the knurled screw.
2. Insert the paper the square it up,
parallel to the Left Side Guide.
3. Adjust the Right Side Guide next
to the inserted paper, leaving
approximately 1mm of space so
that the paper can slide in and out
easily & smoothly.
To adjust the paper length:
1. Open the machine cover
and adjust the Paper Depth
Adjustment Knob to the proper
position, according to your sheet
size. Then close the cover to test
fold a few sheets manually.
2. Centre the folding line of your
booklet by turning the Paper
Depth Adjustment Knob and
making a small adjustment on it.
- Minimum sheet sizes: A5
(or 5.5” x 8.5”)
- Maximum sheet sizes: A6
(or 11” x 18”)
- Minimum of booklet sizes: A6
(or 5.5” x 4.25”)
- Minimum of booklet sizes: A4
(or 8.5” x 12”)

9
Feeding Papers:
2. Make slight adjustments to the
Left & Right Side Guides, Paper
Depth Adjustment Knobs or
Staple Head positions until your
desired, satifactory booklet
comes out. Then press the
“AUTOMATIC” button
and reset the “COUNTER” to
zero, so you can feed in the
papers continuously. NOTE:
When the operation mode is
set on AUTOMATIC, the machine
will start automatically in 2
seconds after the sheets are
inserted into the Paper-in Tray.
- Allows a maximum of 16
sheets of 70gsm paper per run.
- Productivity of up to 800
booklets per hour.
1. Insert at sheets in the
Paper-in Tray and align it to the
Left & Right Side Guides, making
sure that the sheets are squared
up correctly. Press the “MANUAL
START” button on the control
panel, then the sheets willslide
into the machine and the booklet
will be produced.

Troubleshooting:
The power cord is not
plugged in properly
Push power cord thoroughly into the power outlet
The cover is open Close cover
No-Staple light is ON Re-ll Staples. Follow instrictions on page 4.
Papers are not in
Paper-in tray
Place paper in Paper-In Tray and align to the Left &
Right Side Guides
Staples jam 1. Remove jammed staples. Follow instructions on
Page 3.
2. Always use our 26/6 or 26/8 standard staples.
3. Check if the Staples Pusher is scratched or worn
out. Follow the instructions on page 3 to put in a new
Staple Pusher.
Paper jam 1. To remove jammed sheets, press the “REVERSE”
button on the control panel to drive the paper
backward. You may need to press it a few times
until it stops, then you can pull out jammed sheets.
2. Do not insert more than 16 sheets of paper.
3. Do not insert materials that are too thick or too
rigid. Do not insert materials other than paper.
Black (Dark coloured)
covers
If possible, avoid using black or dark coloured
covers as the infrared sensor may not be able to
detect sheets being inserted into the machine.
If the machine is switched on but won’t work at all:
If the machine doesn’t staple although the staple magazines are fully
lled with staples:
Staple Pusher is not
hinged on the pin
The hole on the Staple Pusher should be hinged
onto the pin. Follow instructions on Page 3.
Staple Pusher is
missing or incorrectly
positioned
Follow instructions on Page 3 to put in the Staple
Pusher. The mark “26” should be shown towards
the rear of the machine and the Staple Head latch
should be locked.
10

Unqualied staples Use only our standard 26/6 & 26/8 staples. See
Page 4.
Incorrect staple type
or specication
Use only our standard 26/6 & 26/8 staples. See
Page 4.
Staple Pusher has
been put in the wrong
direction
The Staple Pusher should be shown towards the
rear of the machine. See Page 3.
Residue is inside the
Staple Head
First, remove the Staple Head from the machine
and then unscrew the front plate of the Staple Head.
Clean the Staple Head and then re-install it to the
machine. Make sure the Staple Head latch is locked
before you operate the machine. Follow the
instructions on Page 3 to remove/install the Staple
Heads.
Staple Pusher is
scratched or worn out
Follow the instructions on Page 3 to change the
Staple Pusher.
Missing staples or un-qualied staple in-put:
If you cannot fold or if an un-qualied booklet has been folded & stapled:
Settings for the Fold
& Staple features are
not correctly set
Follow the instructions on Page 2 to set up the Fold
& Staple features correctly.
Too many sheets
are inserted or the
material is too rigid
1. Do not insert more than 16 sheets of paper into
one run.
2. Do not insert materials that are too thick or too
rigid. Do not insert materials other than paper.
Folding line is not
located in the centre
of the booklet, or is at
a slanted angle
1. Properly adjust the Left & Right Side Guides.
If the Side Guides are too far apart, paper can be
unparallel as it is inserted into the machine. On the
other hand, if the Side Guides are set too tightly,
paper can curl up during folding, which can result in
incorrect stapling. See Page 5 for instructions.
2. Properly adjust the Paper Depth Adjustment
Knob, so that the machine folds in the centre of the
sheets. See Page 5 for instructions.
Dirty rollers Clean rollers using a soft and damp cloth. Never use
chemical or alcohol base liquidsas they may
damage the roller.
The 2 staples are not
properly centered in
the booklet
1. Properly adjust the Left & Right Side Guides.
See Page 5.
2. Re-install Staple Heads to the correct positions.
See Page 3.
11

Paper Folding Machines
Pharmaceutical Folding Machines
Folder Inserters
The UK’s No.1 Print Finishing Suppliers
12

Booklet Makers
Our booklet makers are useful for anyone
wanting to make stapled booklets. Turn
multiple A4 sheets into an A5 booklet or
multiple A3 sheets into an A4 booklet.
They’re very handy for making things
such as menus, brochures, church
service booklets and so on. Offering a
low cost solution that drastically improves
production, efciency and the quality
of a nished result.
Business Card Cutters
Here at Galaxy, we provide a wide range
of quality card cutters ideal for business
cards, shop tags, postcards and other
applications. These machines are perfect
for in house low to meduim volume runs.
Creasing & Perforating Machines
Our card creasing and perforating
machines will cater for the smaller
user up to the print nishing specialists.
13

Envelope Slitters
We provide a range of envelope openers
which are suitable for all types of ofces. We
have basic letter openers through to letter
openers with mail extraction systems built in.
Corner Rounders/Punches/Cutters
Galaxy offers a range of corner rounders,
cutters and punches. These can range from
the smaller jobs to the more heavy duty
applications.
Staplers
Staple with ease with our effortless staplers
that are suitable for your stapling needs.
Franking Labels and Inks
14

15
We offer products around the world which has enabled us to
develope local partnerships that are beneting customers
and business partners alike. For mail room and print
nishing solutions, we have an extensive range of
machines and supplies.
Give us a call today to see how we can help with your mail
room and print nishing requirements.
Table of contents