Galaxy GLX160 User manual

ELECTRIC NAIL FILE
GLX160
INSTRUCTION MANUAL
Always read the safety instructions before using the device.
Keep the instructions in a safe place in case you need to review the instructions for use.
1. INTRODUCTION
Electric nail file GLX160 intended for processing of gel, acrylic, natural and artificial nails and the skin surrounding the nails. The device has the ability to
adjust the speed from 0 to 30.000 rpm and has two directions of rotation, which makes it suitable for use by left-handed and right-handed technicians.
“Twist lock” system enables quick and easy replacement of nail file bits, and the ergonomic design of the handle and the flexible cable enable easy use
and simple gel or acrylic treatment on the nail surface, natural nails and surrounding skin while performing a manicure and pedicure.
2. APPLICATION
The file finds practical application in all manicure and pedicure salons. It can be used for shaping, polishing and filing of metal, wood, glass, leather
products, ceramics, plastic and other materials.
3. USAGE
1. Connect the lever connection to the appropriate slot on the housing of the device.
2. Release the file chuck by turning the plastic ring on the lever to the left, in the "R" direction. Place the desired bit, and then turn the ring on the lever to
the right, in the "S" direction, so that the chuck closes and thus fixes the installed bit.
3. Plug the device`s power cord into a suitable electrical outlet.
4. Switch on the device and select the desired direction of rotation by moving the switch from the OFF position to the left or right position.
5. By turning the potentiometer slightly clockwise, start the device and select the desired speed.
4. PROCEDURE FOR INSTALLING AND REMOVING OF NAIL FILE BITS
In the factory package, the device comes with a blank shaft with a diameter of 2.35 mm, which must
be removed and the desired nail file bit placed in the jaw of the lever, following these steps:
a) Prior to installing and removing of nail file bits, turn off the nail file and turn the potentiometer
into the uttermost left position.
b) Holding the lever upright, turn the safety ring in "R" direction (picture on the right),
remove the blank shaft and place the desired nail file bit in the chuck.
c) When the bit is placed in the jaw, turn the safety ring in the "S" direction to fix the attachment.
d) After installation, it is necessary to check whether it is correctly installed by rotating the bit
with your fingers. Pay attention to the sharp edges of the bit, so as not to injure the fingers.
Note: The blank shaft which comes in a factory packaging is necessary to be saved and enclosed
within every servicing of the device. Never move the nail file ring during operation.
5. TECHNICAL SPECIFICATIONS
Model
Input
Frequency
Output
Power
GLX160
AC 100 V - 110 V
/AC 220 V - 240 V
50 - 60 Hz
DC 12 V
35 W
Speed
Dimensions (mm)
Weight
MAX
30.000
RPM
L1 (mm)
L2 (mm)
L3 (mm)
D (mm)
160 g
70
65
135
Ø 26.5

APPLIANCE COMPONENTS:
1. Device housing
2. File lever connection slot
3. Potentiometer for rotational speed control
4. File lever connection
5. Bit holder sleeve
6. Bit
7. Lever holder
8. Switch for turning on/off the appliance
and choosing the desired rotation direction
9. File lever
10. Security ring for releasing or tightening the chuck
11. Power cord
6. PRECAUTIONS
Be sure to read all precautions listed to avoid possible injuries and damage to the device.
1. Only connect the device to the appropriate mains voltage, which is indicated on the housing of the device.
2. Prior to installing and removing of nail file bits, it is necessary to turn off the nail file and turn the potentiometer into the
uttermost left position, otherwise the damage of the nail file lever may occur.
3. Position the attachment so that the distance between its lower part and the clamping head at the top of the lever is at least 4 mm
away, in order to avoid friction and overheating of the lever.
4. The bit must be properly fixed before using the device.
5. Use correct bits, do not use damaged or wrong bits. Strictly use the bits intended for this nail file.
6. Stop using the device if unusual vibrations / noise occur.
7. Always change speed gradually, never abruptly.
8. Do not touch the moving parts of the device when it is switched on.
9. When changing the direction of rotation, stop the engine to zero, then change direction and gradually increase the speed.
10. Do not cover the device with a cloth or any other material, as this may block the ventilation openings. Protect it from dust.
11. If the power cord or any other cable is damaged, be sure to contact an authorized service center to have the cables replaced.
12. The use of the device by persons with lack of experience or limited psycho-physical abilities is not recommended, unless the use is
supervised by a professional or a person in charge of their safety.
13. Do not allow children to play with the device.
14. Warning! Do not use the appliance in the bathroom, near bathtubs, showers or other basins with water. Do not immerse the appliance into water or
other liquids. Do not place the appliance where it can fall.
15. Always unplug the appliance from the mains after the usage. Never leave the appliance unattended if it is plugged in the outlet.
16. Do not make any repairs or adjustments on your one on the device. In case of the defect or irregular operation, it is necessary to send the
device to the authorized service station to be checked and potentially repaired.
The manufacturer does not bear any responsibility for potential device failures that appear due to irregular usage.
CORRECT DISPOSAL OF EXPIRED PRODUCTS
A sign of a crossed waste bin means this product should not be disposed with other household waste. To prevent the potential damage for
the environment or human health due to uncontrolled waste disposal, it is necessary to recycle the products in accordance with regulations.

ELEKTRIČNA TURPIJA ZA NOKTE
GLX160
UPUTSTVO ZA UPOTREBU
Obavezno pročitati bezbednosna uputstva pre upotrebe uređaja.
Sačuvati uputstvo na bezbednom mestu u slučaju potrebe za ponovnim pregledom instrukcija za upotrebu.
1. UVOD
Električna turpija GLX160 namenjena je obradi gela, akrila, prirodnih i veštačkih noktiju, kao i kože oko noktiju. Uređaj ima mogućnost podešavanja brzine
od 0 do 30.000 obrtaja u minuti i poseduje dva smera rotacije, što ga čini pogodnim za upotrebu od strane levorukih i desnorukih tehničara. „Twist lock“
sistem omogućava brzu i jednostavnu zamenu nastavaka za turpiju, a ergonomski dizajn ručice i fleksibilni kabel omogućavaju laku primenu i jednostavnu
obradu akrila ili gela na površini nokta, prirodnih noktiju i kože oko noktiju pri aparatnom manikiru i pedikiru.
2. PRIMENA
Turpija nalazi praktičnu primenu u svim manikir i pedikir salonima. Može se koristiti za oblikovanje, poliranje i bušenje metala, drveta, stakla, proizvoda
od kože, keramike, plastike i drugih materijala.
3. UPOTREBA
1. Spojiti priključak ručice na odgovarajući slot na kućištu aparata.
2. Otpustiti čeljust električne turpije okretanjem plastičnog prstena na ručici ulevo, u smeru „R“. Postaviti željeni nastavak, a zatim prsten na ručici
okrenuti udesno, u smer „S“, kako bi se čeljust zatvorila i tako fiksirao postavljeni nastavak.
3. Priključiti napojni kabel aparata na električnu mrežu odgovarajućeg napona.
4. Uključiti aparat i izabrati željeni smer rotacije prebacivanjem prekidača iz pozicije OFF u položaj levo ili desno.
5. Laganim okretanjem potenciometra u smeru kretanja kazaljke na satu, startovati aparat i odabrati željenu brzinu rotacije.
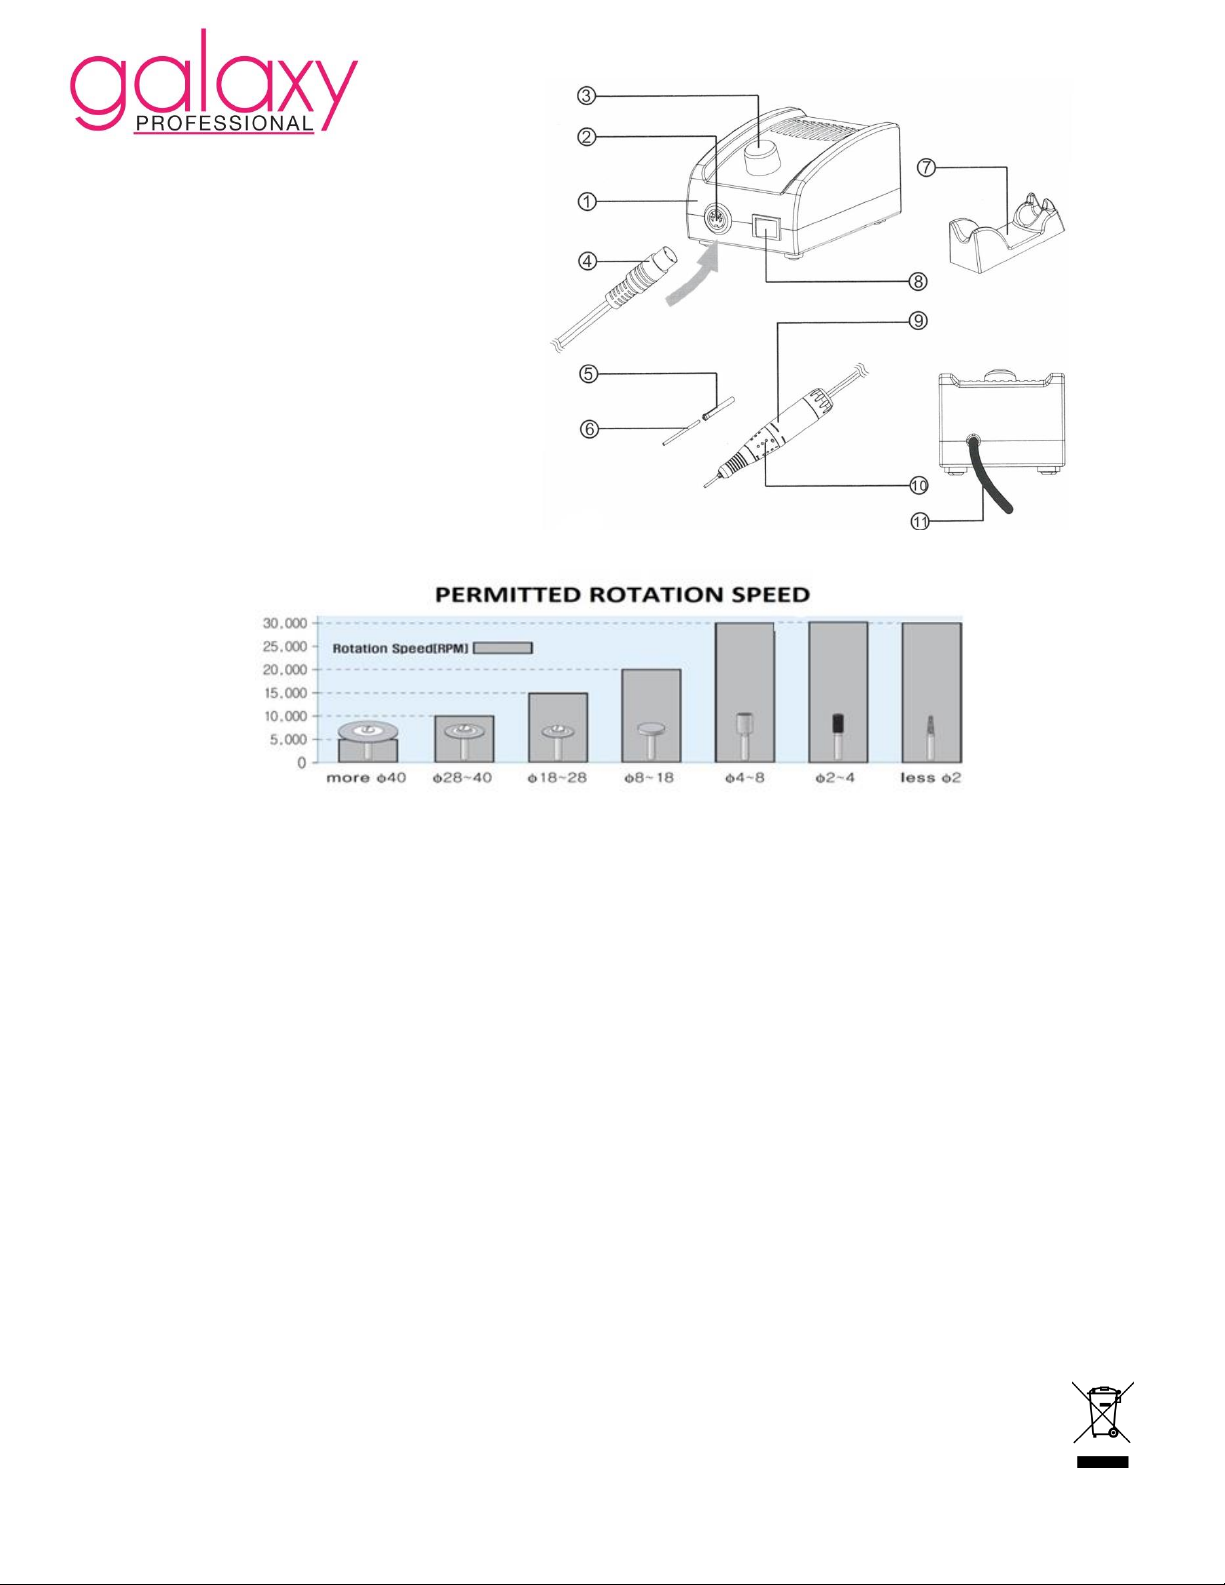
4. PROCEDURA POSTAVLJANJA I UKLANJANJA BRUSNIH NASTAVAKA
U fabričkom pakovanju, uređaj dolazi sa blanko osovinom prečnika 2,35 mm, koju je potrebno
ukloniti i u čeljust ručice postaviti željeni brusni nastavak, prateći sledeće korake:
a) Pre postavljanja i uklanjanja nastavaka, isključiti električnu turpiju
i okrenuti potenciometar u krajnji levi položaj.
b) Držeći ručicu uspravno, okrenuti sigurnosni prsten u smeru „R“ (slika desno),
izvaditi blanko osovinu i postaviti željeni brusni nastavak u čeljust.
c) Kada je nastavak postavljen u čeljust, okrenuti sigurnosni prsten u smeru „S“ kako bi se nastavak fiksirao.
d) Nakon postavljanja, potrebno je rotiranjem nastavka prstima proveriti da li je pravilno
postavljen. Obratiti pažnju na oštre ivice nastavka, kako ne bi došlo do povrede prstiju.
Napomena: blanko osovinu koja dolazi u fabričkom pakovanju, potrebno je sačuvati i priložiti
prilikom svakog servisiranja uređaja. Nikada ne pomerati prsten na ručici turpije u toku rada aparata.
5. TEHNIČKA SPECIFIKACIJA
Model
Ulaz
Frekvencija
Izlaz
Snaga
GLX160
AC 100 V - 110 V
/ AC 220 V - 240 V
50 - 60 Hz
DC 12 V
35 W
Brzina
Dimenzije (mm)
Težina
MAX
30.000
RPM
L1 (mm)
L2 (mm)
L3(mm)
D (mm)
160 g
70
65
135
Ø 26,5

KOMPONENTE APARATA:
1. Kućište aparata
2. Slot za priključivanje ručice
3. Potenciometar za kontrolu brzine rotacije
4. Priključak ručice
5. Čaura za prihvat nastavka
6. Nastavak
7. Stalak za ručicu
8. Prekidač za uključivanje/isključivanje aparata
i odabir smera rotacije
9. Ručica
10. Prsten ručice za otpuštanje/stezanje čeljusti
11. Napojni kabel
6. MERE PREDOSTROŽNOSTI
Obavezno pročitati sve navedene mere opreza kako bi se izbegle eventualne povrede i oštećenje uređaja.
1. Uređaj isključivo priključiti na mrežu odgovarajućeg napona, koji je naznačen na kućištu aparata.
2. Pre postavljanja i uklanjanja nastavaka, obavezno isključiti električnu turpiju i okrenuti potenciometar u krajnji levi položaj. U suprotnom, može doći do
oštećenja turpije.
3. Postaviti nastavak tako da razmak između njegovog donjeg dela i stezne glave na vrhu ručice bude minimum 4 mm udaljen, kako bi se izbeglo trenje i
pregrevanje ručice.
4. Potrebno je da nastavak bude pravilno fiksiran pre upotrebe aparata.
5. Koristiti ispravne nastavke, ne koristiti oštećene ili krive nastavke. Koristiti isključivo nastavke predviđene za ovu električnu turpiju za nokte.
6. Prekinuti upotrebu aparata, ukoliko dođe do pojave neuobičajenih vibracija/buke.
7. Brzinu uvek menjati postepeno, nikada naglo.
8. Ne dodirivati pokretne delove aparata kada je uključen.
9. Prilikom promene smera rotacije, zaustaviti motor na nulu, a zatim promeniti smer i postepeno povećavati brzinu obrtaja.
10. Ne prekrivati uređaj tkaninom niti bili kojim drugim materijalom, jer može doći do blokade ventilacionih otvora. Čuvati uređaj od prašine.
11. Ukoliko dođe do oštećenja napojnog ili bilo kog drugog kabela, obavezno kontaktirati ovlašćeni servis kako bi se kablovi zamenili.
12. Ne preporučuje se upotreba uređaja od strane osoba sa nedostatkom iskustva ili sa ograničenim psiho-fizičkim sposobnostima, osim ukoliko je
upotreba nadgledana od strane stručne osobe ili osobe zadužene za njihovu bezbednost.
13. Ne dozvoliti deci da se igraju uređajem.
14. Upozorenje: Ne upotrebljavati uređaj u blizini kada, tuševa, bazena ili posuda u kojima se nalazi voda. Ne stavljati aparat u vodu ili u druge tečnosti.
Ne odlagati uređaj na mesto sa koga može pasti.
15. Uvek odmah nakon upotrebe isključiti uređaj iz električne mreže. Nikada ne ostavljati bez nadzora uređaj koji je priključen na električnu mrežu.
16. Ne vršiti samostalno bilo kakve tehničke prepravke ili popravke na uređaju. U slučaju kvara ili nepravilnog rada potrebno je uređaj poslati u ovlašćeni
servis na pregled i eventualnu popravku.
Proizvođač ne snosi odgovornost za eventualne kvarove uređaja koji su nastali usled nepravilne upotrebe.
PRAVILNO ODLAGANJE DOTRAJALIH PROIZVODA
Znak precrtane kante za smeće označava da ovaj proizvod ne treba odlagati sa ostalim kućnim otpadom. Da bi se sprečila eventualna šteta po
životnu okolinu ili ljudsko zdravlje zbog nekontrolisanog odlaganja otpada, potrebno je dotrajale proizvode reciklirati u skladu sa propisima.
Table of contents
Other Galaxy Personal Care Product manuals
Popular Personal Care Product manuals by other brands

Dicarre
Dicarre Noble ER 90 User Guide Application Instruction

Beurer
Beurer FC 45 Instructions for use

Pretika
Pretika SonicDermabrasion ST255A Operating instructions & warranty information

Davita
Davita LD 72 user manual

Orliman
Orliman BE-300 Use and maintenance instructions

DeVilbiss Healthcare
DeVilbiss Healthcare SleepCube DV57 Series manual