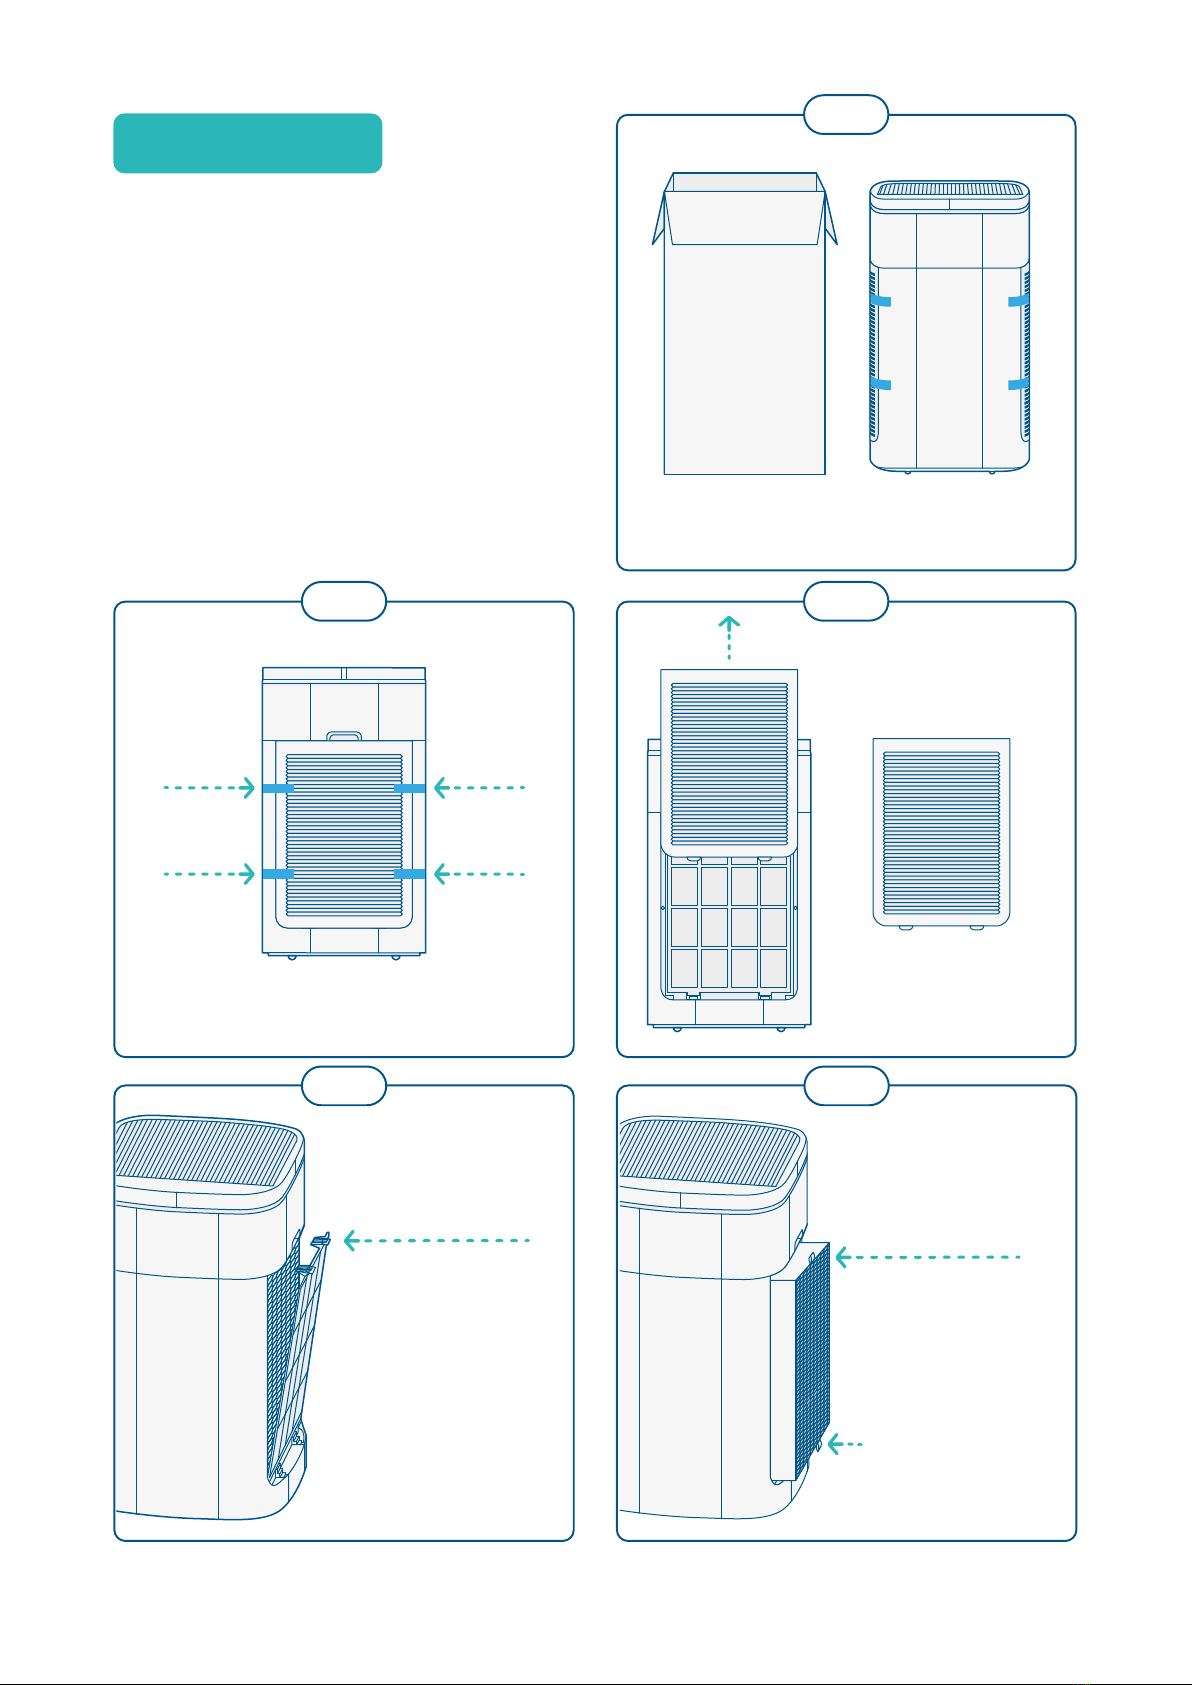
GAMA Clinell Rediair RAIR-UK User manual

How to operate.
Installation & maintenance
PRODUCT MANUAL
RAIR-01 Version 6. Approved 23/02/2022
from the makers of

PRODUCT CONTENTS
Rediair
decontamination device
Pre-filter
Rediair decontamination device, pre-filter, main
combination filter (HEPA 14), instruction manual
Main combination
filter (HEPA 14)

CONTENTS
Introduction
Product description 1
Intended use 1
Limitations of use 1
Rediair’s 3 stages of decontamination 2
Universal labels, symbols and icons 3
Warnings and safety precautions 5
How to use Rediair
Setup 6
LCD touch control panel 8
Disposal, cleaning and maintenance
External surface cleaning 11
Filter changing and cleaning 11
Cleaning a pre-filter 12
Cleaning and changing times 12
How to change the pre-filters 12
Disposal 14
How to change the main filters 15
Appendix
Technical specifications 17
Declaration of Conformity 19
Contact 20

1
INTRODUCTION
Product description
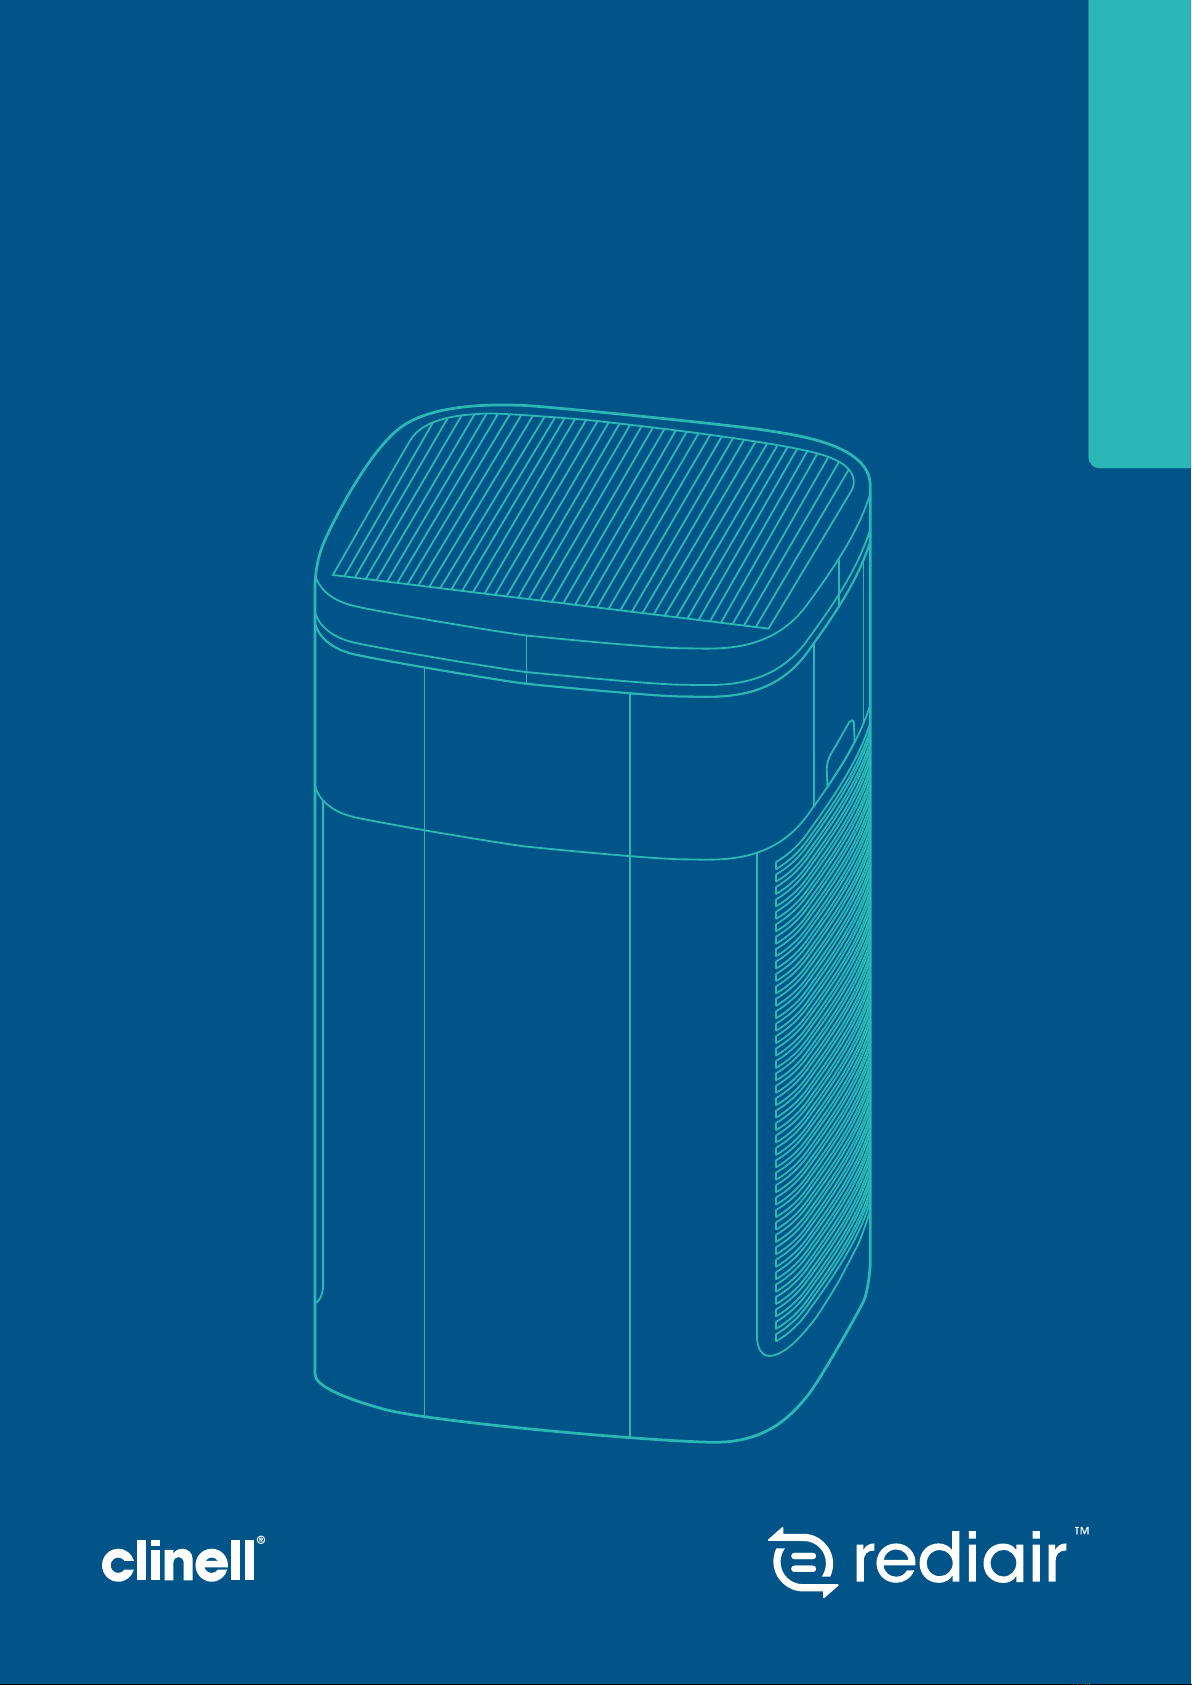
• Rediair is a mobile air decontamination
device that removes numerous
microorganisms, particulates and
gaseous pollutants from the air. This group
includes mould spores, bacteria, airborne
pathogens, animal hair and above
all, house dust allergens (mite faeces,
excrements), but also heavy metals, soot
and mineral fibres. (Figure 1-Product image)
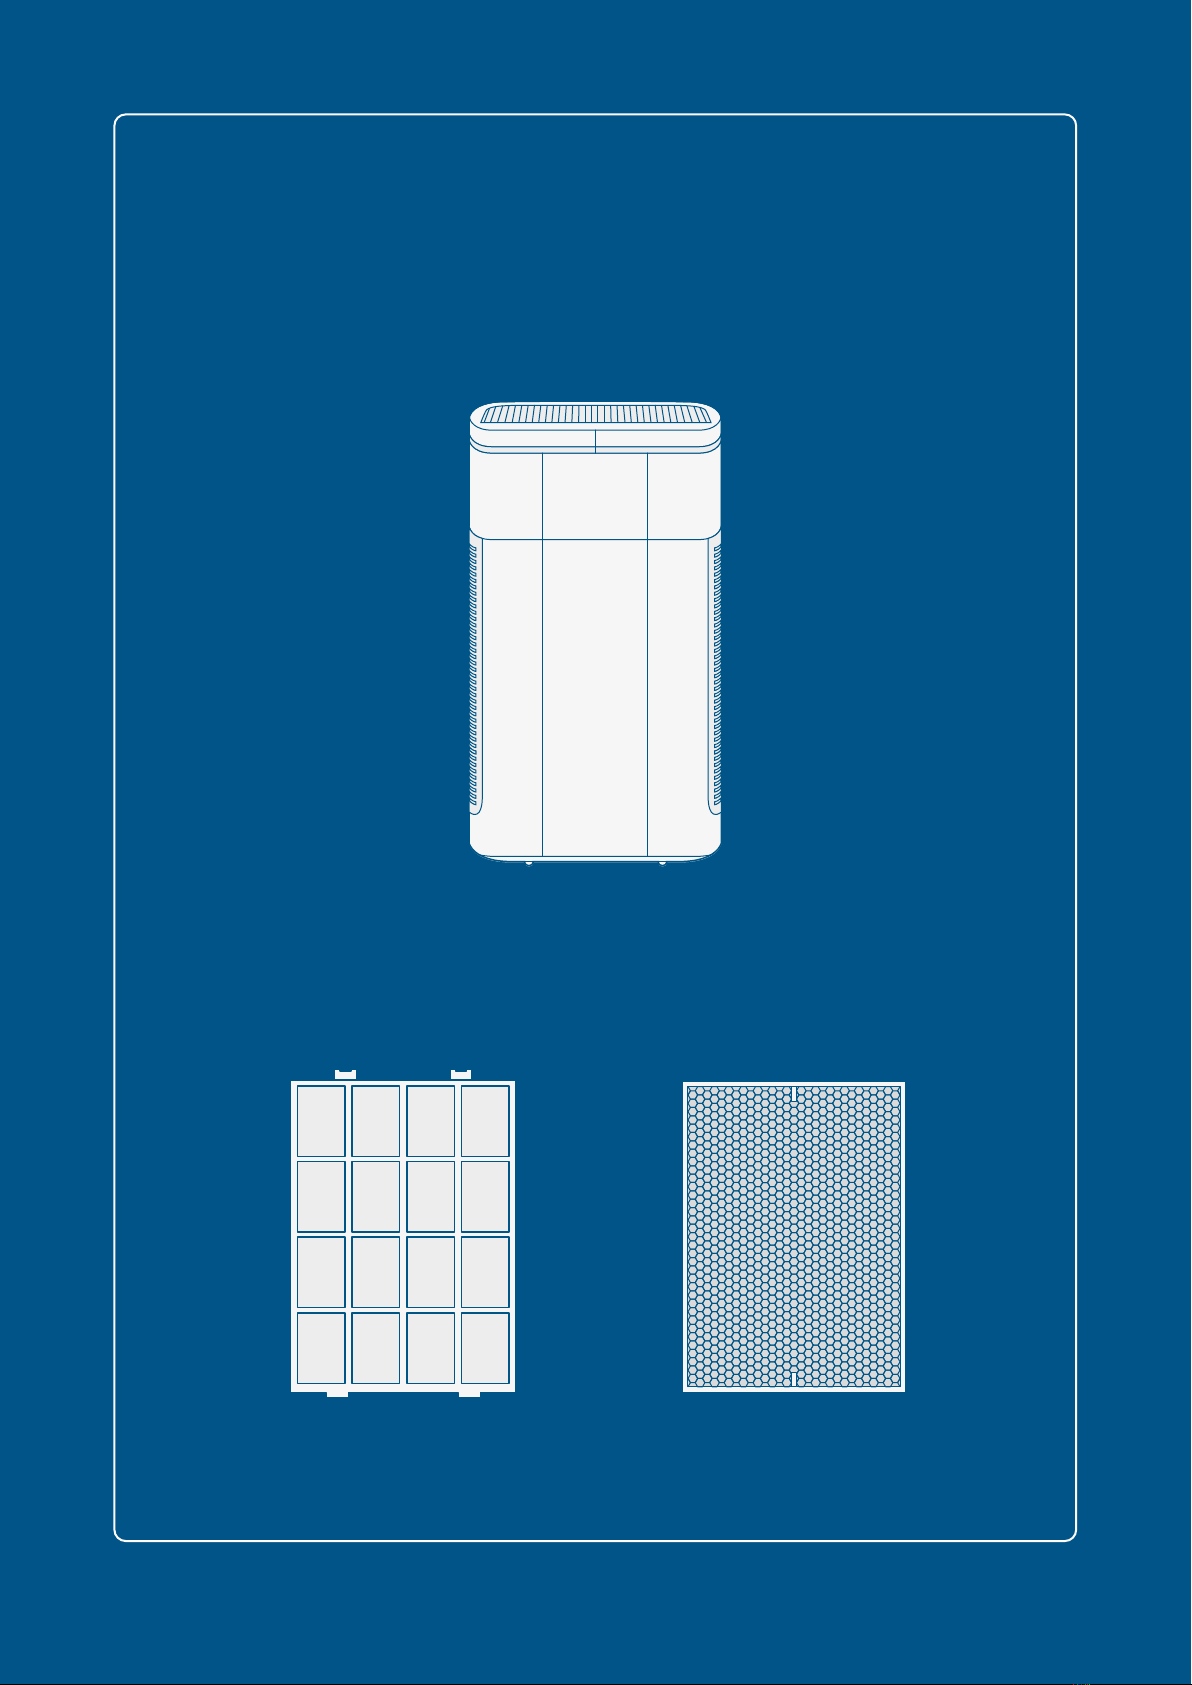
• Rediair comes with 2 HEPA 14 carbon
filters & 2 pre-filters, and a 2-metre
power cord, designed to operate with
a shockproof 230V/50hz plug socket.
The HEPA 14 filters and pre-filters are
removable for cleaning and replacement.
• Rediair is designed to be stationary
when in operation (out of standby
mode). The user can select its three
operating modes: automatic, turbo and
night mode at will. Additional functions
such as night mode, a timer setting
and child lock help Rediair adapt to
various situations and environments.
• An internal particle sensor combined with
an LED air quality indicator strip monitors a
room’s air quality and changes depending
on the current air quality. Rediair will change
its internal fan speeds to account for the
CADR required to decontaminate the
surrounding air when in automatic mode.
Always read before commissioning.
Please carefully follow the instructions
in the operating manual. Non-
observance will invalidate the warranty.
GAMA Healthcare accepts no liability
for any damage or consequential
damage arising from this.
WARNING
Figure 1 – Rediair decontamination device
Intended use
Rediair is a mobile air decontamination
unit that draws in air from the environment,
passing through two three-stage filtration
systems simultaneously. The filter stages
consist of pre-filter, followed by composite
HEPA 14 and carbon filters to remove 99.995%
of airborne particulates down to 0.3µm.
Limitations of use
Rediair is designed to be used in private
apartments, offices, conference and training
rooms, schools and public authorities,
surgeries and fitness centres, and other
areas where people are present.
A local risk assessment should be conducted
before Rediair is commissioned for use.

2
Rediair’s 3 stages of
decontamination are:
1.1 - Pre-filter
A washable plastic pre-filter filters coarse dust
particles of more than 5 micrometres, such as
house dust, scales, pollen. The filter can be
washed out with water and reused several
times. GAMA Healthcare recommends
replacing the pre-filter twice a year.
1.2 - Effective formaldehyde filter
A formaldehyde filter with activated
carbon cleans the air of unwanted odours,
gases and substances. It also cleans the
air of harmful formaldehyde in a relatively
quick time. The activated carbon absorbs
the substances, and when the filter is
saturated, the filter must be replaced. GAMA
Healthcare recommends replacement every
six months. In case of strong odour pollution,
a more frequent change is advisable.
1.3 - Highly efficient HEPA filter
(suspended matter filter)
The HEPA 14 filter filters airborne
microorganisms, smoke, and dust particles
down to 1μm in size at a rate of 99.995% or
more. In combination with stage 2, the HEPA-
14 filter can catch microscopic particles
with a minimum diameter of 20 nanometres,
like bacterial mould, dust, allergens, and
airborne viruses. According to the World
Health Organisation, COVID-19 (SARS-CoV-2),
avian flu virus, influenza virus, and legionella
bacteria are larger than 20 nanometres.
REDIAIR’S 3 STAGES OF DECONTAMINATION ARE:
External cover 1.2 & 1.31.1 Internal view

3
INTRODUCTION
SYMBOL DESCRIPTION
Distributor
Caution
Consult accompanying documents
Warning
Indicates a hazardous situation, which if not avoided,
could result in injury to the operator
Consult instructions for use
AU Regulatory Compliance Mark
CE marked product (European Conformity mark)
UK Conformity Assessed
Do not dispose of in general waste. Waste Electrical and Electronic
Equipment (WEEE Directive; (2012/19/EU; Article 11(2))
Serial number
Quantity
Catalogue number
Date of manufacture
Maximum mass = 20.9kg
Electrical ratings
Universal labels, symbols and icons

4
Maximum altitude
Double insulated device
Handle with care
Keep dry
Temperature limitation
Atmospheric pressure limitation
Humidity limitation

5
INTRODUCTION
Warnings and safety precautions
If Rediair is used in a way other than specified
in this manual, safety of the operator and
others may be compromised. All warnings
and precautions must be followed to avoid
personal injury or damage to the device:
• Read the product manual thoroughly
before using this product.
• For indoor use only.
• Carefully select area for deployment
– conduct a local risk assessment
prior to deployment.
• Only plug the product into an
approved electrical socket.
• Do not cover the top of the
unit during operation.
• Do not position the device so that the air
intakes or outlets are blocked while in use.
• Do not use the product if it is damaged.
• Do not store or operate the product
in areas where it could get wet or be
exposed to any harsh environmental
conditions, such as extreme temperature
or humidity, direct sunlight, dust etc.
• If the device accidentally becomes wet,
discontinue use until dry and then test the
device for proper operation before reuse. Please speak to your local Rediair
customer service representative
for more information about the
warnings and precautions.
NOTE
• To avoid electrical or fire hazards, do
not attempt to remove or replace the
power cord. The power cord and plug
must be intact and undamaged; check
the cable’s integrity before each use.
• In case of damage of any kind, do not use
and do not attempt to repair the cable.
• It is necessary to use the mains supply
cord/plug to disconnect the equipment
electrically – take care not to position
the product so that it is difficult to
disconnect the mains supply/cord.
• Do not attempt to move or reposition
the unit with the mains supply
cord/plug still connected.
• Do not use the product if any moving
parts (i.e. impeller fan) are exposed.
• Always change the filter as soon
as the relevant indicator appears
on the unit (see page 15).
• Do not use a non-compatible filter that
is not designed/approved for use with
this product. (Only use Filter (RAIR-S01)
supplied by GAMA Healthcare Ltd.)

6
HOW TO USE SETUP
Remove the
external covers
(both sides).
Unbox the Rediair and remove
all outer packaging.
To remove
the pre-filters,
press down on
the two clips at
the top of the
filter and remove
(both sides).
Remove the
main filters by
pulling on the
tabs (both sides).
Remove the blue tape on the
external covers of the device.
Before getting started
and switching on
the Rediair, please
remove all packaging.
The Rediair filters must
be removed from their
protective packaging.
2.1
2.3
2.2
2.5
2.4

7
Re-install the main filters
(both sides), making sure that
the tabs are facing outwards.
Remove the
plastic wrap
from the filters.
Connect the power supply.
Re-install the pre-
filters (both sides).
Re-install the
external covers
(both sides).
Note: Ensure
external covers
are fitted correctly
or the Rediair will
not power on.
2.9
2.7
2.10
2.8
2.6

8
HOW TO USE
3.1 - Power on/off
To switch Rediair on/off, press the power
button. Rediair will start in automatic mode.
In automatic mode, the motor speed will be
controlled by a sensor, which is automatically
regulated in 3 stages, depending on the air
quality. Pressing the power button again will
put the Rediair unit back into standby mode.
3.2 - Speed setting (manual mode)
Press to enter ‘manual mode’ and cycle
through fan speed settings. Speed selection
is only available in manual mode.
3.3 - Mode selection
The mode button allows you to cycle through
the 3 additional modes of operation:
• 3.3.1 - Automatic mode: Rediair
will select the appropriate speed,
depending on the current air quality.
In low light conditions (e.g. at night),
Rediair automatically reduces the
fan speed (see ‘3.8 Light Sensor’).
• 3.3.2 - Turbo mode: Made to provide
maximum decontamination, turbo
mode allows the Rediair fan to
operate at its highest speeds.
• 3.3.3 - Night mode: Rediair will operate
at its quietest level. All lights and displays
are turned off and the fan runs at its
slowest speed. In sleep mode, Rediair will
not respond to the air quality sensor.
3.4 - Timer setting
The ‘Timer’ setting lets Rediair operate
automatically for a select period, ranging
from 1 hour to 12 hours. Press the button
until your desired time appears on the
display. 10 seconds after the last press,
the display switches back to the air
quality display. To switch off the timer
setting, press the ‘Timer’ button until no
hour signals are lit up on the display.
3.5 - Child lock
To activate the child lock safety
feature, press the ‘Child Lock’ button
on the display. To unlock, press and
hold the button for 10 seconds.
µg/m3
PM2.5
1h 2h 4h 8h 12h
AUTO
FILTER
TIMER
LOCK
POWER
MODE
SPEED
REDIAIR LCD TOUCH CONTROL PANEL
LCD TOUCH CONTROL PANEL
3.6 3.13.5 3.23.3.33.83.3.1
3.4 3.33.3.2 3.7

9
HOW TO USE
3.7 - Air quality indicator
The air quality is displayed by the LED
ring as outlined above, and shown
numerically in the display in µg/m3.
3.8 - Light sensor
In automatic mode, if ambient light falls
below 3 lumens for more than 3 minutes,
Rediair will enter night mode. If light levels
then exceed 3 lumens for 5 minutes, Rediair
will switch back to automatic mode.
LED AIR QUALITY INDICATOR DISPLAYS (3.7)
PM2.5 VALUE (µg/m3)1 - 35 36 - 75 76 - 150 151 - 500
AIR QUALITY Very good Good Not good Bad
DISPLAY COLOUR Blue Green Amber Red
3.6 - Filter indicator
The Rediair filter indicator displays the
status of the main filters. After 3000
hours of operation, this indicator will
light up continuously red, prompting
you to replace the main filters. If the
filter indicator flashes red intermittently,
it is time to clean the pre-filters.
• 3.6.1 - Working time display: Press the
filter indicator button to view working
time of the current filters on the main
display (3.6). As the Rediair display has
only 3 digits, values of 1000 hours or more
will scroll across the screen. For example,
below shows a working time of 2349 hours.
• 3.6.2 - Resetting the filter time: To
reset the timer after changing the
filters, press and hold the filter indicator
for 3 seconds. Both the filter indicator
and the working time will reset.
The light sensor is only active in
automatic mode. If night mode
is selected manually, using the
‘Mode Selection’ button (3.3),
Rediair will remain in night mode
regardless of the ambient light.
NOTE
µg/m3
PM2.5
1h 2h 4h 8h 12h
AUTO
LOCK
POWER
MODE
SPEED
µg/m3
PM2.5
1h 2h 4h 8h 12h
AUTO
FILTER
TIMER
LOCK SPEED
WORKING TIME DISPLAY (3.6.1): 2349 HOURS

10
LED AIR QUALITY INDICATOR
Very good Not goodGood Bad
3.7

11
External surface cleaning
Before performing any filter change,
clean/decontaminate the external
surface of the Rediair device. When
cleaning the exterior, remember to:
• Clean from top to bottom and
from clean to dirty areas.
• Wipe in an ‘S’ shape to avoid
recontamination of areas
you’ve already cleaned.
• If using a disinfectant, ensure that
recommended contact times are reached.
Filter changing and cleaning
Changing the main Rediair filter is
displayed by the filter indicator button
located on the digital display.
Pre-filters should be cleaned
regularly, at least once a month.
When the filter indicator changes to
red after 3000 hours (approximately
twice a year), you should replace the
main Rediair filter. After replacing the
Rediair main filter, reset the filter.
DISPOSAL, CLEANING AND MAINTENANCE
WIPE IN AN ‘S’
SHAPED PATTERN
ENSURE CORRECT
CONTACT TIME
WORK FROM TOP
TO BOTTOM
ONE WIP E,
ONE SURFACE
WIPE FROM CLEAN
TO DIRTY
Clinell Universal
combined cleaning
& disinfecting wipes
are compatible with
Rediair. Additionally, for
a full list of compatible
agents, please refer
to the appendix.
NOTE
A
D
B
E
C

12
Before dismantling Rediair to perform
filter maintenance/replacement,
a local risk assessment should
consider the appropriate PPE.
Always unplug the Rediair before
dismantling device to perform filter
maintenance/replacement.
WARNING
WARNING
Remove the external covers
and the pre-filters (both sides).
µg/m3
PM2.5
1h 2h 4h 8h 12h
AUTO
POWER
MODE
SPEED
Switch off device and disconnect
the power supply.
Cleaning a pre-filter
• The surface of the pre-filter can be
vacuumed with a HEPA filter if available.
• The pre-filter can also be rinsed with
clean water but must be completely
dry before being used again as any
remaining moisture could potentially
cause damage to the HEPA 14 filter.
Cleaning and changing times
• Pre-filters are to be cleaned twice
a month and replaced twice a year.
• Main filters are to be
replaced twice a year.
• The ioniser is located within the
device and can’t be replaced.
• The particle sensor should be
cleaned every 2 months.
µg/m3
PM2.5
1h 2h 4h 8h 12h
AUTO
FILTER
TIMER
LOCK
POWER
MODE
SPEED
FILTER
TIMER
LOCK
When filter indicator (3.6 on control
panel) flashes red intermittently,
it is time to clean the pre-filters.
4.1
4.2 4.3

13
On the back of Rediair is a small flap
which houses the particle sensor.
To clean the sensor, lift the flap
and carefully clean it with a cotton
swab. This should be done every
2 months or if the LED air indicator
consistently shows poor air quality.
Re-install the external covers and the
pre-filters (both sides). Note: Ensure
external covers are fitted correctly
or the Rediair will not power on.
µg/m3
PM2.5
1h 2h 4h 8h 12h
AUTO
FILTER
TIMER
LOCK
POWER
MODE
SPEED
To clean
Rediair’s air
outlet, lift the
grill from the
side with the
arrow symbol
and clean the
area with a
dust cloth.
The pre-filters can
be rinsed with
clean water.
The pre-filters must be completely
dry before being used again as any
remaining moisture could potentially
cause damage to the HEPA 14 filter.
4.8
4.6
4.4
4.9
4.7
4.5

14
DISPOSAL, CLEANING AND MAINTENANCE
CLEANING AND CHANGING TIMES
External cover
Clean all external
surfaces frequently
Main filter
Replaced twice
a year
Pre-filter
Cleaned twice a
month and replaced
twice a year
Disposal
Used Rediair filters can be disposed of
following local waste guidance policies.
Also, if the device has been used in
polluted air situations, the filter must be
packed into an airtight bag and disposed
of per local waste guidance policies.
In the case of contamination with viruses,
please consult local guidance for the
appropriate PPE. Respiratory protection
is recommended at a minimum of FFP2.
Decommissioning
Rediair has been designed to operate
for many years. However, please
ensure you follow your local waste
guidance policies beforehand if the
device must be disposed of.

15
Remove new main filters
and pre-filters from box.
Remove
external covers
(both sides).
Remove
pre-filters and
dispose of them
(both sides).
Remove
main filters and
dispose of them
(both sides).
µg/m3
PM2.5
1h 2h 4h 8h 12h
AUTO
POWER
MODE
SPEED
Switch off device and disconnect
the power supply.
µg/m3
PM2.5
1h 2h 4h 8h 12h
AUTO
FILTER
TIMER
LOCK
POWER
MODE
SPEED
FILTER
TIMER
LOCK
When filter indicator (3.6 on control
panel) lights up continuously
red, it is time to change the
pre-filters and main filters.
5.5
5.3
5.1
5.6
5.4
5.2

16
µg/m3
PM2.5
1h 2h 4h 8h 12h
AUTO
FILTER
TIMER
LOCK
POWER
MODE
SPEED
µg/m3
PM2.5
1h 2h 4h 8h 12h
AUTO
POWER
MODE
SPEED
Switch on the Rediair via the
LCD touch control panel.
Install the
new pre-filters
(both sides).
Re-install the
external covers
(both sides).
Note: Ensure
external covers
are fitted correctly
or the Rediair will
not power on.
Connect the power supply.
Install the new main filters
(both sides), making sure that
the tabs are facing outwards.
Remove the
plastic wrap
from the filters.
5.11
5.9
5.7
5.12
5.10
5.8

17
TECHNICAL SPECIFICATIONS
AIR FLOW RATE MAX. (M³/H) 600
CADR (CLEAN AIR DELIVERY RATE) (M³/H) Range: 200 – 600
AIR FLOW RATE WITH H14 FILTER MAX.
(M³/H)
600
LED AIR QUALITY INDICATOR DISPLAYS
PM2.5 VALUE (µg/m3)
1 - 35 = Very good (blue)
36 - 75 = Good (green)
76 - 150 = Bad (amber)
151 - 500 = Very bad (red)
FILTER TYPE / CLEANING METHOD Pre-filter, activated carbon + HEPA filter
FILTER CLASS HEPA
ELECTRICAL CONNECTION (V/HZ) 230 / 50
POWER (W) 85
NOISE LEVEL MIN (DB(A) / 3 M) 22
NOISE LEVEL MAX (DB(A) / 3 M) 66
CABLE LENGTH (M) 2
IP CLASS 20
LENGTH/WIDTH/HEIGHT (MM) 400 / 400 / 669
WEIGHT (KG) 15.1
ADDITIONAL FEATURES Intelligent particulate sensor, child lock,
turbo mode, programmable shutdown
time, ionisation function, rounded edges,
brushless motors, castor wheels
APPENDIX
The technical data can be changed
in the course of further development
without prior notice. Some values
are approximate values.
WARNING
This manual suits for next models
2
Table of contents
Other GAMA Air Cleaner manuals
Popular Air Cleaner manuals by other brands

Boneco
Boneco Ionic Pro Turbo TA500 instructions

Crane
Crane EE-7002AIR instruction manual

Pure Enrichment
Pure Enrichment PureZone Kids Bear Air user manual

Omega Altise
Omega Altise OPAL MINI instruction manual

Climate RENTAL SOLUTIONS
Climate RENTAL SOLUTIONS MEC 7 owner's manual

AENO
AENO AP3 Installation and operation manual

Coway
Coway AP-1012GH Owner's instructions

RespirAide
RespirAide 300T Operation manual

AllerAir
AllerAir 5000 D Exec Technical specifications

Eureka Forbes
Eureka Forbes Euroair Detox user manual

TaoTronics
TaoTronics TT-AP001 user manual

Airtecnics
Airtecnics Kleenbox Installation, operation and maintenance manual