Gantom Storm Form User manual

Storm Form and Storm Form DMX User Guide Version 1.1 –2/25/2021
STORM FORM AND STORM FORM DMX USER GUIDE
The Storm Form is a rugged and compact outdoor gobo projector with adjustable zoom and focus. It is
available with either Warm White or Cool White output. The Storm Form is also available in a DMX
controllable version. The Storm Form and Storm Form DMX are small and discreet, but engineered to
deliver lasting performance in permanent outdoor installations. The Storm Form and Storm Form DMX
are available in black or silver finish. The Storm DMX is configured using our DMX Programmer app,
which is available free for Apple and Android devices, or using our DarkBox Programmer standalone
programming device.
Features
oAdjustable zoom and focus
o16-27° beam angle
oAccepts 19mm steel or glass gobo (up to 2mm thick)
oWarm White (90+ CRI) or Cool White LED
o9 Watt LED
oClass 2, low-voltage 12-24VDC input (DO NOT HOT PLUG)
oRated IP65 for permanent outdoor installation
oLocking mount
oWaterproof connector for use with Gantom Pro Cable System
oAvailable in black or silver finish
oDMX controllable version available
Available Models:
Item Number
Item Description
ST128
Storm Form - Warm White - Black Anodized Finish
ST130
Storm Form - Warm White - Silver Anodized Finish
ST131
Storm Form - Cool White - Black Anodized Finish
ST133
Storm Form - Cool White - Silver Anodized Finish
ST163
Storm Form DMX - Warm White - Black Anodized Finish
ST165
Storm Form DMX - Warm White - Silver Anodized Finish
ST166
Storm Form DMX - Cool White - Black Anodized Finish
ST168
Storm Form DMX - Cool White - Silver Anodized Finish

Storm Form and Storm Form DMX User Guide Version 1.1 –2/25/2021
POWER AND WIRING REQUIREMENTS
The Storm Form and Storm Form DMX have a maximum wattage of 9.6W and an operating voltage
range of 12-24VDC.
The Storm Form and Storm Form DMX include a single locking connector which combines both power
and data into one compact cable. This connector is compatible with our Gantom Pro Cable System,
including our G8 Power/Data Distribution Box. A single cable for power and data greatly simplifies
installation and the locking connector gives a secure connection for long term use. This makes the
Gantom Pro Cable System ideal for permanent installations. For more information on this system,
please visit https://www.gantom.com/accessories/gantom-pro-cable/
Note: all fixtures must be installed with the low voltage supply power OFF. Hot
plugging (connecting to a live power supply) is not supported.
Hot plugging a fixture into a system with a running power supply will increase the load on the power
supply, which can generate voltage spikes that more than double of the standard input voltage. This
causes an out-of-spec and out-of-warranty voltage condition which may result in damage to the fixture.
While Gantom fixtures have internal protections against voltage spikes, it is recommended that
installers handle them with care to prevent these spikes from happening in the first place.
Installing all fixtures in the system before turning on power to the low voltage
power supply assures that the power supply has a “soft start”which is free from
harmful voltage spikes.
BARE WIRE PINOUT
Power
+
RED
-
BLUE
DMX signal
D+
GREEN
D-
YELLOW
COM
BLACK

Storm Form and Storm Form DMX User Guide Version 1.1 –2/25/2021
Safety and Operation notes:
Please carefully review the following safety notes regarding the Storm Form micro gobo projector. These
notes are important for safe installation and usage of the product.
Do not look directly at the light source while the fixture is powered on.
Inspect all power cables for damage or crimped cable before use.
Make sure that your circuit is properly grounded and all electrical safety precautions have been
taken to prevent electric shock.
Be aware that the fixture will become HOT to the touch when it is left on.
Allow several minutes for the light to cool before touching it after extended periods of on time.
Ensure that there are no flammable materials close to or in contact with the light fixture.
Never touch the lenses within the fixtures. If the lenses must be cleaned, use a microfiber cloth
and glasses cleaning solution.
Make sure that the locking cable connectors are fully tightened when the product is installed.
Check the voltage of the power line before connecting the fixture to ensure that it is within the
required range for the fixture.
In the event of a serious operating problem, cut power to the fixture and cease operation
immediately.
For technical support, please contact [email protected]om or call 1-855-GANTOM1 (1-855-
426-8661).
MOUNTING INSTRUCTIONS
The Storm Form micro gobo projector comes with an aluminum mounting yoke pre-installed. It is meant
to be used with ¼” size hardware, but please note that mounting hardware is not included with the
fixture. The yoke has a hole and a curved slot. Install a screw in the center hole first, then loosely screw
down a second screw through the curved slot. Rotate the fixture to the appropriate angle and then
finally tighten down both screws all the way to lock the fixture in place.

Storm Form and Storm Form DMX User Guide Version 1.1 –2/25/2021
AIMING INSTRUCTIONS
Once the fixture has been mounted, you can complete the aiming of the fixture. The fixture is adjustable
in the following ways:
When you have the light pointed in the correct orientation, tighten the locking screws in the indicated
locations:

Storm Form and Storm Form DMX User Guide Version 1.1 –2/25/2021
GOBO INSTALLATION
A gobo can be a great way to add texture and dimension to your application. The Storm Form micro
gobo projector accepts glass and stainless steel gobos with an outer diameter of 19mm. The maximum
image size for patterns is 15mm and the maximum image size for text is 10mm. Both stainless steel and
full color glass gobos are available to fit the Gantom Form. Custom stainless steel and full color glass
gobos are available through Rosco. Please see http://www.rosco.com/gobos/ for more information on
how you can order your own.
To install a gobo slide, first make sure that your fixture is powered off. Then remove the barrel by
unscrewing it from the middle of the fixture.

Storm Form and Storm Form DMX User Guide Version 1.1 –2/25/2021
Next, move the primary and secondary optics all the way to the front end of the optic slider rails. To do
this, you will need to loosen the set screws on the Primary and Secondary Optic as shown in the
previous picture. Pro Tip: Don’t touch the lenses. A small fingerprint can distort your projection!
If the lens must be cleaned, do so with a microfiber cloth and glasses cleaning solution.
Unscrew the gobo retainer from the gobo holder ring.

Storm Form and Storm Form DMX User Guide Version 1.1 –2/25/2021
Insert your gobo slide into the gobo retention hole, it should rest easily on the spring that is within the
hole.
Next, screw the gobo retention ring back into the hole until it begins to resist. Once it begins to resist,
continue turning it one quarter of a turn and then stop. This will give enough tension to hold the gobo,
but will not over-tighten the retention ring. Please be careful not to over-tighten the extension ring or
you risk damaging both your fixture and your gobo.
Once the gobo is in place within the retainer system, you can focus your optics to your desired effect.

Storm Form and Storm Form DMX User Guide Version 1.1 –2/25/2021
FOCAL ADJUSTMENT
Power on the fixture and remove the barrel by unscrewing it from the middle of the fixture. Be sure to
never look directly at the LED while the fixture is on.
Now, move the primary optic as close to the LED as possible and the secondary optic as far from the LED
as possible on the optic slider rails. You may need to loosen the set screws on the primary and
secondary optics in order to slide them along the rails.
Slowly begin sliding the secondary optic toward the LED until the projected image comes into focus. This
will be the narrowest focused beam the fixture can achieve.
To widen the beam move the primary optic forward about 1 mm, and then move the secondary object
backward along the optic slider rails toward the LED until the beam comes back into focus. Repeat this

Storm Form and Storm Form DMX User Guide Version 1.1 –2/25/2021
process until you have your desired projection size. At the maximum beam size, the primary and
secondary optics will be touching each other at about 1/4th of the length of the optic slider rails.
When you have the beam adjusted to the focal setting you would like, tighten down the set screws on
the primary and secondary optics. Complete the adjustment by screwing the barrel back onto the
fixture. INSTALLING ACCESSORIES
A removable cutaway snoot for shielding the light source from view is available for the Storm Form.
Installing the snoot: The snoot can be adjusted or removed by loosening the three set screws that are
located toward the back of the snoot. You can then rotate the snoot to the appropriate position, and
finally tighten down all three set screws.

Storm Form and Storm Form DMX User Guide Version 1.1 –2/25/2021
CONFIGURING THE STORM FORM DMX
Due to its compact size, the Storm Form DMX cannot use a physical DIP
switch for addressing. Instead, the Storm Form DMX is programmed
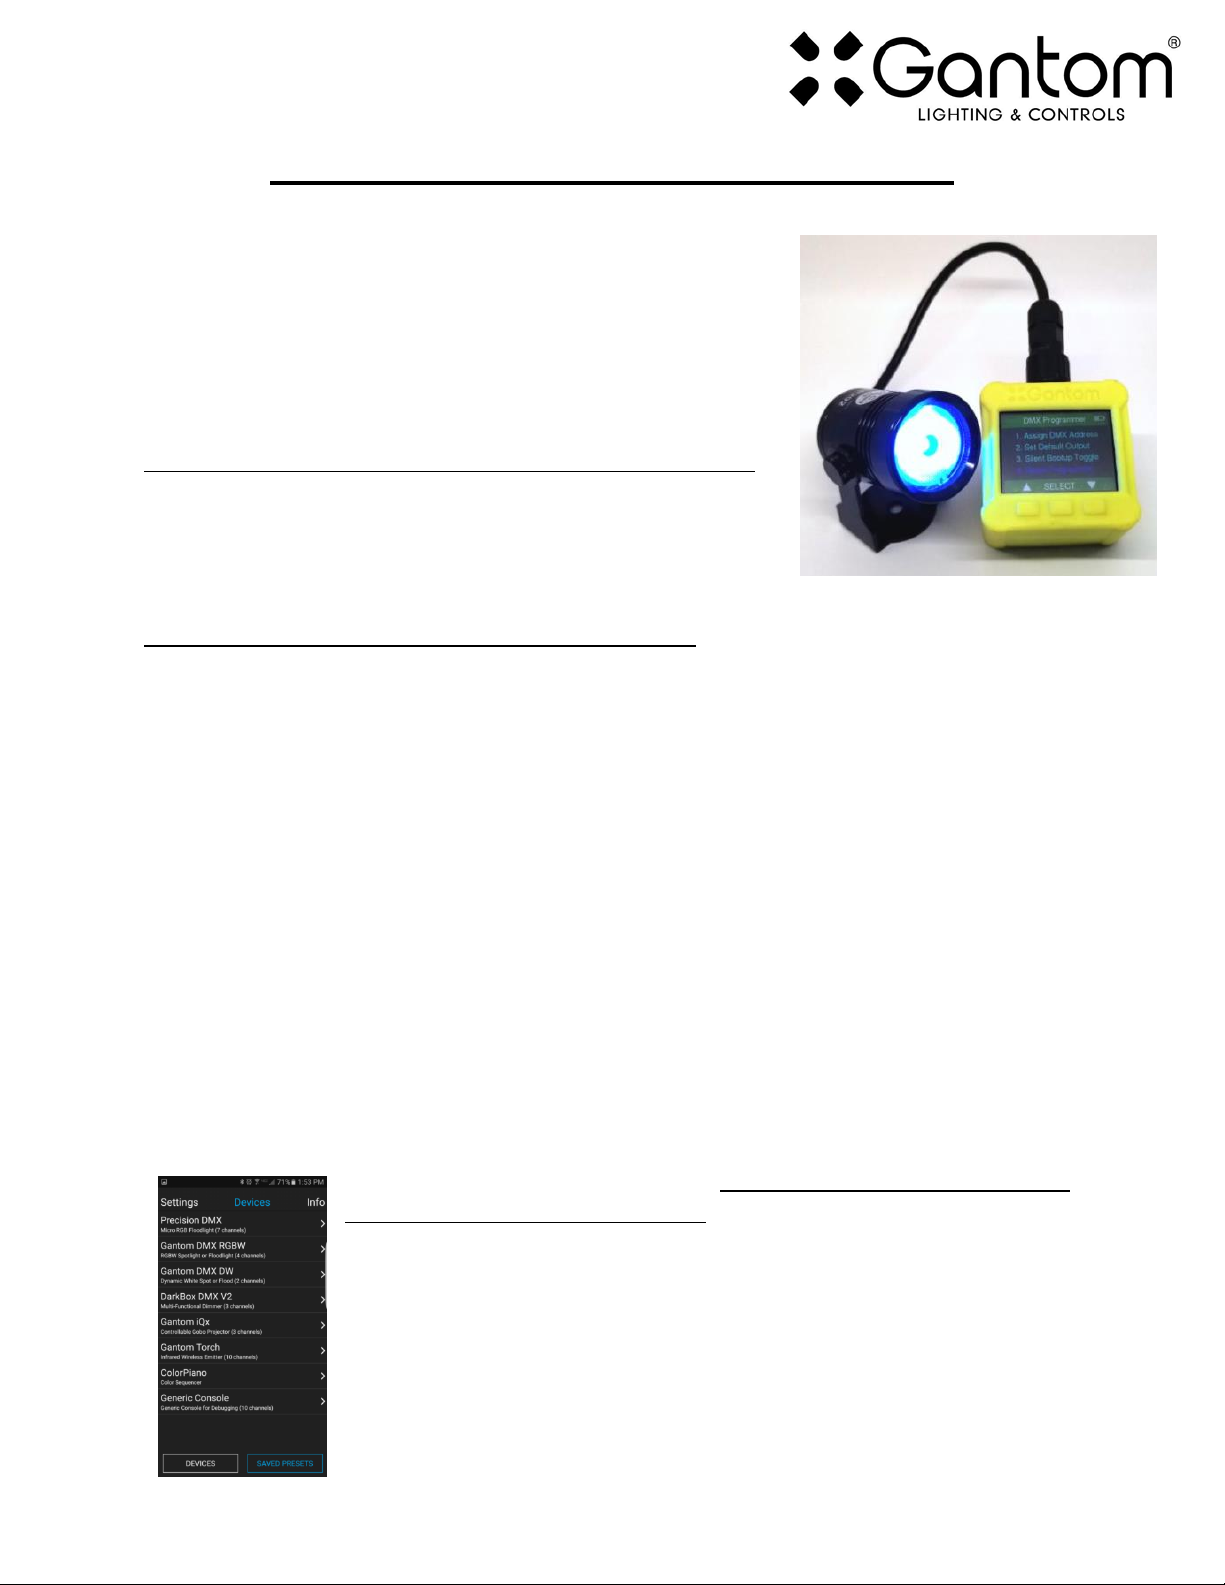
using the DMX Programmer App by Gantom or by using the DarkBox
Programmer V2 programming device (part# DB32, pictured right). In
addition to setting the DMX starting address for the fixture, this will
allow you to save a default color and brightness for the fixture if the
application does not require any DMX control.
Configuring light fixtures with the DarkBox Programmer V2 Device:
For details on how to configure your fixture using the DarkBox
Programmer V2, please consult the user guide for that product. The
DarkBox Programmer V2 device is the easiest and most reliable way to
configure Gantom fixtures and is the preferred option when available.
Configuring the light fixture with the DMX Programmer App:
When the DarkBox Programmer V2 standalone programming device is unavailable, it is also possible to
configure the settings of the device using our free app for iOS and Android devices.
What you need:
oA CB107 Pro Cable Programming Adapter
oAn Android or iOS device for running the Gantom Programmer app. Please note that a
headphone port is required to connect to the device to the fixture. The iPhone7 does work
with, but you will need to use the headphone port adapter that is included with the phone.
oA male-to-male 3.5mm audio 3.5mm cable. This is the same type of cable that you would use to
connect your Android or iOS device to headphones or to an AUX port.
oPower supply for the fixture. All Gantom fixtures accept 12v DC power. We recommend using
one of our PowerPak Mini units if you are just going to power a single fixture.
oThe free DMX Programmer app by Gantom. This can be found by searching “Gantom” in iTunes
for an Apple device or Google Play for an Android device
First, open the DMX Programmer app by Gantom. The app will open to the screen you see here.
From this screen, select Generic Console. (note: a Storm Form DMX menu option
may be added to the app at a later date)
The app will then provide you instructions on how to connect the light fixture to
the tablet or smartphone. Please note the order in which the cables should be
connected. First connect the headphone cable to the light fixture and to the
tablet/smartphone. Next, connect the power to the fixture. When prompted by
the app, tap the “Next” button and you will be taken to the control screen.

Storm Form and Storm Form DMX User Guide Version 1.1 –2/25/2021
CONTROL SCREEN
oAddress –This box shows the address that will be
assigned to the fixture if you hit the “Assign Address”
button
oAssign Address –Hitting this button will assign the
selected address to the fixture. The light fixture should
blink in response to having a new address assigned.
oSave button –this will allow you to save a settings
profile into the app. Use this if you need to configure
many fixtures to have the exact same settings. Please
note that this button DOES NOT save the current
profile or address to the fixture.
oConsole Sliders –These sliders allow you to set
intensity levels for each channel. Only the CH1 slider
will work with the Storm Form DMX
oStore as Default –hitting this will save the current
color and brightness to be the default state for the
light when it turns on. If the light does not see DMX
signal when it is powered on, it will go to this state.

Storm Form and Storm Form DMX User Guide Version 1.1 –2/25/2021
OTHER OPTIONS SCREEN
If you hit the “Other Options” button on the control screen, the following menu appears:
oReset - selecting this will reset the fixture to its default
factory settings. Do this if you are running into programming
issues.
oToggle Silent Bootup –By default, the fixture will flash to
report its DMX address when it is powered on. tapping the
“Toggle Silent Bootup” option will turn address reporting at
startup on or off.
oLock/Unlock 9600 –The Storm Form DMX fixture can
listen to either a standard DMX signal OR to the special
control signal that comes from the app. Lock 9600 will turn
OFF the fixture’s ability to listen to DMX and ONLY allow it to
be controlled through the app interface. For most applications
it is recommended that you keep “UNLOCK 9600” selected.
BOOT SEQUENCE FLASHING
When the fixture first receives power, before it enters normal operation, it will first report its channel
mapping profile and second report its DMX address through a sequence of flashes.
By default, the DMX starting address will be 1. The Storm Form DMX will flash several times when it is
powered on to indicate its starting address. If the Storm Form DMX is assigned to address 245 it will
report its address by flashing 2 times, pausing briefly, then flashing 4 times, pausing briefly, then flashing
5 times. If it is assigned to DMX address 038, it will flash 3 times, pause briefly, then flash 8 times
TURN OFF/ON boot sequence flashing: You may not want your fixture to report its channel mapping
profile and address every time it receives power. In order to toggle the boot sequence flashes on/off,
follow these steps. With the fixture connected to the DMX Programmer App, select the “Generic
Console” profile. Once the control screen appears, power cycle the Storm Form DMX. Next, tap the
“Other Options”, then tap the “Toggle Silent Bootup” button. The light should blink to indicate that it
has received this new setting.

Storm Form and Storm Form DMX User Guide Version 1.1 –2/25/2021
STANDALONE OPERATION
Some applications may not require live DMX control. In order to configure your Storm Form DMX for
standalone operation, all you must do is use the CH1 slider on the Generic Console control screen to set
the desired intensity level. Once the light has the desired output, tap the “STORE AS DEFAULT” button at
the lower left portion of the screen to save this setting directly into the light fixture. Now, when the light
fixture receives power it will automatically go to this newly saved DEFAULT setting once it’s boot
sequence is complete. Please note that if DMX signal is passed to the fixture while it is operating in
standalone mode, the DMX signal will override the standalone setting.
DMX CONTROLLED OPERATION
The Storm Form DMX was designed for use with standard DMX512 control systems. The Storm Form
DMX occupies a single DMX channel and can be given any DMX starting address from 1-512. Please note
that the Storm Form DMX does not feature any RDM functionality.
ADDRESSING YOUR FIXTURE
To set the DMX address, first connect the Storm Form DMX to the
DMX Programmer app by Gantom as was outlined earlier in this
document. With the Generic Console control screen open, you should
have full control of the fixture using the CH1 slider. If the light fixture
is connected to the app but is not responding, try power cycling the
light fixture.
Once you have verified that the light fixture is responding to control
signal from the app, tap the number field next to the word “Address”.
A new screen will pop up, prompting you to enter a DMX address.
After you enter your desired DMX address, the app will return to the
Generic Console screen. Finally, you must hit the ASSIGN ADDRESS
button in order to save the new address into the fixture. Hitting the
“Save” button will not save anything to the light fixture’s memory.

Storm Form and Storm Form DMX User Guide Version 1.1 –2/25/2021
DMX CHANNEL MAPPING
Product Support:
We hope that this guide has been effective for learning how to use your Storm Form or Storm Form
DMX light fixture. However, if you run into a wiring issue, a bug in the software, or just a light that
doesn’t seem to want to cooperate, we at Gantom are ready to help you out! Just send an email to
Support@GANTOM.com and we will get back to you as soon as possible.
Other manuals for Storm Form
1
This manual suits for next models
9
Table of contents
Other Gantom Spotlight manuals
Popular Spotlight manuals by other brands

Future light
Future light Spotlight MH-660 user manual

Lumascape
Lumascape LS411LED Important Instructions for Installation

LIVARNO home
LIVARNO home 375304 2101 Installation, operating and safety information

Philips
Philips 6919114PH brochure

Martin
Martin MAC Quantum Profile Safety and installation manual

GLP
GLP YPOC PRO 250 instruction manual