GARANT GRIDLINE 940710 User manual

LOCHWAND FÜR SCHRÄNKE
940710
MONTAGEANLEITUNG
Assembly instructions | Montážní návod | Instrucciones de montaje |
Instructions de montage | Istruzioni di montaggio | Instrukcja montażu
de
en
cs
es
fr
it
pl

1x
A
90°
2

4

de
en
cs
es
fr
it
pl
GARANT Lochwand für Schränke
1. Identifikationsdaten
Produkt Lochwand für Schränke
Version 01 Originalbedienungsanleitung
Erstellungsdatum 03/2020
2. Allgemeine Hinweise
Bedienungsanleitung lesen, beachten, für späteres Nachschlagen aufbewahren und jederzeit verfügbar hal-
ten.
3. Sicherheit
3.1. BESTIMMUNGSGEMÄSSE VERWENDUNG
3-seitig verzinkte Lochwand aus Stahlblech für GridLine Schränke mit Breiten von 1000 mm und 2000 mm.
9x9 mm mit 37mm Raster zur Aufnahme von Easyfix Haken und Haltern und weiterem Lochwandzubehör.
3.2. SACHWIDRIGER EINSATZ
Lochwand an Perforation nicht mehrfach knicken.
Lochwand nur mit dafür vorgesehenem Zubehör bestücken.
3.3. PERSÖNLICHE SCHUTZAUSRÜSTUNG
Nationale und regionale Vorschriften zur Sicherheit und Unfallverhütung beachten. Schutzkleidung wie Fußschutz und
Schutzhandschuhe müssen entsprechend der bei der jeweiligen Tätigkeit zu erwartenden Risiken gewählt, bereitgestellt
und getragen werden.
4. Montage
A
i
Je nach Schrankbeschaffenheit können ein oder mehrere Lochwände in Schrank eingesetzt werden.
VORSICHT!Schnittgefahr an scharfen Kanten. Schutzhandschuhe tragen.
1. Lochwand an beiden Seiten jeweils um 90° an perforierter Kante nach innen biegen.
2. An beiden Seiten von oben in Einhängeleisten der Schrankinnenseiten einhängen.
6

de
en
cs
es
fr
it
pl
1. Identification data
Product Perforated panel for cabinets
Version 01 Translation of the original instruction manual
Date created 03/2020
2. General instructions
Read the instructions for use, follow them and keep them available for later reference.
3. Safety
3.1. INTENDED USE
3-sided galvanised perforated panel of sheet metal for GridLine cabinets with widths of 1000 mm and 2000 mm.
9x9 mm with 37mm grid to take Easyfix hooks and brackets, and other perforated panel accessories.
3.2. REASONABLY FORESEEABLE MISUSE
Do not bend the perforated panels repeatedly at the perforations.
Fit only the intended accessories to the perforated panel.
3.3. PERSONAL PROTECTIVE EQUIPMENT
Comply with the national and regional regulations for safety and accident prevention. Protective equipment such as safety
shoes and safety gloves appropriate for the risks associated with the intended activities must be selected, provided and
worn.
4. Installation
A
i
Depending on the cabinet model, one or more perforated panels can be installed in a cabinet.
CAUTION!Laceration hazard at sharp edges. Wear safety gloves.
1. Bend the perforated panel inwards by 90° on both sides at the perforated edge.
2. Hang the perforated panel from the top on both sides, using the suspension strips inside the cabinet.
www.hoffmann-group.com 7

de
en
cs
es
fr
it
pl
GARANT Děrovaná stěna ke skříním
1. Identifikační údaje
Výrobek Děrovaná stěna pro skříně
Verze 01 Překlad původního návodu k použití
Datum výroby 03/2020
2. Obecné pokyny
Návod k obsluze si přečtěte, dodržujte ho, uschovejte pro pozdější použití a mějte ho vždy po ruce.
3. Bezpečnost
3.1. STANOVENÉ POUŽITÍ
Třístranně pozinkovaná děrovaná stěna z ocelového plechu pro skříně GridLine s šířkou 1000 mm a 2000 mm.
9x9 mm s rastrem 37mm k uchycení háků a držáků Easyfix a dalšího příslušenství děrované stěny.
3.2. NESPRÁVNÉ POUŽITÍ
Děrovanou stěnu u perforace nelámejte několikrát.
Děrovanou stěnu osazujte pouze určeným příslušenstvím.
3.3. OSOBNÍ OCHRANNÉ PROSTŘEDKY
Dodržujte národní a místní předpisy pro bezpečnost a úrazovou prevenci. Ochranný oblek jako je ochrana nohou a
ochranné rukavice musí být zvoleny, poskytnuty a používány při provádění příslušné činnosti podle očekávaného rizika.
4. Montáž
A
i
Podle vlastností skříně je možné do skříně vložit jedno nebo několik děrovaných stěn.
UPOZORNĚNÍ!Nebezpečí pořezání ostrými hranami. Noste ochranné rukavice.
1. Děrovanou stěnu na obou stranách ohněte vždy o 90° u perforované hrany směrem dovnitř.
2. Na obou stranách zavěste shora do závěsných lišt vnitřních stran skříně.
8

de
en
cs
es
fr
it
pl
1. Datos de identificación
Producto Pared perforada para armarios
Versión 01 Traducción del manual de instrucciones original
Fecha de creación 03/2020
2. Avisos generales
Lea, observe y conserve el manual de instrucciones de uso para consultas posteriores, y téngalo siempre a
mano.
3. Seguridad
3.1. USO CONFORME A LO PREVISTO
Pared perforada galvanizada en treslados de chapa de acero para armarios GridLine con anchuras de 1000mm y
2000mm.
9x9mm con intervalos de 37mm para alojar ganchos Easyfix y soportes, así como otros accesorios para la pared perfo-
rada.
3.2. UTILIZACIÓN INDEBIDA
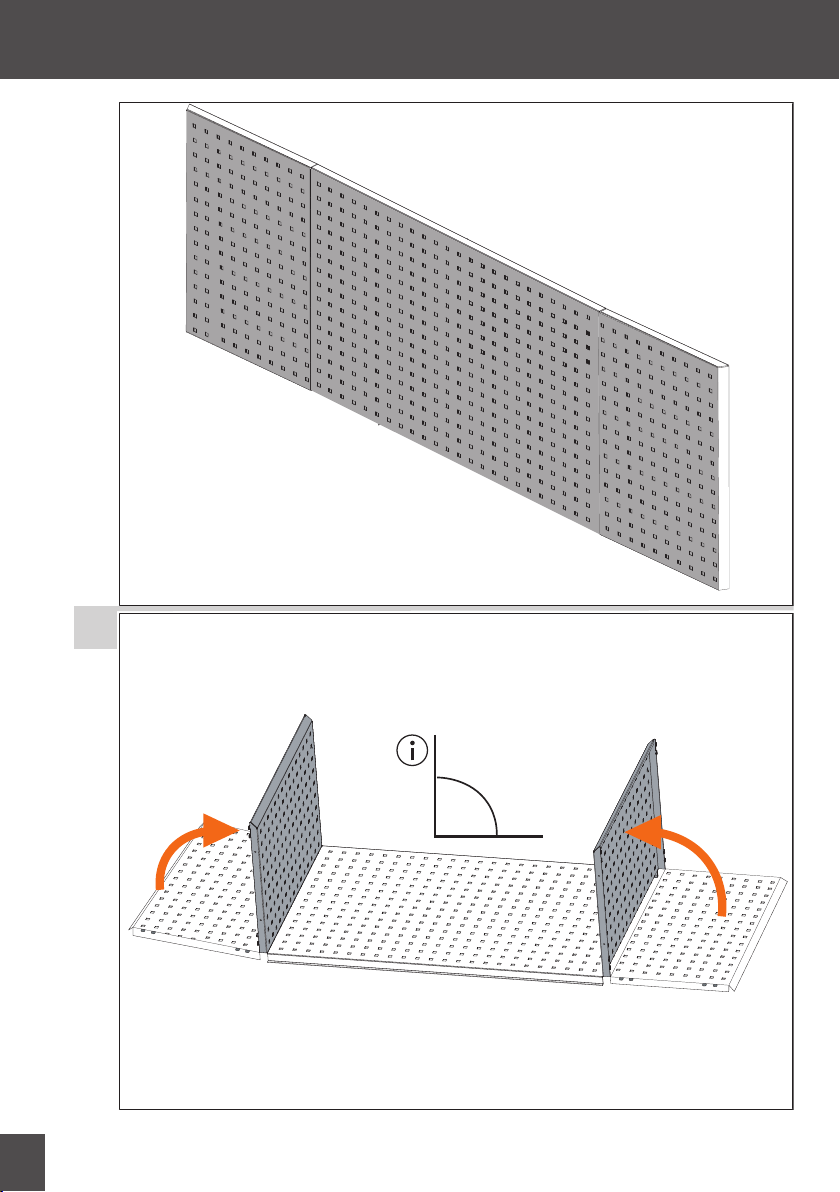
La pared perforada no se debe doblar varias veces en la perforación.
Equipar la pared perforada únicamente con los accesorios previstos para ello.
3.3. EQUIPO DE PROTECCIÓN INDIVIDUAL
Tener en cuenta las normas nacionales y regionales en cuanto a seguridad y prevención de accidentes. La ropa de protec-
ción como protección para los pies y guantes protectores se ha de seleccionar, disponer y llevar de acuerdo con los riesgos
propios de la actividad correspondiente.
4. Montaje
A
i
Se pueden utilizar una o varias paredes perforadas en el armario, según las características de este.
ATENCIÓN!Peligro de corte con los cantos afilados. Utilizar guantes protectores.
1. Doblar la pared perforada 90° hacia el interior a ambos lados en el canto perforado.
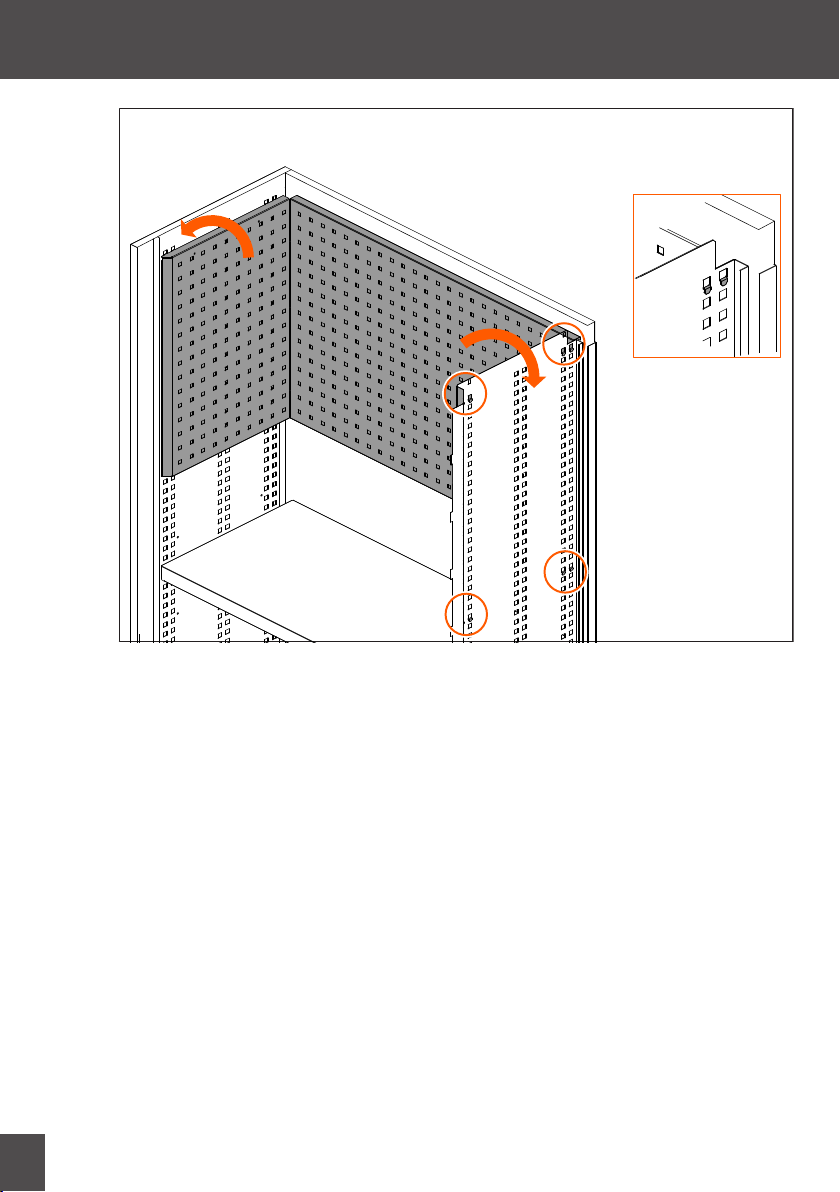
2. Enganchar a ambos lados de la regleta de enganche en la superficie interior del armario.
www.hoffmann-group.com 9

de
en
cs
es
fr
it
pl
GARANT Panneau perforé pour armoires
1. Données d'identification
Produit Panneau perforé pour armoires
Version 01 Traduction du manuel d'instructions original
Date de création 03/2020
2. Remarques générales
Lisez, respectez et conservez le mode d'emploi à des fins de consultation ultérieure, et gardez-le toujours à
disposition.
3. Sécurité
3.1. UTILISATION NORMALE
Panneau perforé galvanisé sur 3côtés en tôle d'acier pour armoires GridLine de 1000mm et 2000mm de large.
9x9mm au pas de 37mm pour fixation de crochets et supports Easyfix et d'autres accessoires pour panneaux perforés.
3.2. MAUVAIS USAGE RAISONNABLEMENT PRÉVISIBLE
Ne pas plier plusieurs fois le panneau perforé au niveau des perforations.
Garnir le panneau perforé uniquement avec les accessoires prévus à cet effet.
3.3. EQUIPEMENTS DE PROTECTION INDIVIDUELLE
Respecter les réglementations nationales et régionales en vigueur en matière de sécurité et de prévention des accidents.
Les vêtements de protection, tels que les chaussures et les gants, doivent être choisis, mis à disposition et portés en fonc-
tion des risques prévus pendant l'activité concernée.
4. Montage
A
i
Selon le type d'armoire, il est possible de monter un ou plusieurs panneaux perforés dans l'armoire.
ATTENTION!Risque de coupure au niveau des bords tranchants. Porter des gants de protection.
1. Replier vers l'intérieur le panneau perforé de 90° des deux côtés au niveau du bord perforé.
2. Accrocher par le haut des deux côtés dans les barres de suspension de l'intérieur de l'armoire.
10

de
en
cs
es
fr
it
pl
1. Dati identificativi
Prodotto Pannello forato per armadi
Versione 01 Traduzione del manuale di istruzioni originale
Data di creazione 03/2020
2. Note generali
Leggere il manuale d’uso, rispettarlo, conservarlo per riferimento futuro e tenerlo sempre a portata di mano.
3. Sicurezza
3.1. USO PREVISTO
Pannello forato su 3 lati, zincato, in lamiera di acciaio per armadi GridLine con una larghezza compresa tra 1000 mm e
2000 mm.
9x9 mm con passo da 37mm per l’inserimento di ganci e supporti Easyfix, nonché accessori per pannello forato.
3.2. USO SCORRETTO RAGIONEVOLMENTE PREVEDIBILE
Non piegare ripetutamente il pannello forato in prossimità dei fori.
Allestire il pannello forato solo con gli accessori adatti.
3.3. DISPOSITIVI DI PROTEZIONE INDIVIDUALE
Osservare le norme nazionali e regionali in materia di sicurezza e prevenzione degli infortuni. L’abbigliamento di protezio-
ne, come scarpe di sicurezza e guanti protettivi, deve essere selezionato, messo a disposizione e indossato conformemente
ai rischi legati all’attività da svolgere.
4. Montaggio
A
i
A seconda delle caratteristiche, è possibile inserire nell’armadio uno o più pannelli forati.
ATTENZIONE!Pericolo di lesioni da taglio sugli spigoli vivi. Indossare i guanti protettivi.
1. Piegare il pannello forato di 90° verso l’interno su entrambi i lati all’altezza del bordo perforato.
2. Agganciare su entrambi i lati dall’alto negli appositi profili di fissaggio all’interno dell’armadio.
www.hoffmann-group.com 11

de
en
cs
es
fr
it
pl
GARANT Ścianka perforowana do szaf
1. Dane identyfikacyjne
Produkt Ścianka perforowana do szaf
Wersja 01 Tłumaczenie oryginalnej instrukcji obsługi
Data opracowania 03/2020
2. Informacje ogólne
Należy zapoznać się z instrukcją obsługi i przestrzegać jej oraz zachować ją na przyszłość, przechowując w
dostępnym miejscu.
3. Bezpieczeństwo
3.1. UŻYTKOWANIE ZGODNIE ZPRZEZNACZENIEM
3-stronna, ocynkowana ścianka perforowana z blachy stalowej do szaf GridLine o szerokości 1000 mm i 2000 mm.
Otwory 9x9 mm rozmieszczone co 37mm umożliwiają mocowanie haków i uchwytów Easyfix, a także akcesoriów do
mocowania na ściankach perforowanych.
3.2. NIEWŁAŚCIWE UŻYTKOWANIE
Nie zginać ścianek perforowanych na perforacji.
Do ścianek perforowanych należy stosować wyłącznie przewidziane do tego celu akcesoria.
3.3. ŚRODKI OCHRONY INDYWIDUALNEJ
Przestrzegać krajowych ilokalnych przepisów dotyczących bezpieczeństwa izapobiegania nieszczęśliwym wypadkom.
Odzież ochronną, taką jak ochrona stóp irękawice ochronne należy dobrać, udostępnić inosić stosownie do rodzajów ryzy-
ka oczekiwanego podczas wykonywania danej czynności.
4. Montaż
A
i
Zależnie od rodzaju szafy można w niej użyć jednej lub kilku ścianek perforowanych.
PRZESTROGA!Niebezpieczeństwo przecięcia na ostrych krawędziach. Nosić rękawice ochronne.
1. Wygiąć ściankę perforowaną obustronnie pod kątem 90° na perforowanej krawędzi.
2. Zawiesić u góry po obydwu stronach w szynie do zawieszania znajdującej się wewnątrz szafy.
12

14
Table of contents
Languages:
Other GARANT Indoor Furnishing manuals