Garaventa Super-Trac TRE-52 User manual

Super-Trac Page | 1of 2
St. James-Assiniboia School Division
Client Handling Program
Super-Trac Portable Wheelchair lift
Approved by:
Paul Deacon
Created by:
Paul Deacon
Last revision date:
March 2, 2020
Hazards Present:
Potential for musculoskeletal injuries
Sudden weight shift, Awkward positions,
Pinch
Signs & Symptoms include
:
Pain, tingling, numbness, tightness, swelling, and
discomfort.
Personal Protective Equipment
or Devices may be Required:
Non-slip footwear
Do not wear long scarves etc.
Additional Training Requirements:
Super-trac training program includes the following:
-Read and understand the operator’s manual
-View and understand the training video
-Practice with an empty super-trac
-Practice with an assistant
Supportive Information:
All users must view and understan
d the Super-trac training video.
Safe Work bulletin # 268 (December 2009) “Safe patient Handling”
NOTE:
Completed
Read the Operator’s manual.
View the Super
-Trac training DVD.
Discuss the above with the trainer.
Loading:
-Make sure there is nothing in the way for about 6 feet (1.8m) in front and
behind.
-Turn the key switch on and set the parking brake
-Pull out the loading ramp
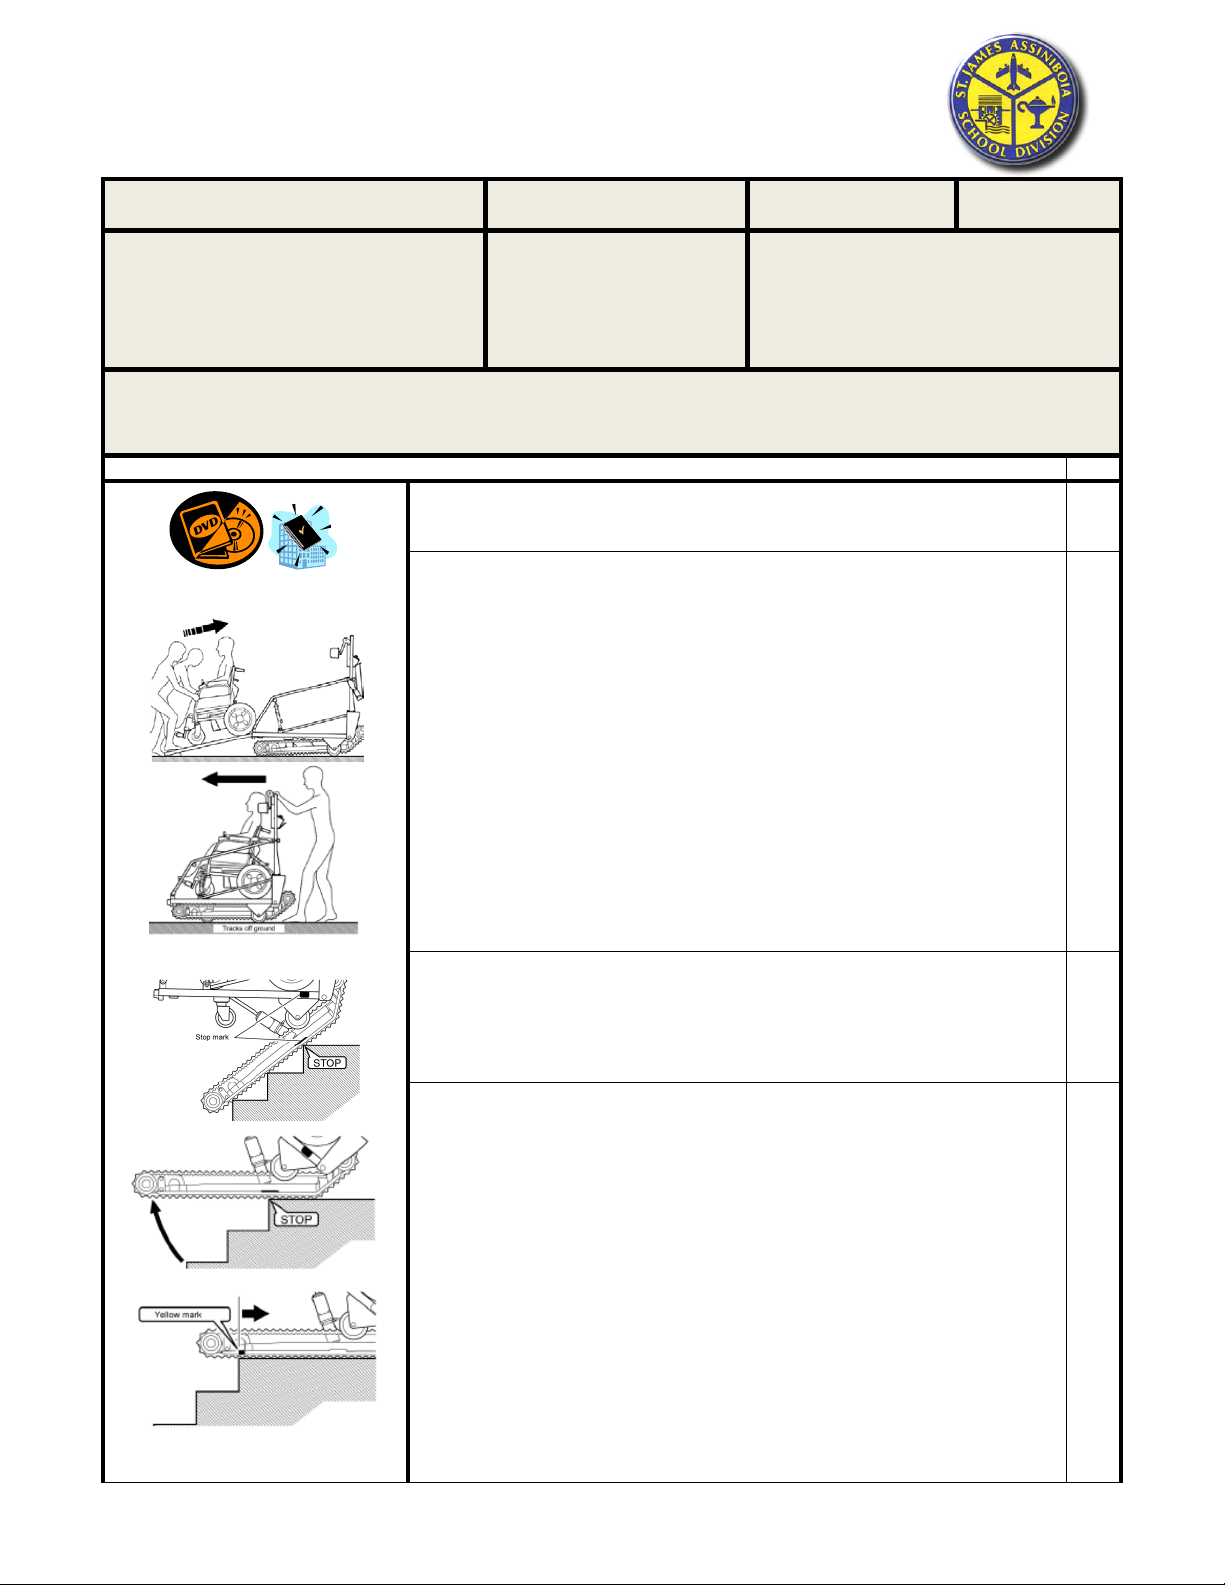
-Move the passenger onto the platform.(Two-person task)
-Secure the wheelchair
-Fasten the seatbelt
-Adjust the headrest
-Store the loading ramp
Unloading:
-Make sure there is nothing in the way for about 6 feet (1.8m) in front and
behind.
-Turn the key switch on and set the parking brake
-Pull out the loading ramp
-Release the wheelchair tie-down straps
-Release the seatbelt.
-Roll wheelchair off platform (one person on each side)
-Refasten seatbelt behind the operating handle. Secure the tie-down straps.
Operating on flat surfaces:
-Do not roll Super-
Trac on ramps or inclined surfaces. It is very heavy and could
run away from the operator.
-Push the parking brake switch to the OFF position (Ο).
-Push the Super-
Trac forward manually. This is the normal manner to cover any
distance.
Ascending stairs:
- The Super-Trac may be used safely on the South-West staircase at Sansome
School. The stair slope is 34°
-Reverse the Super-Trac using the auxiliary wheels until it is at right angles to
the bottom step.
-Tilt the platform as detailed in the Operator’s manual. When the platform is
tilted, weight will shift to the operating handle. Be sure to grip it firmly and be
prepared to support this increased load until you begin to climb the stairs.
-Select “UP”. Press both thumb switches to begin climbing the stairs.
-When you get to the top of the stairs, stop Super-Trac when the red STOP
MARK on the side of the drive frame is aligned with the top stair nose.
The
assistant will alert the operator when approaching STOP MARK.
Position your
line of sight so you can see the STOP MARK clearly.
Do not drive Super-Trac
past the STOP MARK. This could result in a sudden tilting back and shift of
weight to the operating handles.
-Then gently pull back on the operating handles to lower it onto the landing.
This maneuver is always done manually.
Ensure that the Super-Trac is far
enough back from the edge of the stairs that the YELLOW LINE
(Assistant will
alert operator) on the drive frame does not protrude over the edge of the stairs.

Super-Trac Page | 2of 2
I have been trained and have successfully demonstrated this procedure.
I understand that these techniques are to be used to comply with St. James-Assiniboia School Division
client handling program.
*Failure to follow this safe work procedure will increase use of manual lifting, awkward postures & forceful exertions.
This increases the risk of pain, stiffness & injury to the back, neck & arms of Caregivers.
EMPLOYEE NAME: ___________________________ EMPLOYEE SIGNATURE: _______________________
TRAINER NAME: _____________________________ TRAINER SIGNATURE: __________________________
DATE: _____________________
-Once Super-Trac is a safe distance away from the stairs, press the lower part of
the platform tilt switch to return the platform to the horizontal position.
-Use the auxiliary wheels to move the Super-Trac to the next stair flight or the
unloading ar
ea.
-Move away from the stairs.
Descending stairs:
-Position the Super-Trac so that it is at right angles to the stairs.
- Tilt the platform as detailed in the Operator’s manual. When the platform is
tilted, weight will shift to the operati
ng handle. When there is not much room on
the landing, make sure that the warning mark on the bright yellow labels on the
platform does not protrude over the edge of the stairs.
-Press the Up/Down selection switch to DOWN and then press the drive thumb
buttons on both handles simultaneously to crawl Super
-Trac forward to the edge
of the stairs.
-Stop Super-Trac when the STOP MARK is aligned with the top stair nose. The
assistant will alert the operator when approaching STOP MARK.
-Now lift up on the operating handles to tilt Super-Trac up and forward until the
tracks are resting completely on the stairs.
This manoeuvre is always done
manually
-Once the tracks are touching the stairs and Super-Trac is stable, press the
drive thumb buttons on both
handles simultaneously to go down. When you reach
the landing at the bottom of the stairs, continue to press the drive thumb buttons
and crawl Super
-Trac forward about 3 feet (0.9 m) from the base of the stairs
before stopping.
-Press the lower part of the platform tilt switch to return the platform to the
horizontal position.
-Move away from the stairs
Guidance Documents/Standards/Applicable Legislation:
Manitoba Workplace Safety and Health regulation
•2.1 Safe Work Procedures
St. James-Assiniboia School Division Policy:
•EBB-R Safe Work Procedures
NOTE: This task will be monitored
periodically to ensure compliance and safety

Garaventa Super-Trac TRE-52
Portable Wheelchair Lift
Owner’s Manual
14195 Revision C

GARAVENTA SUPER-TRAC
Congratulations on the purchase of your new Garaventa Super-Trac TRE-52 portable
wheelchair lift. This manual describes how to operate the Super-Trac properly and how to
perform simple maintenance checks. Please make sure that you read it before operating the
Super-Trac. In addition, you have been supplied with a Super-Trac Operator Training Video.
Please watch the video before operating Super-Trac
Super-Trac must be operated only by someone who is properly trained!
The serial number may be required when discussing service issues with the local dealer or
Garaventa technicians. Please make a note in this manual of the serial number. It is
stamped on a metal plate at the base of the Operating Handle. Also record the date on which
you purchased your Super-Trac.
Super-Trac Serial Number: _______________________________________________
Date of Purchase: ______________________________________________________
Super-Trac has been designed to provide years of service assisting people with physical
disabilities to overcome the barriers presented by stairs. Your Garaventa dealer is
knowledgeable about the servicing requirements and safe operation of your Super-Trac.
Your Local Authorized Garaventa Dealer is:
Name: ____________________________________________________________
Address: ____________________________________________________________
____________________________________________________________
Telephone: ____________________________________________________________
If you have any questions consult your local dealer, or contact Garaventa Technical Support
by phoning 1-800-663-6556 or + 604-594-0422, or by writing:
In Canada: Garaventa Accessibility In USA: Garaventa Accessibility
7505-134A St. PO Box 1769
Surrey, BC Blaine, WA
V3W 7B3 98231-176


Table of Contents
©Garaventa 2005 Printed in Canada Item 14195 Revision C
Product Identification and Dealer Information
1. Safety First..................................................................................................1
2. Specifications .............................................................................................3
3. Component Identification...........................................................................4
4. Component Function..................................................................................5
5. Batteries & Recharging..............................................................................9
6. Loading and Unloading............................................................................17
7. Operating on Flat Surfaces......................................................................23
8. Ascending Stairs ......................................................................................24
9. Descending Stairs ....................................................................................29
10. Routine Care & Maintenance...................................................................33
11. Replacement Parts & Materials ...............................................................39
12. Warranty....................................................................................................40

1 Safety First!
1
SAFETY WARNINGS
Safety warnings containing important safety and handling information are affixed to the
Super-Trac to ensure that it is operated safely. The following markings appear in the
Owner’s Manual as well as on the safety labels. They are also used in the Operator Training
Video.
SAFETY WARNING SYMBOL
Hazards that could result in serious personal injury or death if the safety
precaution is ignored and the product is not handled properly.
SAFETY WARNING LABELS
Safety labels are affixed to the Super-Trac to ensure that it is used safely.
Please make sure you read and follow all safety warning labels. Safety labels
that are damaged, lost or are no longer legible should be replaced. Safety
labels can be ordered from the local dealer.
The labels contain the following key safety warnings:
SAFETY WARNINGS
Maximum Load Capacity is 440 lbs (200 kgs). Load includes wheelchair and
passenger. Do not overload.
Maximum Stair Angle is 35°. Place the Stair-slope Indicator across two stair
noses to check the stair angle. Operate Super-Trac only when the arrow is in
the green zone.
Do no operate if you have not read the Owner’s Manual and viewed the
Operator Training Video.
Do not carry wheelchairs or scooters that do not fit within the platform area.
The front wheels of the wheelchair must fit behind the blue line on the platform
deck.
Set the Parking Brake when loading and unloading passengers and if leaving
the unit unattended.
Do not let go of the Operating Handle when a passenger is onboard and the
platform is tilted back. (continued on next page)

2 Safety First!
2
SAFETY WARNINGS (continued from previous page)
Always position Super-Trac at an angle of 90° to the stairs.
Do not use Super-Trac on wet or slippery stairs.
Do not use Super-Trac on spiral stairs, irregular stairs or stairs with loose or
insecure treads or coverings.
Do not operate Super-Trac unless the wheelchair and passenger are properly
secured using the tie-down straps and seatbelt. Engage the wheelchair
brakes(s) and turn off the controls to power wheelchairs.
Always come to a complete stop at the red STOP MARK balance point when
ascending and descending stairs.
Keep the front castor wheel back from the edge of the stairs. Do not roll Super-
Trac forward past the yellow mark on the drive frame. When tilting the platform
forward to the horizontal position, make sure the front castor wheel will contact
the floor well away from the stair edge.
Do not reach under the platform. Do not touch any moving parts.
Turn off the key switch and remove the key when Super-Trac is not in use.
Leaving the key switch turned on will drain the battery.
Operating Super-Trac with a second person present will increase the level of
safety and is recommended, particularly when operating with a heavy load.
If using Super-Trac to transport freight, do not exceed the maximum capacity of
of 440 lbs (200 kgs). Ensure that the freight is well secured. Keep the weight
low and to the rear of the platform.
When learning to operate Super-Trac, always start with an empty machine.
Practice ascending and descending the stairs. In particular, practice
consistently stopping on the red STOP MARK at the top of the stairs. When
you are proficient, find an able-bodied partner to practice with. Be an operator
and a passenger. Use Super-Trac to transport people with disabilities only
when you have this level of experience.

2 Specifications
3
Super-Trac TRE-52 Specifications
Capacity: 440 lbs (200 kgs)
Drive Motors: 2 x 12 volt DC - 190 W
Brake: 2 x electromagnetic spring brake
Battery: 2 x 12 volt - 24 AH
Battery Charger:
Automatic 115 / 230 VAC
Speed: Up 21.4 ft (6.51 m) / min
Down 34.7 ft (10.59 m) / min
Weight: 253 lbs (115 kgs)
Dimensions: Height: 50.4 in (1280 mm)
Length 49.5 in (1258 mm)
Width 29.8 in (757 mm)
Platform Size: Length 35.1 in (892 mm)
Width 27.4 in (690 mm)
Wheelchair
Attachment: 4 x quick-release tie-down strap
Electrically interlocked seatbelt
Parking Brake: Electrical activation
Wheels retract - tracks rest on floor
Auxiliary Wheels: Front 5 in. castor rubber wheel
Rear 6 in. fixed rubber wheel x 2
Rubber Belt Tracks:
Molded rubber reinforced with braided wires
Width 2 in (51 mm)
Length 48 in (1219 mm)
Turning Clearance: 63 in (1600 mm) required to turn at landings
Maximum Stair Angle:
35°

3 Component Identification
4

4 Component Function
5
KEY SWITCH
The key switch on the control panel is
used to turn the power ON or OFF.
When the Super-Trac is not in use
(when it is in storage, being recharged
or in transit) put the key switch in the
ΟFF position (Ο), remove the key and
keep it in a safe place.
BATTERY LIFE TIP
If the key switch is left in the ON
position, the battery will discharge and
will eventually go dead. When not in
use, always put the key switch in the
ΟFF position and remove the key.
PLATFORM TILT SWITCH
The platform of the Super-Trac must be tilted
so it is horizontal when going up or down
stairs. The tilting is done by a hydraulic
actuator that is activated by a rocker switch on
the control panel. This is the Platform Tilt
Switch.
Press and hold the top of the rocker switch to
tilt the platform back and the bottom of the
rocker switch to return the platform to the
horizontal position.
The platform will stop moving when you take
your finger off the switch or when it reaches
the maximum travel. The hydraulic actuator
will make a louder noise when this happens.
This is normal.
The Super-Trac will not climb up or down
stairs unless the platform is tilted as far as it
can go. Also, this switch will not work while
the Super-Trac is on the stairs.
There is a safety interlock.

4 Component Function
6
DRIVE CONTROLS
Drive Thumb Buttons
Operate the tracks and work only when
both buttons are pressed. The Super-
Trac will stop moving if you take your
thumb off one button.
Up/Down Selection Switch
Use this to choose the direction of travel
on stairs.
Emergency Stop Button
Push to stop the Super-Trac if other
controls fail to function. To cancel, turn
to the right.
PARKING BRAKE
Parking Brake Switch
Used to lower the tracks to the ground so
that the wheelchair can be loaded and
unloaded safely. Press the Parking
Brake Switch to the ON position (│) to
lower the tracks to the ground. This will
keep the Super-Trac stationary.
Press the Parking Brake Switch to the
OFF position (Ο) to raise the tracks off
the ground.

4 Component Function
7
LOADING RAMP
The Loading Ramp is located under the platform
of the Super-Trac. It provides a gentle slope for
loading and unloading the wheelchair.
Pull it out from under the platform as shown.
Always slide it back to its original position once
the wheelchair has been loaded or unloaded.
SEATBELT
To ensure the safety of the passenger, the
Seatbelt must always be fastened around the
passenger.
Trouble Shooting Tip
The Seatbelt contains an electrical
interlock. The controls, including the
parking brake switch, will not work
unless the seatbelt is fastened.
Seatbelt
Correct Seatbelt Storage
When there is no wheelchair on the Super-Trac,
the seatbelt should always be buckled and
placed on the storage hook provided.
Again, Super-Trac will not function, even when
empty, unless the Seatbelt is fastened together.

4 Component Function
8
WHEELCHAIR TIE-DOWN STRAPS
The 4 Wheelchair Tie-Down Straps must be
attached securely so there is no danger of the
wheelchair moving while the Super-Trac is in use.
Tightening the Tie-Down Straps
Pull strap towards you to fasten.
Releasing the Tie-Down Straps
Push the flap on the buckle (1) and
push in the direction of the arrow (2) to
release.
Storage of Tie-Down Straps
When there is no wheelchair on the Super-
Trac, the straps must be hung in the 4 red
storage rings. If the straps are not stored
correctly they could fall into the tracks and
cause damage.

5 Batteries and Recharging
9
BATTERIES
Small, sealed lead batteries are used in the battery pack. There is no risk of fluid leaking and
no maintenance (replacing water etc.) is required other than charging.
When handling batteries, please observe the following precautions.
Charge Batteries After Every Use
Batteries should be recharged immediately after use with the special battery charger
provided. Putting the Super-Trac away without recharging the batteries may cause problems
when it is next used if the batteries are weak or dead. Further, if the batteries are left without
being charged for a long time, they may stop working altogether.
BATTERY SAFETY WARNINGS
• Do not recharge batteries inside a sealed structure.
• Do not place batteries near fires.
• Do not dismantle or reassemble batteries.
Do not short-circuit batteries with tools or metal items.
• Batteries should only be recharged with the special battery charger
provided.
• Check batteries and replace if you notice any damage such as cracks or
deformities or any leaking fluid.
• Check batteries and clean with a cloth moistened with water. Do not wipe
with oil or an organic solvent such as petrol or thinner.
• If batteries rupture and electrolyte gets on your skin or clothing, rinse
immediately with plenty of water. If any electrolyte gets in your eyes, wash
with clean water and see a doctor immediately.
Recommendations for Long Battery Life
The Super-Trac uses sealed batteries. The batteries will not work if you remove the battery
covers.
If the batteries are allowed to run too low, you may not be able to use them again.
When the Super-Trac is not used for a long period of time, the batteries should be fully
charged and then removed, kept in a dry place with low humidity and recharge once a month.
As batteries deteriorate when stored, they may not work as well as they did before they were
put away.

5 Batteries and Recharging
10
BATTERY CHARGER
The Super-Trac’s special battery charger
automatically charges depending on the
discharge level of the batteries. Therefore,
once battery voltage reaches a certain
level during recharging, it will stop
charging. Batteries that are completely
used up take about 5 hours to recharge.
SET CHARGER FOR LOCAL VOLTAGE
Before using the charger be sure to set the sliding switch on the back of the
charger to the local voltage:
110 – 115 VAC or
220 – 230 VAC

5 Batteries & Recharging
11
HOW TO READ THE BATTERY CHARGE INDICATOR
When the key switch is in the ON position (│), the light on the battery charge indicator
may move to a position to the left of where it was when the Super-Trac was last used.

5 Batteries & Recharging
12
REMOVING THE BATTERY PACK
The battery pack does not need to be removed
for charging. However, if there is no electrical
receptacle nearby, the battery pack can be
removed and carried to where there is a power
source for the charger.
Also, in the case of heavy use, 2 or more
batteries can be swapped when the charge gets
low.
Remove the cover at the top end of the platform
deck of the Super-Trac. Pull out the ramp until
the battery pack can be removed.
Hold the handles on the battery pack with both
hands and lift out.
To put the battery pack back in place, simply
reverse the process.
BATTERY PACK ALIGNMENT
The battery pack can only be put back with the
arrow pointing in the direction shown. This is
so the contacts align.
Make sure the battery pack is inserted
correctly as it could be damaged if inserted
back to front.
WARNING
Be careful not to drop the
battery pack as the
batteries could be
damaged. This could
result in leakage of the
battery fluid.

5 Batteries and Recharging
13
RECHARGING THE BATTERIES
Connect the power cord to the battery
charger.
When the battery pack is in the Super-
Trac, lift up the flap over the charging
socket on the control panel and insert
the battery charger plug.
.
When the battery pack has been taken
out of Super-Trac, lift up the flap over
the charging socket on the battery
pack and insert the battery charger
plug.
Insert the battery charger plug into the
building electrical outlet.
Put the charging switch in the ON position.
Charging will commence when the red and
yellow LED’s come on.
As the batteries are charged, the yellow LED
will turn green, indicating that the batteries are
fully charged
Take the battery charger plug out of the building
electrical outlet.
Take the battery charger plug out of the socket.

5 Batteries and Recharging
14
CHARGER SAFETY WARNINGS
• Make sure no combustible objects are placed near the battery charger, as it
will become very warm during use.
• To ensure that the battery charger is used safely, please read the instruction
manual carefully beforehand.
• The cover should never be taken off. Tampering with the inside of the
battery charger could give you an electric shock.
• The battery charger should be used and stored indoors in a dry place away
from direct sunlight. Otherwise it could cause electric shocks or the unit
could be damaged.
• When the batteries are near the end of their life span, they will no longer be
able to reach battery voltage during charging and the charging automatic
shutoff function will stop working.
REPLACING THE FUSE
A prolonged flashing green light
means that something is wrong (a
blown fuse, faulty connection etc.)
Remove the fuse cap in the
diagram on the right by turning in a
counter-clockwise direction and put
in a new 10A output fuse.
Table of contents
Other Garaventa Lifting System manuals
Popular Lifting System manuals by other brands

Zinko
Zinko ZABJ-12C operating instructions

HAMACO
HAMACO ML-150-45V-D12 user manual

Kelley
Kelley aFX-C user manual

Skyjack
Skyjack 3226 Maintenance & parts manual

APlusLift
APlusLift HW-10KOH-A Installation & operation manual

Phoenix Mecano
Phoenix Mecano Rose+Krieger RKPowerlift M Memory Assembly instructions

Granberg
Granberg Baselift 6300H installation instructions

Gude
Gude GHT 500 Translation of original operating instructions

ABACO MACHINES
ABACO MACHINES ALG50A Operation manual

Aqua Creek Products
Aqua Creek Products Ambassador manual

AMGO
AMGO OH-9 Installation and service manual

AMGO
AMGO HS-12 Installation and service manual