GardePro E6 User manual

E6 TRAIL CAMERA
INSTRUCTION MANUAL
V2.0

Congratulations on your purchase of one of the best trail
cameras on the market! We appreciate your business and
want to earn your trust. Please refer to the notes below and
the instructions in this manual to ensure that you are
completely satisfied with this product.
In case of any further questions or concerns, please get in
touch with us at:
or visit our page for FAQs or latest firmware:
www.zopudt.com

TABLE OF CONTENTS (English)
1. IN THE BOX ....................................................................... 1
2. IMPORTANT NOTE ........................................................... 1
3. INTRODUCTION ................................................................2
4. PARTS AND CONTROLS ..................................................3
5. INSTALLING THE BATTERIES AND SD CARD ...........7
6. USING THE CAMERA .......................................................9
7. THE OFF, ON, AND SURVEILLANCE MODES ........... 10
7.1. OFF Mode ............................................................. 10
7.2. ON Mode ................................................................10
7.3. SURVEILLANCE Mode ......................................... 11
8. Wi-Fi CONNECTION ....................................................... 12
8.1. Download GardePro Mobile App ..........................12
8.2. Enable Wi-Fi and Bluetooth .................................. 12
8.3. Add Your Camera .................................................. 13
8.4. Search Your Camera and Link .............................. 13
8.5. App Navigation ...................................................... 15
8.6. Important Notes on App Wi-Fi Connection ........... 18
9. ADVANCED SETTINGS ..................................................19
10. MOUNTING AND POSITIONING ................................ 24
10.1. Mounting ..............................................................24
10.2. Sensing Angle and Distance Test .........................25
10.3. Starting ................................................................ 26
11. REVIEW PHOTOS OR VIDEOS ....................................27
12. TECHNICAL SPECIFICATIONS .................................. 28
13. TROUBLESHOOTING ................................................... 30
14. WARRANTY ...................................................................31

1
1. IN THE BOX
1 x Camera, 1 x Mounting Strap,
1 x Instruction Manual, 1 x Mini USB Cord
Note: Memory card and batteries are not included (user supplied).
2. IMPORTANT NOTE
2.1. About Batteries
Require eight (8) 1.5V AA Alkaline or Lithium batteries. We
recommend the use of Energizer AA Lithium batteries in this
camera to obtain maximum battery life.
Do not mix old and new batteries. Do not mix battery type.
Rechargeable NiMH AA batteries can be used, but the lower
voltage (generally 1.2V) they produce has short lifetime, you
may have to replace them frequently.
Remove batteries when the camera is NOT in use.
2.2. About SD Card
Require a standard-size SDHC/SDXC memory card (maximum
capacity 256GB, Class 10). Recommend using SanDisk 32GB
SDHC Class 10 memory cards in the camera to obtain the best
cost-performance.
Before first use, please format your SD card in the camera
by using "Format SD Card" in the menu settings.
2.3. About App Wi-Fi Connection
Please refer to Section 8 for details.
For better performance, we recommend that your phone is
within 15 meters (45 feet) of your camera. Since there may be

2
interference around, if the signal is not good, please move
closer to the camera gradually.
Legal attribution: Apple and the Apple Logo are trademarks of Apple Inc.,
registered in the U.S. and other countries. Google Play and the Google Play
logo are trademarks of Google LLC.
3. INTRODUCTION
3.1. About the Camera
The GardePro E6 is a new generation of Wi-Fi trail camera.
The camera has a built-in Wi-Fi and Bluetooth module, so that
you can connect and operate the camera through a dedicated
app ("GardePro Mobile"). The Bluetooth module, operating in
low power, is used for device discovery, and Wi-Fi is used for
preview, image transmission and settings.
The camera features the all-new innovative and ultra-clear
imaging technology, encompasses smart night vision, blur
reduction, and noise reduction technology to deliver high
resolution image quality.
3.2. Main Features
Bluetooth connection for device discovery
Wi-Fi connection for preview, playback, and settings
High quality pictures (32MP still photos), 1296P 20fps or
1080P 30fps H.264 video clips with audio
Clear night vision, flash range 75ft. (23m), the camera is
equipped with 36pcs high performance infrared no glow
940nm LEDs that function as a flash (invisible to human
and animal eyes)
Wide view angle - 110°

3
Easy to use/program with well-designed operation buttons and
built-in 2.4-inch color screen, easy to program, review pictures
and videos on the screen
3 working modes - Motion detection, Time lapse and
Hybrid
Fast trigger time - approx. 0.2s, Fast recovery time - 0.5s, Long
trigger distance up to 75ft. (23m), Detection Angle - 70°
Info strip on each capture: Date, Time, Temperature & Moon
phase
Operation Hours, Loop Recording, Time Lapse, Password
Protected
Built for any climate - IP66, Operation Temperature: -4~140°F
Support SD/SDHC/SDXC memory card, max capacity 256GB
(not included in the scope of delivery)
Extremely long in-field battery life up to 8 months in a
stand-by state with 8 AA 1.5V batteries (not included in the
scope of delivery)
4. PARTS AND CONTROLS
The camera is equipped with 36pcs high efficiency infrared
LEDs, LED Indicators, Lens, PIR Sensors, Lock Holes in front
view (Figure 1).
TIP: During use, the black PIR Lens may be dirty or have
scratches, however it does not affect the performance due to the
reliability design. If you must clean it, please try to blow it off
or pick out the dirt very lightly. Please do not try to wipe it,
which may cause more scratches.

4
Figure 1: Front View
IR LEDs
Lock
Hole
Optics
Lens
PIR
Lens
Light
Sensor
Indicator
Lock
Buckle
Antenna
5
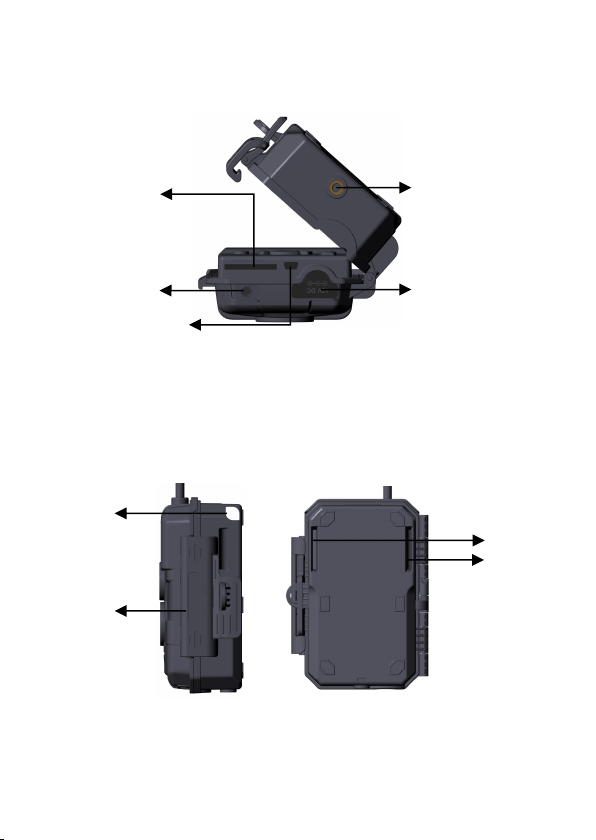
The camera provides the following connections for external
devices: Mini USB port and SD card slot etc. (Figure 2).
Figure 2: Bottom View
The camera has one security cable hole and two strap holes on
the back. The strap can be put through the strap holes and
fastened securely around a tree trunk by pulling the end of the
strap firmly (Figure 3).
Figure 3: Right / Back View
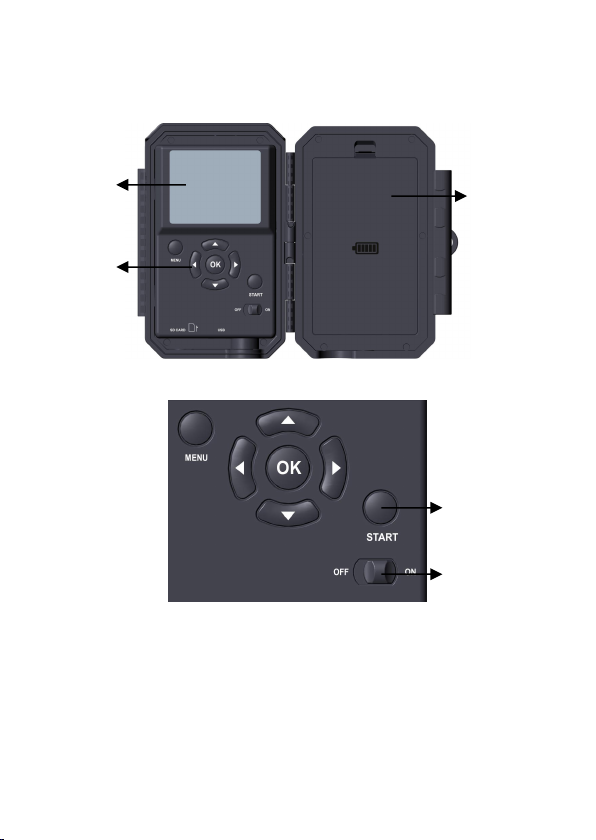
The camera has a 2.4-inch built-in LCD screen, which can be
used for reviewing pictures or videos and menu displaying, and
Tripod Base
1/4" - 20
SD Card
Holder
DC 12V/1A
Plug 5.5x2.1mm
Strap
Hole
Lock
Buckle
Mini USB Port
Microphone
Security
Cable Hole
6
exclusive keypad design for easy program and operation, 8 AA
batteries slot supported (Figure 4).
Figure 4: Inside View
Figure 5: Operation Buttons
A power switch is used to power on (ON mode) or off the
camera (OFF mode). A START button is used to quickly
make the camera into the surveillance mode (motion detection)
or time lapse per your settings (Figure 5). When the camera is
in the surveillance mode, press the START button to wake up
the camera.
Power
Switch
Color
Screen
Battery
Compartment
and Cover
Operation
Buttons
Surveillance
Mode

7
5. INSTALLING THE BATTERIES AND SD CARD
Before you begin learning how to use your camera, you will
first need to install a set of batteries and insert an SD card.
Although that may only take you a minute, there are some
important notes about both batteries and SD cards you should
be aware of, so please take the time to read the following
directions and cautions:
5.1. Loading Batteries
After opening the cover of the battery compartment, you will
see that the camera has eight battery slots (Figure 6). A full
eight batteries must be installed for the camera to operate. Be
sure to insert each battery with correct polarity (negative or
"flat" end against the long spring of each battery slot).
In ON mode when battery power level gets low, the message
"Low Battery" will show on the screen, please replace the
batteries. If the battery indicator shows in RED, this does mean
the batteries are not able to drive IR LEDs flash at night,
however the batteries still work at daytime until "Low
Battery". If you want to continue night vision, please replace
the batteries.
Table of contents
Other GardePro Scouting Camera manuals


