Garland GTXHP36 User manual

XHP Broiler™
Model : GTXHP36
Installation, Operation and Maintenance Manual
,Caution
Read these instructions before operating this equipment and retain for future reference.
For your safety:
Post in a prominent location, instructions to be followed
in the event the user smell gas. This information shall be
obtained by consulting your local gas supplier.
Bring Your Passion to the Surface
Document #: GAR_IOM_4605246 – 1/21
Original Instructions
C US

2 Document #: GAR_IOM_4605246 – 1/21
THIS PAGE INTENTIONALLY LEFT BLANK

Document #: GAR_IOM_4605246 – 1/21 3
Safety Notices
DEFINITIONS
As you work on Garland equipment, be sure to pay close
attention to the safety notices in this manual. Disregarding
the notices may lead to serious injury and/or damage to the
equipment.
Throughout this manual, you will see the following types of
safety notices:
DANGER
Indicates a hazardous situation that, if not avoided, will
result in death or serious injury. This applies to the most
extreme situations.
nWarning
Indicates a hazardous situation that, if not avoided, could
result in death or serious injury.
,Caution
Indicates a hazardous situation that, if not avoided, could
result in minor or moderate injury.
Notice
Indicates information considered important, but not
hazard-related (e.g. messages relating to property
damage).
NOTE: Indicates useful, extra information about the
procedure you are performing.
DISCLAIMERS
DANGER
Improper installation, adjustment, alteration, service,
or maintenance of this appliance or installation of
a damaged appliance can result in DEATH, INJURY,
EQUIPMENT DAMAGE, and void the warranty. NEVER
install damaged appliances, equipment, or accessories.
ALWAYS have installation and service performed by
trained and authorized personnel.
DANGER
Donotinstalloroperateequipmentthathasbeenmisused,
abused, neglected, damaged, or altered/modified from
that of original manufactured specifications.
DANGER
All utility connections and fixtures must be maintained in
accordance with local and national codes.
DANGER
It is the responsibility of the equipment owner to perform
a Personal Protective Equipment Hazard Assessment
to ensure adequate protection during maintenance
procedures.
DANGER
The on-site supervisor is responsible for ensuring that
operators are made aware of the inherent dangers of
operating this equipment.
NOTE: Proper installation, care and maintenance are
essential for maximum performance and trouble-free
operation of your equipment. Visit our website
https://www.garland-group.com/ for manual updates,
translations, or contact information for service agents in your
area.
nWarning
Do Not Store Or Use Gasoline Or Other Flammable Vapors
Or Liquids In The Vicinity Of This Or Any Other Appliance.
Never use flammable oil soaked cloths or combustible
cleaning solutions, for cleaning.
nWarning
It is very important to not spray aerosols, or any other
flammable gases, near this appliance whilst it is in
operation; doing so may cause injury to user.
nWarning
Do not store combustible materials on the appliance.
Keep appliance area free and clear from combustibles.
nWarning
Warning labels mounted directly on the equipment
must be observed at all times and kept in a fully legible
condition.
nWarning
Read this manual thoroughly before operating, installing
or performing maintenance on the equipment. Failure
to follow instructions in this manual can cause property
damage, injury or death.

4 Document #: GAR_IOM_4605246 – 1/21
nWarning
This appliance is not intended for use by persons
(including children) with reduced physical, sensory or
mental capabilities, or lack of experience and knowledge,
unless they have been given supervision concerning use
of the appliance by a person responsible for their safety.
Do not allow children to play with this appliance.
nWarning
This product contains chemicals known to the State of
California to cause cancer and/or birth defects or other
reproductive harm. Operation, installation, and servicing
of this product could expose you to airborne particles
of glass-wool or ceramic fibers, crystalline silica, and/
or carbon monoxide. Inhalation of airborne particles
of glass-wool or ceramic fibers is known to the State of
California to cause cancer. Inhalation of carbon monoxide
is known to the State of California to cause birth defects
or other reproductive harm.
,Caution
Maintenance and servicing work other than cleaning as
described in this manual must be done by an authorized
service personnel.
Notice
Routine adjustments and maintenance procedures
outlined in this manual are not covered by the warranty.
LOCATION
nWarning
DO NOT attempt to lift the unit on your own. Use a "team
lift" or lifting device to move and position the unit.
nWarning
To avoid instability the installation area must be capable
of supporting the combined weight of the equipment and
product. Additionally the equipment must be level side to
side and front to back.
,Caution
This unit can generate large amounts of smoke. It must be
installed under an appropriate ventilation hood.
Notice
Install the unit in close proximity to a grounded power
outlet. Maximum allowable cord length for counter
appliances is 6 ft. and use of an extension cord is not
permitted.
nWarning
No structural material on the appliance should be altered
or removed to accommodate placement of the appliance
under a hood.
nWarning
The appliance and its individual shutoff valve must be
disconnected from the gas supply system during any
pressure testing of that system at test pressures in excess
of 1/2 psi (3.5 kPa).
ELECTRICAL
DANGER
Check all wiring connections, including factory terminals,
before operation. Connections can become loose during
shipment and installation.
DANGER
Do not operate any appliance with a damaged/pinched
cord or plug. All repairs must be performed by a qualified
service company.
DANGER
Failure to disconnect the power at the main power supply
could result in serious injury or death. The power switch
DOES NOT disconnect all incoming power.
nWarning
If the power supply to the appliance fails in events such
as a power-cut, please switch off the appliance at the
front switch. Do not walk away from a grill that has no
power but with the switch turned on. Doing so could
cause a fire is something flammable is left unattended
near the appliance and the power then comes back on
and reignites the grill.
nWarning
This appliance must be grounded and all field wiring must
conform to all applicable local and national codes. Refer
to rating plate for proper voltage. It is the responsibility of
the end user to provide the disconnect means to satisfy
the authority having jurisdiction.

Document #: GAR_IOM_4605246 – 1/21 5
nWarning
Do not use electrical appliances or accessories other than
those supplied by the manufacturer.
nWarning
This equipment must be positioned so that the plug is
accessible unless other means for disconnection from the
power supply (e.g., circuit breaker or disconnect switch)
is provided.
nWarning
Disconnect electric power at the main power disconnect
for all equipment being serviced. Observe correct polarity
of incoming line voltage. Incorrect polarity can lead to
erratic operation.
nWarning
Ensure the input power cable has a slight curve, and is
not ever stretched.
nWarning
Never touch anything that runs on electricity when your
hands are wet.
nWarning
Electrical Grounding Instructions
This appliance is equipped with a three-prong (grounding)
plug for your protection against shock hazard and should
be plugged directly into a properly grounded three-prong
receptacle. Do not cut or remove the grounding prong
from this plug.
Notice
Wiring diagram is located behind the front control panel
on the appliance.
CODE
nWarning
Authorized Service Representatives are obligated to follow
industry standard safety procedures, including, but not
limited to, local/national regulations for disconnection
/ lock out / tag out procedures for all utilities including
electric, gas, water and steam.
nWarning
For an appliance equipped with casters, (1) the installation
shall be made with a connector that complies with the
Standard for Connectors for Movable Gas Appliances
ANSI Z21.69 • CSA 6.16, and a quick-disconnect device
that complies with the Standard for Quick-Disconnect
Devices for Use With Gas Fuel, ANSI Z21.41 • CSA 6.9, (2)
adequate means must be provided to limit the movement
of the appliance without depending on the connector
and the quick-disconnect device or its associated piping
to limit the appliance movement and (3) the location(s)
where the restraining means may be attached to the
appliance shall be specified.
CLEARANCE
DANGER
To reduce the risk of fire, the equipment is to be
installed in non-combustible surroundings only, with no
combustible material within 18” (457 mm) of the sides,
front or rear of the appliance or within 40 “ (1 m) above
the appliance. The appliance is to be mounted on floors/
counters of noncombustible construction or applicable
equipment stand or refrigerated base.
DANGER
Risk of fire/shock. All minimum clearances must be
maintained. Do not obstruct vents or openings.
nWarning
Slipping Hazard: Grease from food products will splatter.
The areas surrounding the grill are a slipping hazard due
to the splatter zone. Clean the area surrounding the grill
regularly. Care needs to be taken as equipment may be
hot.
nWarning
Failure to maintain required clearances and additional
distances as needed can result in INJURY and EQUIPMENT
DAMAGE.
Consult manufacturers’ literature, and sales and service
agencies as needed.
,Caution
Do not block the supply and return air vents or the air
space around the air vents. Keep plastic wrappings,
paper, labels, etc. from being airborne and lodging in
the vents. Failure to keep the air vents clear will result in
unsatisfactory operation of the system.

6 Document #: GAR_IOM_4605246 – 1/21
,Caution
Do not position the air intake vent near steam or heat
exhaust of another appliance.
CLEANING
,Caution
Quenching hot grates in cold water may cause them to
crack or bow. Pouring cold water on unit to clean may
cause ceramics to crack.
nWarning
When cleaning interior and exterior of unit, care should
be taken to avoid front power switch and the power
cord(s). Keep water and/or cleaning solutions away from
these parts.
nWarning
Turn grill off and unplug the unit before cleaning the side/
back panels. Do not remove any panel during cleaning.
nWarning
Never cover the cook surface as a method of cleaning the
unit. The unit is equipped with a temperature sensor that
will detect this condition and shut the unit down.
nWarning
Interior cleaning must be performed by a qualified service
technician only.
nWarning
Never use a high-pressure water jet for cleaning or hose
down or flood interior or exterior of units with water. Do
not use power cleaning equipment, steel wool, scrapers
or wire brushes on stainless steel or painted surfaces.
,Caution
Use a commercial-grade cleaner formulated to effectively
clean and sanitize food contact surfaces. Read the
directions for use and precautionary statements before
use. Particular attention must be paid to the concentration
of cleaner and the length of time the cleaner remains on
the food-contact surfaces.
,Caution
Never use an acid based cleaning solution on exterior
panels! Many food products have an acidic content,
which can deteriorate the finish. Be sure to clean the
stainless steel surfaces.
,Caution
Do not use caustic or alkaline cleaners on any part of the
equipment or equipment cavity . Use mild, non abrasive
soaps or detergents, applied with a sponge or soft cloth.
Never use sharp instruments or harsh abrasives on any
part of the equipment.
PERSONAL PROTECTION
DANGER
Use appropriate PPE during installation and servicing.
DANGER
Never stand on the unit! They are not designed to hold
the weight of an adult, and may collapse or tip if misused
in this manner.
DANGER
Keep power cord AWAY from HEATED surfaces. DO NOT
immerse power cord or plug in water. DO NOT let power
cord hang over edge of table or counter.
nWarning
DO NOT use the unit for storage. DO NOT leave paper
products, cooking utensils, or food on the unit when not
in use.
nWarning
Allow heated equipment to cool down before attempting
to clean, service or move. Unit must be cool to touch and
disconnected from power source.
nWarning
Always wear some type of protective covering on your
hands and arms when opening the unit.
nWarning
Remove all removable panels before lifting and installing.
nWarning
When using cleaning fluids or chemicals, rubber gloves
and eye protection (and/or face shield) must be worn.

Document #: GAR_IOM_4605246 – 1/21 7
nWarning
Use caution when handling all metal surface edges of the
equipment, use appropriate safety glove if necessary.
nWarning
This equipment is intended for indoor use only. Do not
install or operate this equipment in outdoor areas.
nWarning
All covers and access panels must be in place and properly
secured, before operating this equipment.
nWarning
Risk of burns from high temperatures. Surfaces close
to the cooking surface including side panels may get
hot enough to burn skin. Use extreme caution to avoid
coming in contact with hot surfaces or hot grease. Wear
personal protective equipment.
nWarning
When checking for burner ignition or performance, do
not get too close to the burners. Slow ignition can cause
possible flashback, increasing the potential for facial and
body burns.
nWarning
This appliance must be installed with sufficient ventilation
to prevent the occurrence of unacceptable concentrations
of substances harmful to the health of personnel in the
room in which it is installed.

Table of Contents
8 Document #: GAR_IOM_4605246 – 1/21
Safety Notices
Definitions....................................................................................................................... 3
Disclaimers ...................................................................................................................... 3
Location........................................................................................................................... 4
Electrical.......................................................................................................................... 4
Code ................................................................................................................................ 5
Clearance ........................................................................................................................ 5
Cleaning .......................................................................................................................... 6
Personal Protection......................................................................................................... 6
Section 1
General Information
Read This Manual.............................................................................................................. 9
Unit Inspection.................................................................................................................. 9
Purchaser’s Responsibility ................................................................................................. 9
Additional Requirements................................................................................................... 9
Items included with the purchase of your new grill from manufacturer ........................... 10
Items NOT INCLUDED from the manufacturer ................................................................. 10
Serial Plate Numbers ....................................................................................................... 10
Marketing: Model Number Key Description..................................................................... 10
Shipping Damage Claim Procedure ................................................................................. 11
Overall Dimension........................................................................................................... 12
Technical Information...................................................................................................... 13
Section 2
Installation
Removing Grill From Wood Crate..................................................................................... 14
Transporting Grill To Location .......................................................................................... 14
Location .......................................................................................................................... 15
Clearance Requirements.................................................................................................. 15
Leveling........................................................................................................................... 15
Exhaust Hood Requirements ........................................................................................... 15
Positioning ...................................................................................................................... 16
Remove Stainless Steel Plastic Film.................................................................................. 17
Temporary Storage .......................................................................................................... 17
National Codes Requirements ......................................................................................... 17
Installation Store Responsibilities.................................................................................... 17
Electrical Connection....................................................................................................... 17
Gas Connection ............................................................................................................... 18
Section 3
Operation
Before Turning on the Grill .............................................................................................. 19
Turning on the Grill.......................................................................................................... 19
Shutting off the Grill........................................................................................................ 19
Operation of the Grill ...................................................................................................... 20
Section 4
Maintenance
Maintenance ................................................................................................................... 21
Cleaning the Flame Sense/Igniter Probe .......................................................................... 21
Cleaning Under Grates..................................................................................................... 21
Cleaning During Operation .............................................................................................. 22
Cleaning the Stainless Steel Panels .................................................................................. 22
Daily Cleaning Summary.................................................................................................. 23
Section 5
Troubleshooting
Troubleshooting .............................................................................................................. 25
Wiring Diagram. .............................................................................................................. 26

Document #: GAR_IOM_4605246 – 1/21 9
Read This Manual
Garland has developed this manual as a reference guide
for the owner/operator and installer of this equipment.
Please read this manual before installation or operation of
the appliance. A qualified service technician must perform
installation and start-up of this equipment, consult Section 5
within this manual for troubleshooting assistance.
If you cannot correct a service problem, call your Service
Agent or Distributor. Always have your model and serial
number available when you call.
Your Service Agent ____________________________
Service Agent Telephone Number _________________
Your Local Garland Distributor ____________________
Distributor Telephone Number ____________________
Model Number _______________________________
Serial Number ________________________________
Installation Date ______________________________
Unit Inspection
Thoroughly inspect the unit upon delivery. Immediately
report any damage that occurred during transportation to
the delivery carrier. Request a written inspection report from
a claims inspector to document any necessary claim.
Purchaser’s Responsibility
It is the responsibility for the purchaser:
1. To see that the gas and electric services for the grill are
installed on site in accordance with the manufacturer’s
specification.
2. To see that the gas and electric services are connected
properly by a qualified installer of your choice. For
installation in the State of Massachusetts: Installation
of this grill must be performed by a licensed plumber or
gas fitter. All such connections must be in accordance
with applicable code requirements. Refer to “Installation
Requirements” section for specific information.
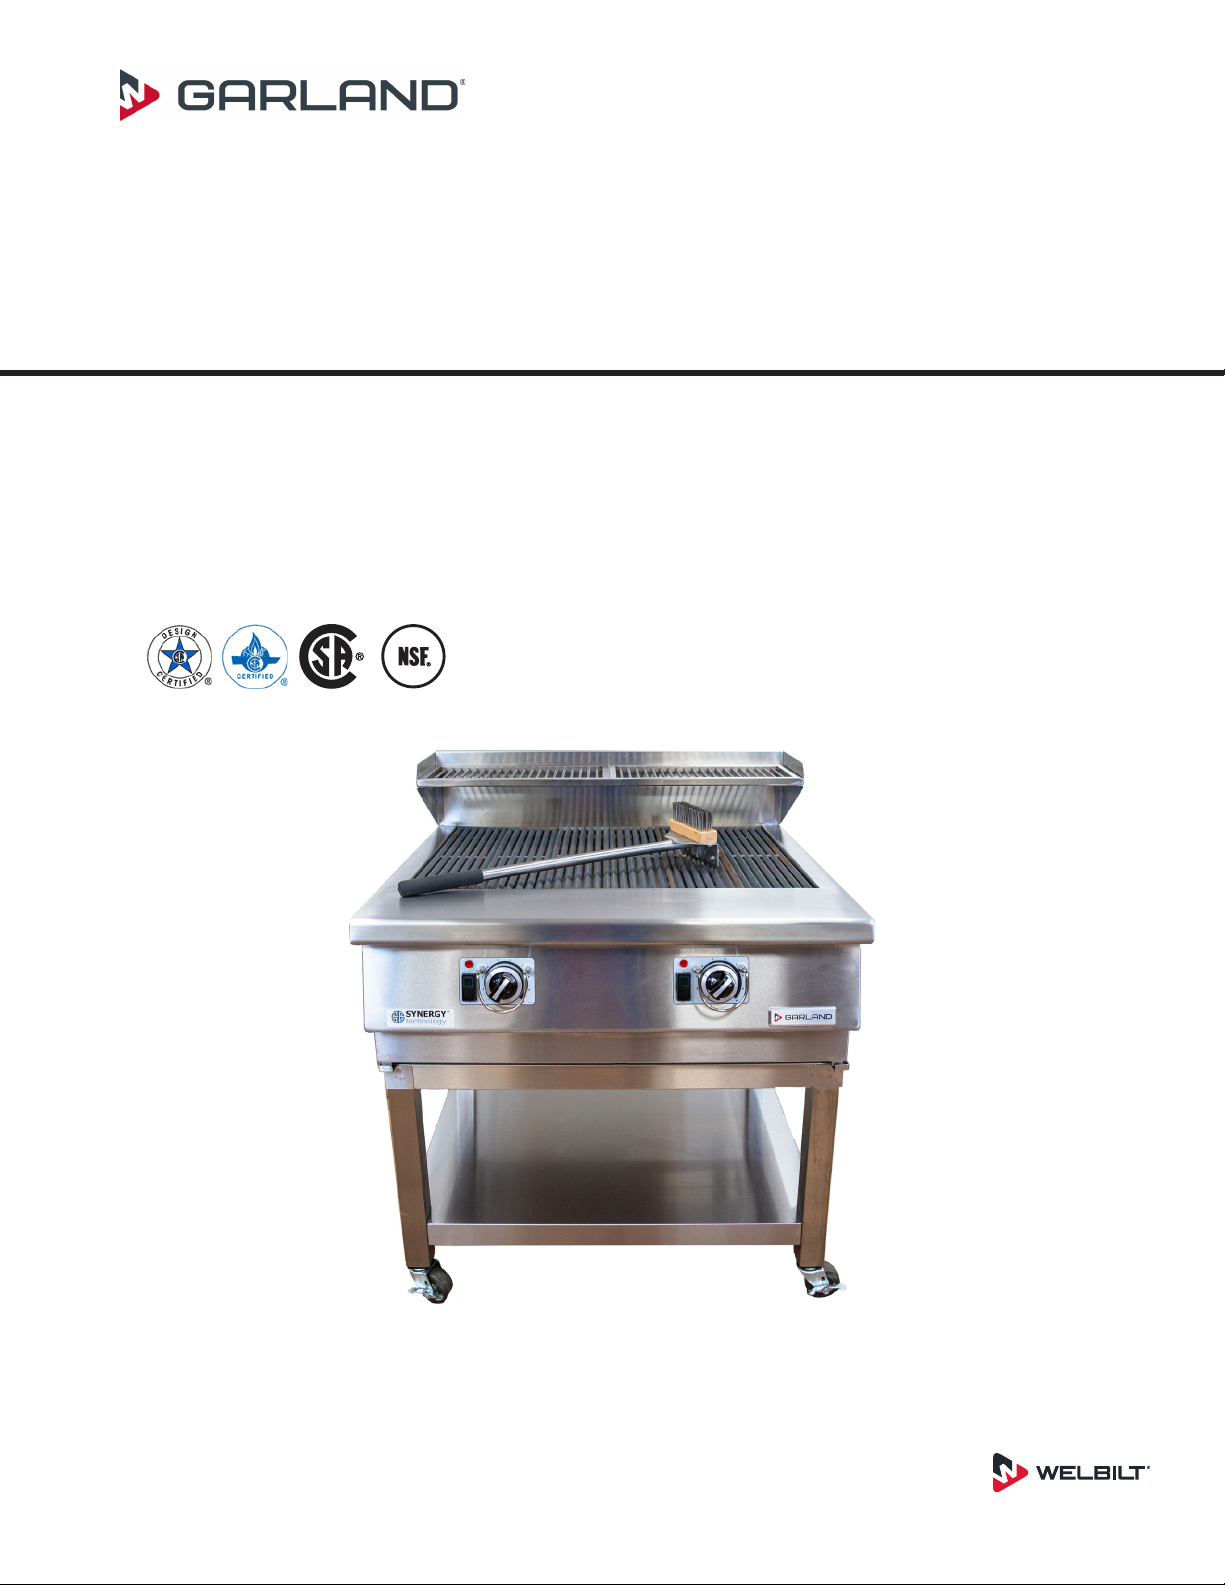
3. Garland advises that you season the cooking bars
before placing any food on them; this will remove any
manufacturing oils and also smooth the natural pitting
created from freshly cast mouldings. Seasoning your
cooking bars with a light oil, such as vegetable oil, can
smooth out the pitting and stop any food from sticking.
Fresh, unoiled cast iron cooking bars are also prone to
rust if you do not season them from the start. Rusting of
cooking bars from lack of seasoning will not be covered
by warranty.
4. Arrange for an Authorized Sevice Technician to inspect
and confirm correct operation of the unit. Do not
attempt to operate the grill until connection of utility
service has been fully inspected by an Authorized
Service Technician or a Garland Foodservice Products,
LLC Service Representative. This service is required by
Garland Foodservice Products, LLC in order to assist the
purchaser in proper start-up of the grill on site. Please
note the specific details on the Warranty and make
certain connections are made to proper utility services.
5. The warranty shall not apply if the unit is operated prior
to installation being inspected by an Authorized Service
Technician or a Garland Foodservice Products, LLC
Service Representative.
Additional Requirements
• It is required that the unit be installed under a ventilation
hood to provide for adequate air supply and ventilation.
• Minimum clearances must be maintained from all
walls and combustible materials. See “Clearance
Requirements” section for more information.
• Keep the grill free and clear of combustible material.
• Do not obstruct ventilation holes on the unit, as these
provide cool air for the electronics and fresh air for
combustion.
• Only connect and operate the unit on the type of gas
and/or electricity listed on the rating plate.
• This manual should be retained for future reference.
• This appliance is for professional use only and should be
used by qualified people.
Section 1
General Information

10 Document #: GAR_IOM_4605246 – 1/21
General Information Section 1
Serial Plate Numbers
The serial plate is affixed to the inner left side of the unit and can be accessed by removing the front lower panel. Important
information such as the unit’s model number, serial number, and electrical/gas specifications can be found on the serial plate.
Items included with the purchase of your new
grill from manufacturer:
1. One Grill includes the following list;
Description Qty
Completed Grill Assembly 1
Cleaning Brush/Scraper Tool 1
Installation/Operation Manual 1
Sandpaper Roll (to clean ignitor rod) 1
Slow Cook Shelf 1
Slow Cook Racks 2
Appliance Regulator 1
Items NOT INCLUDED from the manufacturer:
1. Flexible gas hose.
2. Manual shuto valve.
3. Optional stand and/or condiment rail are available.
Contact your dealer for more information.
Model Number Key Descrip�on
Example: GTXHP36
G T X H P 36
G = GARLAND
2-DIGIT NUMBER =
WIDTH IN INCHES
T = TABLETOP
H = HIGH
X = EXTRA
P = PERFORMANCE
Marketing: Model Number Key Description
The marketing identifiers, which are used in brochures and other marketing communications, indicate the type of function
and size of your appliance.
2101100100001
4.5
N/A N/A 2.2 120
0 0 0 60 27,000
1
NAT
GTXHP36
GTXHP36-00D1
---
---
---
---
---
Example of serial plate for 36” wide unit for use with Natural Gas.
N/A

Document #: GAR_IOM_4605246 – 1/21 11
Section 1 General Information
Shipping Damage Claim Procedure
Please note that Garland equipment is carefully inspected and packed by skilled personnel before leaving the factory. The
transportation company assumes full responsibility for safe delivery upon acceptance of the equipment. What to do if the
equipment arrives damaged:
1. File a claim immediately regardless of the extent of damage.
2. Be sure to note, “visible loss or damage,” on the freight bill or express receipt and have the person making the delivery
sign it.
3. Concealed loss or damage: if damage is unnoticed until the equipment is unpacked, notify the freight company
immediately, (within 15 days), and file a concealed damage claim.

12 Document #: GAR_IOM_4605246 – 1/21
General Information Section 1
Technical Specification
Width Depth Height
Packaged Dimensions 41.000" 41.000” 30.250"
Overall Dimensions 34.500" 32.532" 20.647”
Cook Surface Area 30.719" 21.688" -
Cook Rack Area 34.250” 7.875 -
Overall Dimension
Model: GTXHP36

Document #: GAR_IOM_4605246 – 1/21 13
Section 1 General Information
Technical Information:
Gas Specification
Gas Type
"Input/
Burner
(BTU/h)"
No. of Burners "Total Input
(BTU/h)"
Supply Pressure
("W.C)
Working
Pressure
("W.C.)
Injector Size Gas
Connection
Natural Gas or
Propane 27,000 2 54,000 7.0 4.5 N/A 3/4" MALE
NPT
Electrical Specification
Type "Voltage
(V)"
"Frequency
(Hz)"
"Current
(A)"
"Power
(W)" Electrical Connection
Single Phase 120 60 2.2 264 6FT, NEMA 5-15 Power Cord
Clearance to Combustibles
• For indoor installation only
• For use in non-combustible locations only
• Install under Exhaust hood (see “Exhaust Hood Requirements” in Installation Section)
Controls
• Power Switch for each burner to control on/off status individually
• Knob for each burner to control flame height individually
• LED indicator for each burner to indicate lockout condition
Lockout Indicator
Power Switch
Control Knob

14 Document #: GAR_IOM_4605246 – 1/21
Removing Grill From Wood Crate
Important! Upon delivery of your appliance, carefully remove
all the protective plastic and keep any documentation.
nWarning
The unit is HEAVY. Use “team lift” or mechanical assistance
to lift and position the appliance.
nWarning
Personal Protective Equipment (PPE) required. This
means safety glasses to protect your eyes and gloves to
protect from sharp metal edges.
Tools required.
Wear safety glasses or face
shield - risk of flying wood
chip.
1. The unit is packaged on a wood pallet then covered by
a large cardboard carton (24, 36 sizes) or wood boards
(48, 60 sizes). There will be other dunnage inside to
protect the unit during transport.
2. Remove the cardboard carton and recycle or the top
part of the wood skid for larger unit.
3. Carefully remove and recycle the plastic cover and soft
dunnage on top of the unit.
nWarning
Keep plastic cover away from small children. The thin
film may cling to nose and mouth preventing breathing,
causing suffocation.
4. Ask for help and use the proper techniques to remove
the grill from skid.
Important
Ensure all packaging material and protective film covering
panels has been removed before operating unit.
5. Check the grill for damages after unpacking it. Do not
connect the appliance if it has been damaged during
transport.
NOTE: See Shipping Damage Claim Procedure Section 1 in
this manual
Transporting Grill To Location
Transporting your new grill to the kitchen requires the
following:
• Plan first before anything else. Lower your risk of
encountering problems during the transport process.
• Keep top grill up during transportation.
• Match transportation speed to conditions.
• Make an appropriate plan of transportation, if stability
becomes uncertain on slope or ramp.
• Do not push/pull or lift by power cable or gas line.
Section 2
Installation

Document #: GAR_IOM_4605246 – 1/21 15
Section 2 Installation
Location
The location selected for the equipment must meet the
following criteria. If any of this criteria is not met, select
another location.
• This appliance must be positioned under an exhaust hood
in a draft free position. Excessive draft blowing onto the
grill can affect the vortex air and the heat distribution.
• The location MUST be level and capable of supporting
the weight of the equipment:
→Grill GTXHP36 weight - 115 kg (253 lbs) approximately.
• The location MUST be free from and clear of combustible
materials. Non-combustible installation only!
• Equipment MUST be level both front to back and side to
side.
• Position the equipment so it will not tip or slide.
• The air temperature must be at least 40°F (4.4°C) and
must not exceed 95°F (35.0°C).
• Proper air supply for ventilation is REQUIRED AND
CRITICAL for safe and efficient operation. Refer to
Clearance Requirements.
• Do not obstruct the flow of ventilation air. Make sure the
air vents or louvers of the equipment are not blocked.
• The location must not be near heat-generating (broiler,
dishwashers, etc) equipment or in direct sunlight and
must be protected from weather.
• Do not install the equipment directly over a drain. Steam
rising up out of the drain will adversely affect operation,
air circulation, and damage electrical / electronic
components.
• Do not store anything on top of the unit.
• The grill may be mounted on: Counter, Refrigerated base
or stand (optional). Contact your local distributor for
more information.
Clearance Requirements
• This unit is for non-combustible installation only and does
not require a minimum safety distance from surrounding
non-combustible surfaces.
Bottom and Sides – 0 inches
Rear – 0 inches
Above – 48 inches
• Ensure the front panels are kept clear to allow critical
airflow and access to the Grill. Do not block air intake
openings under the lower front panel under any
circumstance.
Leveling
Position the unit under the hood and in its normal
operational position.
• Level the grill front to back and side to side by adjusting
the levelling feet on the unit or adjusting whatever is
supporting the grill (ie: refrigerated base).
Exhaust Hood Requirements
Adequate ventilation must be provided to ensure capture
and removal of combustion by-products and smoke
generated by the cooking process.
1. Install the equipment under an Exhaust Hood.
2. The exhaust hood should:
A. Be sized for the cumulative ventilation requirements
of all the appliances in the area under the hood.
B. Be large enough to cover the appliance (including
clearances) and extend over the front of the
appliance to ensure adequate smoke capture.
C. If the hood doesn’t meet these requirements, we
recommend installing a new one that does.
NOTE: Always turn ON the exhaust hood when the unit is
running.
6.0in
152.4mm
6.0in
152.4mm
EXHAUST HOOD
6.0in
152.0mm
EXHAUST HOOD
UNLESS OTHERWISE SPECIFIED
TOLERANCES:
FAB. BENDS:
.031 ANG.
2
CNC CUT/MACHINED:
.005 ANG.
.25
NAME
SIZE
B
DWG. NO.
REV
SCALE: 1:12
SHEET 1 OF 1
DO NOT SCALE DRAWING
1/31/2021
THE INFORMATION CONTAINED IN THIS
DRAWING IS THE SOLE PROPERTY OF
GARLAND COMMERCIAL RANGES LIMITED.
ANY REPRODUCTION IN WHOLE OR IN PART
WITHOUT THE WRITTEN PERMISSION OF
GARLAND COMMERCIAL RANGES LIMITED
IS STRICTLY PROHIBITED.
PROPRIETARY AND CONFIDENTIAL
INTERPRET GEOMETRIC DIMENSIONING & TOLERANCING
PER: ASME Y14.5M - 1994
DATE
SIZE
B
DWG. NO.
REV
SCALE: 1:12
SHEET 1 OF 1
HOOD IMAGE
TITLE
GTXHP36 SPEC SHEET W/SLOW COOK SHELF
0
UNITS: INCHES
Sunday, January 31, 2021 8:17:20 PM
CR
NOTE: The drawing shown is a typical installation and is
intended to be a guideline. It is not a rigid specification. Hood
dimensions and the positioning of the hood over the grill will
vary with hood manufacturers.

16 Document #: GAR_IOM_4605246 – 1/21
Installation Section 2
Positioning
The unit is very heavy and mechanical assistance may be
required to lift and position the appliance.
The unit is designed to be installed on a smooth and level
surface built to withstand the weight of the fully laden
appliance.
To comply with NSF, the unit should be siliconed to the
installation surface to prevent debris from accumulating
under the unit. The levelling feet can be removed if required.
If possible, we recommend moving and positioning the unit
without removing the ceramic bricks, however, if the bricks
must be removed, follow the steps below.
• Remove the lower front panel, by removing the screws
on the underside and popping it off the catches on the
top side. Be sure to disconnect the cooling fan wires
before setting the lower panel aside.
• Remove the valve panel by removing the screws on the
underside and the screws under the front rail. Disconnect
the potentiometer(s) and power switch(es) at their
connectors, and the quick connects on the indicator
light(s). Once all the wiring is disconnected, remove the
ground strap screws to free the valve panel from the unit.
• Remove the shields in the corners of the unit under the
front rail by removing the screw. Remove the insulation
as needed behind the shield, to gain access to the hex
bolt.
Remove the entire top of the unit by removing the hex bolt,
then sliding the lock rods forward to release the catch at the
back. Lift straight up to remove the top assembly from the
unit. This can all be done from the front of the unit (back
panels DO NOT need to be removed.
• With the top assembly removed, the stainless steel
divider(s) (if any) and ceramic bricks can be removed.
Take care not to drop the ceramic bricks and be sure
to store them somewhere they won’t get dropped or
damaged. The ceramic bricks are somewhat fragile and
must be handled with care.
• DO NOT REMOVE INSULATING PAPER UNDER THE
CERAMICS. LEAVE IT IN PLACE.
• Once the unit has been moved into position, re-install
the components in reverse order. The ceramics have
features to ensure they are only installed in the correct
location, so look for these features and re-install them
carefully. Also, be sure the insulating paper is in position
as the ceramics are being installed. The air holes in the
insulating paper must match the air holes in the metal
box and the air holes in the ceramics.
• When done, you should be able to look through any air
hole in the ceramics and see the smaller air hole in the
metal box unobstructed by insulation paper.
Important
If for some reason the insulating paper is removed, be
careful to re-install it correctly. That means you must
ensure the air holes in the paper align with the air holes in
the metal box and that no holes are being blocked.

Document #: GAR_IOM_4605246 – 1/21 17
Section 2 Installation
Remove Stainless Steel Plastic Film
Removing this film is one of the things that must be
done once the unit is in place. The film covers external
components (e.g. side panels) and must be removed before
turning on the unit.
1. Using a plastic scraper, wedge the film away from the
stainless steel.
2. Grasp and pull the film very gently away from the
stainless steel.
Temporary Storage
Garland provides adequate protection under normal
conditions in transit and storage. The unit may need
additional protection if it is stored near salt water, a tropical
area, or other unfavorable conditions. Please contact your
Garland representative if the unit will be stored in these
conditions.
National Codes Requirements
• Installation should follow the local recommendations
related to building standards codes and/or regulations
applicable at the time.
• The installation must conform to the National Fuel Gas
Code ANSI Z223.1-1998 or latest edition, NFPA No. 54
– latest edition and National Electrical Code ANSI/NFPA
70-1990 or latest edition and/or local code to assure
safe and efficient operation. In Canada, the installation
must comply with CSA B149.1 and local codes where
applicable.
• In Canada, electrical connection must comply with
applicable sections of the Canadian Electrical Code, C22.1
- 1990, latest edition, “Safety Standard for Installation,
Part 1” and C22.2- No. O-M 1982 latest edition.
Installation Store Responsibilities
• Keep the front of the appliance free and clear of
obstructions to ensure the unit has adequate ventilation.
• Not intended to be installed where excessive vibration
occurs. Excessive vibration can affect the performance of
the unit, leading to malfunction and/or other problems.
• Not intended to be installed adjacent to combustible
walls or on combustible floors.
• Ensure the plug and cord supplied with the unit are not
damaged and are plugged directly into a power outlet
(Do not use and extension cord).
• Ensure the unit has been installed by a competent
trained installation person.
• Do not store anything on top of the unit
• Do not use water jets/power washer to clean the unit.
• Ensure store readiness of utilities, product & personnel.
Electrical Connection
• The type of electrical power for which the unit is
equipped is stamped on the rating plate. Connect the
unit to the electrical type stamped on the rating plate
only.
• The unit is supplied with a 6ft power cord with a NEMA
5-15 plug for connection to a properly grounded standard
120V outlet.
• All electrically operated appliances must be electrically
grounded in accordance with local municipal building
codes; or in the absence of local codes, with the latest
edition of National Wiring Regulations (ANSI/NFPA 70 or
CSA 22.1/22.2).
NOTE: This unit has flame safety and must be properly
grounded to work. The unit uses flame rectification to
detect whether the burner is on or off which won’t function
correctly if the unit is not grounded properly.
• A wiring diagram is provided in this manual. Check the
rating plate mounted on the inside of the left panel for
proper voltages.
• The entry point for the electrical connection is located on
the rear of the appliance.
• Do not cut or remove the grounding prong from the plug.
• Do not place a strong electromagnetic field close to the
unit as it may interfere with the electric controls.
• Adequate means of disconnection of the supply must
be provided and the circuit must be protected by proper
breaker/fuse.
• IN CANADA: All electrical connections are to be made in
accordance with CSA C22.1 – Canadian Electrical Code
and/or local codes.
• It is recommended to allow enough slack on the electrical
cord to allow the appliance to be pulled out for proper
cleaning and maintenance.
• Train your personnel on how to use the unit including:
• turning the unit on and off
• adjusting the temperature
• safety precautions
• cleaning the unit during operation and at the end
of the day
• effective use of the slow cook shelf
• The Garland XHP Charbroiler is like no other and cooks
differently than a traditional broiler. Contact your local
Garland distributor if you have any questions, or for
guidance about how to use your broiler effectively.

18 Document #: GAR_IOM_4605246 – 1/21
Installation Section 2
Gas Connection
• Check the rating plate to determine the type of gas to
connect to the unit. Only connect the gas type listed on
the rating plate to this unit.
• If connecting the unit to gas with a flexible gas hose, a
restraining device must also be installed. The flexible gas
hose should be a minimum of ¾” diameter.
• The appliance and its individual shut off valve must be
disconnected from the gas supply piping system during
any pressure testing of that system in excess of ½ PSIG
(3.45 kPa)
• The size of the main gas line is important. We
recommend using a main gas line with a pipe diameter
of 1-1/2” minimum to avoid pressure drop or gas volume
issues. Connect to the appliance with a ¾” diameter pipe
or approved flexible gas hose.
• Before connecting new pipe, it must be blown out to
dispose of any foreign particles. These particles can
contaminate or block openings and cause equipment
failures.
• When using thread compound, use small amounts on
male threads only. Use a compound that is not affected
by the chemical action of LP gases. Avoid applying
compound to the first two threads to prevent clogging of
the burner orifices or gas valve.
• Have installer check all gas connections for leaks with a
soap solution. DO NOT USE matches, candles or other
ignition sources when checking for leaks.
• Check the “Gas Specification Chart” to determine the
recommended incoming supply pressure based on gas
type.
• The unit is supplied with an appliance regulator. Be sure
to connect this to the back of the unit.
• The gas valve inside the unit has a gas pressure test port
that can be used to verify manifold/working pressure.
Check the “Gas Specification Chart” to determine the
manifold/working pressure based on gas type. After
installing the unit, be sure to verify this pressure is
correct by connecting a manometer to the test port on
the gas valve. If necessary, adjust the appliance regulator
as required to get the correct manifold/working pressure
at the test port.
• Gas pressures should only be checked by the local Gas
Company or an authorized service technician.
• If connecting the appliance with a quick disconnect,
ensure the fittings are installed in the correct orientation
(based on the flow of gas) and that the male coupler is
fully inserted (and snaps into) the female connecter. Only
use approved quick connect fittings.
• If there is a momentary power failure (ie: power turns
off but comes right back on) when you are operating the
appliance, the internal gas valves will stop the flow of
gas for your safety. However, the appliance will restart
automatically on restoration of power; you do not need
to take any action.
• If there is a sustained power outage, be sure to turn
off the appliance at the front switch(es). Do not walk
away from a unit that has no power but has the front
switch(es) turned on because if power is restored, the
burners will automatically light and can start a fire if
flammable materials have been left on or near the
appliance.
Inlet Pressure – Loosen screw and connect a manometer to
this port to read the manifold/working pressure. Manifold/
Working pressure must be 4.5” WC for both Natural Gas and
Propane. If not, adjust the appliance regulator supplied with
the unit to get the correct value.
Servo Regulator – Used to adjust the low flame setting. Set
at the factory; DO NOT adjust.
Throttle – Used to set the main flow through the valve. Set at
the factory; DO NOT adjust.
Outlet Pressure – Used to set the vacuum pressure of the
valve at the factory during initial set up of the unit. DO NOT
use.

Document #: GAR_IOM_4605246 – 1/21 19
Important
The cook grates on this unit have been coated with an
organic FDA approved, food safe anti-rust oil at the factory.
Be sure to burn off all the oil on the grates before cooking.
With the unit in position under the exhaust hood, run the
unit on high for approximately 30 minutes to burn off all
the oil. This only needs to be done when the unit is new,
before cooking for the first time.
Before Turning on the Grill
• Ensure it has been installed correctly by a trained/
licensed technician.
• Check that all packaging material has been removed from
the cook area (including under the cook grates) and that
the plastic film has been removed from all stainless steel
panels.
• Ensure the ceramic ring is in place on the locating pin and
the burner cap is installed on top of the burner.
• Cook grates are in position and have been cleaned and
seasoned.
Turning on the Grill
• To turn on the grill, simply hit the power switch. Most
units have multiple switches and each switch turns on the
burner directly in front of it. When a switch is activated,
the grill will automatically light the burner. This can take
between 10 and 30 seconds. If the red indicator light
above the switch comes on, the burner has “locked out”
and the power switch needs to be toggled to try lighting
the burner again. If the burner locks out a second time,
check the troubleshooting section of this manual.
• Once the burner is on, it can be adjusted by turning the
control knob. The low setting will hold a temperature
between 500-550°F and the high setting will hold a
temperature of 700-750°F. It will take approximately 30-
45 minutes for the unit to heat up and be ready to cook
on.
• For optimal ignition performance it is best to set the knob
to the middle position when starting the unit.
Shutting off the Grill
• To turn off the unit, toggle the rocker switch to the off
position. If there are multiple switches, be sure to turn
them all off when shutting down the grill.
• For units with multiple burners, one or more burners
can be shut off during slow times to conserve energy;
however, keep in mind that sections of the grill that are
shut down will need 30-45 minutes to heat up once
turned back on again.
• In the event of a power outage, the gas valve(s) will close
immediately and all burner(s) will turn off. Be sure to
toggle off the power switch(es) on the unit to prevent the
unit from automatically coming back on when power is
restored.
nWarning
If the power supply to the appliance fails/power-outage/
power-cut, please switch off the appliance at the front
switch. Do not walk away from a grill that has no power
but with the switch turned on. Doing so could cause
a fire if something flammable is left unattended near
the appliance and the power then comes back on and
reignites the grill.
Section 3
Operation
Lockout Indicator
Power Switch
Control Knob

20 Document #: GAR_IOM_4605246 – 1/21
Operation Section 3
Operation of the Grill
• The temperature of the cook surface can be controlled by
adjusting the control knob. Each section of the grill can
be adjusted and/or turned on or off individually.
• Heat is distributed evenly across the entire cook surface
with cooler spots directly above the burner.
• Use the scraper and brush combination tool provided to
clean the cook grates as needed during operation.
• While cooking, any grease drippings from product on
the grill will be vaporized by the ceramic bed under the
cook grates; therefore, this unit has no grease collection
drawer to empty.
• In order for grease/drippings to be vaporized effectively,
the ceramic bed must be hot. This is one reason we
recommend a 30-45 minute heat up time before cooking,
as it will allow the ceramic bed to get hot enough to
vaporize grease/drippings.
• We do not recommend turning on the unit, cooking
before heat up and immediately turning off the unit,
as the grease/drippings will stick to the ceramic bed
and make the ceramics difficult to clean. If you must
cook before the grill is properly heated, we recommend
running the unit for at least 30 minutes after cooking to
vaporize grease/drippings stuck to the ceramics.
,Caution
When cooking on the grill, care should be taken not to
touch hot surfaces. Stainless steel panels close to the
grates, such as the front rail, will become hot and can
burn skin.
• Charbroilers are prone to flare ups when cooking fatty
foods such as hamburger patties. Keep hands/arms
away from the cook surface when possible. If flipping or
adding/removing product, do so quickly and promptly
remove hand/arms from the area directly over the cook
grates. If necessary, use long-sleeved flame-retardant
gloves to protect against burns from flare ups.
• Charbroilers generate smoke as part of the cooking
process. The smoke helps to import a unique flavor into
the food. This unit will generate more smoke than a
traditional broiler because it vaporizes fat/oil drippings.
Be sure to install this unit under a ventilation hood with
enough suction to capture all the smoke generated by
the grill. If necessary, wear safety goggles to protect your
eyes from smoke when cooking on the grill.
Table of contents
Other Garland Broiler manuals

Garland
Garland MSR16 User manual

Garland
Garland IR36-280L Troubleshooting guide

Garland
Garland M110XM Owner's manual

Garland
Garland G80-18B User manual

Garland
Garland M60XR User manual

Garland
Garland CXBE12 User manual

Garland
Garland GF Sentry Series User manual

Garland
Garland CXBE12 User manual

Garland
Garland HEEG "CL" User manual

Garland
Garland CXBE12 User manual
Popular Broiler manuals by other brands

Vulcan-Hart
Vulcan-Hart GHCB40C Installation & operation manual

Vulcan-Hart
Vulcan-Hart GHCB34S Installation and operation manual

Equipex
Equipex SODIR GR-60E Brochure & specs

Vulcan-Hart
Vulcan-Hart VACB20 Installation and operation manual

Southbend
Southbend SCB-24 owner's manual

StarMax
StarMax 6015CBA Installation and operating instructions