Garlando TOORX STREET COMPACT User manual

Ed : Rev : Cod :
INSTRUCTION
06/19 GRLDTOORXTSTRCPT02

- 4 -
Ⅲ. ASSEMBLY INSTRUCTION
Hardware packing list
Part # Description
Quantity (PCS)
Part # Description
Quantity (PCS)
Safety key
1
Silicone Oil
1
Allen wrench
1
Handrails (R+L)
2
Remote Control
1
PIN
1
KNOB
2
MATEL PLATE
2
NOTE: 1. Above described parts are all the parts you need to assemble this treadmill. Before you start to
assemble, please check the hardware packing to make sure they are included.
Step 1:
Pull out the pin (56), Then lift the main handlebar. Check the drawing, do the same operation.
Step 2:
When the main handlebar open and in the right position. Then use the knob(NO.53) to fix handlebar, as
in the drawing, do the same operation on the other side.

- 5 -
Step 3:
Take the side handrail, and insert the axle into hole.
Step 4:
Rotate the handrails, and lock on the handlebar. Then put the safety key on, you can use the treadmill.

- 6--
EXPLODED DRAWING
- 10
Ⅳ PART LIST
SPARE PART LIST.
No
part name
qty
No
parts name
qty
1
FRAME SIDE TUBE
2
30
MIDDLE CABLE
1
2
SIDE RAIL
2
31
LOWER CABLE
1
3
RUNNING DECK
1
32
FUSE SET
1
4
RUNNING BELT
1
33
SWITCH
1
5
FRONT DECORATIVE LINE
1
34
CABLE LOCK
1
6
MOTOR UPPER COVER
1
35
BOLT
1
4
7
MOTOR LOWER COVER
2
36
CLOCK WASHER
10
8
RUBBER CUSHION
2
37
BOLT
1
5
9
HANDLE BAR STEEL FRAME
1
38
SCREW
1
6
1
0
CONSOLE UPPER COVER
1
39
BOLT
2
11
CONSOLE LOWER COVER
1
40
BOLT
2
12
FRONT ROLLER
1
41
FLAT WASHER
2
13
REAR ROLLER
1
42
NUT
2
14
END CAP
1
43
BOLT
4
15
WHEEL PLATE
2
44
FLAT WASHER
2
16
TRANSPORTABLE WHEEL
2
45
BOLT
2
17
FIX PLATE
2
46
FLAT WASHER
2
18
FOOT
2
47
SAFETY KEY
1
19
REAL ROLLER PLATE 1
2
48
LUBRICANT OIL
1
20
REAL ROLLER PLATE 2
2
49
POWER CABLE
1
21
CYLINDER
2
50
ALLEN WRENCH
1
22
BASE FRAME CONNECTION PIPE
1
51
PLASTIC COVER
2
23
CONTROLLER BOARD
1
52
HANDRAILS(R+L)
2
24
MOTOR
1
53
KNOB
2
2
25
MOTOR BELT 1
1
54
REMOTE CONTROL
1
26
ROTATION SHAFT
1
55
SCREW
4
27
FIX METAL
1
56
PIN
1
28
MOTOR BELT 2
1
57
MATEL PLATE
2
29
UP CABLE
1
- 10
1.
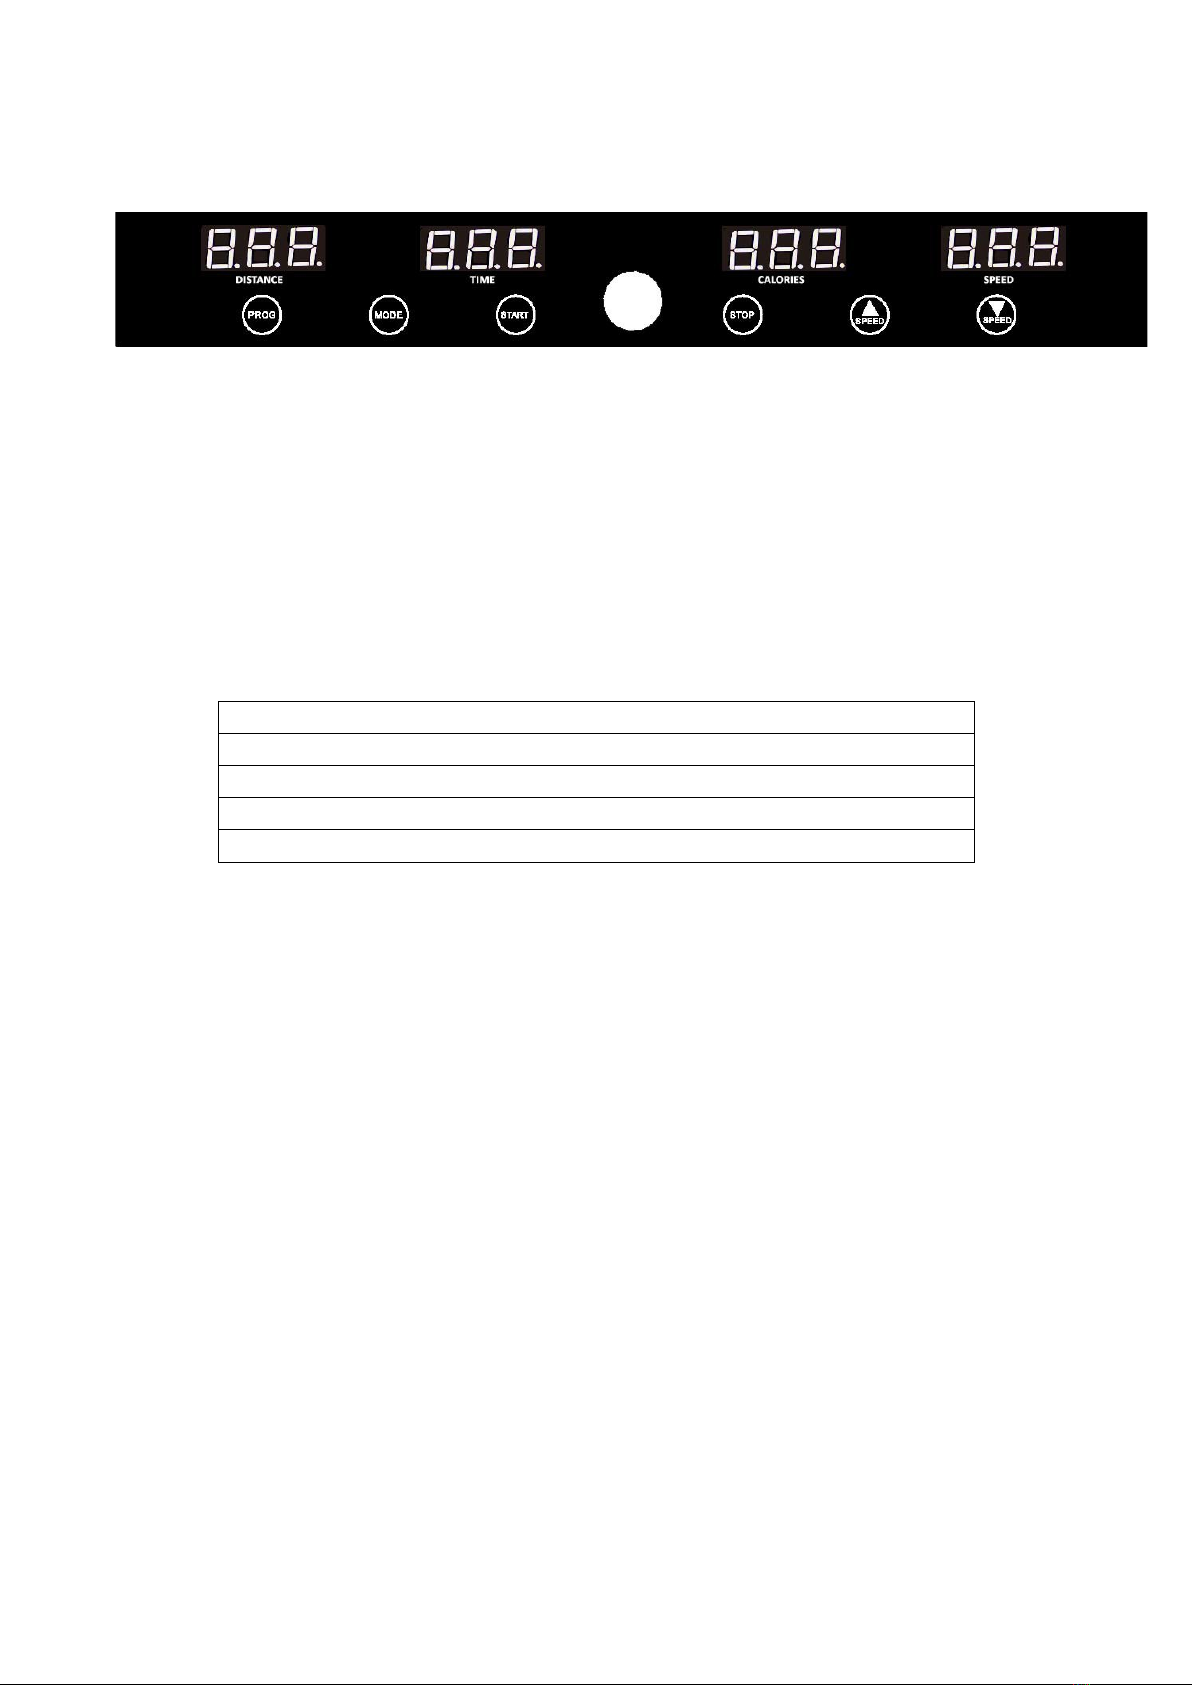
CONSOLE PANEL
Ⅳ. CONSOLE PANEL
2.
KEY FUNCTION:
2.1“START” Start the treadmill ;“STOP” ,Stop the treadmill.
2.2 “PROGRAM”: Program button, at the stopping state, select loop (P1、P2、P3、 …P12) as you want:
2.3 “MODE”: mode button at the setting state, select the countdown time, countdown distance and countdown
calories circularly. when you choose the mode, you can use speed’+” and speed’-“ setting the countdown
data, when you have finished setting, press the “START” you can running the machine.
2.4 SPEED”+”: speed + button, at the running state, press it will be add 0.1KM/H every time ,press it for a long
time ,it will add the speed constantly;
2.5 SPEED”-“: speed – button, at the running state, press it will decrease 0.1KM/H every time, press it for a long
time, it will decrease the speed constantly.
2.6 REMOTE CONTROL
TREADMILL REMOTE CONTROL ACTIVATION
1. Assemble the button cell at the back side of Remote control.
2. Open the treadmill and put the safety key on and ready for use.
3. Press the Speed- button until hear a “bip”.
4. Use the remote control to start the treadmill.
3.
PROGRAM
3.1 Speed display ; at the setting state ,it will show p1-P12 program, at the running state, it will show speed rage;
0.8-8km/h.
3.2 Countdown time training mode :at the stopping state ,press “MODE” button ,enter setting state ,the time window
display flash, default display 30:00,
press SPEED+,- button amend the setting value .The setting range:5—99
minutes .Press “START” button and startup the treadmill. when the
countdown time is 00:00 ,the treadmill stop running automatically .
3.3 Countdown distance training mode: at the stopping state ,press “MODE” button ,enter setting state, the
distance window flash display ,
default display 5.0KM ,press SPEED+,-button and amend setting value ,setting range: 0.5—99.0KM. Press “START” button to startup
treadmill ,as the speed 0.8KM/H to start to run, press SPEED+,- to adjust the speed .When countdown distance is 0.0 ,treadmill stop
running
automatically.
3.4 Countdown calories training mode: at the stopping state , press “MODE” button for three times ,enter the
setting state ,the calories window
display flash ,default display 100CAL, press SPEED+,-button to amend setting value ,setting range:20—990CAL. Press “START/STOP” button
to startup treadmill , as the speed 0.8KM/H to start to run, press the SPEED+,- to adjust speed. When Countdown calories is 0,treadmill will
stop running automatically.
3.5 Now input program mode, the program mode have P1-P12 in all, please press program key separately you can choose you desired and the
time window will flash.
enter setting state ,the time window display flash, default display 30:00, press The setting range:5—99
- 10
minutes SPEED+,- button amend the setting the time .Press “START” button and startup the treadmill. when
the countdown time is 00:00 ,the treadmill stop running automatically .Press speed +,- can change the
program data during running.
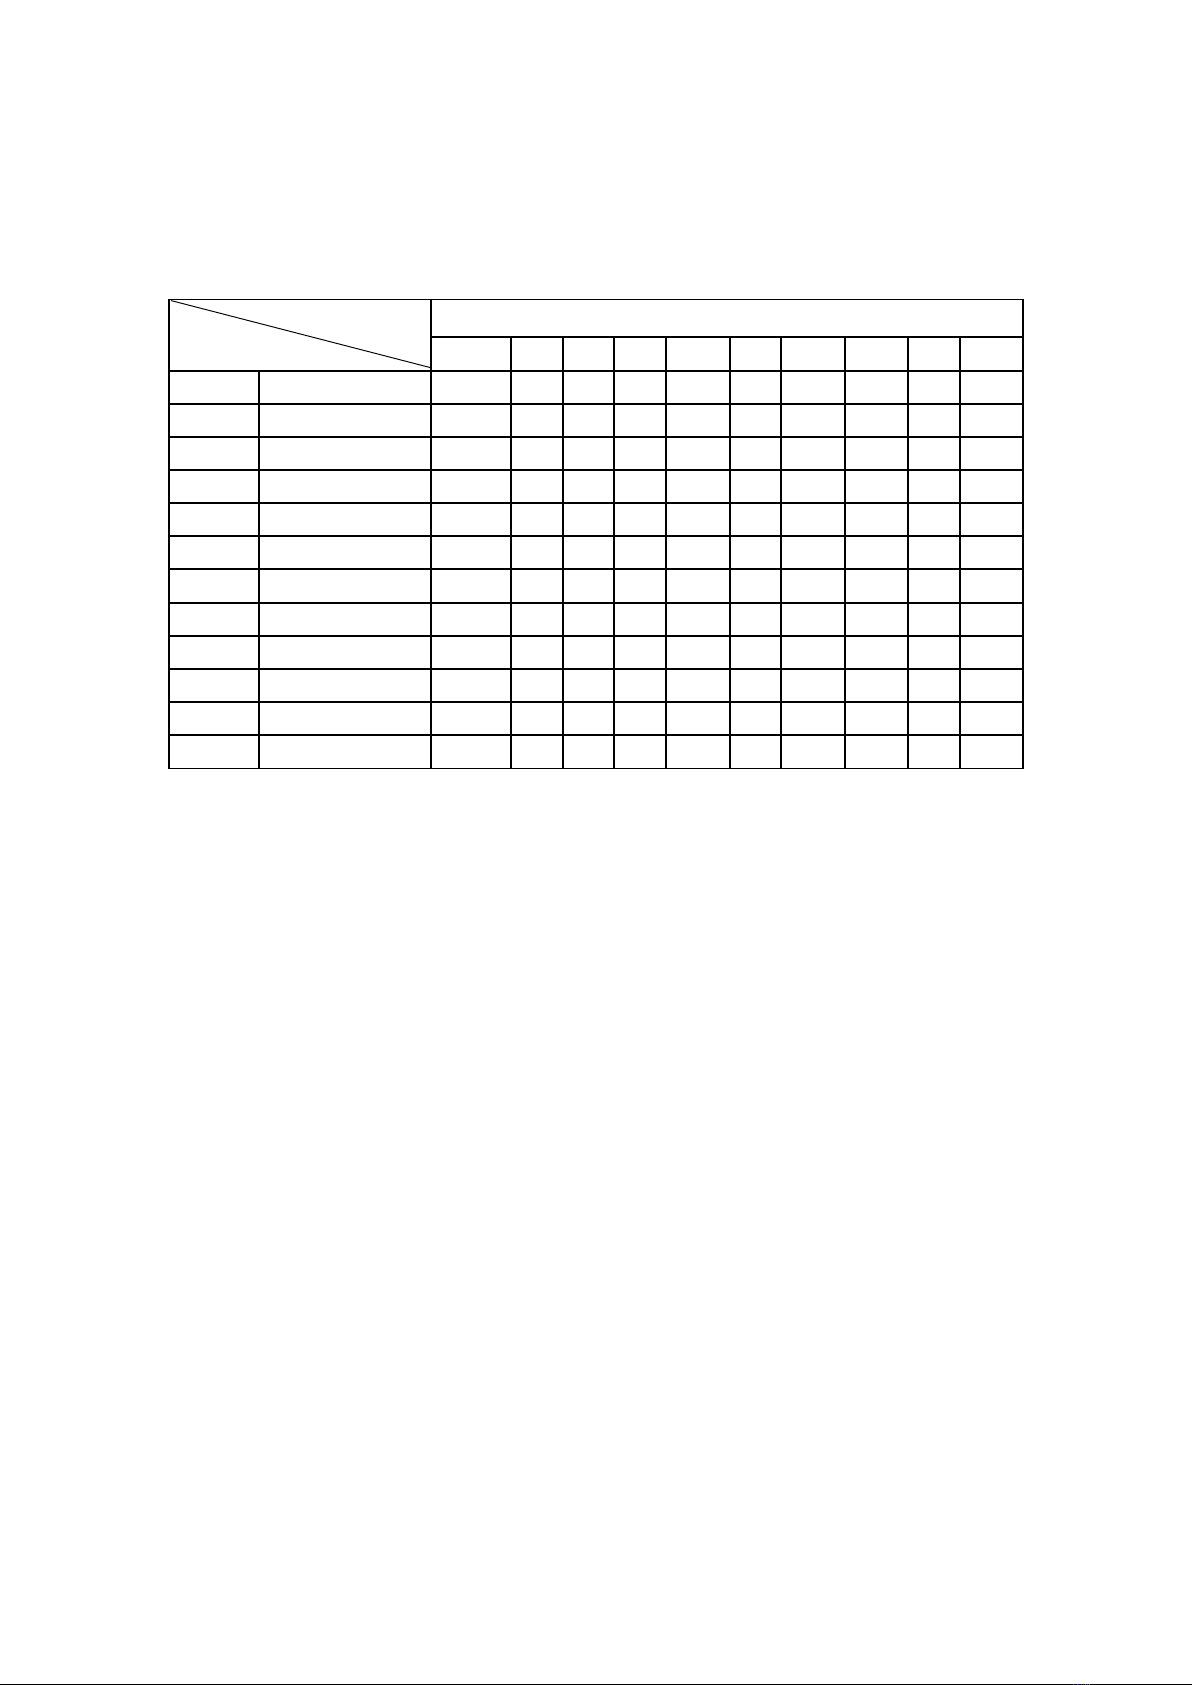
3.7 Program list
Program list
program minutes
Set minutes/ 10 = the time of each level
1
2
3
4
5
6
7
8
9
10
P1
SPEED
2
4
3
4
3
5
4
2
5
3
P2
SPEED
2
5
4
6
4
6
4
2
4
2
P3
SPEED
2
5
4
5
4
5
4
2
3
2
P4
SPEED
3
6
7
5
8
5
9
6
4
3
P5
SPEED
3
6
7
5
8
6
7
6
4
3
P6
SPEED
2
8
6
4
5
9
7
5
4
3
P7
SPEED
2
6
7
4
4
7
4
2
4
2
P8
SPEED
2
4
6
8
7
8
6
2
3
2
P9
SPEED
2
4
5
5
6
5
6
3
3
2
P10
SPEED
2
3
5
3
3
5
3
6
3
3
P11
SPEED
2
6
7
4
4
7
4
2
4
2
P12
SPEED
2
5
5
4
4
6
4
2
3
4
4.
Quick start (manual mode)
4.1. press power switch ,put the safe key to correct place.
4.2 press “START” button, the system into 3 seconds countdown time, the buzzer sounds ,the time display will
show countdown time at the same time .3 seconds later the machine will start to running with 0.8km/h.
4.3 at the running state, press “SPEED+””SPEED-“ adjust the speed according to your request.
.
5.Manual mode
5.1 at the alert state, press “START” button, the machine start to running with 0.8km/h,other display window
start to count data, Press “SPEED +”,”SPEED-“ change the speed.
5.2 at the alert state Press ”MODE” button into countdown time, The ”TIME” display “30:00” and flash, press
“SPEED+””SPEED-“ setting running time, time setting range:5:00-99:00.
5.3 at the countdown time mode, press “MODE” into countdown distance mode, The “DISTANCE” display “5.0”
and flash, Press “SPEED+” “SPEED-“ set running distance, distance setting range:0.5-99.
5.4 at the countdown distance mode, press “MODE” into countdown calorie mode, ”CAL” display “100” and flash,
press “SPEED+” “SPEED-“ setting calorie, Calorie setting range:20-990.
5.5 Choose one mode of above three modes to setting, then press “START” ,3 seconds later ,the machine will
start to running, Press “SPEED+” “SPEED-“adjust speed, Press “ STOP” ,the machine stop running.
6.
Build-in Program
There are 12 build-in program(P1-P12),at the ready state, Press “PROGRAM” button, “SPEED “ display
“P1-
P12” ,After you choose one program mode, the “TIME” display flash at the same time; display preset time
30:00,Press “SPEED+” “SPEED-“ setting running time, then press “START” startup build-in program, there are 10
levels of build-in program, each program level = setting time/10 . The system will sound “Bi-Bi-Bi” to remind you

-10
into next program level mode ,the speed will change when the program level mode change, at the running state
you can press
“SPEED+””SPEED-“ change speed, but this program level speed will recovered when into next
program level mode. after finish
the program level mode, the system will sound “Bi-Bi-Bi” to remind, the
machine speed down smoothly and stop working,
display ”END”.5 seconds later the machine into alert state.
1.
PREPARATION BEFORE START
Ⅴ. OPERATION INSTRUCTION
1.1 Plug in the power cord and press the power key at the down front part of the machine. If the machine is not
operated or
moved for a long time, please turn off the power.
1.2 Nip the safe key on the clothes and put the switch of magnet into the computer. If the safety magnet is not put into the
assigned location, then the machine will not work.
2.
START
2.1 Press START/STOP, the machine begins to work with starting speed 0.8KM/h
2.2 Press SPEED can control the speed, with one press 0.1 KM/h will be increased or decreased. Press the key
without stop can
get to the speed you want. The highest speed is 8KM/h while the lowest is 0.8 KM/h.
3.
TWO WAYS TO STOP THE MACHINE
3.1 Pulling the safe key will put a quick stop to the machine which will beep. Before restart, please put the yellow magnet to
the original place.
3.2 Press START/STOP, the machine will stop working
IMPORTANT SAFETY INSTRUCTION
1. The machine is for home use
2. The voltage for the machine is 220V.
3. Before operating the machine, please do 10-minute warm-up and wear clothes and shoes that are suitable for sports
4. Do not stand on the motorized treadmill when you adjust, test or start the motorized treadmill.
5. Be careful when you get on or off the machine. Before starting the machine, please grab the handlebars and place your
feet on the side rails (not the running belt). After starting the machine, stand on the belt with the machine operating at
the lowest speed. Then increase the speed gradually. Before getting off the
1 -
- 1
machine, please decrease the speed to the lowest level in case of any danger.
6. When operating, press the safety at any time, the motor will stop working and the controller will give
warnings.
7. Children should be supervised by adults when they play on or beside the machine.
8. The motorized treadmill should be protected from sunshine, damp and dirt. All the parts shall be cleaned
often.
9. When the machine is free from using for a long time, please don’t place any objects or stand on the
machine.
MAINTENANCE
In order to prolong using time of the motorized treadmill, regular maintenance is necessary.
1. When the machine is operated for the first time or for a long time, some lubricant on the running deck or the
back of the running belt is necessary in order to lessen the burden of the motor.
2. Clean the parts of the machine regularly to prevent dirt from disturbing the operation of the parts.
3. Drop some lubricant on the axletree of the roller regularly to keep the axletree in good condition.
4. Check the screws and bolts regularly. If they are loose, please screw them down.
LUBRICATION
The treadmills have already been spread with "Silicone Oil" in advance before leaving the manufacturing plant.
Silicone oil is without volatility and has gradually permeated through the running belt. There will be no need to
re-spread the oil in normal circumstances.
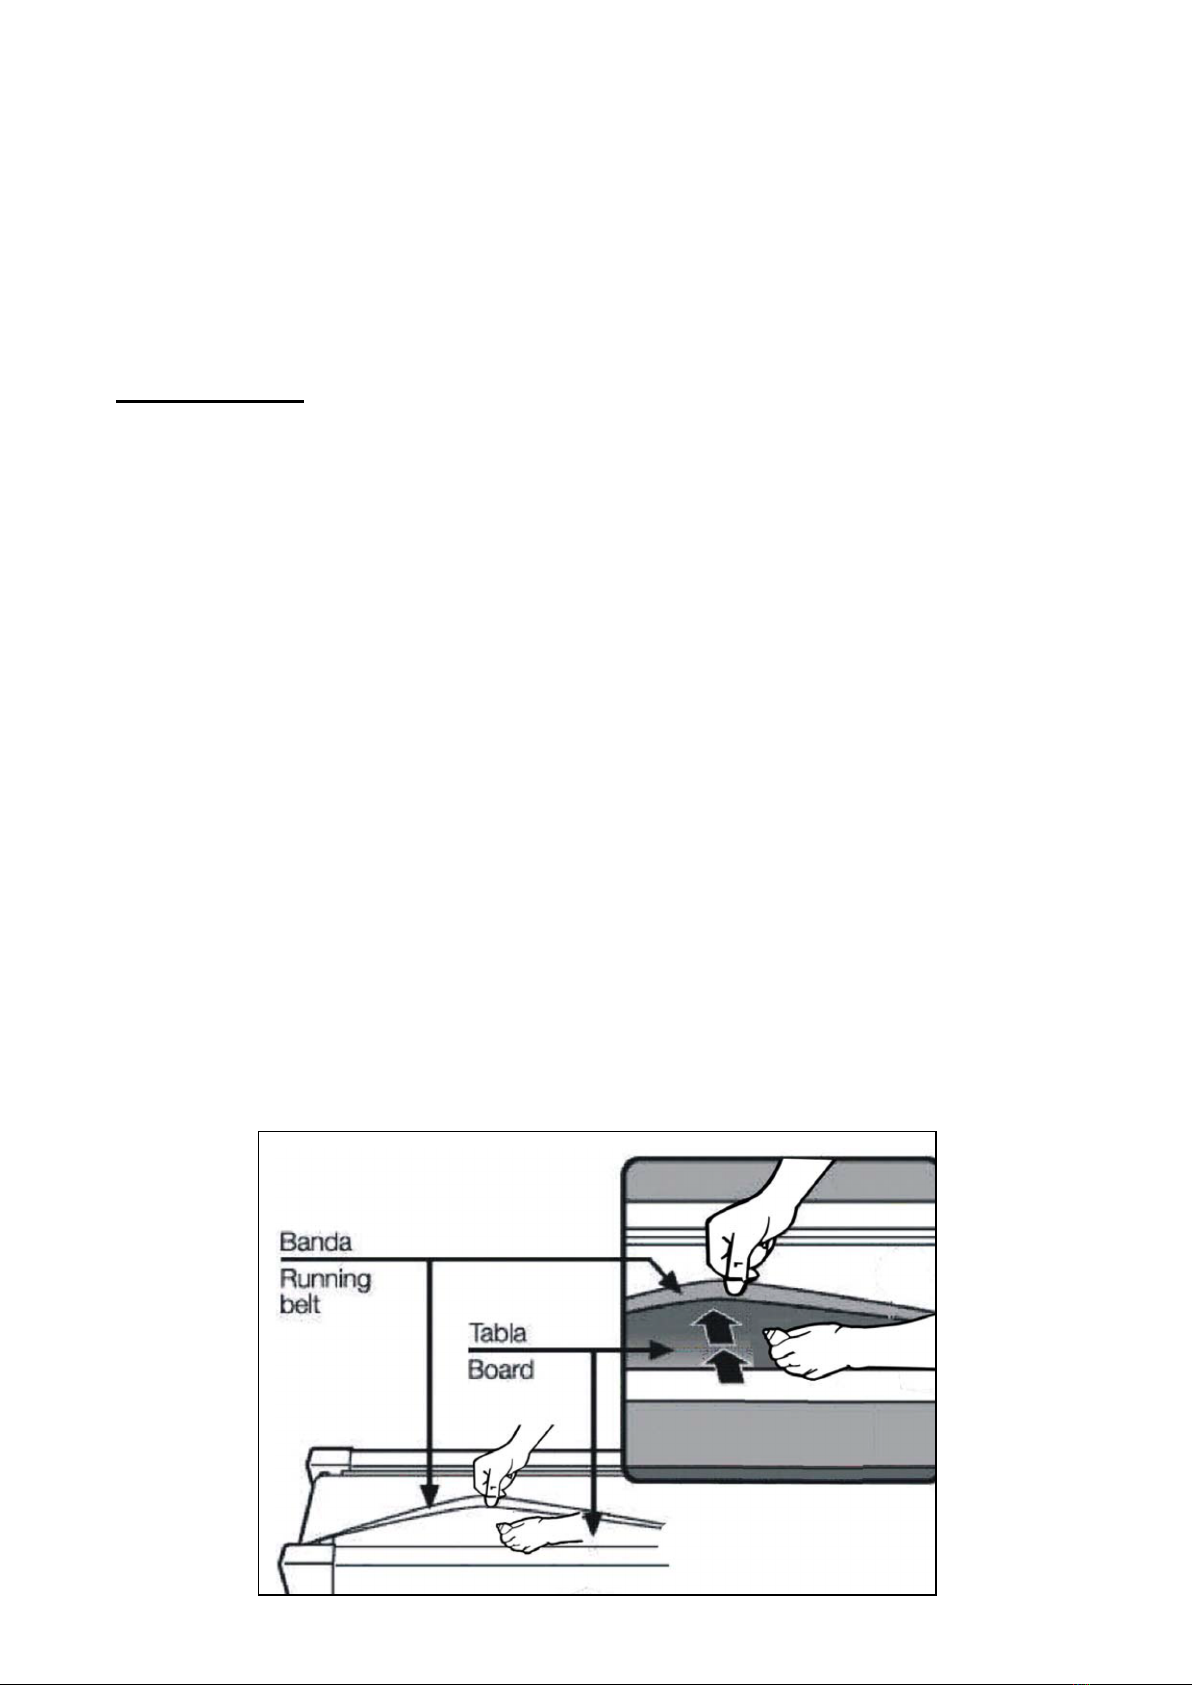
To maintain the running belt, we have included a small bottle of "Silicone Oil". "Silicone
Oil" may be re-spread once the resistance has been increased and the running belt starts
rubbing against the running deck. To hold open the running belt from two sides, apply the
silicone oil with an even motion on the center of the running deck. Allow the silicone oil to
‘set’ for one minute before using the treadmill.
Attention: Only use "Silicone Oil" lubricants for this equipment. In addition, do not add
any other oil ingredient; otherwise the treadmill will be damaged. Do not over-lubricate
the walking board. Excess lubricant should be wiped off with a clean towel.
- 12 -
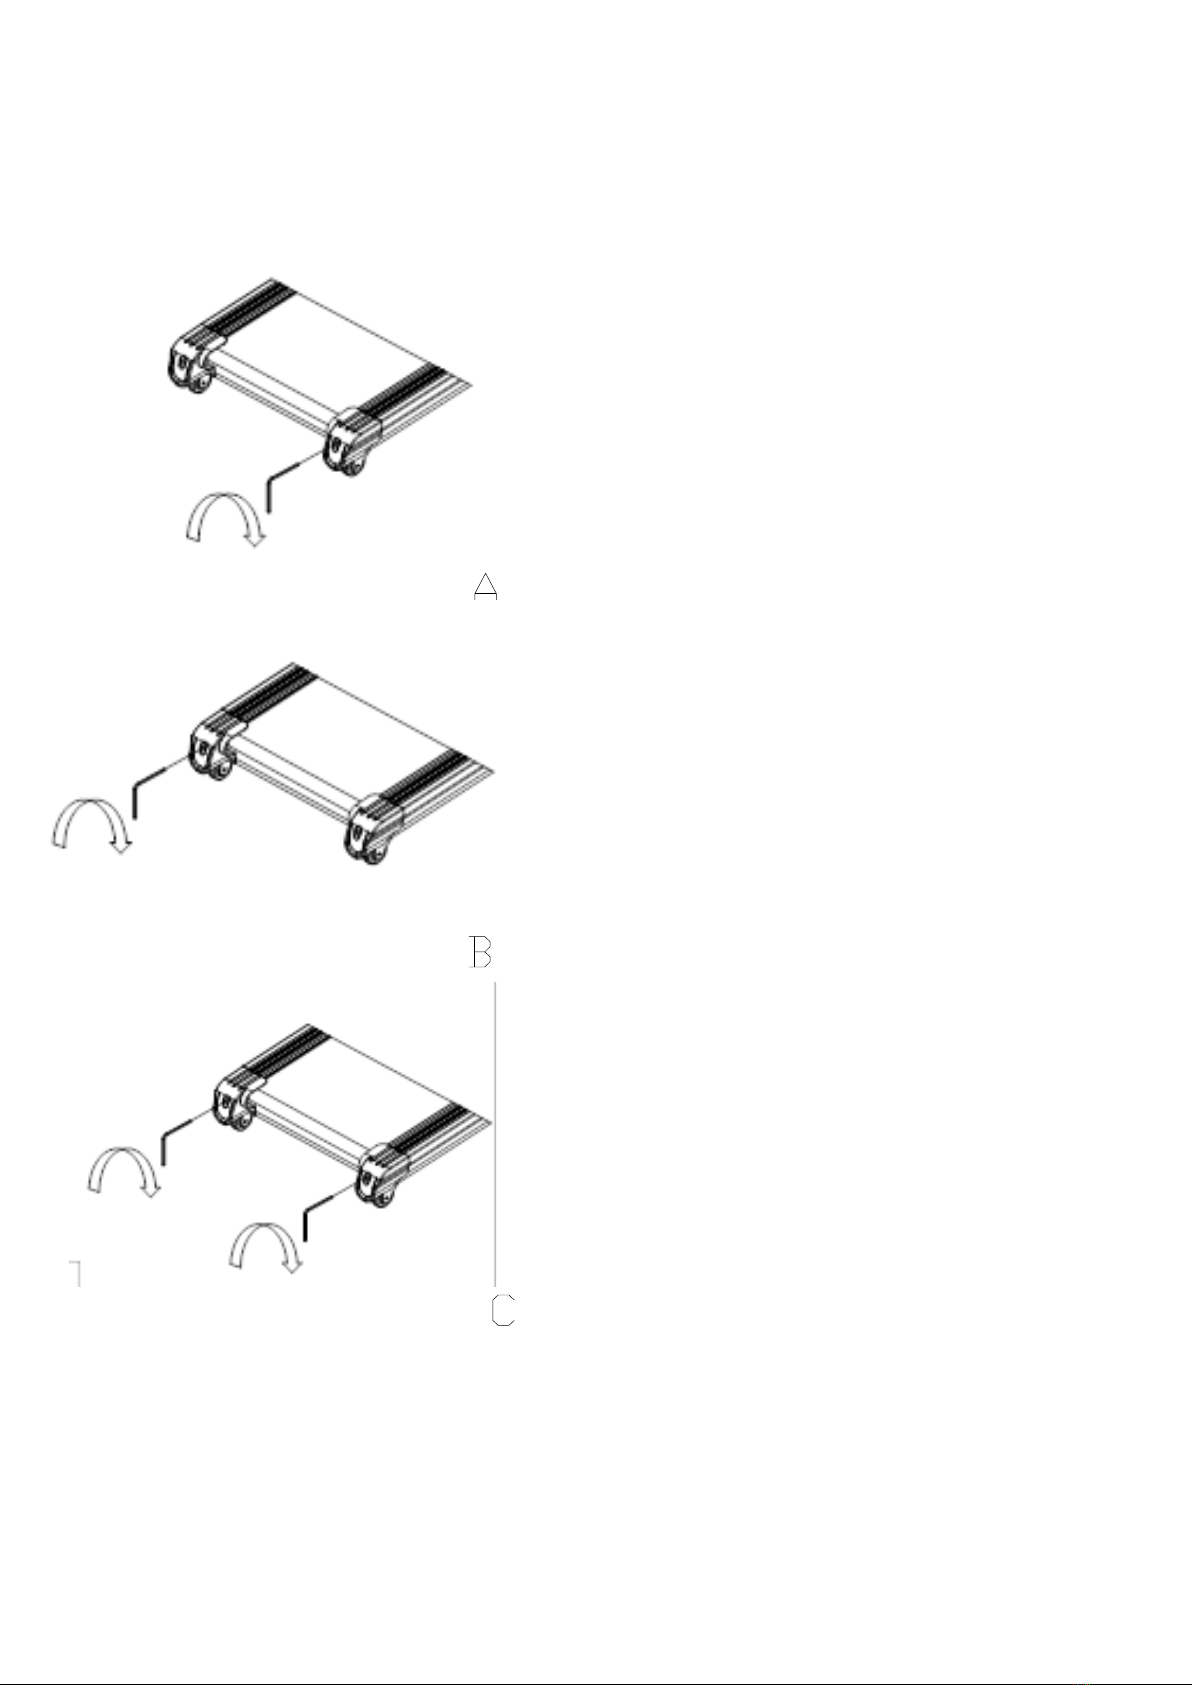
RUNNING BELT ADJUSTMENT
Place treadmill on a level surface. Make
observe the running belt deviate condition.
If the belt has drifted to the right, unplug the
safety lock and power switch, and turn the
right adjusting bolt 1/4 turn clockwise, then
insert the power switch and safety lock, make
the treadmill running, observe the running belt
deviate condition. Repeat above steps until the
running belt be placed in the middle. SEE PIC A.
Once the treadmill belt swerving to the left,
unplug the safety lock, turn off the power, then
with the left adjusting bolt clockwise rotation 1
/ 4 laps, and turn on the safety lock and power
to make treadmill running, checking the
deviation of the treadmill belt. Repeat the
above steps until the belt centered. SEE PIC B.
The treadmill belt will gradually relax after
above steps or after a period of time using,
unplug the safety lock, and turn off the power,
with the two adjusting bolt clockwise rotation 1
/ 4 laps, and turn on the safety lock and power
to make treadmill running, then standing on
the belt to confirm the tightness. Repeat the
above steps until the belt moderate tightness.
SEE PIC C.

GARLANDO SPA
Via Regione Piemonte, 32 - Zona Industriale D1
15068 - Pozzolo Formigaro (AL) - Italy
www.toorx.it - info@toorx.it
Table of contents
Other Garlando Treadmill manuals


