Garmin GDR 190 User manual
GDR 190
Dashboard Camera Owner's
Manual

2
NOTICE
The content of this Owner's Manual is copyright ©
Garmin (Asia) Corporation. All rights reserved. This
Owner's Manual (including text and figures) may not be
quoted, printed, copied, altered, scanned or otherwise
provided for use or sale, in whole or in part, without ex-
plicit written authorization of the Garmin (Asia) Corpora-
tion.
Place of manufacture: Taiwan
Seller: Garmin (Asia) Corporation
Producer: Garmin (Asia) Corporation
Contact address: No. 68, Zhangshu 2nd Rd., Xizhi Dist.,
New Taipei City 221, Taiwan (R.O.C.)
Tel: (02)2642-8999
Customer service hotline: (02)2642-9199

3
GDR 190 Standard Accessories
1. GDR 190 Dashboard Camera
2. GDR Mount (adhesive mount, replacement adhesive
pad included)
3. Car charger
4. 8GB microSD card (includes "PC Tool" built-in imaging
software)

4
1. Product Overview
The GDR 190 is a dashboard camera that combines GPS
functionality, a collision sensor, and an f2.0 large-aperture
lens with a horizontal viewing angle of 200 degrees—the
best in the industry. The GDR 190 not only records every-
thing you see in front of you in crisp HD-quality resolution,
but also captures objects just outside your field of vision,
ensuring you have a safer drive!
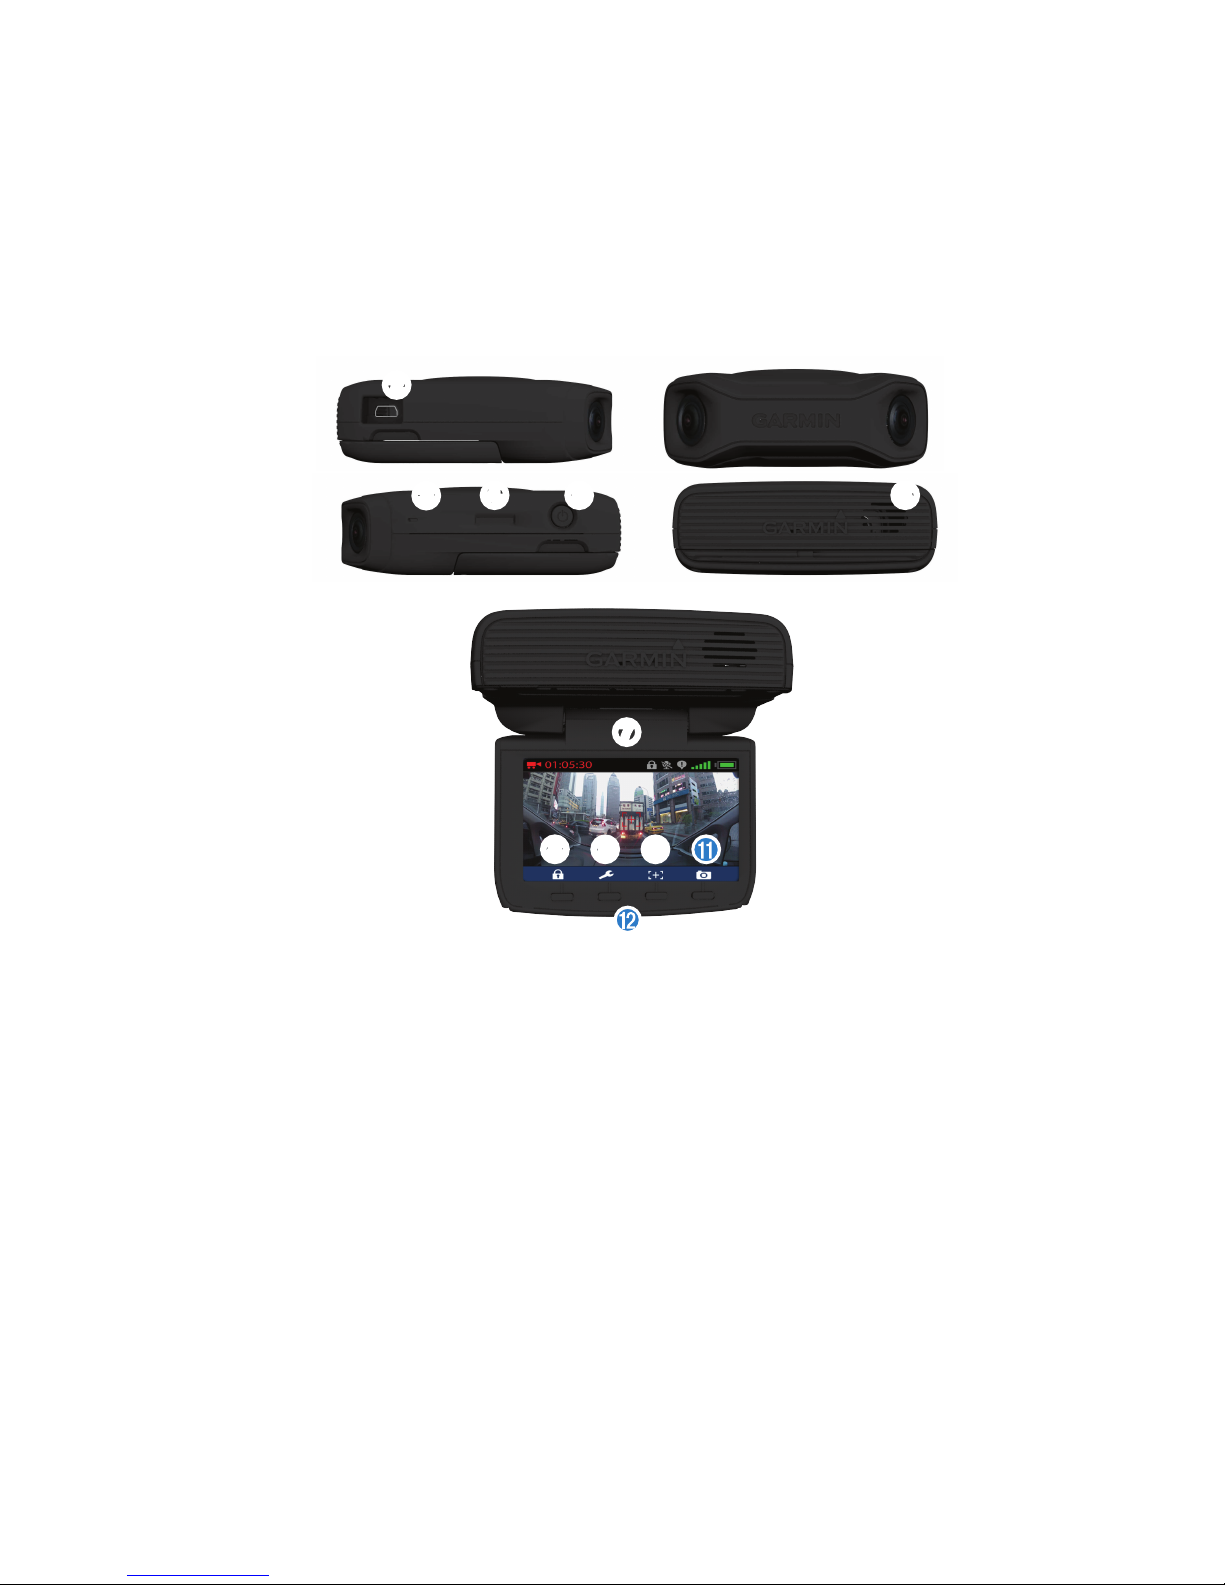
2. Description of Product Exterior
and Indicator Lights
GDR 190 Exterior
➊
5
➋
➌➍ ➎ ➏
➐
➑ ➒ ➓ ➋
1. Mount Connector
2. miniUSB Power Connector
3. Microphone
4. microSD Card Slot
Supports SDXC/SDHC up to 64GB (for SDHC, recom-
mended specs are 8GB, Class 6 or above)

6
5. Power Button
6. Speaker
7. Flip-down LCD Monitor
8. Emergency Image Lock/Image Capture Button
This button can be used to capture still images and
manually protect stored files. (See Collision Warning
section for protection rules)
9. Settings Button
See Function Settings for more details.
10. Image Calibration
This function can be used to detect and calibrate the
image captured based on what the camera is pointing
at, and is compatible with the front collision warning
system (FCWS).
11. The Image Capture Button can be used to quickly take
a picture when needed.
12. LED Status Indicator
7
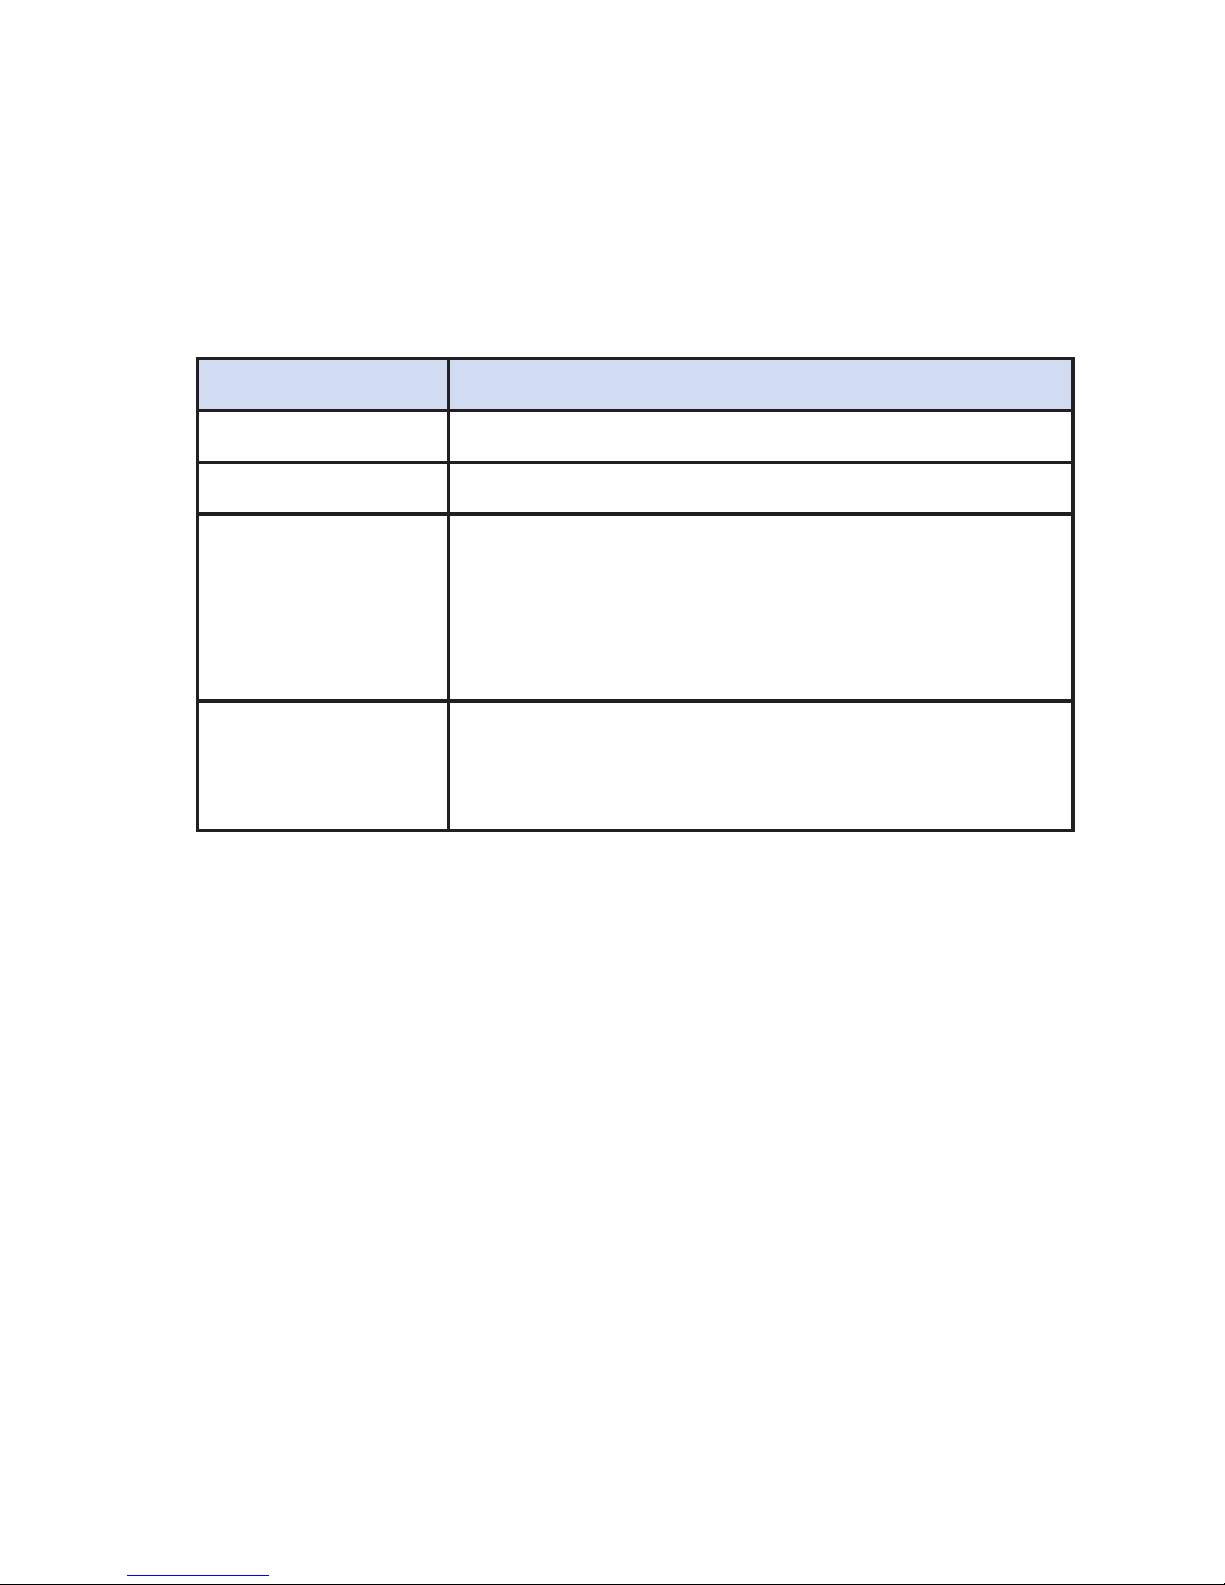
LED color Action indicated
Blinking Green Booting up or updating software
Red Recording
Blinking Red Rapid Blinking: Collision sensor acti-
vated
Slow Blinking: Parking mode activated
Green Idle (unable to record due to absence of
memory card, formatting issue, or other
reason)

8
3. Product Specifications
GDR 190 Product Specs
Dimensions (Length) 10 cm × (Width) 8.2 cm ×
(Depth) 3.1 cm
Weight 185g
GPS Yes
Screen 3-inch TFT LCD
Lens F=2.0
Recording
area
Visible diagonal viewing angle of 204
degrees (horizontal viewing angle: 200
degrees; vertical viewing angle: 74 de-
grees)
Sensor 3M, 1/3-inch, CMOS
Frame rate 30 FPS
Video format AVI (H.264 compression)
Collision sen-
sor
Yes; three collision sensitivity settings
available

9
Battery 1500mAh; up to 1.5 hours of recording
time
Microphone Yes
Speaker Yes
Speed cam-
era detection
Built-in database of fixed speed camera
positions
Memory card
slot
microSD slot, compatible with SDHC/
SDXC. Supports up to 64GB (for SDHC
cards, recommended specs are 8GB,
Class 6 or above)
Recording
modes
Cruising mode: HD quality (1920 x 1080
pixels) at 30fps. Maximum single file size
is 256MB or 2 minutes and 50 seconds
Parking mode: HD quality (1920 x 1080
pixels) at 30fps. Maximum single file size
is 50MB or 30 seconds
Operating
environment
temperature
0 to 60 degrees Celsius

10
1. Installation
➊
➋
➌
Step 1: Affix the adhesive
pad to the top side of the
mount. Position the mount
in the desired location on
the inside of the wind-
shield and press the ad-
hesive side of the mount
firmly against the glass.
Step 2: Attach the GDR
190 to the holder and then
mount the holder onto the
mount's ball-shaped con-
nector.
Step 3: Connect the car
charger to the GDR 190's
power connector.
NOTE: Adhesive reaches maximum strength after 24
hours. To ensure that the mount remains firmly in place, we
recommended allowing the mount to remain in place for
11
one day before attaching the camera.
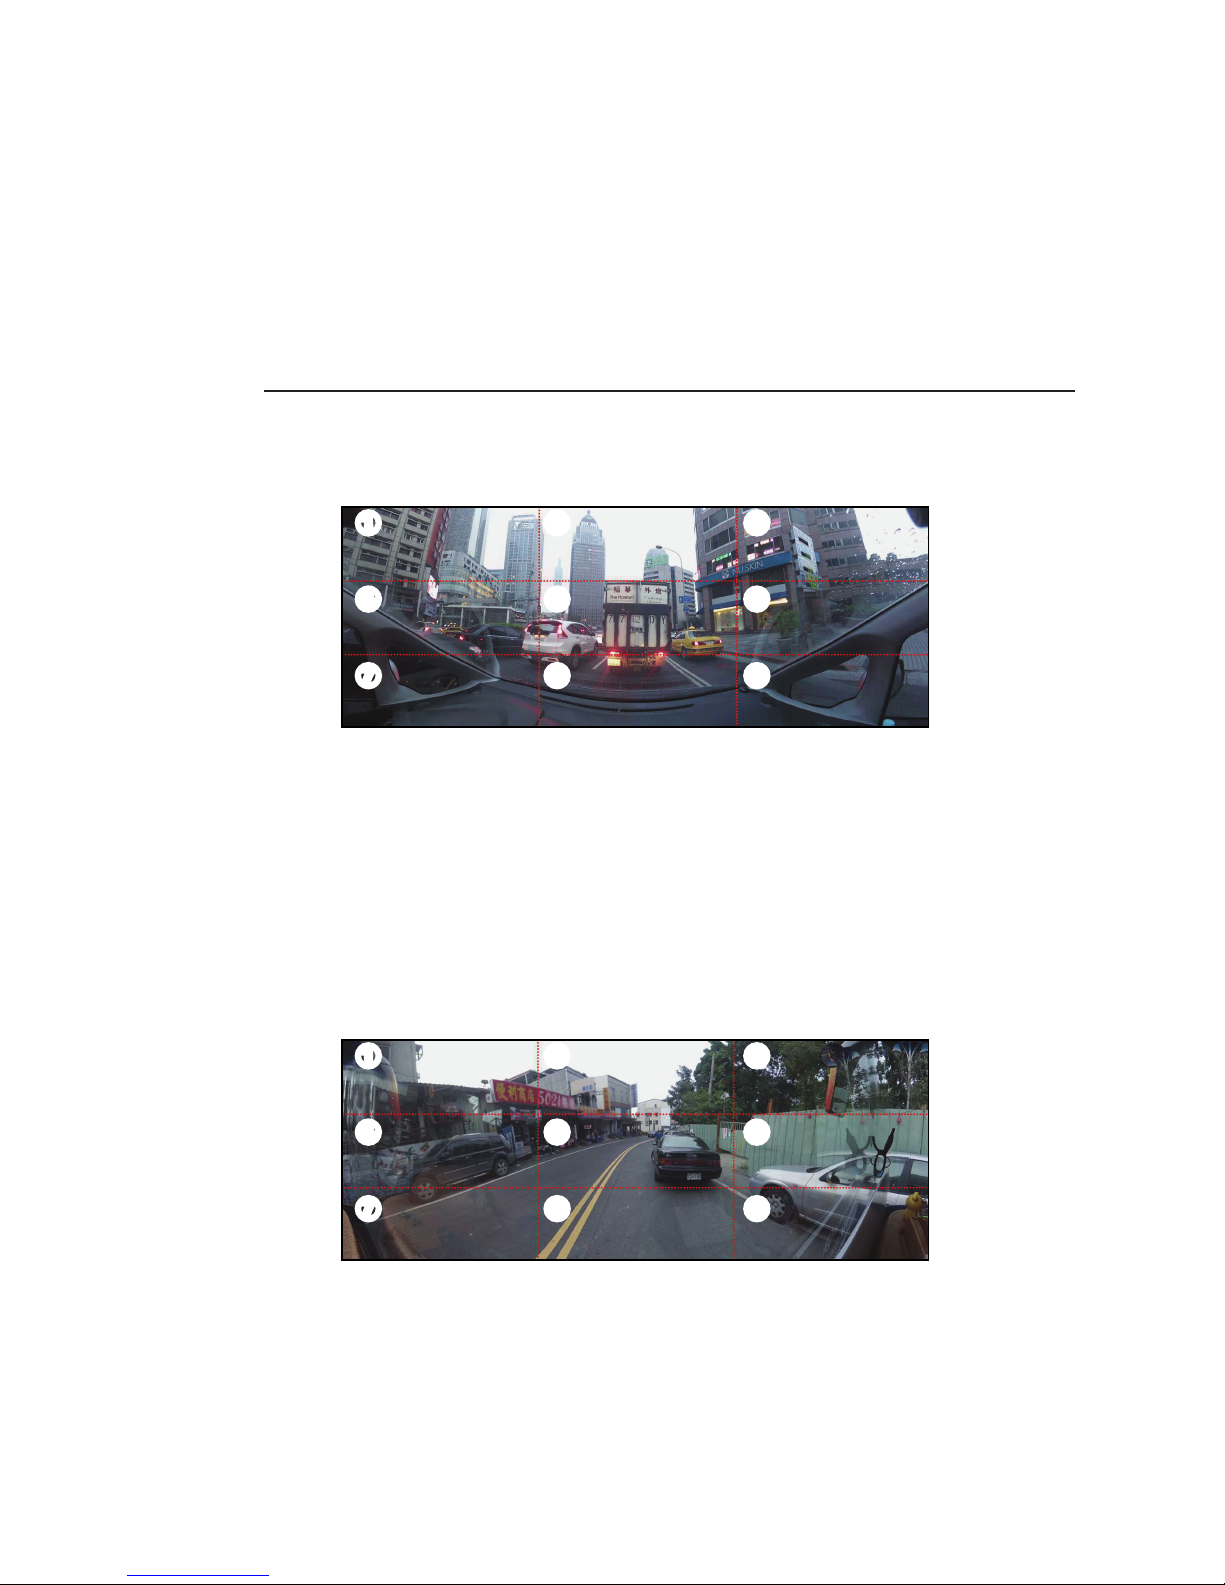
I、Recommended shooting angles for the GDR
Sedan (with windshield angle <40 degrees)
➊
➍
➐
➋
➎
➑
➌
➏
➒
The GDR 190 has a horizontal viewing angle that is wider
than 200 degrees, which is why it covers both pillars of
the windshield. When installed inside a sedan, it is recom-
mendable to divide the viewing area into 9 equal sections
as depicted in the figure, and line up the hood in sections
7, 8, and 9.
Van (with windshield angle >50 degrees)
➊
➍
➐
➋
➎
➑
➌
➏
➒

12
Large vans often lack the reference points that sedans have,
therefore the camera should be lined up so that sections 7
and 9 barely pass the dashboard and then fine tuned accord-
ing to the user's preference.
II、Calibrating for FCWS
Once the GDR 190 has been installed and turned on, the
user will be prompted to complete an initial image calibra-
tion, and the camera will automatically determine the ve-
hicle's center position. During calibration, the GDR 190 will
automatically recognize the lane that the vehicle is travel-
ing on (indicated by the solid green lines) and extend the
two reference lines until they intersect. The point of inter-
section will be used as the screen's center position.
After Calibration Is Complete
1. Intersection of the two extended lines will be marked
on-screen with a green cross.

13
2. When a vehicle enters the detected area, the screen
will prompt the user by displaying a white cross and
frame.
3. If the system detects that the driver is not maintaining
an adequate safe distance with the car in front given
the current speed, a red cross and frame will be dis-
played along with a warning sound to alert the driver.
If the calculated intersection is inaccurate, the driver may
also perform a manual calibration by pressing the "Cali-
bration" button.
NOTE:When calibrating, re-position the vehicle so that
the lanes can be recognized accurately.
1. Function Settings
The settings page provides two options: Dashboard Cam-
era Settings and General Settings.
NOTE: Press and hold the up/down buttons to quickly
scroll through the options
I、 Dashboard Camera Settings
1. Collision sensor calibration
Once the unit has been mounted to the fixed

14
position, select "Collision Sensor Calibration".
The system will automatically record data from 3
axes to enable more accurate estimates. Be sure
to perform this function immediately after initial
installation.
2. Collision sensitivity
Four options are available: High Sensitivity, Nor-
mal Sensitivity, Low Sensitivity, and Off. Sensitiv-
ity can be adjusted according to preference. The
unit's default setting is Normal Sensitivity. Files are
more likely to be stored by selecting High Sensi-
tivity. Note that when sensitivity is set to Low, it is
possible that a collision might fail to be recorded.
3. 3. FCWS Sensitivity
There are four options regarding the sensitivity
of FCWS: High Sensitivity, Normal Sensitivity, Low
Sensitivity, and Off. Sensitivity can be adjusted ac-
cording to preference. The unit's default setting is
Normal Sensitivity.
DESCRIPTION: The front collision warning system
gathers speed information using GPS, and is activated
whenever the speed exceeds 40 km/hr. It also detects its
15
distance from the front vehicle and warns the driver when
approaching too close.
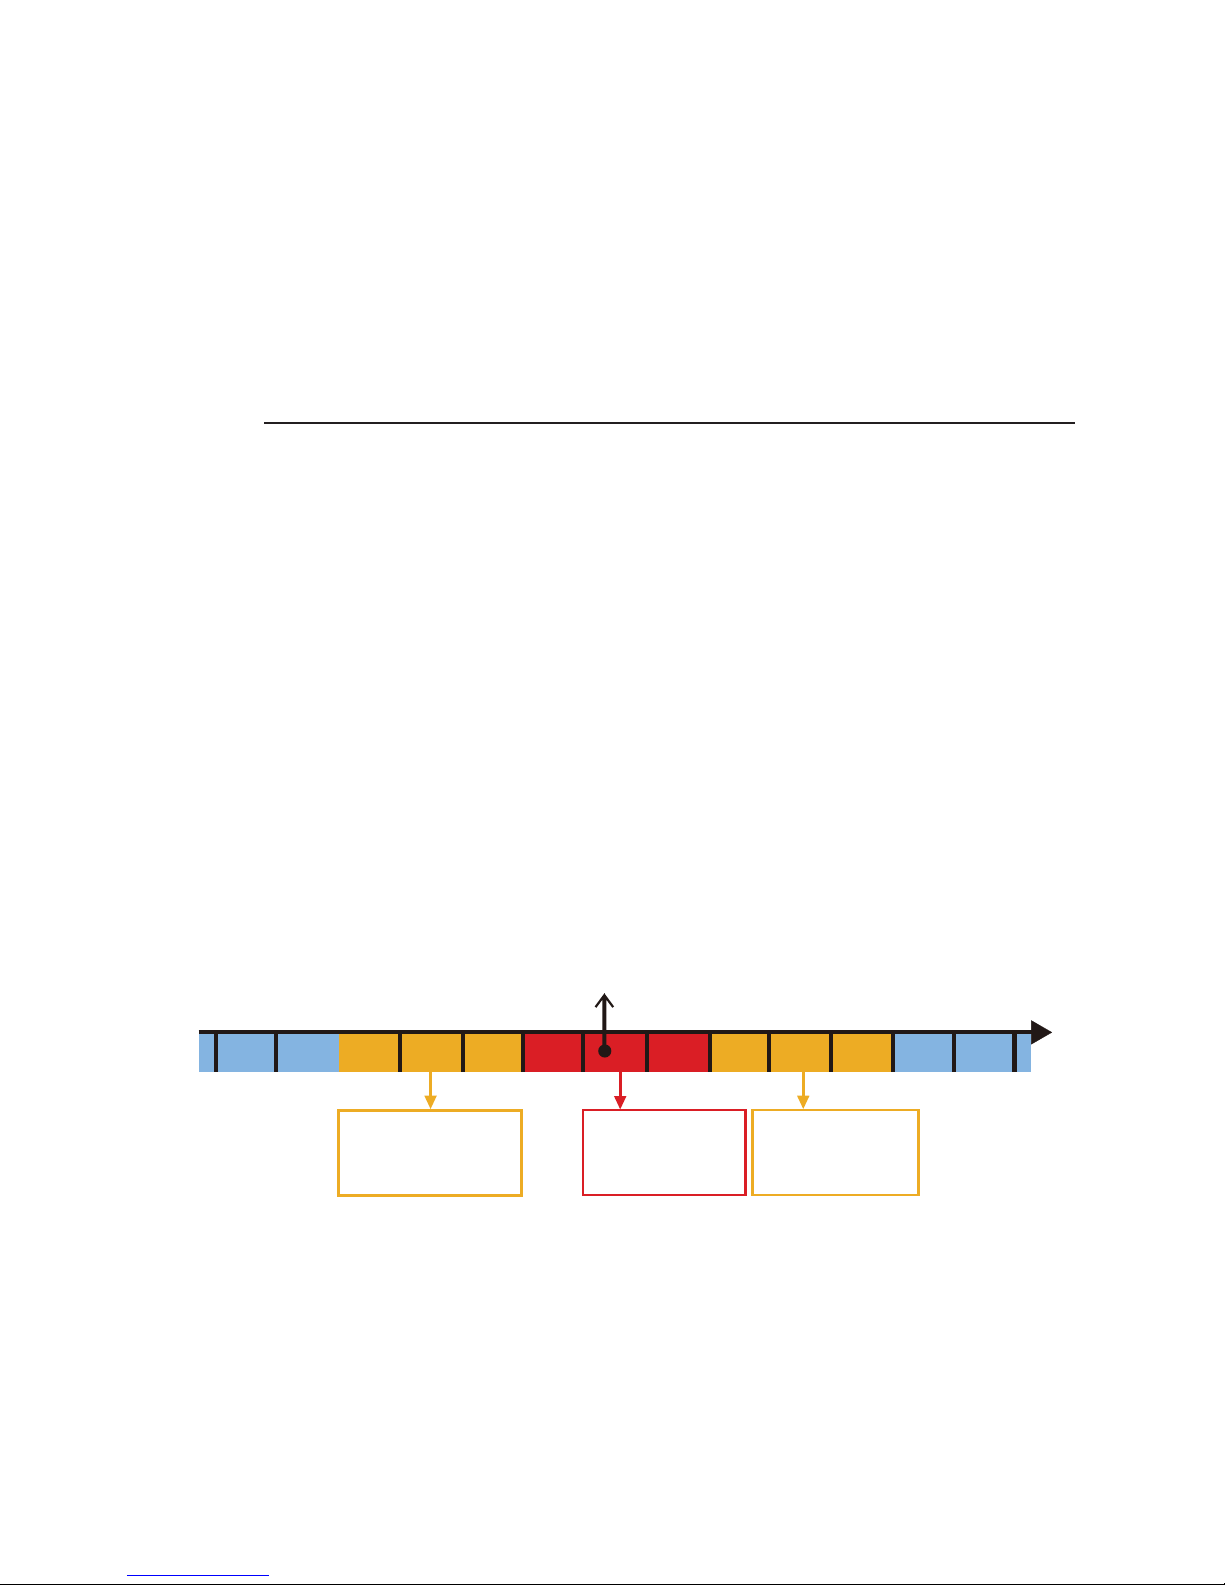
4. Collision warning
The GDR 190 has a built-in G-sensor that detects
collision accidents and triggers recording. Record-
ed video files are stored in a protected state. This
function is turned on by default. When the colli-
sion sensor is on (i.e. when set at High, Normal, or
Low sensitivity), the unit will sound three "beeps"
whenever a collision is detected.
After the sensor detects a collision, the system
will automatically lock down the current file being
recorded, as well as the previous file and the file
after the collision, therefore ensuring continuity of
the accident.
12 3
Recording timelinePoint of event
Previous video
file is automati-
cally locked
Current video
file is locked
Subsequent
video file is
locked

16
5. File protection cycle
The unit provides 15 storage spaces for protected
images. When overwrite is turned on, the system
will overwrite from the first file once all storage
space has been used up. This function is turned on
by default.
6. Audio recording
The unit features a built-in microphone. The user
may choose whether to turn audio recording on or
off.
7. Speed Camera Warning
The unit has a built-in database of fixed speed
camera positions, and will alert the driver when
approaching a speed camera.
NOTE: When English is set as the default language, the speed
camera warning will be in the form of two "beeps."
8. Exposure Compensation
The camera's exposure value features 7 adjustable
settings (Normal, ±1/3, ±2/3, and ±1).
II. Parking Recording Mode
The GDR 190 is able to record images after the engine is

17
switched off. Two recording options are offered:
Car charger
1. Continue recording using built-in battery
User may configure whether the dashboard camera should
record images using the built-in battery after the external
power source is disconnected.
Continue Recording Using External GDR Battery (Sold
Separately)
Once connected to an external battery, the GDR will turn
on its motion detection mode and begin recording when-
ever it detects movement in front of the camera or senses
collisions. This recording mode stores images up to 10 sec-
onds before an accident and up to 20 seconds after move-
ment is detected. The recording time will be extended for
as long as the movement is detected.
060
Point of event Detected move-
ment while
parked - record-
ing started
Continuous
movements de-
tected - extended
recording
-10 20 50 80

18
1. Automatic switch
User may configure whether to activate parked re-
cording mode when the engine is turned off.
2. Stop voltage
The unit is able to detect the voltage level of the exter-
nal battery. There are five stop voltage levels between
11.7V and 12.5V that the user can set; the unit will stop
movement detection and shutdown automatically
once the external battery falls below the defined volt-
age level.
3. Recording Time Setting
User may set motion-detected recording from any
time between 2 hours to continuous, provided that
the external battery does not fall below the stop
voltage. The unit will stop movement detection and
shutdown automatically after the recording exceeds
the preset time limit.
III. III、 General Settings
1. Screen Brightness
There are 10 levels of screen brightness to choose
from. The unit comes with a default setting of 50%
and is adjustable according to preference.

19
2. Volume
There are 10 volume levels to choose from. The
unit comes with a default setting of 70% and is
adjustable according to preference.
3. Auto screen shut-off
The unit will automatically reduce back light after
remaining idle for 1 minute.
4. Button Sounds
This function configures whether to make sounds
with each button pressed. The unit comes with
button press sounds on.
5. Time Zone Setting
Taiwan, Hong Kong and Mainland China are all
within the same time zone (UTC+8), and the unit
is set by default in UTC+8. To select other settings,
please verify the time zone where the unit is to be
used.
6. System Language
This option defines the language interface of the
system. The language interface can be set either in
English or Traditional Chinese. Units distributed in

20
Taiwan are preset in Traditional Chinese.
7. Voice Language
The unit gives voice reminders under special cir-
cumstances. Voice reminders can be set either in
English or Traditional Chinese. Units distributed in
Taiwan are preset in Traditional Chinese.
8. Satellite Status
Displays current GPS reception.
9. Flicker Suppression
Suppresses flickering caused by certain frequen-
cies.
10.File Playback
Plays back recorded videos and still images.
11.Delete File
Individually deletes specified video and still image
files.
12.Format Disk
Use this function to format blank memory cards if
they are not supplied by the unit's producer. It is
not recommended to format memory cards on a
Table of contents
Other Garmin Digital Camera manuals

Garmin
Garmin BC 40 Instruction manual

Garmin
Garmin BC 50 NIGHT VISION User manual

Garmin
Garmin BC 20 User manual

Garmin
Garmin GC 100 User manual

Garmin
Garmin BC 30 Instruction manual

Garmin
Garmin BC 40 Instruction manual

Garmin
Garmin BC 50 User manual

Garmin
Garmin VIRB Series User manual

Garmin
Garmin DASH CAM 56 User manual

Garmin
Garmin XERO G1 Instruction manual


