Garmin BC 40 Instruction manual

Quick Start Manual 2
Manuel
de
demarrage rapide 8
Manuale di avvio rapido
16
Schnellstartanleitung 23
Guia
de
inicio rapido
31
Manual
de
lnicio Rapido
39
BC
™
40
Wireless
Camera
Quick
Start
Manual
Getting
Started
&WARNING
See
the
Important
Safety
and
Product
Information
guide
in
the
product
box
for
product
warnings
and
other
important
information.
--
Installing
the
Mount
on
a
Vehicle
Roll
Bar
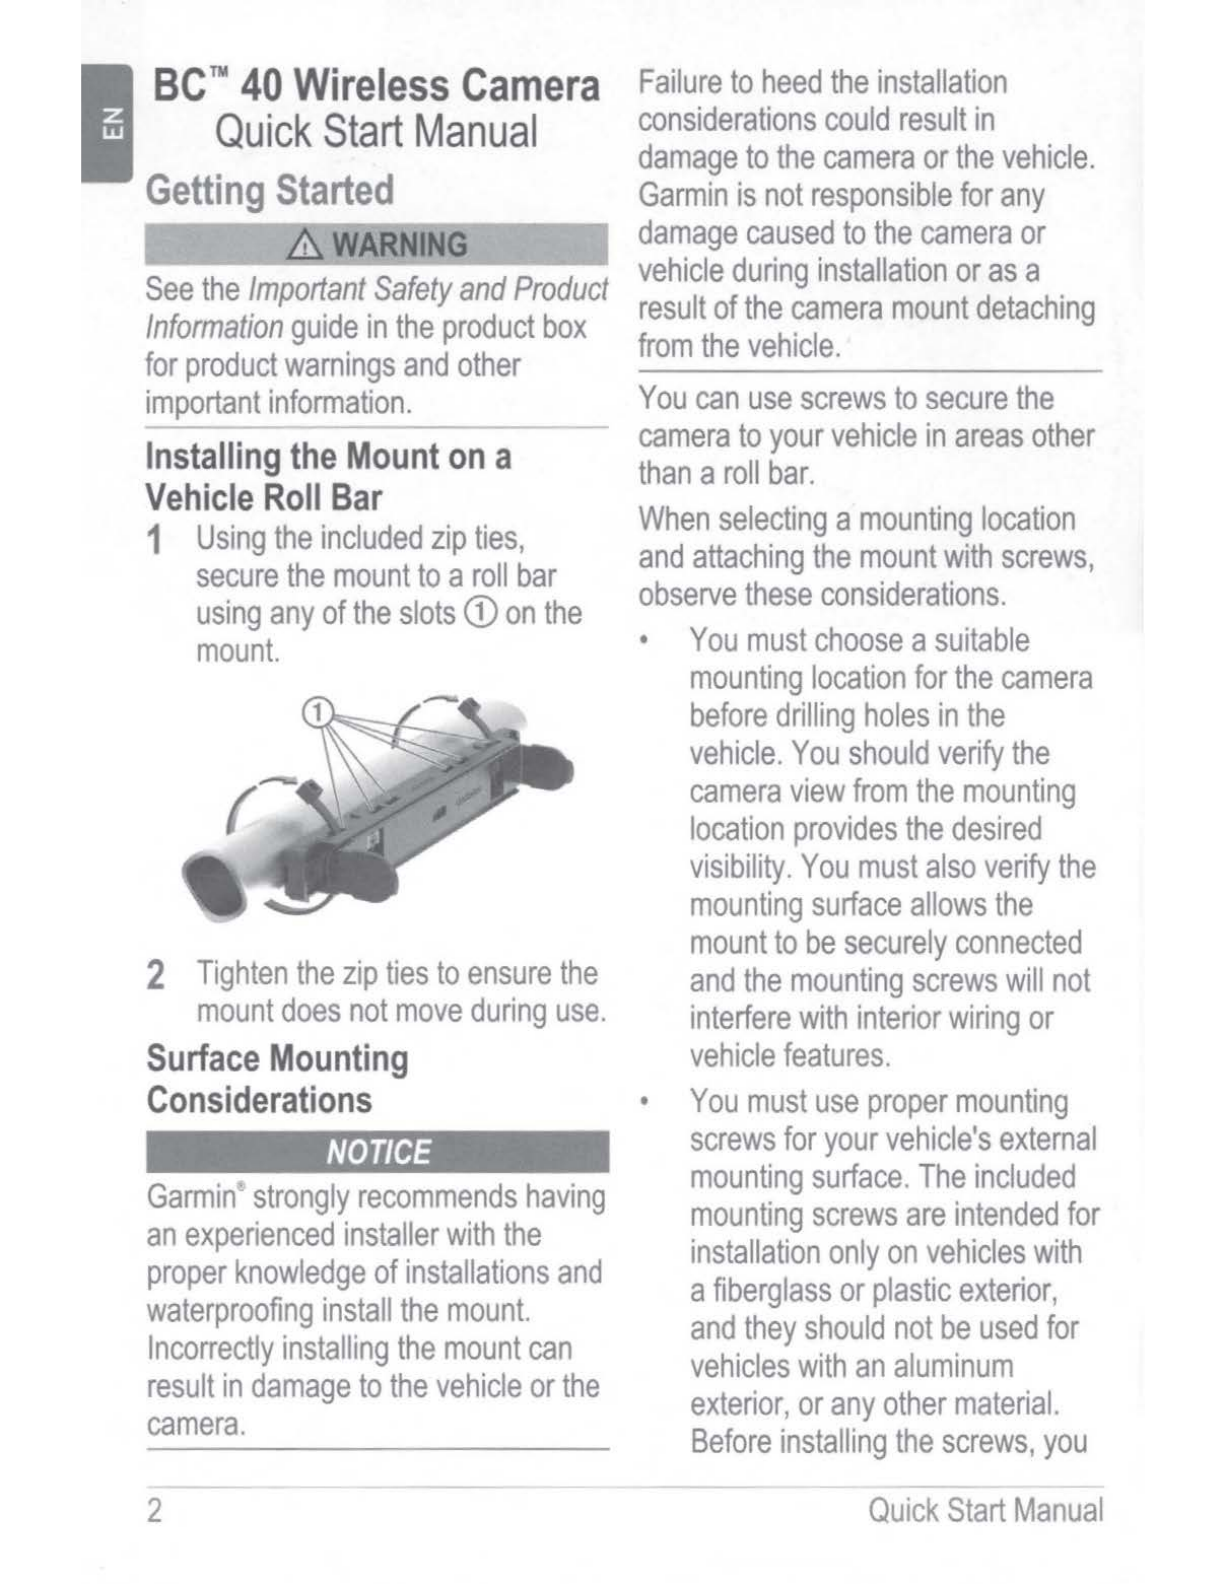
1
Using
the
included
zip
ties,
secure
the
mount
to
a
roll
bar
using
any
of
the
slots
CD
on
the
mount.
2
Tighten
the
zip
ties
to
ensure
the
mount
does
not
move
during
use.
Surface
Mounting
Considerations
NOTICE
Garmin
"
~trongl~
recommends
having
an
experienced
installer
with
the
proper
knowledge
of
installations
and
waterproofing
install
the
mount.
Incorrectly
installing
the
mount
can
result
in
damage
to
the
vehicle
or
the
camera.
2
Failure
to
heed
the
installation
considerations
could
result
in
damage
to
the
camera
or
the
vehicle.
Garmin
is
not
responsible
for
any
damage
caused
to
the
camera
or
vehicle
during
installation
or
as
a
result
of
the
camera
mount
detaching
from
the
vehicle.
You
can
use
screws
to
secure
the
camera
to
your
vehicle
in
areas
other
than
a
roll
bar.
When
selecting
a
mounting
location
and
attaching
the
mount
with
screws,
observe
these
considerations.
•
You
must
choose
a
suitable
mounting
location
for
the
camera
before
drilling
holes
in
the
vehicle.
You
should
verify
the
camera
view
from
the
mounting
location
provides
the
desired
visibility.
You
must
also
verify
the
mounting
surface
allows
the
mount
to
be
securely
connected
and
the
mounting
screws
will
not
interfere
with
interior
wiring
or
vehicle
features.
•
You
must
use
proper
mounting
screws
for
your
vehicle's
external
mounting
surface.
The
included
mounting
screws
are
intended
for
installation
only
on
vehicles
with
a
fiberglass
or
plastic
exterior,
and
they
should
not
be
used
for
vehicles
with
an
aluminum
exterior,
or
any
other
material.
Before
installing
the
screws,
you
Quick
Start
Manual

must
verify
the
screws
are
the
correct
length
and
will
not
damage
any
interior
components.
•
For
some
vehicles,
you
must
fully
seal
the
screws,
holes,
and
mount
with
outdoor
waterproofing
sealant
to
prevent
water
from
entering
the
vehicle
or
the
vehicle
shell.
Securing
the
Mount
with
Screws
To
install
the
mount,
you
need
a
drill
with
a
3.2
mm
(1/8
in.)
drill
bit,
a
pencil,
a
Philips
screwdriver,
outdoor
waterproofing
sealant,
and
two
M4
screws
(included
for
some
vehicles).
1
Place
the
mount
base
against
the
mounting
surface
in
the
location
where
you
want
to
mount
the
camera,
and
mark
the
location
of
the
two
mounting
holes
(D
using
a
pencil
or
other
writing
instrument.
You
should
ensure
the
mount
is
level
and
correctly
positioned.
2
Remove
the
mount
from
the
mounting
surface,
and
use
a
3.2
mm
(1/8
in.)
drill
bit
to
drill
pilot
holes
in
the
two
locations
you
marked.
-
Quick
Start
Manual
NOTICE
If
you
are
drilling
into
a
fiberglass
surface,
you
may
need
to
use
a
specialized
drill
bit
or
drill
counter-clockwise
to
avoid
damaging
the
fiberglass.
For
more
information,
contact
your
vehicle
manufacturer
or
a
professional
installer.
3
If
necessary,
apply
waterproofing
sealant
around
the
drilled
pilot
holes.
You
must
use
an
outdoor
waterproofing
sealant
that
will
bond
with
your
vehicle's
exterior
surface
without
damaging
it.
For
more
information,
contact
your
vehicle
manufacturer
or
a
professional
installer.
4
Place
the
mount
base
against
the
surface,
aligning
the
mounting
holes
in
the
base
with
the
drilled
pilot
holes.
5
Fasten
the
mount
base
to
the
vehicle
using
two
M4
screws.
NOTE:
The
included
screws
are
intended
for
installation
on
a
vehicle
with
a
fiberglass
or
plastic
shell.
You
must
verify
the
screws
are
the
correct
length
and
appropriate
for
the
exterior
mounting
surface
of
your
vehicle.
For
more
information,
contact
your
vehicle
manufacturer
or
a
professional
installer.
3
Installing
AA
Batteries
The
device
operates
on
two
1.5
V
AA
batteries
(not
included).
For
the
best
results,
you
should
use
lithium
batteries,
which
provide
extended
battery
life
and
better
performance
at
low
temperatures.
NOTICE
Do
not
use
AA
batteries
with
a
voltage
specification
higher
than
1.5
V.
Higher
voltages
will
cause
permanent
damage
to
the
camera.
Do
not
use
lithium-ion
rechargeable
AA
battery
cells.
Lithium-ion
batteries
use
a
different
technology
than
non-
rechargeable
lithium
batteries
and
may
permanently
damage
the
camera.
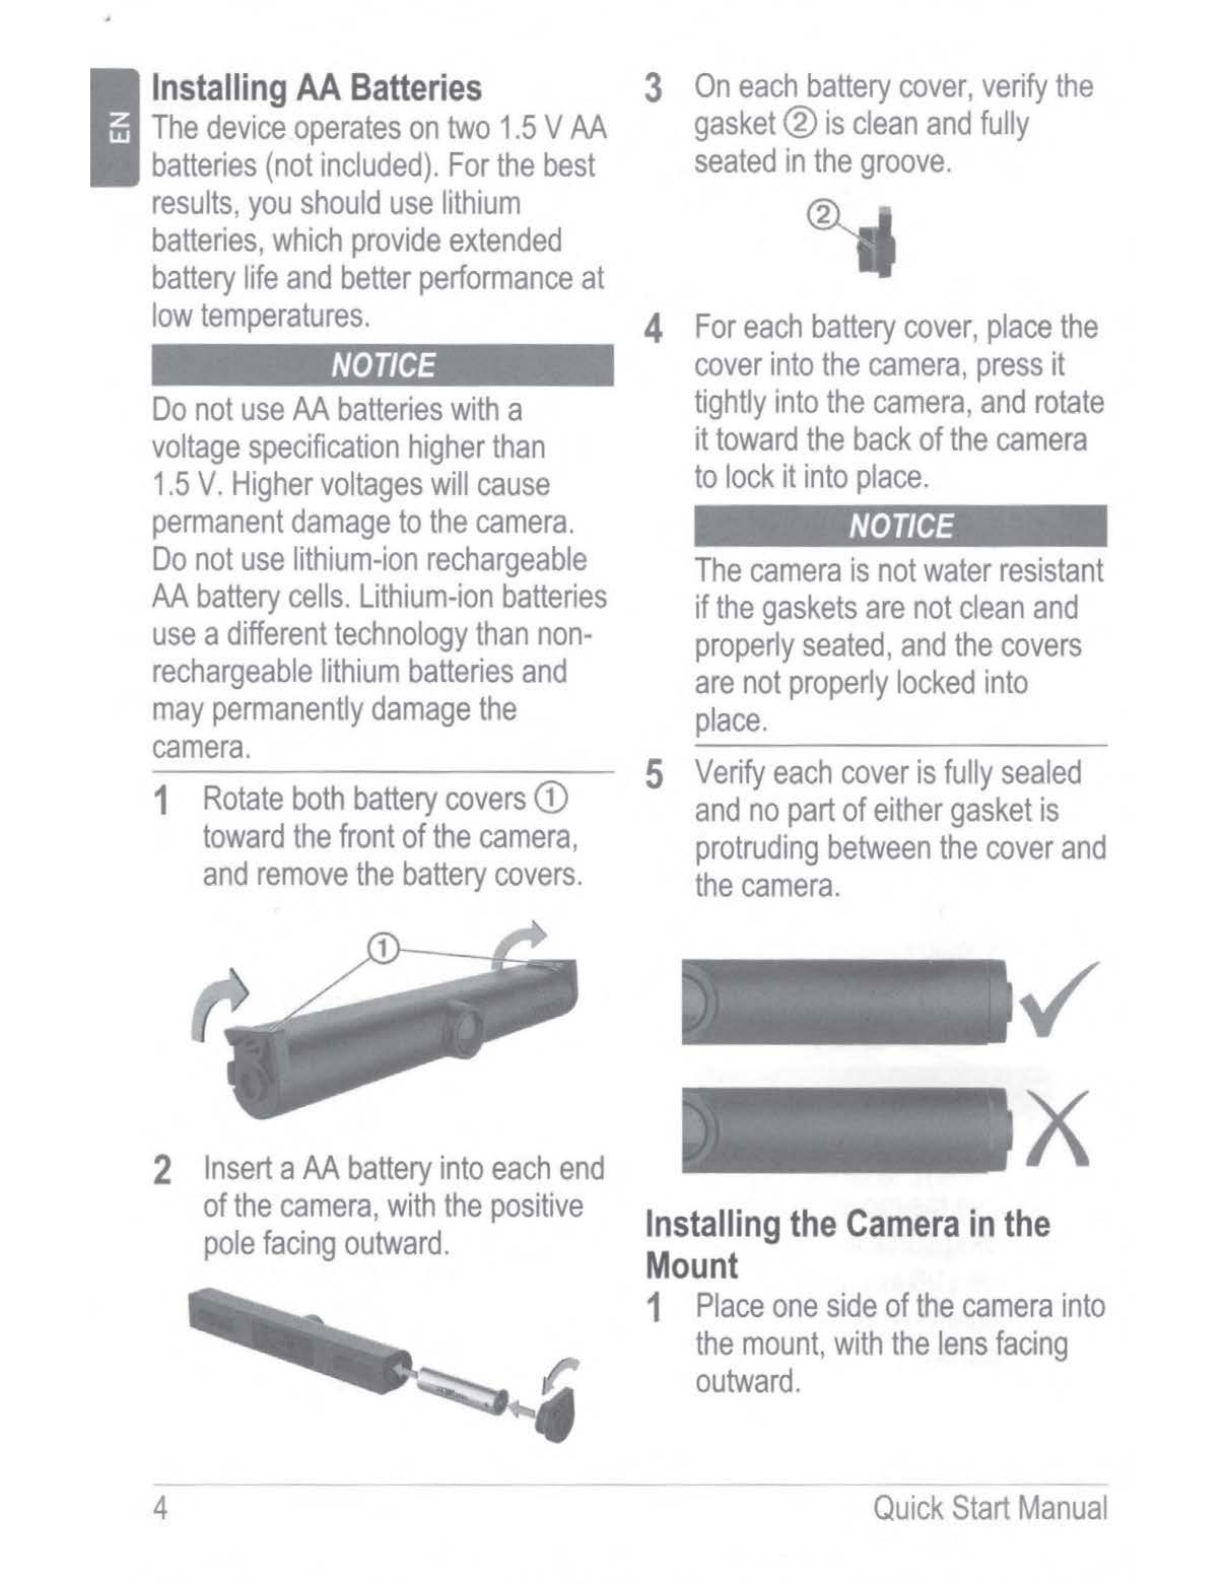
1
Rotate
both
battery
covers
G)
toward
the
front
of
the
camera,
and
remove
the
battery
covers.
2
Insert
a
AA
battery
into
each
end
of
the
camera,
with
the
positive
pole
facing
outward.
4
3
On
each
battery
cover,
verify
the
gasket
®
is
clean
and
fully
seated
in
the
groove.
4
For
each
battery
cover,
place
the
cover
into
the
camera,
press
it
tightly
into
the
camera,
and
rotate
it
toward
the
back
of
the
camera
to
lock
it
into
place.
NOTICE
The
camera
is
not
water
resistant
if
the
gaskets
are
not
clean
and
properly
seated,
and
the
covers
are
not
properly
locked
into
place.
5
Verify
each
cover
is
fully
sealed
and
no
part
of
either
gasket
is
protruding
between
the
cover
and
the
camera.
✓
X
Installing
the
Camera
in
the
Mount
1
Place
one
side
of
the
camera
into
the
mount,
with
the
lens
facing
outward.
Quick
Start
Manual

2
Press
the
other
side
into
the
mount
until
it
clicks.
3
Pull
gently
on
the
camera
to
verify
both
sides
are
locked
into
the
mount.
Pairing
the
Camera
with
a
Garmin
Navigation
Device
You
can
pair
the
camera
with
a
compatible
Garmin
navigation
device.
For
more
information
about
compatible
Garmin
devices,
go
to
the
product
page
at
garmin.com/bc40.
1
Update
your
navigation
device
to
the
latest
software.
Your
device
may
not
support
the
BC™
40
camera
without
the
latest
software.
For
more
information
about
updating
the
software,
see
the
owner's
manual
for
your
navigation
device.
2
Install
batteries
in
the
camera.
The
camera
enters
pairing
mode
automatically,
and
the
LED
flashes
blue
while
the
camera
is
in
pairing
mode.
The
camera
remains
in
pairing
mode
for
two
minutes.
If
pairing
mode
expires,
you
can
remove
and
reinstall
the
batteries.
-
---
----- ---
--
Quick
Start
Manual
3
Bring
the
compatible
Garmin
navigation
device
outside
your
vehicle
and
within
1.5
m
(5
ft.)
of
the
camera,
and
turn
on
the
navigation
device.
The
device
detects
your
camera
automatically
and
prompts
you
to
pair
with
it.
4
Select
Yes.
TIP:
If
the
navigation
device
does
not
detect
the
camera
automatically,
you
can
select
O
>
Wireless
Camera>
Add
New
Camera
to
pair
with
it
manually.
The
location
of
the
pairing
menu
may
vary
by
device
model.
See
the
owner's
manual
for
your
navigation
device
for
additional
pairing
instructions.
5
Follow
the
on-screen
instructions
to
finish
pairing
and
setting
up
the
camera.
Viewing
the
Backup
Camera
After
you
pair
your
camera
with
a
compatible
Garmin
navigation
device,
the
camera
view
appears
automatically
when
you
turn
on
your
navigation
device,
and
you
can
manually
show
the
camera
at
any
time.
•
If
your
navigation
device
is
connected
to
an
ignition-switched
power
outlet
(recommended),
turn
on
your
vehicle.
5
If
your
navigation
device
is
connected
to
an
always-on
power
outlet,
turn
on
the
navigation
device.
•
To
show
the
camera
manually,
select
[9]
~ / • ·
•
To
show
or
hide
the
camera
using
voice
commands,
say
Show
Video
or
Hide
Video.
NOTE:
Voice
commands
are
not
available
on
all
navigation
devices.
The
voice
commands
may
vary
based
on
your
navigation
device
model.
This
feature
is
not
available
for
all
languages
or
may
require
additional
navigation
device
setup
for
some
languages.
For
more
information,
see
the
Voice
Command
app
or
the
Voice
Control
app
on
your
navigation
device,
or
the
navigation
device
owner's
manual.
The
camera
view
appears.
When
the
camera
detects
the
vehicle
is
moving
forward,
the
camera
automatically
stops
sending
video,
and
the
navigation
device
returns
to
normal
operation.
The
camera
video
is
dismissed
automatically
after
2
minutes
and
30
seconds,
whether
or
not
your
vehicle
has
moved
forward.
6
Adjusting
the
Camera
Angle
You
can
adjust
the
camera
angle
up
and
down
to
provide
the
best
view
for
your
vehicle.
1
Drive
to
a
level
area
with
a
clear
view
behind
the
vehicle.
2
Remove
the
camera
from
the
mount.
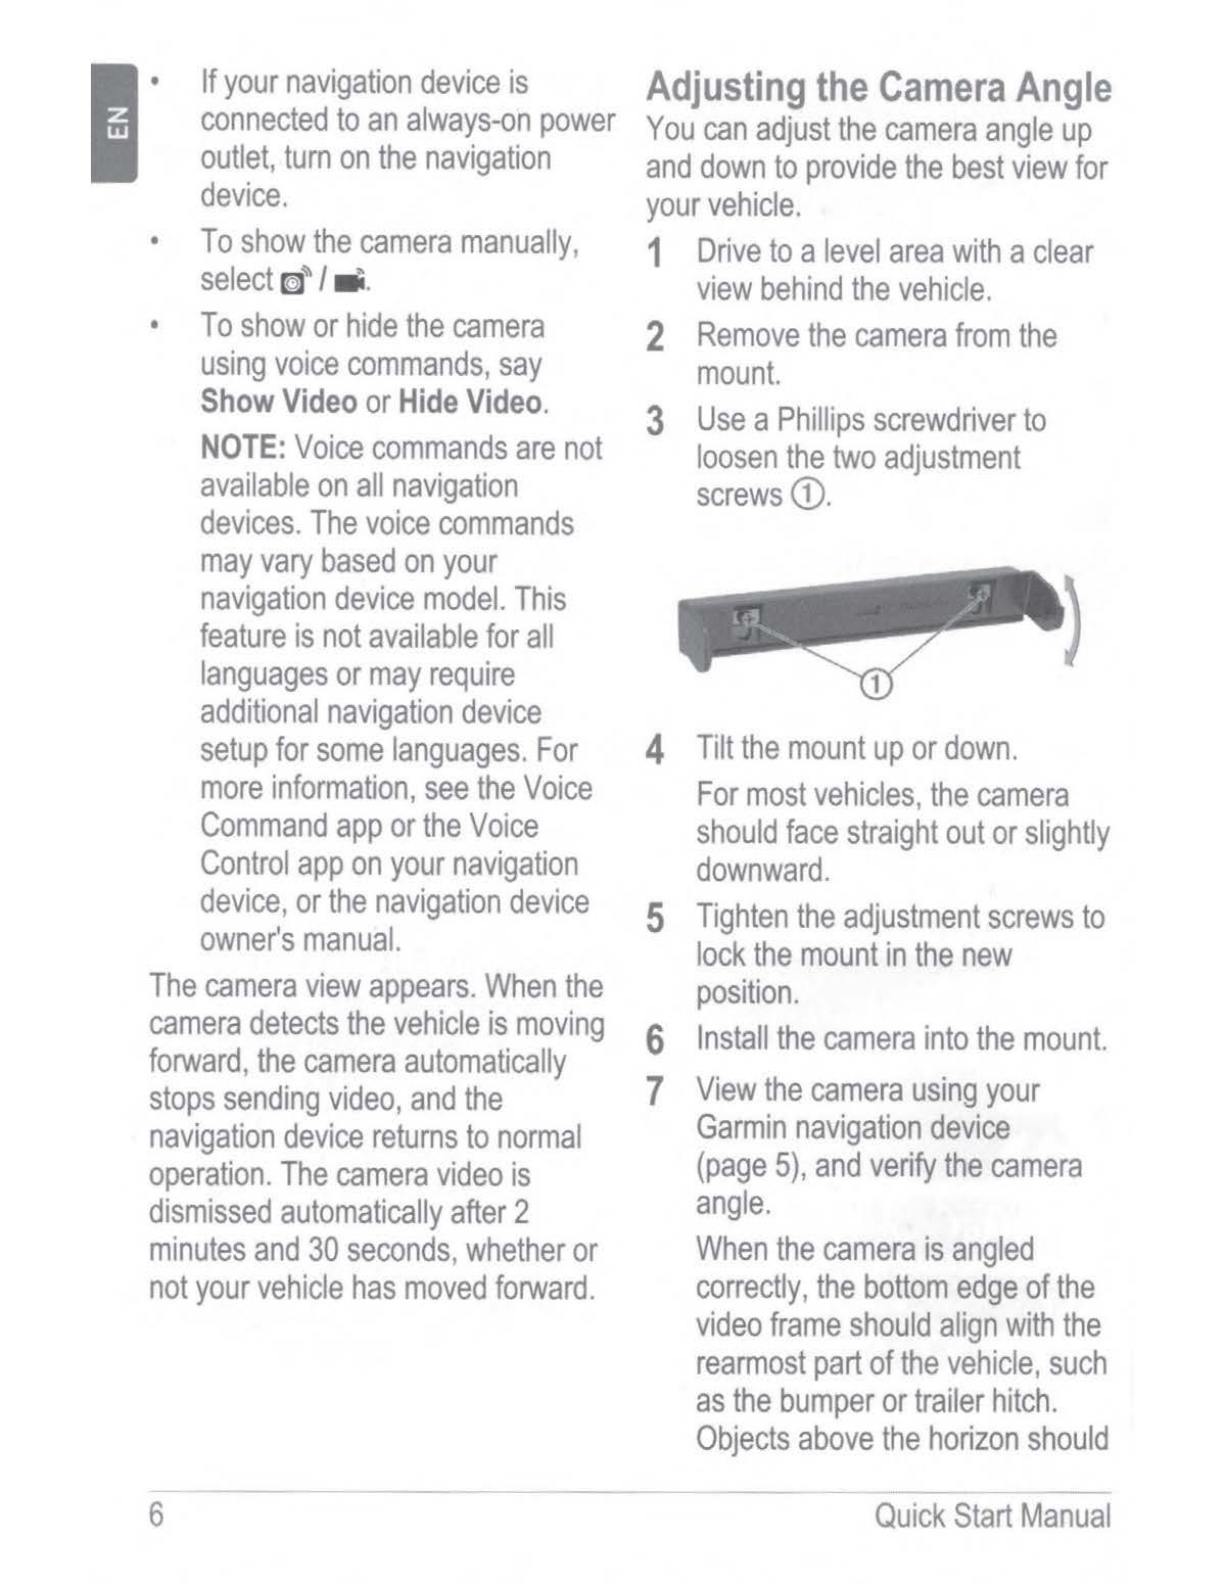
3
Use
a
Phillips
screwdriver
to
loosen
the
two
adjustment
screws
CD.
4
Tilt
the
mount
up
or
down.
For
most
vehicles,
the
camera
should
face
straight
out
or
slightly
downward.
5
Tighten
the
adjustment
screws
to
lock
the
mount
in
the
new
position.
6
Install
the
camera
into
the
mount.
7
View
the
camera
using
your
Garmin
navigation
device
(page
5),
and
verify
the
camera
angle.
When
the
camera
is
angled
correctly,
the
bottom
edge
of
the
video
frame
should
align
with
the
rearmost
part
of
the
vehicle,
such
as
the
bumper
or
trailer
hitch.
Objects
above
the
horizon
should
-
Quick
Start
Manual

appear
in
the top
one-quarter
to
one-third
of
the
frame.
8
If
necessary,
repeat
this
procedure
until
the
camera
angle
is
correct.
After
you
adjust
the
camera
angle,
you
must
align
the
guidance
lines
(page
7).
If
you
previously
set
up
guidance
lines,
they
are
not
accurate
after
the
camera
angle
changes.
Failure
to
properly
align
the
guidance
lines
could
result
in
an
accident
or
collision,
resulting
in
death,
serious
injury,
or
property
damage.
- -
----
Showing
or
Hiding
Guidance
Lines
You
can
enable
guidance
lines
if
you
choose
to
use
your
device
as
a
backup
camera.
NOTE:
Guidance
lines
are
enabled
by
default
on
some
navigation
devices.
1
Select
O >
Wireless
Camera.
2
Select
the
paired
camera
name,
and
select
Guidance
Lines
>
Show
Guidance
Lines.
Aligning
the
Guidance
Lines
1
Position
your
vehicle
with
the
driver's
side
closely
aligned
to
a
curb,
driveway,
or
parking
stall
lines.
Quick
Start
Manual
2
From
the
paired
Garmin
navigation
d~vice,
select
O>
Wireless
Camera.
3
Select
the
paired
camera
name,
and
select
Guidance
Lines>
Adjust
Guidance
Lines.
4
Use
the
arrows
in
the
corners
of
the
screen
to
move
the
ends
of
the
white,
driver's-side
guidance
line.
The
guidance
line
should
appear
directly
on
top
of
the
curb,
driveway,
or
parking
stall
line.
5
Use
the
arrows
in
the
center
of
the
screen
to
move
the
colored
distance
guidance
lines
up
or
down.
The
red
guidance
line
should
be
aligned
with
the
rearmost
part
of
your
vehicle.
6
Reposition
the
vehicle
with
the
passenger
side
closely
aligned
to
a
curb,
driveway,
or
parking
stall
lines,
and
use
the
arrows
to
align
the
white,
passenger-side
guidance
line.
The
guidance
lines
should
be
symmetrical.
-7

Getting
the
Owner's
Manual
Go
to
garmin.com/manuals
/bc40
.
I
Device
Information
•
Software
Updates
Software
updates
for
your
camera
are
received
automatically
from
the
paired
Garmin
navigation
device.
You
should
update
your
Garmin
navigation
device
software
regularly
to
keep
both
it
and
the
camera
up
to
date
.
For
more
information
about
updating
software
,
see
the
owner's
manual
for
your
Garmin
navigator.
Garmin
Support
Center
Go
to
support.garmin
.
com
for
help
and
information,
such
as
product
manuals,
frequently
asked
questions,
videos
,
and
customer
support.
Specifications
-
Battery
Type
2
removable
1.5V
Camera
and
transmitter
water
rating
AA.
Lithium
recommended
.
IEC
60529
IPX7
!Operating
--
F-
ro
_m_--
20
-0
to
70
°C
temperature
(from
-4
°
to
158
°
F)
range
-
--
Wireless
frequencies/
protocols
2.4
GHz@
+13dBm
nominal
BC
TM
Camera
sans
fil
40
Manuel
de
demarrage
rapide
Mise
en
route
~~
A:aiiiriiii
.....
.,,.....,...,..,,,..,.,-.,:7.-:r;;;ffii
•,;'.;
l1i.
·
,-
•.W"·',.•,t•'~_,.
Consultez
le
guide
Informations
importantes
sur
le
produit
et
la
securite
inclus
dans
l'emballage
du
produit
pour
prendre
connaissance
des
avertissements
et
autres
informations
importantes
sur
le
produit.
--
--------
Installation
du
support
sur
l'arceau
de
securite
d'un
vehicule
1 A
l'aide
des
serre-cables
fournis,
fixez
le
support
a
l'arceau
de
securite
a
l'aide
de
l'une
des
fentes
G)
du
support.
2
Serrez
les
serre-cables
pour
vous
assurer
que
le
support
ne
bouge
pas
pendant
!'utilisation.
-
----------~~
---
--- -
8
Manuel
de
demarrage
rapide
©
2020
Garmin
Ltd.
or
its
subsidiaries
Garmin
and
the
Garmin
logo
are
trademarks
of
Garmin
Ltd.
or
its
subsidiaries.
registered
in
the
USA
and
other
countries.
BC
"'
and
Garmin
Express
"'
are
trademarks
of
Garmin
Ltd.
or
its
subsidiaries.
These
trademarks
may
not
be
used
without
the
express
permission
of
Garmin.
The
Bluetooth
~
word
mark
and
logos
are
owned
by
the
Bluetooth
SIG
,
Inc
.
and
any
use
of
such
marks
by
Garmin
is
under
license.
Wi-Fi
is
a
registered
mark
of
Wi-Fi
Alliance
Corporation.
El
numero
de
registro
COFETEUIFETEL
puede
ser
revisado
en
el
manual
a
traves
de
la
siguiente
pagina
de
internet.
-
CE
TA-2018/331
APPROVED
Printed in Taiwan
~-·
■-
December
2020
190-02365-95_0A

IMPORTANT
SAFETY
AND
PRODUCT
INFORMATION
©
2021
Garmin Ltd. or its subsidiaries
Printed in Taiwan
~-
■-
January
2021
I
90-02365-96_0A

Important
Safety
and
Product
Information
Failure
to
heed
the
following
warnings
could
result
in
an
accident
or
collision
resulting
in
death
or
serious
injury.
Distraction
Warning
This
device
is
intended
to
enhance
the
situational
awareness
when
used
properly.
If
used
improperty,
you
could
become
distracted
by
the
display,
which
could
lead
to
an
accident
causing
serious
personal
injury
or
death.
Only
access
the
information
displayed
on
the
device
with
a
glance.
Always
maintain
awareness
of
your
surroundings
and
do
not
stare
at
the
display
or
become
distracted
by
the
display.
Focusing
on
the
display
could
cause
you
to
miss
obstacles
or
hazards.
Use
the
device
at
your
own
risk
.
-
---~------------
Battery
Warnings
Replaceable
lithium,
alkaline,
or
NiMH
batteries
can
be
used
with
this
device.
If
these
guidelines
are
not
followed,
batteries
may
experience
a
shortened
life
span
or
may
present
a
risk
of
damage
to
the
device,
fire,
chemical
burn,
electrolyte
leak,
and/or
injury.
•
Do
not
disassemble,
modify,
remanufacture,
puncture
or
damage
the
device
or
batteries.
•
Do
not
expose
the
device
or
batteries
to
fire,
explosion,
or
other
hazard.
•
Do
not
use
a
sharp
object
to
remove
the
removable
batteries.
•
~
KEEP
BATTERIES
AWAY
FROM
CHILDREN.
@
NEVER
PUT
BATTERIES
IN
MOUTH.
Swallowing
can
lead
to
chemical
bums,
perforation
of
soft
tissue,
and
death.
Severe
burns
can
occur
within
2
hours
of
ingestion.
Seek
medical
attention
immediately.
•
Only
replace
batteries
with
correct
replacement
batteries.
Using
other
batteries
presents
a
risk
of
__!!!e
or
explosion.
Device
Warnings
•
Do
not
immerse
the
device
or
batteries
in
water
or
other
liquids.
•
Do
not
leave
the
device
exposed
to
a
heat
source
or
in
a
high-temperature
location,
such
as
in
the
sun
in
an
unattended
vehicle.
To
prevent
the
possibility
of
damage
,
remove
the
device
from
the
vehicle
or
store
it
out
of
direct
sunlight,
such
as
in
the
glove
box.
•
Do
not
operate
the
device
outside
of
the
temperature
ranges
specified
in
the
printed
manual
in
the
product
packaging.
•
When
storing
the
device
for
an
extended
time
period,
store
within
the
temperature
ranges
specified
in
the
printed
manual
in
the
product
•
_eackagi
__,
ng.._.
__
_
NOTICE
Failure
to
heed
the
following
notice
could
result
in
personal
or
property
damage,
or
negatively
impact
the
device
functionality.
Battery
Notices
•
Contact
your
local
waste
disposal
department
to
dispose
of
the
device/batteries
in
accordance
with
applicable
local
laws
and
regulations.
Product
Environmental
Programs
Information
about
the
Garmin'
product
recycling
program
and
WEEE,
RoHS,
REACH,
and
other
compliance
programs
can
be
found
at
www.garmin.com/aboutGarmin/environment.
Declaration
of
Conformity
Hereby,
Garmin
declares
that
this
product
is
in
compliance
with
the
Directive
2014/53/EU.
The
full
text
of
the
EU
declaration
of
conformity
is
available
at
the
following
internet
address:
www.garmin.com
/compliance.
Innovation,
Science
and
Economic
Development
Canada
Compliance
This
device
complies
with
Innovation
,
Science
and
Economic
Development
Canada
license-exempt
RSS
standard(s).
Operation
is
subject
to
the
following
two
conditions:
(1)
this
device
may
not
cause
interference,
and
(2)
this
device
must
accept
any
interference,
including
interference
that
may
cause
undesired
operation
of
the
device.
Radio
Frequency
Radiation
Exposure
This
device
is
a
mobile
transmitter
and
receiver
that
uses
an
internal
antenna
to
send
and
receive
low
levels
of
radio
frequency
(RF)
energy
for
data
communications.
The
device
emits
RF
energy
below
the
published
limits
when
operating
in
its
maximum
output
power
mode
and
when
used
with
Garmin
authorized
accessories
.
To
comply
with
RF
exposure
compliance
requirements
,
the
device
should
be
installed
and
operated
with
a
minimum
of
20
cm
(7.87
in.)
between
the
device
and
your
body.
The
device
should
not
be
used
in
other
configurations.
This
device
must
not
be
co-located
or
operated
in
conjunction
with
any
other
transmitter
or
antenna.
3

I
FCC
Compliance
This
device
complies
with
part
15
of
the
FCC
Rules.
Operation
is
subject
to
the
following
two
conditions:
(1)
this
device
may
not
cause
harmful
interference,
and
(2)
this
device
must
accept
any
interference
received,
including
interference
that
may
cause
undesired
operation.
This
equipment
has
been
tested
and
found
to
comply
with
the
limits
for
a
Class
B
digital
device,
pursuant
to
part
15
of
the
FCC
rules.
These
limtts
are
designed
to
provide
reasonable
protection
against
harmful
interference
in
a
residential
installation.
This
equipment
generates,
uses,
and
can
radiate
radio
frequency
energy
and
may
cause
harmful
interference
to
radio
communications
if
not
installed
and
used
in
accordance
with
the
instructions.
However,
there
is
no
guarantee
that
interference
will
not
occur
in
a
particular
installation.
If
this
equipment
does
cause
harmful
interference
to
radio
or
television
reception,
which
can
be
determined
by
turning
the
equipment
off
and
on,
the
user
is
encouraged
to
try
to
correct
the
interference
by
one
of
the
following
measures:
•
Reorient
or
relocate
the
receiving
antenna.
•
Increase
the
separation
between
the
equipment
and
the
receiver.
•
Connect
the
equipment
into
an
outlet
that
is
on
a
different
circuit
from
the
GPS
device.
•
Consult
the
dealer
or
an
experienced
radio/TV
technician
for
help.
This
product
does
not
contain
any
user-serviceable
parts.
Repairs
should
only
be
made
by
an
authorized
Garmin
service
center.
Unauthorized
repairs
or
modifications
could
result
in
permanent
damage
to
the
equipment,
and
void
your
warranty
and
your
authority
to
operate
this
device
under
Part
15
regulations.
Software
license
Agreement
BY
USING
THE
DEVICE,
YOU
AGREE
TO
BE
BOUND
BY
THE
TERMS
AND
CONDITIONS
OF
THE
FOLLOWING
SOFTWARE
LICENSE
AGREEMENT.
PLEASE
READ
THIS
AGREEMENT
CAREFULLY.
Garmin
Ltd.
and
its
subsidiaries
(·Garmin")
grant
you
a
limited
license
to
use
the
software
embedded
in
this
device
(the
"Software")
in
binary
executable
form
in
the
normal
operation
of
the
product.
Title,
ownership
rights,
and
intellectual
property
rights
in
and
to
the
Software
remain
in
Garmin
and/or
its
third-party
providers.
You
acknowledge
that
the
Software
is
the
property
of
Garmin
and/or
its
third-party
providers
and
is
protected
under
the
United
States
of
America
copyright
laws
and
international
copyright
treaties.
You
further
acknowledge
that
the
structure,
organization,
and
code
of
the
Software,
for
which
source
code
is
not
provided,
are
valuable
trade
secrets
of
Garmin
and/or
its
third-party
providers
and
that
the
Software
in
source
code
form
remains
a
valuable
trade
secret
of
Garmin
and/or
its
third-
party
providers.
You
agree
not
to
decompile,
disassemble,
modify,
reverse
assemble,
reverse
engineer,
or
reduce
to
human
readable
form
the
Software
or
any
part
thereof
or
create
any
derivative
works
based
on
the
Software.
You
agree
not
to
export
or
re-export
the
Software
to
any
country
in
violation
of
the
export
control
laws
of
the
United
States
of
America
or
the
export
control
laws
of
any
other
applicable
country.
Limited
Warranty
THIS
LIMITED
WARRANTY
GIVES
YOU
SPECIFIC
LEGAL
RIGHTS,
AND
YOU
MAY
HAVE
OTHER
LEGAL
RIGHTS,
WHICH
VARY
FROM
STATE
TO
STATE
(OR
BY
COUNTRY
OR
PROVINCE).
GARMIN
DOES
NOT
EXCLUDE,
LIMIT
OR
SUSPEND
OTHER
LEGAL
RIGHTS
YOU
MAY
HAVE
UNDER
THE
LAWS
OF
YOUR
STATE
(OR
COUNTRY
OR
PROVINCE).
FOR
A
FULL
UNDERSTANDING
OF
YOUR
RIGHTS
YOU
SHOULD
CONSULT
THE
LAWS
OF
YOUR
STATE,
COUNTRY
OR
PROVINCE.
Non-aviation
products
are
warranted
to
be
free
from
defects
in
materials
or
workmanship
for
one
year
from
the
date
of
purchase.
Within
this
period,
Garmin
will,
at
its
sole
option,
repair
or
replace
any
components
that
fail
in
normal
use.
Such
repairs
or
replacement
will
be
made
at
no
charge
to
the
customer
for
parts
or
labor,
provided
that
the
customer
shall
be
responsible
for
any
transportation
cost.
This
Limited
Warranty
does
not
apply
to:
(i)
cosmetic
damage,
such
as
scratches,
nicks
and
dents;
(ii)
consumable
parts,
such
as
batteries,
unless
product
damage
has
occurred
due
to
a
defect
in
materials
or
workmanship;
(iii)
damage
caused
by
accident,
abuse,
misuse,
water,
flood,
fire,
or
other
acts
of
nature
or
external
causes;
{iv)
damage
caused
by
service
performed
by
anyone
who
is
not
an
authorized
service
provider
of
Garmin;
(v)
damage
to
a
product
that
has
been
modified
or
altered
without
the
written
permission
of
Garmin,
or
(vi)
damage
to
a
product
that
has
been
connected
to
power
and/or
data
cables
that
are
not
supplied
by
Garmin.
In
addition
,
Garmin
reserves
the
right
to
refuse
warranty
claims
against
products
or
services
---
--
--
-
--
----------------
--
4
that
are
obtained
and/or
used
in
contravention
of
the
laws
of
any
country
.
Garmin
navigation
products
are
i
ntended
to
be
used
only
as
a
travel
aid and
must
not
be
used
for
any
purpose
requiring
precise
measurement
of
direction,
distance
,
location
or
topography
.
Garmin
makes
no
warranty
as
to
the
accuracy
or
completeness
of
map
data
.
This
Limited
Warranty
also
does
not
apply
to
,
and
Garmin
is
not
responsible
for
,
any
degradation
in
the
performance
of
any
Garmin
navigation
product
resulting
from
its
use
in
proximity
to
any
handset
or
other
device
that
utilizes
a
terrestrial
broadband
network
operating
on
frequencies
that
are
close
to
the
frequencies
used
by
any
Global
Navigation
Satellite
System
(GNSS)
such
as
the
Global
Positioning
Service
(GPS).
Use
of
such
devices
may
impair
reception
of
GNSS
signals.
TO
THE
MAXIMUM
EXTENT
PERMITTED
BY
APPLICABLE
LAW
,
THE
WARRANTIES
AND
REMEDIES
CONTAINED
IN
THIS
LIMITED
WARRANTY
ARE
EXCLUSIVE
AND
IN
LIEU
OF,
AND
GARMIN
EXPRESSLY
DISCLAIMS
,
ALL
OTHER
WARRANTIES
AND
REMEDIES
,
WHETHER
EXPRESS
,
IMPLIED
,
STATUTORY,
OR
OTHERWISE,
INCLUDING
WITHOUT
LIMITATION
ANY
IMPLIED
WARRANTY
OF
MERCHANTABILITY
OR
FITNESS
FOR
A
PARTICULAR
PURPOSE
,
STATUTORY
REMEDY
OR
OTHERWISE
.
THIS
LIMITED
WARRANTY
GIVES
YOU
SPECIFIC
LEGAL
RIGHTS,
AND
YOU
MAY
HAVE
OTHER
LEGAL
RIGHTS,
WHICH
VARY
FROM
STA
TE
TO
STATE
AND
FROM
COUNTRY
TO
COUNTRY
.
IF
IMPLIED
WARRANTIES
CANNOT
BE
DISCLAIMED
UNDER
THE
LAWS
OF
YOUR
STATE
OR
COUNTRY
,
THEN
SUCH
WARRANTIES
ARE
LIMITED
IN
DURATION
TO
THE
DURATION
OF
THIS
LIMITED
WARRANTY
.
SOME
STATES
(AND
COUNTRIES
AND
PROVINCES)
DO
NOT
ALLOW
LIMITATIONS
ON
HOW
LONG
AN
IMPLIED
WARRANTY
LASTS
,
SO
THE
ABOVE
LIMITATION
MAY
NOT
APPLY
TO
YOU
.
IN
NO
EVENT
SHALL
GARMIN
BE
LIABLE
IN
A
CLAIM
FOR
BREACH
OF
WARRANTY
FOR
ANY
INCIDENTAL,
SPECIAL,
INDIRECT
OR
CONSEQUENTIAL
DAMAGES,
WHETHER
RESULTING
FROM
THE
USE
,
MISUSE
OR
INABILITY
TO
USE
THIS
PRODUCT
OR
FROM
DEFECTS
IN
THE
PRODUCT.
SOME
STATES
(
AND
COUNTRIES
AND
PROVINCES)
DO
NOT
ALLOW
THE
EXCLUSION
OF
INCIDENTAL
OR
CONSEQUENTIAL
DAMAGES
,
SO
THE
ABOVE
LIMITATIONS
MAY
NOT
APPLY
TO
YOU
.
If
during
the
warranty
period
you
submit
a
claim
for
warranty
service
in
accordance
with
this
Limited
Warranty
,
then
Garmin
will
,
at
its
option
:(
i)
repair
the
device
using
new
parts
or
previously
used
parts
that
satisfy
Garmin's
quality
standards
,
(ii)
replace
•
the
device
with
a
new
device
or
a
refurbished
device
that
meets
Garmin's
quality
standards
,
or
(iii)
exchange
the
device
for
a
full
refund
of
your
purchase
price.
SUCH
REMEDY
SHALL
BE
YOUR
SOLE
AND
EXCLUSIVE
REMEDY
FOR
ANY
BREACH
OF
WARRANTY
.
Repaired
or
replaced
devices
have
a
90
day
warranty
.
If
the
unit
sent
in
is
still
under
its
original
warranty
,
then
the
new
warranty
is
90
days
or
to
the
end
of
the
original
1
year
warranty
,
whichever
is
longer
.
Before
seeking
warranty
service
,
please
access
and
review
the
online
help
resources
available
on
support
.
garmin
.
com
.
If
your
device
is
still
not
functioning
properly
after
making
use
of
these
resources
,
contact
a
Garmin
Authorized
service
facility
in
the
original
country
of
purchase
or
follow
the
instructions
on
support
.
garmin.com
to
obtain
warranty
service
.
If
you
are
in
the
United
States
,
you
can
also
call
1-800-800-1020
.
If
you
seek
warranty
service
outside
of
the
original
country
of
purchase
,
Garmin
cannot
guarantee
that
the
parts
and
products
needed
to
repair
or
replace
your
product
will
be
available
due
to
differences
in
product
offerings
and
applicable
standards,
laws
and
regulations.
In
that
case,
Garmin
may
,
in
its
sole
discretion
and
subject
to
applicable
laws
,
repair
or
replace
your
product
with
comparable
Garmin
products
and
parts
,
or
require
you
to
ship
your
product
to
a
Garmin
Authorized
service
facility
in
the
country
of
original
purchase
or
to
a
Garmin
Authorized
service
facility
in
another
country
that
can
service
your
product,
in
which
case
you
will
be
responsible
for
complying
with
all
applicable
import
and
export
laws
and
regulations
and
for
paying
all
custom
duties
,V.
A.T
.,
shipp
i
ng
fees
and
other
associated
taxes
and
charges
.
In
some
cases
,
Garmin
and
its
dealers
may
be
unable
to
service
your
product
ina
country
outside
of
the
original
country
of
purchase
or
return
a
repaired
or
replaced
product
to
you
in
that
country
due
to
applicable
standards
,
laws
or
regulations
in
that
country.
Online
Auction
Purchases
:
Products
purchased
through
online
auctions
are
not
eligible
for
rebates
or
other
special
offers
from
Garmin
warranty
coverage
.
Online
auct
i
on
confirmations
are
not
5

accepted
for
warranty
verification
.
To
obtain
warranty
serv
i
ce
,
an
original
or
copy
of
the
sales
receipt
from
the
original
retailer
is
required.
Garmin
will
not
replace
missing
components
from
any
I
package
purchased
through
an
online
auction
.
International
Purchases:
A
separate
warranty
may
be
provided
by
international
distributors
for
devices
purchased
outside
the
United
States
depending
on
the
country
.
If
applicable
,
this
warranty
is
provided
by
the
local
i
n-country
distributor
and
this
distributor
provides
local
service
for
your
device.
Distributor
warranties
are
only
valid
in
the
area
of
intended
di
stribution
.
Australian
Purchases
:
Our
goods
come
with
guarantees
that
cannot
be
excluded
under
the
Australian
Consumer
Law
.
You
are
entitled
to
a
replacement
or
refund
for
a
major
failure
and
for
compensation
for
any
other
reasonably
foreseeable
loss
or
damage
.
You
are
also
entitled
to
have
the
goods
repaired
or
replaced
if
the
goods
fail
to
be
of
acceptable
quality
and
the
failure
does
not
amount
to
a
major
failure
.
The
benefits
under
our
limited
Warranty
are
in
addition
to
other
rights
and
remedies
under
applicable
law
in
relation
to
the
products
.
Garm
in
Australasia
,
30
Clay
Place
,
Eastern
Creek
,
NSW
2766
,
Australia.
Phone:
1800
235
822.
lnfonnations
importantes
sur
le
prodult
et
la
securite
Si
vous
ne
respectez
pas
les
avertissements
suivants
,
vous
risquez
un
accident
ou
une
collision
pouvant
entrainer
des
blessures
graves
,
voire
mortelles
.
---
-------------
Avertissement
lie
au
risque
de
distraction
Lorsqu'il
est
utilise
correctement
,
cet
appareil
est
congu
pour
augmenter
la
vigilance
de
l'utilisateur
.
Si
vous
ne
l'utilisez
pas
correctement,
vous
pourriez
6tre
distrait
par
l'ecran
et
vous
risquez
un
accident
pouvant
causer
des
blessures
graves
,
voire
mortelles
.
Consultez
toujours
brievement
les
informations
affichees
sur
l'ecran
.
Restez
toujours
attentif
a
votre
environnement.
Ne
fixez
pas
l'ecran
et
ne
vous
la
i
ssez
pas
distraire
par
celui-ci.
Si
vous
vous
concentrez
uniquement
sur
l'ecran
,
vous
risquez
de
ne
pas
voir
certains
obstacles
ou
zones
dangereuses
.
Vous
assumez
l'entiere
responsabilite
de
votre
utilisation
de
_
l'a
......
p.,.__pa
_r_
ei
_
l.
_______
_
6
Avertissements
relatifs
a
la
batterie
Vous
pouvez
utiliser
des
piles
lithium
,
alcaline
ou
NiMH
dans
cet
appareil.
Le
non-respect
de
ces
consignes
peut
causer
une
diminution
de
la
dun~e
de
vie
des
batteries,
endommager
l'appareil
ou
presenter
un
risque
d'incendie
,
de
brOlure
chimique
,
de
fuite
d'electrolyte
et/ou
de
blessure
.
•
Ne
demontez
pas
l'appareil
ni
les
batteries
,
ne
les
modifiez
pas
,
ne
les
refabriquez
pas
,
ne
les
percez
pas
,
ne
les
endommagez
pas.
•
N'exposez
pas
l'appareil
ou
les
batteries
au
feu
,
a
une
explosion
ou
a
d'autres
dangers
.
•
N'utilisez
pas
d'objet
pointu
pour
retirer
les
batteries
amovibles
.
•
,£
TE
NEZ
LES
BATTERIES
HORS
DE
PORTEE
DES
ENFANTS.
@
NE
METTEZ
JAMAIS
LES
BATTERIES
DANS
LA
BOUCHE.
L'inhalation
peut
provoquer
des
brOlures
chimiques
,
une
perforation
des
muqueuses
voire
entrainer
la
mort.
De
graves
brOlures
peuvent
apparaitre
2
heures
apres
ingestion.
Faites
immediatement
appel
a
un
medecin.
•
Remplacez
les
batteries
uniquement
par
les
batteries
de
remplacement
adequates.
L'utilisation
d'autres
batteries
peut
presenter
un
risque
d'incendie
o
.__::
u
...:.
d
...:.
'~
_
xe
L..
l_
os
_
io
;_
n_.
____
_
Avertissements
sur
l'appareil
•
N'immergez
pas
l'appareil
ni
les
batteries
dans
de
l'eau
ou
dans
d'
autres
liquides.
•
Ne
laissez
pas
l'appareil
a
proximite
d'une
source
de
chaleur
ou
dans
un
lieu
ou
la
temperature
est
tres
elevee,
par
exemple
dans
un
vehicule
sans
surveillance
stationne
en
plein
soleil.
Pour
eviter
tout
dommage
,
sortez
l'appareil
de
votre
vehicule
ou
placez-le
a
l'abri
du
soleil
,
par
example
dans
la
boite
a
gants
.
•
N'utilisez
pas
l'appareil
si
la
temperature
n'est
pas
comprise
entre
les
plages
de
temperature
indiquees
dans
le
manuel
imprime
fourni
avec
le
produit.
•
Si
vous
devez
ranger
l'appareil
pour
une
periode
prolongee
,
assurez-vous
que
la
temperature
ambiante
du
lieu
de
stockage
est
toujours
comprise
entre
les
plages
de
temperature
indiquees
dans
le
manuel
imprime
fourni
avec
le
_E__~·
..:;;.
uit
:..:.:.·
_____
.......,..
__
.,....._......,._..---
Other manuals for BC 40
3
Table of contents
Other Garmin Digital Camera manuals

Garmin
Garmin VIRB Ultra 30 Instruction manual

Garmin
Garmin VIRB Series User manual

Garmin
Garmin GC 100 User manual

Garmin
Garmin BC User manual

Garmin
Garmin GC 12 User manual

Garmin
Garmin BC 30 Instruction manual

Garmin
Garmin BC 50 NIGHT VISION User manual

Garmin
Garmin DASH CAM 56 User manual

Garmin
Garmin BC 40 Instruction manual

Garmin
Garmin BC 50 User manual


