Garmin Tacx NEO 2T Smart User manual
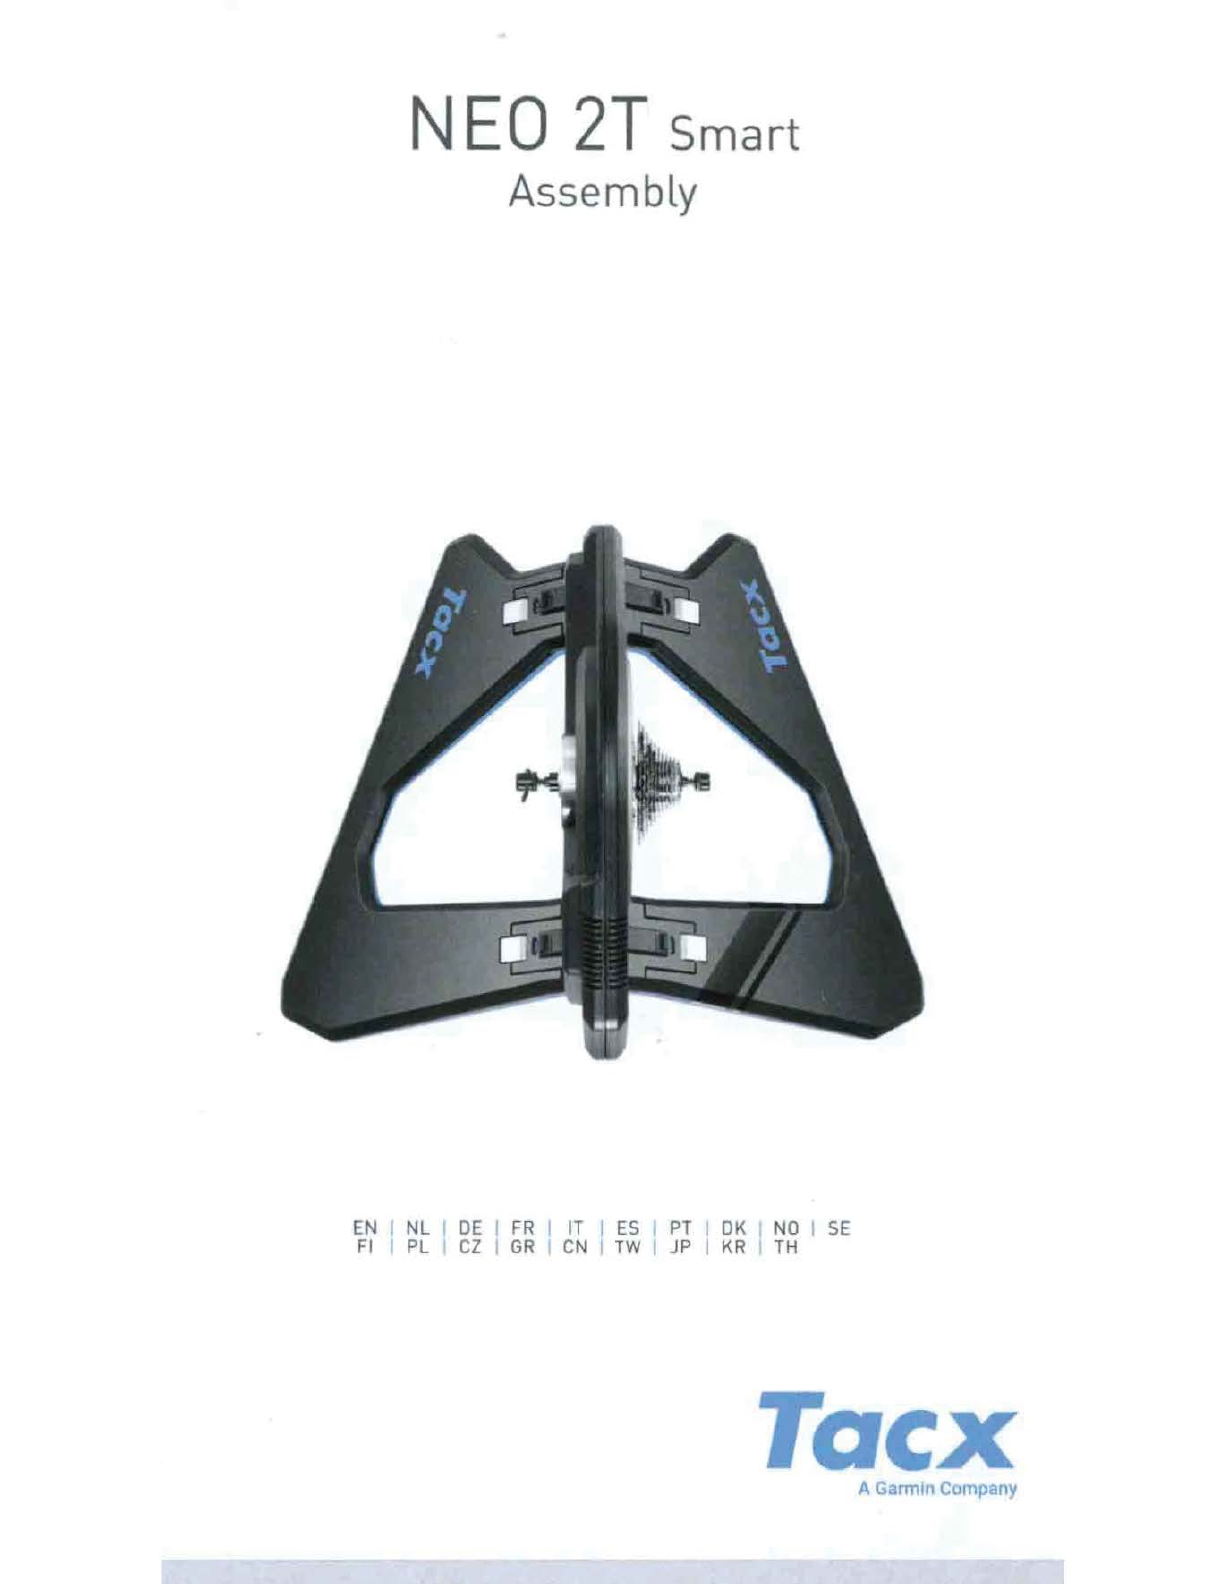
N
EO
2T
Smart
Assembly
EN
NL
DE
FR
I
IT
ES
PT
I
DK
NO
SE
Fl
PL
CZ
GR
CN
I
TW
JP
KR
TH
Tacx
A
Garmin
Company
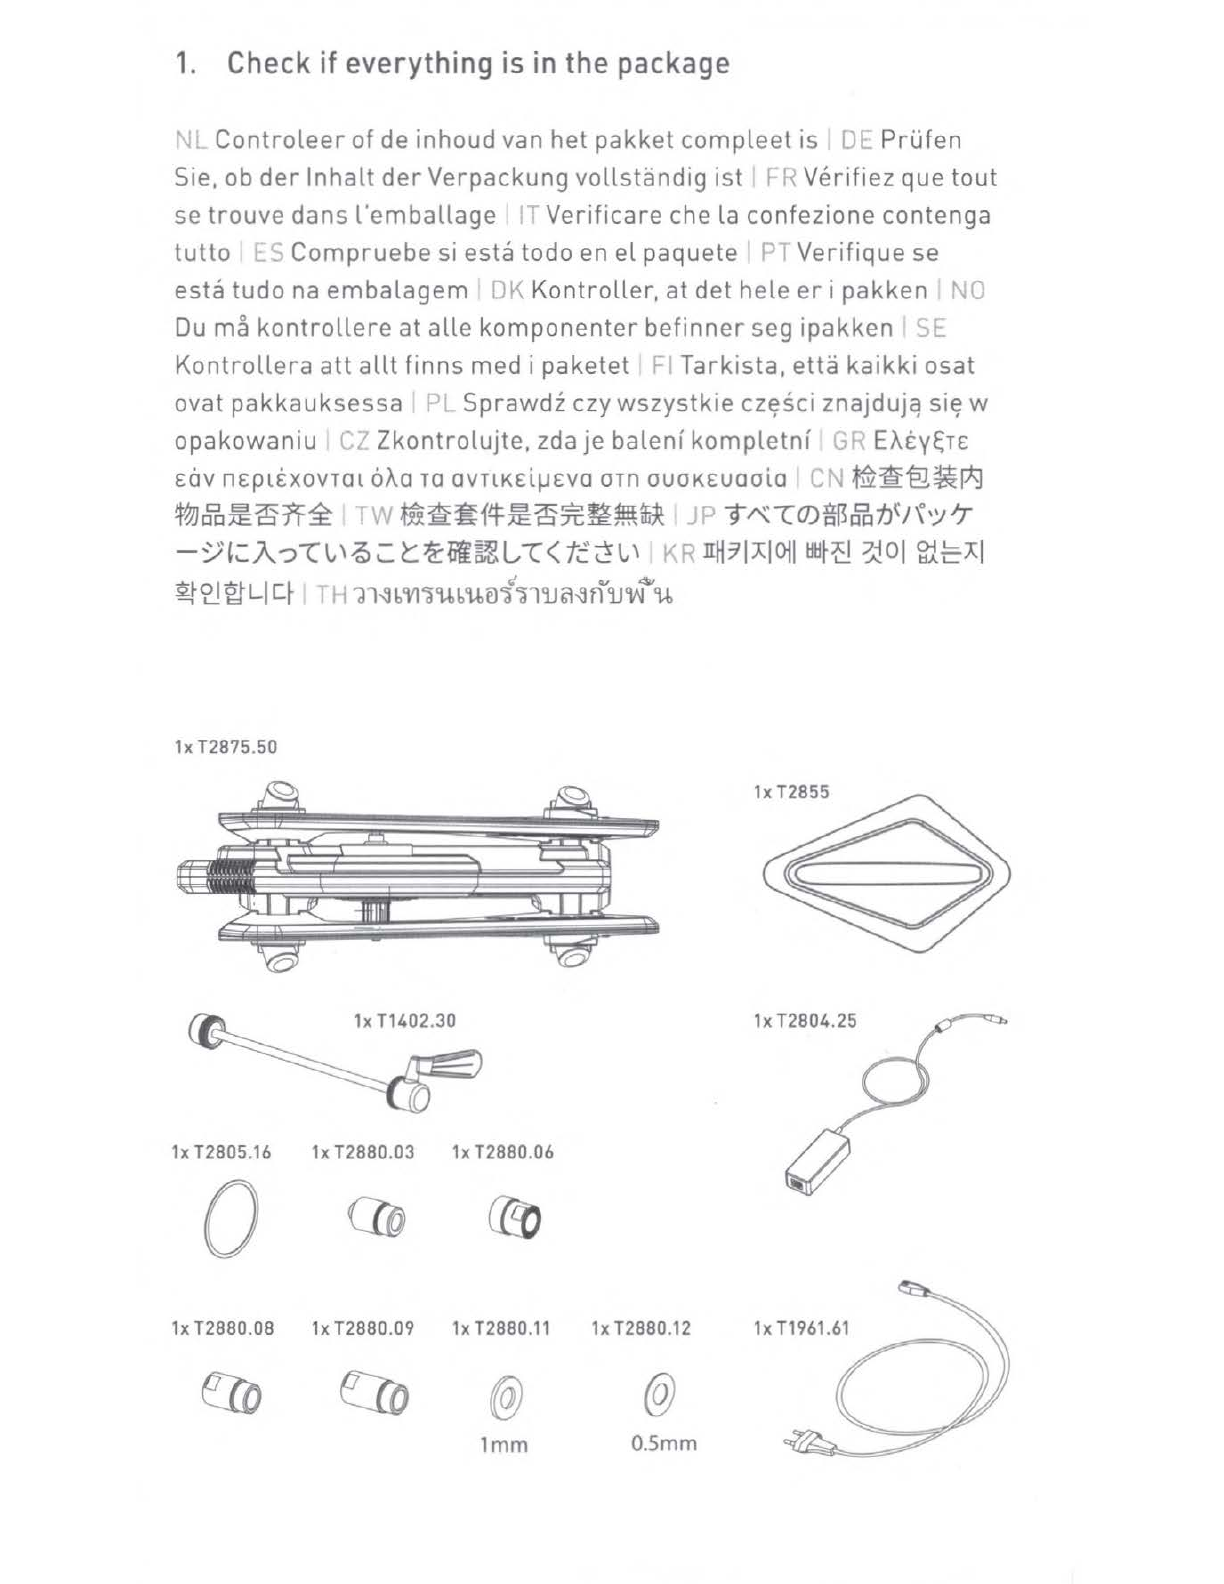
1. Check if
eve
rything
is
inthe package
~
Controleer
of
de
inhoud
van
het
pakket
compleet
is
O[
Prufen
Sie,
ob
der
In
halt
der
Verpackung
vollstandig
ist
(.
i
Verifiez
que
tout
se
trouve
dans
l'emballage
-
verificare
che
la
confezione
contenga
tutto
Compruebe
siesta
todo
en
el
paquete
Verifique
se
esta
tudo
na
embalagem
'JK
Kontroller,
at
det
hele
er
i
pakken
~O
Du
ma
kontrollere
at
alle
komponenter
befinner
seg
ipakken
~c.
Kontrollera
att
allt
finns
med
i
paketet
...
Tarkista,
etta
kaikki
osat
ovat
pakkauksessa
Sprawdz
czy
wszystkie
cz~sci
znajduj
9
si~
w
opakowaniu
Zkontrolujte,
zda
je
balenf
kompletnf
EAty~rE
Eav
nEpLEXOVTOL
6Aa
ra
OVTLKEiµEva
orn
ouoKEUOOLO
~~§~p;i
1t~~:aff~
~~ff1~~:afc~fflUi~ n
°9""-CO)ffl3~1i1,,:;"T
-
:1/
,:A?""(\,,\~~t
~El~
L
""(
(
t.:
~
\,,
\ 0
IIH
7I
Al
OJI
HH~{!
~
0I fil
~
Al
gj''2Jgl-LI
q , 1 n
11-:Jb'Vl'a'U,b'U,el'f"al'iJi;l,:jf)"'iJ'W~'U,
1xT2875.50
1xT2855
1xT1402.30 1xT2804.25
1xT2805.16 1xT2880.03 1x T2880.06
0
Cm
@D
1xT2880.08 1x
T2880.09
1xT2880.11 1xT2880.12 1xT1961.61
(!Io
Clo
@ @
1mm
0.5mm
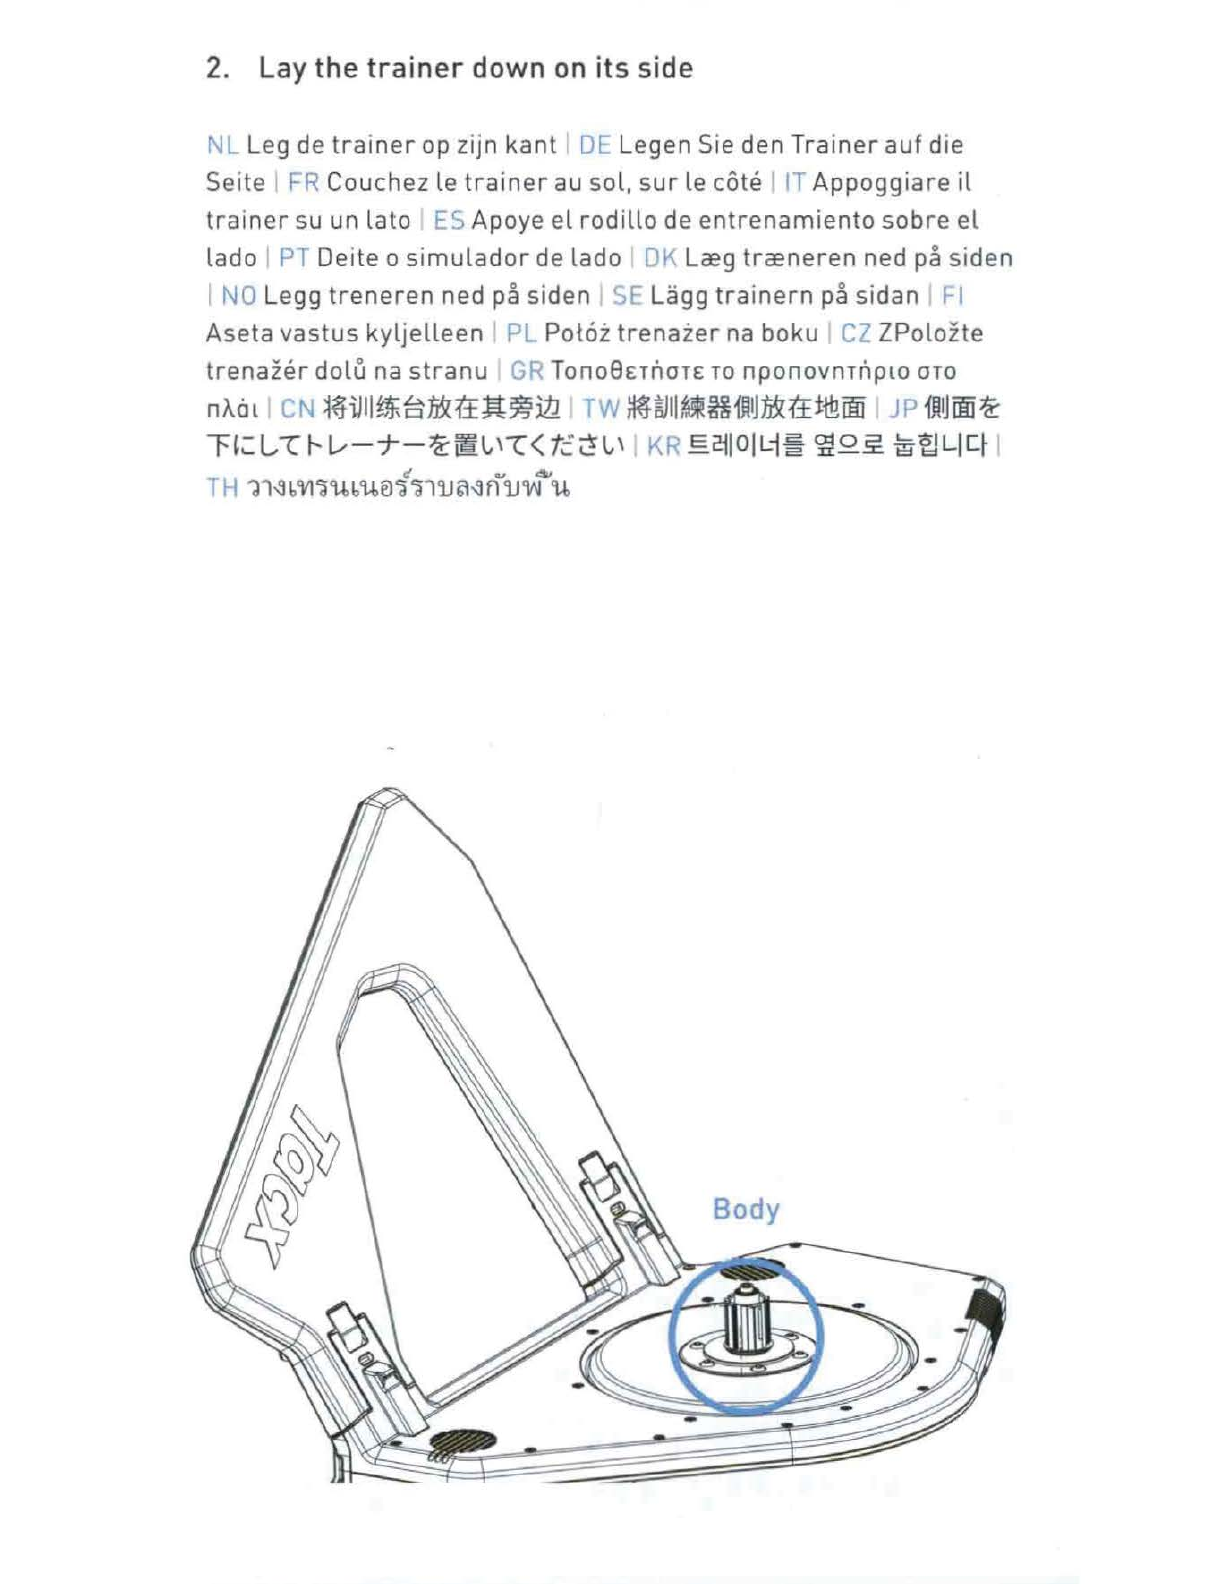
2.
Lay
the trainer
down
on
its side
NL
Leg de
trainer
op zijn kant I
DE
Legen Sie den Trainer auf die
Seite
FR
Couchez le
trainer
au sol,
sur
le cote
IT
Appoggiare
il
trainer
su un lato
ES
Apoye el rodillo de
entrenamiento
sabre
el
lado
PT
Deite o
simulador
de lade
01\
LcEg
trcEneren ned pa siden
I
NO
Legg
treneren
ned pa siden )rLagg
trainern
pa sidan Fl
Aseta
vastus
kyljelleen
rL
Pot6i
trenaier
na boku
CZ
ZPolozte
trenazer
dolu na
stranu
Gr
Tono8ET1iOTE
TO
nponovnrriplO
OTO
nACll
l N ~~iJll~EtJDn'±a*ill
rv
~~ll~HffflJJD<:tt±iBOO
JP
fflUim~
~,.:
L.:r
l---1.-,,-j--~fi:~
,-c<
t.:~~'
Kk
E2:ilOILi
~
~o
~
~ruLlq
,t
.,
41
1 H
11{1
b
'Vl'a'U,b
'U,e)'a
'al
'lJ
~{I
f1
'lJ'W
'U,
Body
3. Determine the needed connector based
on
the cassette
NL
Bepaal
het
benodigde
koppelstuk
voor
de
cassette
r.r
Stellen
Sie
fest,
welchen
Anschluss
Sie
fur
die
Kassette
brauchen
R
Determinez
le
connecteur
necessaire
en
fonction
de
la
cassette
Decidere
quale
sia
il
connettore
corretto
in
base
alla
cassetta
E.
S
Determine
el
conector
necesario
segun
el
cartucho
Determine
o
conector
necessar
io
em
func;:ao da
cassete
L ,
Fastsla
den
n0dvendige
stikforbildelse
pa
grundlag
af
kassetten
NO
Avgj~r
hvilken
kontakt
som
er
nflldvendig
basert
pa
kassetten
,E
Avgor
baserat
pa
kassetten
vilket
kopplingsdon
som
behovs
I
Maarita
vaadittava
liitin
rataspakan
mukaan
I~._
Ustalic
wymagany
l9
cznik
w
zaleznosci
od
kasety
( l
Podle
kazety
urcete
potrebny
konektor
p ~aKplBWoH:
TOV
ananouµe:vo
ouvoe:oµo
B60£l
rnc;
Kaotrac;
cN ffllii:f=ififfls'giitlH~~ttc~...t -H ffitlmfieiLlmtr!.ff~irg~
tlH
I JP
1.J-t!•:;
i--,:~-:5l,\""(~,~~:::J*?:9~~;EL*""t
t'
:1~J-ilEOll
cq2.~
WR~
:1
i
l:1J
Ei
7t
1F-~
<r.!
XI
~£!~LI
q
TH
rf1V1tt@1el
cun-ant'b6lS<!r
el)J@lel'Vlc,@leNii.ii
q
@11
)J
'a
'U
bb
'lJ
'lJ@'l
)J
iii
el
,u q
Shimano/
SRAM
8, 9 &
10
speed
T2805
.1
6
Shimano/
SRAM
11
&
12
speed
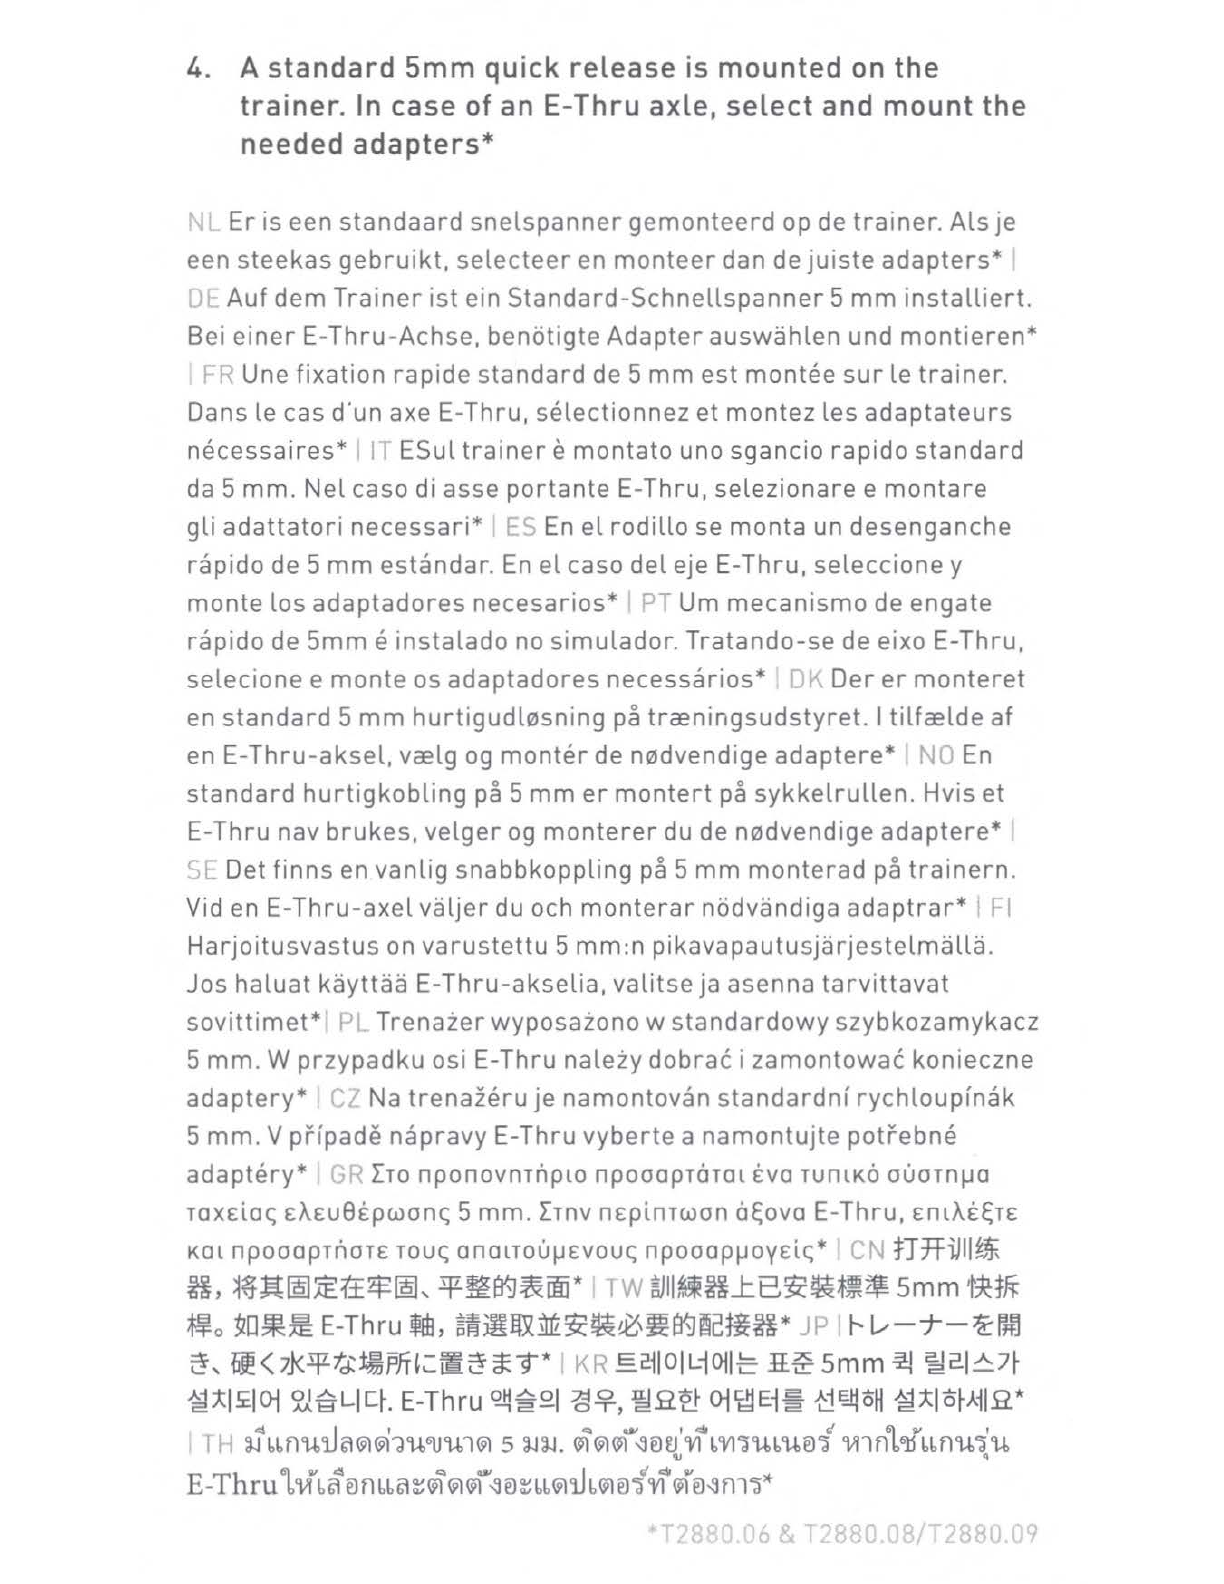
4. A standard 5mm quick release is mounted
on
the
trainer. In case
of
an
E-Thru axle, select and mount the
needed adapters*
ti..
Er
is
een
standaard
snelspanner
gemonteerd op de trainer. Als je
een
steekas
gebruikt,
selecteer
en
monteer
dan de juiste
adapters*
Auf
dem Trainer ist ein
Standard-Schnellspanner
5 mm installiert.
Bei
einer
E-Thru-Achse, benotigte Adapter
auswahlen
und montieren*
r Une fixation rapide
standard
de 5
mm
est
montee
sur
le trainer.
Dans le
cas
d'un axe E-Thru, selectionnez et montez
les
adaptateurs
necessaires*
1 TESul
trainer
emontato uno sgancio rapido
standard
da 5 mm. Nel
caso
di
asse
portante E-Thru,
selezionare
e
montare
gli
adattatori
necessari*
En
el rodillo
se
monta
un
desenganche
rapido de 5 mm
estandar.
En
el
caso
del eje E-Thru, seleccione y
monte los
adaptadores
necesarios*
PT
Um
mecanismo de
engate
rapido de 5mm e instalado
no
simulador. Tratando-se de eixo E-Thru,
selecione e monte
os
adaptadores
necessarios*
• Der
er
monteret
en
standard
5 mm hurtigudl0sning pa trcEningsudstyret. ItilfcElde af
en E-Thru-aksel,
vcElg
og
monter de n0dvendige adaptere* ·
En
standard
hurtigkobling pa 5 mm
er
montert
pa sykkelrullen. Hvis
et
E-Thru nav brukes, velger
og
monterer
du de n0dvendige adaptere*
SI::
Det finns en vanlig snabbkoppling pa 5 mm monterad pa
trainern.
Vid
en E-Thru-axelvaljer du och
monterar
nodvandiga
adaptrar*
•Fl
Harjoitusvastus
on
varustettu
5 mm:n pikavapautusjarjestelmalla.
Jos
haluat kayttaa E-Thru-akselia, valitse ja
asenna
tarvittavat
sovittimet*
Trenaier
wyposaiono w standardowy szybkozamykacz
5 mm. W przypadku osi E-Thru
naleiy
dobrac izamontowac konieczne
adaptery*
Na
trenazeru
je namontovan
standardnf
rychloupfnak
5 mm. Vprfpade napravy E-Thru vyberte a namontujte potrebne
adaptery*
rro
nponovnrnplo npooapr6r0l
tva
rumK6 ouornµa
raxdac; EA£u8tpwonc; 5 mm.
rrnv
nEpinrwon 6~ova E-Thru,
EmAE~TE
Kat
npooaprnor£
rouc;
an
OlTouµ
Evouc;
npooapµ
oyEic;*
· tT:rfiJllti
ff,
~~~~~tt~~,
lf~~~Im*
~ll~ff_tE~~~~
5mm
t~ff.i
~o
~
□~~
E-
Thru
~'
!~~~M~~~,~~l'ictiff*
J
1---
L;-.,--~!m
~'
iif(7J<lffcJ:iiPJH:~~a::1'"*
K~
E2.1I0IL10ll~
l!.-eSmm~
~2.IA7~
~:.tl£10i
~~Liq.
E-Thru
Q!l~21
?3~,
WR~
OiigjEi~
{::!~oH
~:.tlo~AilR*
• 1
3,1\bfl'Ui'U
6'l
~~i·wucu,
1~
s
3,13,1.
@1'
~<Jl..,~e.l~~'Vlc!,
b
'Vl'a'Uib
CUier1
'Vil
flb6libbfl'Ui
~cu,
E-Thrub
cib~
el
fl
bb6'l
::i
~
<Jl..,~el::bb~'U
b<Jl
ei{'Vlc!,@f
el~
fll'a*
•
f2880.06
&
T288O.O8/T288O.O9
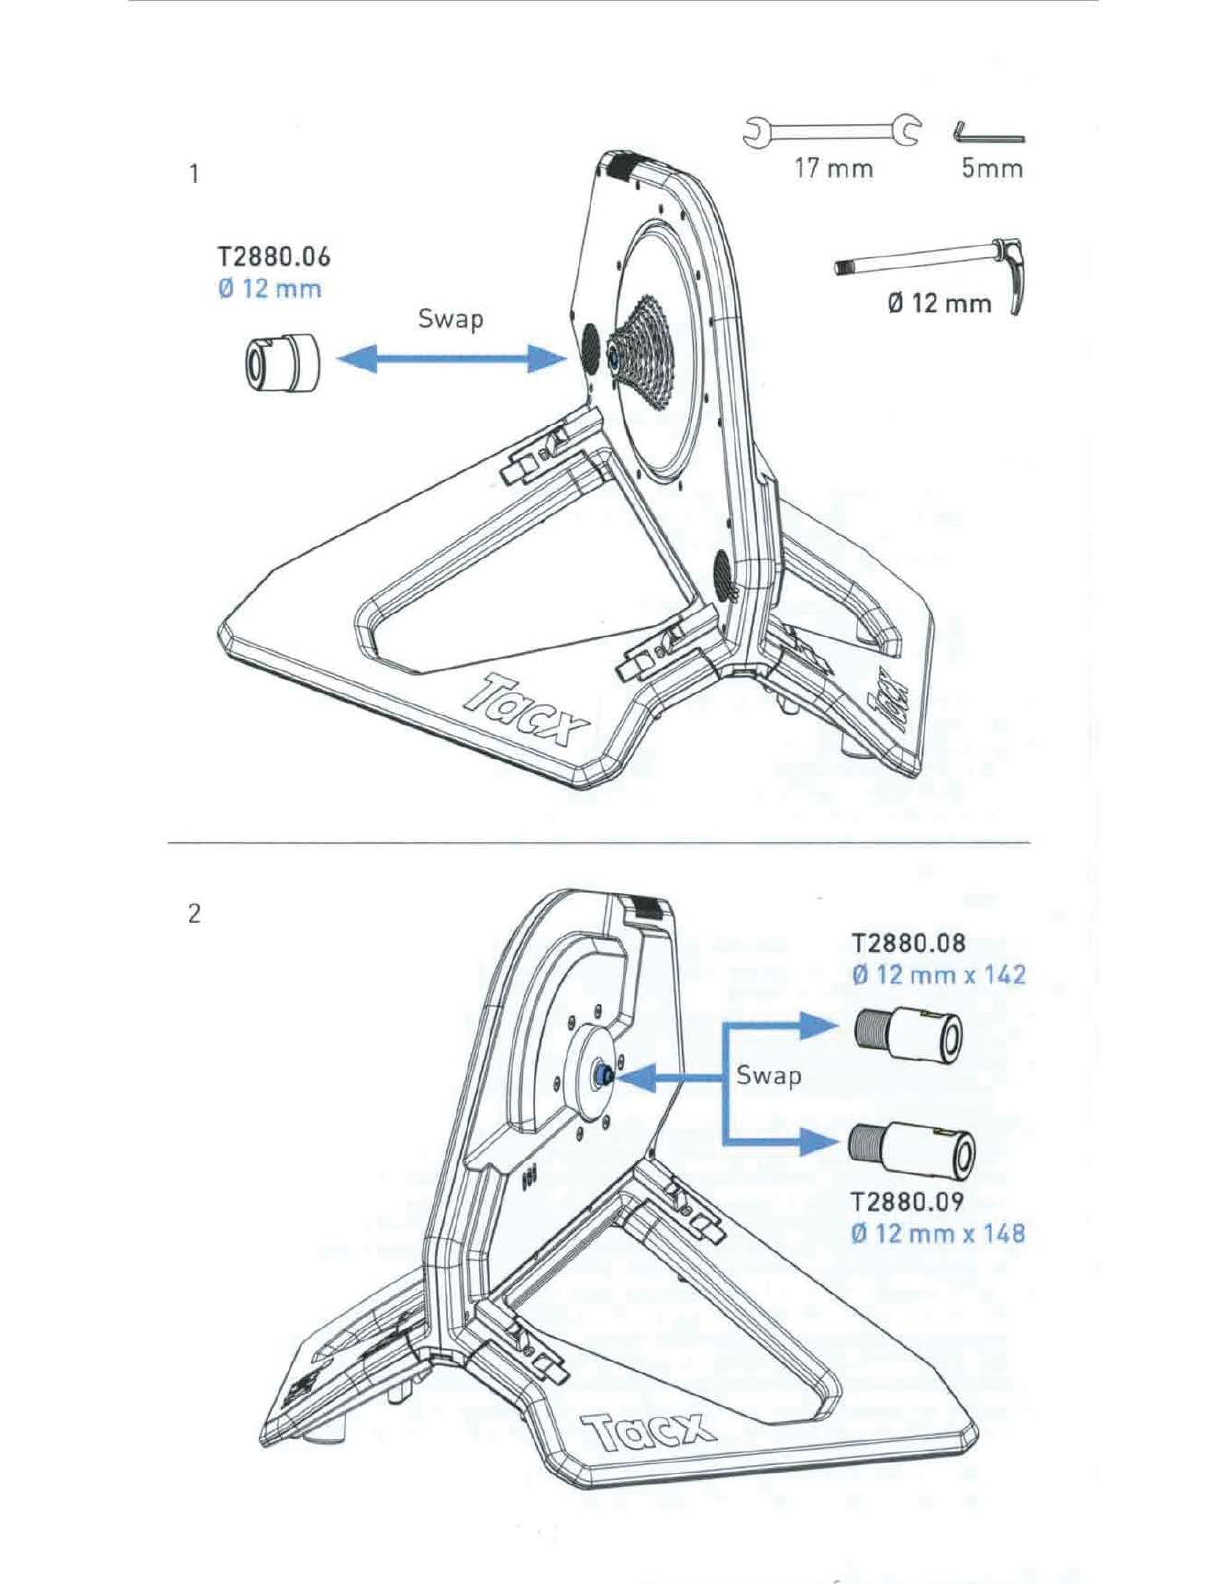
1
2
T288O.
O6
012
mm
Swap
~
'l:=q==a
17
mm
5mm
T288O.O8
012
mm x 142
~
cr[]
,
-
◄--
.......
swap
..___....
cc:@
T288O.
O9
012mmx148
5. Mount the cassette according to the instructions pr
ovided
in the manual
of
the cassette
f\
Plaats
de
cassette
volgens
de
instructies
in
de
handleiding
van de
cassette
Montieren
Sie
die
Kassette
gemar3
den
Anweisungen
im
Handbuch
der
Kassette
f
Montez
la
cassette
conformement
aux
instructions
fournies
dans
le
manuel
d'utilisation
de
la
cassette
Montare
la
cassetta
seguendo
le
istruzioni
riportate
nel
manuale
della
cassetta
stessa
Monte
el
cassette
siguiendo
las
instrucciones
que
se
facilitan
en
el
manual
del
cassette
l
Monte
a
cassete
de
acordo
com
as instrU<;:6es
constantes
do
respetivo
manual
Monter
kassetten
i
overensstemmelse
med
instruktionerne
i
manualen
til
kassetten
Monter
kassetten
if0lge
instruksjonene
som
du
finner
i
brukermanualen
for
kassetten
Si-
Montera
kassetten
enligt
instruktionerna
i
kassettens
bruksanv
isn
ing
Kiinnita
rataspakka
sen
mukana
toimitettujen
ohjeiden
mukaisesti
Zamontowac
kasete;
zgodnie
z
instrukcj
9
kasety
7
Namontujte
kazetu
podle
pokynu
uvedenych
V
navodu
ke
kazete
"
npoooprnon:
rnv
KOOETO
ouµq,wva
µ£
n~
oon
yl£~
nou
naptxov
T
OL
oro
£YXElploLO
rn~
Kaoe:ra~
C'
I\J
-mfflJ.@
~~~oo~~•~m•~~~~
\v
~•m~~oo~mm~~~~~m
~
n-tz
,y
t--
O)I&f&filtaf.l&i:~c~~n
--c
l,,~
~u~,:~
·:ft:1J-tz
,.:;
t--
~
I&
tJ
f-tit
* "
7~A
ilE
□
Hir~Oll
~Al-8
::q~
CH£
7~Ail
E
~
~:;tlgj-LI
q
@l~~~
~
lei@l,~~
0
,bb'U~U,'Ylclr'a'~'1J
e:i~1u~·:.te:i6Uei~~
~
le:i
q q 'lJ
'lJ
q
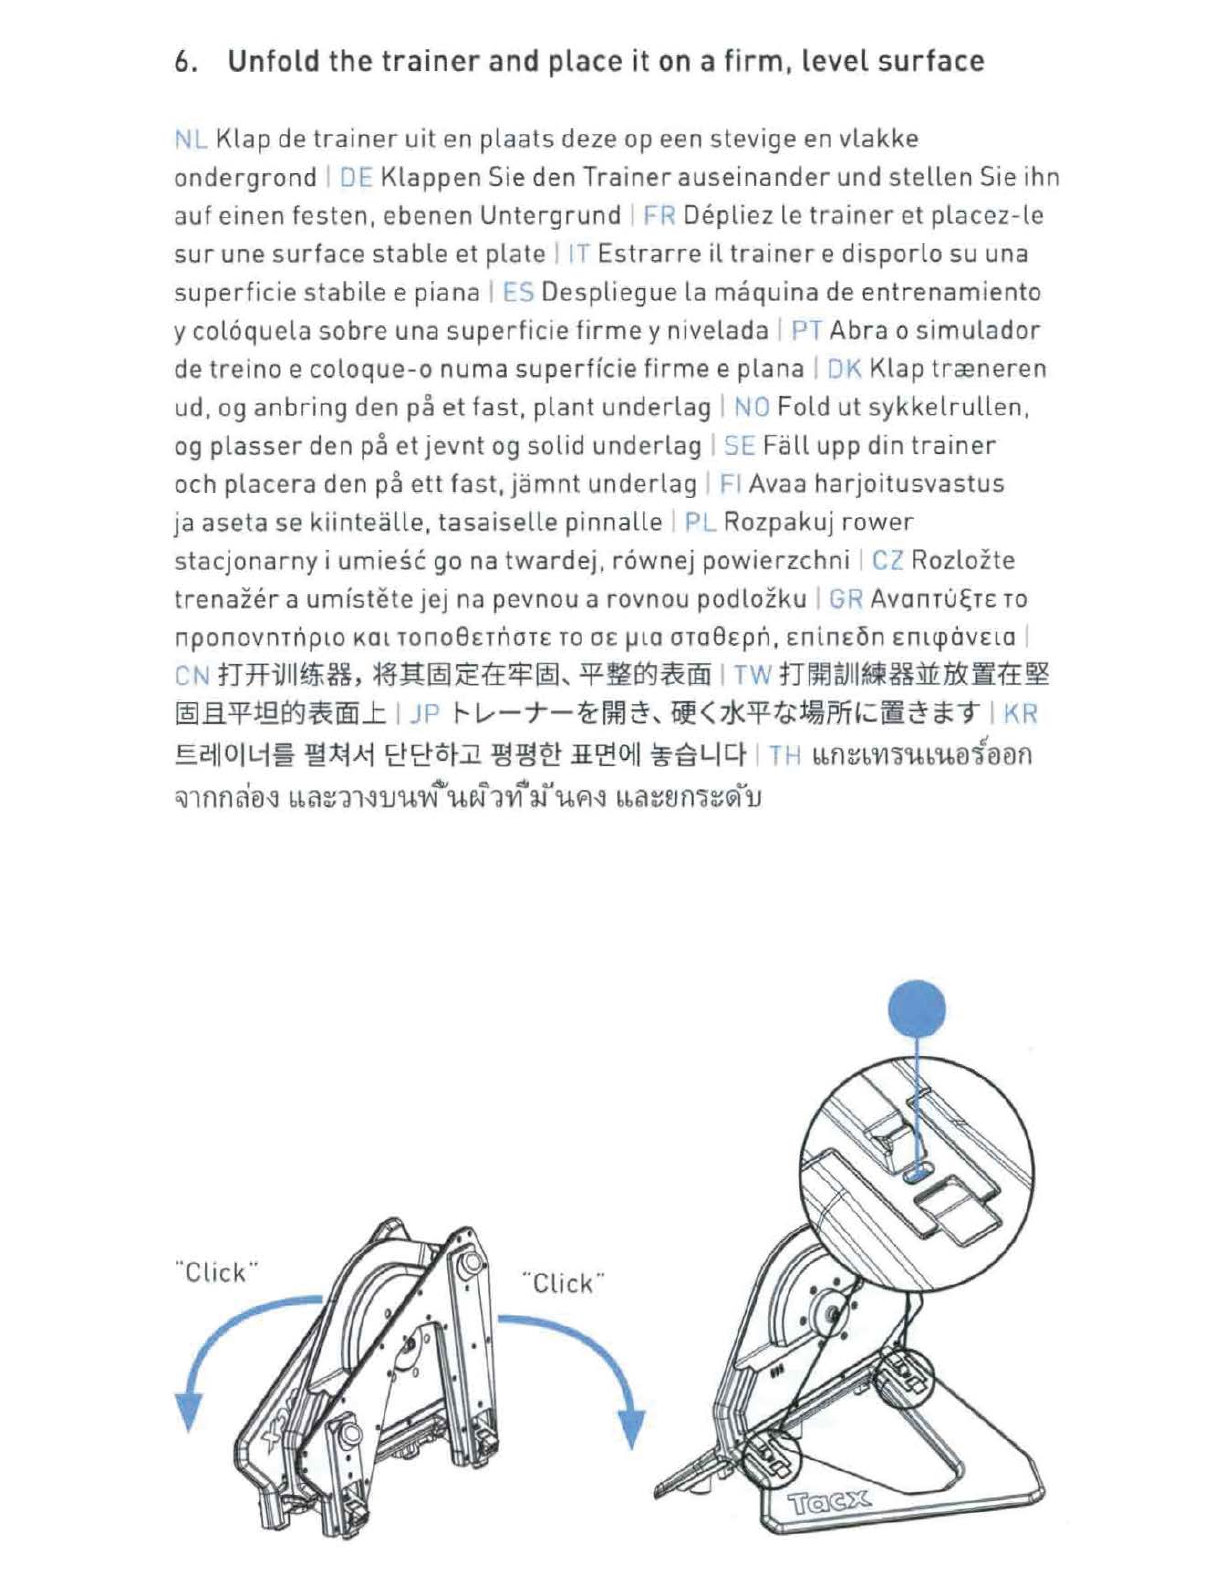
6. Unfold the
train
er and place
it
on
a fi
rm
,
level
surface
h
Klap
de
trainer
uit
en
plaats
deze op een
stevige
en
vlakke
ondergrond
1f:
Klappen
Sie den
Trainer
auseinander
und
stellen
Sie
ihn
auf
einen
festen, ebenen
Unterg
rund ri~
Depliez
le
trainer
et
placez-le
sur
une
surface
stable
et
plate
IT
Estrarre
il
trainer
e
disporlo
su una
superficie
stabile
e piana
Despliegue
la
maquina
de
entrenamiento
y
col6quela
sobre
una
superficie
firme
y
nivelada
PT
Abra
o
simulador
de
treino
e
coloque-o
numa
superffcie
firme
e
plana
[
l-\
Klap
lrcEneren
ud, og
anbring
den pa
et
fast,
plant
underlag
NO
Fold
ut
sykkelrullen,
og
plasser
den pa
et
jevnt
og
solid
underlag
SL
Fall
upp
din
trainer
och
ptacera
den pa
ett
fast,
jamnt
underlag
Avaa
harjoitusvastus
ja
aseta
se
kiintealle,
tasaiselle
pinnalle
PL
Rozpakuj
rower
stacjonarny
i
umiesc
go
na
twardej.
r6wnej
powierzchni
rz
Rozlozte
trenazer
a
umistete
jej
na pevnou a
rovnou
podlozku
GR
Ava
nTU~TE
TO
nponovnrriplo
KOl
rono8£TrlOTE
TO
OE
µto ora8Epn,
Enindin
Enlq>OVElO
l
-J
tTffiJlltiH,
~~lt~~ff42~,
!J!~l't-J~OO
...
wtTlfflwll~HM~irff~
~_§_!J!±Bl'r-J~OO..t
JP
"L,,-7-~Jm
~,
~<
7J<3¥-~~Pni:ii:~
*9
KR
EcilOILi~
~~~Ai
88o~Jl
1M1M~
JI'i:!Ol
l
~~qq
r11
bbn~b'Vl~ttbtter
i'e1ern
"Click
..
"Click"
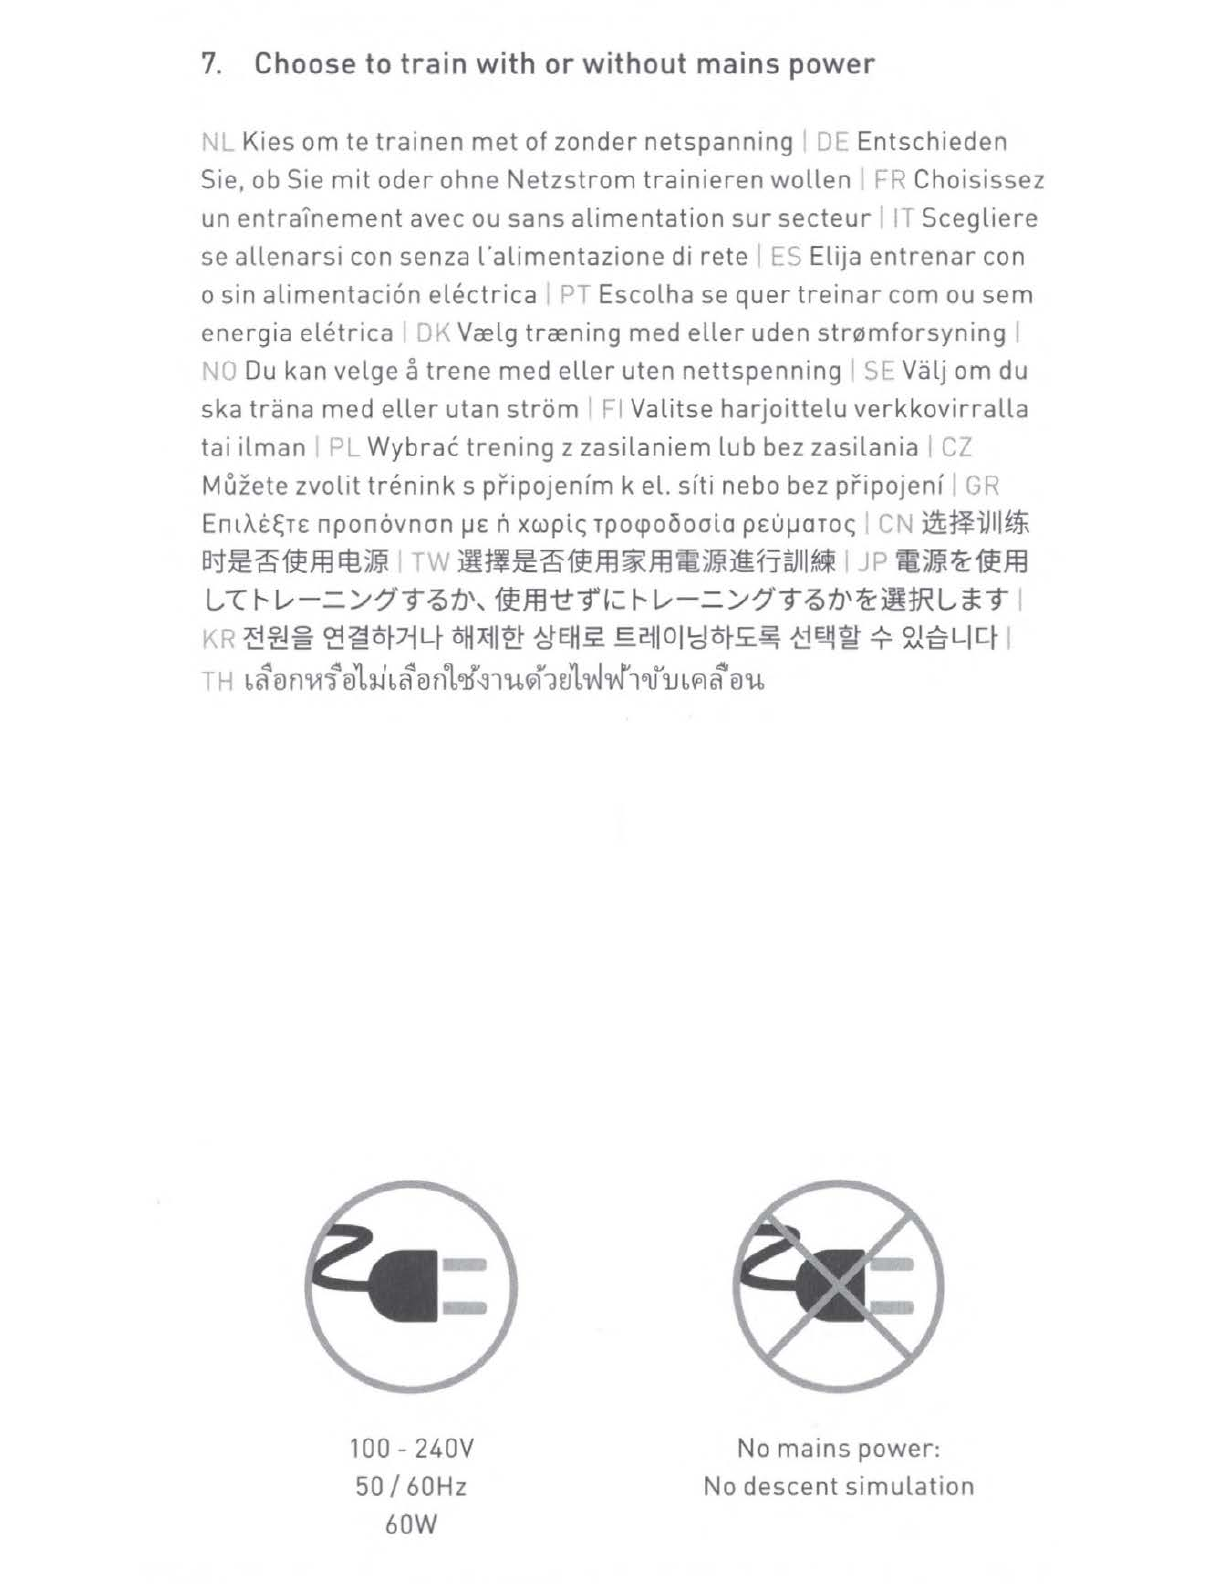
7. Choose
to
train with or without mains power
~
Kies
om
te
trainen
met
of
zonder
netspanning
~
Entschieden
Sie,
ob
Sie
mit
oder
ohne
Netzstrom
trainieren
wollen
J:R
Choisissez
un
entra1nement
avec
ou
sans
alimentation
sur
secteur
Scegliere
se
allenarsi
con
senza
l'alimentazione
di
rete
ES
Elija
entrenar
con
o
sin
alimentaci6n
electrica
PT
Escolha
se
quer
treinar
com
ou
sem
energia
eletrica
Vrelg
trrening
med
eller
uden
str0mforsyning
1 Du
kan
velge
a
trene
med
eller
uten
nettspenning
S[
Valj
om
du
ska
trana
med
eller
utan
strom
i:-1
Valitse
harjoittelu
verkkovirralla
tai
ilman
_
Wybrac
trening
z
zasilaniem
lub
bez
zasilania
Cl
Muzete
zvolit
trenink
s
pripojenfm
k
el.
sfti
nebo
bez
pripojenf
rR
Emt1.£~TE
nponovnon
µE
ri
xwptc; rpocpoooota pEuµaroc; _ iz]~iJllft
s1
~
~
1'f
m
~
~~
~~
~ ~
1'f
m
*mm:~~
Ji
fr
ru11
~
~;~~ff
m
Lt
r-
~-
=/-7
·9
{>1.J',
ffffl-tt"f',:
r-
~-
= /-7'""t{>1.J'~~fRL
*9
r
r\
t:!~~
~~o~7~q
off
Xii~
~EH~
E
2.ilO
l
'cJo~5:.~
~~w
*~~Liq
,
f b
~
el
f1
vr=f
el
b
:..h
~
el
f1
b
6}j-:J
l 'U
i-a
tJ
b
'W
'W
161Jv
'lJ
b
~
l
el
'U
100
-240V
50
/ 60Hz
60W
No
mains
power:
No
descent
simulation

8. Fold the trainer to store it
NL
Klap de
trainer
in
om
hem
op
te
bergen
OE:.
Klappen Sie den
Tr
ainer
zusammen,
um ihn
aufzubewahren
F'i Pliez le
trainer
pour
le
ranger
IT
Ripiegare
il
trainer
per
conservarlo
ES
Pliegue el
rodillo de
entrenamiento
en
el
momenta
de
almacenarlo
PT
Dobre
o
simulador
de treino
para
guarda-lo
ClV
Fold
tr~ningsudstyret
sammen
for
at
opbevare
det
'" Fold
sammen
sykkelrullen for
oppbevaring
SE
Vik
ihop
trainern
for
att
forvara den Fl Sailyta
vastusta
taitettuna
Pl
Zlozyc
trenaier
w celu przechowywania
r7
Trenazer
pred
uskladnenfm
sklopte
r
fc
illnAciJOTE
TO
nponovnrriplO
YlO
va ro
ano8nKEUOETE
(;
N
tfrltiJll~Hl-~~fi-ffffil
TW
tfrlt~ll~Hl-~l&
~
J':>
f--
L,.,--j--,a:jfi
fJ
t.:t.:lv
~'!¥ff
L
""(
<t.:
~
\.,'
KR
E
cJIOI
Li~
~Oi
Ai
.!i!.
~gt
LI
q TH
cw"''.ll
1.o/ldt1,1,cu,e:1{1,cw
4
e:1~"'(.9l
bf1'.ll
"Click
..
"Click"
Specifications
Wireless
Protocol:
Frequency
range
RF
Output
Power
Temperature
Range
Transmit
Range
Power
supply
FCC
and IC
Declarations
Bluetooth
4.0 &
ANT+
2400-2483,5
MHz
0
dBm
(typical)
Operational
-20
°C
to+
55
°C
10
m
Only
use
supplied
power
cord
Yourdevice co
ntains
a
low
power
transmitter.
When
device
is
transmitting
it
sends
out
Radio
Frequency
(RF)
signals.
Compliance
statement
(part
15)
This
device
complies
with
Part
15
of
the
FCC
Rules
and
to
the
licence
-exempt
RSS
standardslsl
of
Industry
Canada.
Operation
is
subject
to
the
following
two
conditions:
(1)
This
device
may
not
cause
harmful
interference.
121
This device
must
accept any
interference
received,
including
interference
that
may
cause
undesired
operation.
FR
I Declaration de conformite
Le
present
appareil
est
conforme
aux
CNR
d'lndustrie
Canada
applicables
aux
appareils
radio
exempts
de
licence.
L
·exploitation
est
autorisee
aux
deux
conditions
suivantes:
111
l'appareil
ne
doit
pas
produire
de
brouillage,
et
12)
l'utilisateur
de
l'appareil
doit
acceptertout
brouillage
radioelectrique
subi,
meme
si
le
brouillage
est
susceptible
d'en
compromettre
le
fonctionnement.
Under
Industry
Canada
regulations,
this
radio
transmitter
may
only
operate
using
an antenna
of
a
type
and
maximum
(or
lesser)
gain
approved
for
the
transmitter
by
Industry
Canada.
To
reduce
potential
radio
interference
to
other
users,
the
antenna
type
and
its
gain
should
be so chosen
that
the
equivalent
isotropically
radiated
power
le.i.r.p.)
is
not
more
than
that
necessary
for
successful
communication.
Warning
(part
15.21)
Changes
or
modifications
not
expressly
approved
party
responsible
for
compliance
could
void
the
user's
authority
to
operate
the
equipment.
Unauthorized
modification,
or
attachments
could
damage
the
transmitter
and may
violate
FCC
regulations.
CE
Declaration
of
Conformity
Tacx
bv
hereby
declares
that
the
this
NEO
2T
Smart
IT2875l
conforms
to
the
essential
requirements
set
out
in
the
Council
(European
parliament)
Directive
and
other
relevant
provisions
of
directives
RED
2014/53/EC and
Ro
HS
2011/65/EU. A copy
of
this
declerat
ion
is
available
on
the
Tacx
website:
www.tacx.com
ROHS
This
product
is
marked
with
this
symbol.
It
means
that
used
electrical
and
electronic
products
should
not
be
mixed
with
general
household
waste.
There
is
a
separate
collections
system
for
these
products.
Taiwan
requlatory
information
(NCC)
ffilJJ.1R58lflt-fttmttllgJfj/Jij~
m+=~A!!!~rtwm~~zflilJJ•t-.tffimttt,
~~A!!!r-Fi:iJ,
~l5J,
iffi~~ffm~~::f~tHft13IH!!ffi*,
n□
*ljJ·~-J!~~!fz~tt°&l.tJ/i~o
m+~~~lJJ•t-.tffi••zffffl::fffl~BmAA~~&~~~~~~;~~~•~•~•-·~~w~
ffl,tt~~MM~-~~fflaMfffflo
M~~~~~.---~~m~~~z•~•~m
o
~lJJ-t-.tffl•-~m~~~~m~I~,M~&a•mm••MttRttlN~z~~
o

Troubleshooting
ProblemA: the deral
ll
eur hi
ts
the
NEO
2when using the
lighte
st gear
1.
Remove
t
he
Bodyincluding the casselle
with
an
allen
key
5mm
. Makesure
the
black
ring
remains
attached
to
the
Body.
2. Slide
the
2
supplie
d
spacers
(T2805
.
11
and T2805.1
2)
lo
the
backor
the
axle.
3. Place
the
Body,
with
the
black
ring,
and
the
cassette
backtn position.
English
• Tests have
revealed
that
the
unit
will
not
overheat, even
when
subject
to
extreme
use. However,
when
subject
to
prolonged
and
intensive
use,
the
enclosure
around
the
brake
may
become
very
hot.
Always
allow
the
brake
to
cool
down
after
use
before
touching
it.
• Ensure
not
to
drop
the
brake
during
assembly
as
this
can
lead
to an
imbalance
which
may
cause
vibration.
•
Never
open
the
brake
unit
as
this
may
cause damage.
•
Inspect
the
nuts
and
bolts
on
the
trainer
on a
regular
basis, and
retighten
if
necessary.
•
Perspiration
moisture
and
condensation
can
harm
the
electronics.
Do
not
use
the
trainer
in
damp
areas.
Incorrect
use
and/or
maintenance
will
void
the
warranty.
•
This
appliance
can be
used
by
children
aged
from
8
years
and
above and
persons
with
reduced
physical,
sensory
or
mental
capabilities
or
lack
or
experience
and
knowledge
if
they
have
been
given
supervision
or
instruction
concerning
use
of
appliance
in a safe
way
and
understand
the
hazards
involved.
•
Children
are
not
to
play
with
the
Tacx
trainer
without
supervision.
• This device
is
not
designed
for
industrial,
commercial
or
medical
applications.
•
Do
not
expose
the
product
to
water
or
moisture.
• Clean
only
with
a
dry
cloth.
Do
not
use cleaning
solvents
or
abrasives.
• In case of
not
using
the
trainer,
switch
it
off
and
unplug
the
mains.
• Keep
the
trainer
in a
dry
room
at
room
temperature.
•
Always
allow
the
brake
to
cool
down
for
20
minutes
after
use
before
touching
it.
Nederlands
• Testen hebben
uitgewezen
dat de
unit
bij
extreme
prestaties
nooit
oververhit
kan
raken.
Wel
kan bij
langdurig
en
intensief
gebruik
de om
hulling
van de
rem
behoorlij
warm
word
en.
Laat
de
rem
na
gebruik
altijd
even
afkoelen
voordat
je
deze
aanraakt
• Zorg
er
voor
dat
de
rem
tijdens
het
monteren
niet
valt.
Er
zou
onbalans
kunnen
ontstaan
die
trillingen
veroorzaakt.
• Open
nooit
de
rem
om
beschadigingen
te
voorkomen.
•
Controleer
regelmatig
of
de
bouten
en
moeren
van de
trainer
nog goed
vast
zitten.
•
Transpiratievocht
en
condens
kunnen
de
elektronica
aantasten.
Gebruik
de
trainer
niet
in
vochtige
ruimtes.
Bij
onjuist
gebruik
en/of
onderhoud
vervalt
de
garantie.
•
Dit
apparaat
kan
gebruikt
warden
door
kinderen
vanaf
8
jaar
en
person
en
met
een
verminderd
fysiek,
zintuiglijk
of
mentaal
vermogen
of
gebrek
aan
ervaring
en
kenni
wanneer
ze
onder
supervisie
staan
of
instructies
gekregen
hebben
over
veilig
gebruik
van
het
apparaat
en
de
bijbehorende
risico·s
begrijpen.
•
Kinderen
dienen
niet
zonder
toezicht
te
spelen
met
de Tacx
trainer.
•
Dit
apparaat
is
niet
geschikt
voor
industrieel,
commercieel
of
medisch
gebruik.
•
Niet
blootstellen
aan
water
of
vocht.
•
Alleen
schoonmaken
met
een
droge
doek.
Gebruik
geen
oplosmiddelen
of
schuurmiddelen.
•
lndien
de
trainer
niet
gebruikt
wordt,
dient
deze te
word
en u
itgeschakeld
en de
stekker
uit
het
stopcontact
gehaald
te
warden.
• Zet de
trainer
waar
het
in
een
droog
en
kamer
termperatuur
heeft.
•
Laat
de
trainer
20
minuten
afkoelen
voordat
je
de
schijf
aanraakt.
Deutsch
•
Durchgefuhrte
Tests
bestatigen,
dass die
Einheit
selbst
bei
intensivem
Training
nicht
Uberhitzt.
Allerdings
kann
das Gehause
der
Bremseinheit
nach
langerem,
intensivem
Training
sehr
heif3
werden.
Lassen Sie die
Bremse
unbedingt
abkUhlen,
ehe Sie
sie
anfassen.
• Lassen Sie die
Bremse
bei
der
Montage
nicht
fallen;
andern-
falls
kann
eine
Unwucht
entstehen,
die
zu
Vibrationen
fUhrt.
• Offnen
Sie
die Bremseinheit nicht. Die Bremseinheitkann beschadigtwerden, wenn sie
gei:iffnetwird.
• KontrollierenSie die
Muttern
und Schrauben amTrainerregelmaf3ig und ziehen
Sie
sie bei
Bedarffest.
• Schweif3 und Kondenswasserki:innen die Elektronikbeschadigen. Benutzen Sie den
Tacx
bv
hereby
declares
that
the
Tacx NEO 2T
T2875
conforms
to
the
essential
requirements
and
other
relevant
provisions
of
directives
RED
2014/53/EG
&
RoHS
2011/65/EU.
A
copy
of
this
declaration
is
available
on
the
Tacx
website:
www.tacx.com
Hierbij
verklaart
Tacx
bv
dat
de
Tacx NEO 2T
T2875
in
overeenstemming
is
met
de
essentiele
eisen
en
de
andere
relevante
bepalingen
van
richtlijnen
RED
2014/53/EG
&
RoHS
2011/65/EU.
Een
kopie
van
deze
verklaring
is
te
vinden
op
de
Tacx
website:
www.
tacx.com
Tacx
bv
erklart
hie
rm
it,
dass
der
Tacx NEO
2T
T2875
alle
wesentlichen
Anforderungen
und
sonstigen
Bestimmungen
der
Richtlinie
RED
2014/53/EG
& RoHS
2011/65/EU
erfullt.
Eine
Kopie
dieser
Erklarung
find
en Sie
auf
der
Website
von
Tacx:
www.tacx.com
Tacx
bv
declare
par
la
presente
que
le
Tacx NEO 2T
T2875
est
conforme
aux
exigences
essentielles
et
autres
dispositions
pertinentes
de
la
directive
2004/108/CE
& RoHS
2011/65/EU.
Une
copie
de
cette
declaration
est
disponible
sur
le
site
Web
de
Tacx:
www.tacx.com
Con
la
presente
dichiarazione,
Tacx
attesta
che
il
T2875
Tacx
NEO 2T e
conforme
ai
requisiti
essenziali
e
ad
altre
disposizioni
pertinenti
della
direttiva
RED
2014/53/EG
&
RoHS
2011/65/EU.
Una
copia
di
questa
dichiarazione
e
disponibile
sul
sito
Web
Tacx:
www.tacx.com
Par
la
presente
Tacx
declara
que
el
Tacx NEO
2T
T2875
cumple
con
los
requisitos
basicos
y
otras
disposiciones
pertinentes
de
la
directiva
RED
2014/53/EG
& RoHS
2011/65/EU.
Si
lo
desea,
puede
consultar
una
copia
de
esta
declaraci6n
en
el
sitio
Web
de
Tacx:
www.tacx.com
A Tacx B.V.
declara
pela
presente
que
o NEO
2T
T2875
da
Tacx
esta
em
conformidade
com
os
requisitos
fundamentais
e
outras
disposic;:6es
relevantes
da
directiva
RED
2014/53/EG
e RoHS
2011/65/EU.
Pode
encontrar
uma
c6pia
desta
declarac;:ao
no
website
da Tacx:
www.tacx.com
Tacx
bv
erklffirer
herved,
at
Tacx NEO
2T
T2875
overholder
de
vcesentligste
krav
og
0vrige
relevante
krav
i
direktiv
RED
2014/53/EG
& RoHS
2011/65/EU.
En
kopi
af
denne
erklcering
findes
pa Tacx·s
websted:
www.tacx.com
Tacx
bv
bekrefter
med
dette
at
Tacx NEO
2T
T2875
er
i
samsvar
med
n0dvendige
krav
og
andre
relevante
bestemmelser
i
direktiv
RED
2014/53/EG
& RoHS
2011/65/EU.
Du
finner
en
kepi
av
denne
samsvarserklceringen
pa
nettstedet
til
Tacx:
www.tacx.com
Tacx
bv
forklarar
harmed
att
Tacx NEO 2T
T2875
uppfyller
nodvandiga
krav
och
6vriga
gangbara
tillampningsomraden
av
direktivet
RED
2014/53/EG
& RoHS
2011/65/EU.
En
kopia
av
denna
forklaring
finns
pa Tacx
web
plats:
www.tacx.com
Tacx
vakuuttaa,
etta
Tacx NEO 2T
T2875
tayttaa
direktiivin
RED
2014/53/EG
& RoHS
2011/65/EU
oleelliset
vaatimukset
ja
muut
eh
dot.
Kopio
tasta
tiedoksiannosta
on
saatavilla
Tacx-verkkosivustolla:
www.tacx.com
Fir
ma
Tacx B.V.
oswiadcza,
iz
Tacx NEO 2T
T2875
jest
zgodny
z
zasadniczymi
wymogami
i
innymi
odpowiednimi
postanowieniami
dyrektywy
RED
2014/53/EG
& RoHS
2011/65/
EU.
Kopia
niniejszej
deklaracji
dost~pna
jest
na
stronie
internetowej
firmy
Tacx:
www.
tacx.com
Spolecnost
Tacx
bv
ti
mto
prohlasuje,
ze Tacx N
EO
2T
T2875
odpovf
da
podstatnym
pozadavkum
a
ostatnfm
relevantn1m
ustanovenfm
smernice
RED
2014/53/EG
& RoHS
2011/65/EU.
Kopie
tohoto
prohlasenf
je
k
dispozici
na
internetovych
strankach
Tacx:
www.tacx.com
H Tacx
bv
on>..wvEL
µEro
nap6v
on
ro
Tacx NEO 2T
T2875
ouµµopcpwvETOL
µ£
nc;
BooLKe:c;
anamioELC:
KOL
a.AA.EC:
oxETLKEC:
npo8AE4JELC:
me; oonyiac; RED
2014/53/EG
KOL
RoHS
2011/65/EU.
'Eva avrlypa<po aurnc; me; ori.\wonc;
dvaL
OLo8e:oLµo
oro
OLKTUOK6
r6no
rnc;
Tacx:
www.tacx.com

T2875.25
2019
-
06
Designed and produced
in
the
Netherlands
Tacx
A Garmin Company

Quick
Start
Smart trainers
T0854E
2019
-
02
Tacx

;t
Tocx

Table of contents
Other Garmin Fitness Equipment manuals


Popular Fitness Equipment manuals by other brands


G-FITNESS
G-FITNESS AIR ROWER user manual

CAPITAL SPORTS
CAPITAL SPORTS Dominate Edition 10028796 manual

Martin System
Martin System TT4FK user guide

CIRCLE FITNESS
CIRCLE FITNESS E7 owner's manual

G-FITNESS
G-FITNESS TZ-6017 user manual

Accelerated Care Plus
Accelerated Care Plus OMNISTIM FX2 CYCLE/WALK user manual


