Gazebo penguin 430133 User manual
430133.Cooler Cart.0911-18.GP.ENFR 1
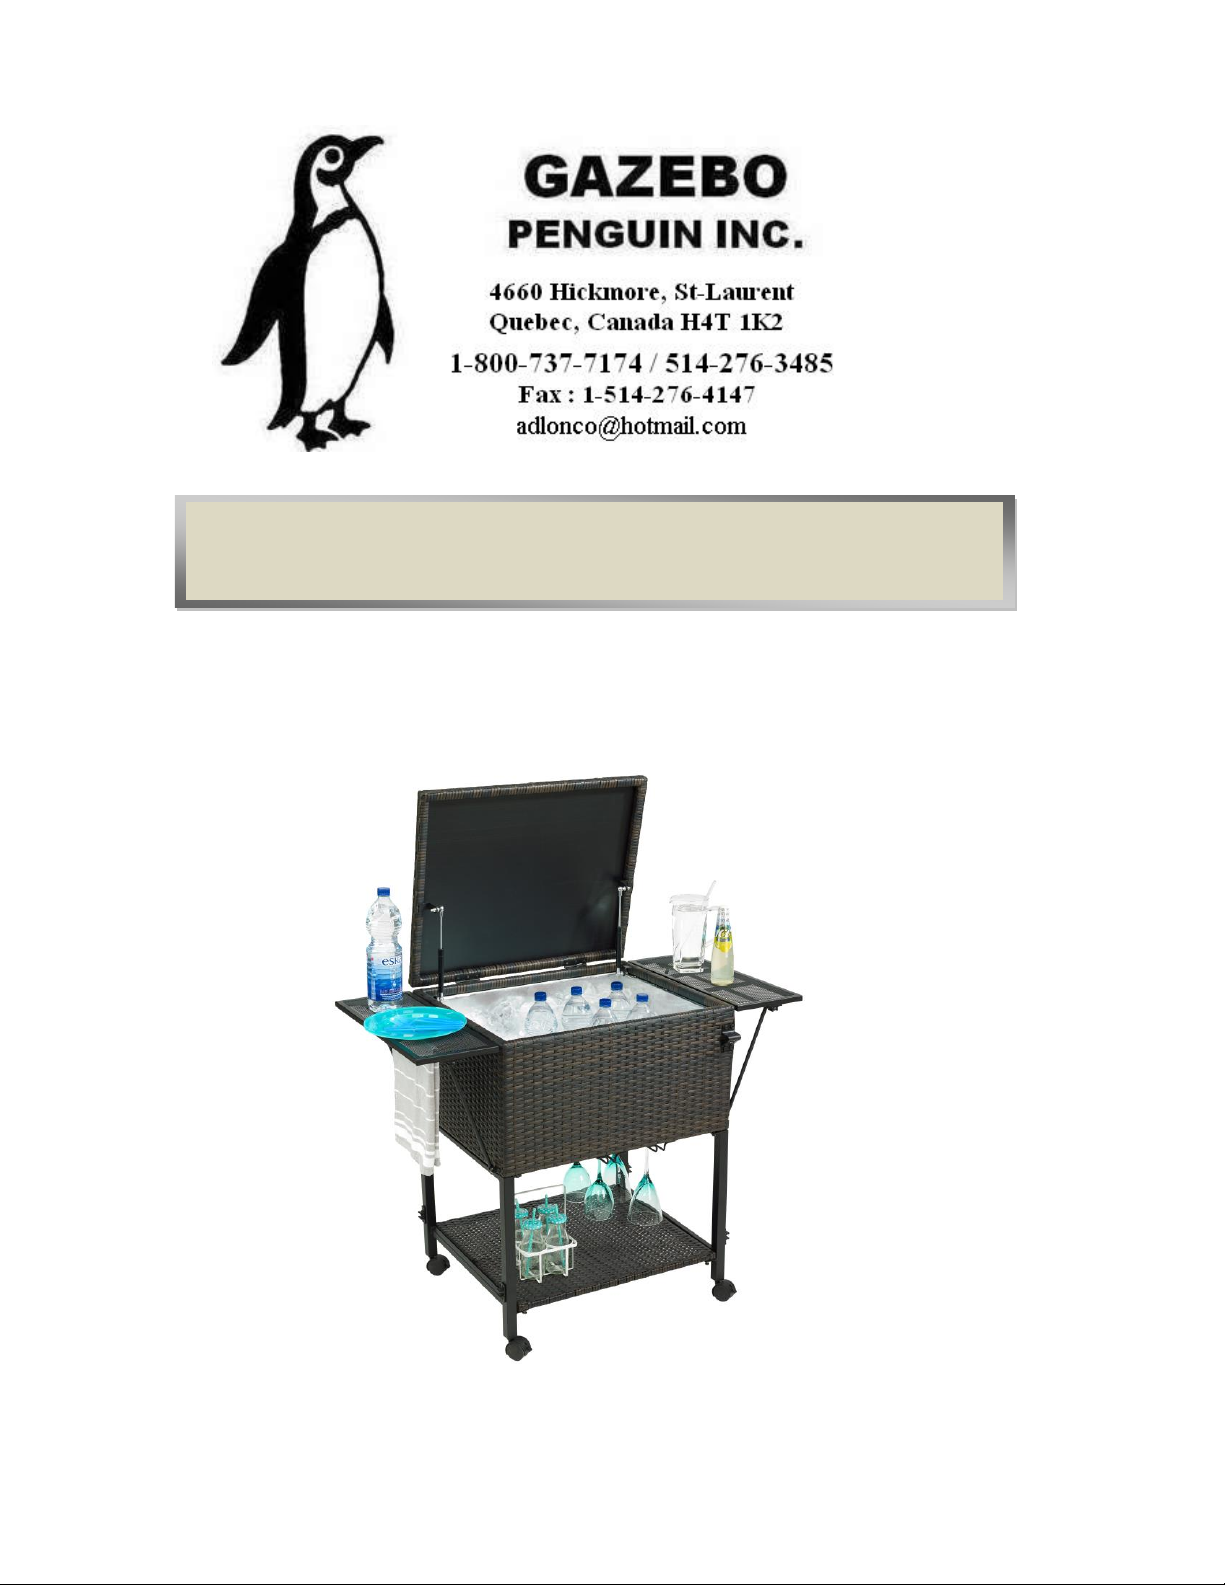
430133 COOLER CART
INSTALLATION MANUAL 430133
430133.Cooler Cart.0911-18.GP.ENFR 2
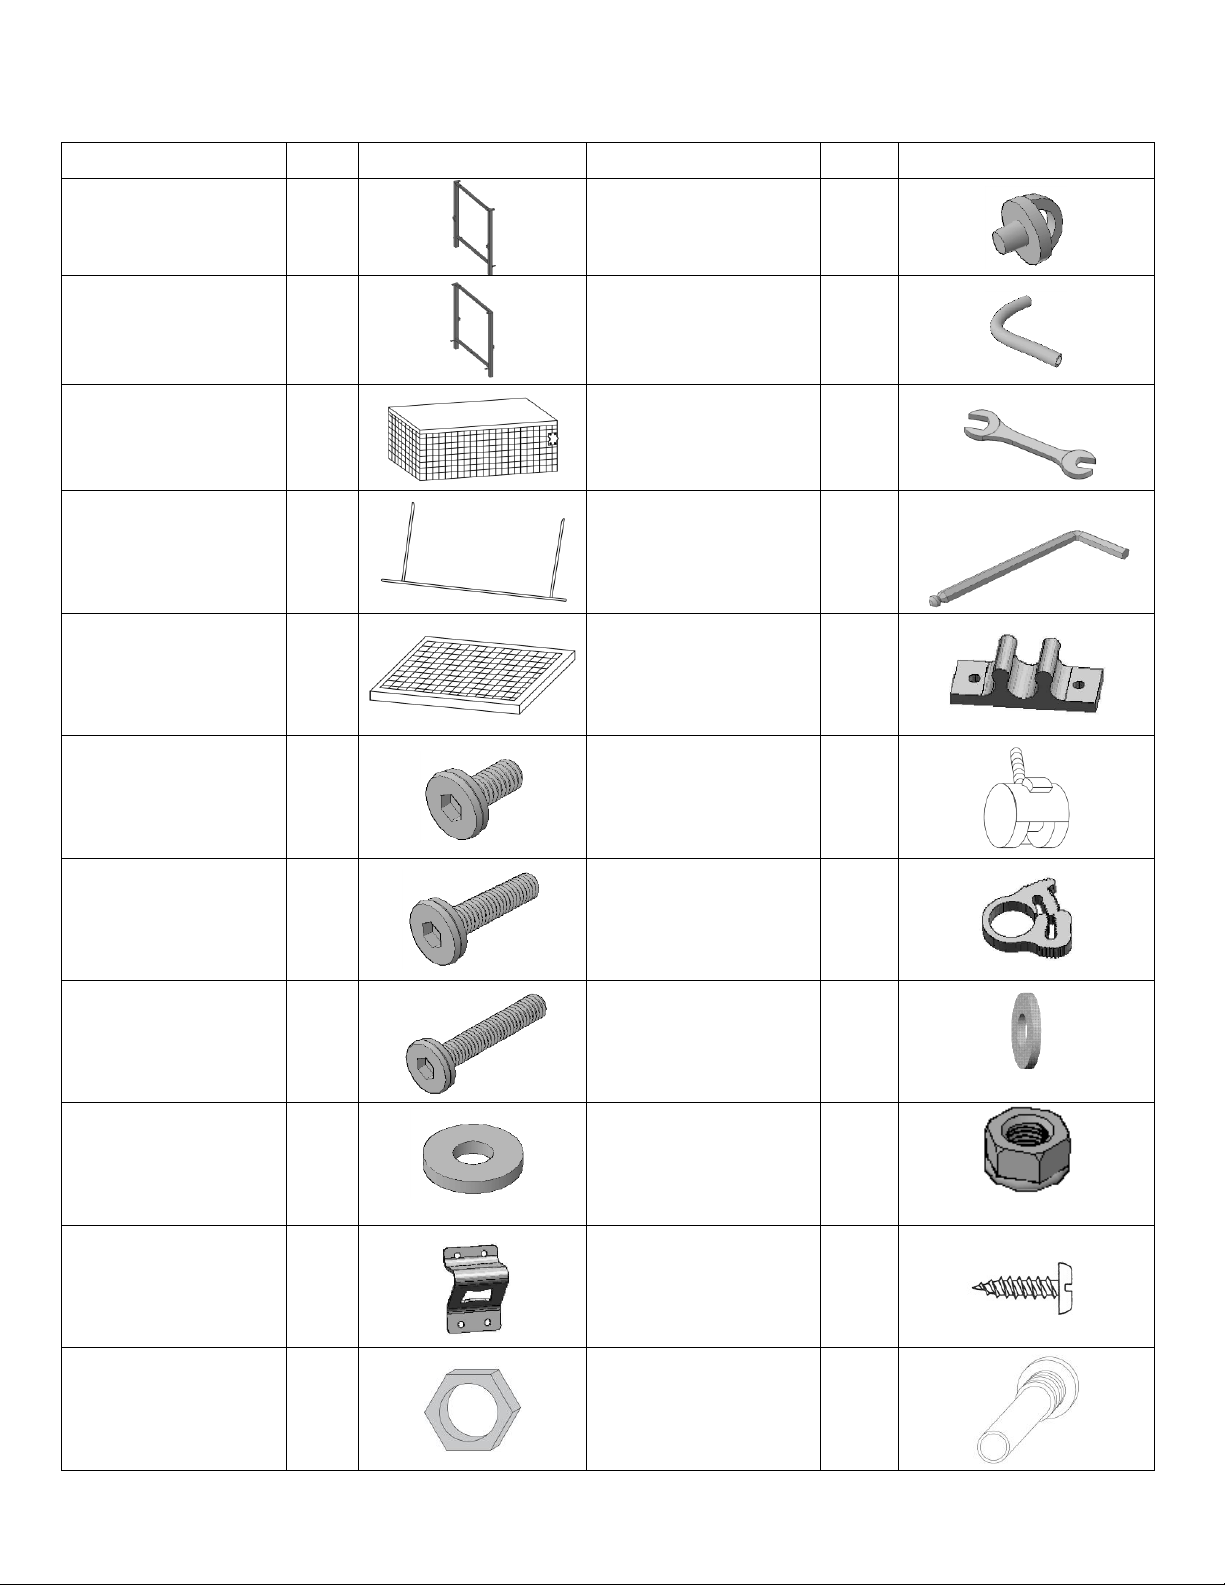
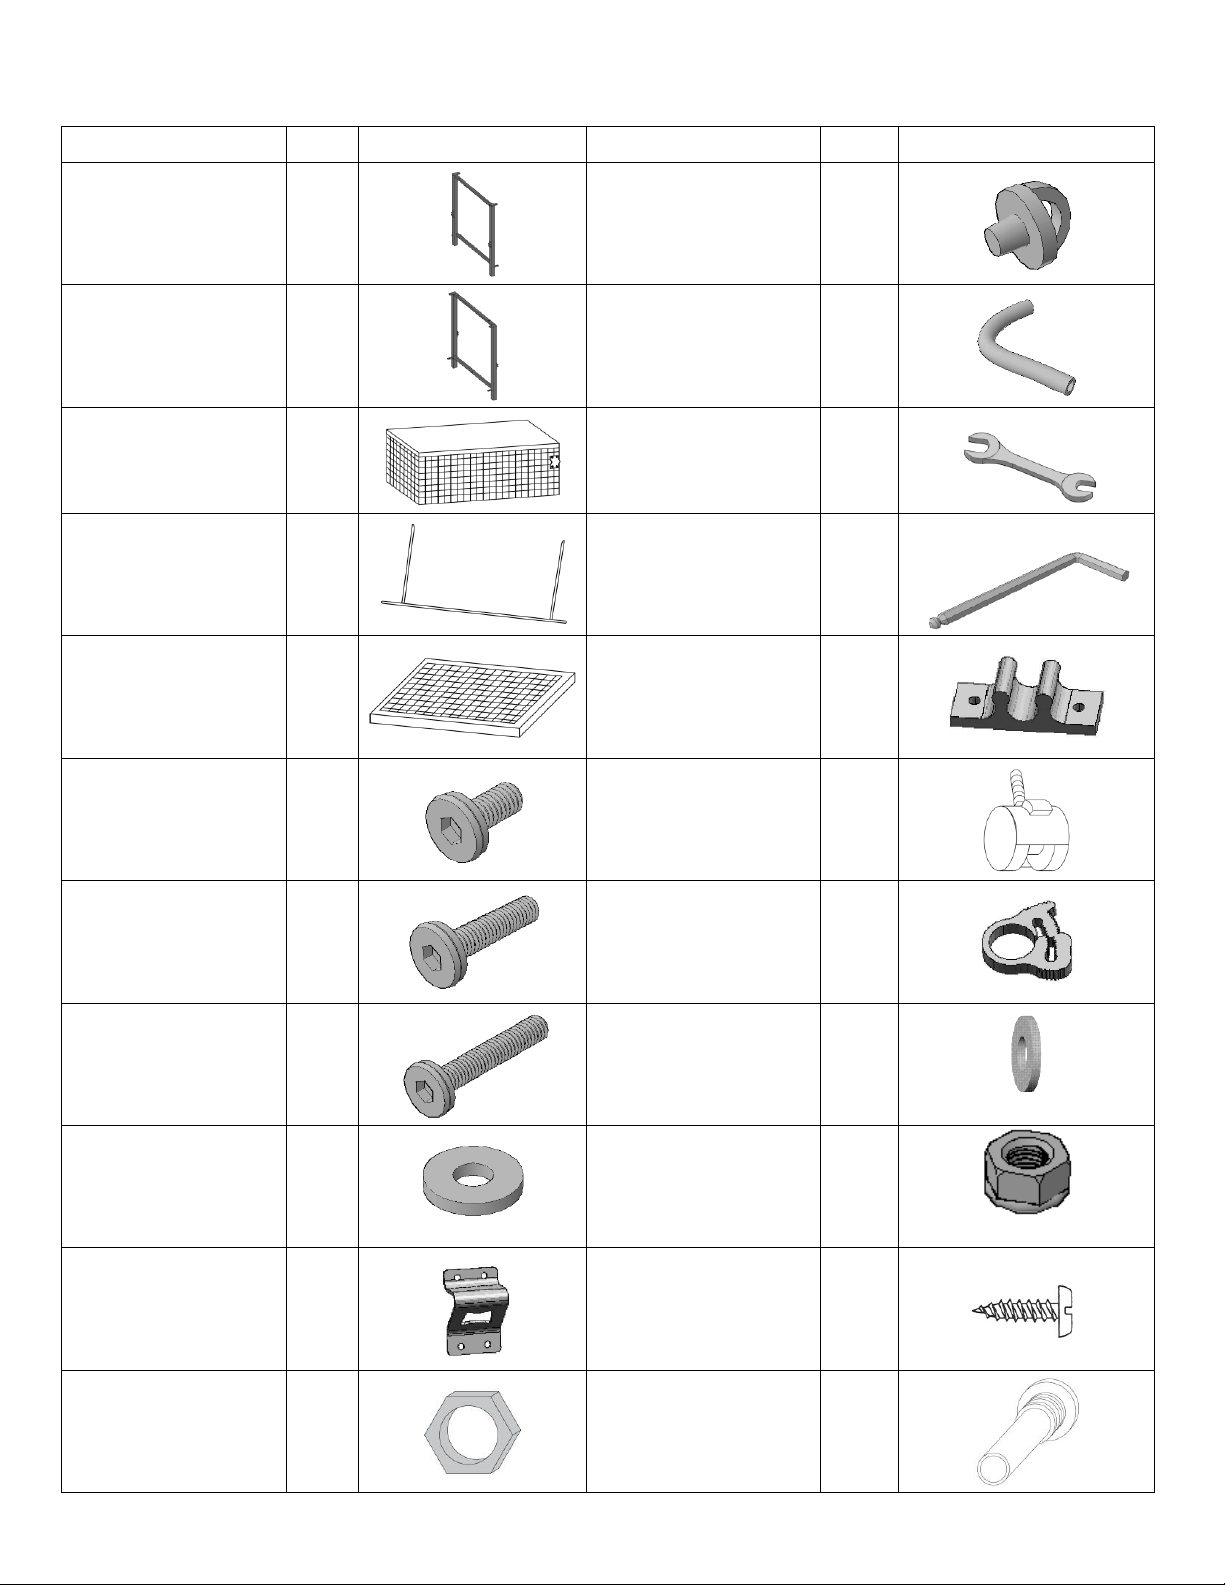
COOLER CART PARTS
PART
QTY
DIAGRAM
PART
QTY
DIAGRAM
LEFT CART LEG
L1
18-093
1
RUBBER PLUG
L
18-103
1
RIGHT CART LEG
L2
18-094
1
PLASTIC TUBE
M
18-104
1
TOP BOX
B
18-095
1
OPEN WRENCH
N
18-105
1
SHELF HANDLE
S
18-096
2
ALLEN WRENCH
O
18-106
1
BOTTOM PANEL
P
18-097
1
PLASTIC CLIP
C
18-107
4
BOLT
M6x18mm
F
18-098
16
WHEEL
E
18-108
4
BOLT
M6x30mm
G
18-099
4
DRAIN FASTENER
E2
18-109
1
BOLT
M6x32mm
H
18-100
2
WASHER
I
18-110
18
M6
PLASTIC WASHER
K
18-101
4
NYLON LOCK NUT
J
18-111
4
BOTTLE OPENER
A
18-102
1
SELF-TAPPING
SCREW
D
18-112
8
DRAIN FITTING
E3
18-191
1
DRAIN FITTING
E4
18-192
1

430133.Cooler Cart.0911-18.GP.ENFR 3
STEP 1
Install the 4 plastic clips (C) on the tablets.

430133.Cooler Cart.0911-18.GP.ENFR 4
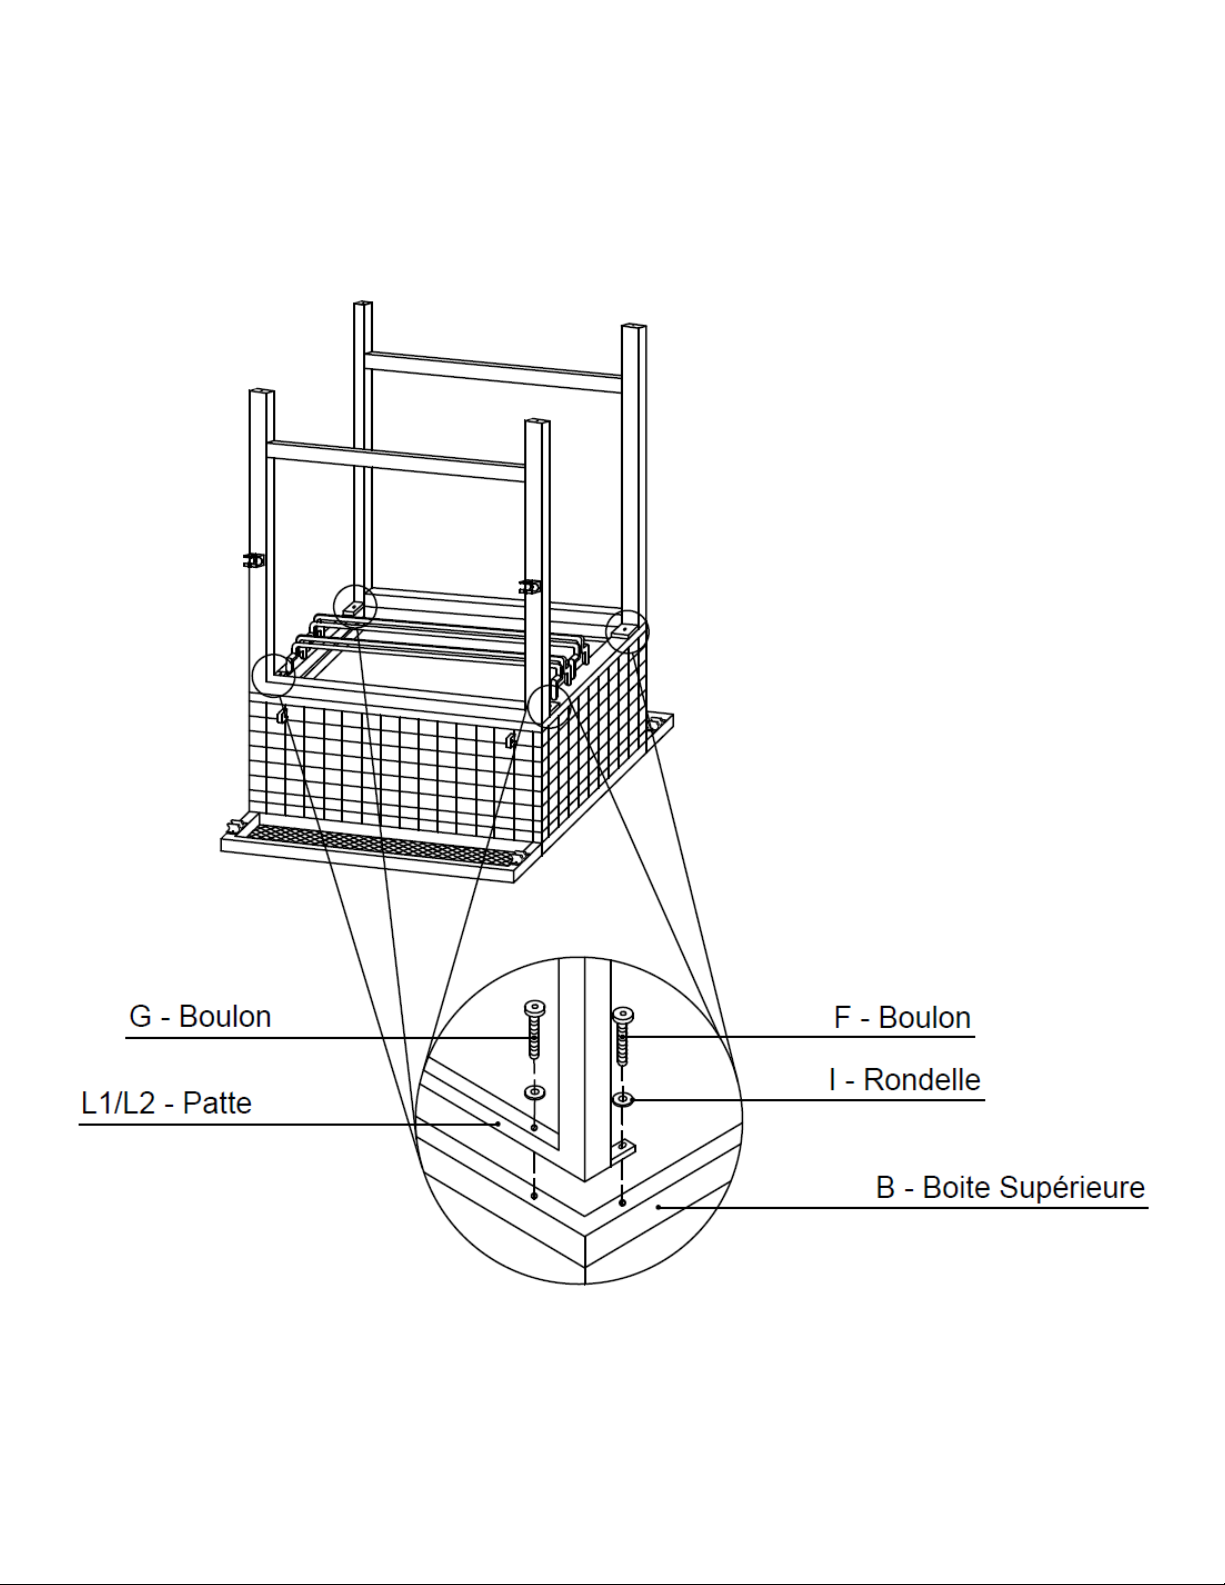
STEP 2
Screw legs (L1/L2) to top box (B) with bolts (G, F) and washers (I) using allen wrench (O).
430133.Cooler Cart.0911-18.GP.ENFR 5
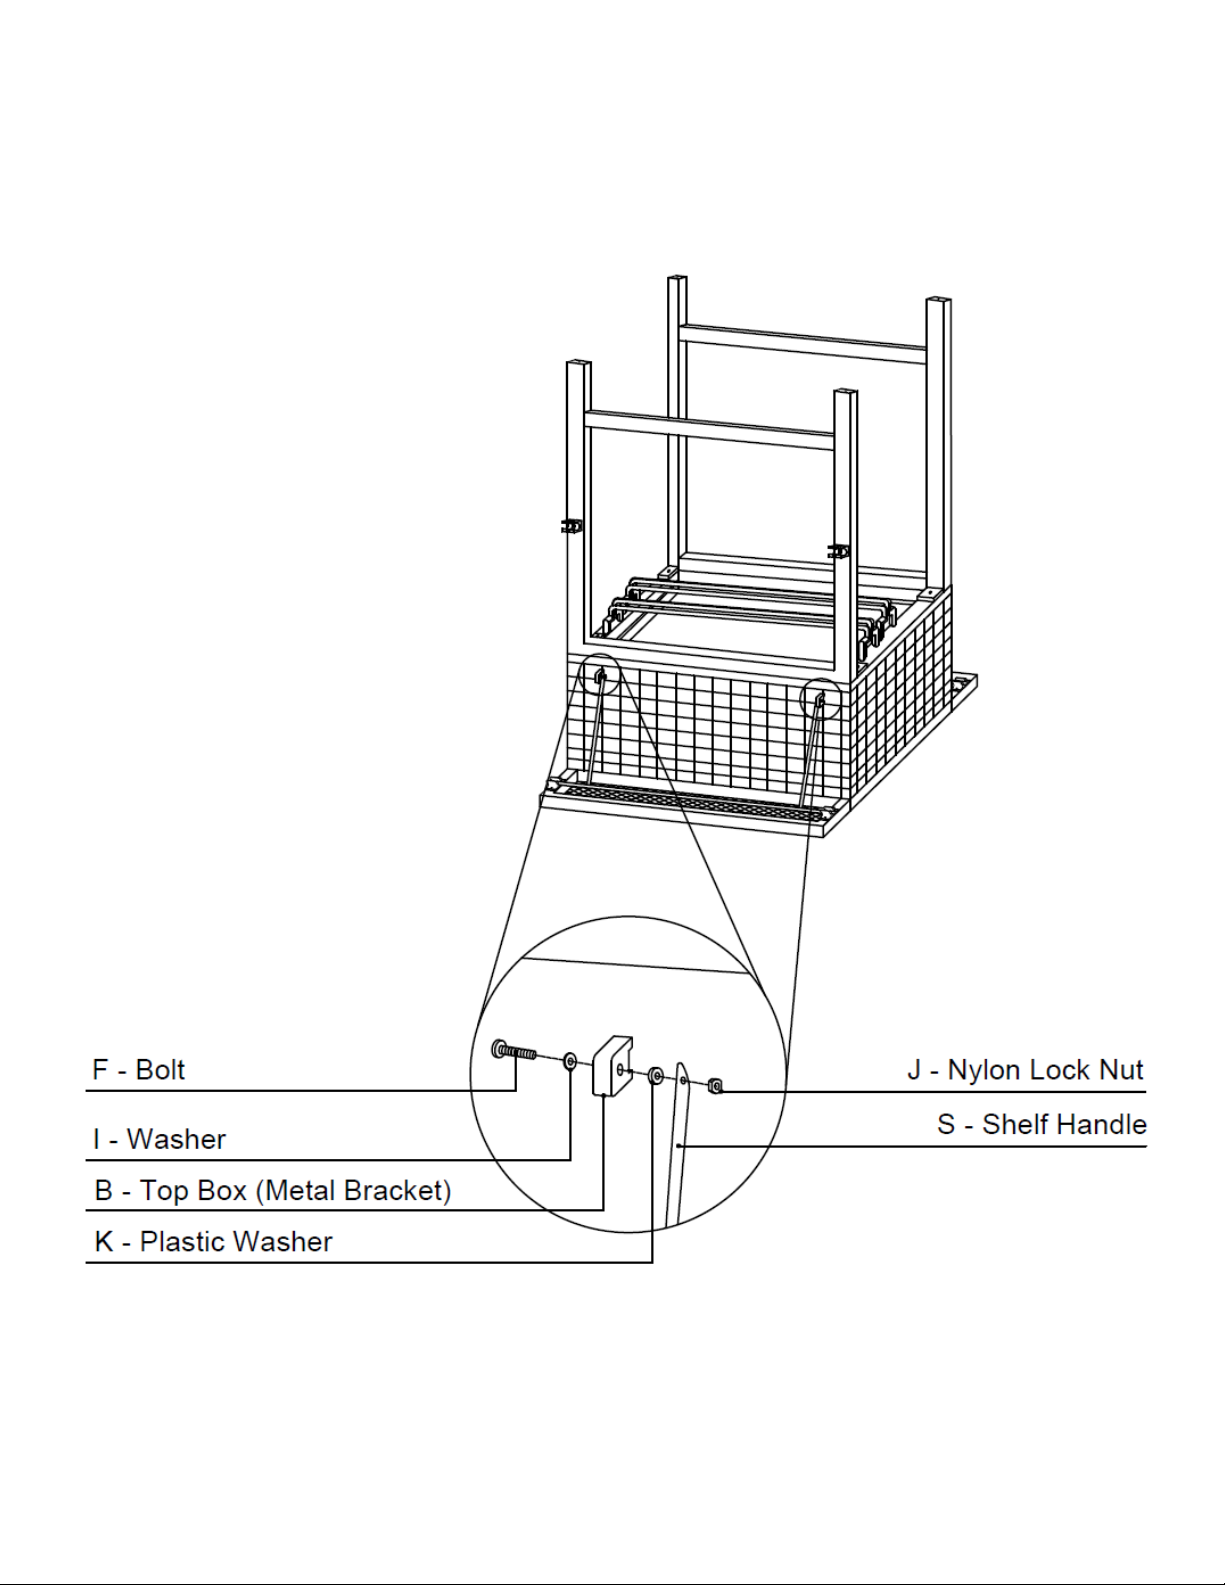
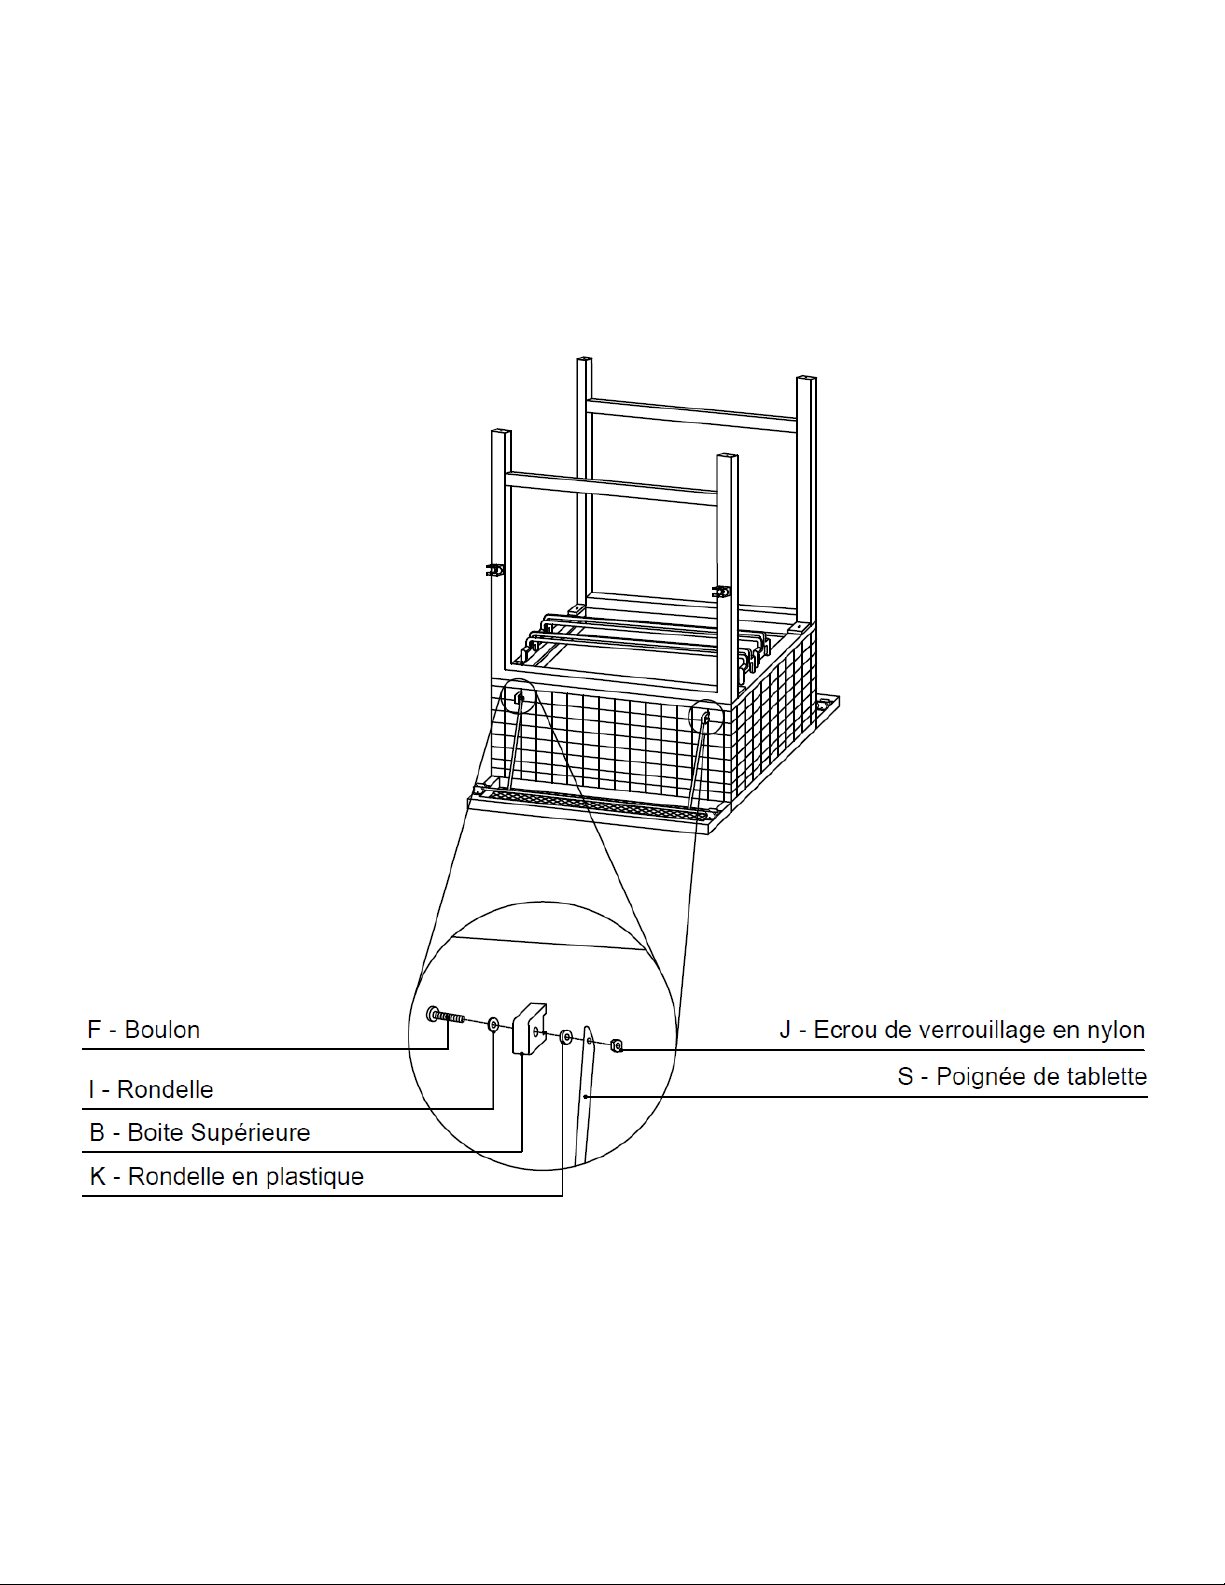
STEP 3
Attach shelf handle (S) to the top box (B) using bolt (F), washer (I), plastic washer (K) and nylon lock
nut (J).
Note: Do not over tighten.

430133.Cooler Cart.0911-18.GP.ENFR 6
STEP 4
Fix the corners of the bottom panel (P) under the brackets of the legs (L1/L2) using bolt (F) and
washer (I).
STEP 5
Fix the sides of the bottom panel (P) under the brackets of the legs (L1/L2) using bolt (H) and
washer (I).
Note: This is done from the inside.
430133.Cooler Cart.0911-18.GP.ENFR 7
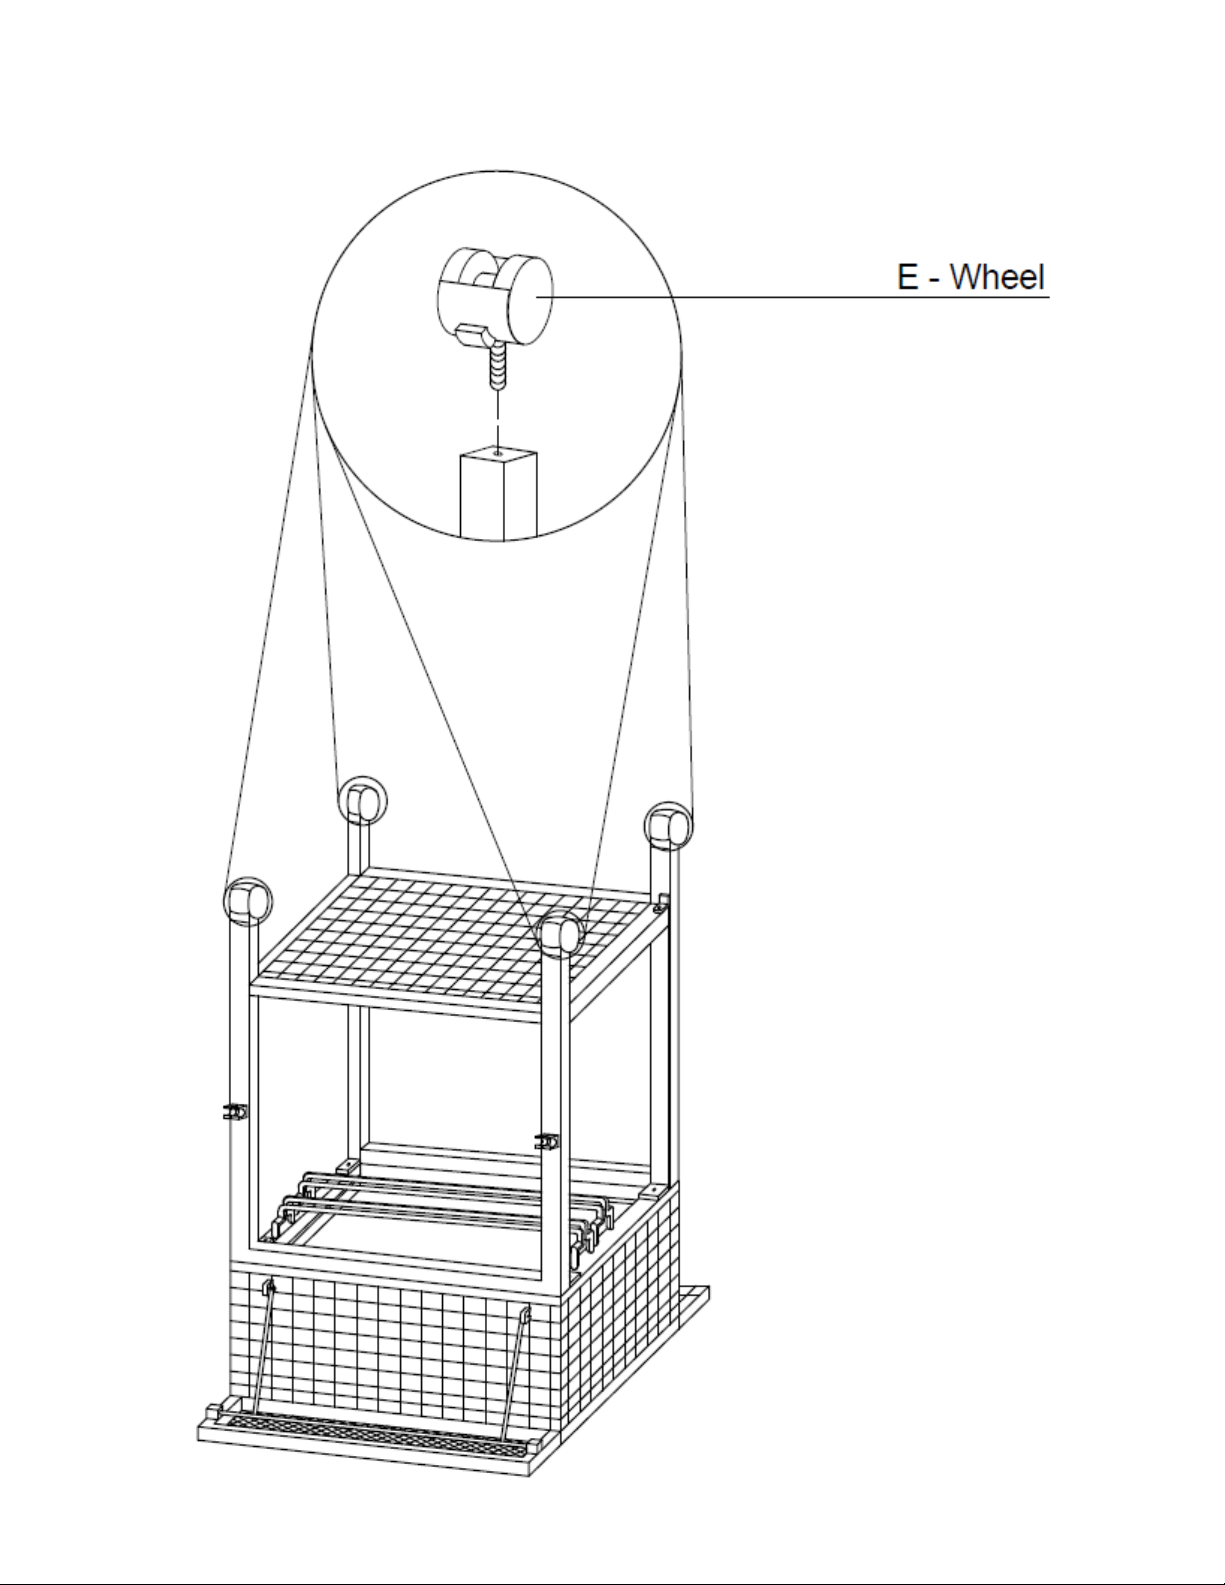
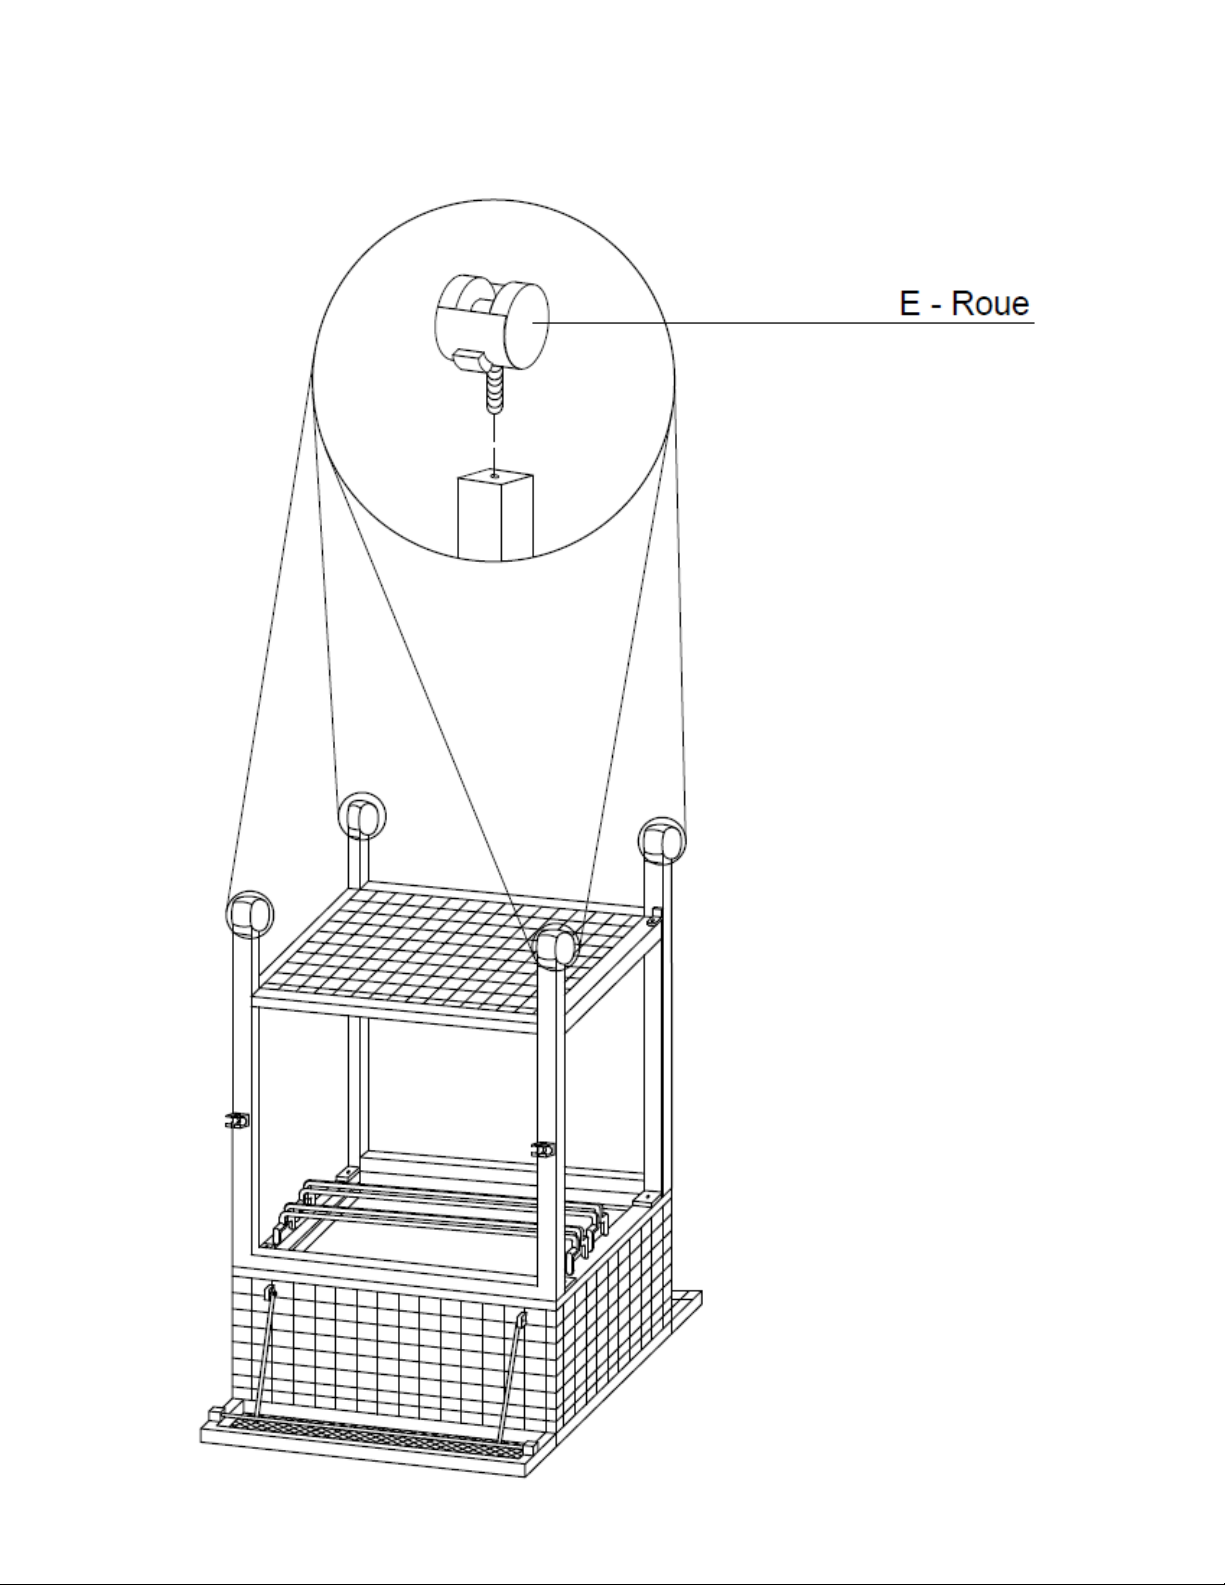
STEP 6
Install wheels (E)

430133.Cooler Cart.0911-18.GP.ENFR 8
STEP 7
Turn the unit back to its standing position and make sure that the shelve handles are lifted.
Lock it to the tray on each side to make it flat.

430133.Cooler Cart.0911-18.GP.ENFR 9
STEP 8
Insert drain tube (M) into the drain fittings (E3, E4) and lock with drain fastener (E2).

430133.Cooler Cart.0911-18.GP.ENFR 10
STEP 9
Insert the rubber plug (L) into the drain hole.
430133.Cooler Cart.0911-18.GP.ENFR 11
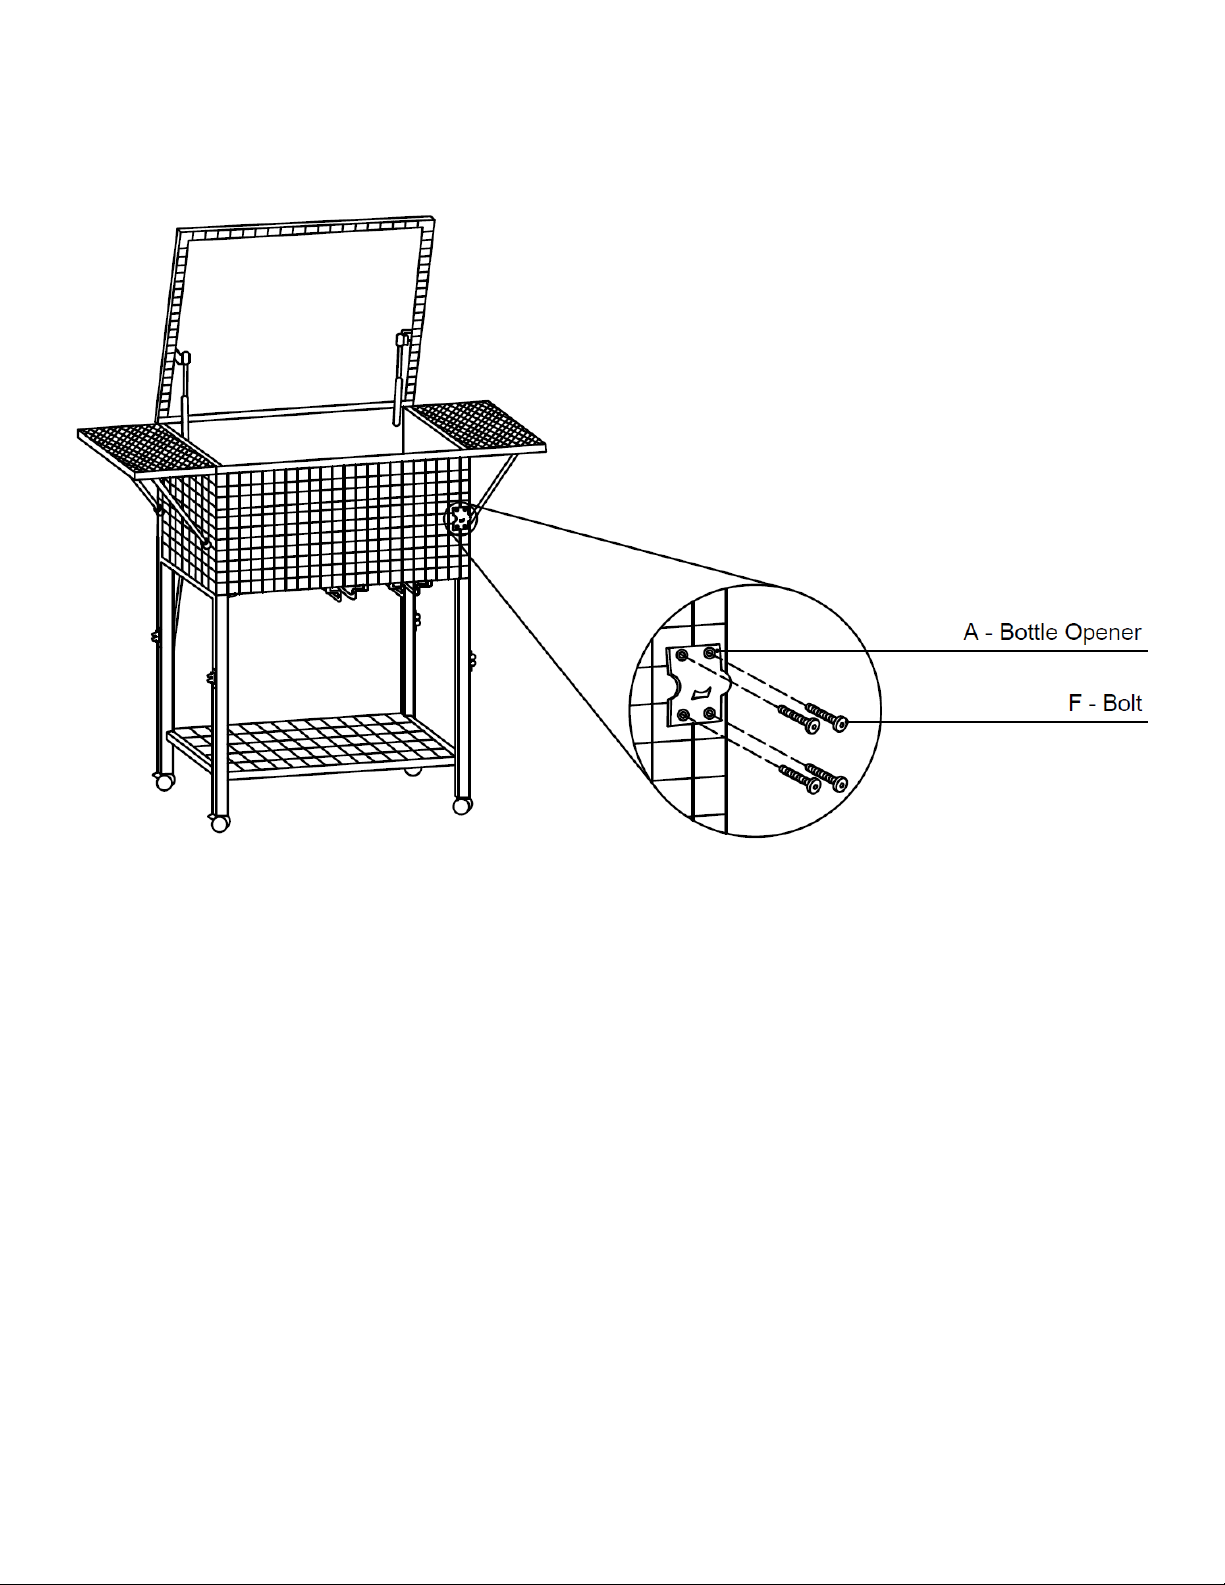
STEP 10
Screw bottle opener (A) with bolts (F).

430133.Cooler Cart.0911-18.GP.ENFR 12
STEP 11
Fill it up and enjoy.
Note: Keep dry when not in use to prevent rust.
If any leakage, use latex by yourself.

430133.Cooler Cart.0911-18.GP.ENFR 13
MAINTENANCE NOTES
1. Please don't destroy the box until completely assembled.
2. The warranty only applies to the original purchaser with the bill.
3. In case of a defective or damaged part, or for any other questions concerning the product, please
contact the manufacturer directly.
4. Please have the parts list and part numbers on hand when ordering or requesting replacement parts.
ONE YEAR LIMITED WARRANTY
This product has been designed and manufactured to meet the highest standards of quality and durability.
Subject to the Conditions for Exercising the Warranty and the Limitations on the Warranty set forth below, it is
warranted to be free of material and manufacturing defects for a period of one year from the date of purchase.
Should the product become damaged, or the warranty period has expired, please contact Gazebo Penguin
Customer Service Department for a complete schedule of replacement parts and prices.
CONDITIONS FOR EXERCISING THE WARRANTY
In order to properly exercise your warranty, please comply with the following:
Carefully inspect the contents of the carton for missing or damaged components. Should you discover
damaged or missing parts, do not return the product to the place of purchase, but contact Gazebo
Penguin Customer Service Department at the numbers listed below (English, French & Spanish, Mon-
Fri 8:00AM to 4:00PM EST):
Reference: HER-HA
Montreal: (514) 276-3485
Elsewhere in Canada and the US: 1-800-737-7174
LIMITATIONS ON THE WARRANTY
1. The product is not warranted against damages due to vandalism, abuse, or falling or thrown objects.
2. The product is only warranted in the event it is installed in accordance with the Gazebo Penguin’s
written instructions enclosed with the product.
3. The product is not warranted in the event it has been improperly anchored.
430133.Cooler Cart.0911-18.GP.ENFR 14
430133 CHARIOT REFROIDISSEUR
GUIDE D’INSTALLATION
430133.Cooler Cart.0911-18.GP.ENFR 15
PIECES DU CHARIOT REFROIDISSEUR
PIECES
QT
DIAGRAMME
PIECES
QT
DIAGRAMME
PATTE GAUCHE
L1
18-093
1
CAPUCHON EN
PLASTIQUE
L
18-103
1
PATTE DROITE
L2
18-094
1
TUBE EN PLASTIQUE
M
18-104
1
BOITE SUPERIEURE
B
18-095
1
CLE HEXAGONALE
N
18-105
1
POIGNÉE DE
TABLETTE
S
18-096
2
CLE ALLEN
O
18-106
1
PANNEAU
INFERIEUR
P
18-097
1
ATTACHE EN
PLASTIQUE
C
18-107
4
BOULON
M6x18mm
F
18-098
16
ROUE
E
18-108
4
BOULON
M6x28mm
G
18-099
4
FERMETURE
DE DRAIN
E2
18-109
1
BOULON
M6x32mm
H
18-100
2
RONDELLE
I
18-110
18
M6
ÉCROU
K
18-101
4
ECROU DE
VERROUILLAGE
EN NYLON
J
18-111
4
OUVRE BOUTEILLE
A
18-102
1
VIS
AUTOTARAUDEUSE
D
18-112
8
RACCORD DE DRAIN
E3
18-191
1
RACCORD DE DRAIN
E4
18-192
1

430133.Cooler Cart.0911-18.GP.ENFR 16
ÉTAPE 1
Installer les 4 attaches en plastique (C) sur les tablettes.
430133.Cooler Cart.0911-18.GP.ENFR 17
ÉTAPE 2
Vissez les pattes (L1 / L2) dans la boîte supérieure (B) à l'aide de boulons (G, F) et des rondelles (I) à
l'aide d'une clé hexagonale (O).
430133.Cooler Cart.0911-18.GP.ENFR 18
ÉTAPE 3
Fixez la poignée de tablette (S) à la boîte supérieure (B) en utilisant le boulon (F), la rondelle (I), la
rondelle en plastique (K) et l'écrou de verrouillage en nylon (J).
Remarque: Ne pas trop serrer.

430133.Cooler Cart.0911-18.GP.ENFR 19
ÉTAPE 4
Fixez les coins du panneau inférieur (P) sous les supports des jambes (L1/L2) à l'aide du boulon (F)
et de la rondelle (I).
ÉTAPE 5
Fixez les côtés du panneau inférieur (P) sous les supports des jambes (L1/L2) à l'aide du boulon (H)
et de la rondelle (I).
Remarque: Cette étape se fait à partir de l'intérieur.
430133.Cooler Cart.0911-18.GP.ENFR 20
ÉTAPE 6
Installer les roues (E).
This manual suits for next models
1
Table of contents
Popular Outdoor Cart manuals by other brands


Fantom
Fantom PROCART 3360 Assembly manual

SCHUNK
SCHUNK VERO-S Assembly and operating manual

Coopers of Stortford
Coopers of Stortford 10949 Instructions for use

McFarlane
McFarlane WDL-2100 Operator's Manual and Set-Up Instructions

LDI Spaces
LDI Spaces SAFCO Onyx 5212 Assembly instructions

Nostalgia
Nostalgia SCC200 Instructions and recipes

Sunex Tools
Sunex Tools 8057XTWH Assembly instructions

R&B Wire Products
R&B Wire Products 100 Series Assembly instructions

H.Wilson
H.Wilson WTPSS41CE Assembly instructions

Pro-Lift
Pro-Lift G5Z Assembly instructions

Home Storage Space
Home Storage Space A35C-3 manual

LABORIE
LABORIE Aquarius XT Service manual