Gazelle Portable Gazebo Quick setup guide

PORTABLE GAZEBO
ASSEMBLY AND USE INSTRUCTIONS
BEFORE YOU BEGIN
• Locate a level site clear of all debris and sharp objects to
prevent tears while setting up your gazebo.
• For easy set-up in windy conditions, make sure to posi-
tion one of the corners of the gazebo into the wind.
• Do not set up your gazebo under any overhead obstruc-
tions in case of falling objects or lightning strikes in in-
clement weather.
SET-UP INSTRUCTIONS
1. Remove the gazebo from the carrying bag. Remove the tie strap from around the top of the gazebo. [SEE FIGURE 1 ]
2. Lay the gazebo at on the ground and check that there is no material twisted or overlapping the ends of any poles. DO NOT force
gazebo when folding or unfolding. Watch for the entanglement of poles. [ SEE FIGURE 2 ]
NOTE: When unfolding, check that a Gazelle logo is visible and locate the webbing loops located in center of wall panel. This is the
OUTSIDE portion of the shelter. The poles and hubs are the INTERIOR of the gazebo.
• Gazelle™ Portable Gazebo
• Ground stakes/storage bag
• Tie-down ropes
WHAT’S INCLUDED IN THE BAG
FIGURE 2
FIGURE 1
19068 | REV3 09/29/2020 |© Copyright 2020 Ardisam, Inc. | All Rights Reserved.
WARNING
READ AND UNDERSTAND ALL ASSEMBLY, INSPECTION, & USE
INSTRUCTIONS PROVIDED BEFORE EACH USE. FAILURE TO FOLLOW
INSTRUCTIONS COULD RESULT IN SERIOUS INJURY OR DEATH.
NEVER ALLOW CHILDREN TO PLAY IN THIS PRODUCT UNATTENDED.
KEEP ALL FLAME AND HEAT SOURCES AWAY FROM THIS TENT FABRIC.
THIS TENT IS MADE WITH FLAME RESISTANT FABRIC WHICH MEETS
CPAI-84 SPECIFICATIONS. IT IS NOT FIREPROOF. THE FABRIC WILL
BURN IF LEFT IN CONTINUOUS CONTACT WITH ANY FLAME SOURCE.
THE APPLICATION OF ANY FOREIGN SUBSTANCE NOT THE TENT FAB-
RIC MAY RENDER THE FLAME RESISTANT PROPERTIES INEFFECTIVE.
THE USE OF ELECTRICAL DEVICES IS NOT RECOMMENDED INSIDE THE
GAZELLE CAMPING TENT.
WARNING
THE GAZEBO WILL COME OUT OF THE BAG APPEARING INSIDE OUT, THIS IS NORMAL.YOU MUST UN-
FOLD THE GAZEBO PER THE INSTRUCTIONS TO AVOID SETTING IT UP INCORRECTLY. WHEN SET UP
PROPERLY, THE POLES/FRAMEWORK OF THE GAZEBO SHOULD BE ON THE INSIDE OF THE GAZEBO.
SIDE WALL
FOR MORE INFORMATION ON SET-UP & TAKE DOWN VISIT OUR WEBSITE
WWW.GAZELLETENTS.COM
TIE STRAP
GAZELLE
LOGO

3. Find the webbing loop handle located on the exterior of each hub, centered on each wall (and roof). Proceed to pull outward until
the wall pops open. Do this to all SIDE WALLS rst. [ SEE FIGURE 3 ]
NOTE: For added assistance, grasp the top seam of the panel and place your foot on the bottom edge when popping open a side wall
panel to help hold the gazebo in place.
4. Once all walls are popped open, locate the zipper door, and enter the gazebo. Proceed to push up on the hub OR roof poles until it
pops over center. [ SEE FIGURE 4 ]
FIGURE 5 FIGURE 6
FIGURE 4FIGURE 3
WEBBING
LOOP HANDLE
5. Locate the two corded poles in the carry bag. Assemble the pole by interlocking the poles together. Go back inside the gazebo and
locate the small pockets on the top and bottom of the vertical seams next to the door. Insert each pole into the top and bottom
pockets. Then secure with the hook/loop strap in the center of the vertical seam. Do this on both sides of the door.
[ SEE FIGURES 5 ]
6. Locate the ground stakes and ropes in the carry bag and fasten the stakes through the grommets located at each outer corner.
Hammer stakes through each grommet completely.
7. Tie a rope to each eye-bolt, centered on each hub. Then tie the other end to a ground stake. Use the slider on the rope to achieve
proper tension. [SEE FIGURE 6 ]

FIGURE 7 FIGURE 8
TAKE-DOWN INSTRUCTIONS
1. Remove the corded poles from either side of the door.
2. Undo all stakes and tie-down ropes and remove any wind panels if they are attached.
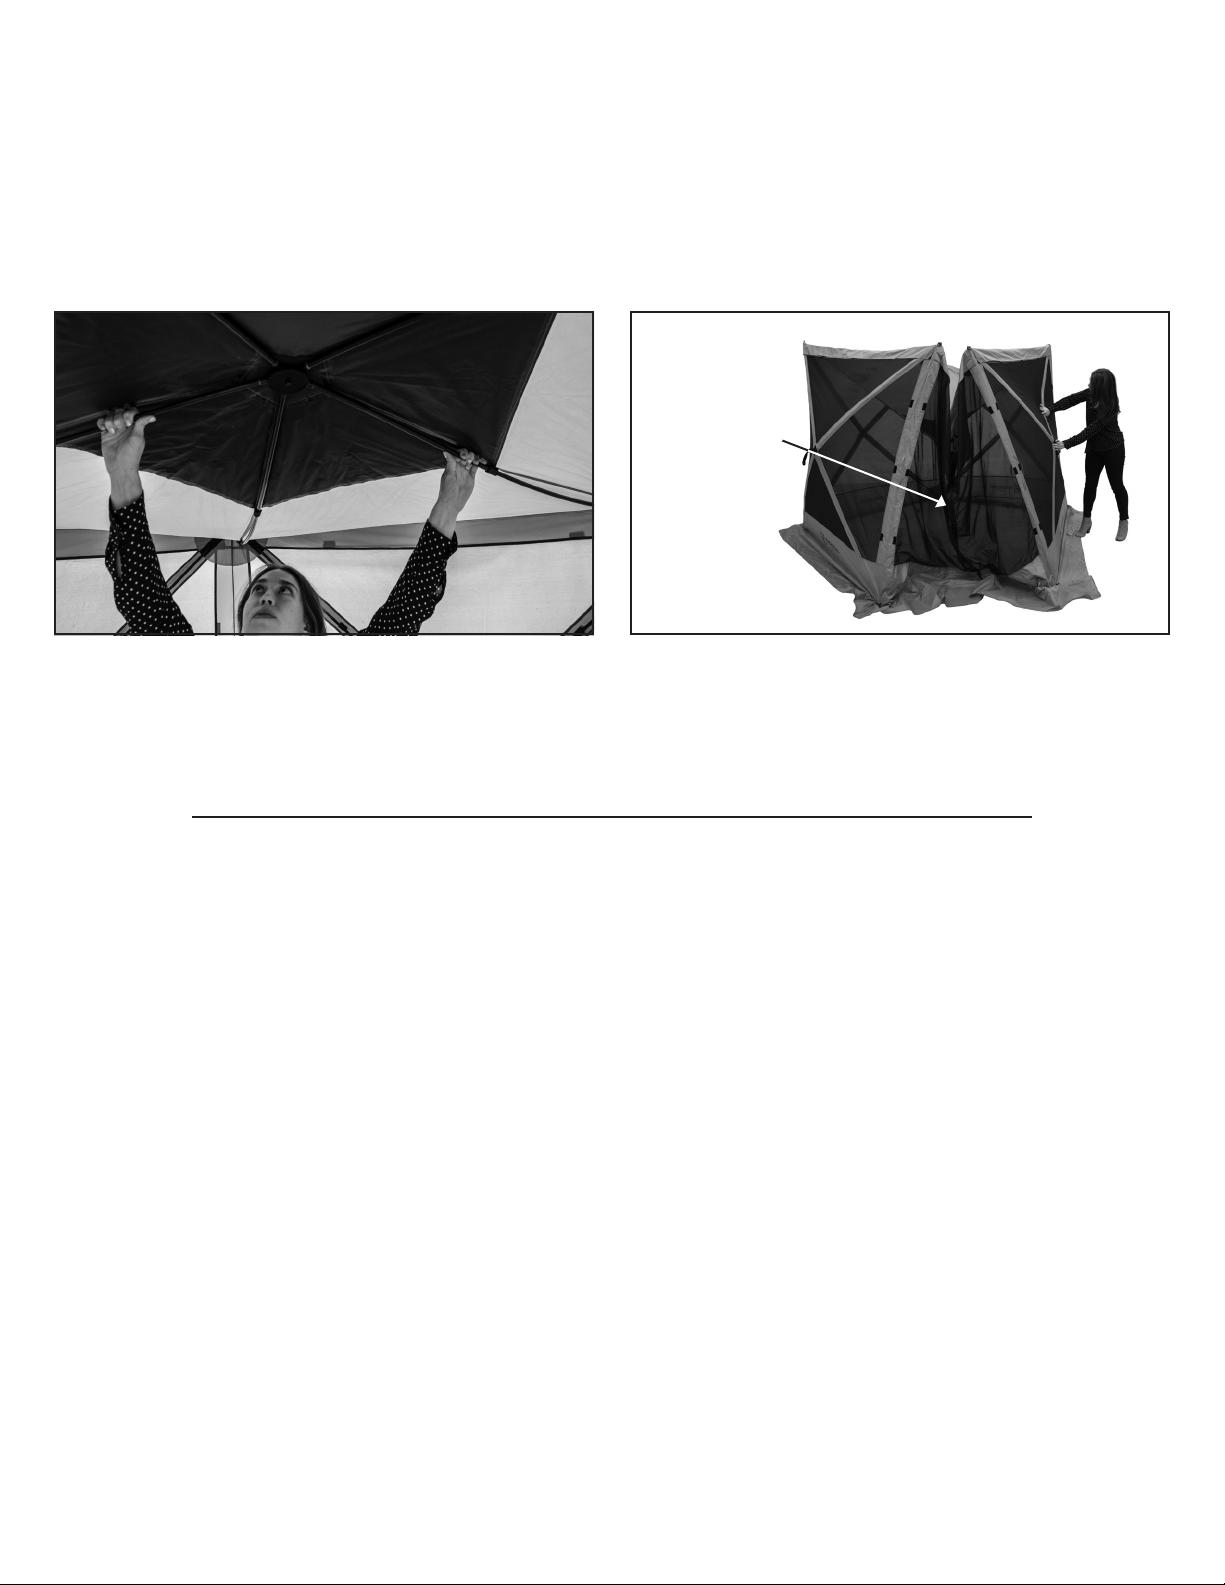
3. From the inside the gazebo, gently pull the roof poles/hub down to collapse the roof. DO NOT stand directly underneath the hub
when collapsing. [ SEE FIGURE 7 ]
NOTE: Always start the take-down process by collapsing the roof rst.
4. From the outside, zip the door shut to prevent tangling of poles. Push the pole/wall near the center hub to collapse each wall.
Do this to all of the walls. [ SEE FIGURE 8 ]
SAFETY AND MAINTENANCE INSTRUCTIONS
Ultraviolet (UV) rays are an invisible part of sunlight. Prolonged exposure to UV rays can cause bers to fade and degrade. This gazebo
will last longer if you limit its exposure to UV rays. Pitch the gazebo in shade when possible and don’t leave the gazebo up longer than
necessary.
• Take down the gazebo when not in use to avoid unnecessary fading from outdoor elements. Fading or discoloring of fabric
is not covered under your warranty.
• Take down the gazebo when not in use to avoid unnecessary damage.
• Use extra tie-downs during excessive winds.
• Never put the gazebo away wet. Always put away dry and clean to avoid mildew and other problems.
LONG TERM STORAGE
Make sure your Gazelle™ gazebo is completely dry and clean before storing for long periods of time. Store your gazebo in a cool, dry
place away from rodents.
WARRANTY
Ardisam, Inc., warrants this Gazelle™ Camping Tent under a one-year limited warranty to be free from defects in materials or workman-
ship or both for a period not exceeding twelve consecutive months from the date of original purchase by the rst retail consumer or
commercial end user. “Consumer use” means personal recreational use by a retail consumer. “Commercial use”or “commercial appli-
cation” means all other uses, including use for commercial, income producing or rental purposes. Once a product has experienced
commercial use, it shall thereafter be considered as a commercial use product for purposes of this warranty. This warranty does not
cover tent tears, or bent poles due to use in high wind, inclement weather conditions, unattended use or uses other than those listed
in the owner’s manual. This warranty applies to the original owner that provides a proof of purchase of the shelter. The warranty is not
transferable. The warranty period begins on the date of purchase by the rst retail consumer or commercial end user, and continues
for the twelve month consecutive period thereafter. Any unit used in a commercial application is covered for a period of 90 days after
purchase. For the warranty to be valid, the product must be registered by lling out the warranty card and it must be received by
Ardisam, Inc., within 30 days of purchase. Ardisam, Inc. shall not be obligated to ship any repair or replacement product to any location
outside of the United States of America or Canada.
5. Once all hubs are collapsed, gather all corners of the gazebo and fold together into a tight cone shape. Do not force the gazebo
when folding and watch for entanglement of poles.
6. Take the provided strap and wrap it around the folded gazebo to allow for easier insertion into the carry bag. Place the folded
gazebo back into the carry bag with the hubs always towards the closed end of the bag. Place the stakes and tie-down ropes
into the bag as well.
MAKE
SURE
DOOR IS
ZIPPED
SHUT

*All weights, specications and features are approximate and are subject to change without notice. Due to continuous product improvements, product images may not be exact. Warning labels in some product
images may have been removed for photography purposes only. Props shown in photos not included. Some assembly may be required.
Gazelle™ Tents,
A Division of Ardisam, Inc.
1160 Eighth Avenue, PO Box 755
Cumberland, WI 54829
Phone: 800-345-6007
Fax: 715-822-2124
www.gazelletents.com
Table of contents
Other Gazelle Outdoor Furnishing manuals
Popular Outdoor Furnishing manuals by other brands

Nola
Nola Parco Ö19-20 Assembly instructions

PARK WAREHOUSE
PARK WAREHOUSE 488be105-3 quick start guide

Sunnydaze Decor
Sunnydaze Decor MERANTI STR-411 Assembly and care instructions

Outsunny
Outsunny 84C-145 Assembly instruction

Polyteak
Polyteak CHAAR-OTM OTTOMAN quick start guide

Halls
Halls Altan 42 manual