gb PLATINUM ELIAN-FIX User manual
AR / EN / RU / UA / EE / LV / LT / TR
ELIAN-FIX
FUTURE PERFECT

2
AR
EN – WARNING! The following brief instructions are intended to provide only an overview. In order to achieve maximum security and comfort for your child
it is absolutely imperative that you read the whole instruction manual carefully.
LV – UZMANĪBU! Sekojošās norādes un instrukcījas mērķis ir sniegt pārskatu par produktu. Lai nodrošinātu Jūsu bērnam maksimālu drošību un komfortu, ir
būtiski nepieciešams iepazīties pilnībā ar lietošanas norādījumiem.
EE – HOIATUS! Järgnev ülevaade on lühitutvustus et tagada teie lapsele maksimaalset mugavust ja turvalisust on väga oluline, et te loete tähelepanelikult
kogu kasutusjuhendit.
LT – ĮSPĖJIMAS! Ši trumpa instrukcija suteikia tik trumpą produkto apžvalgą. Perskaitykite atidžiai visą instrukciją, tik taip garantuosite maksimalų savo
vaiko saugumą.
TR – UYARI! Aşağıda ki kısa talimat sadece özet sağlamak amacıyla hazırlanmıştır. Çocuğunuz için maksimum güvenlik ve konfor elde etmek için tüm
kullanım kılavuzunu dikkatle okumak kesinlikle zorunludur.

ARENRUUAEELVLTTR
3
Short instruction
Lühike tutvustus
Īsā pamacība
Trumpa instrukcija
Kısa Açıklama
6 |
7 | CONTENT
7 |
38 |
39 | SISUKORD
39 | SATURS
70 | TURINYS
71 | İÇERİK
1
6
CLICK!
CLICK!
2
7
3
8
4
9
5
10
11 12 13 14

4
.
!
2/3
3615
123
16
HOMOLOGATION
gb Elian-Fix – car seat
ECE R44/04 age group 2/3
Weight: from 15 approx. 36 kg
Age: from approx. 3 up to 12 years
Only suitable for vehicle seats with a
three-point automatic belt, approved
under ECE regulation no. 16 or equivalent
standard.
GB ELIAN-FIX
ELIAN-FIX
UNIVERSAL
SEMI-UNIVERSAL
15 - 36 kg
04301343
gb GmbH
Riedingerstr. 18, 95448 Bayreuth
Germany
ECE R 44/04

5
ARENRU
Thank you for buying the gb Elian-Fix. We can assure you
that safety, comfort and ease of use were our highest
priorities when developing the gb Elian-Fix. This product is
manufactured under exceptional quality control and meets the
strictest safety requirements.
NOTE! Always keep this Instruction Manual at hand in the
compartment that has been provided for that purpose at the
designated place on the gb Elian-Fix.
NOTE! Due to country-specific requirements (e.g. colour labelling
on the car seat), the product features may vary in their external
appearance. This, however, does not aect the correct functioning
of the product.
DEAR CUSTOMER!
! WARNING! In order to keep your child properly protected it is
absolutely essential that you use the gb Elian-Fix as described
in this manual.
!

6
AR
3
8
16.
18
18
22
26
28
28
32
32

7
ARENRU
CONTENT
RU
3
9
11
11
15
15
17
19
19
21
23
25
27
29
29
31
31
33
33
35
EN
SHORT INSTRUCTION.......................................................................................................................... 3
HOMOLOGATION ....................................................................................................................................4
FIRST INSTALLATION ...........................................................................................................................9
PROTECTING THE VEHICLE ............................................................................................................11
CORRECT POSITION IN THE VEHICLE.....................................................................................11
SAFETY IN THE VEHICLE..................................................................................................................15
INSTALLING THE CAR SEAT IN THE VEHICLE...................................................................15
INSTALLING THE CAR SEAT WITH ISOFIX CONNECT SYSTEM ...........................17
REMOVING THE CAR SEAT FROM THE VEHICLE...........................................................19
ADJUSTMENT TO THE CHILD`S HEIGHT ..............................................................................19
STRAPPING WITH VEHICLE SEAT BELT................................................................................21
ADJUSTING THE RECLINING HEADREST........................................................................... 23
SECURING THE CHILD CORRECTLY........................................................................................25
REMOVING THE SEAT COVER.....................................................................................................27
CLEANING ................................................................................................................................................. 29
PRODUCT CARE ................................................................................................................................... 29
WHAT TO DO AFTER AN ACCIDENT.......................................................................................31
PRODUCT INFORMATION................................................................................................................31
PRODUCT DURABILITY ................................................................................................................... 33
DISPOSAL................................................................................................................................................... 33
WARRANTY.............................................................................................................................................. 35

8
21
5
41
2
6L.S.P
!
3
!
1
2
4
5
1
2
3
LSP
6!
9
ARENRU
FIRST INSTALLATION
12
2
The car seat consists of a booster seat 1and a backrest 2with
adjustable shoulder parts (width & height) and headrest (height).
Only the combination of these two parts provides best protection
and comfort to your child.
2145
1
6
Connect the backrest 2to the booster 1 by hooking the guide lug
4on the axis 5of the booster 1. Insert the “Linear Side-impact
Protection” pads (L.S.P.) on both sides of the shoulder rest into the
appropriate installation holes 6. Push the pads slightly downwards
until you hear them ,click‘ in.
!
! WARNING! Make sure to read, understand and follow the
instruction manual.
3
NOTE! Please keep the instruction manual close by for future
reference by storing it in the pocket 3in the front of the seat.
!
! WARNING! The parts of the gb Elian-Fix must not be used
alone or in combination with boosters, backrests or headrests
from other manufacturers or from dierent product series.
In such instances, the certification expires immediately.
Misapplication can lead to serious injury or death of your
child. Please keep these instructions for future reference.
!
! WARNING! Always ensure that the individual components
of the child seat are never compressed or jammed (e.g. by
jamming in the car door or when adjusting the back seat).

10
.
!

11
ARENRU
PROTECTING THE VEHICLE
Traces of use and/or discoloration can appear on some vehicle
seats made from delicate materials (e.g. alcantara, leather, etc.) if
car seats are used. You can avoid this by putting, e.g. a blanket or a
towel underneath the car seat. In this context also see our cleaning
directions. It is essential that these are followed before the first use
of the car seat.
In cars with airbags, you should push the passenger seat back as
far as possible. When doing so, however, ensure that the upper
pivot point of the safety belt is behind the belt feed point of the
car seat.
Always comply with the recommendations of the vehicle
manufacturer.
CORRECT POSITION IN THE VEHICLE
The car seat with retracted ISOFIX Connect system can be used on
all vehicle seats with automatic three-point safety belts approved
in the vehicle manual for ,universal‘ use.
A ‘semi-universal’ certification is given to restraint systems that
are connected to the car through ISOFIX Connect. For this reason,
ISOFIX Connect can only be used in certain vehicles. Please refer
to the enclosed vehicle type list for approved vehicles. You can
obtain the most up-to-date version from www.gb-online.com.
In exceptional cases, the car seat may also be used on the front
passenger seat. Please note the following in this case:
!
! WARNING! The car seat is not suitable for use with a two-
point or lap belt. If the seat is secured using a two-point
belt, an accident may result in severe or even fatal injuries
to the child.
12
!
!
!
7
7
7

13
ARENRU
!
!
!7
,
! WARNING! The car seat may not be used on vehicle
seats facing to the side of the direction of travel. Use of
the car seat is permitted on rearfacing seats, e.g. in a
van or minibus, provided that the seat is permitted for
transporting an adult. It is essential to ensure that the
headrest is not removed when the vehicle seat is installed in
a rearwardfacing direction.
! WARNING! Never leave your child unattended in the car.
The plastic parts in the child restraint system heat up in sun
and the child may sustain burns. Protect your child and the
car seat from direct sun exposure (e.g. by covering it with a
light colored cloth).
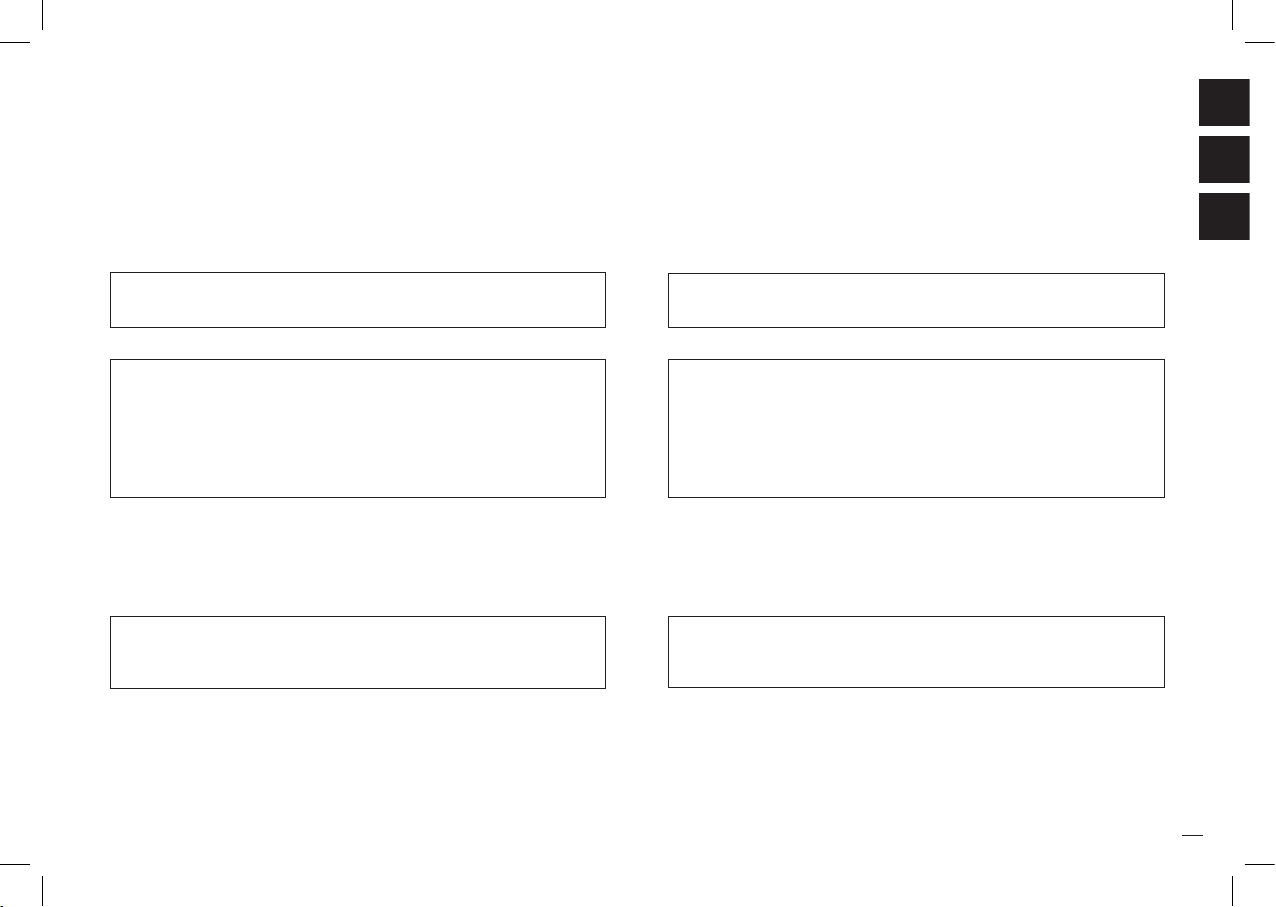
! WARNING! The diagonal belt 7must run back at a recline
and must never run forward to the upper belt point in your
vehicle. If it is not possible to adjust the seat in this way, e.g.
by pushing the car seat forward or using it on another seat,
this car seat is not suitable for your vehicle.
Contact the car seat manufacturer if in doubt Luggage or
other objects present in the vehicle that may cause injury
in the event of an accident must always be firmly secured.
Otherwise, they may be thrown, causing fatal injuries.

14
!
!
!

15
ARENRU
!
foldable backrests in the vehicle are locked in their upright position.
when installing the car seat on the front passenger seat, adjust the
vehcile seat in rearmost position.
you properly secure all objects likely to cause injury in the case of
an accident.
all passengers in the vehicle are buckled up.
SAFETY IN THE VEHICLE
In order to guarantee the best possible safety for all passengers
make sure that ...
! WARNING! The car seat must always be secured correctly
with the vehicle belt in the vehicle even when not in use. In
case of an emergency brake or accident, an unsecured car
seat may injure other passengers or your.
Always ensure that the entire surface of the backrest of the car
seat is placed fully against the backrest of the vehicle seat. If
necessary, you can adjust the distance using the adjustment lever
on the frame of the car seat.
If the headrest of the vehicle is in the way, pull it out all the way
or remove it completely. The backrest will perfectly adapt to
practically any recline of the vehicle seat.
INSTALLING THE CAR SEAT IN THE VEHICLE
Place the car seat on the appropriate seat in the vehicle.
! WARNING! The full surface of the backrest of the car seat
must be against the backrest of the vehicle. To ensure
maximum protection for your child, the car seat must be in
a normal upright position!
! WARNING! Do not use any load bearing contact points
other than those described in the instructions and marked
in the child restraint.
!
!

16
810
12.11
11
8
29
10
10
.8
.ISOFIX
9
10
12
11
CLICK!
CLICK!
13
8
8
.
810
12
.11
9
813
13

17
ARENRU
10
811
12
11
8
92
10
10
8.
NOTE! Before clicking the ISOFIX connect locking arms 10 into
the ISOFIX anchorage points 8, check the release buttons 11.
If the green safety indicator 12 is visible, you must first release
the ISOFIX connect locking arms before joining by pressing and
pulling back the release button 11.
NOTE! The ISOFIX anchorage points 8are two metallic clips
for each seat and are positioned between the backrest and the
seating surface of the vehicle seat. In case of doubt, please refer
to the driver’s manual of your vehicle.
Use the adjustment button 9under the seat cushion 2on the frame
of the car seat.
Pull the two ISOFIX connect locking arms 10 as far as they will go.
Now twist the ISOFIX connect locking arms 10 180° so that they
are facing the direction of the ISOFIX anchorage points 8.
INSTALLING THE CAR SEAT WITH ISOFIX CONNECT SYSTEM
Using the ISOFIX Connect system, you can fix the car seat to the
vehicle, thereby increasing your child’s safety. The child still needs
to be secured with the three-point belt of your vehicle.
NOTE! If the ISOFIX anchorage points are hard to reach in your
vehicle, you can use the supplied ISOFIX guides.
Push the two ISOFIX connectors 10 into the ISOFIX anchorage
points 8until these lock into place with an audible ‘CLICK’.
Ensure that the car seat is secure by trying to pull it out.
The green safety indicator 12 must now be clearly visible on the
two red release buttons 11.
You can now use the adjustment button 9on the frame of the
car seat to position it.
Insert the supplied ISOFIX guides 13 with the longer strap
upwards into the two ISOFIX anchorage points 8. In some
vehicles, it is better to mount the ISOFIX guides 13 in the
opposite direction.
108
12
11.
9
13
8
13

18
10
9
7
14
15
10
10
11.8.109
2
14
7
12
.1415
14
1415

19
ARENRU
NOTE! By folding in the ISOFIX Connect locking arms 10, you are
not just protecting the vehicle seat but also the ISOFIX Connect
locking arms of the ISOFIX Connect system from dirt and damage.
REMOVING THE CAR SEAT FROM THE VEHICLE
Perform the installation steps in the reverse order:
Unlock the ISOFIX Connect locking arms 10 on both sides by pushing
the red release buttons 11 and pulling them back simultaneously.
Pull the car seat out of the ISOFIX anchorage points 8.
Rotate the connectors 10 180°.
Operate the adjustment button 9on the frame of the car seat
and push the connectors in as far as they will go.
NOTE! The shoulder wings of the gb Elian-Fix are connected
with the headrest and do not have to be moved separately. The
headrest has to be adjusted in a way that the distance between the
child‘s shoulders and the headrest doesn‘t exceed 2 cm (approx. 2
fingers width).
ADJUSTMENT TO THE CHILD`S HEIGHT
A headrest 14 can only provide the best protection and comfort for
your child if optimally adjusted.
Only then it can guarantee that the diagonal belt 7is positioned
optimally. The height of the headrest and the width of the shoulder
wings can be adjusted in 12 possible positions.
Place your child in the car seat.
Pull the adjustment handle 15 up in order to unlock the headrest 14.
Push the headrest 14 into the desired position.
As soon as you release the adjustment handle 15, the headrest 14
locks automatically.
10
11
8.
10
9
14
7
1514.
14
1514
20
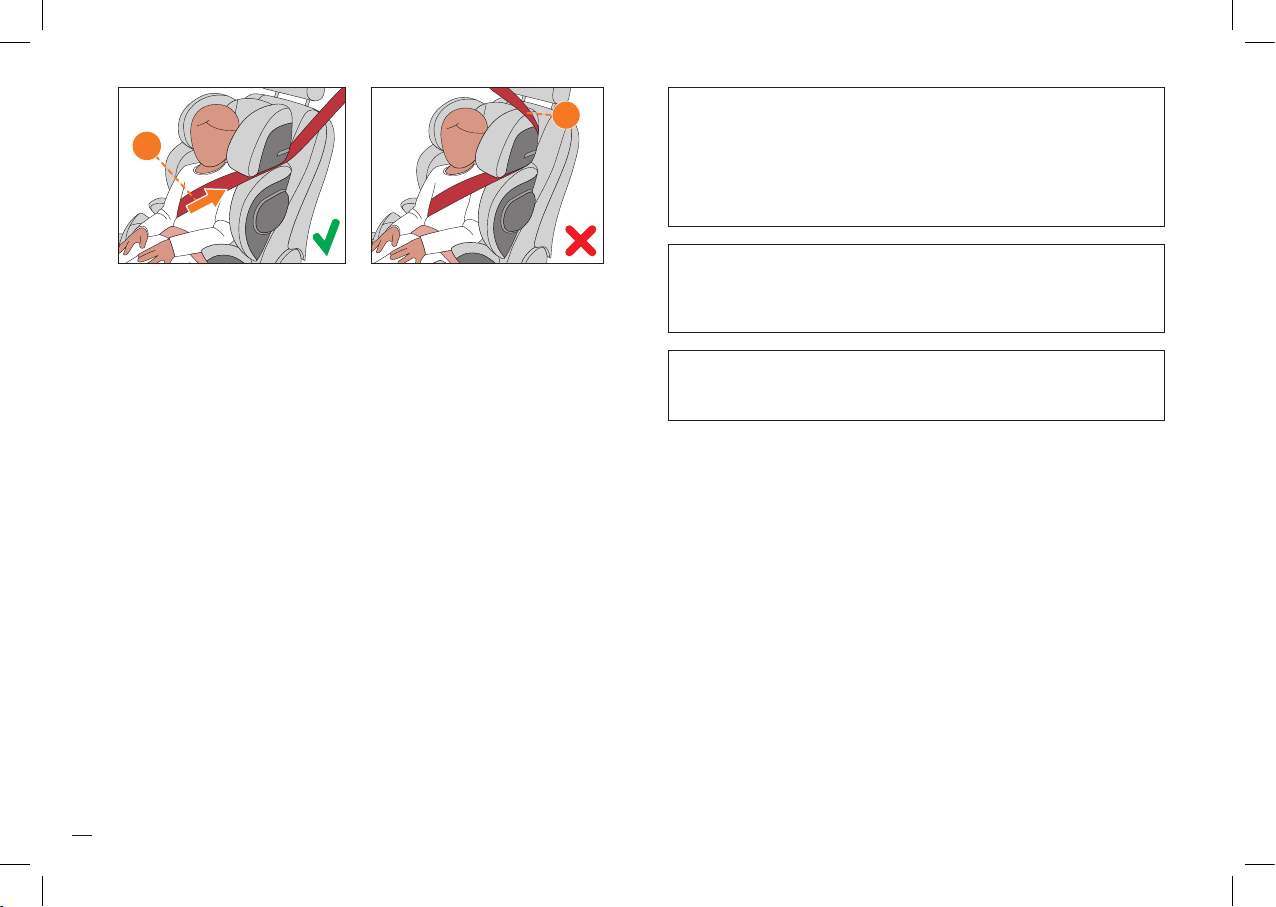
!
16
!
!
1
16
51918
21617
3
1918
57
716
.1918
16
17
18
7
16
CLICK!
7
18
19
16
18
19
Table of contents
Languages:
Popular Automobile Accessories manuals by other brands


ULTIMATE SPEED
ULTIMATE SPEED 279746 Assembly and Safety Advice

SSV Works
SSV Works DF-F65 manual

ULTIMATE SPEED
ULTIMATE SPEED CARBON Assembly and Safety Advice

Witter
Witter F174 Fitting instructions

WeatherTech
WeatherTech No-Drill installation instructions

TAUBENREUTHER
TAUBENREUTHER 1-336050 Installation instruction